Listen SoundConnect 2 User manual

Listen, Inc. 580 Harrison Ave, Suite 3W, Boston, MA 02118
Tel: (617) 556-4104 Fax: (617) 556-4145 Web: www.listeninc.com
Listen, Inc. 580 Harrison Ave, Suite 3W, Boston, MA 02118
Tel: (617) 556-4104 Fax: (617) 556-4145 Web: www.listeninc.com
SoundConnect 2
User Manual
TM
Listen, Inc. 580 Harrison Ave, Suite 3W, Boston, MA 02118. Tel: (617) 556-4104.
PN: 8024 REV 052715
SOUNDCONNECT 2 USER MANUAL
© COPYRIGHT 2013-2015 LISTEN, INC.
PN: 8024 REV 022820
SOUNDCONNECT 2 USER MANUAL
© COPYRIGHT 2013-2020 LISTEN, INC.

REV 022820

SoundConnect 2TM Manual Contents i
Contents
Contents. . . . . . . . . . . . . . . . . . . . . . . . . . . . . . . . . . . . . . . . . . . . . . . . . . . . . . . . . . . . . i
Limited Warranty. . . . . . . . . . . . . . . . . . . . . . . . . . . . . . . . . . . . . . . . . . . . . . . . . . . . . iii
IMPORTANT SAFETY PRECAUTIONS . . . . . . . . . . . . . . . . . . . . . . . . . . . . . . . . . . . 1
Safety Symbols . . . . . . . . . . . . . . . . . . . . . . . . . . . . . . . . . . . . . . . . . . . . . . . . . . . . . . . . . . . . . . . . . 2
Introduction . . . . . . . . . . . . . . . . . . . . . . . . . . . . . . . . . . . . . . . . . . . . . . . . . . . . . . . . . 3
Features . . . . . . . . . . . . . . . . . . . . . . . . . . . . . . . . . . . . . . . . . . . . . . . . . . . . . . . . . . . . . . . . . . . . . . . 3
Requirements . . . . . . . . . . . . . . . . . . . . . . . . . . . . . . . . . . . . . . . . . . . . . . . . . . . . . . . . . . . . . . . . . . 3
Front Panel . . . . . . . . . . . . . . . . . . . . . . . . . . . . . . . . . . . . . . . . . . . . . . . . . . . . . . . . . 4
Channel Settings Mode . . . . . . . . . . . . . . . . . . . . . . . . . . . . . . . . . . . . . . . . . . . . . . . . . . . . . . . . . . 4
Rear Panel . . . . . . . . . . . . . . . . . . . . . . . . . . . . . . . . . . . . . . . . . . . . . . . . . . . . . . . . . . 8
Lemo Connector . . . . . . . . . . . . . . . . . . . . . . . . . . . . . . . . . . . . . . . . . . . . . . . . . . . . . . . . . . . . . . . . 8
Software Control . . . . . . . . . . . . . . . . . . . . . . . . . . . . . . . . . . . . . . . . . . . . . . . . . . . . . 9
Settings . . . . . . . . . . . . . . . . . . . . . . . . . . . . . . . . . . . . . . . . . . . . . . . . . . . . . . . . . . . . . . . . . . . . . . . 9
Overall settings for unit: . . . . . . . . . . . . . . . . . . . . . . . . . . . . . . . . . . . . . . . . . . . . . . . . . . . . . . . . 10
Operation . . . . . . . . . . . . . . . . . . . . . . . . . . . . . . . . . . . . . . . . . . . . . . . . . . . . . . . . . . 11
Output Gain 0 dB / +6 dB option . . . . . . . . . . . . . . . . . . . . . . . . . . . . . . . . . . . . . . . . . . . . . . . . . . 11
Calibration . . . . . . . . . . . . . . . . . . . . . . . . . . . . . . . . . . . . . . . . . . . . . . . . . . . . . . . . . . . . . . . . . . . . 11
Connection Diagrams. . . . . . . . . . . . . . . . . . . . . . . . . . . . . . . . . . . . . . . . . . . . . . . . . . . . . . . . . . . 12
Block Diagram . . . . . . . . . . . . . . . . . . . . . . . . . . . . . . . . . . . . . . . . . . . . . . . . . . . . . . 15
Specifications . . . . . . . . . . . . . . . . . . . . . . . . . . . . . . . . . . . . . . . . . . . . . . . . . . . . . . 17
Equipment Ratings . . . . . . . . . . . . . . . . . . . . . . . . . . . . . . . . . . . . . . . . . . . . . . . . . . 19
Declaration of Conformity . . . . . . . . . . . . . . . . . . . . . . . . . . . . . . . . . . . . . . . . . . . . 20
Service and Repair . . . . . . . . . . . . . . . . . . . . . . . . . . . . . . . . . . . . . . . . . . . . . . . . . . 21
Contents

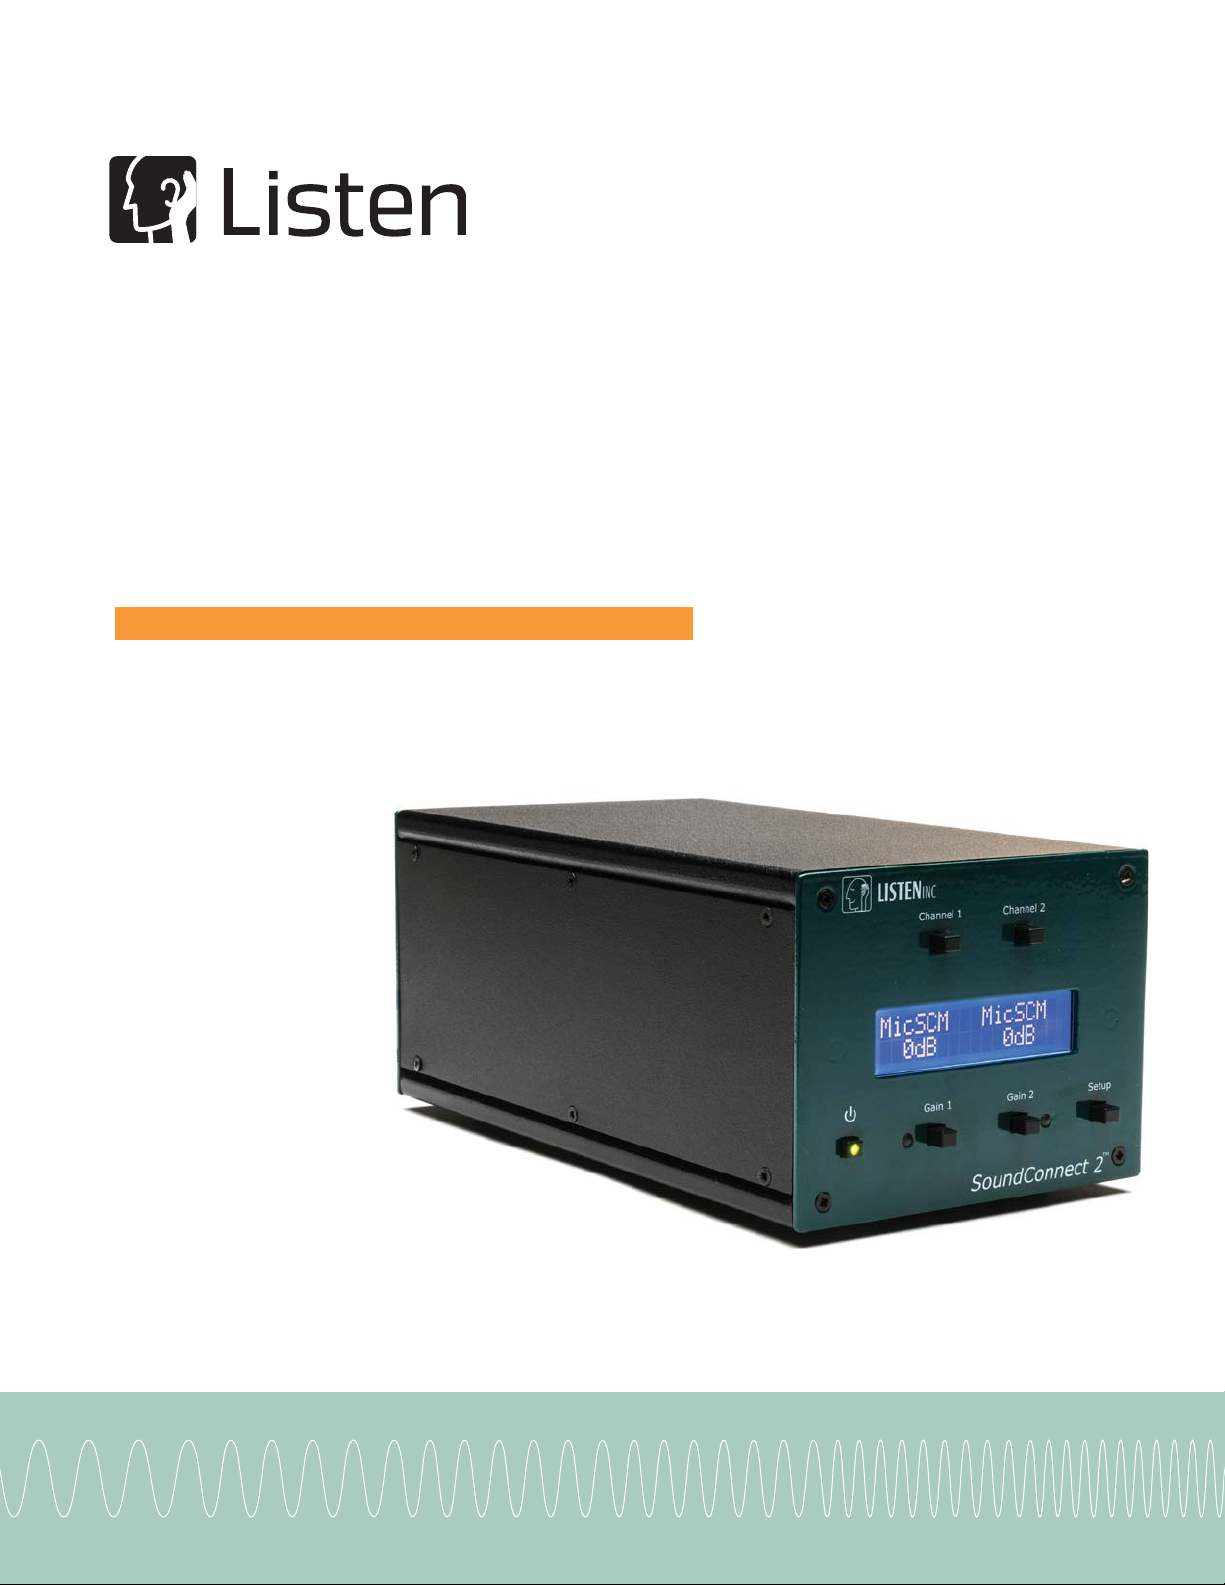
SoundConnect 2TM Manual Limited Warranty iii
Limited Warranty
LISTEN, Inc., a Massachusetts Corporation, having its principal place of business at 580 Harrison Ave,
Suite 3W, Boston, MA 02118 (Manufacturer) warrants its SoundConnect 2 products (the Products) as
follows:
1. Limited Warranty.
Manufacturer warrants that the Products sold hereunder will be free from defects in material and
workmanship for a period of one (1) year from the date of purchase. If the Products do not conform to this
Limited Warranty during the warranty period (as herein above specified), Buyer shall notify Manufacturer in
writing of the claimed defects and demonstrate to Manufacturer satisfaction that said defects are covered
by this Limited Warranty. If the defects are properly reported to Manufacturer within the warranty period,
and the defects are of such type and nature as to be covered by this warranty, Manufacturer shall, at its own
expense, furnish, replacement Products or, at Manufacturer's option, replacement parts for the defective
Products. Shipping of the replacement Products or replacement parts shall be at Buyer's expense.
2. Other Limits.
THE FOREGOING IS IN LIEU OF ALL OTHER WARRANTIES, EXPRESS OR IMPLIED, INCLUDING BUT
NOT LIMITED TO THE IMPLIED WARRANTIES OF MERCHANTABILITY AND FITNESS FOR A
PARTICULAR PURPOSE. Manufacturer does not warrant against damages or defects arising out of
improper or abnormal use of handling of the Products; against defects or damages arising from improper
installation (where installation is by persons other than Manufacturer), against defects in products or
components not manufactured by Manufacturer, or against damages resulting from such non-Manufacturer
made products or components. Manufacturer passes on to Buyer the warranty it received (if any) from the
maker thereof of such non-Manufacturer made products or components. This warranty also does not apply
to Products upon which repairs have been effected or attempted by persons other than pursuant to written
authorization by Manufacturer.
3. Exclusive Obligation.
THIS WARRANTY IS EXCLUSIVE. The sole and exclusive obligation of Manufacturer shall be to repair or
replace the defective Products in the manner and for the period provided above. Manufacturer shall not
have any other obligation with respect to the Products or any part thereof, whether based on contract, tort,
strict liability or otherwise. Under no circumstances, whether based on this Limited Warranty or otherwise,
shall Manufacturer be liable for incidental, special, or consequential damages.
4. Other Statements.
Manufacturer's employees or representatives' ORAL OR OTHER WRITTEN STATEMENTS DO NOT
CONSTITUTE WARRANTIES, shall not be relied upon by Buyer, and are not a part of the contract for sale
or this limited warranty.
5. Entire Obligation.
This Limited Warranty states the entire obligation of Manufacturer with respect to the Products. If any part
of this Limited Warranty is determined to be void or illegal, the remainder shall remain in full force and
effect.

SoundConnect 2TM Manual IMPORTANT SAFETY PRECAUTIONS 1
IMPORTANT SAFETY PRECAUTIONS
SoundConnect 2 has been supplied in safe operating condition.
This User’s Manual contains information and warnings that should be followed by the user to
ensure safe and service free operation. Special note should be made of the following:
1. Read these instructions
2. Keep these instructions
3. Heed all warnings
4. Follow all instructions
5. WARNING: To prevent fire or electric shock, do not expose this equipment to rain or
moisture. Do not use this apparatus near water.
6. Clean only with a dry cloth. Do not use spray or liquid cleaning solutions.
7. Install in accordance with the manufacturer’s instructions.
8. Do not install near any heat sources such as radiators, heat registers, stoves, or other
apparatus that produce heat.
9. The appliance coupler is the AC mains disconnect and should remain readily operable
after installation.
10. Protect the power cord from being walked on or pinched, particularly at plugs,
convenience receptacles, and the point where they exit from the apparatus.
11. Use only attachments/accessories specified by Listen, Inc.
12. Use only with hardware, brackets, stands, and components sold with the apparatus or by
Listen, Inc.
13. Unplug the apparatus during lightning storms or when unused for long periods of time.
14. Whenever it is likely that the correct functioning or operating safety of the apparatus has
been impaired, the apparatus must be made inoperative and be secured against
unintended operation. Any adjustment, maintenance and repair of the open apparatus,
under power, must be avoided as far as possible and, if unavoidable, must be carried out
only by trained service personnel. Servicing is required when the apparatus has been
damaged in any way, such as power supply cord or plug is damaged, liquid has been
spilled or objects have fallen into the apparatus, the apparatus has been exposed to rain
or moisture, does not operate normally, or has been dropped.
AND SYMBOL EXPLANATIONS

2 IMPORTANT SAFETY PRECAUTIONS SoundConnect 2TM Manual
Safety Symbols
Power In Connector
CAUTION! Do not substitute the supplied AC power adapter. Substituting the AC power
adapter may damage the product and introduce safety hazards. Only use power adapters
supplied by or approved by Listen, Inc.
Polarized Mic Input Connectors
CAUTION! The Polarized Mic In 1 and Polarized Mic In 2 connectors on the rear panel are
intended to interface to microphones requiring a polarization voltage of 200V. The polarization
voltage supply available from these connectors is current limited to 10μA and does not
represent a safety hazard. To minimize exposure to the polarization voltage supply, only use
prefabricated cables and accessories recommended for use by the polarized microphone manufacturer.
Promptly dispose of damaged cables or accessories.
The exclamation point triangle is used to indicate that caution is necessary when operating the
device or control close to where the symbol is placed, or to indicate that the current situation
needs operator awareness or operator action in order to avoid undesirable consequences.
This alerts the user to the presence of important operating and maintenance (servicing)
instructions in this manual.

SoundConnect 2TM Manual Introduction 3
Introduction
SoundConnect 2TM is a compact and rugged USB controlled microphone power supply and conditioning
amplifier. It can power either one or two microphones, so it is a great choice for audio test applications
where two microphones need to be powered simultaneously, for example headphone testing, stereo
measurements, or anywhere you need a reference microphone as well as your input microphone.
Features
USB Control
SoundConnect 2 features full USB control in addition to the manual interface, which permits control
of the device from within your test and measurement software or directly from your computer.
Message Step control requires SoundCheck 14 or later.
Powers most test microphones:
Two powered BNC connectors on the rear panel provide 10 VDC power for Listen SCM
microphones, and IEPE power for IEPE microphones or accelerometers. Optional LEMO
connectors are available for powering microphones that require 200 V polarization. It is fully TEDS
compatible* for seamless communication of calibration data to your measurement device.
Wide frequency response
SoundConnect 2 has a bandwidth greater than 100 kHz, and offers gain control from -20d B to
+40 dB in 10 dB increments. User-selectable low pass (22.4 kHz and 120 kHz) and high pass
(1 Hz, 10 Hz, 20 Hz, 100 Hz) 2nd order Butterworth filters with -1 dB corners, permit the frequency
response to be tailored for a wide variety of applications. Each channel is independently
configurable, and the configurations can be stored for later recall.
Low Self-Noise
SoundConnect 2 offers excellent dynamic range and low distortion which makes it a good choice
for production line environments as well as the R&D lab. Balanced inputs and outputs offer
excellent noise immunity and ground loop immunity.
Simple User Interface
The front panel features simple push buttons for power and gain control; multicolored level
indicators and a 2-line LCD display offers a clear readout of settings.
Compact and Lightweight
The unit is compact and lightweight, measuring just 4 3/8” wide and 2 units high. Up to four units
can be mounted side by side in a 19” x 2U rack.
Excellent Value
SoundConnect 2 is less than half the price of other microphone power supplies that offer similar
functionality.
* Feature under development. Available soon as a software upgrade.
Requirements
NI Visa is required for Listen Hardware such as: AmpConnect, AudioConnect and SoundConnect 2. It is
automatically installed with the SoundCheck installer for Windows and must be manually installed for Mac
OS.

4 Introduction SoundConnect 2TM Manual
Front Panel
The front panel controls allow you to select the
input type for each channel as well as other
settings. Pressing the Setup button will display
other menus to access the various options.
Power Switch
The LED indicator shows when unit is powered
on. The current state of SoundConnect 2 is
stored in memory when it is shut off via the front
panel power switch. These values are recalled
the next time it is turned on.
LCD Display
Parameters are displayed on the top row; values on the bottom.
Channel Settings Mode
This is the default, power up state displayed whenever power
is applied to the unit. Channel Settings Mode provides access
to the parameters that are changed the most: Source and
Gain.
Channel Buttons 1 and 2
Allows you to select the input connector and bias configuration for each
channel. (These buttons are also used to select other parameters in
other Setup Modes.)
Pressing either Channel Button will change the respective channel’s
signal source:
Line In: 1/4” TRS Input, Balanced or Single ended operation
Mic In: Microphone connected to BNC input. No Bias enabled
MicSCM: Microphone connected to BNC input. Biased for constant voltage, e.g.: SCM-2 or SCM-3
microphones, as well as electret capsules. Use with SCM Microphone requires a Microdot to BNC
adapter. See SCM Microphone with Microdot to BNC Adapter on page 13.
MicIEPE: Microphone connected to BNC input. Biased for constant current microphones.
MicLemo: Microphone connected to Polarized Lemo input. Bias may be +200V or off.
Also used for SCM Microphone with a Microdot to Lemo adapter. See SCM Microphone with
Microdot to BNC Adapter on page 13.
(This option is only available when the optional Lemo board is installed.)
Muted: For use when an output signal is not desired, especially when minimizing noise during
system setup.
Figure 1-1: Front Panel
Line In
-10dB Mic In
+30dB
Figure 1-2: Channel Settings Mode

SoundConnect 2TM Manual Introduction 5
A brief "Wait.." message is displayed after the source is selected to allow the input stage and high-pass
filters to settle.
A brief "No Bias" message is displayed if MicSCM, MicIEPE, or MicLemo bias is disabled. See Setup Mode
1 - Channel on page 6.
Gain Button - Channel 1 and 2
Values are selected by pressing the channel Gain buttons.
Gain Values: -20 dB, -10 dB, 0 dB, +10 dB, +20 dB, +30 dB,
+40 dB
Gain is applied immediately after a button is pressed.
The gain selection order is bidirectional.
Starting at the default of 0 dB, pressing the gain button four times will advance the gain upward to
the maximum +40 dB value.
The next button press will cause the gain to decrease; after six button presses, the gain will be the
minimum -20 dB value.
The next button press causes the gain to increase again, and so forth.
Signal LED Channel 1 and 2: (Levels listed are approximate)
Off: Output level is less than -40 dBV
Green: Output level is between -40 dBV and +1.8 dBV
Yellow: Output level is between +1.8 dBV and +10.8 dBV
Red: Output level is above +10.8 dBV
Note: This is useful for adjusting the signal gain of SoundConnect 2 to maximize the full-scale
deflection of the A/D converter on the test system data acquisition board.

6 Introduction SoundConnect 2TM Manual
Setup Button
This activates a menu on the front panel display allowing
you to access secondary parameters not available when the
Channel buttons or Gain buttons are pressed.
Parameters are displayed on the top display row;
values on the bottom.
Except for the Gain menu, Parameter and Value
menus are cyclical; after the last value is displayed,
the selections are repeated from the top of the order.
The setup menu is exited when you press the Setup
button again. The display will revert to the Channel Settings Mode after 30 seconds.
Setup Mode 1 - Channel
Pressing the Setup Button once activates Setup Mode 1
The unit parameter is displayed on the top row, and the respective value is displayed on the bottom
row
Pressing the Channel button changes the Parameter field for that channel
Pressing the Gain button changes the value for that parameter
Parameters specific to Channel 1 and Channel 2 are selected, in the following order:
1. High Pass Filters:
a Displayed Parameter = HPF
b Displayed Values = 1 Hz, 10 Hz, 20 Hz, 100 Hz
2. Low Pass Filter:
a Displayed Parameter = LPF
b Displayed Values = 22.4 kHz, 120 kHz
3. Constant Voltage (SCM) Feed Resistance:
a Displayed Parameter = SCM Res
b Displayed Values = No Bias, 7.5 kOhm (for SCM mics), 2.2 kOhm (typically used for testing
electret capsules). Factory calibrated for 10 VDC open circuit using 7.5 kOhm setting.
4. Constant Current (IEPE) Current:
a Displayed Parameter = IEPE
b Displayed Values = 10 mA, 4 mA, No Bias
5. Polarization Voltage:
(This option is only displayed when the optional Lemo board is installed.)
a Displayed Parameter = Pol
b Displayed Values = +200 VDC
Values are applied immediately after a button is pressed.
HPF
1 Hz1 Hz
HPF
Parameters
Values

SoundConnect 2TM Manual Introduction 7
Setup Mode 2 - General
Pressing the Setup button a second time activates Setup Mode 2 which is for setting the general
parameters for the unit. The parameter is displayed on the top row, and the respective value is displayed on
the bottom row.
Pressing either Channel button changes the Parameter field
Pressing either Gain button changes the value for that parameter
The display will revert to the Channel Settings Mode after 30 seconds.
General parameters for the unit are selected in the following order:
1. Line In / Out Grounds
a Displayed Parameter = Line I/O Grounds
b Displayed Values = Lift, Chassis Ground (default)
Note: The Ground Lift feature allows you to interrupt the connection between the Line In/Out Grounds
and the Chassis Ground. Only select Lift when you are trying to resolve noise issues due to a
Ground Loop. It does not lift the ground of the Mic or BNC inputs.
2. Output Gain
a Displayed Parameter = Output Gain
b Displayed Values = 0 dB, +6 dB (0 dB is factory default)
Please refer to Output Gain 0 dB / +6 dB option on page 11 for more information.
3. Contrast
A bar graph is displayed showing the LCD contrast setting. Pressing the Gain 1 button reduces the
contrast. Pressing the Gain 2 button increases the contrast.
4. Restore Defaults
Select Yes to restore factory default settings for all menus
Values are applied immediately after a button is pressed.
Pressing the Setup button a third time deactivates Setup Mode and causes the menu system to re-enter the
Channel Settings Mode. The display will also revert to the Channel Settings Mode after 30 seconds.
The display will also show USB messages. When USB is available, either because a cable was connected
or a computer has booted, the display will show the message “USB Active”. When a cable is disconnected
or the attached computer is shutdown, the display will show the message “USB Not Active”.
Front Panel Lockout Mode
As of SoundCheck 14, a Message Step can be used to control SoundConnect 2 in a sequence. See
Operation on page 11.
When Front Panel is selected, the unit will not respond to front panel button presses. The display will show
the message “Front Panel is Locked” for a few seconds after a button press, then return the display back
to normal operation. If SoundCheck unlocks the front panel, the display will show the message “Front
Panel is Enabled” for a few seconds, and the unit will respond to front panel button presses.

8 Introduction SoundConnect 2TM Manual
Rear Panel
Power In
Connector for SoundConnect 2's AC power
adapter.
CAUTION - only use the AC power
adapter supplied by Listen, Inc.
Mic / Accel Channel 1 and 2
BNC connector
Biased for constant voltage or
constant current
Line In/Output Channel 1 and 2
¼” TRS jack
Externally Polarized Mic 1 and 2
Lemo 7 pin connector (1B series, type 307); compatible with externally polarized and pre-polarized
mics
Requires optional Lemo board
USB 2.0
Connect to SoundCheck system. SoundCheck Message Steps are used to control
SoundConnect 2 settings.
Chassis GND
The Chassis Ground connection should be used when encountering ground loop noise
Thumb screw accepts bare wire or standard banana plug
Lemo Connector
The following diagram details the pinout of the Optional Lemo Connectors.
1. Unused
2. Negative Input - (Differential Input)
3. Polarization Voltage: 0 or +200VDC
4. Positive Input - (Differential Input)
5. TEDS *: Serial number, type and sensitivity
information is stored in a TEDS Microphone
6. Power Supply: +15VDC (always on)
7. Power Supply: -15VDC (always on)
The dot below the connector indicates the location of the connector key.
Figure 1-1: Rear Panel
6
5 7
1
2
34
Power Supply -15VDC
Power Supply +15VDC
TEDS
Positive Signal In
Unused
Polarization Voltage
Negative Signal In
Figure 1-2: Lemo Connector Pinout

SoundConnect 2TM Manual Software Control 9
Software Control
As of SoundCheck 14, SoundConnect 2 can be controlled with a Message Step in SoundCheck.
Startup defaults can also be set in the Hardware Editor - Listen Hardware page.
The controls for SoundConnect 2 are shown in Figure 2-1.
SoundConnect 2 settings update when Apply is clicked in the
Message Step or in the Sequence Editor or when the step
runs in a sequence.
All controls follow the same definitions as shown on Channel
Settings Mode on page 4.
Input selections will only allow certain Bias settings to be
available as noted below.
When turning on Bias Voltage for a microphone, it may be
necessary to include some amount of “Wait time” in the Message
Step before allowing the sequence to continue. This will allow the
microphone to stabilize.
Figure 2-2 shows the first page of the Message Step set to a Wait
time of 2.5 seconds. The sequence will wait for this amount of time
before continuing.
Settings
Input
Muted, Line In and Mic In - Bias is automatically set to Off
Mic SCM - Off, 7.5 kOhm and 2.2 kOhm can be selected. See Bias section below.
Mic IEPE - Off, 10 mA and 4 mA can be selected
Lemo (optional Lemo board required) - Off and +200 VDC Polarization voltage can be selected
Gain
Select: -20 dB, -10 dB, 0 dB, +10 dB, +20 dB, +30 dB, +40 dB
Select the input gain for Channel 1 or 2 independently
Figure 2-1: SoundConnect Editor
Figure 2-2: Wait Time

10 Software Control SoundConnect 2TM Manual
Bias
Off - No Bias
7.5 kOhm - used for SCM mics and 2.2 kOhm - typically used for testing electret capsules - BNC
connector only
10 mA and 4 mA - for IEPE microphones - BNC connector only
+200 VDC Polarization voltage - Lemo connector only
+/- 15 VDC - Voltage is always present on the Lemo connector, pin 6 (+) and pin 7 (-)
High Pass
1Hz, 10Hz, 20Hz, 100Hz
Low Pass
22.4 kHz, 120 kHz
Overall settings for unit:
Panel Lock - When On the front panel buttons are
disabled
Output Gain - When ON the Output Gain of channels
1 and 2 are increased by 6 dB. See Output Gain
0 dB / +6 dB option on page 11.
This Gain value is taken into account when Auto
Read is used in the Calibration Editor for an Input
Signal Path.
Ground Lift - Off = Chassis Ground (default). Allows
you to interrupt the connection between the Line In/
Out Grounds and the Chassis Ground. Only select
Lift when you are trying to resolve noise issues due
to a Ground Loop.
SoundCheck Acquisition Step Gain Field
Important! Switching Listen Hardware from Maximum Gain to Minimum Gain in the
Acquisition Step is not recommended. This does not allow the input gain
circuit sufficient time to stabilize. If you need to switch from Max Gain to
Minimum Gain we recommend that you use a Listen Hardware Message
step with a 500 mSec wait time to allow for settling.
Figure 2-3: Overall Settings

SoundConnect 2TM Manual Operation 11
Operation
Output Gain 0 dB / +6 dB option
The Output Gain of SoundConnect can be set to 0 or +6 dB. In
addition to increasing the total input to output gain, when
selected the +6 dB option provides the maximum dynamic range
for the instrument.
The default factory setting for Output Gain is 0 dB.
As of SoundCheck 14, Auto Read can be used to automatically
account for SoundConnect 2 Gain settings.
By using the Auto Read function in the SoundCheck Calibration
Editor, you can automatically compensate for this added gain
when using any Input Signal Path other than Direct In 1 or 2.
(Direct In/Out paths are protected)
Warning: If you enable Auto Read on a Signal Path that uses the unity cal (Read only)-in.dat calibrated
device file (e.g. Impedance Box), gain will be applied to all Signal Paths that use unity cal
(Read only)-in.dat including Direct In 1 and Direct In 2. In this case, you may want to create a
new unity cal file so the default unity cal file used by the Direct Inputs retains its default value.
Auto Read checks the gain setting of the selected
SoundConnect 2 channel along with the Output Gain
setting. The Gain field in the Calibration Editor is
automatically updated with the total gain as shown in
Figure 3-3. In this case, the Output Gain of
SoundConnect 2 is set to +6 dB and the Channel 1
Gain is set to 0 dB.
See Setup Mode 2 - General on page 7.
The pros and cons of the settings:
The +6 dB setting maximizes SNR, but the
added gain may be confusing during
calibration
The 0 dB setting may be less confusing, but
reduces SNR by 6 dB
As with any external amplifier, calibration in
SoundCheck is required regardless of which setting
is chosen. For microphones, this is handled during
SoundCheck calibration with a mic calibrator. For the
Line Inputs, you must provide a known electrical
level and perform a direct calibration in SoundCheck. Whichever output gain setting is chosen, the output
gain will be compensated for during calibration.
Calibration
The ANSI S1.40 standard recommends that a certified calibration laboratory calibrate test instrumentation
at least once a year.
0dB
Output Gain
Figure 3-1: Output Gain
Figure 3-2: Auto Read

12 Operation SoundConnect 2TM Manual
Connection Diagrams
Lemo Connector Microphones
Microphone requiring polarization voltage
SoundConnect 2 can be used with microphones and preamps requiring polarization voltage. Polarization
voltage can be set via the front panel controls or through Message Steps in a SoundCheck sequence.
Message Step control requires SoundCheck 14 or later.
Set the microphone input type to MicLemo. See Channel Settings Mode on page 4
Set the microphone gain. See Channel Settings Mode on page 4
Set the polarization voltage. See Setup Mode 1 - Channel on page 6
SCM Microphone with Lemo adapter
When connecting a Listen SCM mic to the Lemo input (optional board required) using the Microdot to Lemo
adapter P/N 4013: (See Figure 3-3)
Set the microphone input type to MicLemo. See Channel Settings Mode on page 4
15V DC supply voltage is always present on Lemo the connectors so no Bias setting is needed
IEPE and Pol. should be set to No Bias
Set the microphone gain. See Channel Settings Mode on page 4
SCM or Polarized Mic
SoundCheck
Computer
Audio Interface
Chan 1 In
Chan 2 In
USB
Front
Panel
Back
Panel
External
DC
Power
Adapter
Each SCM Microphone Requires:
1) Microdot to Lemo adapter P/N: 4013
to connect to Lemo input
MicLemo
-10dB+10dB
MicLemo
Figure 3-3: Lemo Microphones

SoundConnect 2TM Manual Operation 13
SCM Microphone with Microdot to BNC Adapter
When connecting an SCM mic to the BNC input using the Microdot to BNC adapter P/N 4014:
Set the microphone input type to MicSCM. See Channel Settings Mode on page 4
Set the SCM Res to 7.5 kOhm. See Setup Mode 1 - Channel on page 6
IEPE and Pol. should be set to No Bias
Set the microphone gain. See Channel Settings Mode on page 4
SCM 3
SCM 3
SoundCheck
Computer
Audio Interface
Chan 1 In
Chan 2 In
USB
Each SCM Microphone Requires:
1) Microdot to BNC adapter P/N: 4014
to connect to BNC input
Front
Panel
Back
Panel
External
DC
Power
Adapter
MicSCM
-10dB+10dB
MicSCM
Figure 3-4: SCM Microphones
Table of contents
Other Listen Amplifier manuals