Logik L17LIDI9E User manual

1
L17LIDI9E / L17LIDI9WE
L19LIDI9E / L19LIDI9WE
L22LIDI9E / L22LIDI9WE
17/19/22 Inch HD Ready Digital LCD TV with
Integrated DVD Player and docking for iPod
iPod is a trademark of Apple Inc., registered in the U.S. and other countries.

2
PLACEMENT INFORMATION
• Donotusethisunitinplaceswhichareextremelyhot,cold,dusty,orhumid.
• Placetheunitonaatandevensurface.
• Donotrestricttheairowofthisunitbyplacingitsomewherewithpoorairow,bycoveringitwithacloth,
orbyplacingitonbeddingorcarpeting.
• Undertheenvironmentwithradiofrequencyinterference,thepicturemaybeinuenced.
SAFETY INFORMATION
• Whenconnectingordisconnectingthecord,griptheplugandnottheACcorditself.Pullingthecordmay
damageitandcreateahazard.
• Whenyouarenotgoingtousetheunitforalongperiodoftime,disconnecttheACcord.
• Themainsplugisusedasthedisconnectingdevice.Itshallremainreadilyoperableand should not be
obstructedduringintendeduse.Tobecompletelydisconnectedfromthesupplymains,themainsplugof
theapparatusshouldbedisconnectedfromthemainssocketoutletcompletely.
• Theapparatusshouldnotbeexposedtodrippingorsplashingandthatnoobjectslledwithliquids,suchas
vases,shouldbeplacedonapparatus.
• ThemainsplugofapparatusshouldnotbeobstructedORshouldbeeasilyaccessedduringintendeduse.
• Leave a minimum of 200mm around the apparatus for ventilation, and 200mm beside the DVD
mechanism;
• Theventilationopeningsshouldnotbeimpededbycoveringwithitemssuchasnewspaper,table-cloths,
curtainsetc.
• Nonakedamesourcessuchaslightedcandlesshouldbeplacedontheapparatus;
• Attentionshouldbedrawntotheenvironmentalaspectsofbatterydisposal;
• Theuseofapparatusinmoderateclimates.
• Undertheinuenceofelectrostaticphenomenon,theproductmaymalfunctionandrequireusertopower
reset.
CONDENSATION INFORMATION
• Whentheunitisleftinaheatedroomwithwarmanddamp,waterdropletsmayforminsidetheunitdueto
condensation,thismaycausemalfunctionoftheunit.Lettheunitstandfor1-2hoursbeforeturningthepower
on,orgraduallyheattheroomandlettheunitdrybeforeuse.
RATING PLATE LOCATION
• Theratingplateisonthebackofproduct.
WARNING:Shouldanyproblemsoccur,disconnecttheACcordandreferservicingtoaqualied
technician.
ThesymbolforClassII
(Doublelnsulation)
CAUTION
INVISIBLELASERRADIATIONWHENOPEN
ANDINTERLOCKSDEFEATED.
AVOIDEXPOSURETOBEAM
Thisproductcontainsa
lowpowerlaserdevice.
Thissymbolmeansthattheunitcomplies
with European safely and electrical
interferencedirectives.
WARNING : TOPREVENTFIREORSHOCKHAZARD,DONOTEXPOSETHISUNITTORAINORMOISTURE.
DONOTPLACEOBJECTSFILLEDWITHLIQUIDSONORNEARTHISUNIT.
CAUTION : DANGEROFEXPLOSIONIFBATTERYISINCORRECTLYREPLACED.REPLACEONLYWITH
THESAMEOREQUIVALENTTYPE.
Theexclamationpointwithinatriangle
alertsyoutothepresenceofimportant
operating,maintenanceandservicing
instructionsinthisuser’smanual.
Thelightning ash with anarrowhead
withinatrianglealertsyoutouninsulated
dangerousvoltagewithintheproduct’s
enclosurethatcouldcauseanelectric
shock.
CAUTION
RISK OF ELECTRIC SHOCK
DO NOT OPEN
WARNING:TOREDUCETHERISKOFELECTRIC
SHOCK,DONOTREMOVECOVER(ORBACK).
NOUSER-SERVICEABLEPARTSINSIDE.REFER
SERVICINGTOQUALIFIEDPERSONNEL.
SAFETY PRECAUTIONS
PREPARATION CONNECTIONS USING THE FEATURES SPECIFICATIONTROUBLESHOOTING
USING THE DVD / iPod
FEATURES

3
Caution: Moisture Condensation
If the equipment is moved from a cold place to a warm one, water in the air will condense on some parts
and may cause damage or malfunction if the equipment is operated.
Allow at least two hours for the equipment to acclimatise before switching it on.
This unit is designed to operate from a 230V AC ~ 50Hz mains supply.
Please note that when the STANDBY/ON switch is in the standby position this does not completely disconnect
the unit from the mains supply. If the equipment is not to be used for a day or more, disconnect it at the
wall outlet.
This symbol means that the unit is double insulated.No connection to earth is necessary.
SAFE USE OF YOUR EQUIPMENT
This equipment has been designed and manufactured to meet UK safety standards but like any electrical
equipment care must be taken to obtain the best results from the equipment and assure your own safety.
Here are a few tips to help you do this:
READ this instruction manual before you attempt to use the equipment.
NEVER fit makeshift stands or legs with woodscrews. Use only approved supports and fasteners specially
designed for the equipment.
NEVER let anyone, especially children, push objects into holes, ventilation slots or any other opening; this
could result in fatal electric shock!
ALWAYS disconnect the AC power cord when you are not going to use the unit for a long period of time.
ENSURE adequate ventilation of the equipment is not obstructed, for example by curtains above or soft
furnishings underneath it.
ENSURE that all electrical connections (including the mains plug, extension leads and interconnections
between pieces of equipment) are properly made in accordance with the instructions given. Switch off the
main supply when making or changing connections.
CONSULT your dealer if you are ever in doubt about the installation, operation or safety of your
equipment.
DON’T continue to operate the equipment if it is damaged in any way or if it does not function normally.
Withdraw the mains plug and consult your dealer.
DON’T leave equipment switched on when it is unattended unless it is part of it’s normal function to operate
in your absence, for example a video cassette recorder with timed recording facility.
LISTEN to headphones at moderate volume levels; high volume levels can permanently damage your
hearing.
IMPORTANT SAFETY INSTRUCTIONS
PREPARATIONCONNECTIONSUSING THE FEATURES
USING THE DVD / iPod
FEATURES
TROUBLESHOOTINGSPECIFICATION

4
PREPARATION ........................... 2
SAFETY PRECAUTIONS ...................... 2
IMPORTANTSAFETYPRECAUTIONS......3
TABLEOFCONTENTS...............................4
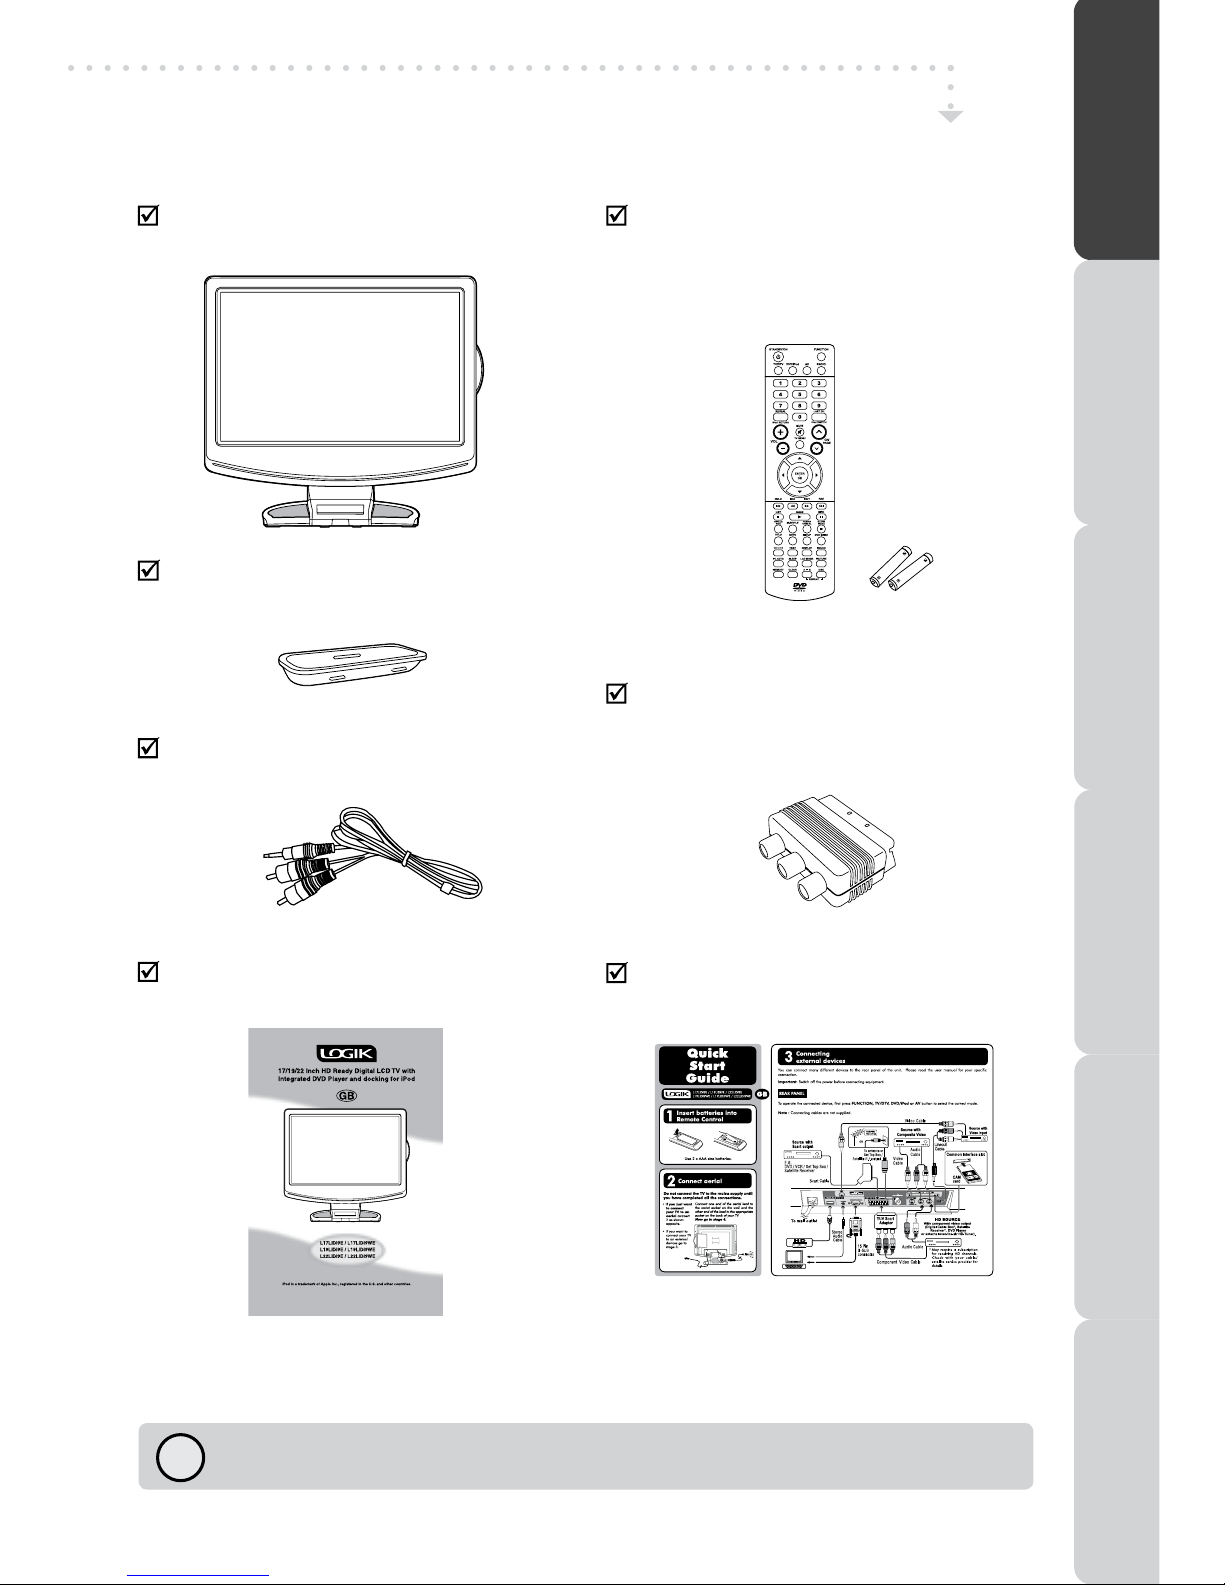
PACKAGECONTENTS............................5
DISC FORMATS .................................. 6
GETTING STARTED .............................. 7
LCDTV ....................................... 8 - 9
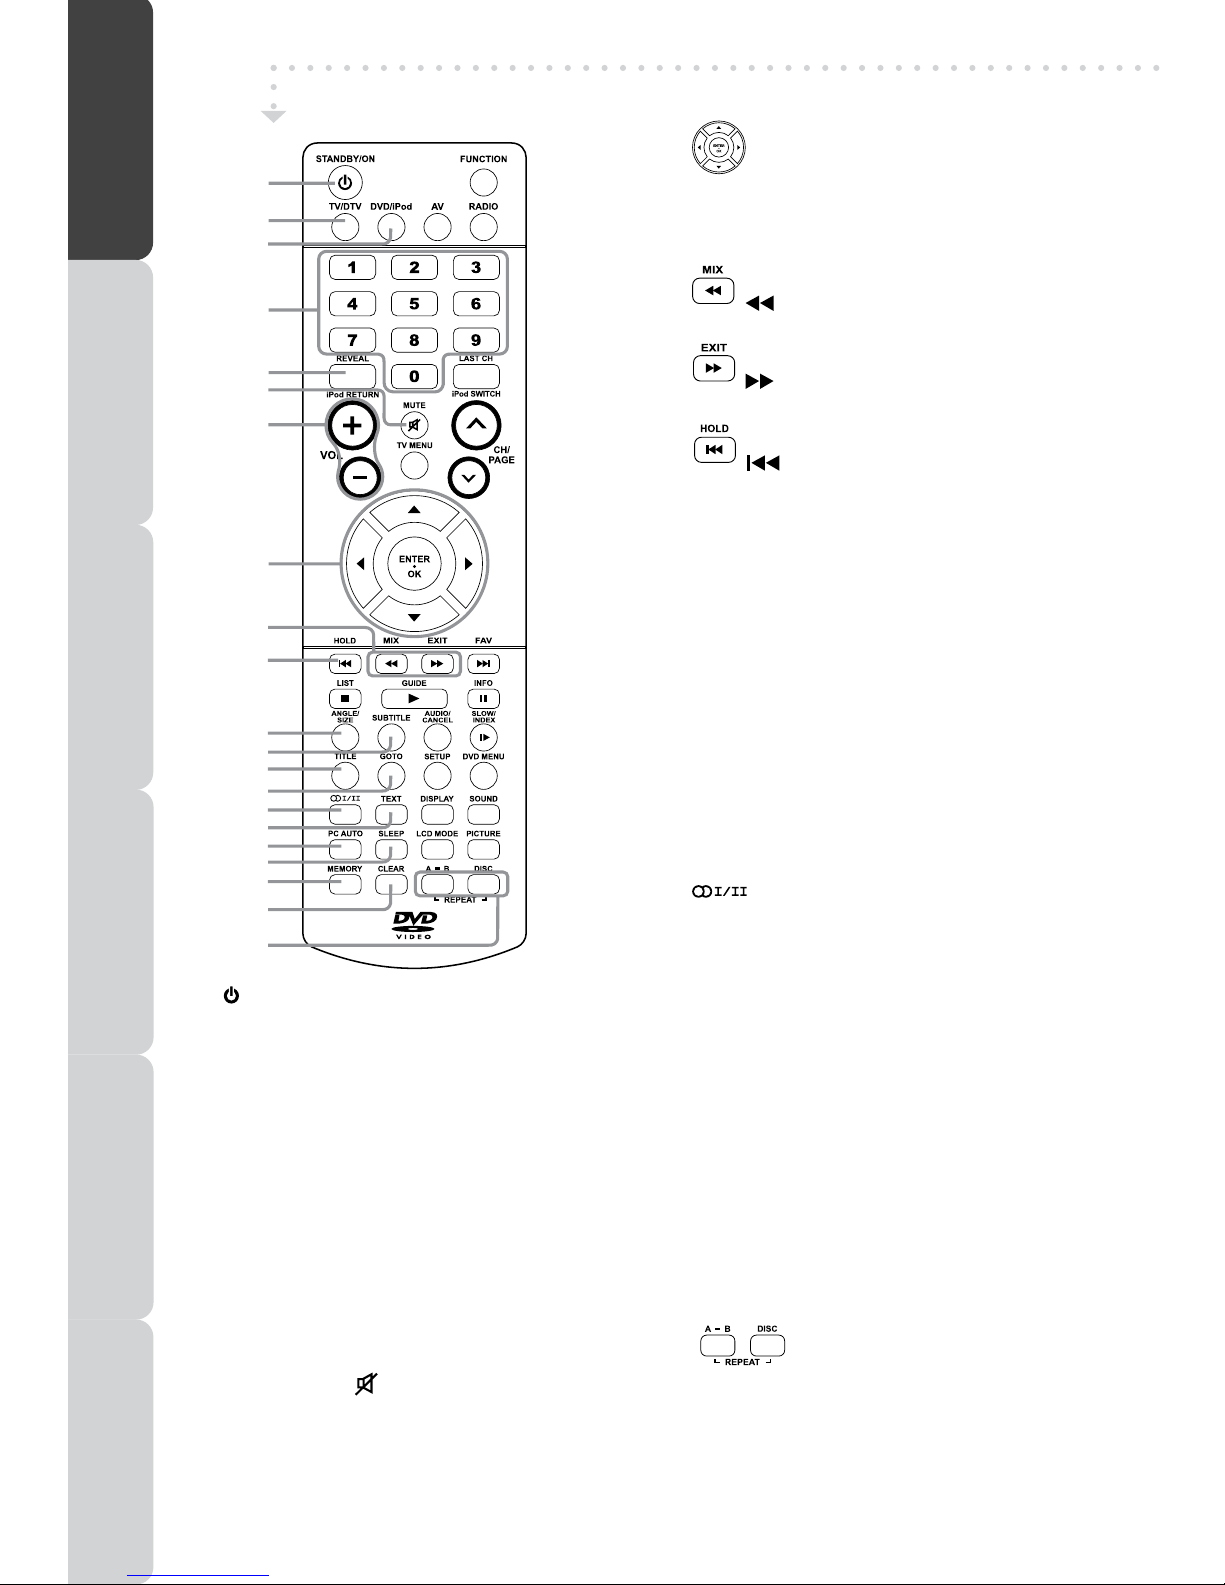
REMOTECONTROL......................10-11
CONNECTIONS ........................ 12
CONNECTIONS.....................12-15
Connecting a TV Antenna/Cable/
Satellite.....................................12
Connecting a Power Cord .............12
Common Interface ...................... 12
Connecting to devices with a composite
(yellow RCA-type) video output ... 13
Connectingtodeviceswithavideoinput
.................................................... 13
Connecting to sources with scart ....
.................................................... 13
Connecting a High Definition (HD)
Source (YUV) ............................ 14
Connecting a PC ........................ 14
Connecting HDMI (applicable to model
L19LIDI9 and L22LIDI9 only) ......... 15
Using Headphones .................... 15
DOLBYDIGITAL(ForDVD)..........15
USING THE FEATURES .............. 16
BASIC OPERATION .................. 16
TurningtheUnitonfortheFirstTime..16
TV/DTV/RADIOSETUP.......17-21
TV Setting ............................ 17 - 18
Electronic Programme Guide (EPG)
for DTV ..................................... 18
Audio Language for DTV ............. 18
Picture Menu ................................ 19
Sound Menu ................................. 19
Time Menu ................................... 20
Setup Menu .................................. 20
Lock Menu .................................. 21
TELETEXT ............................... 22
USINGTHE DVD/iPod FEATURES . 23
CUSTOMIZING THE DVD / iPod
SETTINGS ........................ 23 - 24
Language setup ........................ 23
Video setup .............................. 23
System setup ....................... 23 - 24
DVDFEATURES....................25-29
CD/DVDOPERATION.............25-26
Playing a disc ............................. 25
Playing a picture file disc ........ 25
Pausing playback (still mode) .. 25
Stopping playback ................... 25
Skipping to a different track .... 25
Fast forward/fast reverse ........ 26
Slow-motion play (DVD) .......... 26
Audio selection (DVD) .............. 26
Subtitle selection (DVD) ........... 26
Angle Selection (DVD) ............. 26
SPECIALFUNCTIONS.................27
Display function ..................... 27
Locating a specific title (DVD) .. 27
Locating a specific chapter/track .
............................................... 27
Locating a specific time .......... 27
REPEAT PLAYBACK ................28
Repeating a chapter/title ......... 28
Repeatingasingletrack/wholedisc..28
Repeating a specific section (DVD)
(CD) .......................................... 28
DVDPROGRAMMABLEPLAYBACK
.................................................... 29
Programmable memory .............. 29
Title/chapter programmed playback
(DVD) ..................................... 29
iPodFEATURES.........................30-33
iPod dock adaptor...................... 30
Installing the iPod dock adaptor .... 30
Removing the iPod dock adaptor ... 30
Connecting your iPod.............. 30
Playing music................................. 30
Playing photos.............................. 31
UsingaiPodClassic/iPodNanotoview
the photo ..................................... 31
UsingaiPodTouchtoviewthephoto..31
Playing videos............................... 32
Using a iPod Classic / iPod Nano 3rd
generationtowatchthevideo.........32
UsingaiPodTouchtowatchthevideo..32
Settings...................................... 33
MAINTENANCE ........................... 34
TROUBLESHOOTING ........... 35 - 36
SPECIFICATIONS ......................... 37
TABLE OF CONTENTS
PREPARATION CONNECTIONS USING THE FEATURES SPECIFICATIONTROUBLESHOOTING
USING THE DVD / iPod
FEATURES

5
iPoddockadaptors
(*Detailspartnumber,pleaserefertheitemlist
onlastpage)
PACKAGE CONTENTS
Makesureallofthefollowingcontentsareincluded.
TheseitemsareallyouneedtosetupandoperatetheLCDTVinitsbasicconguration.
Ifthereareanyitemsmissing,pleasecontactPartmaster(UKonly).
Tel:08706001338
LCDTV
User’sManual
(P/N811-711991Wxxx)
RemoteControl/AAAbatteriesx2
(P/N043-A55656W110- L17LIDI9WE/L19LIDI9WE/
L22LIDI9WE)
(P/N043-A55656W120- L17LIDI9E/L19LIDI9E/
L22LIDI9E)
YUVSCARTadaptor
(P/N138-RGB040W000)
(applicabletomodelL19LIDI9E/L19LIDI9WE/
L22LIDI9E/L22LIDI9WEonly)
LINEOUTcable
(P/N122-000020W102)
QuickStartGuide
(P/N810-711995Wxxx)
!
PREPARATIONCONNECTIONSUSING THE FEATURES
USING THE DVD / iPod
FEATURES
TROUBLESHOOTINGSPECIFICATION
(L17LIDI9E / L17LID9WE / L19LIDI9E /
L19LIDI9WE/L22LIDI9E/L22LIDI9WE)
T o AC outlet
Connect to
AUDIO jack (PC OUT)
Connect to PC VGA OUT connector
Source with HDMI output
(applicable to model L19LIDI9E/
L19LIDI9WE/L22LIDI9E/L22LIDI9WE only)

6
Thisunitcanplayback:
TITLES, CHAPTERS AND
TRACKS
• DVDsaredividedinto“titles”and“chapters”.
Ifthedischasmorethanonemovieonit,
each movie would be a separate “title”.
“Chapters”aresectionsoftitles.
• AudioCDsaredividedinto“tracks”.A“track”
isusuallyonesongonanAudioCD.
ICONS USED ON DVDS
Samplelcons
Note:
• WhenplayingbackaCD-G(Graphics)or
CDEXTRAdisc,theaudioportionwillbe
played,butthegraphicimageswillnotbe
shown.
DVDS
[8CM/12CM
DISC]
AUDIO CDS
[8CM/12CM
DISC]
CD-R/CD-RW
Compatible
REGION MANAGEMENT INFORMATION
RegionManagementInformation:ThisunitisdesignedandmanufacturedtorespondtotheRegion
ManagementInformationthatisencodedonDVDdiscs.IftheRegionnumberprintedontheDVD
discdoesnotcorrespondtotheRegionnumberofthisunit,thisunitcannotplaythatdisc.
Theregionnumberofthisunitis .
Note:
• Numbersidentifyeachtitle,chapter,andtrackonadisc.Mostdiscshavethesenumbers
recordedonthem,butsomedonot.
Notes on Unauthorized Discs
YoumaynotbeabletoplaybacksomeDVDdiscsonthisunitiftheywerepurchasedfrom
outsideyourgeographicareaormadeforbusinesspurposes.
DISC FUNCTION OR OPERATION THAT IS NOT AVAILABLE
Whenthe symbolappearsonthescreen,itindicatesthatthefunctionoroperationattempted
isnotavailableatthattime.ThisoccursbecausetheDVDdiscmanufacturerdeterminesthe
specicfunctions.Certainfunctionsmaynotbeavailableonsomediscs.Besuretoreadthe
documentationprovidedwiththeDVD.
Languageselectionsforaudio
Languageselectionsforsubtitles
Screenaspectratio
Multiplecameraangles
Regioncodeindicator
1
NOTES ON COPYRIGHT
It is forbidden by law to copy, broadcast, show, broadcast on cable, play in public, or rent
copyrightedmaterialwithoutpermission.
ApparatusClaimsofU.S.PatentNos.6,836,549;6,381,747;7,050,698;6,516,132;and5,583,936
licensedforlimitedviewingusesonly.
ThisproductincorporatescopyrightprotectiontechnologythatisprotectedbyU.S.patentsand
otherintellectualpropertyrights.Useofthiscopyrightprotectiontechnologymustbeauthorized
byMacrovision,andisintendedforhomeandotherlimitedviewingusesonlyunlessotherwise
authorizedbyMacrovision.Reverseengineeringordisassemblyisprohibited.
DISC FORMATS
PREPARATION CONNECTIONS USING THE FEATURES SPECIFICATIONTROUBLESHOOTING
USING THE DVD / iPod
FEATURES

7
USING THE REMOTE CONTROL
• PointtheremotecontrolattheREMOTESENSORlocatedonthe
unit.
• Whenusingthisunitinaverybrightlylitarea,theinfraredREMOTE
CONTROLSENSORmaynotworkproperly.
• Therecommendedeffectivedistanceforusingtheremotecontrolis
about16feet(5metres).
INSERTING BATTERIES IN THE REMOTE CONTROL
BATTERY REPLACEMENT
Whenthebatteriesbecomeweak,theoperatingdistanceoftheremotecontrolwillbegreatly
reducedandyouwillneedtoreplacethebatteries.
Note:
• Removethebatteriesfromtheremotecontrolwhenitisnottobeusedforalongperiod.
Otherwiseitcouldcausecorrosionorbatteryleakageandmayresultinphysicalinjuryand/
orpropertydamageincludingre.
• Do not mix old and new batteries. Do not mix ALKALINE, standard (CARBON-ZINC) or
rechargeable(NICKEL-CADMIUM)batteries.
• Corrosion,oxidation,battery-leakageandanyothergraduallyacidicdefectofthisnaturewill
invalidatetheguarantee.
• Whendiscardingbatteries,environmentalproblemsmustbeconsideredandlocalrulesor
lawsgoverningthedisposalofthesebatteriesmustbefollowedstrictly.
CAUTION:
Dangerofexplosionmayberesultedifbatteriesareincorrectlyreplaced.Replaceonlywiththe
sameorequivalenttype.
WARNING:
•Donotdisposeofbatteriesinareortheymayleakand/orexplode.
• Thebatteryshallnotbeexposedtoexcessiveheatsuchassunshine,reorthe
like.
GETTING STARTED
+
_
+
_
1.Pressandliftthebackcoveruptoopenthebattery
compartmentoftheremotecontrol.
2. InserttwoAAAsizebatteries.Makesuretomatch
the(+)and(–)endsofthebatterieswiththe(+)
and(–)endsindicatedinthebatterycompartment.
Snapthecoverbackintoplace.
30˚ 30˚
5M
PREPARATIONCONNECTIONSUSING THE FEATURES
USING THE DVD / iPod
FEATURES
TROUBLESHOOTINGSPECIFICATION

8
678910 11 12 13 14 15 16
6) DVD VIDEO OUT jack
7) Power Cord
8) HDMI in jack (applicable to
model L19LIDI9E / L19LIDI9WE
/ L22LIDI9E / L22LIDI9WE only)
9) Audio jack (PC IN)
10)MONITOR/VGA jack (PC IN)
11)SCART jack (AV IN 2)
12)TV Antenna
13)VIDEO IN jack (AV IN 1)
14)AUDIO IN jacks (Left/Right)
15)PHONES jack
16)COMMON INTERFACE slot
LCD TV
FRONT VIEW
BACK VIEW
1) Color LCD Screen
2) Tweeters
3) Remote Sensor
Donotblockthissensorortheremote
controlwillnotwork.
Standby Indicator
IndicateswhethertheunitisONorin
STANDBY(OFF)mode.
LightOn:TheunitisinSTANDBY.
LightOff:TheunitisturnedON.
4) Dock for iPod®
5) Speakers
123425
PREPARATION CONNECTIONS USING THE FEATURES SPECIFICATIONTROUBLESHOOTING
USING THE DVD / iPod
FEATURES

9
LCD TV
SIDE VIEW
17)
/ I button
Turnstheunitonandoff.
18) PLAY button
Presstostartorresumeplaybackofadisc.
PresstoplayamusicorvideoiPodmode.
19) STOP button
Presstostopplayingadisc.
20) MENU button
Presstodisplaytheon-screenTVmenu.
21) FUNCTION button
Select DTV, TV, AV1, AV2/SCART, YUV/
SCART,DVD,iPod,HDMIorPC.(HDMIis
applicabletomodelL19LIDI9E/L19LIDI9WE
/L22LIDI9E/L22LIDI9WEonly)
22) buttons
- PresstochangeTVchannels.
- Presstohighlightselections(Up&Down)
onthemenuscreen.
- Presstoselectpreviousornextchapters/
tracksonadisc.
23) controls
Adjustthevolumelevel.
24) Disc Door
Pushgentlytoclosethediscdoor.
25) button
Presstoopenthediscdoor.
26) Sub-woofer
17
18
19
20
21
23
22
24
25
26
PREPARATIONCONNECTIONSUSING THE FEATURES
USING THE DVD / iPod
FEATURES
TROUBLESHOOTINGSPECIFICATION

10
1) STANDBY/ON button
PresstoturnONtheunitorputitinSTANDBY(OFF)
mode.
2) TV/DTV button
PresstoswitchtoTV/DTVmode.
3) DVD/iPod button
PresstoswitchDVD/iPodmode.
4) Number (0 - 9) buttons
UsetochangetheTV/DTVchannels.
5) REVEAL button
Presstorevealanswersonaquizorgamepagesfrom
Teletext.
iPod RETURN button
PresstoreturntothepreviousmenuiniPodmode.
6) MUTE button
Presstomutethesound.
Pressagaintocancelmute.
7) VOLUME + / – buttons
Presstoadjustthevolumelevel.
8) buttons
Allow you to highlight selection, adjust setting and
conrm selection on the menu screen or iPod menu
lists.
9) MIX : Press to selectTeletext with aTV
programme.
:Fastreverseplayback.
EXIT : Presstoexitthemenuandreturndirectly
tonormalviewing.
:Fastforwardplayback.
10) HOLD : Press to stop the automatic page
changefromTeletext.
: Presstoselectpreviouschaptersor
tracksonadisc.
11) ANGLE button
Press to switch the camera angle of the video
presentationwhensceneswithmultiplecameraangles
arerecordedonaDVD.
SIZE button
Presstosettheletterssizeofteletextonthescreen.
12) SUBTITLE button
Presstoselectoneofthesubtitlelanguagesprogrammed
onaDVD/DTV.
13) TITLE Button
Presstoselectthetitlemenuscreen.
14) GOTO button
PresstoskipdirectlytoaspeciclocationonaDVD/
CD.
15) button
PresstodirectlyselectMono/StereoorMono/DualI/
DualII.
16) TEXT button
PresstodirectlyselectsTeletextmode.
PressagaintoexitTeletextmode.
17) PC AUTO button
SetpicturesettingsforPCmodeautomatically.
18) SLEEP button
PresstosettheSLEEPtimer.TheunitwillremainONforthe
timethatisset,andwillautomaticallyshutoffafterwards.
19) MEMORY button (red button)
Presstoperformtitle/chapterprogrammedplayback.
20) CLEAR button (green button)
Press to clear input selections and cancel certain
playbackfunctions.
21)
REPEAT A-B button (yellow button)
Press to perform point-to-point repeat playback on a
DVDorCD.
REPEAT DISC button (blue button)
Repeatchapter/titleofaDVD.
RepeatsingletrackorwholeCD.
PresstoswitchbetweenRepeatOff,RepeatOneorAll
iniPodmode.
REMOTE CONTROL
1
2
3
4
5
6
7
8
9
10
11
12
13
14
15
16
17
18
19
20
21
PREPARATION CONNECTIONS USING THE FEATURES SPECIFICATIONTROUBLESHOOTING
USING THE DVD / iPod
FEATURES

11
22) FUNCTION button
PresstoswitchbetweenDTV,TV,AV1,AV2/SCART,
YUV/SCART, DVD, iPod, HDMI or PC. (HDMI is
applicable to model L19LIDI9E / L19LIDI9WE /
L22LIDI9E/L22LIDI9WEonly)
23) RADIO button
PresstoselectDTVdigitalradioprogrammes.Press
againtoexittonormalDTVprogrammesmode.
24) AV button
PresstoselectsourceconnectedtoAV1,AV2/SCART,
YUV/SCARTorHDMI.(HDMIisapplicabletomodel
L19LIDI9E/L19LIDI9WE/L22LIDI9E/L22LIDI9WE
only)
25) LAST CH button
Presstoswitchrepeatedlybetweenthelast
twochannelsdisplayed.
iPod SWITCH button
PresstobetweeniPod’s“RemoteUImode”
and“ExtendedInterfaceMode”.
26) TV MENU button
Presstodisplaytheon-screenTVmenu.
27) CH/PAGE / buttons
- PresstochangetheTV/DTVchannels.
- PresstogoforwardorbackwardthepageofTeletext
screeninTVmode.
- Press to go forward or backward the page of
ProgrammeEdit&FavouriteinTV/DTVmode.
28) FAV : Press to display the Favourites
program in TV/DTV mode. (You
should setup your favourite TV/
DTVchannelsinProgrammeEdit
menu.
: Presstoselectnexttitle,chapter
ortrackonadisc.
Presstoselectnextmusicorvideo
iniPodmode.
29) : Presstostopplayingadisc.
LIST : Presstodisplaythechannellistin
TV/DTVmode.
: Presstostartandresumeplayback
ofadisc.
PresstoplaymusicorvideoiniPod
mode.
GUIDE : Press to display the Electronic
ProgrammeGuide(EPG)inDTV
mode.
: Presstopauseplaybackandsingle
frameadvance.
INFO : Press to display the channel
informationinDTVmode.
30) SLOW : Press to play a DVD in slow-
motion.
INDEX : Presstoselectthepagenumber
oftheindexfromTeletext.
31) AUDIO button
PresstoselectaudiosoundtracksofaDVDorchange
theoutputmodeofaCD.
CANCEL button
PresstocanceltheTeletextmenu.
32) DVD MENU button
Press to enter the main menu of the disc you are
watching.
33) SETUP button
PresstoenterandexittheSETUPmenuoftheDVD
player.
34) SOUND button
Presstoselectfrompresetsoundsettings(Standard,
Music,Theatre,Voice,Personal)tomatchthetypeof
showyouarewatching.
35) DISPLAY button
Presstochangediscstatusinformationdisplayedon
thescreen.
36) PICTURE button
Presstoselectfrompresetscreendisplaysettingsto
matchthetypeofshowyouarewatching(Standard,
Movie,Dynamic,Soft,Personal).
37) LCD MODE button
PresstosetthesizeofLCDdisplay.
38) RED/GREEN/YELLOW/BLUE button
Press to select the relevant page quickly from
Teletext.
REMOTE CONTROL
22
23
24
25
26
27
28
29
30
31
32
33
34
35
36
37
38
PREPARATIONCONNECTIONSUSING THE FEATURES
USING THE DVD / iPod
FEATURES
TROUBLESHOOTINGSPECIFICATION

12
CONNECTING A POWER CORD
• ConnecttheACpowercordintoawalloutlet.
• Pressthe / I buttonontheunitortheSTANDBY/
ONbuttononremotecontroltoturnontheunit.
Note:
• Be sure the AC power cord is disconnected
and the TV is switched off before making
connections.
• Makesurethatallthecomponentsareconnected
correctly.
• Whenyouarenotgoingtousetheunitforalong
periodoftime,disconnectthepowercord.
• Theapparatusshouldnotbeexposedtodripping
or splashing and that no objects lled with liquids, such as vases, should be placed on
apparatus.
• The mains plug is used as the disconnecting device. It should remain readily accessible
andshouldnotbeobstructed during use.To becompletely disconnectedfrom thesupply
mains,themainsplugoftheapparatusshouldbedisconnectedfromthemainssocketoutlet
completely.
CONNECTING A TV ANTENNA/CABLE/SATELLITE
Toviewtelevisionchannelscorrectly,asignalmust
bereceivedfromoneofthefollowingsources:
-Anindoororoutdooraerialantenna
-Acablesystem
-Asatellitesystem
Note:
For receiving over-the-airTV broadcasts, we
recommendthatyouuseanexternalxedantenna.
Shouldyourequiretheuseofatemporaryantenna,
please ensure that you purchase an antenna
with sufcient ability to receive in weak signal
areas.Onlywhenyouareincloseproximitytoa
transmitterwillatemporaryantennareproducea
signalasstronglyasaxedantenna.
CONNECTIONS
COMMON INTERFACE
TheunitisequippedwithaCIslot.TheCIslotallowsyoutoinsertaCAM(ConditionalAccess
Module)withanappropriatesubscriptioncardforsomepayforviewservices.
ItisrequiredtosubscribetoapaychannelcompanytoviewthepaychannelsoftheDigital
Terrestrialbroadcasting.
FullyinserttheCAM(ConditionalAccessModule)intotheCI(CommonInterface)slotonthe
bottomoftheunitwithitslabelsidefacingyou.
Important notes:
• SwitchofftheTVandunplugfromtheACpowermainsbeforeinsertorremovethe
CAM.
• TheCAMshouldbecorrectlyinserted,itisimpossibletoinsertfullyifreversed.The
CAM or the TV terminal may be damaged if the CAM is forcefully inserted.
• SomeCAMsmayrequiresettingup.Refertothemoduleinstructionmanualfordetails
of the settings.
Satellite, Cable, or TV
antenna cable to TV
ANTENNA CABLE Terminal
(cable not included)
PREPARATION CONNECTIONS USING THE FEATURES SPECIFICATIONTROUBLESHOOTING
USING THE DVD / iPod
FEATURES

13
VIDEO OUT
DVD
VCR / DVD RECORDER /
OTHER DISPLAY DEVICE
CONNECTINGTO DEVICES WITH A COMPOSITE (YELLOW RCA-TYPE)
VIDEO OUTPUT
ToconnecttoA/VdevicessuchasaVCR,camcorderorvideogamesystem.
- Connect to aVCR / Video Game System
/ Camcorder
Connect the AUDIO /VIDEO cable (not
included)asshown.
Make sure you connect the cable from
theotherequipment(AUDIOandVIDEO
OUT) to this unit (AUDIO and VIDEO
IN).PresstheFUNCTIONorAVbuttonto
selectAV1mode.
Note:
Please refer to the user manual for the
otherequipmentformoreinformation.
ToAUDIO/
VIDEOOUTjacks
ToAUDIO/
VIDEOIN
jacks
(AV IN 1)
CONNECTIONS
CONNECTING TO SOURCES WITH SCART
Devices with RGB output must be
connectedtotheSCARTinput:
ConnectstheSCARTfromthesourceto
the corresponding SCART on this unit
(SCARTcablenotincluded)asshown.
Make sure you connect both to SCART
toSCART.
Tooperatetheconnecteddeviceandplay
thesource,rstpresstheFUNCTIONorAV
buttontoselecttheAV2/SCARTmode.
SCART
CABLE
If your VCR permits, then
connect your antenna to
your VCR and VCR RF to
your TV
CONNECTING DEVICES WITH A VIDEO INPUT
ConnecttheAUDIOcable(included)and
VIDEOcable(notincluded)asshown.
Makesureyouconnectthecablefromthe
otherequipment(AUDIO and VIDEO IN)
tothisunit(Headphone jackandVIDEO
OUT).PresstheFUNCTIONorDVDbutton
toselectDVDmode.
Note:
Pleaserefertotheusermanualfortheother
equipmentformoreinformation.
VIDEO
CABLE
AUDIO CABLE
PREPARATIONCONNECTIONSUSING THE FEATURES
USING THE DVD / iPod
FEATURES
TROUBLESHOOTINGSPECIFICATION

14
CONNECTIONS
Note:
When connecting a DVD player to the television, the picture resolution is dependent
upontheresolutionofboththeDVDplayerandtheTV.Forbestresults,selectthehighest
resolutionoftheDVDuptotheTVmaximumof1080i.
CONNECTING A HIGH-DEFINITION (HD) SOURCE (YUV)
High-Denition(HD)DeviceswithcomponentvideooutputmustbeconnectedtotheYUV
input.
Connectthecomponentvideocableandaudiocable(notincluded)asshown.
MakesureyouconnecttheYUVScartadaptortothisunit,thenconnectcomponentvideo
cableandaudiocablefromtheotherequipment(COMPONENT VIDEO OUT and AUDIO
OUT)tothisunit(SCARTandAUDIO IN).
Tooperatetheconnecteddeviceandplaythesource,rstpresstheFUNCTIONbutton
toselecttheYUV/SCARTmode.
* May require a subscription for
receiving HD channels. Check
with your cable/satellite service
providerfordetails.
ToAUDIOIN
jacks
ToAUDIO
OUTjacks
ToCOMPONENT
VIDEOOUTjacks
ToSCART
jacks
CONNECTING A PC
Connectthe15-pinD-SUBPC/VGAconnectorfrom
yourcomputertothe15-pinD-SUBPC/VGAinput
onthisunitusingamonitorcableandstereoaudio
cable(notincluded)asshown.
Makesureyouconnectthecablefromthecomputer
(PC ConnectorandAUDIO - PC OUT)tothisunit
(MONITOR/VGA andAUDIO - PC IN).Pressthe
FUNCTIONbuttontoselectPCmode.
ToAUDIOjack(PC OUT)
ToPC connector
StereoAudio
Cable 15PinD-SUB
connector
PREPARATION CONNECTIONS USING THE FEATURES SPECIFICATIONTROUBLESHOOTING
USING THE DVD / iPod
FEATURES
YUVSCART
adaptor
(applicable to
model L19LIDI9E
/ L19LIDI9WE
/ L22LIDI9E /
L22LIDI9WE only)

15
DolbyDigitalisasoundsystemdevelopedbyDolbyLaboratoriesInc.Thisunitautomatically
recognizesDVDsthathavebeenrecordedwithDolbyDigital.
NotallDolbyDigitalsourcesarerecordedwith6channels.
SomesourcesmarkedDolbyDigitalmayberecordedinDolbySurround,a2channelsystem.
Lookforthislogoonyourunit.
ManufacturedunderlicensefromDolbyLaboratories.
‘Dolby’ and the double-D symbol are trademarks of Dolby
Laboratories.
DOLBY DIGITAL (For DVD)
USING HEADPHONES
• Turn down the volume before connecting
headphonestotheunit,thenadjustthevolume
toyourdesiredlevel.
• Whenheadphonesareconnected,nosoundwill
comefromthefrontspeakers.
Note:
• Avoid listening to sound at high levels for
prolongedperiodsoftime.Thismaybeharmful
toyouandmaycausehearingloss. Earphones / Headphones
(1/8”[3.5mm]diameterplug)
CONNECTING HDMI (applicable to model L19LIDI9E / L19LIDI9WE / L22LIDI9E
/ L22LIDI9WE only)
HDMI(HighDenitionMultimediaInterface)supportsbothvideoandaudioonasingle
digital connection for use with DVD players, DTV, set-top boxes and other digital AV
devices. HDMI was developed to provide the technologies of High Bandwidth Digital
ContentProtection(HDCP)aswellasDigitalVisual
Interface(DVI)inonespecication.HDCPisused
toprotectdigitalcontenttransmittedandreceived
byDVI-compliantorHDMI-compliantdisplays.
HDMI has the capability to support standard,
enhancedorhigh-denitionvideoplusstandardto
multi-channelsurround-soundaudio.HDMIfeature
includeuncompresseddigitalvideo,abandwidth
of up to 2.2 gigabytes per second (with HDTV
signals),oneconnector(insteadofseveralcables
andconnectors),andcommunicationbetweenthe
AVsourceandAVdevicessuchasDTVs.
HDMI,theHDMIlogo andHigh-Denition
Multimedia Interface are trademarks or registered
trademarksofHDMIlicensingLLC.
ConnecttheHDMIcable(notincluded)asshown.
Makesureyouconnectthecablefromtheequipment
(HDMI OUT)tothisunit(HDMI IN).
Tooperatetheconnecteddeviceandplaythesource,
rstpresstheFUNCTIONbuttontoselecttheHDMImode.
CONNECTIONS
ToHDMI
INjack ToHDMIOUT
jack
PREPARATIONCONNECTIONSUSING THE FEATURES
USING THE DVD / iPod
FEATURES
TROUBLESHOOTINGSPECIFICATION

16
TURNING THE UNIT ON
When the AC power cord is connected, the standby
indicatorlightson.Pressthe / Ibuttontoturntheunit
on,thestandbyindicatorwillblinkforabout10secondsfor
loading,andwillnallylightoffwhentheunitisON.Press
theFUNCTIONbuttontoselectthedesiredmode(DTV,TV,
AV1,AV2/SCART,YUV/SCART,DVD,iPod,HDMIorPC)
(HDMIisapplicabletomodelL19LIDI9E/L19LIDI9WE/
L22LIDI9E/L22LIDI9WEonly).IfyouselectDVDmode,
theDVDlogowillappearonthescreen.
Note:
When the unit is not going to be used for a long time,
disconnecttheACpowersupplycordfromACoutlet.
TURNING THE UNIT ON FOR THE FIRST TIME
Therst time youturn the unit on,it will go straightintoAutoscan mode. Simplyfollowthe
screenpromptsasbelowtotuneinthechannels.
1.Usethe / buttontoselectthescreenmenulanguageyouprefer.
2.Usethe buttontomovetoAutoTuning,presstheENTER•OKbuttontoenterAutoTuning
menu.
3.Usethe / buttontoselecttheCountryyouarein.
4.Usethe buttontomovetoStart.PresstheENTER•OKbuttonconrmStart.Thesystem
willautomaticallystarttoscanandpresetallavailableprogrammes.
5.Afterscanninghasnished,theTVwilldisplaytherstprogrammesstored.
BASIC OPERATION
PREPARATION CONNECTIONS USING THE FEATURES SPECIFICATIONTROUBLESHOOTING
USING THE DVD / iPod
FEATURES

17
• CIInformation
DisplayCAMandSmartcardinformation;selectthelanguageifavailable.
TV / DTV / RADIO SETUP
TV SETTING (only in ATV or DTV or RADIO mode)
1. PresstheFUNCTIONorTV/DTVbuttontoselect
DTV/TVmode;orpressRADIObuttontoselect
DTVdigitalradioprogrammes.
2. PresstheTV MENUbutton.
3. Usethe or buttontoselecttheTV SETTING.
4. Usethe or buttontoselecttheoptions(Auto
Tuning, DTV ManualTuning, ATV Manual Tuning,
Programme Edit, CI Information), press the
ENTER•OKbuttontoenterthesettings.
5. Press the TV MENU button to return to previous
menu,repeatstep4toadjustothersettings.
6. To exit the setup menu and return to the normal
screen,presstheEXITbutton.
• AutoTuning:Automaticallyscan,sortandstoreallavailableprogrammes.
• DTVManualTuning:PerformmanualsearchforDTV(DigitalTV)programmes.
• ATV Manual Tuning:Perform manual search and ne tune for ATV (Analog TV)
programmes.
• ProgrammeEdit:AllchannelsstoredarelistedintheProgrammeEditmenu,youcanedit
thechannelsbythefollowingsteps:
1. Usethe or buttontoselectachannel.(PresstheCH/PAGE/ buttontoskiptoprevious/
nextpage.)
2. PresstheRED / GREEN / YELLOW / BLUEbuttonortheFAVbuttontoeditthechannel.
• DELETE
Press the RED button to delete the selected channel, press the
ENTER•OKbuttontoconrm.PresstheTV MENUbuttontostop
delete.
• RENAME(for ATV mode only)
PresstheGREENbuttontorenametheselectedchannel.Usethe
or buttontoselectthecharacterstorepresentthestationname,
usethe or buttontomovethenextpositionofcharacter,press
theTV MENUbuttontoconrm.
• MOVE (for ATV mode only)
PresstheYELLOWbuttonandusethe or buttontomovethe
selectedchannel,thenpresstheTV MENUbuttontoconrm.
• SKIP
PresstheBLUEbuttontoskipornotskiptheselectedchannel.
• FAV(Favourite)
Press the FAVbuttontosetorcanceltheselectedchannelasoneofthefavourite
programmes.
BCC ONE
BCC TWO
Discovery
PREPARATIONCONNECTIONSUSING THE FEATURES
USING THE DVD / iPod
FEATURES
TROUBLESHOOTINGSPECIFICATION

18
WhilewatchingaDTVprogramme,youcanpresstheGUIDEbuttontodisplaytheElectronic
ProgrammeGuide(EPG)menu,andcheckforprogrammeinformation.
• Programmetimeandnamewillbedisplayed,usethe buttonselectaprogramme,
press the INFO button to display detailed information if available. Press the INFO button
againtoreturn.
• Press the YELLOW button to highlight programme date, use the / button to display
informationforotherdates.PresstheYELLOWbuttonagaintoreturn
• PresstheENTER•OKbuttontoconrmtheselectedchannel.
• PresstheEXITbuttontoexittheElectronicProgrammeGuide(EPG)menu.
Note:
GuideinformationdisplaymaybedifferentaccordingtotheDTVprogrammes.
• Usethe or buttontoselectanaudiolanguageor
audioformatifavailable,pressthe or buttontoselect
soundtrackbetweenL/R(Stereo),L/L(MonoLeft)andR/R
(MonoRight).PresstheENTER•OKbuttontoconrm.
• Pressthe orEXITbuttontoexittheAudioLanguage
menu.
Note:
ForanalogueTV,pressthe buttontoselectMono
/StereoorMono/DualI/DualIIdirectly.
WhilewatchingaDTVprogramme,youcanpressthe
buttontodisplaytheAudioLanguagemenu,andselectaudio
language,audioformatandsoundtrack.
ELECTRONIC PROGRAMME GUIDE (EPG) FOR DTV
AUDIO LANGUAGE FOR DTV
TV / DTV / RADIO SETUP
BBC ONE
BBC ONE
BBC TWO
five
BBC THREE
QVC
UK Gold
Breakfast
Breakfast
No Info.. Arth..
Mio..Old ..No In..
Arthur No Information
No Information
Casual & Co QVC Outlet
Closedown
No Information
This is BBC THREE
Best of Friends
Animal 24:7 Homes Under the..
PREPARATION CONNECTIONS USING THE FEATURES SPECIFICATIONTROUBLESHOOTING
USING THE DVD / iPod
FEATURES

19
TV / DTV / RADIO SETUP
PICTURE MENU
1. PresstheTV MENUbutton.
2. Usethe or buttontoselecttheoptions(Picture
Mode, Contrast, Brightness, Colour, Sharpness,
Tint, Colour Temp),adjustthembyusingthe or
button.
3. Press the TV MENU button to return to previous
menu.
4. Toexitthesetupmenuandreturntothenormalscreen,
presstheEXITbutton.
• PictureMode
Select from four preset screen display settings (Standard, Movie, Dynamic and Soft), or select
PersonalinwhichyourownsettingsofContrast,Brightness,ColourandSharpnessarestored.
YoucanalsoselectPictureModesimplybypressingthePICTURE buttonontheremotecontrol.
• Contrast
Adjustthecontrastofthepicture.Theblackportionsofthepicturebecomericherindarknessand
thewhitebecomebrighter.
• Brightness
Adjustthebrightnessofthepicture.
• Colour
Adjustthecolourofthepicture.
• Sharpness
Adjustthesharpnessleveltoimprovedetailinthepicture.
• Tint (only for AV mode with NTSC signal)
Adjustthetintofthepicture.(Towardpurple/Towardgreen).
•Colour Temp
Selectthecolourtemperatureofthepicture.SelectNormal(balanced)/Warm(redwhite)/Cold(blue
white)mode.
SOUND MENU
1. PresstheTV MENUbutton.
2. Usethe or buttontoselecttheSOUND.
3. Usethe or button to select the options (Sound
Mode, Treble, Bass, Balance),adjustthembyusing
theor button.
4. PresstheTV MENUbuttontoreturntopreviousmenu.
5. To exit the setup menu and return to the normal
screen,presstheEXITbutton.
Experiment with different sound settings until you
find the settings you prefer.
• SoundMode
Selectfromfourpresetsoundsettings(Standard,Music,TheatreandVoice),orselectPersonalin
whichyourownsettingsofTrebleandBassarestored.
YoucanalsoselectSoundModesimplybypressingtheSOUNDbuttonontheremotecontrol.
• Treble
Adjustthetreblerange.
• Bass
Adjustthebassrange.
• Balance
Adjustthebalanceleveltowardtheleftorrightspeakers.
PREPARATIONCONNECTIONSUSING THE FEATURES
USING THE DVD / iPod
FEATURES
TROUBLESHOOTINGSPECIFICATION

20
•PC Setup
Usethe or buttontoselecttheoptions(H-offset,V-offset, Size, Phase, Auto Adjust)andadjust
thembyusingthe or buttons.
-BestResolution:1440x900(L17LIDI9E/L17LIDI9WE/L19LIDI9E/L19LIDI9WE)
1680x1050(L22LIDI9E/L22LIDI9WE)
-RefreshFrequency:60Hz
• H-offset
Centretheimagebymovingitleftorright.
• V-offset
Centretheimagebymovingitupordown.
• Size
Adjustthescreensize.
• Phase
Adjustwhen charactershavelowcontrastor when
theimageickers.
• AutoAdjust
Adjusttheimageautomatically.
• RestoreSetting
PresstheENTER•OKbuttontorestorethesystemsettingstothefactorydefault.
TV / DTV / RADIO SETUP
TIME MENU
1. PresstheTV MENUbutton.
2. Usethe or buttontoselecttheTIME.
3. Use the or button to select the options (Clock,
Sleep Timer, Time Zone),adjustthembyusingthe
or button.
4. PresstheTV MENUbuttontoreturntopreviousmenu.
5. To exit the setup menu and return to the normal
screen,presstheEXIT button.
• Clock
PresstheENTER•OKbuttontoentertheClockmenu,
use the button to set Date, Month, Year,
HourandMinute.
• Sleeptimer
SelectthetimetoturntheunittoStandbymodeautomatically:Off->5min--->90min->120min.
• TimeZone
Selectyourtimezone.
SETUP MENU
1. PresstheTV MENUbutton.
2. Usethe or buttontoselecttheSETUP.
3. Use the or buttontoselecttheoptions
(Language, Audio Language, Subtitle Language,
PC Setup, Restore Setting),adjustthembyusing
the or button.
(InPCmode,selectPCSetupandpressthe
ENTER•OKbuttontoenterthesettings.)
4. PresstheTV MENUbuttontoreturntopreviousmenu.
5. Toexitthesetupmenuandreturntothenormal
screen,presstheEXITbutton.
• Language
SelectyourpreferredOnScreenDisplaylanguage.
• AudioLanguage
Selectyourpreferredaudiolanguage.(Availablefordigitalchannelsifmultipleaudiolanguagesare
broadcasted.)
• SubtitleLanguage
Selectyourpreferredsubtitlelanguageorturnoffsubtitle.(Availablefordigitalchannelsifmultiple
subtitlelanguagesarebroadcasted.)
PREPARATION CONNECTIONS USING THE FEATURES SPECIFICATIONTROUBLESHOOTING
USING THE DVD / iPod
FEATURES
This manual suits for next models
5
Table of contents
Other Logik TV DVD Combo manuals

Logik
Logik L22DVDB20 User manual

Logik
Logik L22LDVB19 User manual

Logik
Logik L19DVDB19 User manual

Logik
Logik L24FED13 User manual

Logik
Logik L32HED13 User manual

Logik
Logik L24DVDB19 User manual

Logik
Logik L26HED12 User manual

Logik
Logik L32DLCD11 User manual

Logik
Logik L22DVDB11 User manual

Logik
Logik L26HED12N User manual