MAD Contax G2 User manual


mad-paris.com1
Thank you for your purchase of a Contax G2.
Based on the Contax philosophy of producing a “camera which works”, this 35mm AF range
finder camera with focal plane shutter is extremely easy to use, which is a shade dierent
from a single-lens-reflex camera.
This camera features aperture-priority auto-exposure using actual stop-down aperture
metering, a high-speed focal-plane shutter (speeds up to 1/6000 second), high-speed
continuous exposures (up to about 4 frames/second), and many other advanced features,
within a compact body.
Further, by adding the optional multi-function type “Contax Data back GD-2” you can
perform interval photography and add exposure data and dates to photographs.
Before using the camera, please read this instruction manual carefully to operate it correctly.
This manual explains the operating procedures for this excellent Contax G2 camera with
G-mount Planar T*45 mm F2 lens. However, you can also use it in the same way as described
in this manual, unless otherwise stated, for the integrated use of the camera with other
G-mount Carl Zeiss T* interchangeable lenses.
• If you use the Hologon 16mm F8 lens, be sure to read the section “Using the Hologon 16mm
F8 lens“ in this manual (p. 196), as well as the instructions accompanying the lens.

mad-paris.com2
Names of Parts
• Basic Steps
• Basic Operation Before Shooting
Loading the Batteries
<Battery Check>
<Battery Replacement>
<Battery Precautions>
Mounting and Dismounting the Lens
Main Switch
Display in the Viewfinder
Display Panel/Exposure Counter
Dioptre Adjustment
Loading the Film
Setting and Checking the Film Speed
Shutter Speed Dial
Drive Mode Dial
Focus Mode Dial/Focus Lock Button
Holding the Camera
Rewinding the Film
• Focusing the Lens
Relationship between Drive Modes and Focus Modes
Focusing on Auto Focus
Focusing on Manual Focus
Remarks on the Auto Focus System
• Camera Functions and Applied Techniques
<Selecting the Exposure Mode>
Aperture-priority Auto Exposure
Manual Exposure
Bulb Exposure [B]
Exposure Compensation
<Using the Exposure Compensation Dial>
<Using the AE Lock>
<Using the A.B.C Mode>
Flash Photography
Multiple Exposure
Using the Self-timer
• Others
Custom Functions
<List of the Custom Functions>
<Setting the Custom Functions>
Release Socket/Detaching the Camera Back
Metering System
Using the Hologon 16 mm F8
Depth of Field
Camera Care and Precautions
Specifications
3
5
7
9
11
12
13
14
16
18
21
22
23
24
27
29
34
36
41
25
44
46
53
60
63
69
70
71
76
78
79
26
42
64
64
67
CONTENTS

mad-paris.com3
Direct X-contact
Dedicated-flash Contacts
Accessory Shoe
Exposure Compensation Dial
A.B.C. Lever
Dial Index
Shutter Speed Dial
Shutter Speed Dial Lock Release Button
Exposure Counter
Main Switch
Shutter Release
Release Socket
Focus Dial
Self-timer LED
Distance Reference Index
Display Panel
Drive Mode Dial
ISO Button
Active AF Focusing Window
(infrared emitter)
Strap Lug
Viewfinder
Lens Index
Lens Release Button
Passive AF Focusing Windows
Active AF Focusing Window
(infrared receiver)
External Metering Window
NAMES OF PARTS
1
2
3
4
5
6
7
8
9
10
11
12
13
14
15
16
17
18
20
21
22
23
24
19
25
26

mad-paris.com4
Camera Back Release Pin
Spool
Focus Lock Button
Focus Mode Dial
Shutter Curtain
Viewfinder Eyepiece
Diopter Adjuster
Film Mounting Spindle
Sync Terminal
Camera Back Release Knob
Manual Rewind Button
Film Check Window
Camera Back
Battery Compartment/Cover
Data back Contacts
Tripod Socket
DX Contacts
Film Chamber
NAMES OF PARTS
27
28
29
30
31
32
33
34
37
38
39
40
41
35
42
44
36
43

mad-paris.com6
Set the focus-mode dial to “SAF” and the drive mode dial to “S”
(see page 29, 22).
Set the Shutter Speed
Dial to “AUTO”
(see page 21).
Set your desired aperture
(see page 42).
Aim the focusing frame at your subject, and depress the shutter
halfway. The focusing mark turns on. Press the shutter release and shoot
(see page 30).
BASIC STEPS
6
6 7
7
8
8
9
9

mad-paris.com7
Be sure the main switch is “OFF” before replacing batteries.
Use a coin to turn the battery compartment cover as
shown and remove the cover.
Load two new 3V lithium batteries (type CR2) in
the compartment with polarities aligned as shown.
• If battery polarities are not aligned correctly, the camera
will not operate and may be damaged.
Replace the cover screw.
LOADING THE BATTERIES
1
2
3

mad-paris.com8
<Battery Check>
After the batteries are loaded, operate the camera first,
the battery voltage is normal if the mark “ ” (battery
warning mark) does not appear in the display panel.
<Battery Replacement>
If the mark “ ” turns on in the display panel, it is time to replace
the batteries. Set the main switch at “OFF”, open the battery
compartment cover and replace the batteries with new ones.
• Though you can take a picture even after the mark “ ” has
turned on, it is recommended to replace the batteries as soon
as possible. Be careful because the mark “ ” will blink or
go out and the camera will no longer operate if the battery
capacity has dropped below the eective limit.
• Some batteries may tend to decrease their voltage temporarily
when they are loaded. You need not worry about this because
they recover their performance when the power is turned on.
If the mark “ ” appears soon after the new batteries are
loaded, turn o the main switch and then turn it on again.
If the mark " " goes out, you can use these batteries.
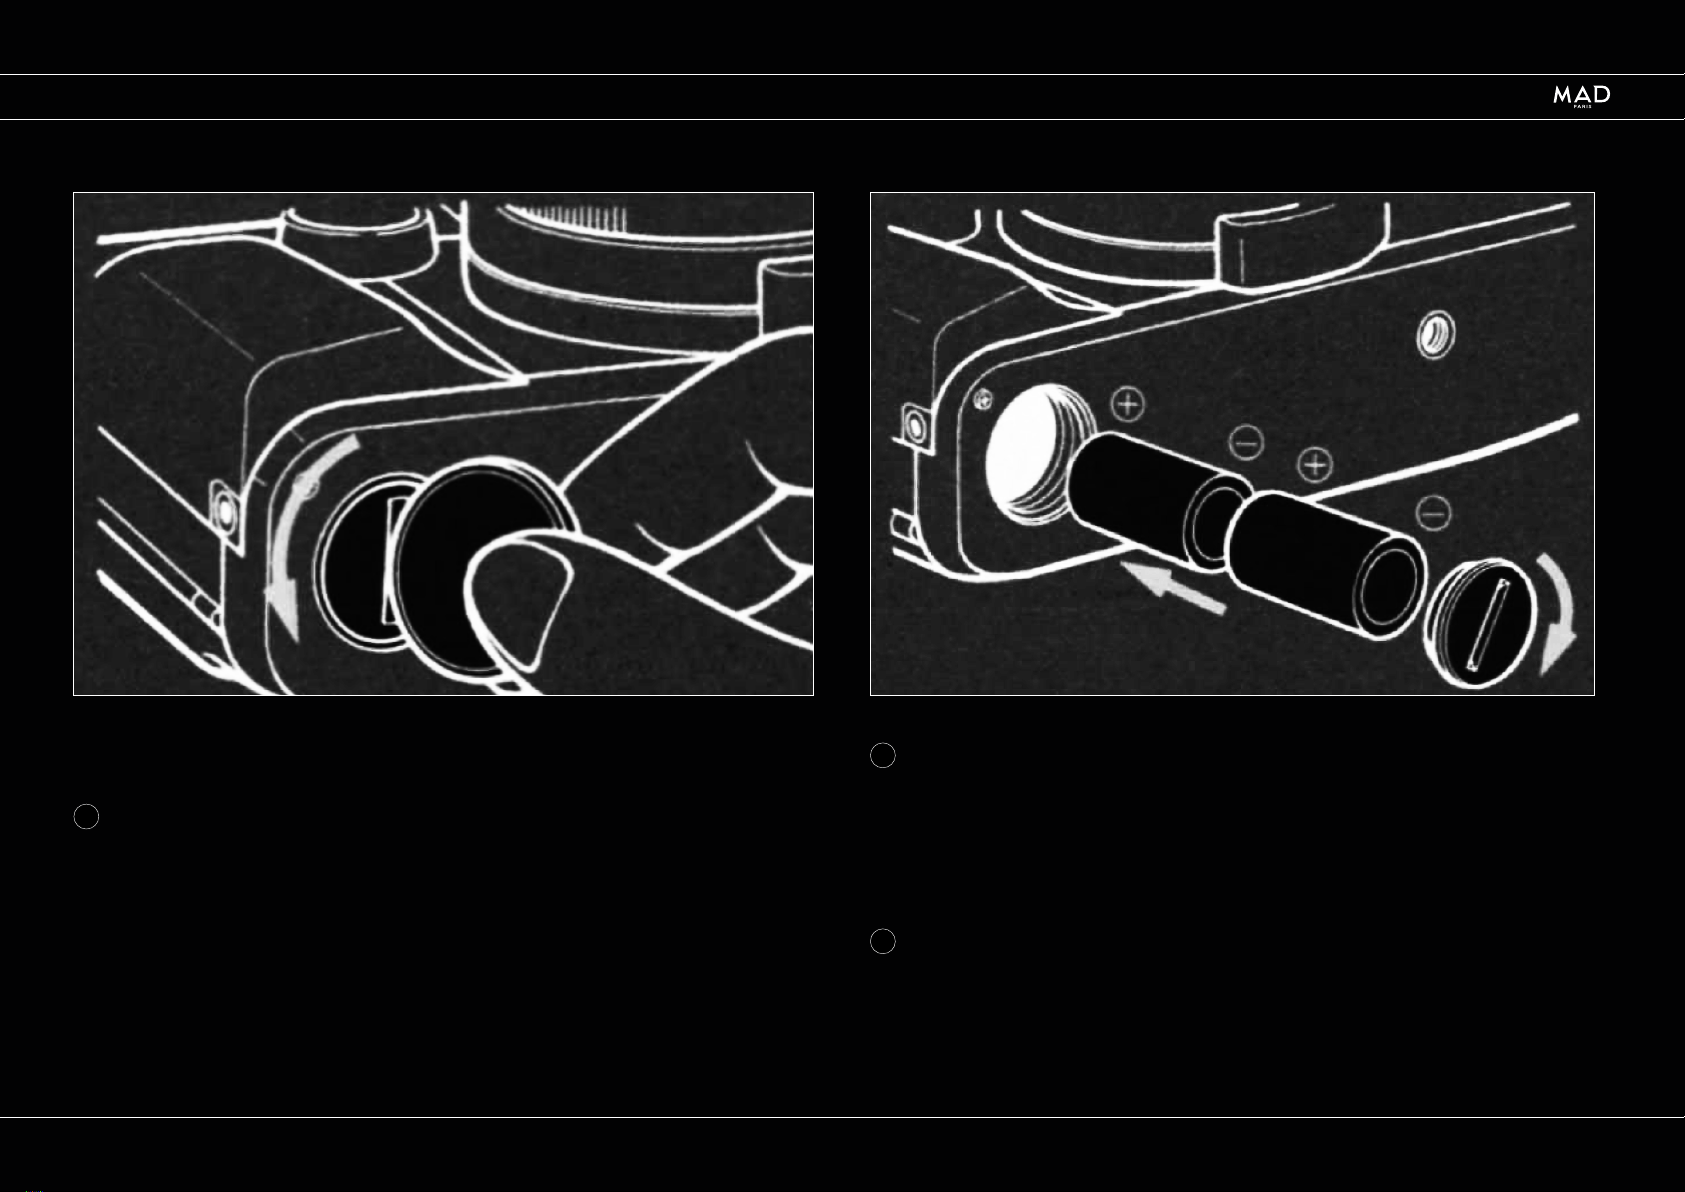
Replace the batteries
<Battery Precautions>
• Always replace the batteries with new ones of the same type.
Do not mix dierent kinds of batteries or new and old batteries.
Always use two new batteries of the same type and brand.
• Generally, battery performance is reduced by cold
temperatures. If you are shooting in cold weather, it is advisable
to keep the camera warm in a bag or an outfit for protection
against cold. The battery reduced by low temperatures
will return to normal when you take pictures at
an ordinary temperature.
• Before loading the batteries wipe both poles clean with
a dry cloth because poor contact may result if they are
soiled with sweat or grease.
• If you are going on a long trip, bring new spare batteries
with you.
• Do not throw used batteries into fire or try to change or
disassemble them because it is dangerous.
• The 3V lithium battery (CR2) cannot be charged by any means.
• Battery should be kept away from children.
LOADING THE BATTERIES

mad-paris.com9
<Mounting the Lens>
First, remove the camera’s body cap and the lens’ rear cap.
Then, holding onto the lens grip ring, align the red dot on
the lens with the lens index mark on the camera body, insert
the lens into the body and press in while turning the lens
clockwise (the direction of the arrow in the illustration).
Turn the lens until it locks into place with a “click.”
• If the lens is not properly mounted, or the red dot is not
correctly aligned with the lens index, it will not lock with a click.
In this case, remove the lens from the camera once. Then, turn
the lens mount ring (shaded portion) and the lens grip ring in
the direction of the arrow fully, as illustrated, to mount the lens
on the camera again.
This part does
not rotate
Lens
grip ring
Lens mount
ring
Lens
grip ring
MOUNTING AND DISMOUNTING THE LENS

mad-paris.com10
<Dismounting the Lens>
When holding the lens grip ring and pressing in the middle of
the lens release button, turn the lens counter-clockwise as far as
it will go and pull it out towards you. After dismounting the lens
from the camera, protect the lens with the lens cap and rear cap,
and the camera with the body cap.
• Do not touch the lens surface and camera inside, contacts
and so on with your fingers when mounting and dismounting
the lens.
• Avoid direct sunlight or other bright light when changing
the lens with film loaded in the camera.
• Do not leave the camera in direct sunlight for extended periods
of time when the lens is detached from the camera.
• Always mount and dismount the Hologon 16 mm F8 lens by
holding the lens guard.
When the lens is dismounted from the camera, the aperture
ring operation range will change, but this is not a malfunction.
The range will return to normal when the lens is mounted to
the camera.
Lens grip ring
This part does not rotate
MOUNTING AND DISMOUNTING THE LENS

mad-paris.com11
The main switch turns on and o the camera and sets it for AE
lock (AEL).
• The main switch should be locked at a click position when
shooting to prevent it from shifting by mistake.
OFF: Red mark not visible
When the red mark is not visible, the main switch is set
at OFF, turning o the camera. If you are not using the camera,
turn o the main switch to prevent the shutter from tripping
inadvertently.
“ON” mark
The camera’s power is turned on. Usually, set the switch in
this position.
“AEL” mark
The AE lock is useful for shooting backlighted subjects
or if you want to shoot moving subjects continuously with
a fixed exposure.
For details on AE lock, see page 48.
O position On position
Red mark
MAIN SWITCH

mad-paris.com12
The display in the viewfinder will turn on in the following cases,
then turn o automatically after 16 seconds.
(1) When the main switch is turned on.
(2) When the main switch is set to ON, and either: the shutter
release is depressed halfway, or the focus dial or focus lock
button are operated.
If you switch a button, dial, etc. while the display is shown,
the display will remain on for another 16 seconds.
(The illustration shows all information available in the viewfinder for reference.
It does not represent an actual example of display.)
DISPLAY IN THE VIEWFINDER
Picture Area Frame
When the shutter release is depressed halfway, the picture area frame on
display changes automatically according to the shooting distance, lens focal
length, etc. To shoot, place your subject within the displayed frame.
Focus Frame
Place your subject to focus in this frame.
Flash Mark
If your are using the TLA flash system for taking flash pictures, the flash “ ”
will turn on as soon as the flash is fully charged. If your subject is correctly
exposed, it will blink two seconds after the flash has fired.
Exposure Compensation Mark
The “+” or “-” mark will light when exposure compensation is performed
with the exposure compensation dial, or A.B.C. mode.
Focusing Indicator
Shows the condition of focus. For details, see the section “Focusing the lens”
on p. 26.
Shutter Speed/Shooting Distance
Normally, displays the shutter speed from 1/6000 second to 16 seconds, in
1/2 step intervals. On the scale, “6000” means 1/6000 second, “200” means
1/200 second, and “16” means 16 seconds.
When the focus lock button is pressed in the “MF” (manual focus) mode,
the display indicates the shooting distance to the subject (the display is
shown only while the button is held depressed).
Exposure Mark
In the auto exposure mode, the over “ ” or under “ ” mark indicating
deviation from the exposure control range will be displayed. In the manual
mode, the correct “ ”, over “ ” or under “ ” mark will be displayed.
1
2
3
4
5
7
5

mad-paris.com13
<Display Panel>
(The illustration shows all information available in the display panel/
exposure counter for reference. It does not represent an actual
example of display.)
ISO/DX Indicator
When displaying the film speed or in the film speed setting
mode, this indicator will be displayed.
• When auto mode is set with DX code, always “DX” is displayed.
Multiple Exposure Mark
Shooting Distance/Film Speed Indicator
When the shutter release is depressed halfway, the shooting
distance is displayed. If the ISO button is depressed, however,
it switches to display the film speed.
It also shows the setting condition for custom functions.
Battery Warning Mark
It turns on when it is time to change the batteries.
<Exposure Counter>
The exposure counter normally shows the number of
exposures on a film. It also provides the following functions:
• Display of the operation order in the “A.B.C.” mode.
• Display of the end of the film.
• Remaining operating time in self-tome mode.
• Elapsed time during bulb exposure (B) mode.
DISPLAY PANEL/EXPOSURE COUNTER
1
2
3
4

mad-paris.com14
This camera has a built-in dioptre adjustment unit. To adjust
the viewfinder eyepiece to your eyesight, turn the dioptre
adjuster until the focus frame in the centre of the viewfinder
appears sharp and clear. The adjustable range is from
+0.3 to -2 dioptres.
If the built-in dioptre adjustment provides insuicient
compensation for your eyesight, an optional dioptre lens,
The range of dioptre adjustments possible with and without
optional lenses.
Dioptre Lens Range of Adjustment
None +0.3D ~ -2.0D
GFL (-4) -3.0D ~ -5.0D
GFL (-2) -1.0D ~ -3.5D
GFL (+2) +3.0D ~ +0.4D
DIOPTRE ADJUSTMENT

mad-paris.com15
<Installing a Dioptre Lens>
When installing a dioptre lens, hold the
camera with the viewfinder eyepiece
pointing upward, to help prevent the
dioptre lens from dropping out. Also,
take care in handling so as not to soil
the dioptre lens when installing it.
As shown in the illustration, while pressing the pointed end of the camera strap
stopper in the hole on the side of the viewfinder eyepiece, lift up and remove up
the eyepiece frame.
Place the dioptre lens inside the eyepiece frame.
Fit the pins on the left side of the eyepiece frame into their holes, and press down
the frame to its original position.
Camera strap stopper Dioptre Lens
Fit in while pushing in this direction
DIOPTRE ADJUSTMENT
1
1
2
3
32

mad-paris.com16
Open the camera back by erecting and rotating
the camera back release knob in the direction of the arrow.
After the camera back is opened, replaced the knob in place.
• When loading film, be sure to remove the protective sheet in
the camera’s picture area frame.
Insert the film cassette slantwise into the film chamber
with its protruding end downward as illustrated.
Note on the shutter curtain:
The shutter curtain is a precision part. Never touch it with
your finger or strike it with the film tip. When the film tip lies
on the shutter curtain, in particular, never trip the shutter.
• Take care not to touch or contaminate the DX contacts
and data back contact.
• Always load and unload a film in subdued light.
Data back contacts
LOADING THE FILM
1
1
2
2

mad-paris.com17
Pull out the film tip as far as
the orange “I” mark and place it
on the spool.
Take care that the film does not float up
(see illustration).
• If the length of film protruding from
the cassette is too long, adjust it by
winding film back into the cassette
before loading the film.
Close the camera back securely.
As soon as the camera back is closed, the film advances automatically and stops
when the exposure counter shows “01”.
• If the exposure counter blinks at “00”, the film is not advancing properly.
Open the camera back and reload the film correctly.
LOADING THE FILM
3
3
4
4

mad-paris.com18
When DX automatic film speed
setting is used
<Checking the Film Speed>
With the main switch set to ON, if the ISO button is pressed,
the film speed (ISO number) will appear in the display panel
for about 16 seconds. When DX automatic film-speed setting is
used, “DX” will appear in the display.
• If the shutter release is depressed halfway while the film speed
is displayed, the display will return to the shooting
distance display.
When manual film speed setting
is used
If “DX” is displayed in the display panel, the film speed is
automatically set by the DX code. When using film with DX code,
no adjustment is required. Without the “DX” mark, be sure to
set the film speed manually.
SETTING AND CHECKING THE FILM SPEED

mad-paris.com19
• Automatic Setting Mode:
If the film speed is set to “DX” and
you are using DX film, the camera will
automatically set itself to the speed
of the film you are using.
• You can set the film speed in 1/3 step increments in a range
of ISO 6 to 6400.
• When the film speed (ISO number) has been set manually,
that manually set speed will be used even if DX code film is
later loaded in the camera.
<Setting the Film Speed>
The film speed can be set in two ways: automatic setting mode
with DX codes and manual setting mode.
DX films are available in a range of ISO 25 to 5000. The DX
mark and film speed are printed on the film box.
• Manual Setting Mode:
Set the film speed as you desire. If
you are using non-DX film, or if you
want to change the film speed from
that of the film you are using, set
the film speed manually.
Turn the main switch on. If you press and hold on the ISO
button for about 1.2 seconds or more, the display of the film
speed in the display panel will start to blink.
After blinking, remove your finger from the button.
Hold depressed for about 1.2 seconds or more
SETTING AND CHECKING THE FILM SPEED
1
1
Table of contents