NIKKORMAT FT2 User manual


tikkormat
INSTRUCTION
MANUAL

NOMENCLATURE
Neck Strap Eyelet
Self
-Timer
Trips
theshutter
in 8
seconds
delay.
Shutteb'-Speed
Lever
a,
fd
ikkprrtt&t 'r-
Meter Coupling Pin
Couples the exposure meter
to the lens' auto diaphragm.
Mirror Lock
Slide
downward
to lock the
mirrorup out of theoptical
parh.
Lens ReleaseButton
Unlocks the lens for
removing or changinglenses.
ASA Lock
Shr.rtter-Speed
Index
Align with the desired
shutter speed.
Camera
Back
Press
to open
back.
Latch
the camera
ASA Film-Speed Index
Adjusts the meter for the
speed
of the film used.
ASA Film-Speed Scale
Range: t2-1.600
ASA.
Tripod Socket
Battery Chamber
Houses the silver-oxide
battery that powers the
meter.
Rewind Button
Press
to rewind the film.
Carnera Back
Hinged to swing open from
the side.
www.orphancameras.com

Aperture/Distance Scale I
ndex DistanceScale
lnfrared
Lines
up
distance
Mark
with the prefocused
to compensate
in focus.
Depthof-Field Scale
Color-coded markings give
depth-of-field at different
apertures.
Focusing
Ring
Easy-to-grip,
knurled surface
for quick, accurate
focusing.
ApertureScale
il/leterCoupling Prong
Connects
to themeter
coupling
pin.
Shutter-Speed
Scale
Speeds
from 1/1000
to 1
second
plusB.
Shutter Release
Button
(With screw
thread
for cable
release).
Frame
Gounter
Indicates the number of
frames exposed.
Film-Advancs Lever
Advances the film, cocks
the shutter and operates
the frame counter. Also
switches the built-in
exposure meter on or off.
Film-Plane
Indicator
Shows
theexactpositionof
the film plane.
for shift
Aperture Ring
Sets
the lensdiaphragm
the desired f/number.
meter is set for the
maximum aperture of the
lensbeing used.
to
Depth-of-Field
Preview
Button
Press
to preview
how much
background
or foreground
is
in or out of focus.
Flash
Terminal
Acceots
aflash
:cepts a flash
nch cord.
RewindCrank
Fold out to rewind the film.
Meter
Window
AccessoryShoe
FinderEyepiece
Permits
co
mfortableviewing,
composingandfocusing.
Hot-Shoe
&ntact

CONTENTS
Nomenclature 2
5
6
8
Depth-of-Field Scale 20
Foreword Changing
the Lens
LensMounting 22
Loading the Camera 22
Film-Plane Indicator Maximum-Aperture Scale 23
Film-Advance Lever 8 Self-Timer 24
Frame Counter 9
9Mirror Lock 24
Film-Speed (ASA) Setting Infrared Photography 25
Exposure Controls L0
1.1
11
T2
1.2
L3
T4
15
L6
L7
18-
L9
tg
Silver-Oxide Batter.v 25
Setting the Shutter Speed Exposure Measurement: Special
Cases
-2 6
6
7
Setting the Aperture
Exposure Measurement Stop-Down Exposure Measurement
- 26
Repro-Copying
Turning On the Meter Slide
Copying 27
28
28
29
29
29
30
31
3L
Centering the Needle Accessories
Getting the Right Exposure Lens
Hoods
How to Hold the Camera Filters
Focusing EyepieceCorrection Lenses
Shutter Release Finder
Eyecup
Flash Synchronization CameraCare
Depthof rield Features/Specifications
Depth-of-Field Preview Button Nikon Warranty
www.orphancameras.com

!
t';
'v-
114
'i;tr
'; t
FOREWORD
The Nikkormat FT2 offers the high quality
performanceand
durability commonto Nikon
cameras,but with the basicsimplicity of de-
sign that has made the Nikkormat camera
popular with amateurand professionalalike.
Systematically-positionedcontrolsfor picture-
taking ease,
a convenient
flash
unit mount for
simplifiedflash
photographyandthe extensive
possibilities
of the Nikon System of Photo-
graphyfurther enhance
the capabilitiesof the
Nikkormat FT2.
To ensure
you get the bestresults
from your
Nikkormat FTz. read this instruction book
carefully and practice usingthe controls be-
fore you load film into the camera.Follow
thesuggestions
on cameracareon page
30 and
you will receivemanyyears
of reliable
service.
The Nikon Warranty which comeswith your
Nikkormat FT2 is your assuranceof prompt,
courteous
service
andcompletesatisfaction.
5

L0AmfiruffiT&4ffi
ffieMffiK&
Press
down the camera back latch on the side of the
cameraand the hinged back will springopen. Pull up
on the rewind knob and drop a film cartridge into the
film chamber with the film leader pointing towards
the take-up spool. Now, push down the rewind knob
to hold the cartridge in place and insert the end of
the film leader into any one of the three slots in the
take-up spool. Rotate the talce-up spool as shown in
the illustration sothat the'film passesunder the spool
with its emulsion side (dull side)facing out. Make sure
that the perforations along the edgesof the film mesh
with the sprockets.
Close the camera by pressing on the back until it
snaps
into place. Fold out the rewind crank and turn
it gently in the direction of the arrow until you can
feel a slight tension. This will take up any slack in the
film cartridge. Be careful not to exert too much pres-
sureon the rewind crank.
Loading exposes the first few inches of the film. To
dispose of this exposed film, wind the film advance
www.orphancameras.com
leverand make two blank exposures. Watch the rewind
knob to seeif it rotates in the direction opposite the
arrow while the film is being advanced. This will
indicate that the film has been loaded correctly and
is being advanced.
The frame counter on top of the camerashould now
rest at "0". Advance the film one more frame and
you are ready to take the first picture.
Caution: Do not load the c&nerain bright sunlight.If no
othershadeis available,
shade
the camerafrom thesun
with
vour bodywhileloading. ).
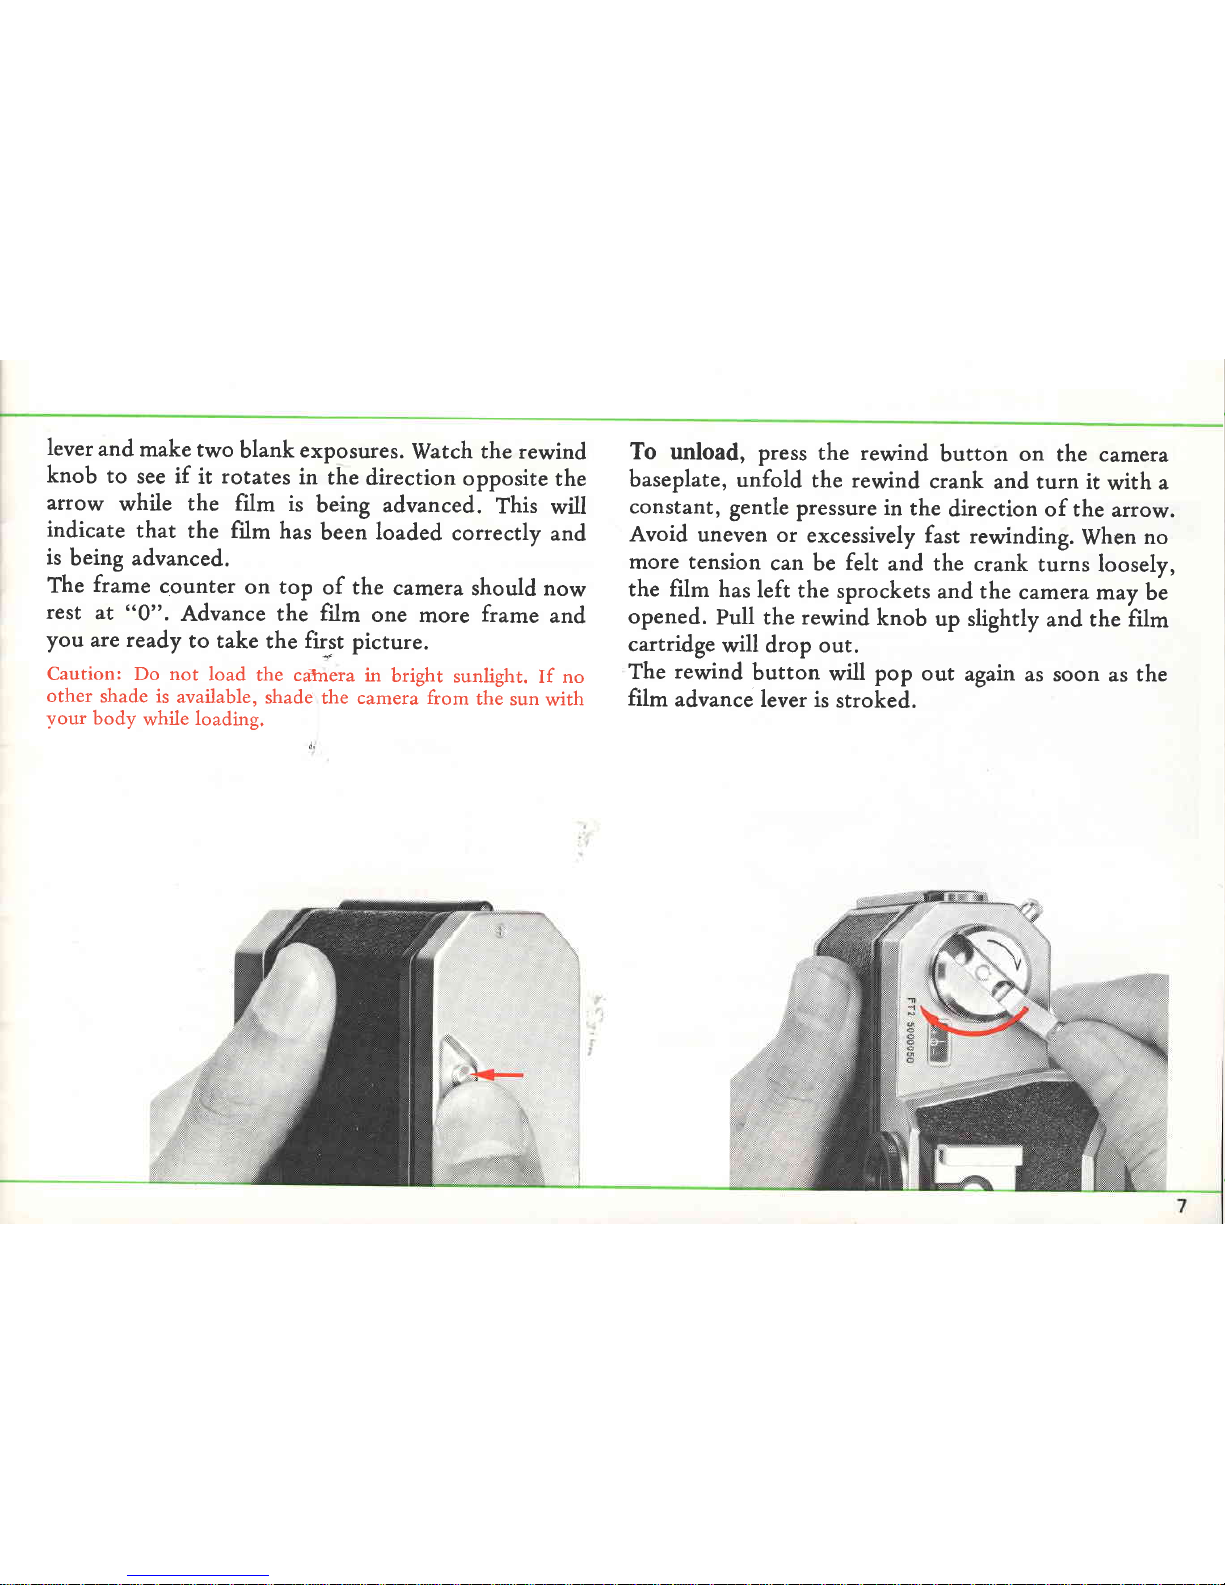
To unload, press the rewind button on the camera
baseplate, unfold the rewind crank and turn it with a
constant, gentle pressure
in the direction of the arrow.
Avoid uneven or excessively fast rewinding. When no
more tension can be felt and the crank turns loosely,
the film has
left the sprocketsand the cameramay be
opened. Pull the rewind knob up slightly and the film
cartridge will drop out.
The rewind button will pop out again as soon asthe
film advance lever is stroked.

LOADING
THECAMERA
Film-Plane
Indicator
The (+) mark on top of the camera body shows the
exact position of the film plane. This is important to
know when measuring the film-to-subject distancq,
especially
in close-ups
and macrophotography'
Film-Advance
Lever
The film-advance lever simultaneously advances the
film, cocks
the shutter and oPerates
the frame counter'
It also servesas an on-off switch for the exPosure
meter.
Stroke the film-advance lever with the right thumb in
a singlestroke. A built-in locking devicePreventsthe
shuttler from beins released unless it is fully cocked
and the film hasbJen "drranced a full frame.
The film-advance lever springsback to its original posi-
tion, with ample clearance for the thumb, after each
stroke. However, the meter will remain in the "on"
position until the lever is pressed flush against the
camera
body.
Caution:
Be careful
not to pushtherewind
button (on the
camera's baseplate) during film advance operation' Should
this occur, temporary stoppage
of fi1m transport and double
exposureof the negative
may result.
\
\\
\\
\:
- ---l
www.orphancameras.com
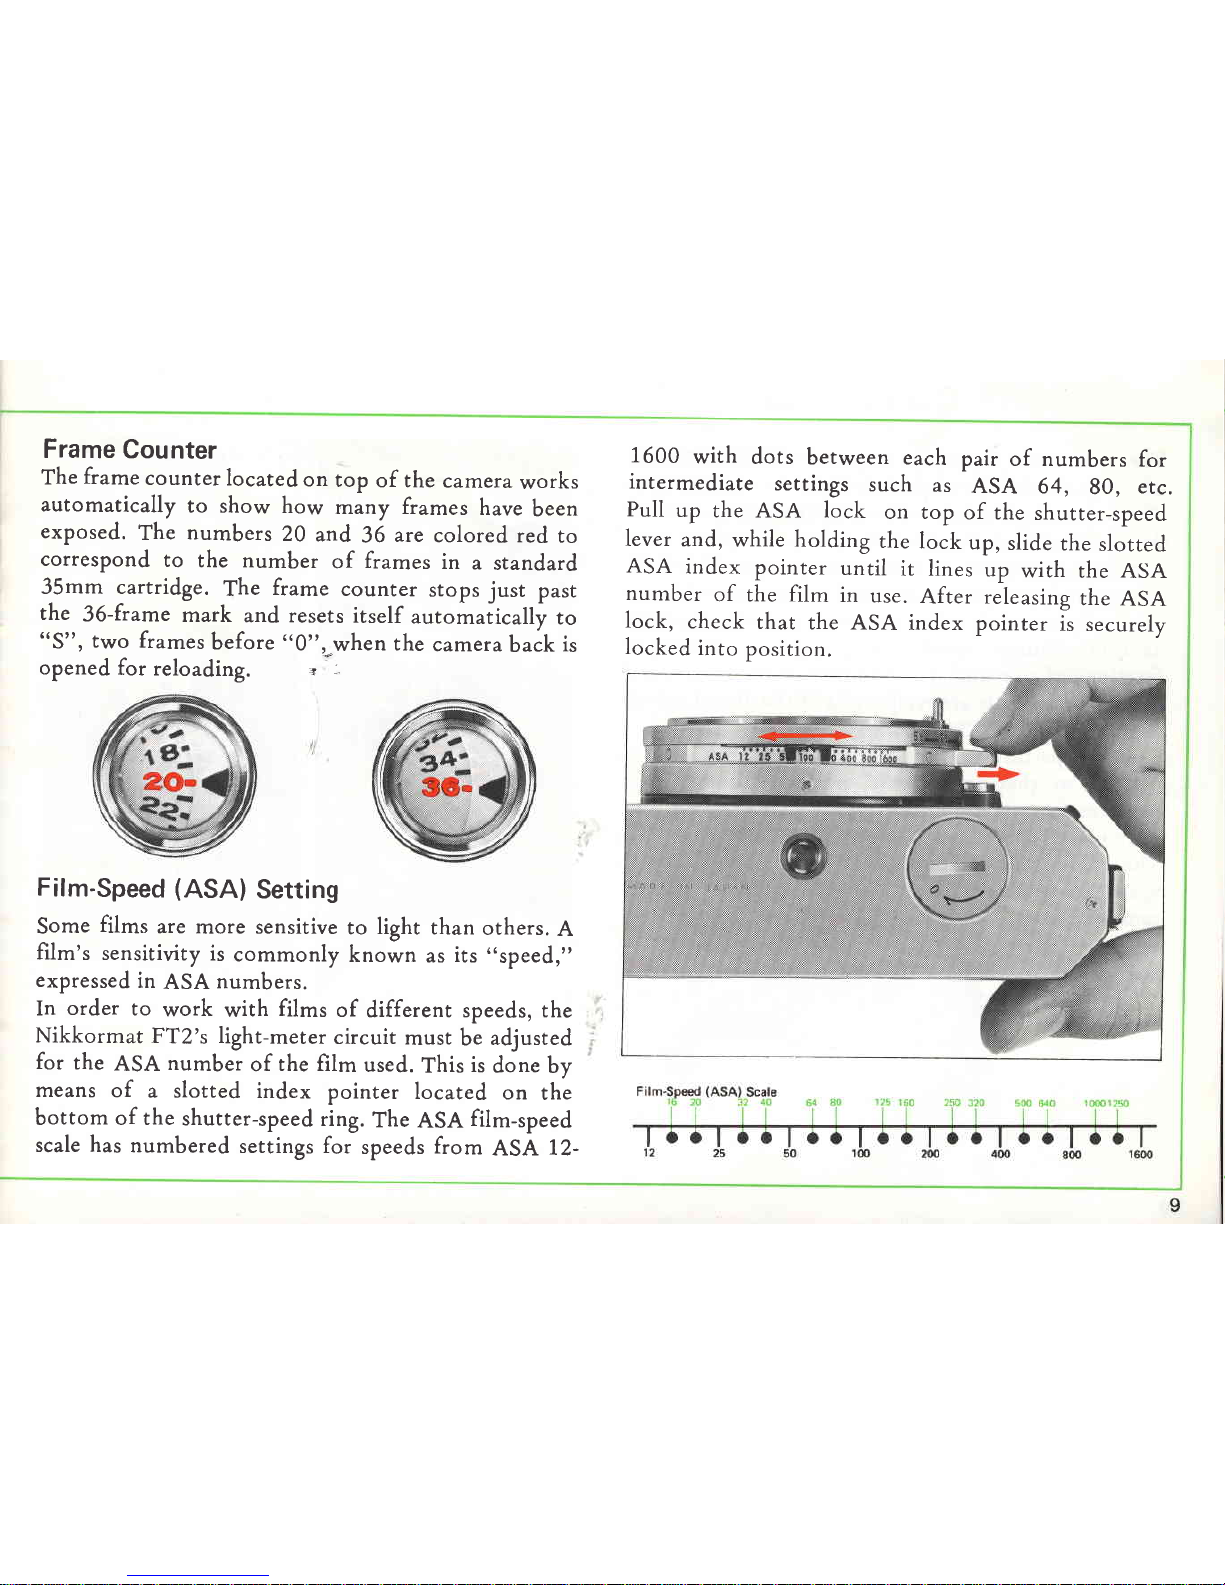
Frame
Counter
The
frame
counter
located
on top of the camera
works
automatically to show how many frames have been
exposed.
The numbers 20 and 36 are colored red to
correspond to the number of frames in a standard
35mm cartridge. The frame counrer stops just past
the 36-frame mark and resets
itself automaticallv to
"S", two frames
before "0"*when the camer"b"ik i,
openedfor reloading. ?
Film-Speed
(ASA) Setting
Somefilms are more sensitive
to light than others.
A
film's sensitivity
is commonly known asits "speed,"
expressed
in ASA numbers.
In order to work with films of different speeds,the
Nikkormat FT2's light-meter
circuit musrbe adjusted
for the ASA number of the film used.
This isdoneby
means of. a slotted index pointer located on the
bottom of the shutter-speed
ring.The ASA film-speed
scalehasnumbered settingsfor speeds
from ASA 12-
1600 with dots between each pair of numbers for
intermediate settings such as ASA 64,80, etc.
Pull up the ASA lock on top of the shutter-speed
lever and, while holding the lock up, slide
the slotted
ASA index pointer until it lines up wirh the ASA
number of the film in use. After releasing
the ASA
lock, check that the ASA index pointer is securely
locked into position.

HxpffiSuffiffi
C0NTffiSL$
The amount of exposurethe film receives
is determin-
ed by a combination of shutter speed
and aperture.
The largerthe lensaperture,
the more exposure.Like-
wise, the slower the shutter speed the greater the
exposure. Aperture is expressed
in f/numbers with
larger
numbers representingsmalleraperturesand vice
versa.For example, f/8 givestwice as
much exPosure
as fl1J. Shutter speed is expressed
in seconds
or
fractions of a second.
Th€ numbers on the Nikkormat
shutter-speed
scalearereciprocalsof the actual speeds
(250
represents
L1250second,
etc.).
Camera aperture and shqtter-speed controls ate caI-
culated so that an increase of one f/number com-
pensates
for a one-step
decrease
in shutter speed.For
example, Ll25O at fl8 is equivalent
to I11,25
at flt!.
The table below shows how aperture and shutter-
speed are interrelated. All the combinations give the
same
exPosure.
Aperture f
11.4 fl2 il2.8 fl4 il5.6
Shutter speed
(seconds) 1/500 1t250 11125 1/60 1130
www.orphancameras.com
Setting
the Shutter,
Speed
Shutter speeds
are
controlled by a ring around the base
of the bayonet mount rather than ihe usual dial on
top of the camera body. To set the shutter speed,
Fasp the lever and turn the ring until the desired
speed
appears
next to the indicator dot on the front
of the camera body. For added convenience when
measuring
exposure,
the shutter speedin useas
well as
the next highest and lowest speeds appear in the
bottom of the viewfinder, sothe shutter speed
canbe
adjusted while observing,the exposure meter needle.
Click-stoppedsettingsforrshutter speeds
from 1/1000
to 1 second plus "B" are engraved on the shutter-
speed ring. At the "B" (bulb) setting, the shutter
remains open aslong asthe shutter release
button,is
depressed.
Note: lntermediate
shutter-speed
settings
are not recom-
mended
exceprin the Il25O ro 1/1000 second
range.
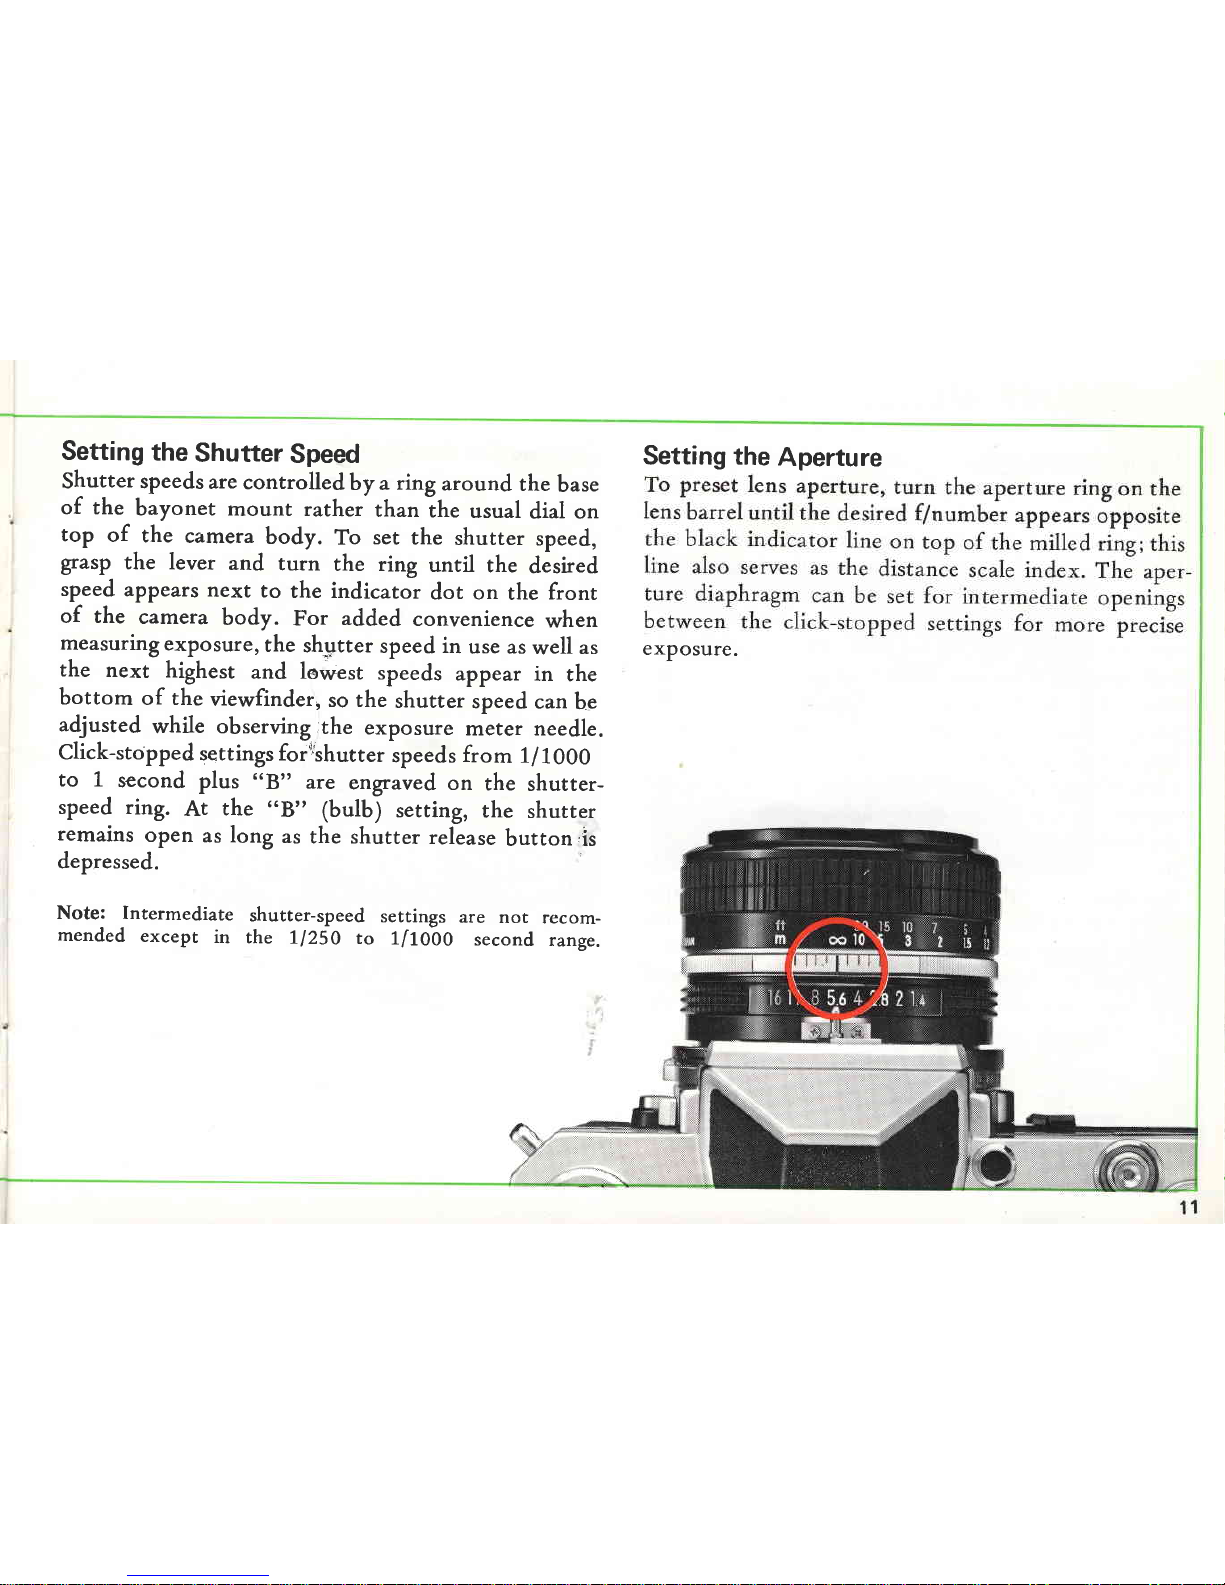
Settingthe Aperture
exposure.
EXPOSURE
MEASUREMETUT
The Nikkormat FT2 featur-gsa center-weighted thru-
the-lens exposure metering system cross-coupled
to
the shutter speed
and aperture controls. The meter
reads the light over the entire focusing screenbut
favors a central area. This means that correct ex-
posures are possible even in situations where an
averagedreading would result in wrong exPosure-
with strong backlighting, fgr example.
Full-Aperture Exposure Measurement
The FTz meter takes advantage of automatic dia-
phragm feature of Nikkor Auto Lenses to measure
light at the maximum apefture of the lens.This insures
a
tright viewfinder imagefor viewing and focusing and
minimizes the influence of light entering through
the finder eyepiece.
In order for the FT2 meter to measure
exPosure
at
full aperture with lensesof different maximum aPer-
ture, it must be coupled with the maximum aPerture
of the lensin use.
This is done eachtime the lensis
attached or changedby turning the aPerture
ring of
the lens through its entire range (see
"Changing the'
Lens,"p.22,). r
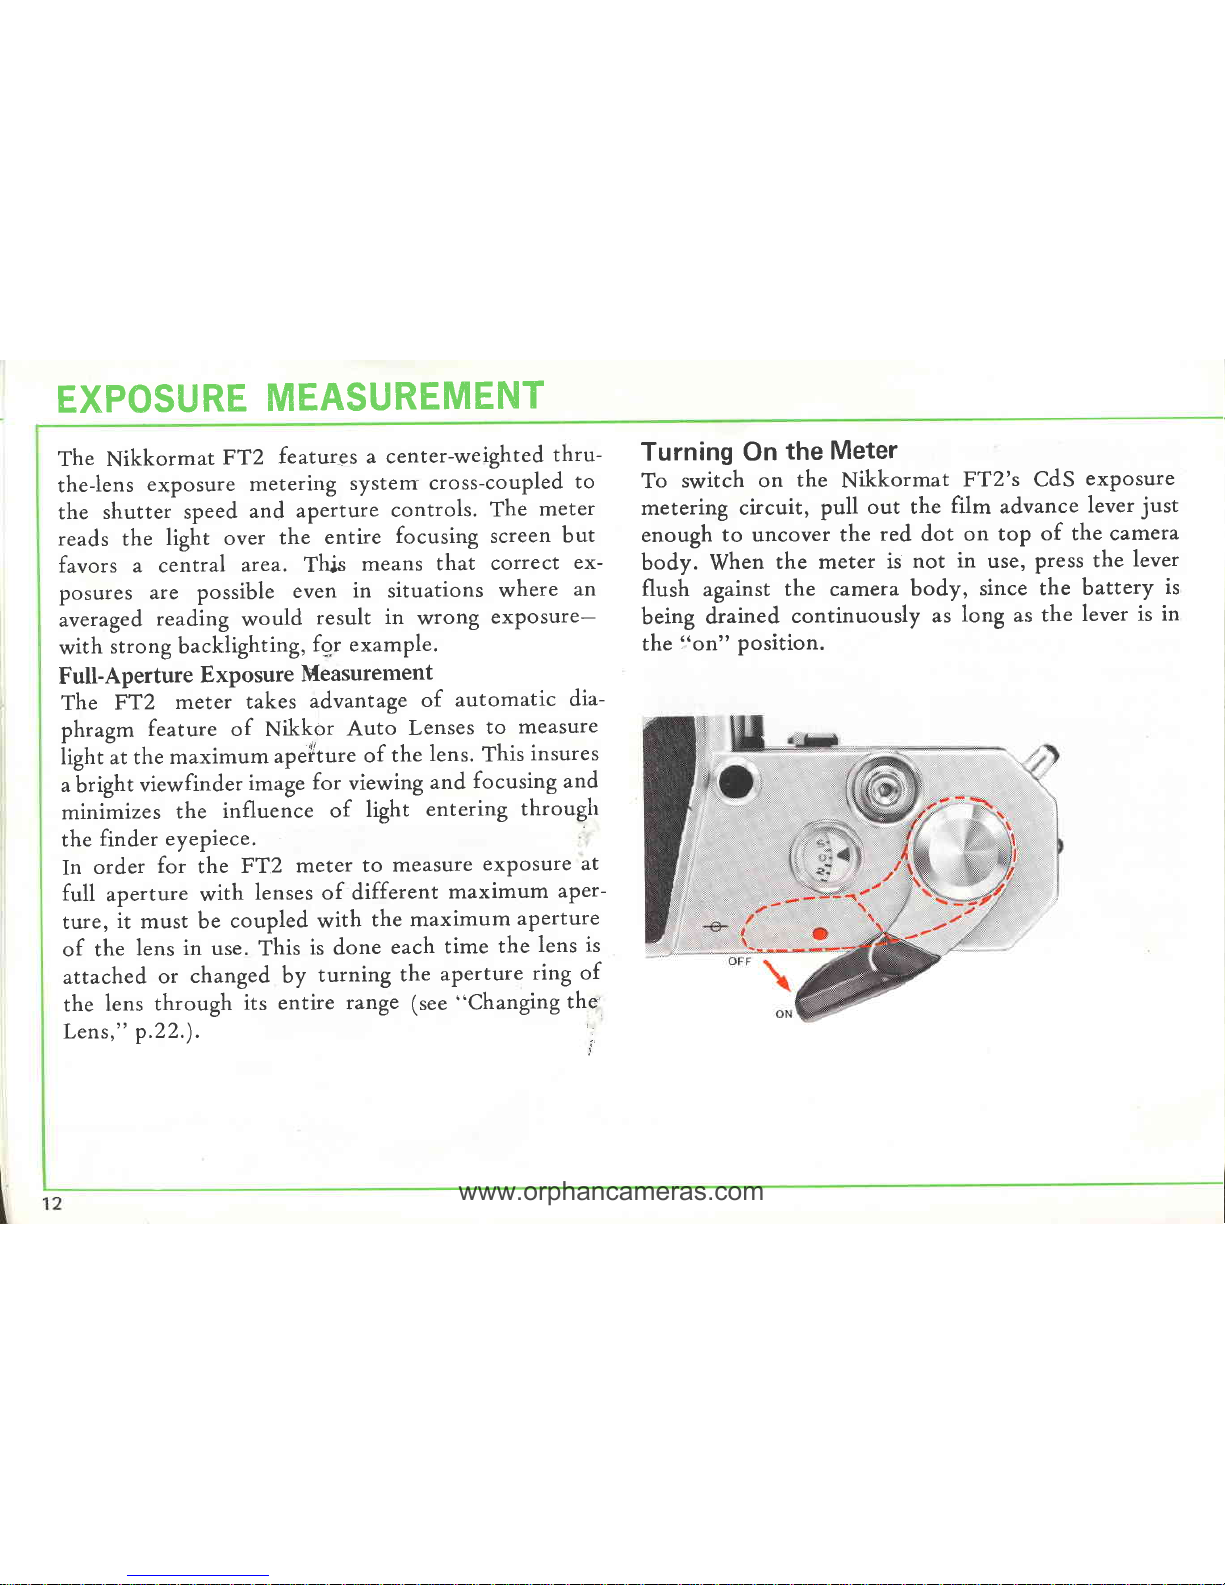
Turning On the Meter
To switch on the Nikkormat FT2's CdS exposure
metering circuit, pull out the film advanceleverjust
enough to uncover the red dot on top of the camera
body. When the meter is not in use, Press
the lever
flush against the camerabody, since the battery is
being drained continuously as long asthe lever is in
the i'on" position.
www.orphancameras.com
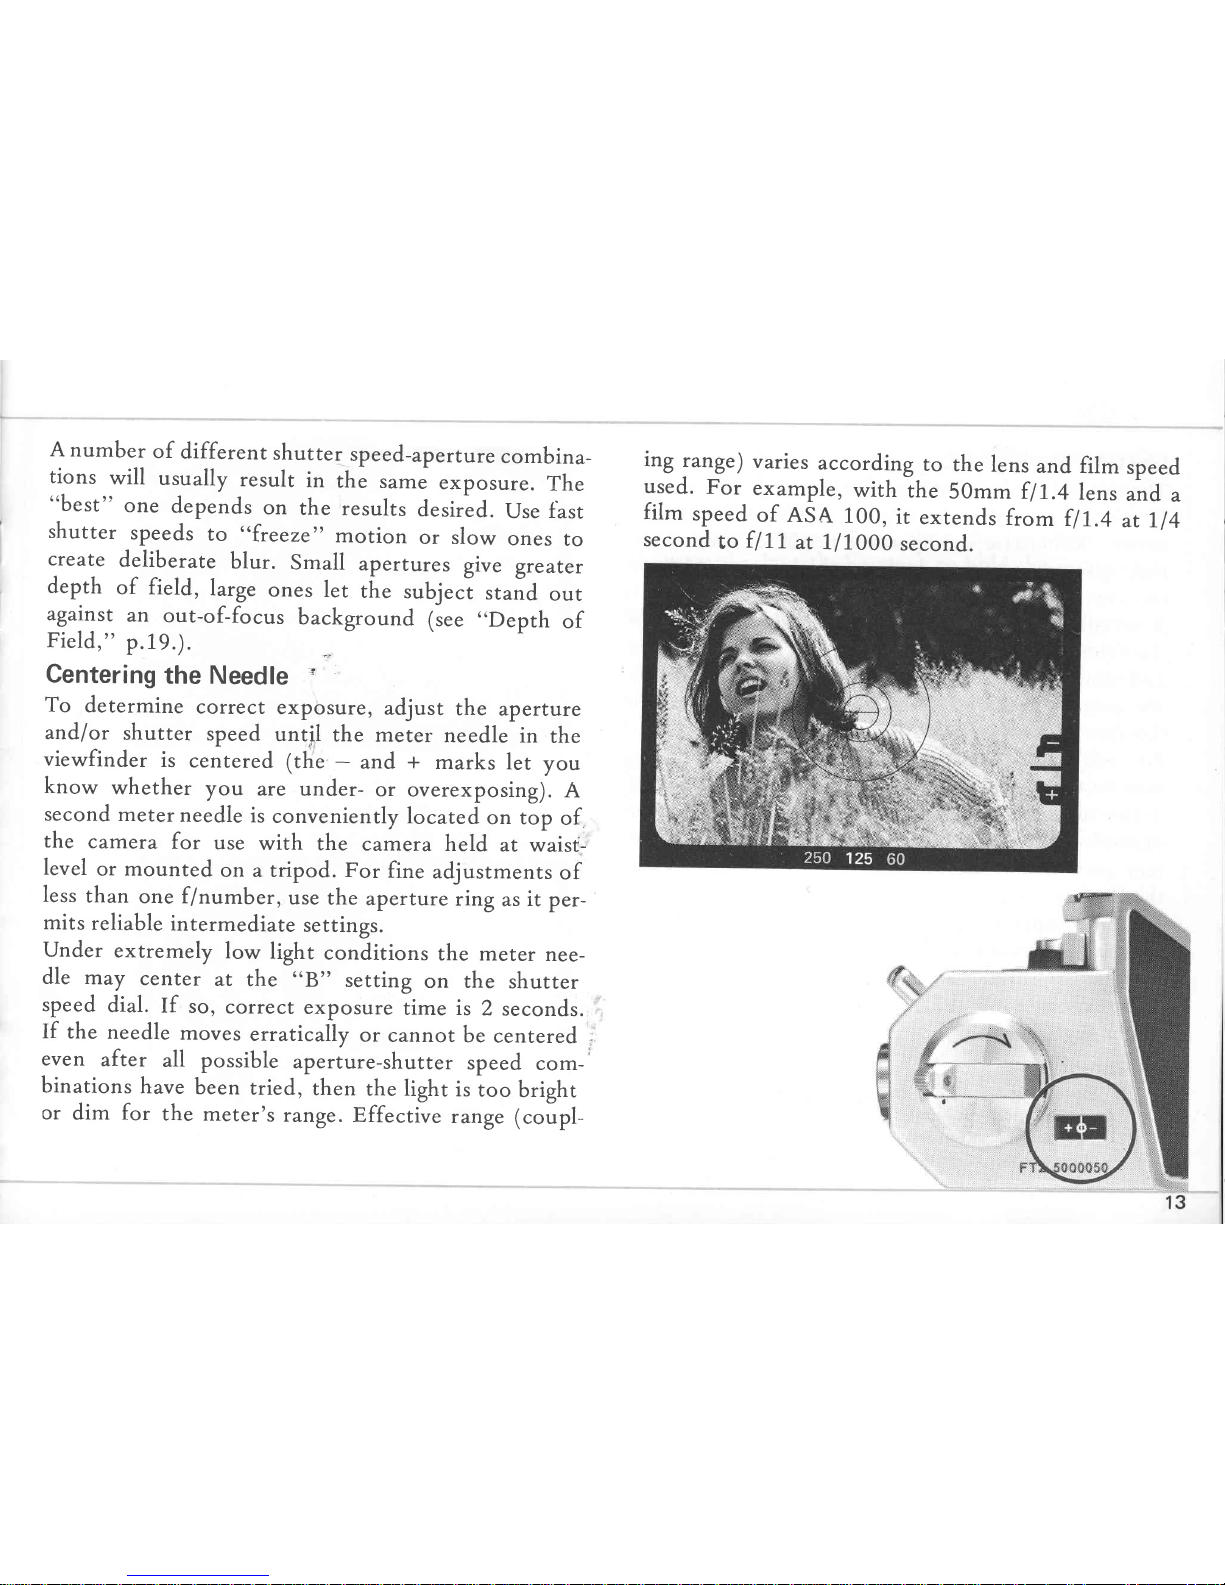
A number of different shutter speed-aperture
combina-
tions will usually result in the sameexposure. The
"best
" one dependson the results desired.
use f
ast
shutter speeds
to "freeze" motion or slow ones to
create deliberate blur. Small apertures give grearer
depth of field, large ones let tlre subjecl sta;d out
against
an out-of-focus background (see,,Depth of
Field," p.19.).
Centering
the Needle :
To determine correct exposure,adjust the aperture
and/or shutter speed until the meter ne
edle in the
viewfinder is centered (the - and + marks let you
know whether you are under- or overexposing).
A
second
meter
needle
isconveniently\ocated
on top of
the camera for use with the camera held at waist-
levelor mounted on a tripod. For fine adjustments
of
less
than onef/number, use
the aperture
ring as
it per-
mits reliable
intermediate settings.
under extremely low light conditions the meter nee-
dle may center at the (68" setting on the shutter
speed
dial. If so, correct exposuretime is z seconds.
If the needle
moves
erratic
ally or cannot be centeredj
even after all possible aperture-shutter speed com-
binationshavebeen tried, then the light is too bright
or dim for the meter's range.Effective range
(coupl-
ing range)varies according to the lensand film speed
used. For example, with the 50mm flt.+ lens ""a a
film speed
of RsR 100, it extends
from ilt.q at Ll4
second
to f l11.
at 1/1000 second.

EXPOSU
REMEASUREil/NENT
Getting
the Right Exposure
The central Eart of the focusing screen
should always
be aimed at the main subject when centering the
needle. Otherwise unimportant bright or dark areas
may give an exposure reading which is too high or
too low, resulting in under- or overexposure.
If an off-center composition is desired,first measure
thelight striking the main subject and setthe aperture
and shutter speed to cehter the needle. Then move
the camera until the desired composition appears
in
the viewfinder.
For subjects of unifornii tonal brightness, a reading
may be taken from any paft of the subject. However,
if the subject is contrasty (sidelighted portraits, for
example), measure
the light falling on the most impor-
tant part of the subject in which detail is desiredin
the final picture.
For landscapes including large areasof sky, tilt the
camera downward during measurement or fill the
center of the finder with the main subject to Prevent
underexposure of the main subject caused by the
bright skylight.
Photos:
L. Measuring
the bright area
in the center of the screen
will
causeunderexposure
of the main subject.
2. For correct exposure,first measurethe light striking the
main subject,
then compose
and shoot.
Exposure measurement
area
Picture
area
www.orphancameras.com

HOWTO HffiLffi
Tffiffi
ffiATffiffiffiA
Steady camera holding is important for best results,
since even the slightest camera movement at the
moment of exposure can result in an appreciable
loss
of sharpness,
especially at slow shutter speeds.
The
photographsshowthe best
way to hold the camerafor
rock-steady picture-taking.
Wrap the fingers of the right hand around the camera
body sothat the index finger rests
comfortably on the
shutter release button and the thumb fits between
the body and film advance lever. This way you can
stroke the film-advance without removing your eye
from the viewfinder. Cradle the camera in the left
hand for additional support, with the left thumb and
index finger grasping the focusing ring. The camera
may be switched from horizontal to vertical format
in this position.

Focusing is always done at full aperture with Auto
Nikkor lenses.
This gives
the brightest possible
image
on the focusing screen
for easy
viewing and comPos-
irg. It also minimizes depth of field so the image
snaps
in and out of focusdistinctly.
The Nikkormat FT2 focusing screen consists of a
matte Fresnel field with a central 3mm| split-image
rangefinder spot surrounded by a doughnut-shaped
1mm-wide microprism for rapid, accurate focusing.
Look through the viewfinder and turn the focusing
ring until the two halvesof the central rangefinder
image coincide to form d single,
sharp
image,
or until
the image in the microprism appears
sharp and crisp.
This focusingscreen
issuitable
for subjects
with both
straightlinesandill-definedcontours.
However,when
used with lenseshavin
g a maximum aperture smaller
than
f
I
+.5,
or
in close-upphotography,
therangefinder
spot is likely to darken. In this case,
focus on the
surrounding
matte field.
The lens can also be prefocusedusing the distance
scaleengraved
in both feet and meters on the lens
barrel.Line up the black indicator line on top of the
milled ring opposite the camera-to-subject
distance
as
measuredor estimated.
This technique
isuseful
for
candid shots of elusivesubjects
when time does
not
permit through-the-lens
focusing.
Microprism/split-imagescree
n
16
www.orphancameras.com

Out of focus
ShutterRelease
For sharp pictures, correct shutter releasing
isjust as
important as steady camera
holding. A quick, jabbing
movement of the finger on the shutter release
button
will result.in camera movement and blurred pictures.
Hold the camera
steadyas
shown previously, relax and
squeeze
theshutterrelease
with a gentle,
evenpressure.
For long time exposures
with the camera
mounted on
a
tripod, use
acablerelease.
The shutter release
button
is threaded to accept the Nikon F and Nikkormat
cable releases.For hand-held exposures at speeds
slower than L
ISO second, greater sharpness
."tt be
obtained if the shutrer release
is tripped by means
of
the self-timer.Setthe self-timermechanismin motion
(see
"Self-timer," p.24.), hold the camera
steady
and
wait for the timer to trip the shutter.
Caution: When mounting the camera
on a tripod, do not
over-screw
the tripod thread
into thecamera
tripod socket
as
it maydamage
thecamera
baseplate.
In focus
17

FLASH
SYNCHRONIZATION
The Nikkormat FT2 features-
an accessoryshoe with
built-in hot-shoe contact and automatic MX switch-
over via shutter speed
selection to facilitate the useof
various light sources.
Consult the table below to find
out which shutter speeds
are acceptablefor different
Note: Nikon speedlight units SB-2, SB-3 and SB-4 are not
available in North America.
Caution: Flash units without a hot shoe may fire accidentally
when being slipped into place or when a flashbulb is inserted'
Although not recommended, accidental firing may be prevent-
ed by covering the hot-shoe contact on the camera body with
electrical tape.
types
of flashbulbs.
the accessory
shoe on top cif the pentaprism housing'
Due to the built-in hot-hoe contact, the need for a
synch cord is eliminated for units with a hot shoe'
Fo. r.rnit, without a hot shoe, use a synch cord and
connect the threaded synch terminal on the camera
body to the synch socket on the flash unit' To prevent
acciiental eiectrical shock, the safety switch in the
accessoryshoe turns on only when the flash unit is
in place.
Nikon speedlight units SB-3 and SB-4can be directly
attachei to tte Nikkormat FTz. For mounting thq
Nikon speedlight unit SB-2 or flash unit BC-7, useof
the flash unii coupler AS-2 is necessary.
For details,
referto theinstruction manualprovided with eachunit.
18
www.orphancameras.com

Depth of field refers to a zone extending in front of
and behind the plane of sharpest focus. Within this
zone blur (or unsharpness of the image) will be
negligible and everything can be accepted as in sharp
focus.Depth of field extends a greater distancebehind
the subject in focus than in front. Depth of field
depends on three factors: focal length of the lens,
lens-to-subject distance a-+d taking aperture. The
smaller the aperture and the shorter the focal length
of the lens,the gre
aterthe depth of field (for example,
wideangle lenses have more depth of field than tele-
photos). Also, the closer
.the subject, the smaller the
depth of field. These three factors can be adjusted
independently or in combination to give the photo-
graphercreative control over the final picture.
Depth-of-Field
Preview
Button
The depth-of-field preview button located on top of
the Nikkormat lets you check depth of field before
shooting and make desired adjustments. Press the
button and the lens stops down to the preselected
aperture to allow you to seehow much background
or foregound is in or out of focus.
Table of contents


