Maxon Trutalk WX-80 User manual

WX-80
SAME
Weather Monitor
Operating Instructions

Table of Contents
I. FCC Information.....................................................................
II. AboutTopaz3.........................................................................
III. About Your WX-80..................................................................
IV. Unpacking and Checking Equipment.......................................
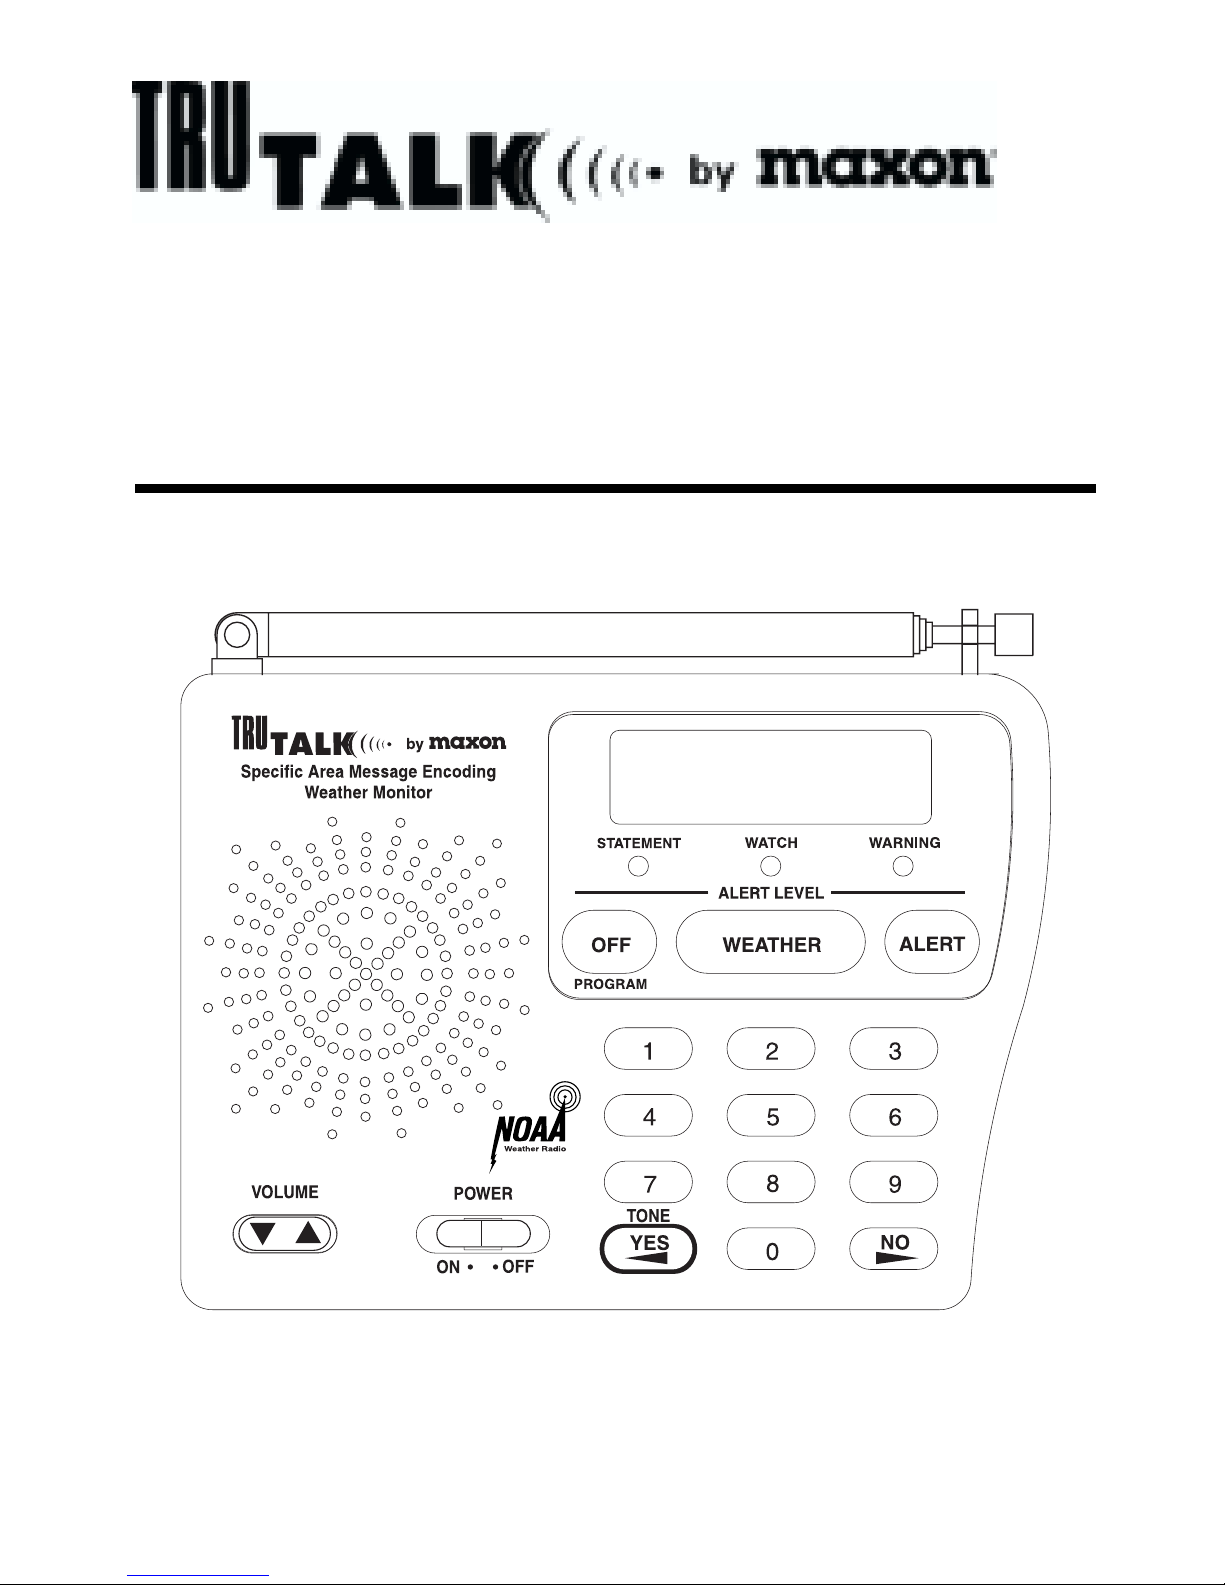
V. Getting to Know Your WX-80.................................................
VI. Powering the Weather Monitor.............................................
Installing the Backup Battery.................................................
Connecting the Weather Monitor to AC Power.............................
Using the Built-In Antenna.....................................................
VII. Listening to a Weather Broadcast..........................................
VIII. Programming Your WX-80.....................................................
Factory Default Programming................................................
Setting the Alert Type..........................................................
Setting the Backlight............................................................
Understanding SAME Geographic (FIPS) Codes.........................
Monitoring Single or Multiple Locations...................................
Entering FIPS Location Codes................................................
IX. Alert Tones............................................................................
X. Finding the Best Location for Your WX-80 Monitor................
Testing the Alert Tone..........................................................
XI. Using the Alert Function........................................................
Setting the Alert Tone Volume...............................................
Setting the WX-80's "All Signals" Code..................................
Reviewing Overlapping Alerts................................................
When a Test or Demo Alert Occurs........................................
Undefined Weather Descriptions............................................
TestMode.........................................................................
XII. NWS Weather Event Descriptions..........................................
XIII. Specifications........................................................................
XIV. Maintenance..........................................................................
XV. Warranty Service Instructions...............................................
XVI. Warranty Statement..............................................................
i
1
2
2
4
4
6
6
7
8
8
9
9
12
14
15
17
19
21
26
26
27
28
29
30
31
31
32
34
38
39
39
40

Contenido
I. Información Sobre FCC..........................................................
II. Acerca de Topaz3...................................................................
III. Información Acerca de Su WX-80............................................
IV. Desempaque y Verificación del Equipo...................................
V. Familiarizándose con la WX-80..............................................
VI. Conectando el Monitor Meteorológico...................................
Instalando la Batería de Respaldo............................................
Conectando el Monitor Meteorológico a Electricidad de AC..........
Usando la Antena Incorporada.................................................
VII. Escuchando Una Radio-Emisora Meteorológica......................
VIII. Programando Su WX-80.........................................................
Programación Default de Fábrica.............................................
Ajustando el Tipo de Alerta....................................................
Ajustando la Luz de Fondo......................................................
Comprendiendo los Códigos Geográficos SAME........................
Monitoreando Ubicaciones Únicas o Múltiples............................
Entrando los Códigos de Ubicación FIPS....................................
IX. Tonos de Alerta......................................................................
X. Buscando la Mejor Ubicación para Su Monitor WX-80............
Probando el Tono de Alerta.....................................................
XI. Usando la Función de Alerta...................................................
Ajustando el Volumen de Tono de Alerta...................................
Ajustando el Código "Toda Señal" del WX-80's..........................
Revisando Alertas Solapadas.................................................
Cuando Ocurre una Alerta de Prueba o de Demostración..............
Descripciones Meteorológicas No Definidas..............................
MododePrueba...................................................................
XII. Descripción de Eventos Meteorológicos de NWS....................
XIII. Especificaciones...................................................................
XIV. Mantenimiento......................................................................
XV. Instrucciones Servicio de Garantía........................................
XVI. Declaración de Garantía........................................................
42
43
44
45
46
48
48
50
50
51
52
52
55
57
58
61
62
65
70
71
72
73
73
75
76
77
78
80
84
85
85
86
ii

I. FCC INFORMATION
The FCC (Federal Communications Commission)
requires that you be advised of certain requirements
involving the use of this device. This equipment has
been tested and found to comply with the limits for a
Class B Digital Device, pursuant to Part 15 of the FCC
Rules and Regulations. These rules are designed to
provide reasonable protection against harmful interfer-
ence in a residential environment.
This equipment uses and can generate radio frequency
(RF) energy. If not used in accordance with the instruc-
tions, it may cause interference to other radio commu-
nications. However, there is no guarantee that the
interference will not occur in another device's recep-
tion (which can be determined by turning the equip-
ment off and on). The user is encouraged to correct the
interference by one or more of the following measures:
• Reorient or relocate the receiving antenna
• Increase the separation between the radio and other
devices
• Consult the manufacturer for technical assistance
FCC Warning: This equipment generates or uses radio
frequency (RF) energy. Changes or modifications not
expressly approved in writing may cause harmful
interference and void the user's authority to operate
this equipment.
1

II. ABOUT TOPAZ3
Topaz3 is the exclusive supplier of Maxon®, Legacy and
TruTalk brand communication products.
Our product line ranges from two-way radios suitable for
Business and Industry (B&I) markets like farm, government,
law enforcement, utility, etc. to consumer communications
equipment for recreational and light-duty business markets.
Product offerings include a variety of UHF and VHF
handheld and mobile radios, repeaters and RF link modules,
as well as FRS (Family Radio Service), GMRS (General
Mobile Radio Service) radios, MURS (Multi User Radio
Service) radios, Citizen’s Band radios and weather monitors.
Available accessory items include a variety of carrying
cases, spare batteries, desktop and mobile chargers, ear
bud speaker microphones and more for each radio model.
For additional information on our product line, visit our
website:
www.topaz3.com
III. ABOUT YOUR WX-80
The WX-80 SAME Weather Monitor "hears" weather
alert broadcasts from the National Weather Service,
and announcements from the Emergency Alert System
to keep you aware of ever-changing conditions.
SAME (Specific Area Message Encoding) technology lets
you program the monitor to receive forecasts, updates
2

III. ABOUT YOUR WX-80, Continued
targeted to your area. The unit stores up to 15 SAME
geographic codes, allowing you to hear weather events
in the counties you choose - not those far away from
you.
Other features of the TruTalk WX-80 include:
• Provides instant weather information anytime night or day - up to
50 miles from nearest transmitter
• Stores up to 15 SAME geographic codes - allowing you to hear
weather events in the counties you choose
• Meets EAS (Emergency Alert System) standards
• LED Indicators identify alert types: Statement, Watch and Warning
• Keypad selects weather channel, enters SAME geographic codes
and chooses alert type
• Backlit 8-character LCD shows specific emergency messages
• Variable alert tone and audio broadcast volume levels
• Built-in "test mode" confirms operation and resets to factory default
settings
• Separate alert "off" control button
• Telescopic antenna
• AC Power operation (AC power adaptor included)
• 9V Battery backup keeps you advised during power outage
(battery not included)
• Compact monitor can be used on counter or wall-mounted
• One Year Warranty
3

IV. UNPACKING AND CHECKING EQUIPMENT
Carefully unpack the monitor and any accessories. Use
the item list below to identify the components included
in the product packaging, to ensure that no items are
discarded in the packing materials.
WX-80 Weather Monitor
AC Power adaptor
Wall mounting hardware
If any items are missing or damaged, you should
contact the Topaz3 Customer Service Department.
Dial 1-800-821-7848, Ext. 499 for assistance.
V. GETTING TO KNOW YOUR WX-80
A) Speaker - announces event messages and alert tones
B) Telescopic antenna - extends for maximum radio
reception
C) 8-Character LCD - displays event message, radio
alert status and low battery condition
D) Statement, Watch, Warning LED's - visually confirms
weather event status condition
E) ALERT Button - used to turn alert on or off
F) WEATHER Button - used to obtain NWS weather
announcements anytime night or day
G) OFF / PROGRAM Button - used to turn off weather
alert siren and enter programming mode
H) Numeric keypad - used to enter SAME geographic
codes
4

V. GETTING TO KNOW..., Continued
I) NO Function selection button - declines function during
programming
J) YES / Tone Function button - selects function during
programming; adjusts alert siren tone
K) Power On / Off switch
L) Volume up / down switch
Monitor base (not shown):
Battery compartment door, Wall mounting keyholes
On Monitor side (not shown):
External antenna jack, DC Power jack
5
A
B
C
D
E
F
G
H
I
J
KL

VI. POWERING THE WEATHER MONITOR
Your WX-80 weather monitor uses standard 12V DC
power for normal operation and one 9V battery (not
supplied) for backup power when standard power fails
or is temporarily disconnected. For the best performance
and longest life during power failure, we recommend
an alkaline battery. A fresh backup battery will power
the weather monitor for up to 1 hour with the weather
broadcast turned on or up to 8 hours in alert standby
mode. However, we recommend you always connect
the weather monitor to AC power for normal use.
Remember, when the unit is powered OFF, no alert
signal will be received, even with a backup battery
installed! The unit must be "ON" to receive alerts and
broadcasts.
Installing the Backup Battery
1. Place the monitor's power on / off switch into the
"OFF" position by sliding it to the right.
2. Press the tab on the battery compartment cover,
lift the cover up and set it aside.
3. Using a fresh 9V alkaline battery, "snap" the terminal
connector onto the battery, and place the battery
into the compartment, taking care not to crimp
or damage the wiring.
4. Replace the cover.
5. Power ON the WX-80 by sliding the power switch
to the left ("ON" position).
6

VI. POWERING THE WEATHER..., Continued
Installing the Backup Battery, Continued
NOTE: Do NOT use a rechargeable-type battery in your
weather monitor. Use standard alkaline batteries only.
NOTE: If the backup battery becomes weak, your
weather monitor might not sound a tone when an
emergency or test alert is broadcast. Check the monitor's
reception periodically, and replace the battery as
needed.
CAUTION: Dispose of an old or weak battery promptly
and properly. Do not burn or bury it. Batteries can leak
chemicals that can cause personal injury and/or damage
to the monitor unit.
When "REPLACE BATTERY" appears on the radio
display or the weather monitor stops operating (while
under battery-only power), replace the battery with a
fresh one. "REPLACE BATTERY" will also appear on the
radio display if no backup battery is installed and the
weather monitor is connected to AC power and then
turned on. This is to remind you that the battery
backup capability will not work in times of AC power
outages without a battery installed!
Connecting the Weather Monitor to AC Power
1. Place the monitor's power on / off switch into the
"OFF" position by sliding it to the right.
7

8
VI. POWERING THE WEATHER..., Continued
Connecting the Weather Monitor..., Continued
2. Plug the AC power adaptor into the power jack
on the left side of the monitor.
3. Plug the power adaptor into a standard, household
110V AC outlet.
Using the Built-In Antenna
The weather monitor's built-in telescoping antenna
lets you receive strong local signals. Lift the antenna
to a vertical position, then full extend it for optimum
reception.
To improve reception in remote areas, you can connect
an external 50 Ohm antenna to your weather monitor
using an optional adapter cable with an RCA plug
connected to the side panel EXT ANT (External Antenna)
jack. Your local electronics store sells a wide variety of
antennas. Follow the installation instructions provided
with the antenna to connect to the WX-80 monitor.
VII. LISTENING TO A WEATHER BROADCAST
Your weather monitor is pre-programmed with the 7
NOAA weather broadcast frequencies (Channels 1-7).
To select a frequency broadcast for your area, follow
steps outlined on the next few pages.

VII. LISTENING TO A WEATHER..., Continued
1. With the WX-80 powered ON, push the "WEATHER"
button to activates the monitor audio circuitry.
2. Adjust the audio volume to the desired listening
level using the Volume Up / Down bar. Volume
settings range from 1 - the lowest setting, to
8 - the highest setting. The audio volume control
has a mute setting (volume setting 0) that will
allow you to temporarily mute all audio.
3. To turn off the weather broadcast, press the
WEATHER button again.
VIII. PROGRAMMING YOUR WX-80
Factory Default Programming
Your weather monitor is preprogrammed to receive
broadcasts for ALL area broadcasts and ALL weather
alert types. This is called "All Signals Code", (refer to
Table of Contents for page number). The first time
you use your weather monitor, you will find that it is
automatically set to use the NOAA weather broadcast
frequency 162.550 MHz (Channel 1).
Depending on your location, you may need to select a
different channel, determined by your local area NWS
transmitter frequency. Follow these steps to select your
local broadcast frequency.
IMPORTANT: During all programming modes, if there
9

VIII. PROGRAMMING YOUR WX-80, Continued
Factory Default Programming, Continued
is a pause of 40 seconds without a key press, the WX-80
will store current settings and return to operations mode.
This will ensure that the WX-80 is operational, should
there be any interruptions during your programming
setup.
The following programming instructions are broken
down by specific function. Each programming topic
ends by terminating the programming and returning to
standby or operating mode.
All programming functions can be set in one session
should you desire to program multiple functions before
returning to operations mode. The YES key is used to
accept the current display setting and will continue to
advance you to the next programming step, allowing
you to skip options that you do not wish to change.
1. Power the WX-80 weather monitor "on" by sliding
the on/ off switch to the left. You will hear a tone
to confirm power is ON.
2. Press the OFF/PROGRAM button for 2 seconds to
begin the programming mode. The display will
show the last selected weather channel (possibly
the default setting frequency).
3. Press the WEATHER button to activate the weather
audio, then push the volume up or down key to
10

VIII. PROGRAMMING YOUR WX-80, Continued
Factory Default Programming, Continued
adjust the broadcast volume to desired level.
4. Press the number keys, in sequence, from 1 through
7 to find the broadcast channel for your area, by
listening for the strongest signal. Re-adjust the
volume level if necessary, then listen briefly to
the announcement message to ensure information
about your local area is being broadcast. If another
channel seems strong, go to that channel and
listen to its broadcast. Choose the channel which
best represents information for your location.
Channel Frequency Channel Frequency
1 162.550 MHz
2 162.400
3 162.475
4 162.425
5. When you have selected the best channel for your
location, push the YES button to store your
selection and advance to the next programming
step, "Setting the Alert Type", or push the OFF /
PROGRAM key for 2 seconds to store the
selection and set mode to operate. The current
alert status (WEATHER ALRT ON or WEATHER
ALRT OFF) appears.
11
5 162.450
6 162.500
7 162.525

12
VIII. PROGRAMMING YOUR WX-80, Continued
Setting the Alert Type
You can set the WX-80 weather monitor to respond to
an NWS alert broadcast in one of two ways. When the
monitor is powered on and activated by an alert signal,
the following will occur (by setting selection):
VOICE - when activated by an alert signal, the weather
monitor sounds an alert beep or siren for about 8
seconds, then automatically broadcasts the weather for
5 minutes. Then it returns to standby operation. The
display shows the alert description (such as TORNADO
WARNING) until the alert's effective time expires. An
alert could be in effect for several hours.
ALERT - when activated by an alert signal, the weather
monitor sounds an alert beep or siren continuously and
displays an alert description until the alert's effective
time expires. To turn off the alert sooner, press the OFF
button. To hear the NWS voice broadcast, press the
WEATHER button.
NOTE: When the weather monitor's alert expires or
you turn it off, you hear the NWS alert termination tone
(three bursts) for a few seconds before you hear the
voice broadcast. The NWS alert termination tone has
a different sound than the weather monitor's alert tone.

VIII. PROGRAMMING YOUR WX-80, Continued
Setting the Alert Type, Continued
The weather monitor is set to the ALERT setting as
the factory default. To change the alert type setting to
VOICE (or to check the current selection), follow these
steps:
1. With the WX-80 powered on, push the
OFF/PROGRAM button for 2 seconds to
set mode to program.
2. Press the YES button once to advance to the Alert
Type setting. The current alert pattern selection
(VOICE or ALERT) appears on the display.
3. To select the alternate setting (choosing VOICE
instead of ALERT or choosing ALERT instead
of VOICE) press the NO button. The alternate
setting appears. To toggle between settings,
press the NO button more than once. Your
selection is saved by pressing the YES button.
NOTE: Pressing the NO button repeatedly will alternate
or toggle between the selection of ALERT and VOICE.
4. When your selection appears on the display, push
the YES button to store the selection and
advance to the next programming step, (Setting
the Backlight) or push the OFF/PROGRAM
button for 2 secondsto store the selection and
set mode to operate. The current alert status
13

14
VIII. PROGRAMMING YOUR WX-80, Continued
Setting the Alert Type, Continued
(WEATHER ALRT ON or WEATHER ALRT OFF) will
appear in the display.
Setting the Backlight
Your weather monitor's display backlight automatically
turns on for about 10 seconds each time you press a
key. For extended use in low light situations, you can
set the backlight so it remains on continuously until
you turn it off. NOTE: The monitor must be connected
to AC power to have a continuous backlight setting.
Follow these steps to turn the backlight on or off.
1. With the WX-80 powered on, push the
OFF/PROGRAM button for 2 seconds
to set mode to program.
2. Press the YES button twice so "CONTINUO"
(continuous) and "BACKLITE" alternately flash
on the display.
3. Press the YES button to accept the continuous
backlight setting, or press the NO button to turn
off the continuous backlight. NOTE: If you
choose NO, the backlight setting will turn off
10 seconds after the last button press. The
display will advance to the next programming
step, "Single or Multiple Location Monitoring".
4. Push the OFF/PROGRAM button for 2 seconds to

VIII. PROGRAMMING YOUR WX-80, Continued
Setting the Backlight, Continued
store the selection and set mode to operate. The
current alert status (WEATHER ALRT ON or
WEATHER ALRT OFF) appears.
Understanding SAME Geographic Codes
NOTE: In the following text, SAME Geographic Codes
are also known as FIPS Codes. The National Oceanic
and Atmospheric Administration (NOAA) began
broadcasting coded weather alert signals able to
identify specific areas where the weather emergency
is forecasted to occur. These Specific Area codes are
called FIPS (Federal Information Processing System)
codes. A unique FIPS code is assigned to every county
or parish throughout the United States and all US
territories.
Example: The 6-digit FIPS code to identify Kansas City,
Missouri (Jackson County) is 029095.
The first digit in a FIPS code identifies the county
subdivision, used only for extremely large counties or
counties with geographically unusual shapes such as
a long, narrow county. The next two digits identify the
state, and the last three digits identify the county or
parish.
15

16
VIII. PROGRAMMING YOUR WX-80, Continued
Understanding SAME Geographic..., Continued
NOTE: Most FIPS codes begin with 0, which means
that FIPS code represents an entire county. The NWS
has future plans to subdivide some large counties.
When that happens, each subdivision will be assigned
a digit from 1 - 9, resulting in codes such as 129059,
229059, and so on.
Event Codes - Emergency events, such as weather
emergencies or civil emergencies, are also assigned
a code known as an Event Code. These event codes
are used to identify an emergency by type.
Example: (TOW) for Tornado Warning.
SAME - (Specific Area Message Encoding) combines
the FIPS Code to identify a specific area and an Event
Code to specify the particular emergency event for that
area. The area and event identification data is followed
by a voice message pertaining to the emergency
situation for that area. This data is then digitally
encoded and broadcast by your local NOAA
Weather Radio (NWR) station.
Your WX-80 weather monitor can receive all SAME
alert signals broadcast within about a 40 to 50 mile
radius of the NWR transmitter tower. To receive SAME
alerts about weather emergencies occurring only

VIII. PROGRAMMING YOUR WX-80, Continued
Understanding SAME Geographic..., Continued
in particular counties of interest, you can program up
to 15 FIPS codes into the weather monitor's memory.
This allows you to avoid hearing an alert that applies
to an area that is possibly several counties from you.
Obtaining Your Area's FIPS Code(s)
To obtain the FIPS code for your current location,
call the National Weather Service toll free at
1-888-NWR-SAME (1-888-697-7263). Follow the
instructions as prompted to enter your state and county
location. The system will respond with the FIPS code
for that county. If you are close to a county line, you
might want to obtain the codes for the neighboring
county or other nearby counties of interest to you.
Monitoring Single or Multiple Locations
Your WX-80 Weather Monitor will monitor either a
single location or up to 15 locations, determined by
the number of SAME Geographic Codes you enter,
or choose to monitor.
To set the weather monitor to single or multiple
locations, use the following steps:
1. With the WX-80 powered on, push the
OFF/PROGRAM button for 2 seconds to set
mode to program.
17
Table of contents
Languages: