MCE TORQMAX F5 User manual

00.PC.0UB-K334
TORQMAX F5 ELEVATOR DRIVE
Reference Manual

2
This instruction manual describes the TORQMAX F5 ELEVATOR DRIVE. Before working with
the unit the user must become familiar with it. This especially applies to the knowledge and
observance of the following safety and warning indications. The icons used in this instruction
manual have the following meaning:
cDanger Pay Attention
i
Information
Discharge Time Important
Warning
Help
Caution Tip
The QR codes used in this instruction manual are linked
to the KEB America YouTube channel. Video examples of
general start-up procedures will be linked to QR codes in
this instruction manual.
Scan the QR code with the QR code reader on your
smartphone to access videos. For your phone to be
able to read QR codes, you will need to download a
QR code scanning app from your mobile app store.
KEB America YouTube channel URL:
youtube.com/c/KEBAmericaIncShakopee
i
For online elevator support, pdf manuals, and instructional videos, visit our
elevator support page at: https://www.kebamerica.com/elevator-support.

3
General ........................................................ 6
Product Description ..................................................6
Summary of Changes .......................................... .....7
Technical Information................................. 9
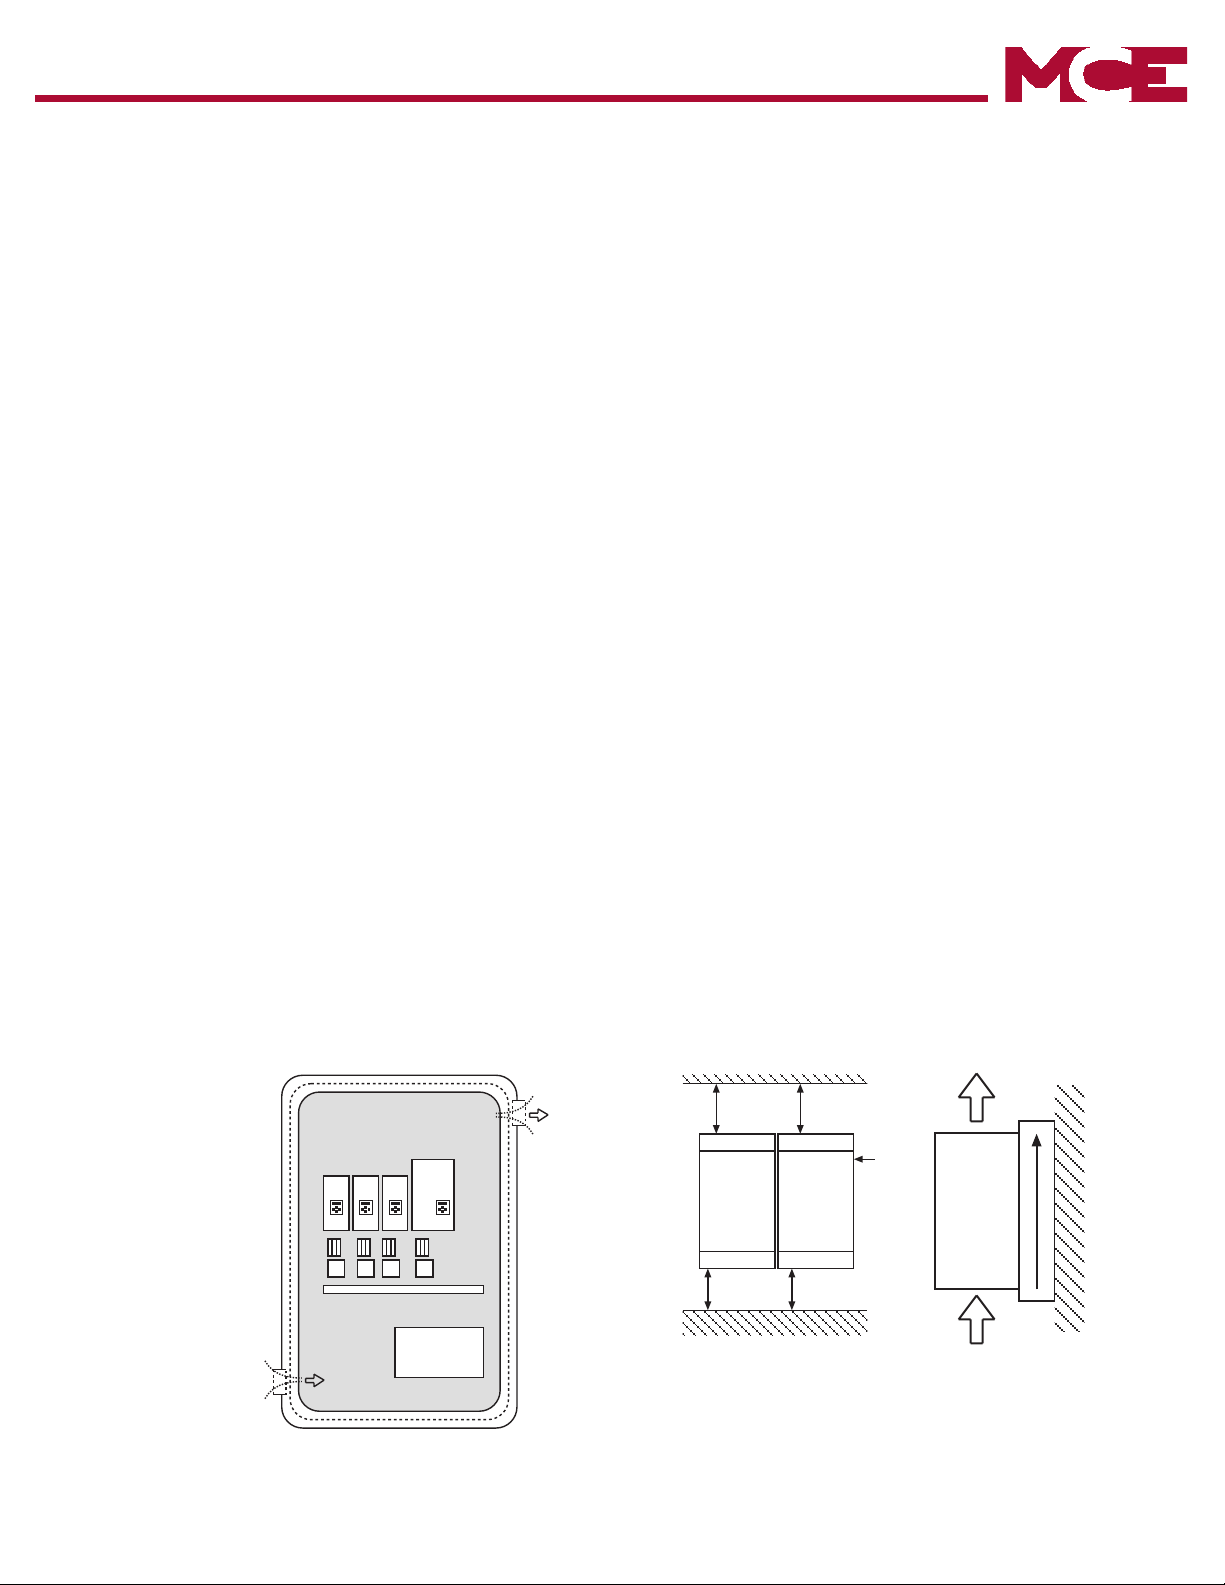
Mounting Instruction............................................ .....9
Classication ...........................................................................9
Physical Mounting...................................................................9
Harsh Environments......................................................... .....10
Ambient Conditions ......................................................... .....10
Electrical Connections....................................... .....11
Safety First ........................................................................ .....11
Voltage Supply.................................................................. .....11
Disconnect Switch............................................................ .....11
Fusing.....................................................................................12
Line Chokes ...........................................................................14
Motor Thermal Protection .....................................................14
Motor Cable Length...............................................................15
High Voltage Connections ....................................................16
Ground Connections.............................................................17
High Frequency Shielding ....................................................17
Storage of Unit.................................................................. .....19
Dielectric Testing ...................................................................20
Insulation Measurement .......................................................20
Brake Transistor Monitor.........................................21
Monitor Circuit Wiring Diagrams..........................................22
Temperature Sensor Wiring Diagrams.................................24
Model Number Information .....................................26
Technical data 230V (size 13 to 23)*.......................27
Technical data 480V (size 13 to 28)* ......................29
Dimensions and Weight ..........................................31
Power Connections ............................................ .....33
Connection of the power circuit........................ .....35
Ferrite Ring Installation...................................... .....36
Time dependent overload curve........................ .....39
Low Speed Overload ..............................................40
Control Connections ................................ 41
Control Circuit ........................................................41
Terminal Strip Connections F5-A.........................................41
Connection of the control signals .......................................42
Digital Input............................................................................42
Analog Inputs ........................................................................42
Voltage Input / External Power Supply ................................43
Digital Outputs.......................................................................43
Relay Outputs ........................................................................43
Analog Outputs .....................................................................43
Voltage Output .......................................................................43
Control Circuit - STO ......................................... .....44
Assembly of the wires (F5-K) ...............................................45
Terminal Strip Connections (F5-K) ......................................46
Digital Inputs (F5-K) ..............................................................48
Analog Inputs (F5-K) .............................................................48
Digital Outputs (F5-K) ...........................................................48
Relay Outputs (F5-K).............................................................48
Analog Outputs (F5-K) ..........................................................49
STO Conections (F5-K) .........................................................49
STO Inputs (F5-K) ...............................................................50
STO Output (F5-K) .................................................................50
STO Input Control Sequence (F5-K) ..................................50
Encoder Feedback Interfaces............................ .....51
Incremental TTL Encoder Interface X3A Screw
Terminals .......................................................................53
EnDat Encoder Interface X3A ..............................................55
Sin/Cos Encoder Interface X3A ...........................................58
SSi Encoder Interface X3A ..................................................61
BiSS / EnDat 2.2 Encoder Interface X3A ............................64
Hiperface Encoder Interface X3A.........................................67
UVW Encoder Interface X3A.................................................70
Incremental TTL Encoder Interface X3A SubD ..................72
X3B Output TTL Incremental .......................................... .....74
Operation of the unit ................................ 75
LCD Operator ...........................................................75
Keypad Buttons .....................................................................75
Serial/CAN Hardware Version ............................ .....76
LED Indicators .......................................................................76
Backward Compatibility ..........................................77
Menus and Navigation Overview....................... .....77
Home Screen............................................................77
Languages .......................................................... .....78
Programming Menu .................................................79
Parameter Adjustment...........................................................80
Setting the Password ............................................................81
Units .......................................................................................83
Diagnostics Screen .................................................84
Error Messages & Fault Log.................................................84
Fault Data Logging................................................................85
Date & Time ......................................................... .....86
Setting the date......................................................................86
Setting the time......................................................................86
Customizing Parameter Lists ........................... .....87
Customizing Defaults......................................... .....89
Initial Start Up ........................................... 90
Connecting the drive and operator ........................90
Default Operator and Drive...................................................90
Previously Programmed Operator or Drive.........................90
Manual Programming ......................................... .....91
Getting Started.......................................................................91
Elevator App...........................................................................92
Basic Setup ......................................................... .....93
Inputs/Output Conguration ..................................93
Inputs......................................................................................94
Ouputs....................................................................................94
Motor Data........................................................... .....95
Induction Motors ...................................................................95
Permanent Magnet Motors....................................................95
Encoder Data ...........................................................96
Machine Data ...................................................... .....96
Speed Prole....................................................... .....97
Prole Adjustment .................................................................97
Motor Learn ......................................................... .....99
Encoder Learn .................................................. .....100
SPI Encoder Learn.......................................................... .....101
Encoder Pole Position Learn......................................... .....102
Encoder Synchronization .............................................. .....103
Running the Motor............................................ .....103
Running at High Speed.................................................. .....103
Table of Contents

4
Advanced Ride Adjustments ........................... .....104
Inertia Learn.................................................................... .....104
Internal Pretorque........................................................... .....105
Closed Loop Analog Pretorque..................................... .....106
Closed Loop Digital Pretorque...................................... .....107
Predictive Synthetic Pretorque...................................... .....107
Parameter Description ............................109
US - Basic Setup Parameters.................................111
LI - Input Parameters ........................................ .....121
LM - Motor Data Parameters ............................ .....143
LE - Encoder Data Parameters ........................ .....158
LN - Machine Data Parameters ........................ .....167
LS - Speed Prole Parameters......................... .....169
LL - Tune Parameters........................................ .....180
LC - Control Setting Parameters ..................... .....183
LT - Timer Parameters............................................200
LP - Positioning Parameters .................................204
LX - Special Functions Parameters................. .....211
CH - Conguration Handling Parameters....... .....217
LA - Analog I/O Parameters ..................................225
LO - Outputs Parameters ................................. .....231
FB - Field Bus Parameters ............................... .....237
DG - Diagnostics Parameters
(Combivis only) ...............................................251
TS - Terminal Slowdown Parameters ...................263
DB - Debug Parameter Group
(Combivis only) ...............................................269
Diagnostics and Troubleshooting ......... 270
Diagnostics Screens .............................................270
Drive Faults ...........................................................272
Additional Information ........................................................292
Operation Problems ..............................................296
Diagnostic Solutions........................................ .....303
Learn Procedure Troubleshooting................... .....308
Parameter Reference...............................311
v3.34 Parameter List Reference....................... .....311
v1.71 Crossover Reference ............................. .....327
Errata ....................................................... 333
Combivis ................................................. 339
Software............................................................. .....339
Combivis 6 XML File............................................................339
Connection Cables .............................................340
Replacement Parts ................................. 341
Transistor Tests................................................. .....342
Unintended Movement Test ............................. .....344
Brake Release Conrmation Tests .................. .....345
Appendix ................................................. 348
Appendix ................................................. 349

5
Protect Against
Accidental
Contact
AC motor controls and servo drives contain dangerous voltages which can
cause death or serious injury. During operation they can have live "ener-
gized" un-insulated parts, moving parts, as well as hot surfaces. Care should
be taken to ensure correct and safe operation in order to minimize risk to
personnel and equipment.
All work involving this product, installation, start up as well as maintenance,
may only be performed by qualied electrical technical personnel. Accord-
ing to this manual "qualied" means: those who are able to recognize and
acknowledge the possible dangerous conditions based on their training and
experience and those who are familiar with the relevant standards and instal-
lation codes as well as the eld of power transmission.
AC motor controls and servo drives must be protected against physical dam-
age during transport, installation, and use. Components or covers must not
be bent or deformed as this may decrease insulation distances inside the unit
resulting in an unsafe condition. On receipt of the unit visual damage should
be reported immediately to the supplier. DO NOT ATTEMPT TO POWER UP
A UNIT WITH VISIBLE PHYSICAL DAMAGE. This unit contains electrostati-
cally sensitive components which can be destroyed by incorrect handling. For
that reason, disassembly of the unit or contact with the components should
be avoided.
Before any installation and connection work can be done, the supply volt-
age must be turned off and locked out. After turning off the supply voltage,
dangerous voltages may still be present within the unit as the bus capacitors
discharge. Therefore it is necessary to wait 5 minutes before working on the
unit after turning off the supply voltage.
The low voltage control terminal strip and communication ports are securely
isolated in accordance with EN50178. When connecting to other systems,
it is necessary to verify the insulation ratings of these systems in order to
ensure the EN requirements are still met. When connecting the unit to a
grounded delta power system, the control circuit can no longer be classied
as a "securely isolated circuit".
Before putting the motor control into operation be sure the connection termi-
nals are tight and all covers removed for installation have been replaced.
The AC motor control or servo system can be adjusted to self initiate an
automatic restart in the event of a fault or error condition. The design of the
system must take this into account, such that personnel are safe guarded
against potentially dangerous circumstances.
Software functions in the AC motor control or servo system can be used
to control or regulate external systems. However, in the event of failure of
the motor control or servo system there is no guarantee these software
function(s) will continue to provide the desired level of control. As a result,
when operator or machine safety is at stake, external elements must be used
to supplement or override the software function within the AC motor control or
servo system.
Danger to Life
Only Qualied
Personnel
Secure
Isolation
Note Capacitor
Discharge Time
Damage to
Property and In-
jury to Persons
Redundant Safety
Mechanisms
READ FIRST - SAFETY PRECAUTIONS

6
General
In selecting the TORQMAX F5 series inverter, you have chosen a
frequency inverter with the highest quality and dynamic performance.
The F5 inverter has the following features:
- Small mounting footprint
- Large die IGBTs
- Power circuit gives low switching losses
- Low motor noise with high carrier frequency
- Extensive protection for over- current, voltage and temperature
- Voltage and current monitoring in static and dynamic operation
- Short circuit proof and ground-fault proof
- Noise immunity in accordance with IEC1000
- Hardware current regulation
- Integrated temperature controlled cooling fan
- PM motor control capable
- Synthesized-pre torque for roll back compensation
- CE compliant and cULus listed
- Extensive elevator functional capabilities
- DPC - Direct Position Control
- Stationary Pole Identication (SPI)
- Multi-lingual LCD display
- Structured parameter lists to simplify adjustment and handling
- OEM customization without special software
- Adjustment wizards for start up and operation
- Redundant elevator safety features
This manual describes the frequency inverter TORQMAX F5.
- 7.5 hp...60 hp 270A peak / 230V class
- 7.5 hp...175 hp 450A peak / 480V class
CPU Software version 4.3 or greater
Application Software Version 3.34
It is exclusively designed for smooth speed regulation of a three-phase
motor.
The operation of other electrical loads is forbidden and can lead to
destruction of the unit.
1. General
1. 1. Product Description

7
Summary of Changes
Section 2.2.4.1: Removed the column which refers to the UL 489 MCCB.
Section 2.2.4.2: Removed the column which refers to the UL 489 MCCB.
Section 2.4: The rated output current has been changed to 224A. The E.OC
trip level is 540A.
Section 2.6: The Shallow version of the heatsink is only used on 230V size
19 R housing. Previously this was described as “Peak Unit.”
Section 2.10: Reworded “Error Low Speed Overload” to “Error Overload Low
Speed” in the Table of Contents, in LX07 (Pg. 210), and in Diagnostics and
Troubleshooting (Pg. 275 and 286) to better allign the manual to what dis-
plays on the LCD screen.
Section 6.2: The Binary Speed Selection information for parameter LI16 has
been updated to display the correct control inputs for both S High and S Correc-
tion sections of the table.
Section 6.4: LE - Encoder Data Parameters LE37 - LE39 added with param-
eter descriptions
Section 6.6: The LS01 upper limit has been increased from 25FPM to
59FPM. The upper limit can only be increased when LX50 Unlock LS01 is
activated.
Section 6.6: The ETS/ESD Speed Diagram in LS49 has been updated
Section 6.8: LC32 - The torque boost default setting has been updated from
0.5% to 5%.
Section 6.11: The LX35, Improved Phase Detection, has been added.
Section 6.11: The LX50, Unlock LS01, has been added.
Section 6.12: CH01 Default Parameters - The option “Pi Password” (2) has
been added so that the keypad can be completely defaulted.
Section 6.16: Changed DG19 Pre-torque value from 0 to 1.
Section 6.16: Added DG50 Elevator Speed parameter.
Section 6.16: DG80 Easy Direction and Digital Output Status has been
added
1.2. Summary of Changes

8
Summary of Changes
Section 6.18: The DB (Debug Parameter Group) section has been added
with the following to display the execution time of the timer interrupts that
are used to execute the software’s primary functions. This group is only vis-
ible with Combivis. These parameters are (1) DB00 Lift Time, (2) DB01 DIN/
Switch/ServSLV Time, and (3) DB02 Lift Com Time.
Section 8.1: Added max value 2147483647 and min value is -2147483648
For LE37 - Added a minimum value of 0 and max value of 13, and added a
default level of “2”. The default value for LE38 and LE39 is now “1.”
Section 8.1: The upper limit of US06 Contract Speed has been increased
from 1600FPM to 2000FPM
Section 8.1: The max value of LS00 was corrected from 0.478m/s to the
correct max value in m/s mode of 0.010m/s.
Section 8.1: The max value of LS01 is 59fpm when LX50 Unlock LS01 is
activated.
Section 8.1: Added password level of “Adjuster” to LE37, LE38, and LE39
Section 10.1: Updated to show that Combivis 6 software version 6.7 and
greater is not compatible with Windows 7 (32 and 64 bit) and not recom-
mended for use with Windows 8.8
Section 12.1: Changed the diagram of a VFD input and output circuits to
have the GTR7 under the resistor instead of above.

9
Technical Information
The elevator drive is classied as an “Open Type” inverter with an IP20
rating and is intended for “use in a pollution degree 2 environment.”
The unit must be mounted inside of a control cabinet offering proper
environmental protection.
Install the inverter in a stationary location offering a rm mounting point with
low vibration.
Installation of the inverter on a moving system may require special earth ground
connections to the inverter.
For best high frequency grounding, install the inverter on a bare metal sub-
panel, i.e. zinc plated steel or galvanized steel.
Use manufacturer recommended tightening torque for all bolts used to mount
the enclosure.
Take into consideration the minimum clearance distances when positioning
the inverter (see drawing below). The F5 series inverters are designed
for vertical installation and can be aligned next to each other. Maintain
a distance of at least 2 inches in front of the unit. Make sure cooling is
sufficient.
2. Technical Information
2.1. Mounting Instruction
2.1.1. Classication
2.1.2. Physical
Mounting

10
Technical Information
For extended life, prevent dust and other contaminants from getting into the
inverter.
When installing the unit inside a sealed enclosure, make sure the enclosure is
sized correctly for proper heat dissipation or that a cooling system has been
installed in the panel.
Protect the inverter against conductive and corrosive gases,
liquids and other contaminants. Water or mist should not be allowed
into the inverter.
The F5 elevator drive must be installed in an explosion-proof enclosure
when operating in an explosion-proof environment.
Maximum Surrounding AirTemperature 45°C!The operating temperature
range of the unit is -10°C to + 45°C (14°F to +113°F). Operation outside
of this temperature range can lead to shut down of the inverter.
The unit can be stored (power off) in the temperature range -25°C to 70°C
(-13°F to +158°F).
The power rating of the inverter must be derated for operation above 3,300
ft (1000 m). Reduce the rated power 1% for each additional 330 ft (100 m).
The maximum elevation for operation is 6,560 ft (2000 m).
The relative humidity shall be limited to 95% without condensation.
2.1.3. Harsh
Environments
2.1.4. Ambient
Conditions

11
Electrical Connections
CAUTION - RISK OF ELECTRIC SHOCK! Always disconnect supply
voltage before servicing the F5 Elevator Drive.
After disconnecting the supply voltage, always wait 5 minutes before
attempting to change the wiring. The internal DC BUS capacitors must
discharge.
Pay attention to the supply voltage and be sure the supply voltage matches
that of the inverter. A 240V unit can be supplied with voltage in the range 180
to 260VAC +/-0%, for a 480V unit the range is 305 to 528VAC +/- 0%, 48Hz
to 62 Hz.
All 240V models are suitable for use on a circuit capable of delivering not more
than ___ kA rms symmetrical amperes, 240 volts maximum when protected
by class ___ fuses rated ___ Amperes as specied in table 2.2.4.1 or when
protected by a circuit breaker having an interrupt rating not less than ___ kA
rms symmetrical amperes, 240V maximum, rated ___ amperes as specied
in table 2.2.4.1.
All 480V models are suitable for use on a circuit capable of delivering not more
than ___ kA rms symmetrical amperes, 480 volts maximum when protected
by class ___ fuses rated ___ Amperes as specied in table 2.2.4.2 or when
protected by a circuit breaker having an interrupt rating not less than ___ kA
rms symmetrical amperes, 480V maximum, rated ___ amperes as specied
in table 2.2.4.2.
Connection of the F5 series inverters to voltage systems congured
as a corner grounded delta, center tap grounded delta, open delta, or
ungrounded delta, may defeat the internal noise suppression of the
inverter. Increased high frequency disturbance in the controller and on the
line may be experienced. A balanced, neutral grounded wye connection
is always recommended. The three phase voltage imbalance must be
less than 2% phase-to-phase. Greater imbalance can lead to damage of
the inverter’s power circuit.
A disconnect switch or contactor should be provided as a means of turning
off the supply voltage when the unit is not in use or when it must be serviced.
Repetitive cycling on and off of the input supply voltage more than once every
two minutes can lead to damage of the inverter.
2.2. Electrical Connections
2.2.1. Safety First
2.2.2. Voltage Supply
i
2.2.3. Disconnect
Switch

12
Electrical Connections
Integral solid state short circuit protection does not provide branch circuit
protection. Branch circuit protection must be provided in accordance
with the Manufacturer Instructions, National Electrical Code (NFPA70 or
CSA22.1) and any additional local codes.
The minimum voltage rating for protection devices used with 240V inverters
shall be 250VAC.The minimum voltage rating for protection devices used with
480V inverters shall be 600VAC.
Fuses shall not be installed between the drive and the motor.
In PM motor applications where the drive input current can be lower than the
output current, it is allowed to use a protection device with a lower current
rating thus being able to optimize line side wiring and ancillary components.
If the controller / elevator drive is supplied through an individual isolation
transformer, the maximum fuse amperage rating shall not be greater than
125% of the secondary current rating of the transformer per NFPA70 and
CSA 22.1. This value may be signicantly lower than the values in the
preceding tables.
Branch circuit protection for the F5 must be provided using the fuses as
listed in the tables 2.2.4.1 and 2.2.4.2 below. Fast Acting class J fuses
are recommended due to size and trip speed. Note the amperage value
is the maximum value. Lower values may be used based on the relative
sizing of the motor to the inverter. If there is an isolation transformer and
a harmonic lter installed, a high speed class J fuse must be used (only
Ferraz type HSJ is approved).
Table 2.2.4.1 - 230V Units
SCCR UL 248 Semiconductor
Unit Size /
Housing
[kA] rms Class J Rating [A] Fuse Number* / Rating [A]
13 / E 10 40 50 140 06 80 / 80
14 / G 10 50 50 140 06 100 / 100
15 / G, H 10, 18 70 50 140 06 80 / 80
16 / H 18 90 - -
17 / H 18 110 - -
18 / R 100 125 - -
19 / R 100 150 - -
20 / R 100 175 - -
21 / R 100 200 - -
23 / U 100 350 - -
* Semiconductor fuses are manufactured by Siba Fuse Inc. When using this type of fuse,
this is the model number of the fuse that must be used.
2.2.4. Fusing

13
Electrical Connections
Table 2.2.4.2 - 480V Units
SCCR UL 248 Semiconductor
Unit Size /
Housing
[kA] rms Class J Rating [A] Fuse Number* / Rating [A]
13 / E 10 25 50 140 06 40 / 40
14 / E 10 30 50 140 06 50 / 50
14 / G 10 30 50 140 06 80 / 80
15 / E 10 40 50 140 06 80 / 80
15 / G, H 10, 18 40 50 140 06 40 / 40
16 / G, H 10, 18 50 50 140 06 63 / 63
17 / G, H 10, 18 60 50 140 06 80 / 80
18 / H 18 70 50 140 06 80 / 80
19 / H 18 90 50 140 06 100 / 100
19 / R 100 90 - -
20 / H 18 100 - -
20 / R 100 100 - -
21 / R 100 150 - -
22 / R 100 175 - -
23 / R,U 100 200 - -
24 / R,U 100 225 - -
25 / U 100 275 - -
26 / U 100 300 - -
27 / U 100 350 - -
28 / W 100 400 - -
* Semiconductor fuses are manufactured by Siba Fuse Inc. When using this type of fuse,
this is the model number of the fuse that must be used.

14
Electrical Connections
A line choke with minimum 3% impedance is required for all 230 V
inverters 50hp (size 20) and greater. A line choke with minimum 3%
impedance is required for all 480V inverters 100hp (size 23) and greater.
Alternately, an isolation transformer installed between the main line and
the elevator drive will satisfy the same requirement.
The line choke (or transformer) is used to prevent nuisance errors and damage
caused by voltage spikes. Additionally, the use of a line choke will double the
operational lifetime of the DC bus capacitors in the unit. At the same time the
choke will reduce the harmonic distortion of the line current from very high
values of 80-100% THiD to around 45% THiD.
If lower values of line current distortion are required, Contact KEB regarding
an applicable harmonic lter. With such a device it is possible to reduce the
harmonic distortion below 8% THiD.
The F5 series elevator drive is UL approved as a solid state motor overload
protection device. It is necessary to adjust the current trip level in parameter
LM09 Electric Motor Protection Current (IM) or LM03 Motor Current (PM).
The function assumes the use of a non-ventilated motor. The function meets
the requirements set forth in VDE 0660 Part 104, UL508C section 42, NFPA
70 Article 430 part C. See the description for parameter LM08 Electric Motor
Protection for the trip characteristics.
A motor winding sensor can also be used for additional safety and the highest
level of protection. Either a normally closed contact (rating: 15V / 6mA) or a
PTC (positive temperature coefficient) resistor can be connected to the T1,
T2 terminals on the inverter. The thermal device should be connected as
indicated in Sections 2.7 and 2.8.
The F5 Elevator drive can also accept a KTY type temperature sensor. This
sensor will give an analog temperature reading which can be displayed directly
in the diagnostic parameters. Additionally, a temperature level can be set to
give a warning signal to the controller to indicate the motor is becoming too
hot. This allows the controller to stop taking calls or adjust door open time
in an effort to reduce motor temp. A KTY sensor is standard on drive sizes
with R-housing and above or as an added option to drive sizes in housings
H and below.
The KTY device is a solid state device. The approved model number is KTY-
84 (1000Ω at 100° C).
2.2.5. Line Chokes
2.2.6. Motor Thermal
Protection

15
Electrical Connections
In some conventional installations and many MRL applications, the motor
can be a considerable distance (greater then 40 feet) from the elevator drive.
Under these circumstances the long cable length can cause high voltage
peaks or high dV/dt (rate of voltage rise) on the motor windings. Depending
on the design of the motor, the long runs can cause damage to the motor
winding. Therefore, in these installations the use of a special dV/dt lter is
highly recommended.
The standard approved solution is a special output choke. The choke is designed
to be used with a maximum of 16kHz switching frequency and low inductance
so it does not drastically inuence the motor’s equivalent circuit model.
There are three sizes available for motors rated up to 100A - All chokes are
rated for use up to 550VAC. The part numbers and current ratings are listed
below.
Part Number Rated Current
15Z1F04-1005 22A
17Z1F04-1005 42A
21Z1F04-1005 100A
The use of a conventional line or motor choke on the output of the drive is
not recommended since the inductance value is high enough that it would
distort the values in the motor model and result in poor control of the motor.
In addition, these chokes may not be designed to handle the heating incurred
from 16kHz switching operation.
2.2.7. Motor Cable
Length

16
High Voltage Connections
Always note inverter voltage. Select appropriate over current protection
devices, select disconnect device, and select proper wire size before beginning
the wiring process. Wire the drive according to NFPA 70 Class 1 requirements.
The correct wire gauge for each size inverter can be selected from the charts
in Sections 2.4-2.5. The wire gauge is based on the maximum fuse rating for
the inverter. The terminal tightening torque can be found for each unit in the
same charts.
Always use UL listed and CSA approved wire. Use 60/75°C copper conductors
only for equipment rated 100 Amperes or less and use 75°C copper conductors
only for equipment rated greater than 100 Amperes! Use minimum 300V rated
wire with 230V systems and minimum 600V rated wire with 480V systems.
To prevent coupling high frequency noise, the following wires must be spatially
separated from each other a minimum distance of 8 inches (20 cm) when they
are laid parallel to each other.
• AC supply power and motor lines not connected to inverters
• Motor lines connected to inverters
• Control and data lines ( low-voltage level < 48 V )
When using EMI lters, use only the wire provided with the lter to connect
the lter to the inverter. Do not add additional wire between the lter and the
inverter as this will have a negative effect on the operation of the lter.
2.2.8. High Voltage
Connections

17
Ground Connections
When working with high frequencies ( > 1kHz ) and power semiconductors
it is recommended to make all ground connections with large exposed metal
surfaces to minimize the ground resistance.
The metal sub-plate the inverter is mounted on is regarded as the central ground
point for the machine or the equipment. For best results use an unpainted,
galvanized or plated sub-panel.
An additional high frequency ground wire should be connected between the
inverter and the sub-panel. Use a stranded wire equal in size to the main
line conductor or a thick ground strap. This is in addition to the ground wire
required by NFPA 70, UL 508, CSA 22.1.
All ground connections should be kept as short as possible and as close as
possible to the ground system, sub-panels.
If other components in the system exhibit problems due to high frequency
disturbances, connect an additional high frequency ground wire between
them and the sub-panel.
The EMI lter should be mounted to the drive or as close as possible to the
inverter and on the same sub-panel as the inverter. Good metallic surface
contact to the sub-panel is required to provide adequate high frequency
grounding of the lter.
Use of shielded cable is recommended when high frequency emissions or
easily disturbed signals are present. Examples are as follows:
• Motor wires: Connect shield to ground at both the drive and motor.NOTE
the shield should never be used as the protective ground conductor
required by NFPA70 or CSA22.1. Always use a separate conductor
for this.
• Digital control wires: Connect shield to ground at both ends.
• Analog control wires: Connect shield to ground only at the inverter.
The connection of meshed shields to the ground connection should not be
done through a single strand or drain wire of the shield, but with metallic
clamps to provide 360° contact around the surface of the shield to the ground
point. Connection with a single wire from the braided shield reduces the
effectiveness of the shield 70%. Metal conduit clamps work well for this. Be
sure the t is tight.
2.2.9. Ground
Connections
2.2.10. High
Frequency
Shielding

18
High Frequency Shielding
Rigid metal conduit can be used as the shield of the motor wires. Always
observe the following points:
• Remove all paint from the control cabinet and motor housing where
the conduit is fastened.
• Securely fasten all conduit ttings.
• Run only the motor wires through the conduit, all other wires, high voltage
AC and low voltage signal, should be pulled through a separate conduit.
• Connect the control panel to the Sub-panel with a heavy ground strap.
Should EMI lters be used, they should be mounted to the inverter or as close
as possible to the inverter and on the same sub-panel as the inverter. Good
metallic surface contact to the sub-panel is required to provide adequate high
frequency grounding of the lter. Always use the shielding plate provided with
the lter when connecting the lter to the inverter.
Shielding of control wires:
• If digital signal wires are terminated on a terminal block in the control
panel, the shields should be rmly connected to the sub-panel on both
sides of the terminal block.
• The shields of digital signal wires originating outside the control cabinet
which are not terminated on a terminal block, must be connected to the
sub-panel at the point where the cable enters the control panel and at
the inverter.
• If the shield is terminated to the sub-panel within 8 inches (20cm) of the
inverter, then the shield no longer needs to be connected to the inverter.
• When using un-shielded signal wires, they should always be installed
as a twisted pair (signal and common).
• Low voltage signal wires should cross high voltage wires at right angles

19
Storage of Unit
The DC bus of the Torqmax F5 is equipped with electrolytic capacitors. If
the electrolytic capacitors are stored de-energized, the oxide lm working as
a dielectric uid reacts with the acidic electrolyte and destroys itself slowly.
This affects the dielectric strength and capacity of the unit. If the capacitors
start running with rated voltage again, the oxide lm tries to build up quickly.
This causes heat and gas and leads to the destruction of the capacitors.
To avoid failures, the Torqmax F5 must be started up according to the fol-
lowing specication based on duration of storage period (powered off):
Storage Period: < 1 Year
Start up normally, without any additional precautions
Storage Period: 1 - 2 Years
Power on frequency inverter for one hour without any modulation
Storage Period: 2 - 3 Years
Remove all cables from power circuit, including braking resistor
connections
Remove drive enable command
Connect variable voltage supply to inverter input
Increase voltage slowly to indicated input level and remain for specied
time.
Voltage Class Input Voltage Minimum Time
230V
0 - 160V 15 minutes
160 - 220V 15 minutes
220 - 260V 1 hour
480V
0 - 280V 15 minutes
280 - 400V 15 minutes
400 - 500V 1 hour
Storage Period: > 3 Years
Input voltage same as above, however double the amount of time for
each additional year. Eventually consider changing capacitors.
2.2.11. Storage of Unit

20
Dielectric Testing
The Torqmax F5 Elevator drive is dielectric tested after assembly as part
of the factory end test routine. This dielectric test is harmonized and in
accordance with the requirements set forth in UL 508C, CSA C22.2 No.
274-17, ASME A17.5-2019, CSA B44.1-19, EN81, IEC61800-5 and EN
60204-1. The factory dielectric test is conducted using a voltage of 3640
VDC for one second.
EN 60204-1 states that it is permissable to disconnect already tested
components, such as the Torqmax F5 elevator drive, because it has been
100% factory tested. This is the recommended approach.
However, if subsequent testing is required in the integrated system (control
panel), the following points must be observed:
• High voltage LINE side (L1,L2,L3), DC (++, PA+, PB, --) and motor side
load connections (U, V, W) must all be jumpered together.
• All 24V control signals must be connected to earth ground.
• Only DC Voltage can be used for the test. Testing with AC voltage will
damage the semiconductors and capacitors within the elevator drive
thereby voiding the warranty.
• The maximum permitted voltage must be reduced to 80% of the
previously tested factory value. This is 2112 VDC for one second or 1760
VDC for 60 seconds.
• The suggested slew rate of the voltage, to minimum leakage current
resulting from capacitor charging, is 2000VDC/sec.
An insulation measurement (in accordance with EN 60204-1 chapter 18.2)
is permissable with 500VDC. The following points must be observed:
• High voltage LINE side (L1, L2, L3), DC (++, PA+, PB, --) and motor
load side connections (U,V,W) must all be jumpered together.
• All 24V control signals must be connected to earth ground.
• Only a DC voltage (maximum 500V) can be used for the test. Testing
with AC voltage will damage the semiconductors and capacitors within
the elevator drive.
The resulting insulation resistance shall be greater than 1MΩ
2.2.13. Insulation Measurement
2.2.12. Dielectric Testing
Table of contents