Medema Fitform Nordic User manual

Servicemanual
Fitform Nordic
Service Information Fitform 574 Vario Nordic - 2016
1
1. POINTS OF ATTENTION UPON DELIVERY
1.1. All chairs
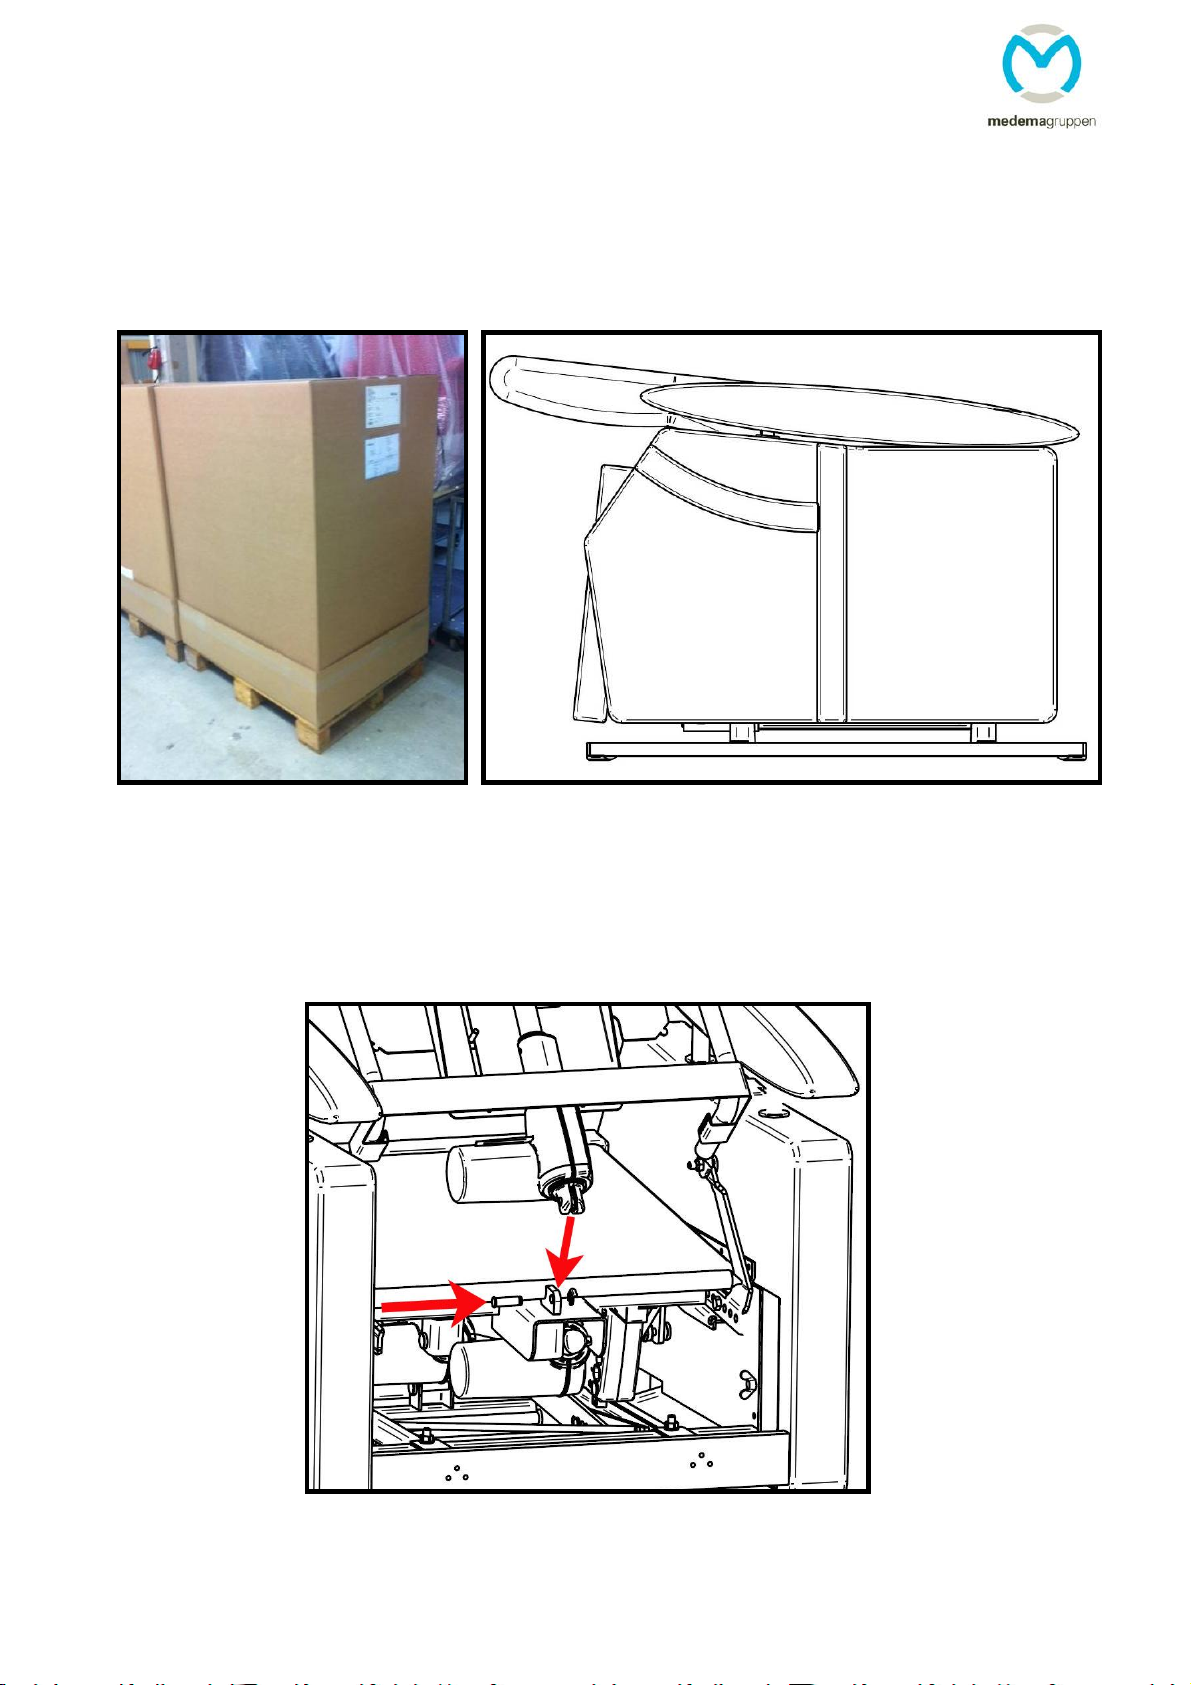
All chairs are packed in a box on a pallet. Remove all packaging before preparing the chair.
Mounting the backrest in the correct position:
For transportation purposes the backrest is assembled on the chair but not yet connected to
the backrest motor. To connect this you need to assemble the mounting pin at the sub frame of
the backrest and the backrest motor.
Service Information Fitform 574 Vario Nordic - 2016
2
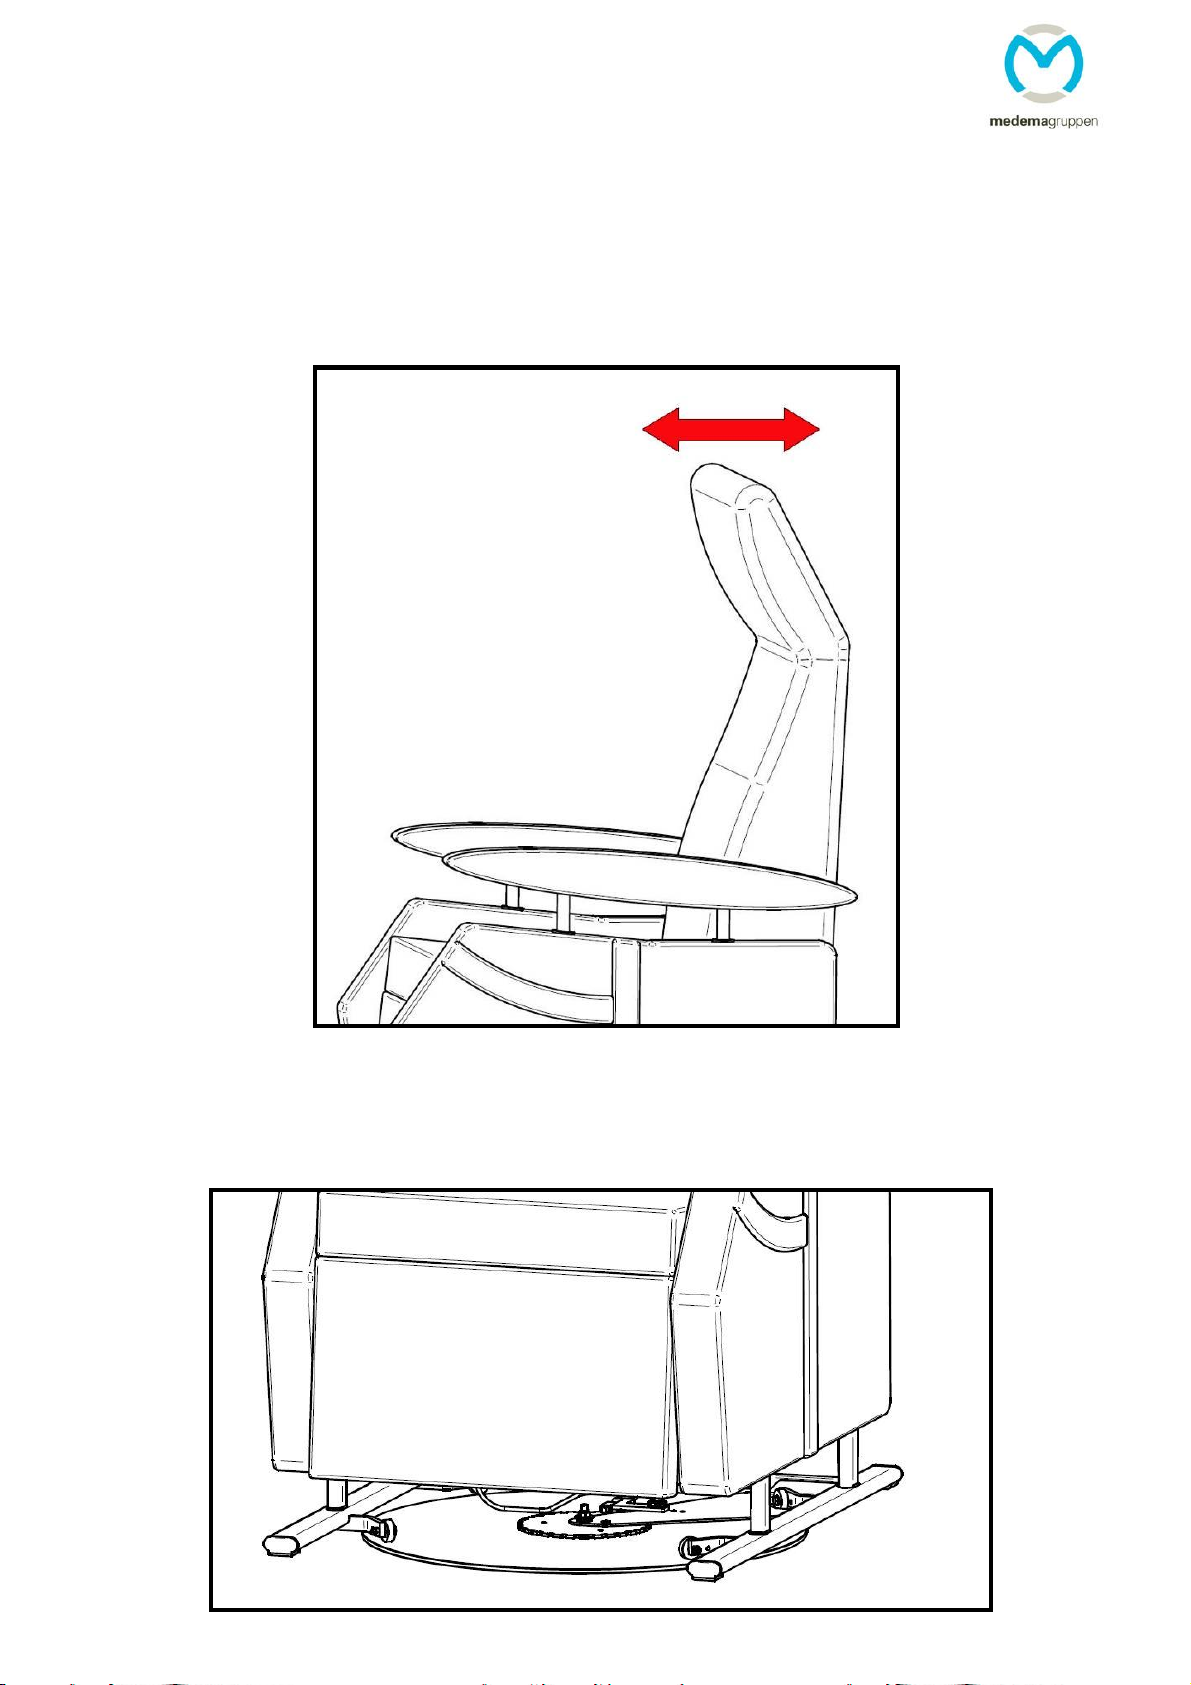
Positioning the adjustable headrest:
The headrest of the chair is adjustable. Adjust the headrest by taking the top of the headrest
(on both sides) into your hands and moving it forwards or backwards. (This can also be done by
the user while sitting in the chair). (A headrest with electrical adjustment is optionally
available)
1.2. Chairs with revolving platform
For transportation purposes the revolving platform is always locked on the brake.

Service Information Fitform 574 Vario Nordic - 2016
3
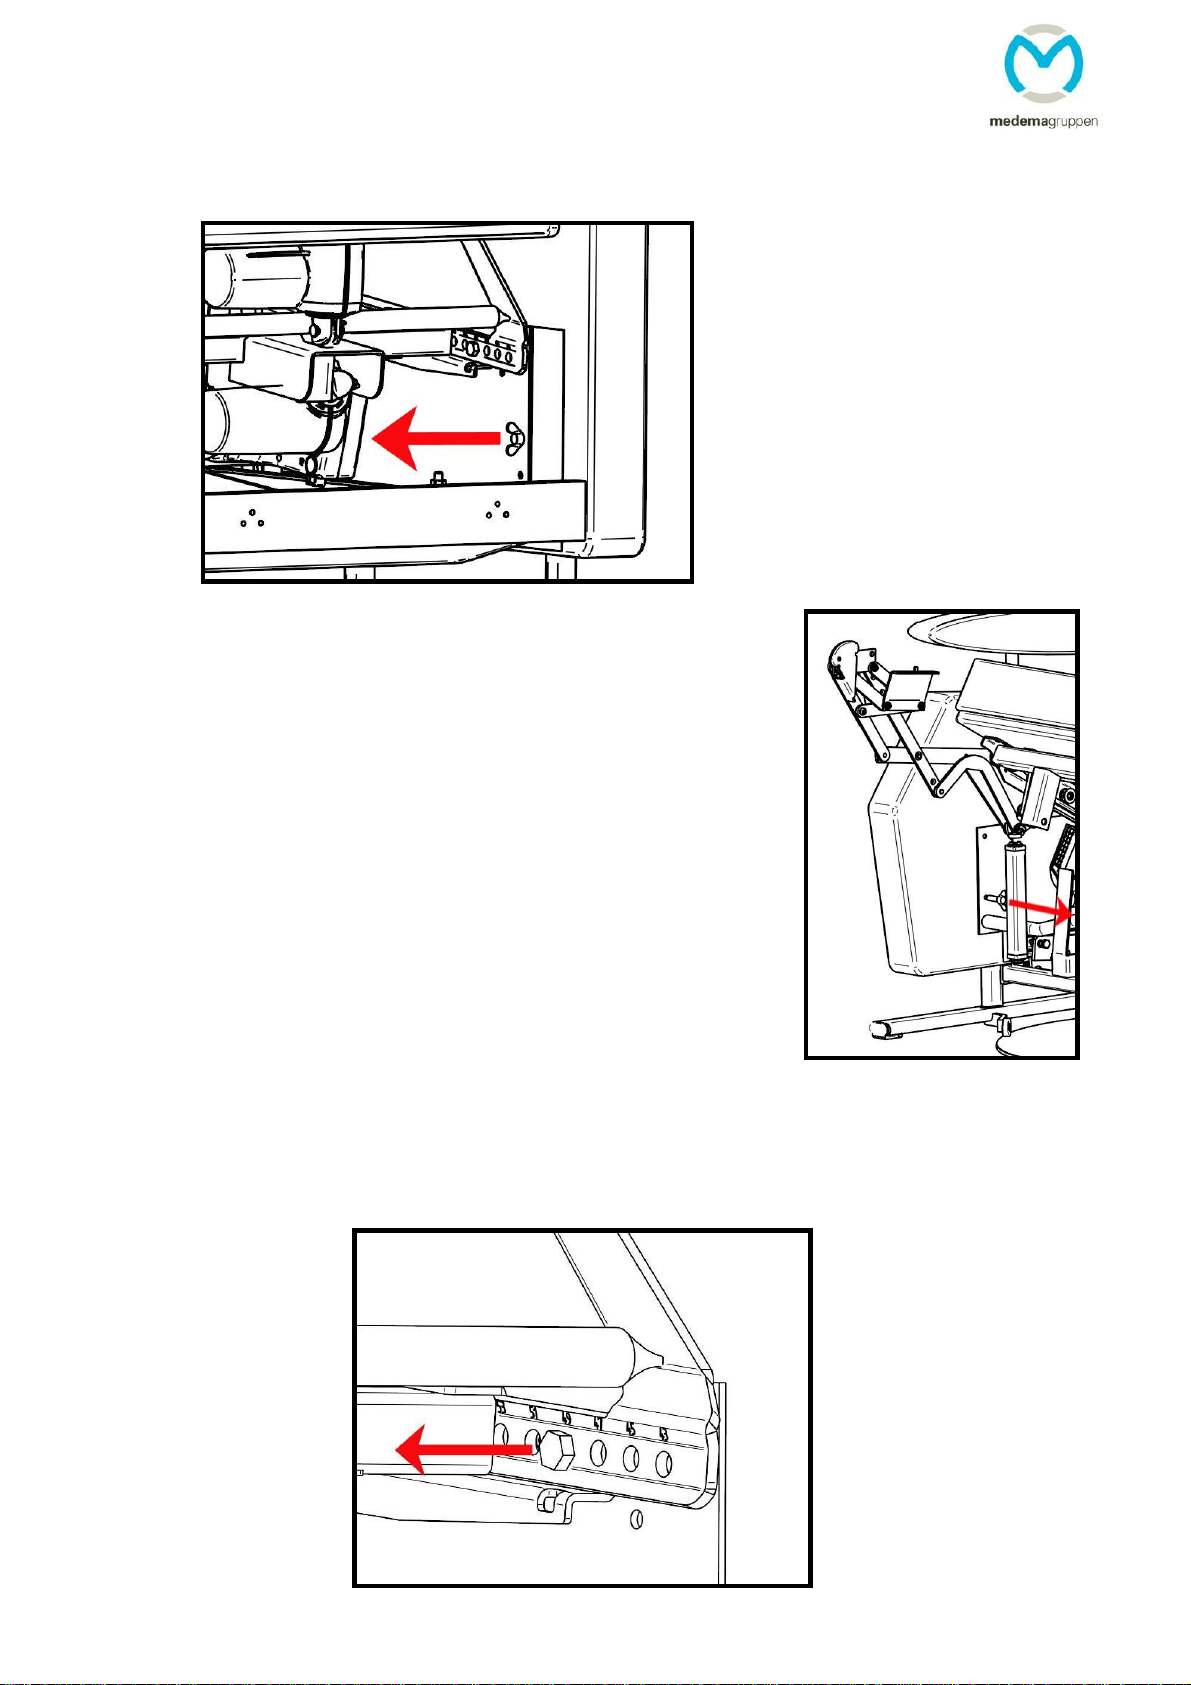
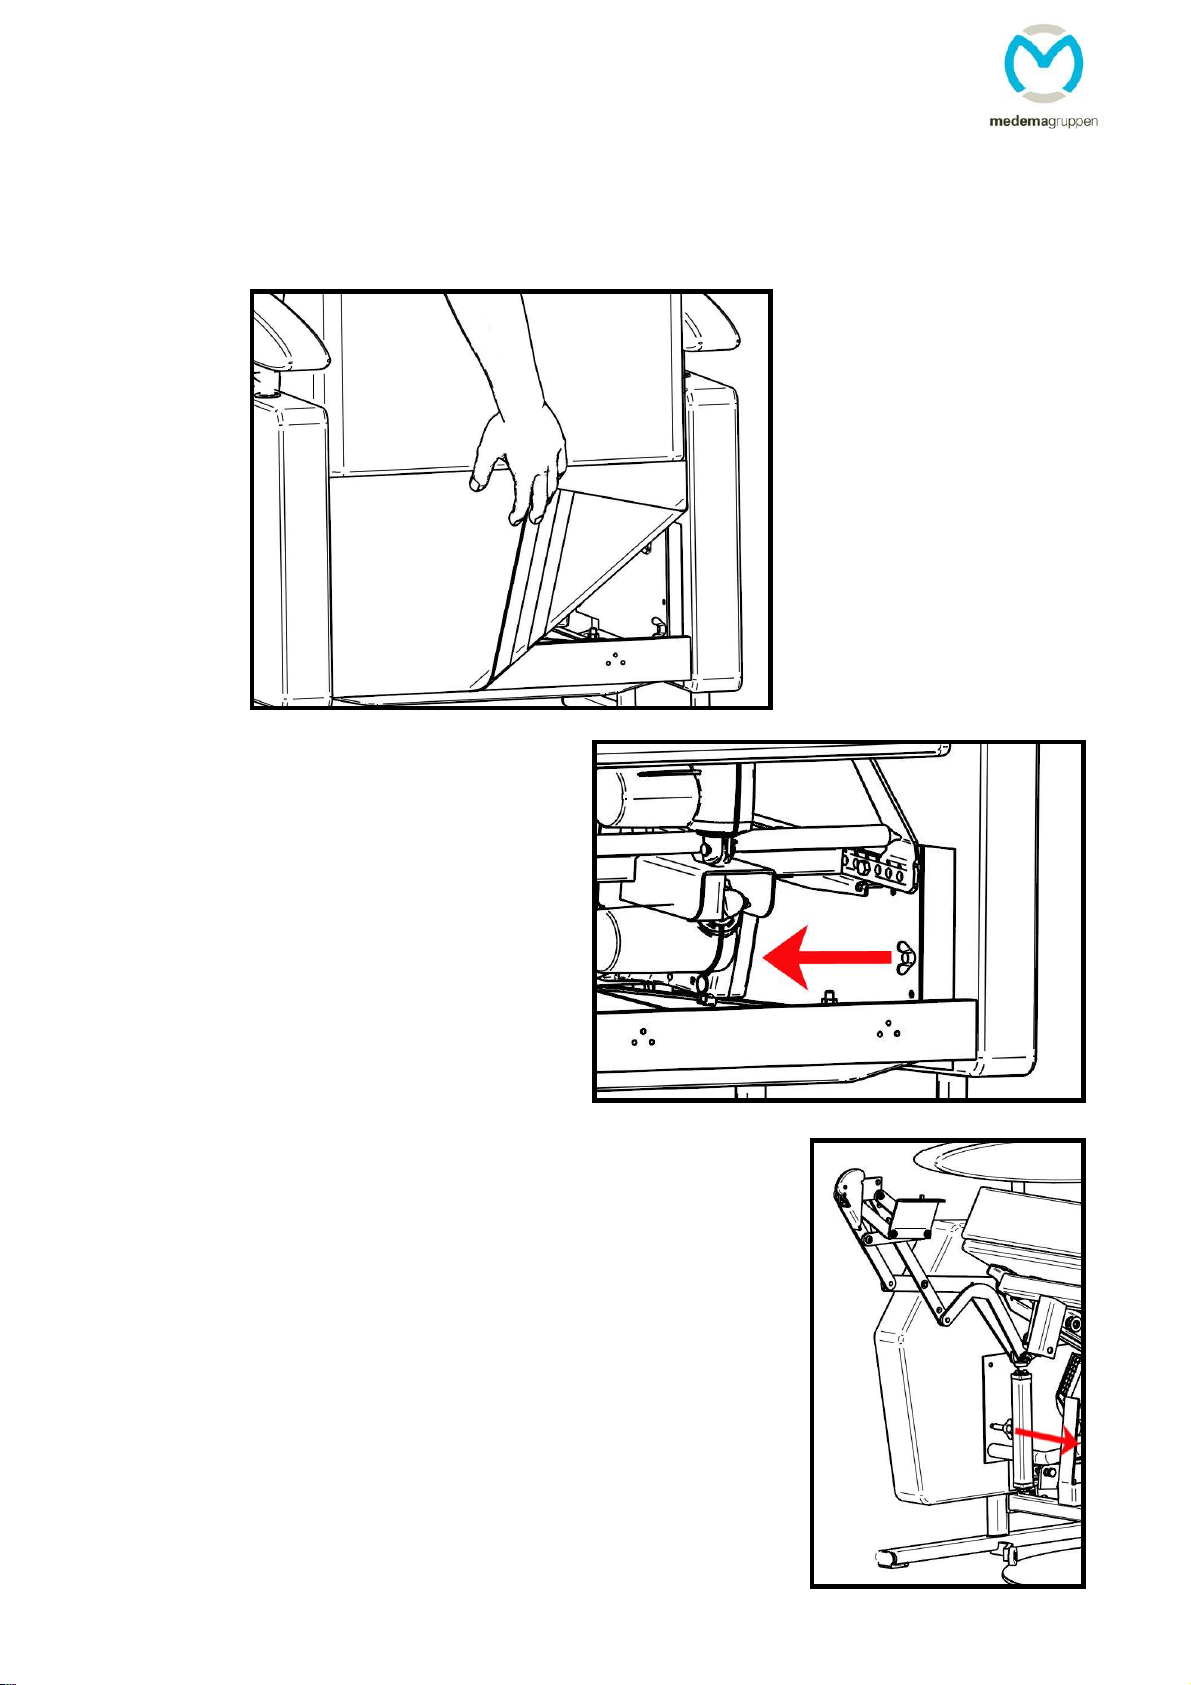
1.3. Chairs with swivelling side panel
To prevent transport damage, the pivot part of the chair has been
protected with a so-called ‘transport protection screw’. Remove this
‘transport protection screw’ before using the swivelling side panel.
Fully extend the footrest.
When there is a tilt function on the chair: move the chair into its
maximum tilting position.
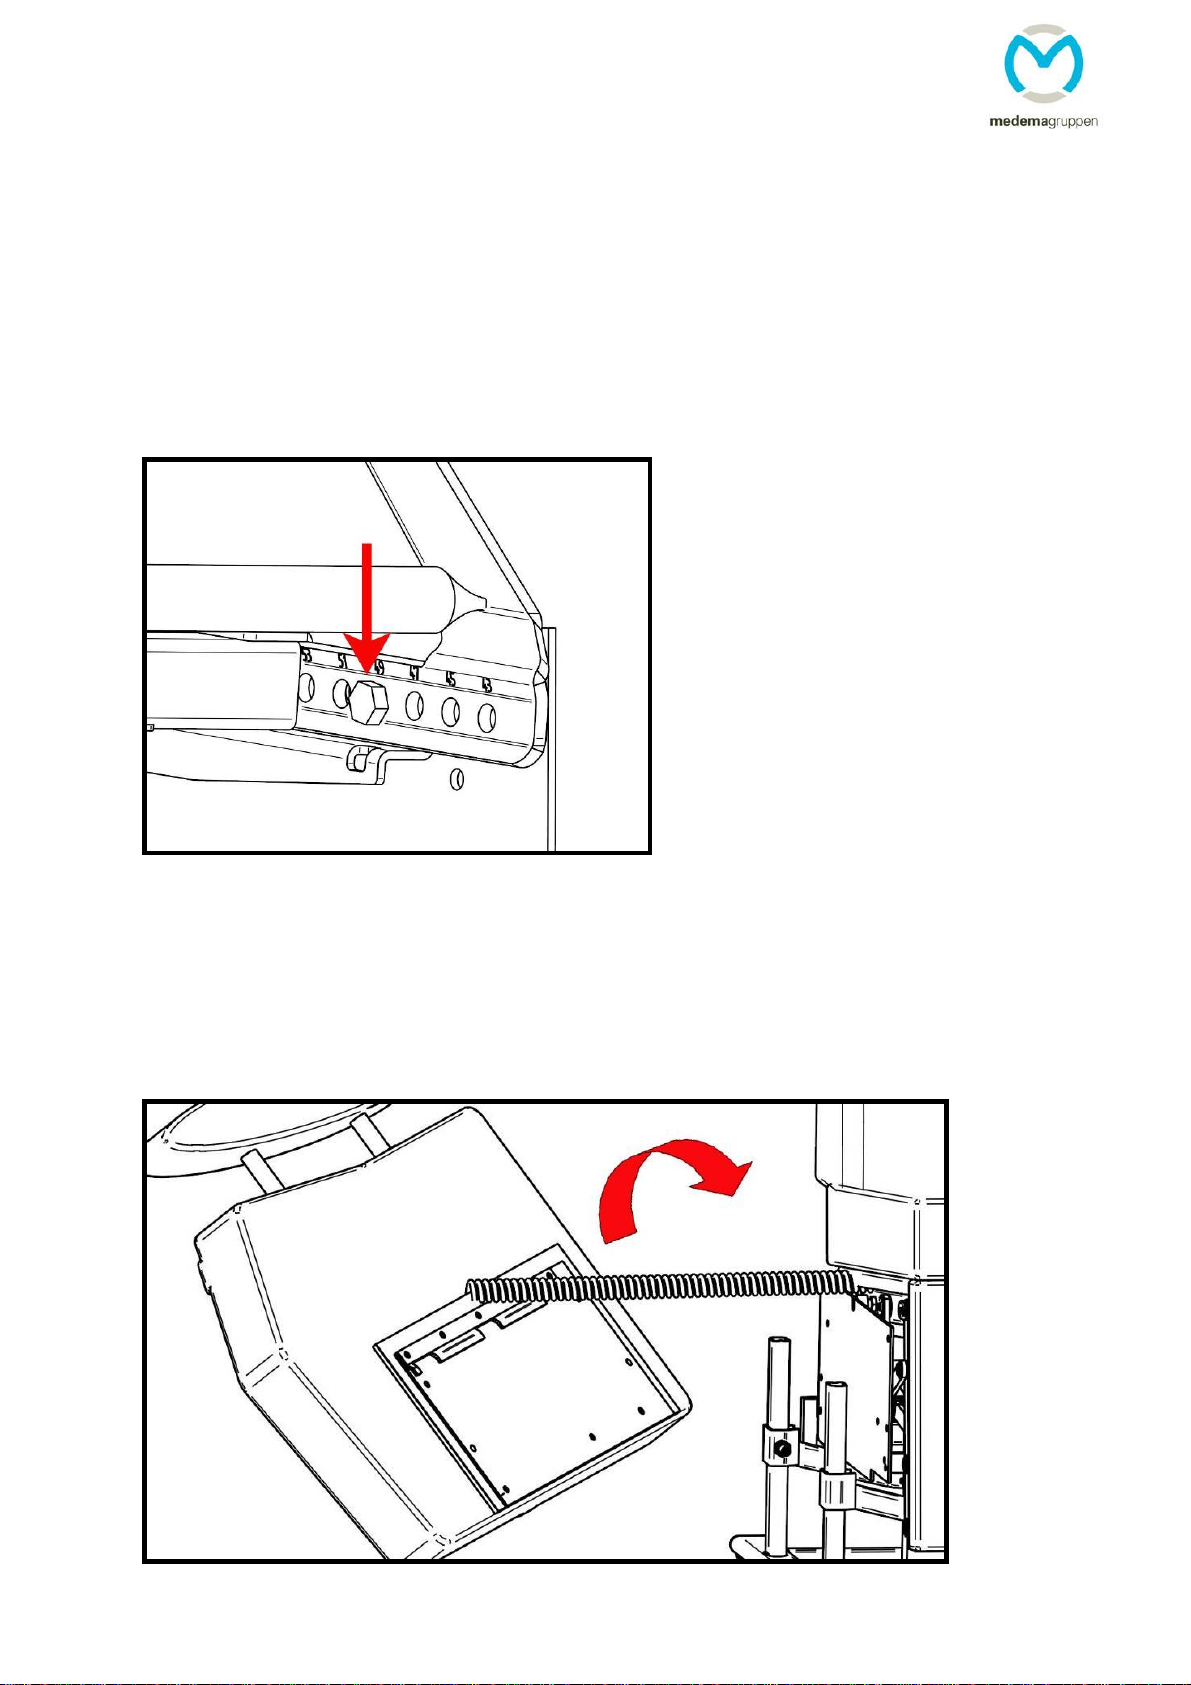
Remove the transport safety screw located at the front of the
chair (on the inside of the mounting plate). The transport safety
screw can be identified by the red sticker.
2. DISASSEMBLY –ASSEMBLY INSTRUCTIONS
Whenever it is not possible to deliver the Fitform 574 Vario Nordic at your client as a fully mounted
chair, we recommend that you transport the chair in parts and to assemble it on location. Below you
will find the easiest, safest and most reliable method to do this, described from a completely
mounted chair.
2.1. Disassembly of the side panels (required time: approx. 5 minutes)
Loosen the Velcro attachment of the rear flap.
Service Information Fitform 574 Vario Nordic - 2016
4
Remove the rear wing bolts with which the side panels are connected to the mechanism
(both left and right)
Extend the footrest completely by using the hand control (if
the chair also has a tilt function, tilt the chair by using the
hand control to maximum level backwards)
Remove the front wing bolts with which the side panels are
connected to the mechanism (both left and right)
Take the cable of the hand control out of the supply unit
and carefully remove both side panels.
2.2. Disassembly of the backrest (required time: approx. 3 minutes)
Take the cable of the backrest motor out of the supply unit.
Remove the mounting bolts of the back hinges and gently shove the backrest backwards
off the mechanism.
Service Information Fitform 574 Vario Nordic - 2016
5
2.3. Assembly of the backrest (required time: approx. 3 minutes)
Gently shove the backrest forwards into the mechanism at the desired sitting depth
Place the mounting bolts into the holes that correspond with the desired sitting depth
and fasten them
Connect the cable of the backrest motor into the supply unit
2.4. Assembly of the sidepanels (required time: approx. 5 minutes)
Hang the side panel with the hand control on the mechanism and connect the cable of
the hand control into the supply unit. Please make sure that the cable cannot get
entangled anywhere in the mechanism! Hang the other side panel on the mechanism as
well.

Service Information Fitform 574 Vario Nordic - 2016
6
Extend the footrest completely by using the
hand control (if the chair also has a tilt
function, tilt the chair by using the hand
control to maximum level backwards)
Fasten the front wing bolts with which the side
panels get connected to the mechanism (both
left and right)
Fasten the rear wing bolts with which the side panels get connected
to the mechanism (both left and right)
Fasten the Velcro attachment of the rear flap

Service Information Fitform 574 Vario Nordic - 2016
7
3. INSTALLING THE REVOLVING PLATFORM UNDER AN EXISTING
CHAIR
Let the chair rise to the stand-up position.
Place the chair on its left side ( be aware of the hand control).
Take off the two side bars .
Mount the complete new base (which consists of a ground plate, a locking mechanism, two
side bars with wheels and the connected Bowden cable) at the desired sitting height.
First attach the side bars at the desired sitting height.
The extra double support wheels on the connection beam should be in the back. The
connection beam is installed at the bottom of the side bars with 2 plate screws on each side.
At last, the revolving platform gets installed onto the bottom of side bars. (As seen on the
illustration on page 8.)

Service Information Fitform 574 Vario Nordic - 2016
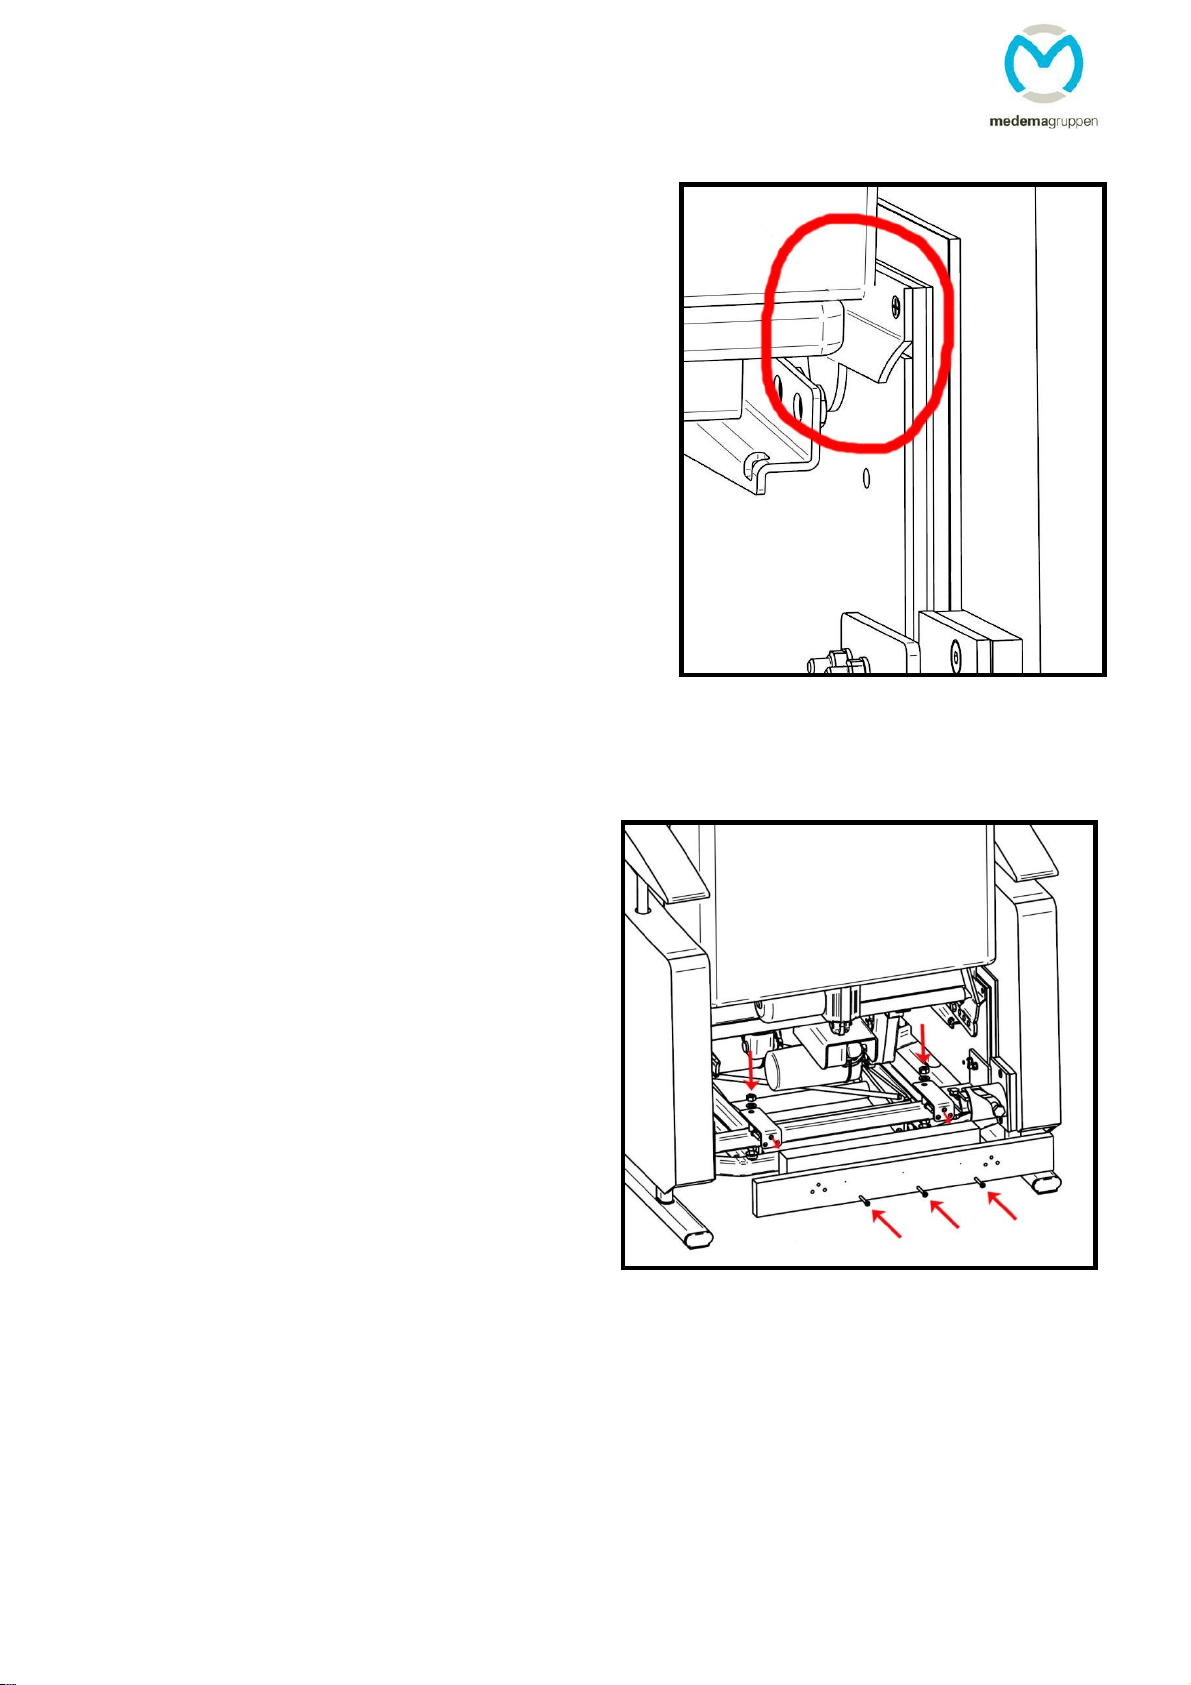
8
Mount the handling mechanism on the back beam of the lower frame with the M6 bolt and
nut. Attach it approximately in the middle of the beam, but keep it clear from the revolving
wheels.
Service Information Fitform 574 Vario Nordic - 2016
9
4. INSTALLING A PIVOTING SIDE PANEL ON AN EXISTING 574 VARIO NORDIC
4.1 Disassembly of the current side panel
Loosen the Velcro attachment of the rear flap.
Remove the rear wing bolts with
which the side panel to replace is
connected to the mechanism.
Extend the footrest completely by
using the hand control (if the chair
also has a tilt function, tilt the chair
by using the hand control to
maximum level backwards)
Remove the front wing bolts with which the side panel is
connected to the mechanism.
If the hand control is on the side of the pivoting side panel,
take the cable of the hand control out of the supply unit and
carefully remove the side panel. The hand control must be
installed on the none pivoting side panel now, following
service manual point 4.10

Service Information Fitform 574 Vario Nordic - 2016
10
4.2 Disassembly of the rear board
Loosen the nuts with which the rear board brackets are fastened and remove the rear board.
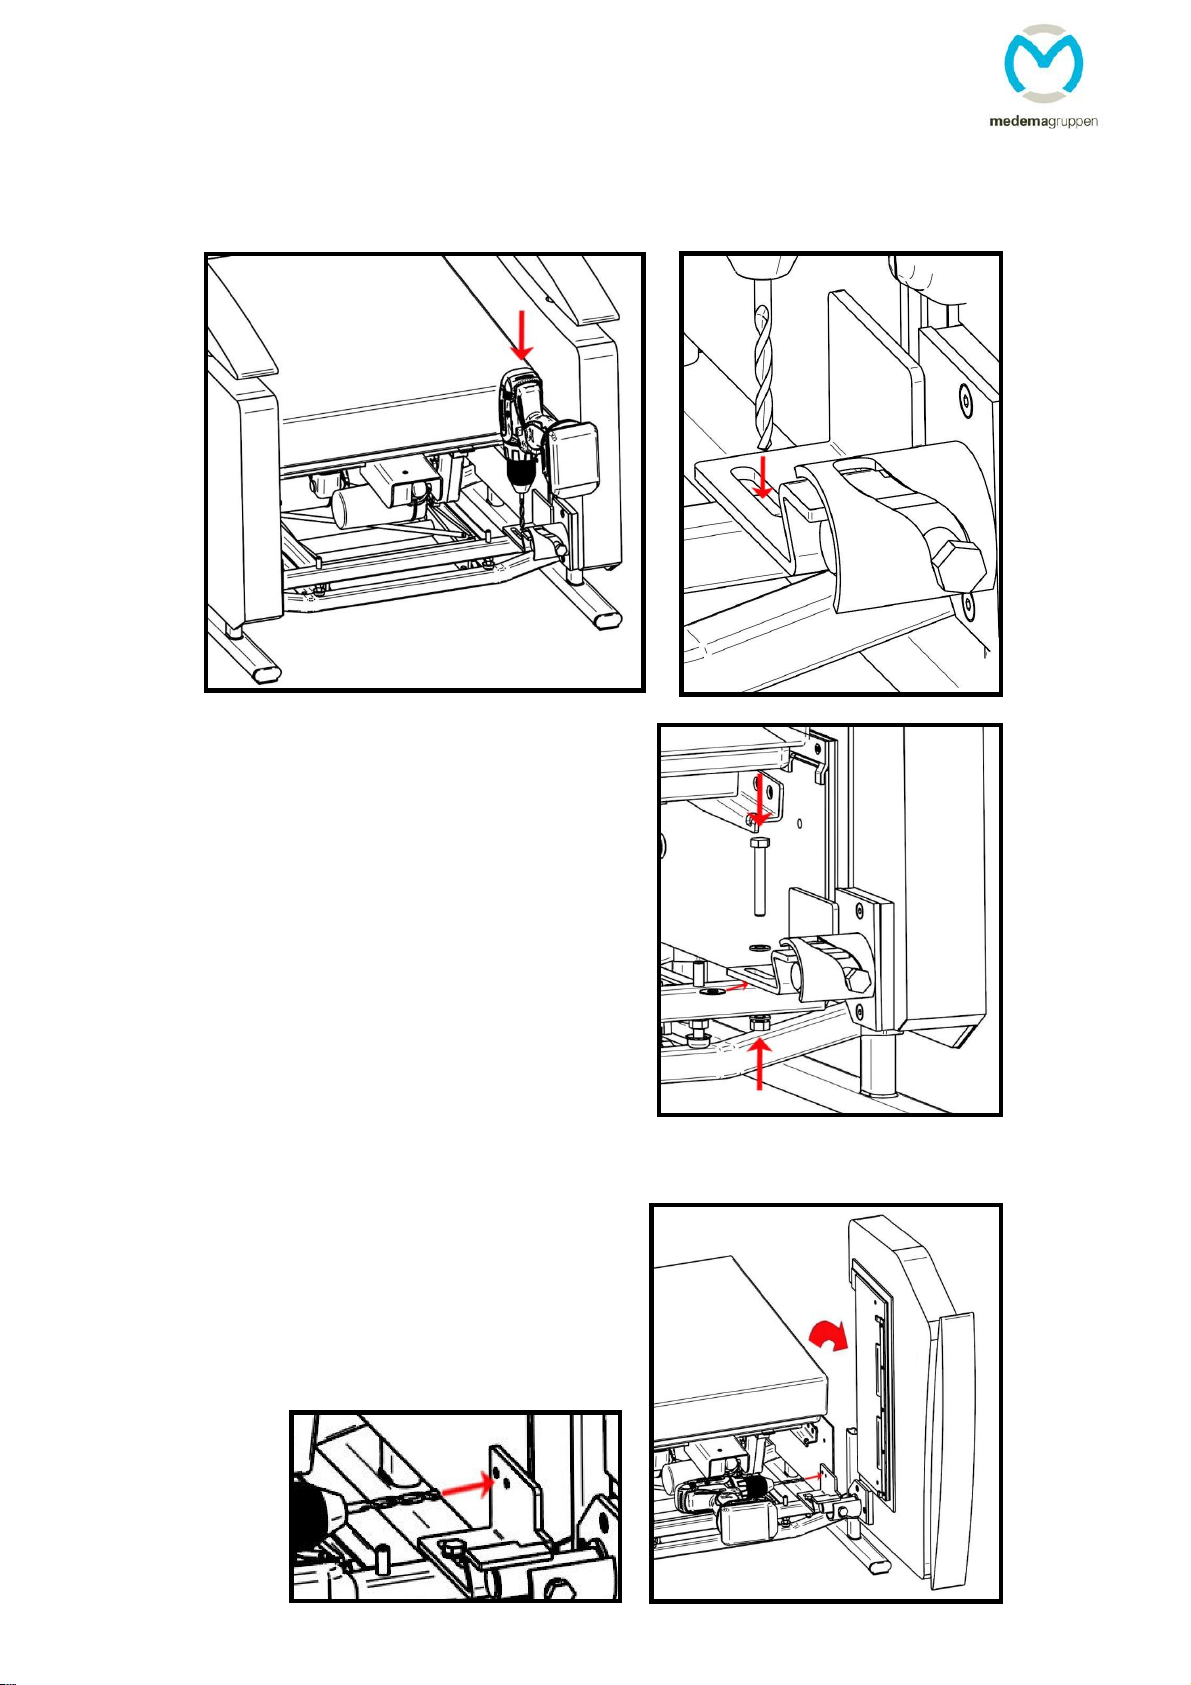
4.3 Placing the pivoting side panel
Place the new pivoting side panel on the chair, by hanging the mounting strip over the side
plate of the mechanism.
Make sure that the pivoting bracket is positioned correctly with the corner piece inside the
mechanism side plate and on the rear beam of the tilting frame. Position the side panel so
that it is symmetric with the other side panel.
Service Information Fitform 574 Vario Nordic - 2016
11
Drill a Ø8mm hole in the middle of the beam through the key hole in the pivoting bracket.
(Temporarily remove the backrest if this provides more desirable work space. Use service
manual point 2.2)
Fill up the space between the rear beam and
the pivoting bracket with large washers, until
the pivoting bracket is positioned straight.
(Make sure by putting a level on the bracket.)
Fasten the pivoting bracket onto the rear
beam, using the provided M8 x 50 bolt, nut
and washers.
Now tilt the side panel upwards. Drill two
Ø6mm holes ±25mm apart, through the
vertical part of the fastened pivoting bracket
that also go through the mechanism side
plate.
Service Information Fitform 574 Vario Nordic - 2016
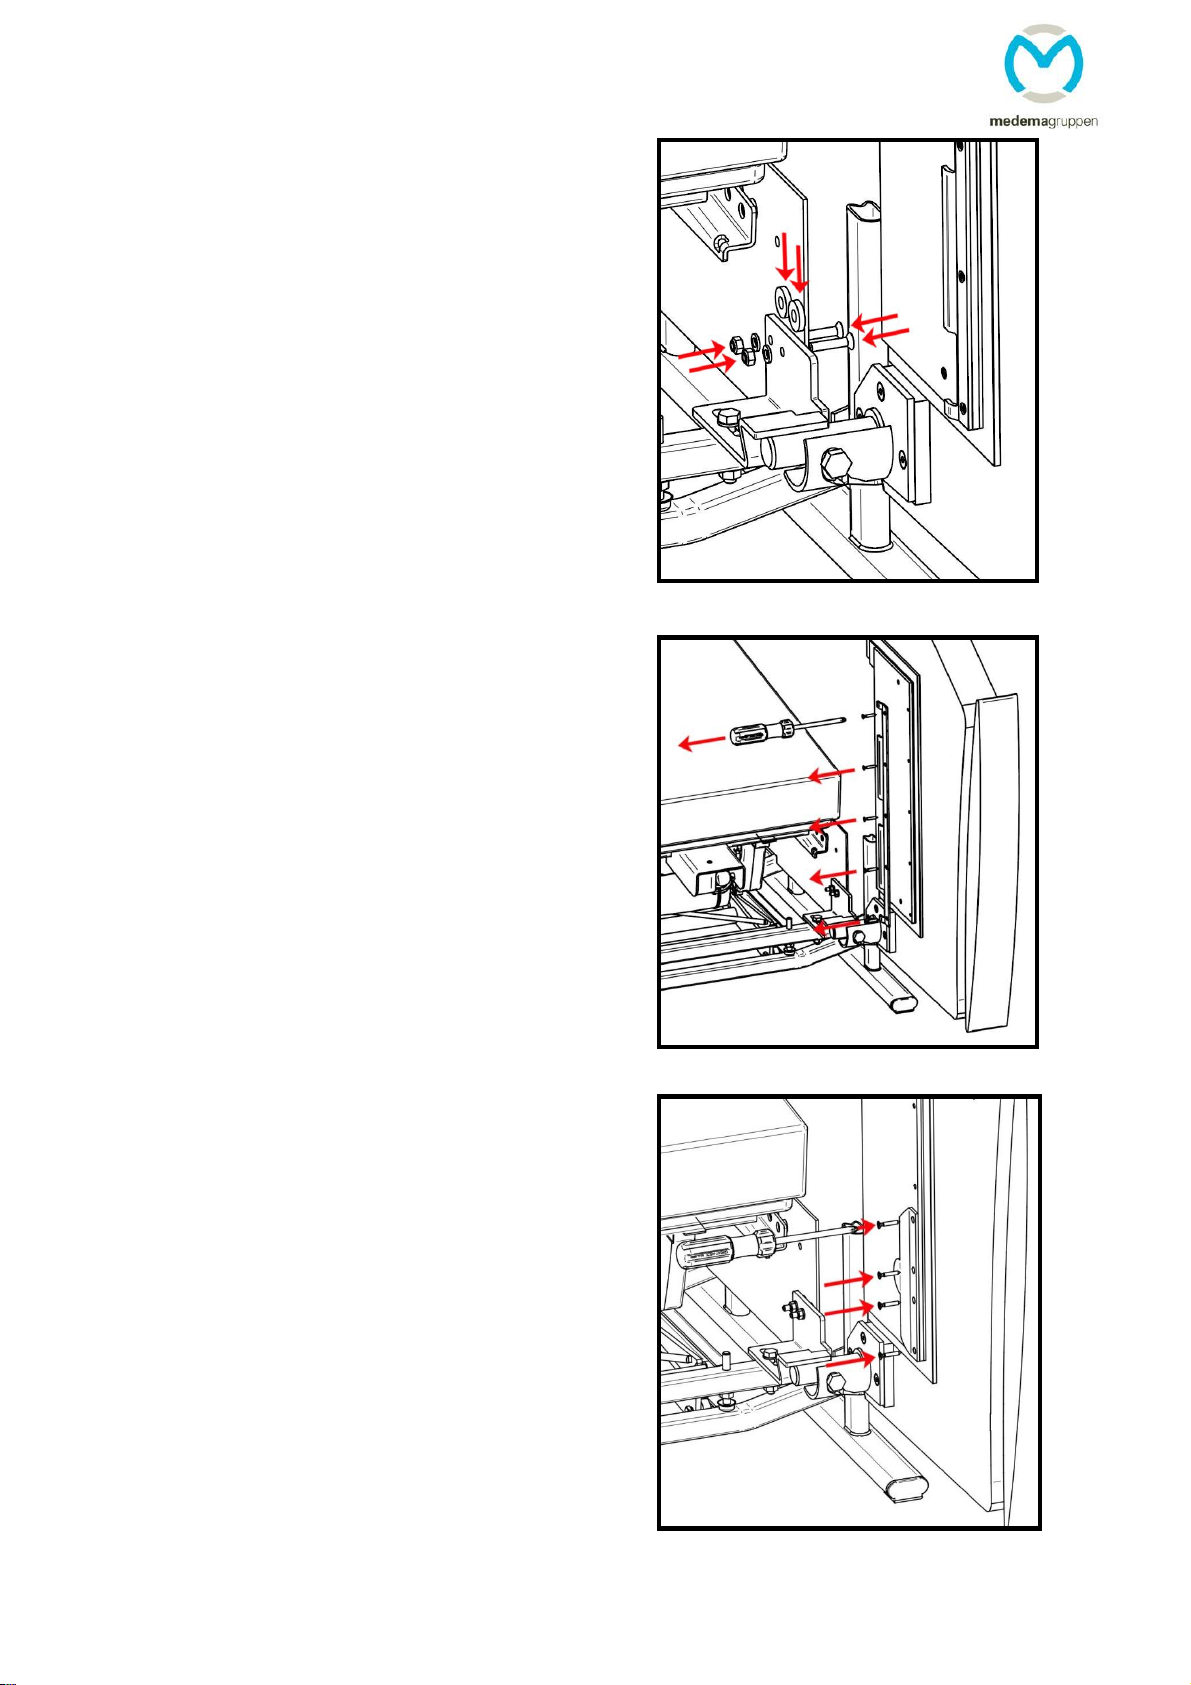
12
Fill up the space between the pivoting bracket
and the mechanism side plate with thick
washers.
Fasten the pivoting bracket onto the side plate
with the provided countersunk M6 screws,
nuts and washers. The screw heads should go
on the outside of the side plate.
Remove the mounting strip from the pivoted
side panel.
Fasten the provided shorter mounting strip
onto the side panel in the rear upper corner of
the mounting plate with 4 of the removed
screws.
Service Information Fitform 574 Vario Nordic - 2016
13
Tilt back the side panel and make sure the short
mounting strip falls correctly over the mechanism
side plate.
(If it does not, use thicker of thinner fill up
washers between the pivoting bracket and the
side plate.)
4.4 Remounting the rear board
Place the provided fill up block in between
the rear board and the rear board brackets
and mount the adjusted rear board onto
the bolts in the rear beam.
Reattach the rear flap onto the Velcro of
the rear board.
The pivoting side panel is now ready for use.

Service Information Fitform 574 Vario Nordic - 2016
14
5. INSTALLING A MOBILITY KIT ON AN EXISTING 574 VARIO NORDIC
Let the chair rise to the stand-up position.
Place the chair on its left side ( be aware of the hand control).
Take off the two side bars.
Mount the Mobility Kit side bars.
Position the chair upright and remove the backrest upholstering and backrest cushion

Service Information Fitform 574 Vario Nordic - 2016
15
Apply the Mobility Kit operating bracket to the backrest frame. (with 2x blind rivet on the
lumbar plate and with the provided bolt in the backrest bracket.
Position the chair on it’s side and guide the Bodown cables around the back of the chair,
through the openings in the Mobiltity Kit side bars.
Secure the outer cable by mounting the adjusting screw to the adjustment plate inside the side bar.
Loosen the most

Service Information Fitform 574 Vario Nordic - 2016
16
Now fasten the ring on the end of the inner cable to the brake bracket with the provided screw.
Position the chair in upright position and re –apply the backrest cushion and the provided
Mobility Kit backrest upholstering.
6. INSTALLING A WHEEL SYSTEM ON AN EXISTING 574 VARIO NORDIC
Remove the plastic caps on the backside of both of the chairs side bars with the help of a
flathead screwdriver.

Service Information Fitform 574 Vario Nordic - 2016
17
Place the wheel brackets in the backside of both side bars and tighten them with the provided
screws.
7. INSTALLING A LUMBAR SUPPORT ON AN EXISTING 574 VARIO NORDIC
Remove the backrest upholstering and backrest cushion

Service Information Fitform 574 Vario Nordic - 2016
18
Mount the lumbar support onto the lumbar plate of the backrest frame:
oApply the lock nut in the right slot connection loose enough, so that movement
through the slot is still possible.
oApply the adjustment knob in the left slot tightly and the lock nut with enough space
between it and the adjustment knob, so that it is possible to loosen the knob for
height adjustment of the lumbar support.
Test the lumbar support by squeezing the bellows to pump up the cushion. Release the air in
the cushion by pushing the button on the bellows.
Now the backrest cushion and the backrest upholstering can be reapplied.

Service Information Fitform 574 Vario Nordic - 2016
19
8. INSTALLING A SMALL COFFEE TABLE ON AN EXISTING 574 VARIO NORDIC
Mount the table top onto the table stand
Stick 3 felt pads on the underside of the side bar fastening bracket. Then mount the table onto
the side bar fastening bracket
Table of contents
Popular Indoor Furnishing manuals by other brands


Whittier Wood
Whittier Wood 2906AUF Assembly instructions

AV Amplivox
AV Amplivox Capri W360 Assembly instructions

Winners Only
Winners Only GDB166LWR Assembly instructions

Pradel
Pradel MIRALITE CONNECT 60 user manual

Nijpels
Nijpels Altea 02R instructions

Fremont & Park
Fremont & Park 194S9510#SC Assembly instruction

Outdoor Interiors
Outdoor Interiors TNA7900-G Assembly instructions

Fraser Hill Farm
Fraser Hill Farm FMC058-2RD2-AA Assembly instructions

American Standard
American Standard 2071 installation instructions

Manhattan Comfort
Manhattan Comfort 6GMC Assembly guide

OSP Home Furnishings
OSP Home Furnishings SEVILLE SVE9858 Assembly instructions

Songmics
Songmics Vasagle LCT64 manual