Mediadroid IMPERIUS SEVEN 3G MT7009 User manual

Quick guide
MT7009
IMPERIUS SEVEN 3G
7”DUAL SIM ANDROID 4.x TABLET PC

2
EN Basics �����������������������������������������������������������������������������������������������2
Introduction ����������������������������������������������������������������������������������2
Box Contents���������������������������������������������������������������������������������2
Getting Started�����������������������������������������������������������������������������3
Prepare to work����������������������������������������������������������������������������3
Appearance of the smarttablet����������������������������������������������5
Key explanations �������������������������������������������������������������������������5
Turning ON/OFF���������������������������������������������������������������������������5
Icons�������������������������������������������������������������������������������������������������6
Device operation�������������������������������������������������������������������������7
Installed apps��������������������������������������������������������������������������������8
Advanced device settings ��������������������������������������������������������9
Connecting to the wireless network ����������������������������������11
Unlocking tablet ������������������������������������������������������������������������12
Making a call �������������������������������������������������������������������������������13
Using the device������������������������������������������������������������������������13
Using camera module��������������������������������������������������������������14
Browsing multimedia���������������������������������������������������������������14
Using USB OTG function ���������������������������������������������������������14
Troubleshooting ������������������������������������������������������������������������15
Basics
Introduction
Thank you for purchasing Dual SIM Android 4�x tablet�
The device is equipped with Android™ 4�x operating
system� It allows you to use two mobile SIM cards at the
same time (two numbers of dierent providers), down-
load applications and use the Internet the same way as
using a computer� It also features a video player, music
player, photo viewer, ebook reader and many more�
Box Contents
1� Tablet
2� USB cable
3� OTG USB cable
4� AC charger
5� Earphones
6� Quick guide
7� Warranty card

3
EN
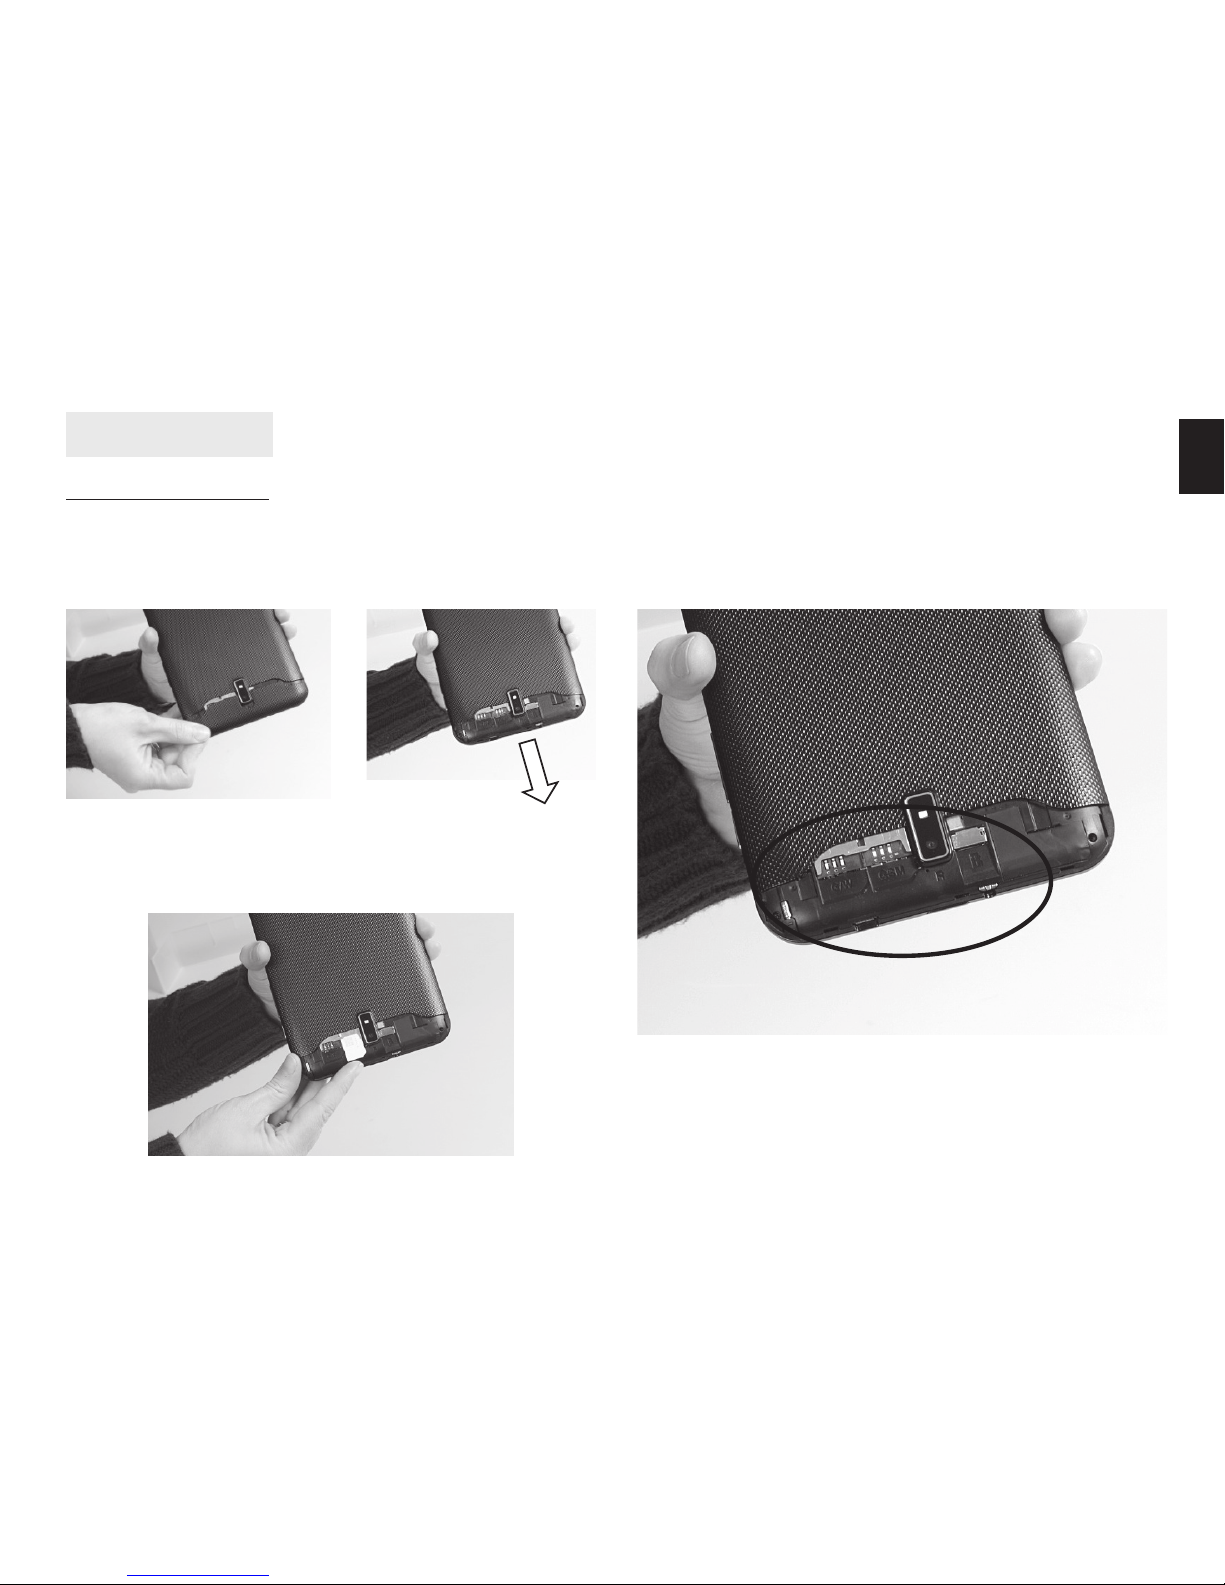
c) Insert valid SIM card (or SIM cards) to proper sockets�
During this task please pay attention to icons inform-
ing about correct direction of inserting�
Getting Started
Prepare to work
Before turn it ON
a) Unpack all items from the giftbox�
b) Put nail to separate back cover�
Note: SIM cards are not included in the tablet set�
If You have only one card, please put it to GSM or G/
WCDMA port� If you like to use dual SIM card system,
please put into G/WCDMA port card which will use
voice and data transfer service (3G/HSPA), and into 2nd
port marked GSM put only voice service card�
Warning: Do turn o your tablet before removing
the SIM card. Never insert or remove the SIM card
when an external power supply is connected, as this
may cause damage to the SIM card.

4
EN NOTE! Removing the card when device is in use can
cause damage or loss of data, application crash or it
can even freeze the device.
d) Insert the micro SD memory card with capacity up to
32GB (not included in the set)� The micro SD card is not
necessary to use tablet functions, but are essential to
operate camera or managing data�
■Put micro SD card according to the compartment
shape:
e) Close gently the cover� Press on edges of tablet to
hear “click” sound�

5
EN
Appearance of the smarttablet
a) Headset socket
b) Power button
c) MicroUSB socket
d) Home button
e) Volume button
f) Main camera lens
g) Flash white LED
h) Loudspeaker
i) Front camera lens
j) Back touch button
k) Home touch button
l) Recently used touch button
ⓗ
ⓘ ⓖ ⓕ ⓐ ⓑ ⓒ
ⓓ
ⓔ
ⓙ ⓚ ⓛ
Key Explanations
Home button
(d), (k)
At any status, press the key to return to the home
screen.
Power
button (b)
Hold down this key to turn your tablet o and on.
Press the button to unlock and lock the tablet.
Volume
button (e)
During the conversation, press the two keys to
adjust the volume.
While playing an audio le, press the two keys to
adjust the volume.
Back button (j) Return to the previous menu.
Recently used
button (l)
Display a list of recently used applications.
Key explanations
Note: In this guide, the phrase “press the key” refers to
pressing and thereafter releasing a key� “Hold down a
key”refers to pressing a key and keeping it depressed
for 2 seconds or longer�
Turning ON/OFF
■To turn tablet ON, press and hold 3 seconds power
button (b), then wait for system loading�
■To turn OFF the tablet, press and hold 3 seconds
power button (b), then tap in displayed window
“Power o” and conrm with OK�

6
EN Icons
In the standby mode, the following icons may appear
in standby sceen�
Icon Description
Indicate the intensity of network signals
Show missed calls
Location by satellite
Receive a new message
An application is being downloaded
The downloading is over�
The alarm clock has been set and activated
A call is in progress
The tablet is playing a song
The tablet is being charged
Enable USB
The access is blocked�
Get connected to the wireless network
Turn on the Bluetooth
GPRS data connection is on

7
EN
Device operation A) The standard pre-installed widget to search the
contents of the device and the Internet with Google
search(access to the Internet must rst be estab-
lished via wireless Wi-Fi or 3G)� (Widget - a small ap-
plication which is permanently running in the back-
ground�)
B) Tap this button to display all installed apps and
widgets on the device� Selected application can be
started by clicking on it� Pressing and holding your
nger on the icon allows you to create a shortcut on
one of the main screens�
C) Shortcuts of applications installed on the device�
Press and hold your nger on the selected icon, al-
lowing you to change its location or remove the
shortcut (application will not be completely re-
moved, uninstalled)�
D)Panel informs about the status of the battery, Wi-Fi
and GSM connection, current time, etc� The panel
also displays the current information about system
and notication such as an incoming email message�
E) Quick access menu
Ⓐ
Ⓔ
Ⓒ
Ⓑ
Ⓓ

8
EN Installed apps
After tapping the apps button (B), list of icons of all cur-
rently installed apps will be displayed� Here is descrip-
tion of few of them:
application to take pictures, make movies and
view photos
application to view les in the memory card
and microSD / SDHC card
application to display map and current loca-
tion which works also with GPS (requires Inter-
net connection)
GPS navigation software (requires Internet
connection)
application to view web pages
calendar
calculator
previously Android Market – application used
to download / purchase software for Android
OS (requires Internet connection)
application to play music from ash memory
or the microSD / SDHC card
application to view les downloaded from the
Internet
application to operate e-mail account (re-
quires Internet connection)
application to search the contents of the de-
vice and the Internet using Google
access to advanced device settings
displays the clock on the screen, also can con-
gure the alarm

9
EN
voice Recorder
application to operate short text messages
application to enable mobile phone mode
contacts management (phone and e-mail)
Advanced device settings
After entering to the Settings menu, you have access
to full list of options of management of device and its
accessories and memory� Here is description of avail-
able options:
Warning. Do not change setting if you don’t know
what you are doing.
SIM management - options related to installed SIM
cards, enabling/suspending service, managing serv-
ices including data transfer (point which card will be
responsible for internet connection), roaming, contact
from SIM card
WI-FI - enabling/disabling WI-FI card, connecting to
available network

10
EN
Airplane mode – turns OFF all wireless interfaces and
GSM services
VPN – setting for VPN network
Bluetooth - enabling/disabling BT interface, pairing
with available devices
Data usage – info about used data transfer, setting lim-
its and warnings
More... – next part of menu “Wireless & networks”
Tethering & portable hotspot – sharing internet con-
nection, setting up mobile access point
Mobile networks – connection to 3G/GSM operator
GPRS transfer prefer mode – enabling/disabling pref-
erences for data transfer (higher priority than voice ser-
vices)� We suggest to keep this option unmarked�
Audio proles: General, silent, meeting and outdoor
optional� In the meanwhile, customized setting-up of
some scene modes are allowed� Select a mode and
enter the customized setting-up, operational are vibra-
tion, volume, ring tones, notications and key beep, etc�
Display: Customized setting-up of the tablet lumi-
nance, wallpaper, the screen and screen time-out and
font size is allowed�

11
EN
Storage: The internal memory of the storage card and
of the tablet is shown�
Battery: info about usage of the battery
Apps: View, manage and delete the applications on
your tablet�
Account & sync: Set the synchronization of your tablet
account with your tablet�
Location services: enabling location services by GPS
and mobile networks
Security: Set unlocking pattern; lock the SIM card
Language & input: user interface language language,
input method and keyboards languages
Backup and reset: Reset DRM and restore factory set-
tings to clear all personal data on your tablet�
Connecting to the wireless network
Tap the menu touch button (f), and then go to Set-
tings� In the menu turn on WI-FI� Tap the “WI-FI” word
and move to the network discovery menu� Tap on the
chosen network and enter the password if the network
is secured�
Date and time: set current time and date�
Schedule power on/o: set the time to turn on and
o your tablet�
Accessibility: options for low vision users
Developer options: options for developers� Better do
not use this option if you are not developer
About tablet: display smarttablet model, service sta-
tus, mobile software and hardware information, etc�

12
EN
Please note: It is strongly recommended to turn the
WI-FI o if you are not using the network. This will
extend the battery working time.
Unlocking tablet
If you have turned on your tablet without inserting the
SIM card, the tablet will prompt you to install the SIM
card� With the SIM card already inserted, your tablet au-
tomatically veries the availability of the SIM card�
Then, the screen shows the following in order:
■Enter PIN1—if you have set the SIM card password�
■Enter tablet password—if you have set your tablet
password�
■Search for network—the tablet searches for the ap-
propriate network�
Once your SIM card is unlocked, your tablet searches for
available network automatically (the screen will show
the network searching is underway)� If your tablet has
found the available network, the name of network ser-
vice provider appears at the center of screen�
Note: If “only for emergency calls” appears on the
screen, it indicates that you are beyond the network
coverage (service area), and that you can still make
emergency calls depending on the signal intensity�

13
EN
When the logo of network service provider appears on
the screen, you can make or answer a call� The bars at
the upper left corner of screen indicate the intensity of
network signal�
Conversation quality is signicantly aected by obsta-
cles, thus moving within a small area while making or
answering a call can improve the conversation quality�
Making a call Using the device
We recommend setting up WiFi internet connection in
rst place� Next please set up google account in order
to access application from Google Play�

14
EN Press “Show applications” to pop-up screen with in-
stalled applications�
Using USB OTG function
Plug USB OTG cable rst, then plug USB device like
pendrive, mouse, keyboard and etc�
Browsing multimedia
You can use Explorer to open selected le, le will be
opened with appropriate application�
Using camera module
Switch front/rear
camera view
Press and hold to
autofoucs, release
to release shutter
Recording movies
Taking photos

15
EN
Troubleshooting
If you have any questions about the tablet, please nd the solutions from the table below�
Problem Causes Solutions
Poor reception When you use your tablet at poor reception ar-
eas, for example, near high rise buildings or base
rooms, the radio wave cannot be transmitted ef-
fectively�
Avoid this as far as you can�
When you use your tablet at network trac con-
gestion, such as working time and o-duty time,
the congestion can result in poor reception�
Avoid this as far as you can�
This is related to the distance to base station in
question�
You may ask the network service provider to
provide service coverage map�
Echoes or noises The trunk line of network is in bad condition� It is
a regional problem�
Hang o the call and dial again� Choose another
better line�
In some areas, the call lines are in bad condition�
Shorter standby time The standby time is relevant to network settings� In poor reception areas, turn o your tablet tem-
porarily�
Replace the batteries Change with a new battery�
When no signals are received, your tablet will
continue searching for base stations, thus con-
suming a large amount of battery power and
reducing standby time�
Use your tablet at strong signal areas or Turn o
the tablet temporarily�
Failed to turn on your
tablet
The battery power is used up� Check the battery power level or charge the bat-
tery�

16
EN SIM card error The SIM card is damaged� Contact your network service provider�
The SIM card is not properly installed� Ensure the SIM card is properly installed�
The metallic face of the SIM card is contami-
nated�
Wipe the face with a clean cloth�
Failed to connect to
the network
The SIM card is invalid� Contact your network service provider�
Beyond the GSM coverage� Consult the network service provider for service
areas�
The signal is feeble� Retry at a stronger signal area�
Failed to make a call The call barring feature is used� Cancel the call barring settings�
The xed dialing number feature is used� Cancel the xed dialing number settings�
PIN code error Enter incorrect PIN codes for three times in suc-
cession�
Contact your network service provider�
Failed to charge the
battery
The battery or the charger is damaged� Change a new battery or charger�
Charge the battery when ambient temperature
is lower than -10°C or above 55°C�
Change the environment�
Poor connection� Check whether the plug is properly connected�
Failed to add contacts
to tabletbook
The storage space of phone book is used up� Delete some contacts from the phone book�
Failed to set up some
features
Your network service provider does not provide
the services, or you haven’t subscribed them�
Contact your network service provider�
Specication and appearance of product are subject to change without prior notice.
For technical support please visit www.media-tech.eu.
Table of contents
Other Mediadroid Tablet manuals