MEDIZS Smart CP11 User manual


1
IMPORTANT NOTICE
This product may malfunction due to electromagnetic waves caused by portable
personal telephones, transceivers, radio-controlled toys, etc. Be sure to avoid having
objects such as, which affect this product, brought near the product.
The information in this publication has been carefully checked and is believed to be
entirely accurate at the time of publication. MEDIZS assumes no responsibility,
however, for possible errors or omissions, or for any consequences resulting from the
use of the information contained herein.
MEDIZS reserves the right to make changes in its products or product specifications
at any time and without prior notice, and is not required to update this
documentation to reflect such changes.
Operation Manual Ver 1.04
ISSUE DATE : 2013.03.13
ⓒ2013 MEDIZS Inc.
All rights are reserved.
Under copyright laws, this manual may not be copied, in whole or in part,
without the prior written consent of MEDIZS Inc.
702 Tamnip-dong, Yuseong-gu, Daejeon,
305-510, Republic of Korea

2
CONTENTS
1. Introduction
1-1 Outline of product
1-2 Feature
2. Safety Information
2-1 Safety Symbols
2-2 EU Countries
2-3 Safety Instruction
2-4 General Safety Information
2-5 Notes for Using the Instrument
3. Configurations
3-1 Main Body (front)
3-2 Main Body (rear)
3-3 Remote controller
4. Installation
4-1 Installation and Focusing
5. Operating Instructions
6. Charts description
7. Program mode
8. Maintenance and Repair
8-1 Basic trouble shooting
8-2 Lamp replacement
8-3 Sleep mode
8-4 Cleaning
9. Service Information
10. Specifications
11. Components List

3
1. Introduction
1-1 . Outline of product
MEDIZS CP-11 is an Automatic Chart Projector which provides 41 different
charts including red/green and polarized filters and orizontal/vertical/single
letter mask. Users can select the desired charts instantaneously by
cordless remote controller.
1-2 . Features
Refined design
Bright and clear chart images
Easy and convenient lamp replacement : spare lamp installed
41 Various charts

4
2. Safety Information
2-1 Safety Symbols
2-2 EU Countries
The following mark, the name & address of the EU Representative shows compliance of
the instrument with Directive 93/42/EEC.
EU Representative:
LP Servizi di Luigi Pinellil
Via Gran Sasso,38-Caronno Pertusella-20142 Varese, Italy
Symbol
Description
Protective earth
Alternating current
This symbol identifies a safety note. Please check
instructions in this manual.
Power OFF
Power ON
Disposal of your old appliance
1. When this crossed-out wheeled bin symbol is
attached to a product it means the product is covered by
the European Directive 2002/96/EC.
2. All electrical and electronic products should be
disposed of separately from the municipal waste stream
via designated collection facilities appointed by the
government or the local authorities.
3. The correct disposal of your old appliance will help
prevent potential negative consequences for the
environment and human health.
4. For more detailed information about disposal of your
old appliance, please contact your city office, waste
disposal service or the shop where you purchased the
product.
Manufacturer
Authorized Representative in the European community
Consult operating instructions
[Table 1]

5
2-3 Safety Instruction
In case that you found „WARNING‟, „CAUTION‟or „NOTE‟mark during use of this
equipment, please check the description carefully. Ignoring this may cause an
injury or an accident. Please read carefully all instructions before switching on
this device.
WARNING
It may cause death or severe injury of you or other person.
CAUTION
It may cause malfunction of instrument or slight injury of you or other
person.
NOTE
It means important notice about installation, operation, basic safety and
maintenance.
Please check the information to avoid improper use of instrument.
WARNING
Please use this equipment in the range of voltage which indicated on the
name plate, or it may cause fire or electric shock.
WARNING
Connect or disconnect power cable after switching off the instrument.
Don‟t operate the instrument with wet hands. It may cause severe injury
due to electric shock.
WARNING
In the below cases, switch off the equipment immediately and disconnect
power cable. Please contact the dealer.
When there is smoke, strange odor or loud noise.
When liquid has been spilled into the instrument, or a metal object
has entered through an opening.
When you dropped the equipment, or when the cover was cracked.
WARNING
Never disassemble the instrument. It may cause fire or electric shock
because this equipment includes high voltage and other dangerous parts.
WARNING
When you replace the lamp, please allow sufficient amount of time to cool
down the heat. Do not touch the lamp directly.
[Table 2]

6
2-4 General Safety Information
1. This instrument is used with accessories from MEDIZS. If user would
like to use the accessories from other manufacturers, safety of
accessories should be verified and identified by manufacturer or by
MEDIZS.
2. Keep this manual in a place easily accessible at all times for persons
operating and maintaining the instrument.
3. Keep away from impact or vibration when moving this instrument. It
may cause some damage inside or outside of the instrument. Handle it
with care.
4. Disconnect the power supply and consult the dealer when there is
smoke, strange odor, or noise while working.
5. If you want to connect this with other equipment, consult the dealer.
6. Don‟t use organic solution such as alcohol, thinner, benzene, etc. to
clean the surface of this instrument. It may damage the instrument.
7. Don‟t disassemble or modify this instrument.
8. If you leave the equipment without using it for long period, disconnect
the power supply and protect the unit with dust cover.
9. Don‟t pull power cable to disconnect from wall outlet.
10. Before every operation, visually check the instrument for exterior
mechanical damage.

7
2-5 Notes for Using the Instrument
1. Caution
①Do not disassemble the instrument. It may cause malfunction or
electric shock.
②When replacing the lamp, turn off power and disconnect the power
cable. And allow the projector to cool down enough time before
replacing the lamp. Hot lamp may cause severe burn.
2. Storage space
①Not humid place and not in the vicinity of water.
②Not dusty and not in the vicinity of filthy place with salt or sulfur.
③Not in the vicinity of vibration or shock.
④Not in the vicinity of direct sunlight.

8
3. Configuration
3-1 Main Body (front)
3-2 Main Body (rear)
Power Inlet
Communication Port (RS232)
Power Switch
Fuse Box
One Touch Button
Spare Lamp Storage
(for Halogen Lamp only)
Lamp replacement handle
Focusing Wheel
Projection Lens
Angle Adjustment
Wheel
Table Stand
[Fig. 1]
[Fig. 2]
[Fig. 3]

9
3-3 Remote controller
Infrared light Transmitter
Number Chart
Snellen Chart
Letter Chart
Landolt Chart
Red/Green filter
Eye image Chart
Arrow button
LAMP
Program button
Horizontal/vertical/
single latter mask
Children Chart
[Fig. 4]
10
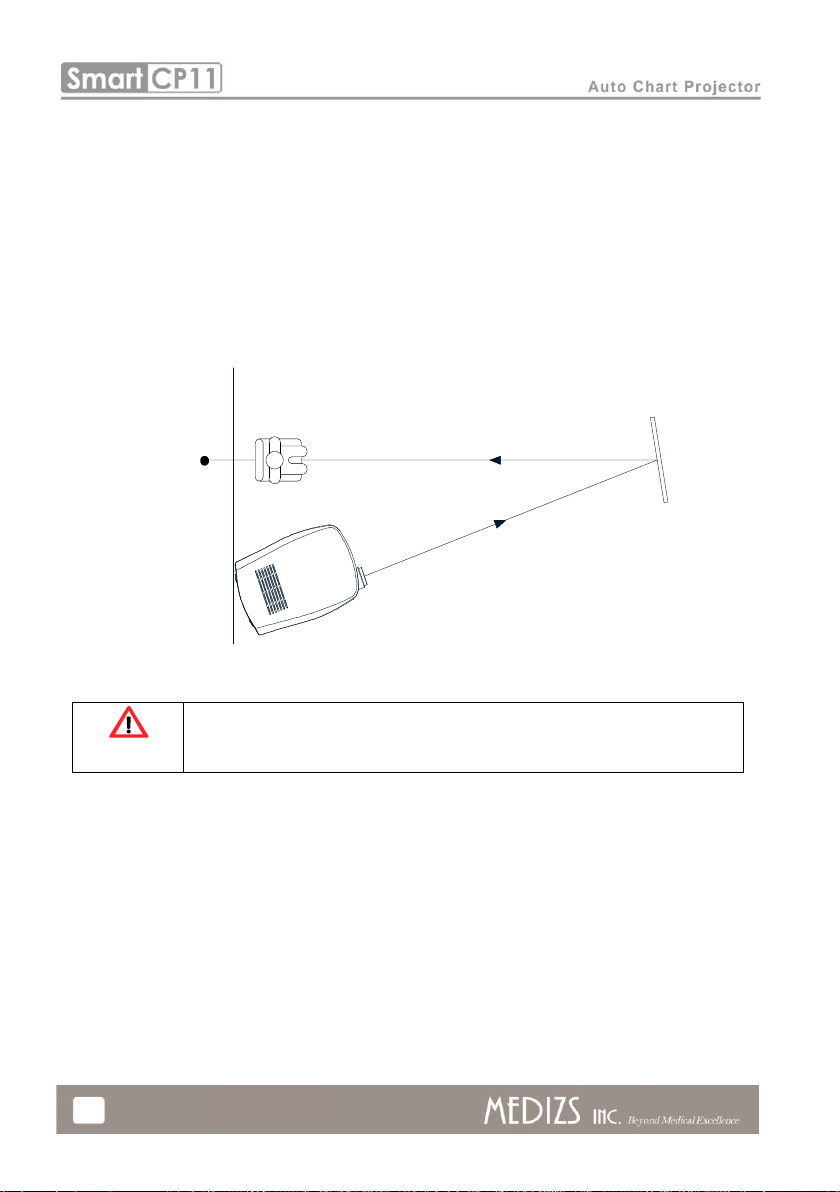
4. Installation
4-1 Installation and focusing
1. Position the screen within the range between 2m and 7m to the
patient.
2. Position the Chart Projector with same range to the patient.
3. Project 0.05(20/400, 6/120) “C”chart onto the screen.
4. Adjust it for a bright clear image using the focusing wheel.
WARNING
Connect or disconnect power cable after switching off the instrument. Do
not touch the projector with wet hands. It may cause severe injury due
to electric shock.
5. Operating Instructions
1. Turn on the power switch of CP-11.
2. The projection lamp lights and the chart for 0.05 vision shall be
viewed.
3. Select the chart using remote controller.
4. Selected part of chart can be projected by using mask button.
Patient
Screen
Chart Projector
Sport of
Light on
[Fig. 5]

11
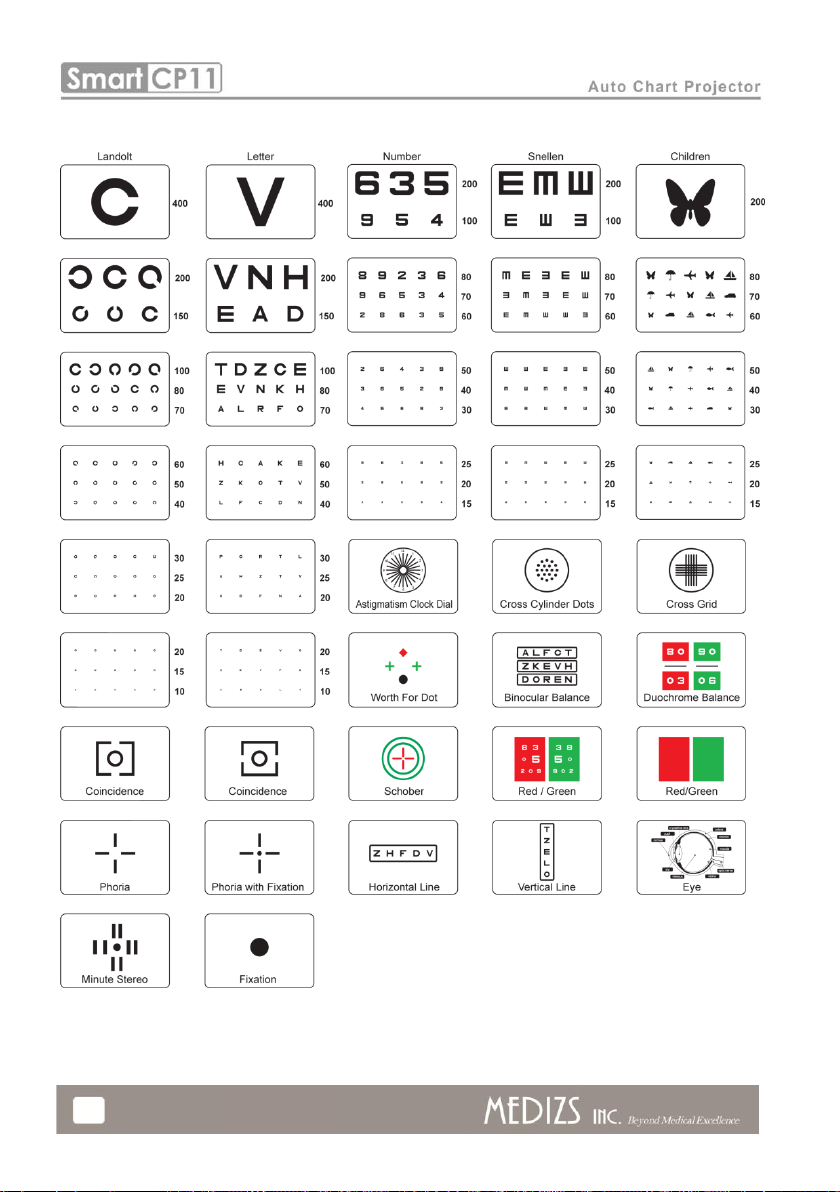
6. Chart description
Charts in CP-11 are as follow
A Type (Fraction indication)
[Fig. 6]
12
B Type (Feet indication)

13
C Type (Meter indication)

14
D Type (For Russian)

15
7. Program Mode
User can program desired charts on CP-11. 2 programs are available.
7-1 Setup program “A”
1) Press „Program-A‟button long time to enter setup mode.
Complete : Beep sound 3 times
2) Select desired chart.
3) Save selected chart by pressing „Program ▶‟ button.
Complete : Beep sound 2 times.
4) User can save maximum 30 charts by repeating process 2) ~ 3)
5) Finish program “A”setup by pressing „Program-A‟or „Program-B‟button.
Complete : Beep sound 3 times and flickering front LED 3 times
7-2 Setup program “B”
1) Press „Program-B‟button long time to enter setup mode
Complete : Beep sound 3 times
2) Select desired chart.
3) Save selected chart by pressing „Program ▶‟ button.
Complete : Beep sound 2 times
4) User can save maximum 30 charts by repeating process 2) ~ 3)
5) Finish program “A”setup by pressing „Program-A‟or „Program-B‟button..
Complete : Beep sound 3 times and flickering front LED 3 times
7-3 Operation of stored program
1) Press „Program-A‟or „Program-B‟button to select the program of your choice.
Complete : Beep sound 2 times
2) Press „Program ◀‟ or „program ▶‟ to scroll through your stored program.
3) If there is no stored program, charts move according to location on disk.
7-4 Program Initialization
1) Press „Program-A‟or „Program-B‟button long time to select the program you
need to initialize.
Press „LAMP‟button then selected program will be initialized.
Complete : Short beep sound 1 time & long beep sound 1time, flickering
front LED 3 times

16
8. Maintenance and Repair
8-1 Basic Trouble Shooting
If there‟s some error or malfunction on the instrument, please do self
inspection according to following instruction.
If the problem still remain after self inspection, please switch off the
instrument and contact dealer (refer to „9. Service Information‟)
1. When the instrument doesn‟t turn on:
Check the facility power source. (Circuit Breakers)
Check the main fuse on the rear of the unit.
2. When the instrument turns on, but does not function:
Check the battery in the remote controller.
Check whether front LED is flickering.
Symptom
Cause and solution
Wrong chart alignment
(Ex: 2 charts in 1 screen)
Check whether there is beep sound when switch on. If there
is beep sound, motor or motor sensor has a problem.
Please contact the dealer.
Instrument works well, but
front LED is flickering.
Projector entered into setup mode.
Please switch off and on.
Chart is changing
automatically.
Projector entered into chart test mode.
Please switch off and on.
[Table 3]

17
8-2 Lamp Replacement
1. Switch off the instrument.
2. Allow the projector to cool down for about 10 minutes before replacing the lamp.
3. Put on heat protection gloves.
4. Pull lamp replacement handle on rear side. (Power cable is connected)
5. Disassemble lamp socket from lamp module.
6. Disassemble lamp from lamp socket.
7. Assembly procedure is reverse of disassembly.
WARNING
The lamp may be HOT! Do not touch the lamp directly and allow
the sufficient amount of time to cool down the heat.
[Fig. 7]
[Fig. 8]
[Fig. 9]

18
8-3 Sleep mode
This instrument enters into sleep mode when there is no use in selected period. User
can set 3/5/10 minutes with remote controller.
1.Press „LAMP‟button to turn off the lamp.
2.Press „Clock Dial‟button 3 times.
Enter into sleep mode setup with beep sound.
3.Press mask button. (3, 5, and 10 minutes from right side)
4.Complete setup by pressing „LAMP‟button.
5.The lamp will be turn on with beep sound (1 minute: 1 time, 5 minutes: 2 times,
10 minutes: 3 times).
8-4 Cleaning
1.This instrument should be maintained clean. Do not use volatile substance,
thinner, benzene, etc.
2.If for some reason the instrument becomes soiled, wipe it with the lint-free cloth
and mild detergent. Then, wipe off with a dry cloth to finish.
9. Service Information
If product problem persists after following instructions in „8.Maintenance and Repair‟,
please contact the dealer.
Referring the name plate, please give below information to the dealer.
1. Information
Model name : CP-11
Serial Number : 7 digits in the name plate
Symptom : For fast service, please describe it as much as possible
2. Supply of spare parts
Parts of this instrument will be supplied for 6 years if it was discontinued.
Serial Number
[Fig. 10]
Table of contents


