Metos XQG70-Q712K User manual

It is essential to read this manual carefully before it is installed
and used for the first time.
XQG70-Q712K
MG4160990MU

This washing machine conforms to current safety
requirements. Inappropriate use can, however, lead
to personal injury and damage to property.
To avoid the risk of accidents and damage to the
washing machine, please read this manual carefully
before using it for the first time. They contain
important information on its installation, safety, use
and maintenance.
Keep this manual in a safe place for future reference.
14
15
12

Read and understand thoroughly these safety instructions
before use. The items indicated here are very important
safety precautions, which must be followed. We cannot be
held liable for damage caused by non-compliance with the
warning and safety instructions or resulting from incorrect
use or operation.
Technical safety
Before setting up the washing machine, check it for any externally
visible damage. Do not install or use a damaged washing machine.
Before connecting the washing machine, ensure that the connection
data on the data plate (voltage and current) match the electricity
supply. If in any doubt, consult a qualified electrician.
The electrical safety of this washing machine can only be guaranteed
when continuity is complete between it and an effective earthing
system which complies with current local and national safety
regulations. It is most important that this basic safety requirement is
present and regularly tested, and where there is any doubt the
household wiring system should be inspected by a qualified electrician.
The manufacturer cannot be held liable for the consequences of an inadequate earthing system.
Do not connect the washing machine to the mains electricity supply by an extension lead.
Extension leads do not guarantee the required safety of the appliance.
Unauthorized repairs could result in unforeseen dangers for the user, for which manufacturer
cannot accept liability. Repairs should only be undertaken by an approved service technician.
Ensure current is not supplied to the machine until after maintenance or repair work has been
carried out.
If the supply cord is damaged, it must be replaced by the manufacturer, its service agent or
similarly qualified persons in order to avoid a hazard.
when these parts are fitted can the safety standards of the machine be guaranteed.
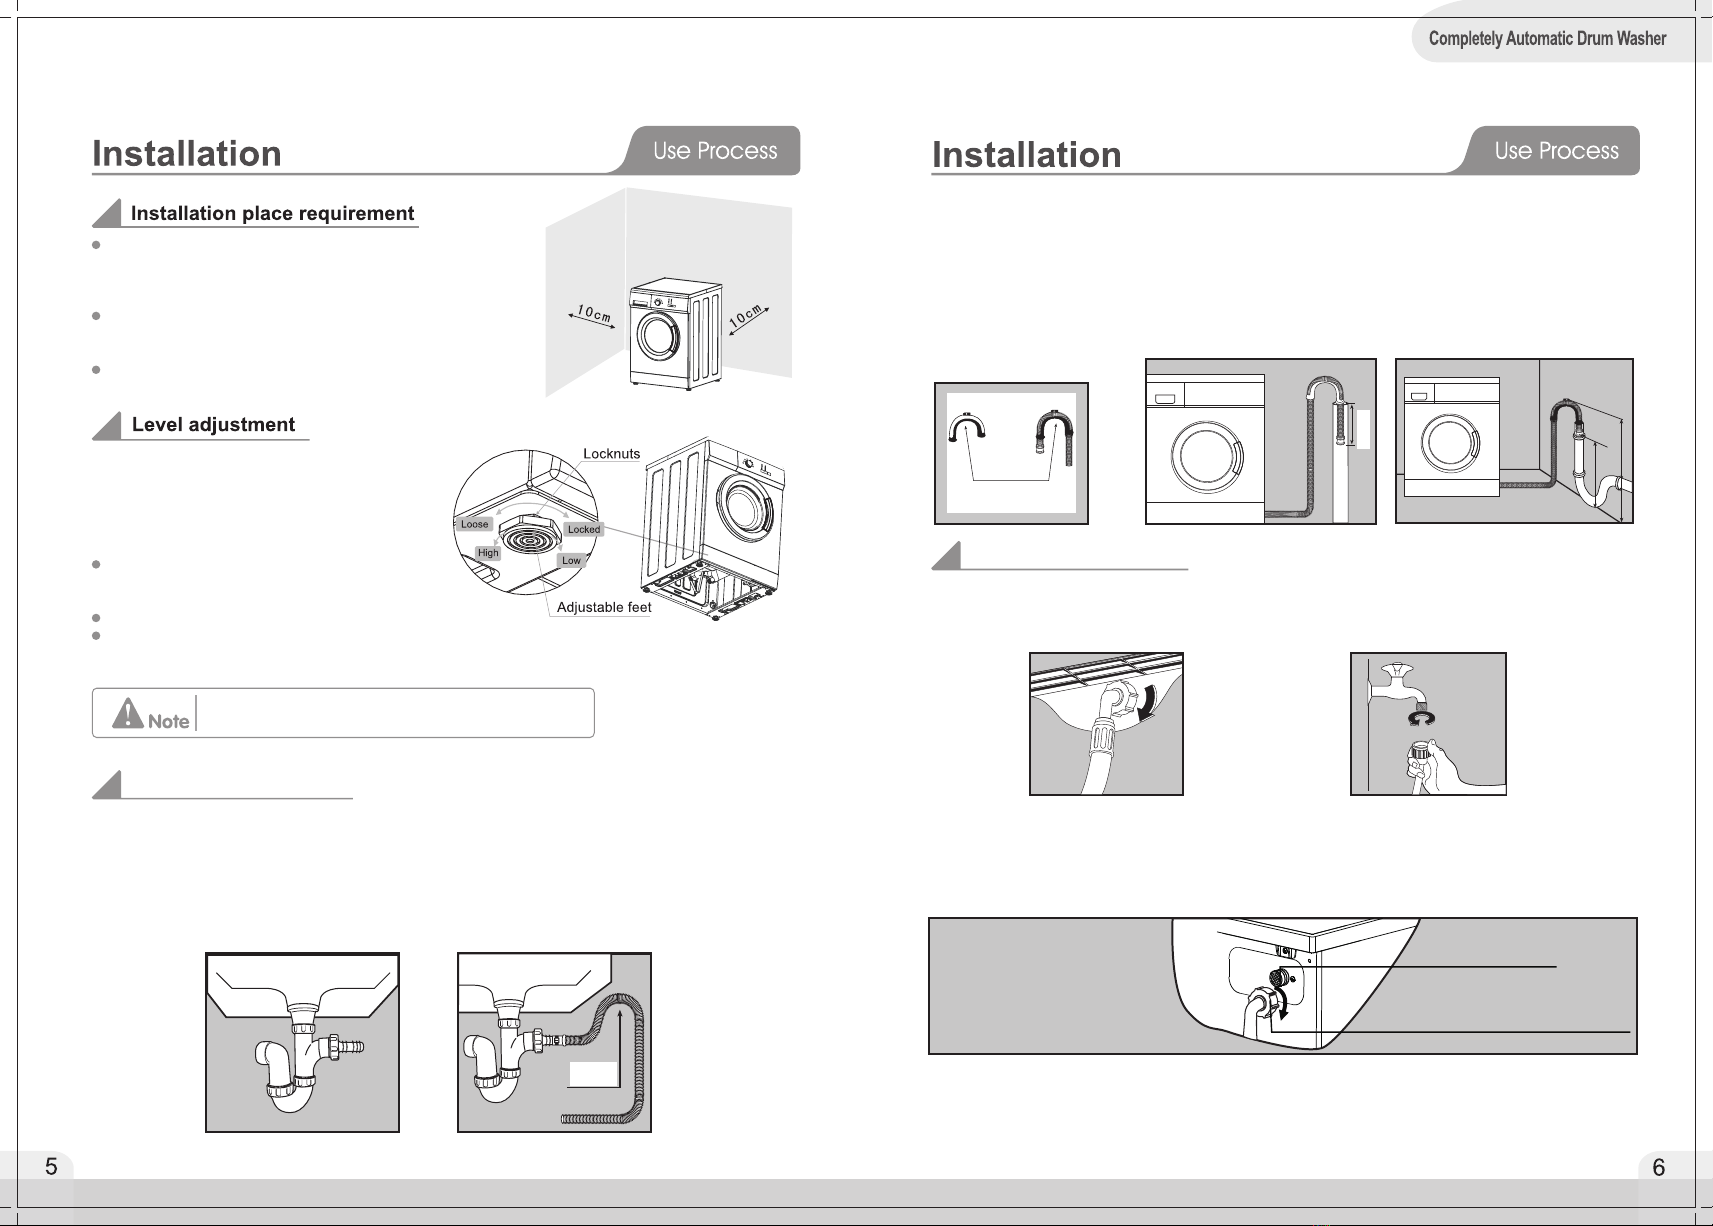
To avoid the risk of personal injury or damage to the washing
machine, do not install it in place where it is damp and where
it suffers from rainfall.
Do not install the washing machine in place where it suffers
from the sun directly, in which plastic or components will be
damaged. It will be shortened the life of your washing machine.
Do not install the washing machine in place where temperatures
below freezing may occur. Frozen hoses may burst or split. The
reliability of the electronic control unit may be impaired at
temperatures below freezing point.
Do not shoot the washing machine with water when you clean it.
Keep the washing machine away from fire or heat sources.
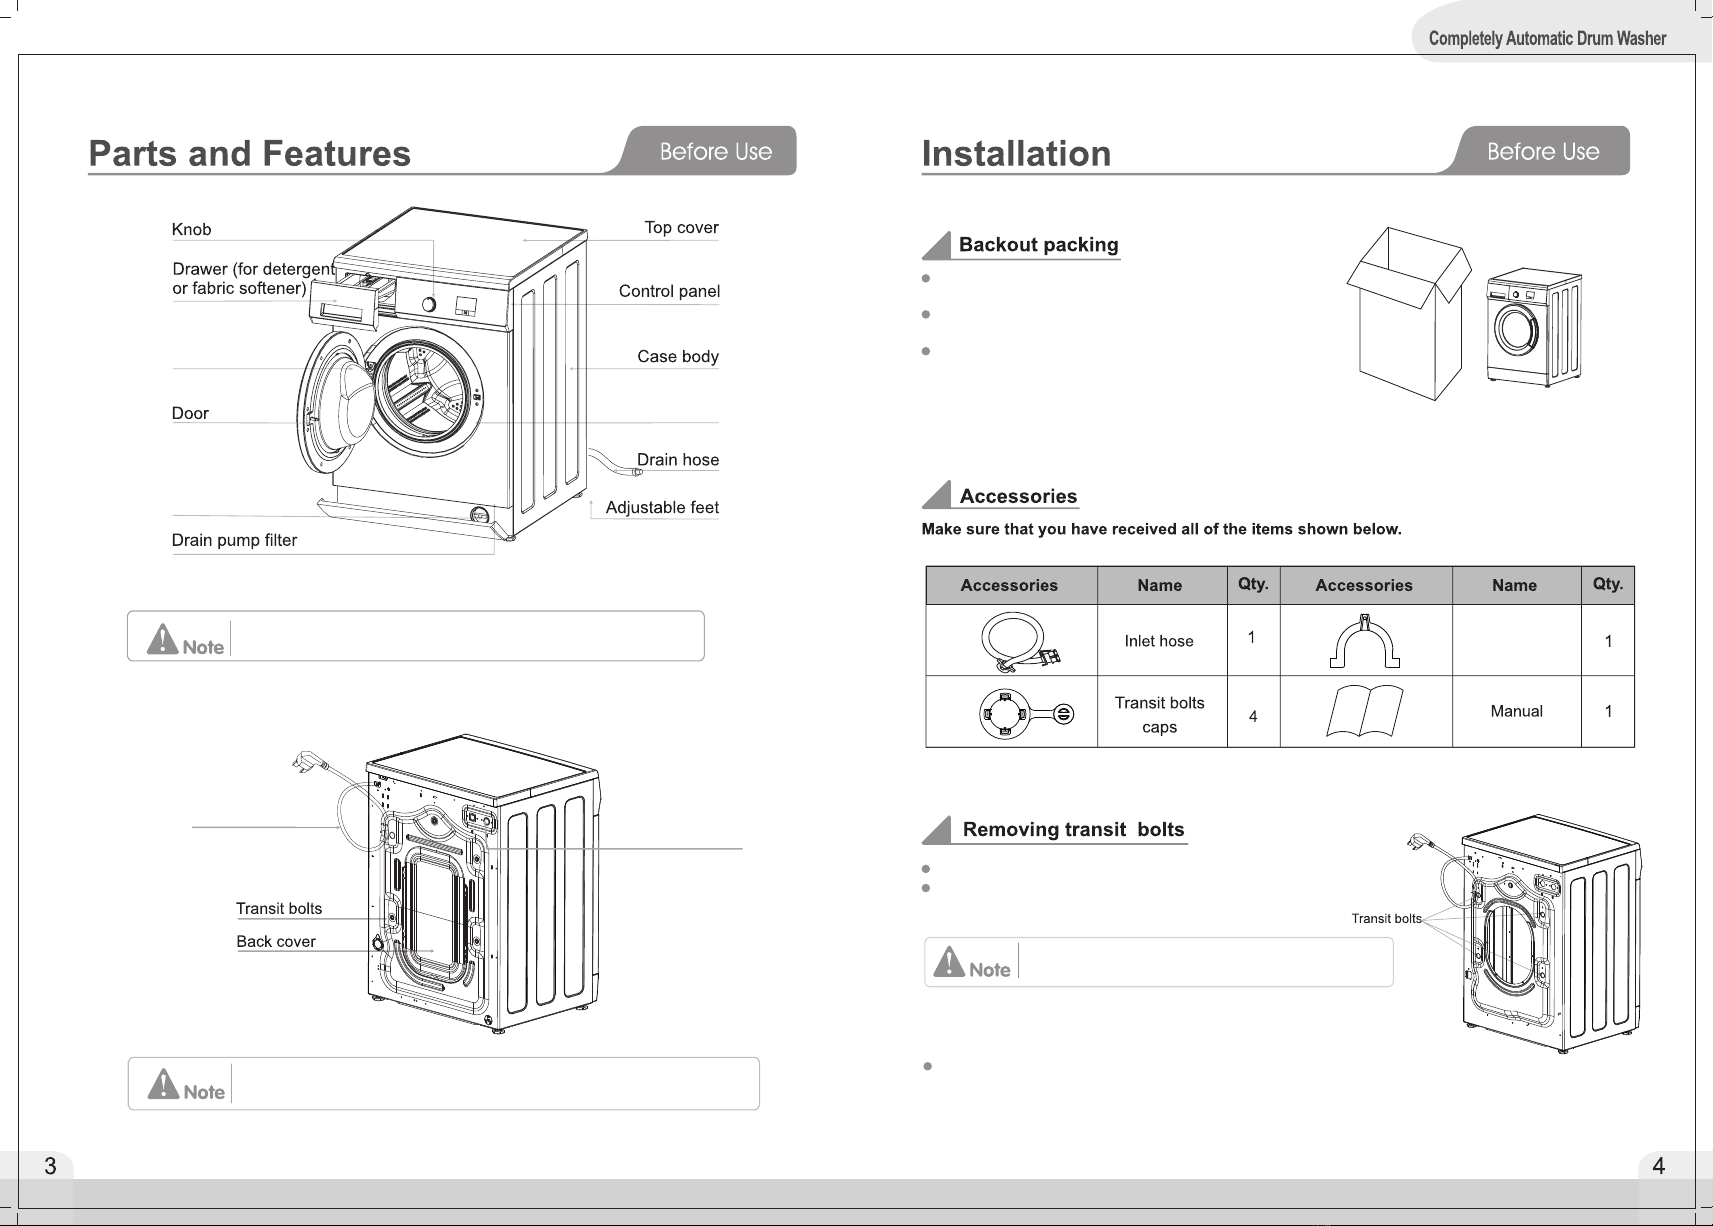
Before using the washing machine for the first time, check that the transit bolts
at the rear of the machine have been removed. During spinning, transit bolts which is still in place
may result in damage to both the machine and adjacent furniture or appliances.
Turn off the tap if the machine is to be left for any length of time (e.g. holiday), especially if there is
no floor drain (gully) in the immediate vicinity.
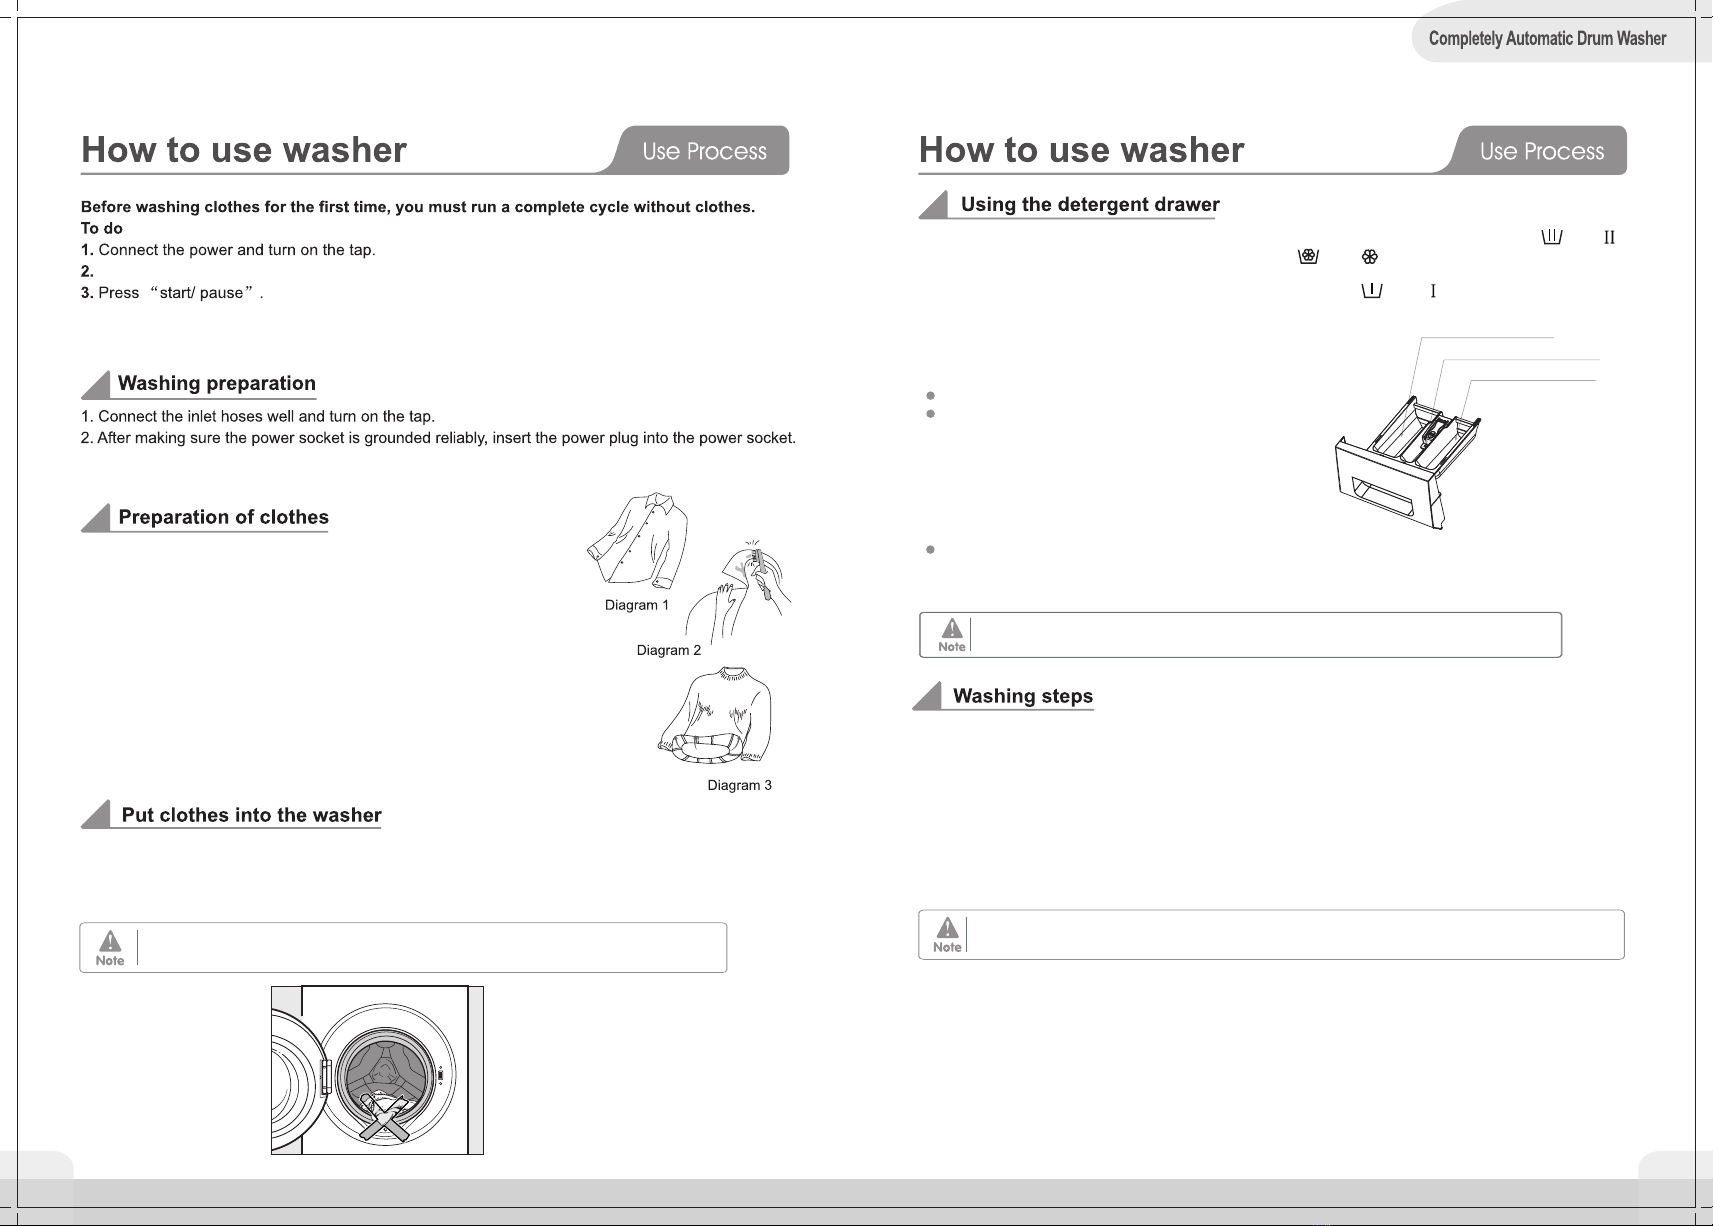
Take care to ensure that foreign objects (e.g. nails, pins, coins, paper clips) do not find their way
into the machine with the laundry. These may damage components of the machine (e.g. drum),
which in turn can result in damage to the laundry.
Do not wash water-repellent things(e.g. raincoats) with washing machine.
Only remove laundry from the washing machine once the drum has stopped turning. Reaching
into a moving drum is extremely dangerous and could result in injury.
For washing machines having ventilation openings in the base, the washing mechines can not be
working on the carpet.
Correct use
Safety with children
Keep children away from the washing machine at all times. To avoid
the risk of injury do not allow children to play on or near it or to
play with its controls. Supervise children whilst you are using it.
Older children may only use the washing machine if its operation has
been clearly explained to them and they are able to use it safely,
recognising the dangers of misuse.
For machines with a 'porthole' door, remember that the porthole glass
will be hot when washing at very high temperatures. Do not let children
touch it.
THIS WASHING MACHINE MUST BE EARTHED.
This appliance can be used by children aged from 8 years and above and
persons with reduced physical, sensory or mental capabilities or lack of
experience and knowledge if they have been given supervision or instru-
ction concerning used of the appliance in a safe way and understand the
hazards involved. Children shall not play with the appliance. Cleaning
and user maintenance shall not be made by children without supervision.
Children of less than 3 years should be kept away unless continuously
supervised.
The new hose-sets supplied with the appliance are to be used and that
old hose-sets should not be reused.

Remove all the transit bolts at the back of the machine with tools.
Keep the transit bolts for future transportation. Whenever the machine
is transported, the transit bolts must be refitted.
Plug the holes with the transit bolts caps .supplied
Strong vibration,noise or failures may occur
if the transit bolts are not removed.
The drawing of machine in the manual is only used for instruction.
It may be vary from the model you buy.
It is normal that water drops appear on the packing
plastic bag and the door glass, which are resulted
from the water left in the tub for checking out.
Connection Cable
Unscrew the drain pump filter to let water run out when the
machine is not used for a long time.
Remove all the packing ( including the foam base)
or the vibration and noise may occur.
Dispose all the wrappage safely and keep them out
of the reach of children. Danger of suffocation!
Door glass
Door seal
Drainage pump damper
“U” piece
cold water inlet valve

A concrete floor is the most suitable installation surface
for a washing machine, being far less prone to vibration
during the spin cycle than wooden floorboards or a carpeted
surface.
The machine must be level and securely positioned. The
distance between the machine and wall must be more than
10 cm.
To avoid vibrations during spinning, the machine should not
be installed on soft floor coverings.
The machine must stand perfectly level on all
four feet to ensure safe and proper operation.
Incorrect installation may increase electricity
and water consumption and may cause the
machine to move about.
To do these when the machine is not level:
Using the spanner turn locknut in a clockwise
direction. Then turn locknuts together with adjust
feet to unscrew.
Use a spirit level to check the machine is standing level.
Hold adjust feet securely with a pipe wrench. Turn locknut again
using the spanner until it sits firmly up against the housing.
Vibration and noise may occur if the locknuts do
not sit firmly up against the houses.
Drain hose connection
1. Direct into a sink
If the outlet spigot has not been used before, remove any blanking plug
that may be in place.
Push the drain hose onto the spigot and secure with a clip if required,
ensure a loop is formed in the drain hose to prevent waste from the sink
entering the washing machine.
If required, the drain hose can be extended to a length of 4 m.
Loop
“U” piece
supplied
30cm
60cm
90cm
Water inlet connection
Connect the inlet hose supplied with the machine to a tap with a 3/4” thread.
Do not use previously employed hoses.
Installation should comply with local water authority and building regulations’ requirements.
inlet hose for cold water with a white nut
inlet valve for cold water
2. Connected securely to a standpipe.
Firstly form a hook in the end of the drain hose using the “U” piece”
supplied.
Place the drain hose into your standpipe, which should have an internal diameter of approximately
38mm thus ensuring there is an air break between the drain hose and standpipe.
When discharging into a standpipe ensure that the top of the standpipe is no more than 90cm and
no less than 60cm above floor level.
Connect a water supply to the inlet valve at the back of the machine. Follow the indication of
the picture below to complete the connection.

Note: The running time above is for the default programs, which is only for reference,
and it may different because of different laundries, weights and washing temperature.
The default options of the programs are in boldface.
For your safety, please not turn the knob to the position “ ” and get clothes while the
machine is running. Because the temperature of water may be high and it may scald
you. The door lock will open automatically at the end of a wash cycle while the tem-
perature of the drum is cool down.
4.
standard 60 °C and standard 40 °C are suitable to clean normally soiled cotton laundry and they
are the most efficient programs in terms of combined energy and water consumptions for washing
that type of cotton laundry; in addition, the actual water temperature may differ from the declared
cycle temperature;
Turn this knob clockwise or anticlockwise to select the required wash program. Once the “Start/Pause”
button is pressed and the machine is running, the program can not be changed. The details of programs
are in Form 1 on page 8.
(Note: At the end of a wash cycle, the knob must be turned to the position“ ”)
1.
Press this button to start or pause a wash cycle. The door can not be open when the machine pauses.
2.
Press this button repeatedly to set the delay time of the starting of a wash cycle from 1 hour to 24
hours.
3. Speed
Press this button repeatedly to change the spin speed. The detail is in Form 1 on page 8.
Child lock (“ Speed ” + “Delay”)
How to use this function:
1.Press the “Speed” and “Delay” buttons for 3 seconds after washing cycle be started, then the
icon “ ” is lighted up on the screen means it’s works. And it can be release via to repeat press
again those two buttons again.
2.All keys and knob’s operation will be aborted with alerts while it’s works, and you can power off
your appliance via turn the knob to “ ”position in urgent case.
3.This function only can be activated after washing cycle started and it will be release automatically
after washing cycle finished.
95℃ Anti-Bac
Mix 40℃
Heavy 40℃
40℃ Daily
20℃ Cotton
Wool 20℃
Synthetic 30℃
40℃
60℃
The operation panel
Options and functions for programs
Form 1
80
74
173
193
57
131
49
11
16
18
94
55
50
99
63
40
20
40
60
Cold
95
--
20
30
20
40
40
2
2
2
2
2
2
2
0
2
4
2
2
3
3
1
7
7
7
7
5.5
4
7
7
2
7
3.5
2.5
7
4
0
0/400/600/800/12001000/
0/400/600/800/ /12001000
0/400/600/800/ /12001000
0/400/600/800/ /12001000
0/400/600/800/ /12001000
0/400/600/800/ /12001000
0/400/600/ /1000/1200800
0/400/600/800/ /12001000
0/400/600/800/ /12001000
0/400/600/ /1000/1200800
0/400/600/800/ /12001000
0/400/600/800
0/400/600
0/400/600/ /1000/1200800
0/400/600/ /1000/1200800
Program MAX. Load (kg) Time(min) Rinse
times Spin speed (rpm)
Cold
Cold
Note: “ ”is for the standard cotton program.
--
95℃ Anti-Bac
40℃ Daily
20℃ Cotton
40℃
60℃
Synthetic 30℃
Wool 20℃
Heavy 40℃
Mix 40℃

9 10
It can remove the water which is left in the tub because of manufacturer’s checking out.
these:
3. Place the drain hose well.
1. Sort the laundry by colour and by care label. Most garments have a
textile care label in the collar or side seam.
2. Make sure all the pockets are empty, Foreign objects (e.g. nails, coins,
paper clips, etc.) can cause damage to garments and components in
the machine.
3. Close any zips, fasten hooks and eyes etc before washing.
4. Dark textiles often contain excess dye and should be washed separately
several times before being included in a mixed load. Always wash whites
and coloureds separately.
5. Badly soiled areas, stains etc. should be pre-treated with liquid detergent,
stain removers etc.
6. Turn over the clothes which pill easily and is with woolen surface before
putting them into the machine.
Unfold the laundry and load loosely in the drum. Mixing both large and small items
gives better wash results and also helps distribute the load evenly during spinning.
The most efficient use of energy and water is achieved when a full load is washed.
However, do not overload as this causes creases and reduces cleaning efficiency.
Make sure that no garments are caught between the door and the seal.
It is recommended to use low foaming powder for all washing temperature programs.
When washing cycle is finished, the machine will change into standby mode.
And the power will be off after 10 minutes without any control on the control panel.
1. Open the drawer and add adequate detergent into main wash compartment marked “ ” or “ ”.
2. Add the fabric softener into compartment marked “ ” or “ ” .
Do not exceed the maximum level mark.
3. Add the detergent into the pre-wash compartment marked “ ” or “ ”
according to the programme you select.
4. Close the drawer. Main wash compartment
Fabric softener compartment
Pre-wash compartment
The right amount to dispenser will depend on the following:
The quantity of laundry
The soiling level of the laundry
- Lightly soiled
No visible dirt or stains. Possibly slight body odour.
- Normally soiled
Visibly dirty and/or just a few slight stains.
- Heavily soiled
Visible dirt and stains and/or dried on soiling.
The water hardness level.
Turn the knob to position “ Cotton”.20℃
1.Turn on the water tap, and connect the power.
2.Open the door, and put the cloth into the drum one by one.
3.Close the door, and put suitable amount of detergent and fabric softener into the
dispenser, then close the drawer.
4.Choose a programme you need by turning the knob .
Press the “Speed” button and select a spin speed.5.
6.Press “ Start/Pause” button to start the washing machine.
7.When the cycle is finished, there is a warning tone sounds.

11 12
Washing programme chart
The machine is fitted with a balance control device, which ensures the machine is stable
during the spin. To protect the machine, it will cut in if the laundry is not evenly distributed
in the drum. The laundry is redistributed by reverse rotation of the drum. This may happen
several times before the unbalance disappears and normal spinning can resume. If, after
15 minutes, the laundry is still not evenly distributed in the drum, the machine will not spin.
In this case, redistributed the load manually and reselect the spin programme.
When the machine is started, the door lock is locked though you press the “Start/Pause” button.
Press the “power” button to switch off the machine and the door lock is unlocked in two minutes.
When the temperature inside the drum is above 53℃, the door lock is locked.
When the water is above a certain level, the door lock is locked.
When the washing cycle is finished, the door lock is unlocked after two minutes.
Important:
Do not try to open the door when the washing cycle is not finished or power supply is cut off
during the washing cycle, because the temperature may be high and you may be scalded.
Disconnect the machine from the mains electricity supply and withdraw the plug from
the socket before cleaning the machine.
The washing machine must not be hosed down.
Clean the exterior with a mild non-abrasive cleaning agent or soap and water using a well wrung-out
cloth. Wipe dry with a soft cloth.
Do not use solvents, abrasive cleaners, glass cleaners or all-purpose cleaning agents.
These might damage plastic surfaces and other components because of the chemicals
theycontain.
Clean the drum every 3 months by using the “ ” programme.
Cleaning the drawer
Remove detergent residues regularly. Clear the drawer following these:
Pull out the drawer until a resistance is felt. Press down the release catch and at the same time
pull the drawer right out of the machine.
Remove the siphon from compartment and clean it.
Clean the dispenser using a brush and warm water.
Spin
Washing symbol Fabric
Programme
Cottons, linens or cotton mix fabrics, e.g. table linen, towelling,
underwear, T-shirts etc.
Small loads of items which require freshening up and which
can be washed in a Cotton programme.
Separate spin for cotton and linen items
Cottons, linens or cotton mix fabrics, e.g. table linen, towelling,
underwear, T-shirts etc.
Synthetic or mixed fabrics, underwear, coloured garments,
non-shrink shirts.
Machine-washable or hand-washable wool or wool blend fabrics.
If the care label does not specify a temperature, wash using the
cold setting. Also suitable for hand-washable silks.
Reduce the spin speed.
Quick Wash
Standard Cotton

13 14
Use pointed nose pliers to withdraw the plastic filter.
Clean, put back and secure. These filter should be
checked every 6 months or so, or more often if there
are frequent interruptions to the water supply.
1. Disconnect the machine from
the mains electricity supply and
open the lower cover with a
screwdriver.
2. Place a container under the pump.
Unscrew and remove the filter.
3. Clean the filter carefully.
The filter should be cleaned in every 2 months or when there
is fault that the “Rinse” and “Spin” LEDs flicker.
Cleaning the drawer housing
Use a bottle brush to remove detergent residues
inside the drawer housing.
The filter must be put back in place after cleaning.
Important:
If the machine is exposed to temperatures below 0°C, certain precautions
should be taken.
1. Turn off the water tap.
2. Unscrew the inlet hose.
3. Unhook the drain hose from the rear support and position the end of this
hose and that of the inlet hose in a bowl. Run the spin programme.
4. Disconnect the appliance.
5. Screw the inlet hose and reposition the drain hose.
6. When you intend to start the machine up again, make sure that the room
temperature is above 0°C.
1.
it is secure.
Check the connection and ensure
2. Change the temperature sensor.
1. Connection between the
temperature sensor and wire is
not secure.
2. Temperature sensor is damaged.
1. Check the connection and ensure
it is secure.
2. Change the heating tube.
1. Connection between the
heating tube and wire is not
secure.
2. Heating tube is damaged.
1. Check the connection and ensure
it is secure.
2. Check if the machine is overloaded.
Switch off the machine, and retry
when the motor becomes cool.
3. Change the motor.
1. Connection between the
motor and wire is not secure.
2. Motor is protected because
of over-heat.
3. Motor is damaged.
1. Change the water inlet.
2. Check the connection and ensure
it is secure.
3. Change the water sensor.
1. Water inlet valve is damaged.
2. The connection between the
water sensor and wire is not
secure.
3. Water sensor is damaged.
Possible Cause
Machine
fills overtime
Doorlock alarm
1. Water tap is not open.
2. Drain hose is put down.
3. Water inlet valve is damaged.
1. Open the water tap.
2. Hook up the hose.
3. Change the water inlet valve.
“E01” is on the
screen.
Problems Error Code
Machine
pumping
overtime
Water overflows
the machine.
/ Water sensor
works abnormal.
Motor does
not work.
There is a
heating tube
fault.
There is a
temperature
sensor fault.
1. Check the drain hose.
2. Clean the filter.
3. Check the drainage system
and clean it.
1. Drain hose is squashed
or kinked.
2. Drain pump filter is block.
3. Drainage system pipes are
blocked.
1. Lock the door well.
2. Put the garment into the drum.
3. Change the door lock.
1. Door is not locked well.
2. Clothes stay between door
and seal.
3. Door lock is damaged.
“E02” is on the
screen.
“E04” is on the
screen.
“E03” is on the
screen.
“E05” is on the
screen.
“E06” is on the
screen.
“E07” is on the
screen.

15 16
Symbol expalanation
Note:
Data can vary from the nominal values given depending on water pressure,
water hardness, water inlet temperature, room temperature, type and volume
of load, fluctuations in the electricity supply and any extra options selected.
Rated power
Water pressure
65kg/69kg
595X545X845
7.0kg
2000W
0.02-0.8MPa
XQG70-Q712K
220V-230V~60Hz
Energy-efficient test program entrance guide:
choose the program “ ”,select the spin speed to “1200rpm”.
60℃
This manual suits for next models
1
Table of contents
Other Metos Washer manuals