Mezzabarba M ZERO Overdrive User manual

MZERO OVERDRIVE v1.2 ENG
MZERO OVERDRIVE User Manual
1/12
Mezzabarba
c u s t o m a m p l f c a t o n
M ZERO Overdr ve
User manual

MZERO OVERDRIVE v1.2 ENG
MZERO OVERDRIVE User Manual
2/12
Index
Front panel. .............................................................................................................................................................................................. 4
Rear panel. ............................................................................................................................................................................................... 4
Turning on your M ZERO. ..................................................................................................................................................................... 6
Basic sounds. .......................................................................................................................................................................................... 6
Footswitch and Footswitch iagrams. .......................................................................................................................................... 7
Usage and periodical maintenance. ............................................................................................................................................... 8
Replacing tubes and adjusting bias. .............................................................................................................................................. 8
Troubleshooting. .................................................................................................................................................................................... 9
Fuses. ......................................................................................................................................................................................................... 9
Warranty. .................................................................................................................................................................................................10
Customization options ........................................................................................................................................................................10
Important safety information ........................................................................................................................................................... 11
Technical specifications. ................................................................................................................................................................... 12
Contacts. .................................................................................................................................................................................................. 12
IMPORTANT
:
PLEASE READ SAFETY INFO ON PG. 11 CAREFULLY BEFORE SWITCH ON THE AMP

MZERO OVERDRIVE v1.2 ENG
MZERO OVERDRIVE User Manual
3/12
The M ZERO is my personal dream, the ultimate amp, as I have always
envisioned it, with no compromises on dynamics or technology.
This is why I undertook the project without worrying about budget or production
constraints: I simply wanted to create my best amp ever, period. And I did this by
drawing upon every little bit of experience and passion as I possibly could.
Inspired by the founding fathers of amplification, I stood on their shoulders and tried
to look beyond.
This is how the M ZERO OVERDRIVE was born. A double
preamp channel amp that combines elegance, brute force, and an infinite array of
overtones in between.
I based its engineering on Point To Point technology, not for its superior quality
compared to PCBs, but because it allowed me to listen and mold, in real time, the
emotional impact of the output. Just as a tailor, I seamed sound, electrons, and
energy into what I believe to be my masterpiece. And this is why it carries my name.
Pierangelo Mezzabarba
-Masotti Guitar evices CEO and Founder-
MZERO OVERDRIVE v1.2 ENG
MZERO OVERDRIVE User Manual
4/12
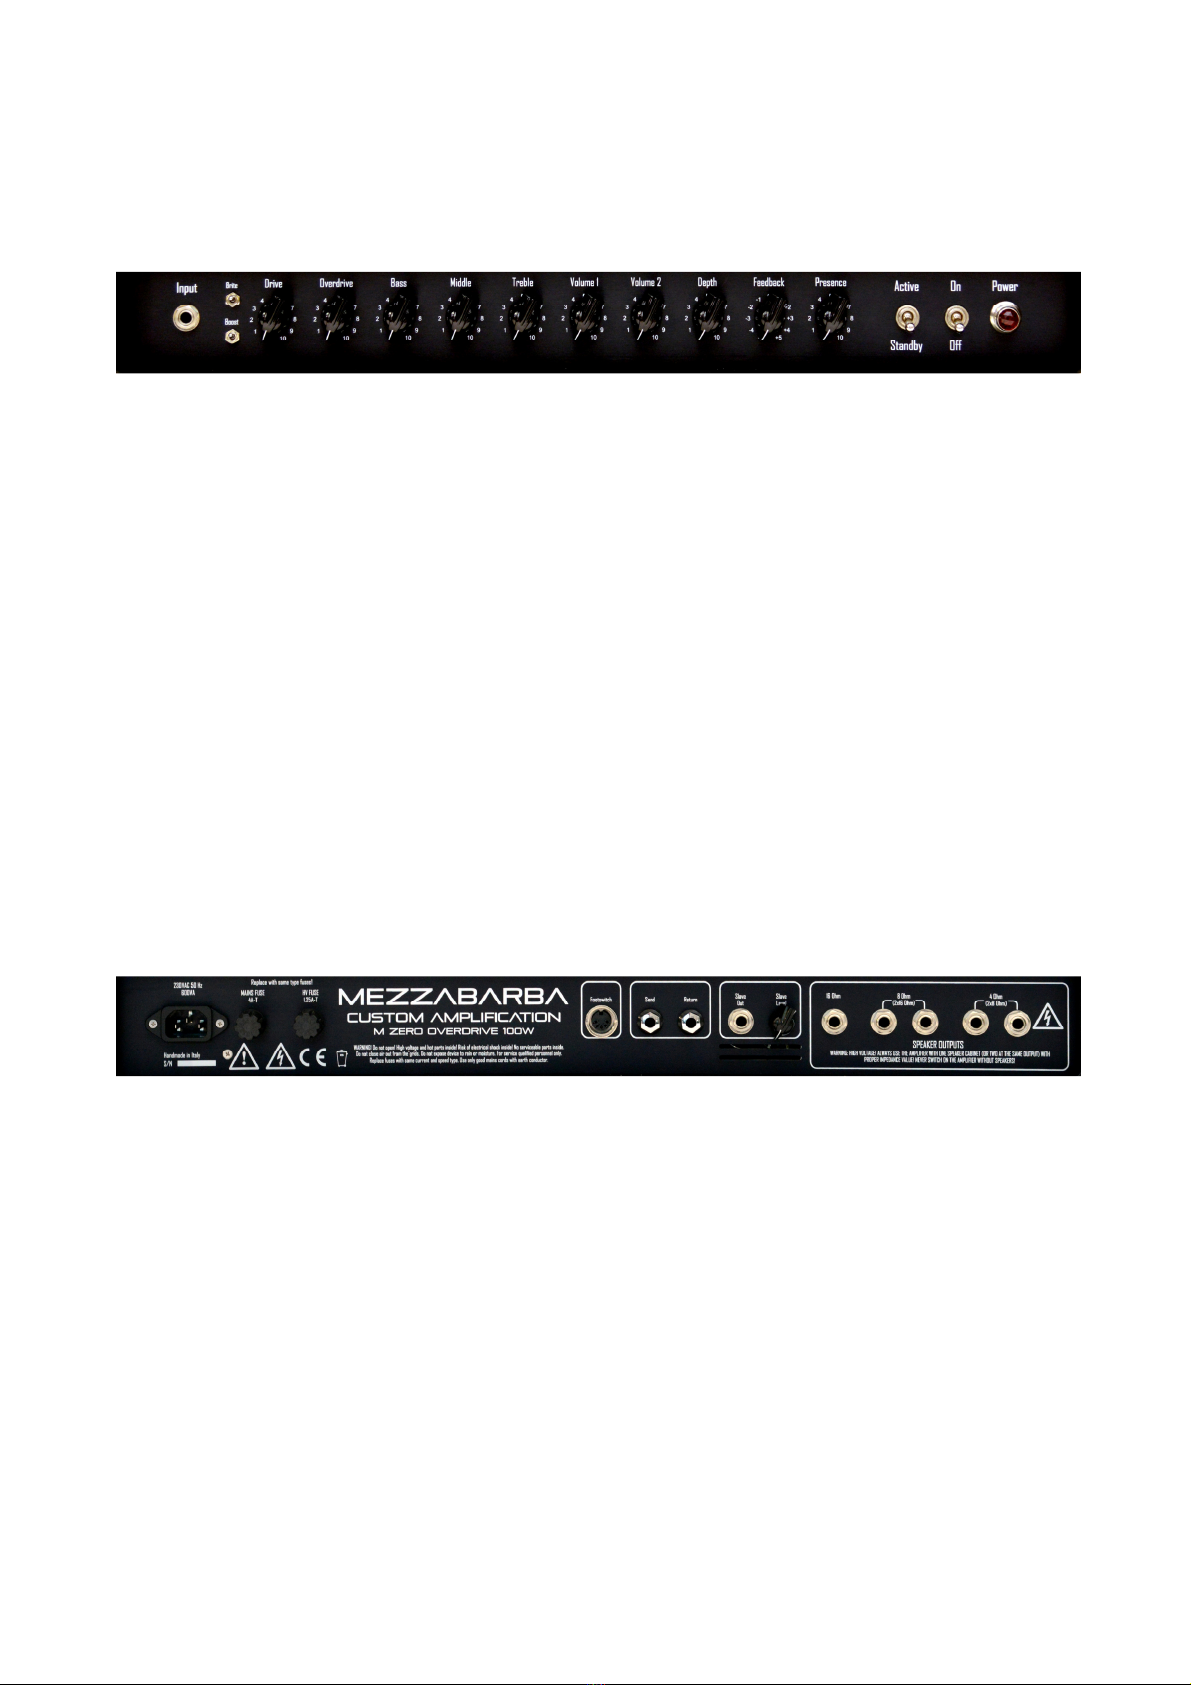
Front panel
From left to right:
a) Guitar input jack.
b) Brite and Boost switches.
c) rive and Overdrive controls -these allow for gain management in the preamp section.
d) Equalizer section: Bass, Mid, Treble.
e) Volume 1 and Volume 2 -respectively, for the rive and Overdrive channels
f) epth, Feedback and Presence
g) Stand-by/Active switch
h) Master power switch
i) Power indicator
Rear panel
From left to right:
a) IEC plug
b) Mains fuse
c) HV fuse
d) Footswitch connector -standard stereo jack or MI I style, for controlling multiple functions;
e) SEN and RETURN connectors -these allow for a) processing sound through external effects or b)
utilizing only the PRE section (by taking the signal from SEN ) or the final section (by connecting a
preamp to the RETURN input);
f) SLAVE OUT with dedicated pot. Ideal for tri-amping or re-amping.
g) Speaker output jacks: 1 x 16 oh , 2 x 8 oh and 2 x 4 oh .

MZERO OVERDRIVE v1.2 ENG
MZERO OVERDRIVE User Manual
5/12
You can connect one or two speakers at the same time as long as the total impedance is equal to that
indicated on the connectors. For example, you can connect only one, 4 ohm speaker to one of the two
connectors marked as “4 Ohm (2X8 Ohm)”; or two, 8 ohm speakers to the two connectors marked as “4 Ohm
(2X8 Ohm)”. In the same way, you can connect only one, 8 ohm speaker to one of the two connectors marked
as “8 Ohm (2X16 Ohm)”; or two, 16 ohm speakers to the two connectors marked as “8 Ohm (2X16 Ohm)”.
Finally, you can only connect one, 16 ohm speaker to the connector marked as “16 Ohm”.
Whenever connecting only one speaker, the maximum input power must be equal to or greater than 100W
Rms. Whenever connecting two speakers, the maximum input power of each speaker must be equal to or
greater than 50W Rms.
IMPORTANT: Do not connect two speakers to inputs with different i pedance values (e.g. one to the 4
oh input and the other one to the 8 oh input)

MZERO OVERDRIVE v1.2 ENG
MZERO OVERDRIVE User Manual
6/12
Turning on your M ZERO
IMPORTANT: Before turning on the a p, ake sure the power cable is intact and has a ground
connection, the electrical syste you are plugging into is properly grounded, and the i pedance of
the speaker is equal to that of the output jack to which it is connected.
a) Before connecting the power cable to the M ZERO, make sure the power switch is on the OFF
position and that the Standby switch is on STAN BY.
b) Plug in your guitar;
c) Switch on the amp keeping it on STAN BY mode;
d) After about 2 minutes, move the Standby switch to ACTIVE.
You are now ready to start experimenting the M ZERO’s amazing potential.
When switching off the amp, turn the Standby switch to STAN BY, wait 15-20 seconds, and turn the main
power switch to OFF.
Basic sounds
The M ZERO series was conceived to express its full potential in any musical context, hence the preamp,
effects loop, and power amp sections were all specifically engineered to deliver an unusual array of
possibilities. Whether you are using an M ZERO amp in combination with distortion pedals, digital effects, or
on its own, you will be amazed by the response you’ll get in any of these contexts. Imagine the dynamics and
rage of the best, late 60s’ Brit amps, beautifully infused with a more modern tone, all of which results in an
elegant elaboration of a classic, evergreen sound.
Although particularly suited for Rock and Rock-Blues, the M ZERO’s capabilities extend way beyond,
comprising anything from Metal to Pop,
The M ZERO Overdrive is a high-gain evolution of its single-channel sister; the fruit of a 20-year search for
the ultimate, devastating, yet classy overdrive tone. The first channel is identical to the MZERO Standard
whereas the second channel gives you the definition, fluidity, warmth, and harmonics that only thermoionic
tubes can deliver.
The resulting dynamics, combined with the guitar volume and your personal touch, will open a portal to a
virtually infinite world of tone which will make the MZERO Overdrive the last amp you will ever need.
The epth and Presence controls on the front panel allow you to further chisel your tone. The former allows
to control the damping of the cones, hence the responsiveness of the bass frequencies, giving them more or
less body according to your taste. The latter allows you to control the mid-high frequencies.
Finally, the Feedback control allows you to control the negative feedback loop of the power amp, allowing for
anything from smooth, controlled sounds all the way the wild, raunchy tones that made the old school Brit
amps so legendary.

MZERO OVERDRIVE v1.2 ENG
MZERO OVERDRIVE User Manual
7/12
Standard Footswitch Triple Footswitch ( ual Master option)
Footswitch iagrams
MZERO TRS IN Connections

MZERO OVERDRIVE v1.2 ENG
MZERO OVERDRIVE User Manual
8/12
Usage and periodical maintenance
The M ZERO does not require any more precautions and maintenance than any other tube amp. Make sure you
do not obstruct the air cooling grids located on the top, front, and back of the amp, in order to allow for
optimal cooling.
When turning on the amp, it is of crucial importance to wait for at least 2 minutes before deactivating the
Standby switch in order to allow the power tubes to reach their ideal temperature.
The external chassis can be cleaned with a clean, damp cloth. The paint is resistant to normal cleaning
products but not to aggressive solvents (benzene, acetone, etc.) which should therefore be avoided.
If you are using your M ZERO mostly in a studio setting, you will simply need to periodically replace the tubes,
especially the power ones, just as you would in any other tube amp. If on the other hand, you use your M
ZERO mostly on the road, it is advisable to periodically check that all of the internal components are properly
connected and functioning. Given the heavy-duty build quality of your M ZERO, this might be necessary as
little as once a year, and in any case only if you use the amp on the road every day.
Warning: the afore- entioned checks ush be carried out solely by qualified MGD (Masotti Guitar
Devices) personnel and/or authorized technicians. Before scheduling any such check, please contact
MGD for full advise.
Replacing tubes and adjusting bias
All of the factory-supplied tubes in your MZERO are accurately handpicked by MG . The five ECC83/12AX7
tubes have a life expectancy of several years and their replacement does not require any additional
adjustments.
The layout of the tubes is represented in the following diagram:
Preamp: 5 x
ECC83/12AX7
FX Loop
P.I.
V3 pre
V2 pre
Power Tubes: 4 x EL34
V1 pre

MZERO OVERDRIVE v1.2 ENG
MZERO OVERDRIVE User Manual
9/12
The life expectancy of the four E34L power tubes depends on the average volume the amp works at, and can
range from about 12 to 48 months. It is crucially important to replace them all at the same time, with high
quality brand tubes. You will most likely need to adjust the bias with the internal trimmer. Any short-circuits
caused by a faulty tube can lead to burning one or more fuses, which must be replaced by qualified MGD
personnel and/or authorized technicians.
The brand and type of both the preamp and the power tubes, affect the overall amp tone and can be chosen
based on personal taste. Feel free to contact us for any advise!
Warning: replace ent of tubes and internal fuses, adjust ent of the bias and any other operation
inside the M ZERO ust be carried out by qualified MG (Masotti Guitar evices) personnel and/or
authorized technicians, while the amp is powered off and has been completely disconnected from a power
source for at least 30 inutes!
Troubleshooting
Here below are some of the problems that you might experience when operating your M ZERO. Some of them
are trivial whereas other ones might require the intervention of qualified MGD (Masotti Guitar Devices)
personnel and/or authorized technicians. Please do not hesitate to contact us when in doubt, we are at
your complete disposal for any help you may require.
M ZERO is not turning on. Check whether there is power running to your socket. Check the power
cable. Check the fuse on the rear of the unit and replace it with an identical one. If the problem
persists, contact MG .
The power indicator is lit but no sound is co ing fro your a p. Check that all of the jacks are
properly plugged in. Check the rive, Tone, and Volume controls, making sure none of them are on 0.
You hear a scratchy noise while turning one or ore pots. o not attempt to clean with spray
products! Please contact MG and we will be happy to replace the faulty pot(s)
Sound quality has deteriorated; the a p tends to feedback or akes strange noises. One or
more tubes need replacement. Please contact MG for advise and service in order to continue
getting the best out of your MZERO.
Fuses
M ZERO is equipped with 2 fuses:
1) HV FUSE: External, High-Voltage fuse. 250V 1,25 A-T delayed;
2) MAINS FUSE: External Mains fuse: 250V 4 A-T delayed (6,3A-T delayed for 117V).
The external Mains fuse can fault also following a series of power outages and must therefore be replaced by
qualified personnel with an identical one.
Warning: replace the external fuse with one with identical characteristics! Internal fuses ust be
checked and replaced only by MGD personnel or authorized technicians.

MZERO OVERDRIVE v1.2 ENG
MZERO OVERDRIVE User Manual
10/12
Warranty
Limited Lifetime Warranty: New Mezzabarba Amplifiers are lifetime warranted to the original purchaser
against failure of parts/materials and workmanship if purchased through an authorized dealer. No other
warranty applies.
Tubes, transformers and speakers are warranted for a period of ninety days. Pots, connectors and switches
are warranted for a period of two years. This warranty applies only if the amplifier has not been damaged by
accident, misuse or as a result of repair or modification. The use of non-authorized Mezzabarba tubes and
replacement parts may void this warranty. Mezzabarba reserves the right to make any design changes
without notice or obligation to incorporate these changes in products previously purchased. Masotti is not
liable for any freight or duty charges.
Return Authorization is required for all products returned to Mezzabarba Custom Amplification. In most
cases we will be able to supply the technical information needed to repair the amplifier thus avoiding the
shipping issues and costs. All shipping costs to/from Mezzabarba shall be borne by the owner, after 90 days
of purchase. Mezzabarba will be responsible for the factory-to-customer return shipping cost to the original
owner for only the first 90 days of ownership. Authorized Returns should be shipped in the original
Mezzabarba box and original packing materials. A return packing/handling charge may be applied to any
product shipped to Mezzabarba in sub-standard or damaged shipping box and materials. This is to make sure
your amplifier is packaged safely in a new box and to recover our costs for doing so. Since the courier
doesn’t honor damage claims for non-original packaging, Mezzabarba is not responsible for any factory-to-
customer return shipping damage to products shipped in non-original box and packing materials. A copy of
the final Sales Receipt from an Authorized Mezzabarba ealer is required with this Warranty Registration.
Customization options
Your M ZERO can be equipped with a ual Master control upon request. We are at your complete disposal to discuss any other
solution to optimize your M ZERO, Midi options included.
IMPORTANT: it is not possible to replace a given type of power tubes with another: if your M ZERO is equipped with
EL34 (or the equivalent, E34L), they cannot be replaced with 6L6 or vice versa.

MZERO OVERDRIVE v1.2 ENG
MZERO OVERDRIVE User Manual
11/12
Important safety information
Your M ZERO was engineered and built according to the strictest electrical safety standards as per international norm, IEN EN
60065 and according to the electromagnetic compatibility requirements specified by international norms EN 55103-1 and
EN55103-2. It thus fully complies to EU standards and therefore carries the CE marking on the rear panel.
Our amps utilize as much as possible eco-compatible materials. o not however dispose of any parts of the amp in the
environment and please use special containers as per EU regulations.
To reduce the risk of electric shock or wounds, please follow the instructions on this manual very carefully, with particular
reference to the following ones:
•o not open the chassis for any reason. Removing the rear grid or removing the metal chassis from the wooden
frame will expose you to live circuitry which is powered by potentially hazardous electric tension. Should you need to
replace the tubes or the internal fuses, please contact either MG or an authorized technician.
•o not remove any screws from the amp.
•o not expose the amp to rain or moisture, steam, metal particles and anything that may penetrate inside the amp
through the air cooling grids.
•o not obstruct the air cooling grids. Always make sure that the top and rear parts of the amp are not obstructed.
•o not introduce any foreign objects (metallic or insulating) in the air cooling grids.
•o not use the amp without the protective metal grid on the rear.
•o not insert objects other than the standard jacks inside the amp’s input and output jacks.
•o not expose the amp to excessive heat.
•o subject the amp to excessive vibrations or shock, especially when it is powered on.
•When setting up the amp in a room temperature environment following storage and/or transportation at very low
temperatures one, dew might form on the outside and/or inside of the amp. Make sure that the amp stays at room
temperature for about 10 minutes before turning it on in order for the dew to evaporate.
•Always use standard power cables making sure they are intact. o not remove or interfere with the ground
connection of the plug or socket.
•Always check that the mains power complies to the specs written on the rear panel of the amp.
•isconnect the device from mains during thunderstorms.
•Should the HV fuse fail in absence of exceptional external events such as violent power surges, severe
thunderstorms, etc., the cause might be one or more faulty power tubes. o not attempt their replacement on your
own. Contact MG or an authorized technician.
•o not force pots and switches.

MZERO OVERDRIVE v1.2 ENG
MZERO OVERDRIVE User Manual
12/12
Technical specifications
Power supply: 230V or 117V ±10% - 50Hz or 60HZ
Power consumption: 350VA
Input impedance: 1MΩ.
Output power: nominal 100W rms
Output impedance: 4-8-16 ohm
Tubes: 5 x ECC83/12AX7, 4x E34L/EL34
Environmental operating parameters: 10-40°C, 30-90% humidity without condensation
imensions: 63 x 24 x 24h cm.
Weight: 20 Kg
Contacts
Masotti Guitar Devices Via C. Battisti 107– 01010 Farnese (VT) Italy.
URL: www.mezzabarba.com
e-mail [email protected]
Phone: +39 0761.458076;
Mobile: +39 329.3251005
Mezzabarba
c u s t o m a m p l f c a t o n
Table of contents


 H Handbook")


