Montgomery Ward 773274 User manual

Instruction Manual
ITEM: 773274
Wards.com 1•888•557•3848
Montgomery Ward Customer Service
3650 Milwaukee Street, Madison, WI 53714
8:00 am to Midnight, Monday through Friday
Wards.com 1•888•557•3848
Countertop Dishwasher
7
wash
cycles!
®
®

Thank you for purchasing your Countertop Dishwasher by
Montgomery Ward. Put through the paces by the experts, we
guarantee that it will perform to the highest standard,
time after time, with all the convenience, easy cleanup and
durability you rely on from Wards.
3
Important Safeguards ................... 3
Electrical Safety ...............................4
Specications.................................... 4
Parts & Features.......................... 5–6
Installation.......................................6-8
How to Use...................................9–13
Cleaning & Care........................ 14–15
Troubleshooting & Notes..... 16–19
Return Information ...................... 20
Warranty..............................................21
Thank you
for your
purchase!
Table of Contents
21•888•557•3848
Wards.com
Important Safeguards
READ CAREFULLY BEFORE USING AND SAVE THESE INSTRUCTIONS!
• FOR HOUSEHOLD USE ONLY. DO NOT use this appliance for other than its
intended use.
• Remove all packaging materials and labels before rst use. Dispose of the
packaging materials via the appropriate recycling system. DO NOT allow
children to play with packaging materials.
• A short cord is provided to reduce the hazards resulting from entanglement
or tripping. DO NOT drape the cord over a counter or tabletop, where it can be
pulled on or tripped over. Never wrap the cord tightly around the appliance, as
this could cause the cord to fray or break. DO NOT cover the cord with a rug.
• DO NOT use an extension cord with this appliance.
• CLOSE SUPERVISION IS NECESSARY WHEN USING THIS APPLIANCE NEAR
CHILDREN.
• A re may occur if this appliance is used near ammable materials, including
curtains, towels, walls, etc. DO NOT place any paper items in the appliance.
• DO NOT place the appliance or its cord on or near a heated surface, or in a
heated oven.
• This appliance should always be used on a stable, dry, heat-resistant surface.
• DO NOT use an accessory or attachment not recommended by Wards, as this
may cause injury, or damage the appliance.
• DO NOT attempt to move an appliance when it is hot or has hot contents.
• DO NOT use outdoors.
• Turn off and unplug this appliance when not in use.
• DO NOT sit/stand on the dishwasher, door or rack.
• NO SERVICEABLE PARTS INSIDE THIS APPLIANCE.
• DO NOT USE AN APPLIANCE WITH A DAMAGED CORD OR PLUG, OR AFTER
THE APPLIANCE MALFUNCTIONS OR HAS BEEN DAMAGED IN ANY MANNER.
• DO NOT operate your dishwasher unless the door is properly closed.
• Open the door very carefully if the dishwasher is operating (there is a risk of
hot water squirting out).
• DO NOT leave the door all the way open and unattended, as it is a safety/
tripping hazard.
• Remove the door before discarding an old dishwasher.
• Old appliances/tools contain valuable materials that can be recycled. Dispose
of your old appliances/tools using appropriate collection systems, in
accordance with local and federal regulations.
®

Parts & Features
Specications
Electrical Safety
41•888•557•3848
Wards.com
45
This appliance is equipped with a three-prong grounding plug. This is a safety
feature to reduce the risk of electrical shock. Using an extension cord is not
recommended with this appliance. It is recommended that an electrical outlet
serving ONLY this appliance be used. This outlet must be properly installed and
grounded. If you have any questions about the grounding or electrical instructions,
contact a qualied electrician. DO NOT attempt to modify the plug in any way.
Montgomery Ward cannot accept any liability for damage or injury resulting from
failure to observe these safety procedures.
POWER RATING 120V, 60Hz, 680W, 5.72A
CAPACITY 6 standard place settings
CORD LENGTH 40"
DIMENSIONS 21¾" W x 17¼" H x 19½" D
WATER CONSUMPTION/
WASH CYCLE
approx. 2 gallons
WEIGHT approx. 60 lbs.
MODEL RDW3208-MW
A. Cup Shelf H. Filter Assembly
B. Rack I. Rinse Aid Dispenser
C. Rubber Seal Gasket J. Spray Arm
D. Cabinet K. Power Cord
E. Door (open) L. Water Inlet Port
F. Detergent Dispenser M. Drain Port
G. Flatware Basket
1. Drain Hose Port Connection (6-sided)
2. Drain Hose Quick Connection (circular)
3. Inlet Hose Port Connection (star-shaped)
4. Inlet Hose Quick Connection (circular)
5. Faucet Adapter
6. Faucet adapter Washer (2)
7. Pressure Relief Valve
8. Faucet Adapter Connection
9. Locking Collar
10. Inlet Hose Connection
11. Drain Hose Connection
C
J
I
HGF
E
D
B
A
BACK
Assembly
M
L
K

CONNECT THE DISHWASHER
1. Your dishwasher is equipped with a faucet adapter (installed on the quick
connect assembly). To remove the faucet adapter, pull back on the locking
collar on the quick connect while pulling the faucet adapter in the opposite
direction.
2. Remove the tape from the end of the faucet adaptor (2 washers are held in
place by the tape).
3. The faucet adapter is compatible with either female (inside) or male (outside)
threaded faucet connections. If your faucet is female, both rubber washers
must be installed inside the faucet adapter. If your faucet is male, use only one
rubber washer (remove the second washer).
1•888•557•3848
Wards.com 7
6
Installation (cont.)
Installation
4. Screw the faucet adapter onto (or into) the faucet. Check for leaks. Use
plumbers tape to eliminate any leaks, if necessary.
5. Connect the 6-sided end of the drain hose to the drain port located on back of
the dishwasher cabinet. To avoid damage to threads, DO NOT over-tighten.
(continued on next page)
Note: The maximum permissible inlet water pressure is 1Mpa. The minimum
permissible inlet water pressure is 0.04Mpa.
WARNING: Disconnect electrical power before installing the dishwasher.
Failure to do so can result in death or electrical shock.
PLACEMENT
1. To prevent injury, have 2 people move and install the dishwasher.
2. Remove all packaging materials: shipping tape, foam pieces, etc. before use.
3. DO NOT use sharp instruments, rubbing alcohol, ammable uids or abrasive
cleaners.
4. Check that all parts are included. If parts are missing, contact customer
service.
5. This dishwasher is designed for countertop installation. It is equipped with inlet
and drain hoses that can be positioned to the right or the left of the unit to
facilitate proper installation. Make sure the water supply/faucet connection is
within reach of the inlet and drain hosees (60").
6. Place the dishwasher on a level and at surface that can support the weight
when the dishwasher is fully loaded.
·
Parts & Features
1. Power Button
2. Delay Button
3. Display Screen
4. Rell Rinse-Aid Warning Indicator
5. No Water Supply Indicator
6. Wash Program Selector
7. Start/Pause Button
8. Wash Program Indicators (see page 12)
CONTROL PANEL

1•888•557•3848
Wards.com
89
Installation (cont.) How to Use
LOAD THE DISHWASHER
Properly loading the dishwasher is key for optimal performance. Position the
dishes and utensils so they are secure and will not be moved by sprayed water
during the wash cycle.
1. This dishwasher is designed to hold 6 place settings. DO NOT overload!
6. Connect the star-shaped end of the inlet hose to the inlet port located on the
back of the dishwasher cabinet. To avoid damage to threads, DO NOT over-
tighten.
7. Connect the circular end of the drain hose to the longer (bottom) hose
connection on the quick connect assembly.
8. Connect the circular end of the inlet hose to the shorter (top) hose connection
on the quick connect assembly.
9. Attach the quick connect assembly onto the faucet adapter: pull down on the
locking collar, while pushing the quick connect assembly upwards onto the
faucet adapter. Release the locking collar when the quick connect assembly
snaps onto the faucet adapter. Verify connection is secure.
10. Slowly turn on the water line and check for any signs of water leaks at all
connections. If leaks are located, immediately turn off the water supply and
repair connections.
Note: Once you turn on the water supply (even if turned off immediately), the
inlet hose will be pressurized. To relieve the water pressure (make sure
water supply is turned off), press and hold the red pressure relief button on
the quick connect assembly until the ow of water stops.
DISCONNECT THE DISHWASHER
WARNING: Failure to relieve water pressure before disconnecting the quick
connect from the faucet, will result in back-pressure overspray.
The temperature of incoming water can be very hot, and back-
pressure overspray can cause severe burns and/or scalding. DO
NOT let children disconnect the dishwasher!
1. Turn off water supply at the faucet.
2. Disconnect the power supply cord.
3. Press and hold the red pressure relief valve until the ow of water stops.
4. Disconnect the quick connect assembly by pulling down on the locking collar to
release from faucet adapter.
2. Scrape food from dishes before loading into dishwasher and presoak items with
dried-on food.
3. Curved items, or those with recesses, should be loaded at a slant so water can
run off.
4. Allow sufcient space between items so water and detergent can reach each
surface.
5. Ensure glasses are secure and balanced.
6. Flatware should be placed in the atware basket with handles down. DO NOT
let similar pieces nest together.
7. Knives and other sharp utensils should be placed in the atware basket with
handles up, but make sure the tips do not extend through the bottom of the
atware basket. Place sharp items so they are not likely to damage the rubber
seal gasket.
8. Longer utensils should be placed horizontally on the cup shelf.
(continued on next page)
1. cups
2. serving bowls
3. glasses
4. saucers (some under cups)
5. bowls
6. platter
7. dinner plates
8. dessert plates
9. atware
8
3
4
9

Wards.com
10 11
How to Use (cont.)
Wards.com
Wards.com 1•888•557•3848 11
10
How to Use (cont.)
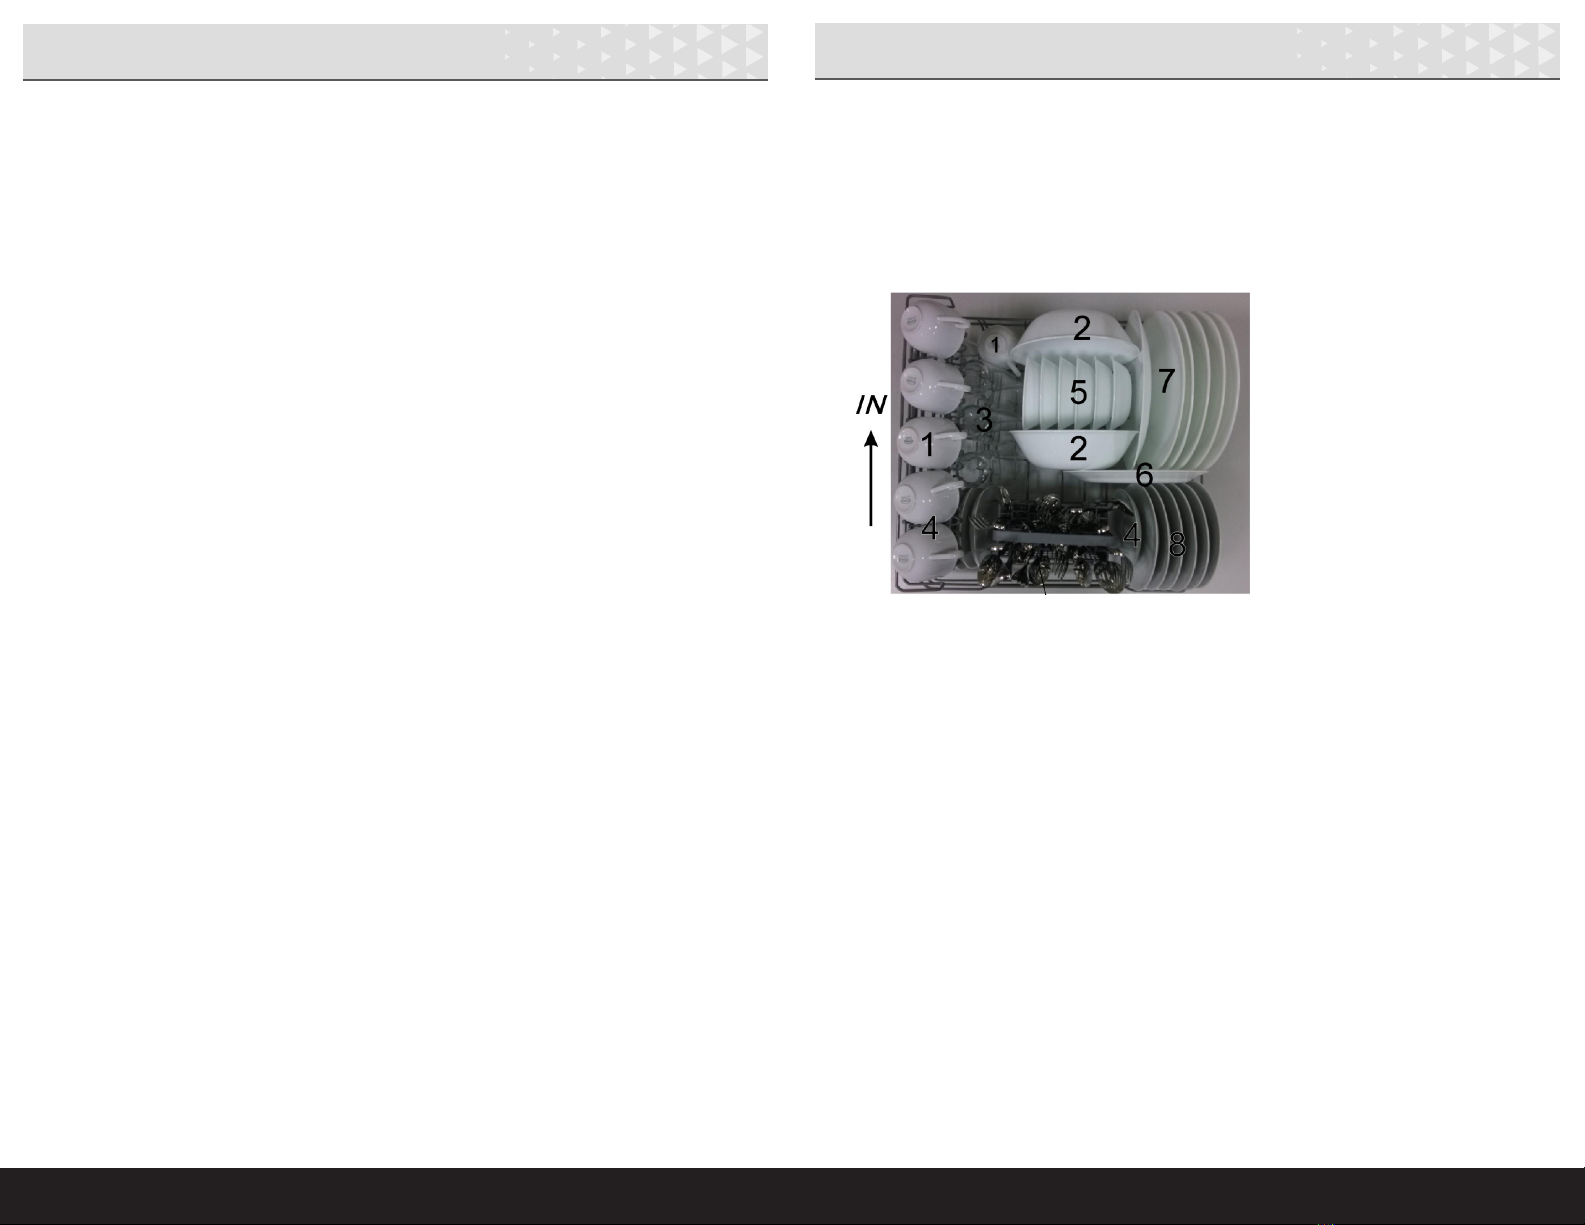
9. The following items are not suitable for the dishwasher:
• Items with wooden, horn china or mother-of-pearl handles
• Wooden items
• Plastic items that are not marked as dishwasher safe
• Items with glued parts that are not temperature resistant
• Bonded items
• Pewter or copper items
• Crystal glasses or stemware
• Steel or cast iron items subject to rusting
• Very small items that may fall through the rack or atware basket
• Items made from synthetic bers
• Silver and aluminum
· • Delicate glazed items
ADD DETERGENT AND RINSE AID
1. Detergent and/or rinse aid must be added before starting a wash cycle. This
dishwasher uses less detergent and rinse aid than a conventional dishwasher.
Generally, only 1 Tbsp. of detergent is needed for a normal wash load.
2. Use only detergent and rinse aid designed for an automatic dishwasher:
• DO NOT use hand soap, laundry detergent, or any other washing
detergent in the dishwasher.
• Store detergent in a dry area.
• DO NOT put powder detergent into the dispenser until you are ready to
operate the washer.
• The hardness of your water will affect the amount of detergent needed.
With hard water, extra detergent is needed to remove deposits left by
excessive minerals. Soft water requires less detergent. Too much
detergent with soft water can cause cloudiness of glassware.
• If using a detergent tablet, select a long program (heavy or normal) to
ensure the tablet has enough time to completely dissolve. Different
brands will dissolve at different speeds.
(continued on next page)
main detergent
chamber
tablet or pre-
wash detergent
chamber
rinse aid
chamber
WARNING: Keep detergents and rinse aids out of the reach of children and
avoid contact with skin and eyes.
3. After lling, close the detergent dispenser lid and press until it locks in place.
4. Turn the rinse aid cap counterclockwise. Lift and remove cap.
5. The rinse aid dispenser has four settings. It is recommended to
start with the dispenser set at 3. If spots or poor drying occurs,
increase the setting to 4. If there are sticky white stains on
dishes or blue lm on glassware, reduce the setting to 2 or 1.
6. Add rinse aid until the indicator window turns completely black.
DO NOT overll. Use only rinse aid in this chamber. DO NOT use detergent or
other substances.
7. To close, replace the cap and turn clockwise.
8. Wipe up any spilled rinse aid to avoid excessive foaming during the wash cycle.
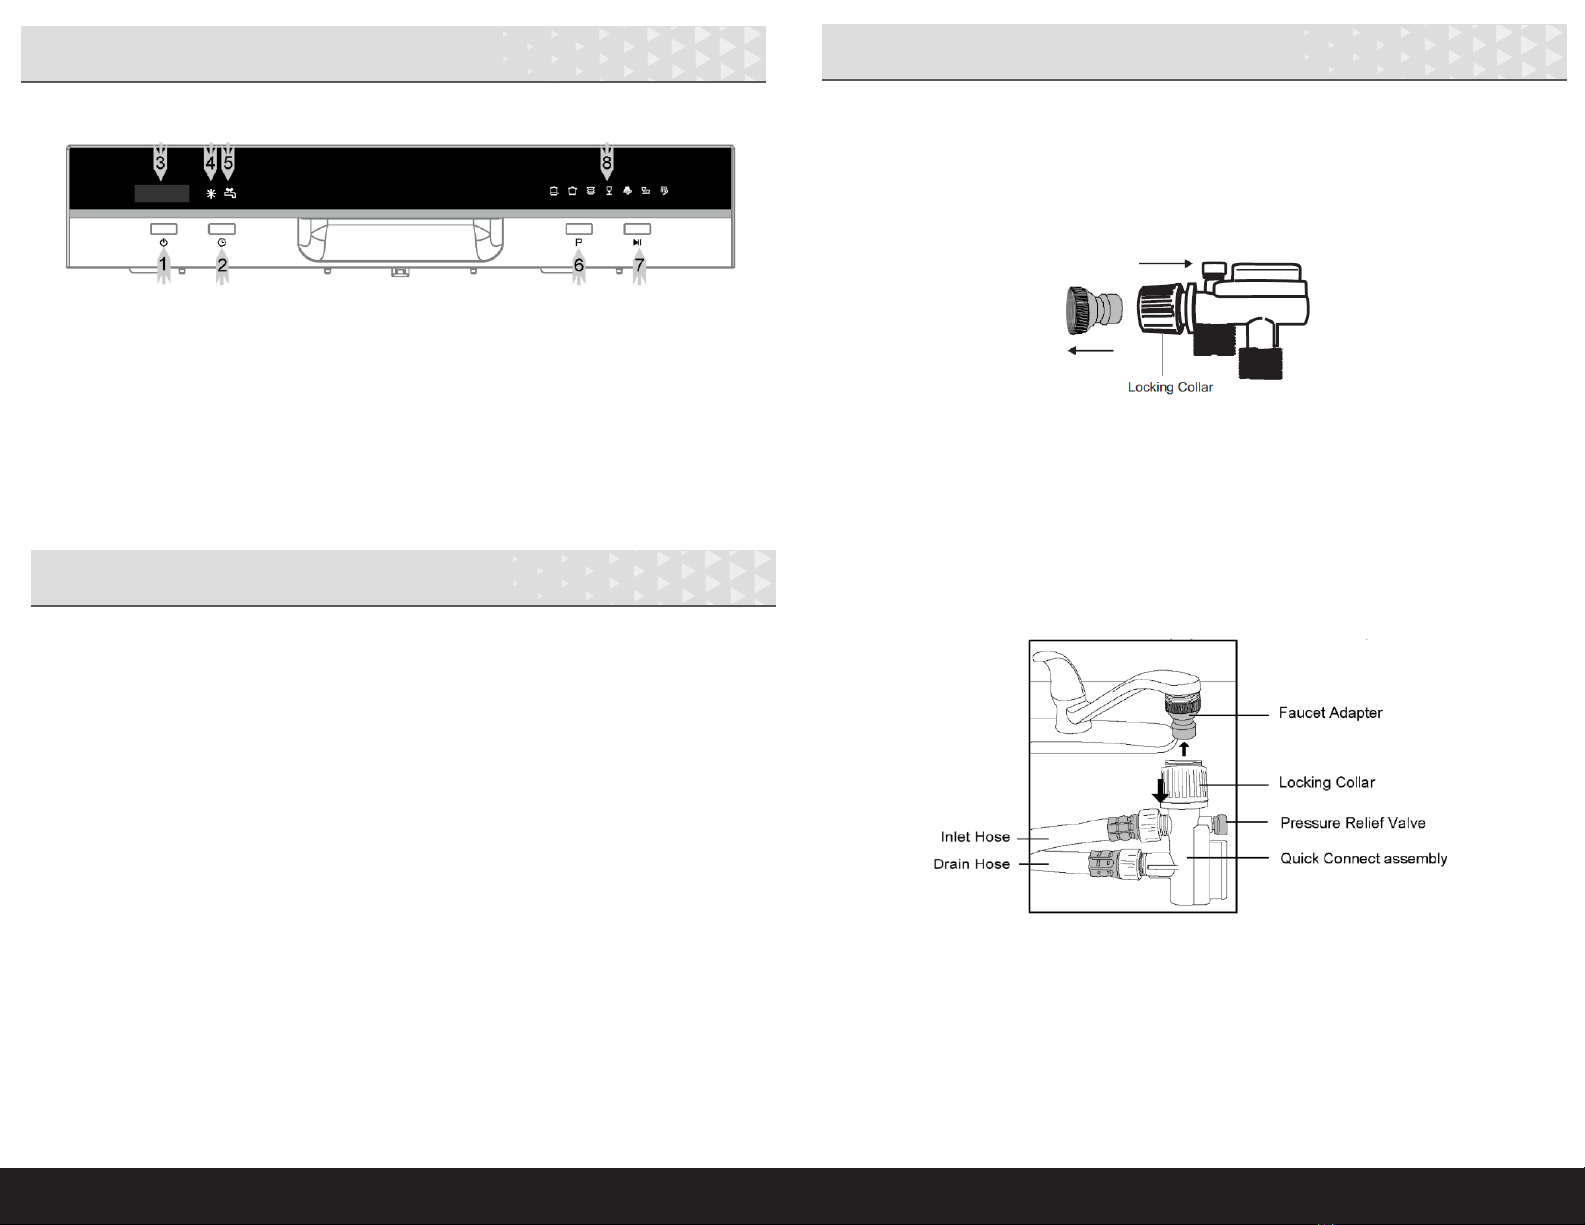
START THE DISHWASHER
1. Ensure the dishwasher is level.
2. Ensure water is connected. Turn water on (at the faucet) to full pressure.
3. Check for leaks at the drain and inlet ports.
4. Plug the power cord into an outlet.
5. Close the door and press POWER.
6. Check for kinks in the drain and inlet hoses.
START A WASH CYCLE
1. Press PROGRAM to select desired wash cycle (see page 12).
2. To delay start time, press DELAY (2, 4, 6 or 8 hours).
3. Press START/PAUSE to begin the wash cycle.
4. Press START/PAUSE during a wash cycle to pause operation. During pause, the
unit will beep once each minute until START/PAUSE is pressed again to resume
operation.
5. Press POWER to cancel a wash cycle.
rinse aid
indicator
lever

Wards.com 1•888•557•3848 13
12
How to Use (cont.)How to Use (cont.)
Heavy
heavy
soiled loads
prewash
prewash 122oF
wash 131oF
wash 122oF
rinse
rinse 154oF
dry
100 yes
Normal
average
soiled loads
prewash
prewash
wash 125oF
rinse
rinse 149oF
dry
110 yes
Light
lightly
soiled loads
prewash
prewash 122oF
wash 122oF
rinse
rinse 140oF
dry
75 yes
Mini Party lightly
soiled
glassware
or delicate
dinnerware
prewash
wash 113oF
rinse
rinse 122oF
dry
20 yes
Rinse
rinse only prewash
main wash 24
Speed
short wash
cycle (no
dry cycle)
prewash
prewash 122oF
wash 122oF
rinse
rinse 131oF
45 yes
Soak rinse dishes
that will
be washed
later
prewash 10
Program Selection Process Minutes Rinse Aid WARNING: Turn off the faucet after each use to avoid water pressure build up.
CHANGE THE WASH PROGRAM
1. After starting a wash cycle, the program can be changed if still in prewash.
2. Press and hold START/PAUSE for 3 seconds or more and the dishwasher will be
in stand-by mode.
3. Select another program.
4. Press START/PAUSE to start the new wash cycle.
Note: If you open the door during a wash cycle, the unit will be paused. After
door is closed again, press START/PAUSE to resume operation.
WARNING: Opening the door during operation may result in injury from hot
water and/or steam.
ADD A DISH
1. A dish can be added any time during prewash.
2. Press START/PAUSE.
3. Open the door slightly to stop the cycle.
4. After the spray arm has stopped spinning, open the door fully.
5. Add the dish.
6. Close the door.
7. Press START/PAUSE and unit will resume operation after 10 seconds.
AT THE END OF THE WASH CYCLE
1. When the wash cycle has nished, the dishwasher will buzz for 8 seconds.
2. Turn off the dishwasher by pressing POWER.
3. Shut off water supply and open the door.
4. Leave the door ajar and wait a few minutes before unloading. This will allow the
dishes to cool and assist in the drying process. Dishes that are still hot are more
susceptible to breakage.
5. Unload the dishwasher. It is normal for the dishwasher to be wet inside.
6. When nished, leave the door slightly open so moisture and odors are not
trapped inside.
WARNING: Hot steam will be ejected when the door is opened. Keep
hands and face away!

14 15
1•888•557•3848
Wards.com
Cleaning & Care (cont.)
Cleaning & Care
1. Turn off and unplug the appliance.
2. Always allow the appliance to cool completely before cleaning.
3. DO NOT use abrasive brushes, pads or harsh cleaning solutions.
4. The spray arm can be removed for cleaning by grasping at the center and
pulling upward. Wash the spray arm with mild soap and a soft cloth. Carefully
reinstall.
5. The lter assembly should be cleaned regularly to prevent clogs and odors.
Turn the lter assembly counterclockwise and lift to remove. Use a soft
cleaning brush and hold under running water to clean the lters. Replace.
DO NOT run the dishwasher without the lters in place!
6. Check the rubber seal gasket for trapped food. Clean with a damp cloth or
sponge.
7. Wipe the interior and door with a soft cloth. DO NOT use a spray cleaner.
8. Clean the control panel and exterior with a soft, damp cloth and dry
thoroughly.
9. Hard water may contribute to lime deposits and/or scaling on the stainless
steel interior of the dishwasher. When this occurs, it is recommended to
periodically operate/rinse the empty dishwasher using 1 cup of white vinegar.
10. Do not immerse any electrical appliance, cord or plug into water.
spray arm
lter
assembly
MOVING THE DISHWASHER
1. Keep the dishwasher in the upright position when moving.
2. DO NOT position the dishwasher on its side or upside down.
STORING THIS DISHWASHER
1. Run a wash cycle with the dishwasher empty. Leave the door slightly open (this
will help the rubber seals last longer and prevent odors from forming inside the
dishwasher).
2. Turn off the water supply and disconnect the hoses from the back of the unit.
3. Drain water from the hoses and ports.
4. Remove the lter assembly and use a sponge to absorb any remaining water in
the unit. Ensure lters are completely dry before replacing.
5. Store in a dry area.
6. DO NOT store in extremely hot or cold temperatures.
.

16 17
1•888•557•3848
Wards.com
Troubleshooting (cont.)Troubleshooting
ISSUE POSSIBLE CAUSE SOLUTION
Dishwasher does not
start
Fuse is blown or circuit
breaker is tripped
Power supply is not
turned on
Dishwasher door is not
properly closed
Replace fuse or reset cir-
cuit breaker. Remove any
other appliances sharing
the same circuit.
Make sure dishwasher
is turned on and door is
closed securely. Check
power cord.
Close the door and make
sure it latches.
Drain water not pumped
from dishwasher
Kink in drain hose
Filter clogged
Check drain hose.
Check and clean lters.
Suds inside of
dishwasher at end of
wash cycle
Improper detergent used
Spilled rinse aid
Use only specied deter-
gent for dishwasher use.
If improper detergent
was used, open the dish-
washer and allow suds to
evaporate. Add 1 gallon
of cold water to the tub,
close door and start the
SOAK cycle to drain
water. Repeat if
necessary.
Always clean up rinse aid
spills.
Stained tub interior Detergent used contains
colorant
Do not use detergents
with colorants.
White lime or scaling
on dishwasher interior
surface
Hard water minerals See page 14, step 9.
(continued on next page)
ISSUE POSSIBLE CAUSE SOLUTION
Rust stains appear on
cutlery
Items are not non-
corrosive
Do not place items in
dishwasher unless
marked dishwasher safe.
Knocking noise inside
the dishwasher
Spray arm is knocking
against an item in the
rack or atware basket
Pause the wash cycle
and rearrange items
which are obstructing
the spray arm.
Rattling noise inside the
dishwasher
Items are not securely
placed in dish rack
Pause the wash cycle
to rearrange and secure
items.
Knocking noise in water
pipes
This issue is not related
to the dishwasher
Contact a plumber.
Dishes are not clean Dishes were not properly
loaded
Selected wash cycle was
not powerful enough
Not enough detergent
Items are blocking the
path of the spray arm
Filters are dirty/clogged
or installed incorrectly
See page 9.
Select a longer cycle.
Use more or change
brand of detergent.
Rearrange items so the
arm spins freely.
Clean the lters and/or
check installation.
Glassware is cloudy Combination of too
much detergent with
soft water
The lters may be dirty
or clogged
Use less detergent and/
or select a shorter wash
cycle.
Clean lters and/or
check installation.
Black or gray marks on
dishes
Utensils may have
rubbed against dishes
Load more carefully.
Detergent left in
dispenser
Dishes blocked the
dispenser
Load dishes properly.
(continued on next page)

18 19
1•888•557•3848
Wards.com
Notes
Troubleshooting (cont.)
ISSUE POSSIBLE CAUSE SOLUTION
Dishes are not dry Improper loading
Not enough rinse aid
Dishes were removed too
soon
Wrong cycle selected
Dishes are not
dishwasher safe
See page 9.
Add more rinse aid.
DO NOT remove dishes
from the dishwasher
immediately after wash.
Short cycles have lower
cleaning performance.
Choose a longer cycle.
Wash only dishwasher-
safe items in the
dishwasher.
Display E1 Restricted water inlet Water supply is not
turned on, water
supply is restricted or
water pressure is too low.
Display E2 Overow Leak in dishwasher. If
there is water in the
bottom, the water should
be removed before
restarting the dishwasher.
______________________________________________________
______________________________________________________
______________________________________________________
______________________________________________________
______________________________________________________
______________________________________________________
______________________________________________________
______________________________________________________
______________________________________________________
______________________________________________________
______________________________________________________
______________________________________________________
______________________________________________________
______________________________________________________
______________________________________________________
______________________________________________________
______________________________________________________
______________________________________________________
______________________________________________________

1•888•557•3848
Wards.com
12 13
If any item, for any reason, does not meet your expectations, just
return it to us. We’ll gladly either:
• Refund your merchandise amount
• Credit your account
• Send a replacement
You can return any unused item in its original packaging within 60
days of its receipt for a full refund of the purchase price (excluding
shipping and handling charges).
Please send returns to:
Montgomery Ward, Inc.
Attn: Customer Returns
2000 Harrison Suite 100
Clinton, IA 52732-6676
When returning an item:
• Use the original packaging and pack it securely.
• Please adequately insure your item in case you need to
make a claim with the carrier you choose for returning your
item.
• Include your order number and reason for return.
• We recommend keeping the receipt for 4 weeks.
Montgomery Ward, Inc. warrants this product
to be free from defects in material and workmanship
for one year from provable date of purchase.
Within this warranty period, Montgomery Ward
will repair or replace, at its option,
defective parts of this
product at no charge, provided the product is returned,
freight prepaid with proof of purchase to
Montgomery Ward.
Allow 2–4 weeks for return shipping.
This warranty does not cover improper installation, misuse,
abuse or neglect on part of the owner. Warranty is also
invalid in any case that the product is taken apart or
serviced by an unauthorized service station.
This warranty gives you specic legal rights and they may
vary from state to state.
THE FOREGOING WARRANTIES ARE IN LIEU OF ALL
OTHER WARRANTIES AND CONDITIONS,
EXPRESS OR IMPLIED, INCLUDING
BUT NOT LIMITED TO THOSE OF MERCHANTIBILITY
OR FITNESS FOR A PARTICULAR PURPOSE.
1 Year Limited Warranty
Montgomery Ward Customer Service
8:00 am to Midnight CST, Monday through Friday
Wards.com 1•888•557•3848
Returns
20 21
1•888•557•3848
Wards.com
®

1514
Table of contents
Other Montgomery Ward Dishwasher manuals