Montgomery Ward SLF-1131 User manual

Instruction Manual
Item: 766695
Wards.com 1•888•557•3848
Montgomery Ward Customer Service
3650 Milwaukee Street, Madison, WI 53714
8:00 am to Midnight, Monday through Friday
Extra
frozen
storage!
Wards.com 1•888•557•3848
4.3 Cu. Ft. Upright Freezer
®
®

Thank you for purchasing your Montgomery Ward
4.3 Cu. Ft. Upright Freezer. Put through the paces by the experts,
we guarantee that it will perform to the highest standard, time after
time, with all the convenience, easy cleanup and durability
you rely on from Wards.
3
Important Safeguards ................... 3
Electrical Safety ...............................4
Specications.................................... 4
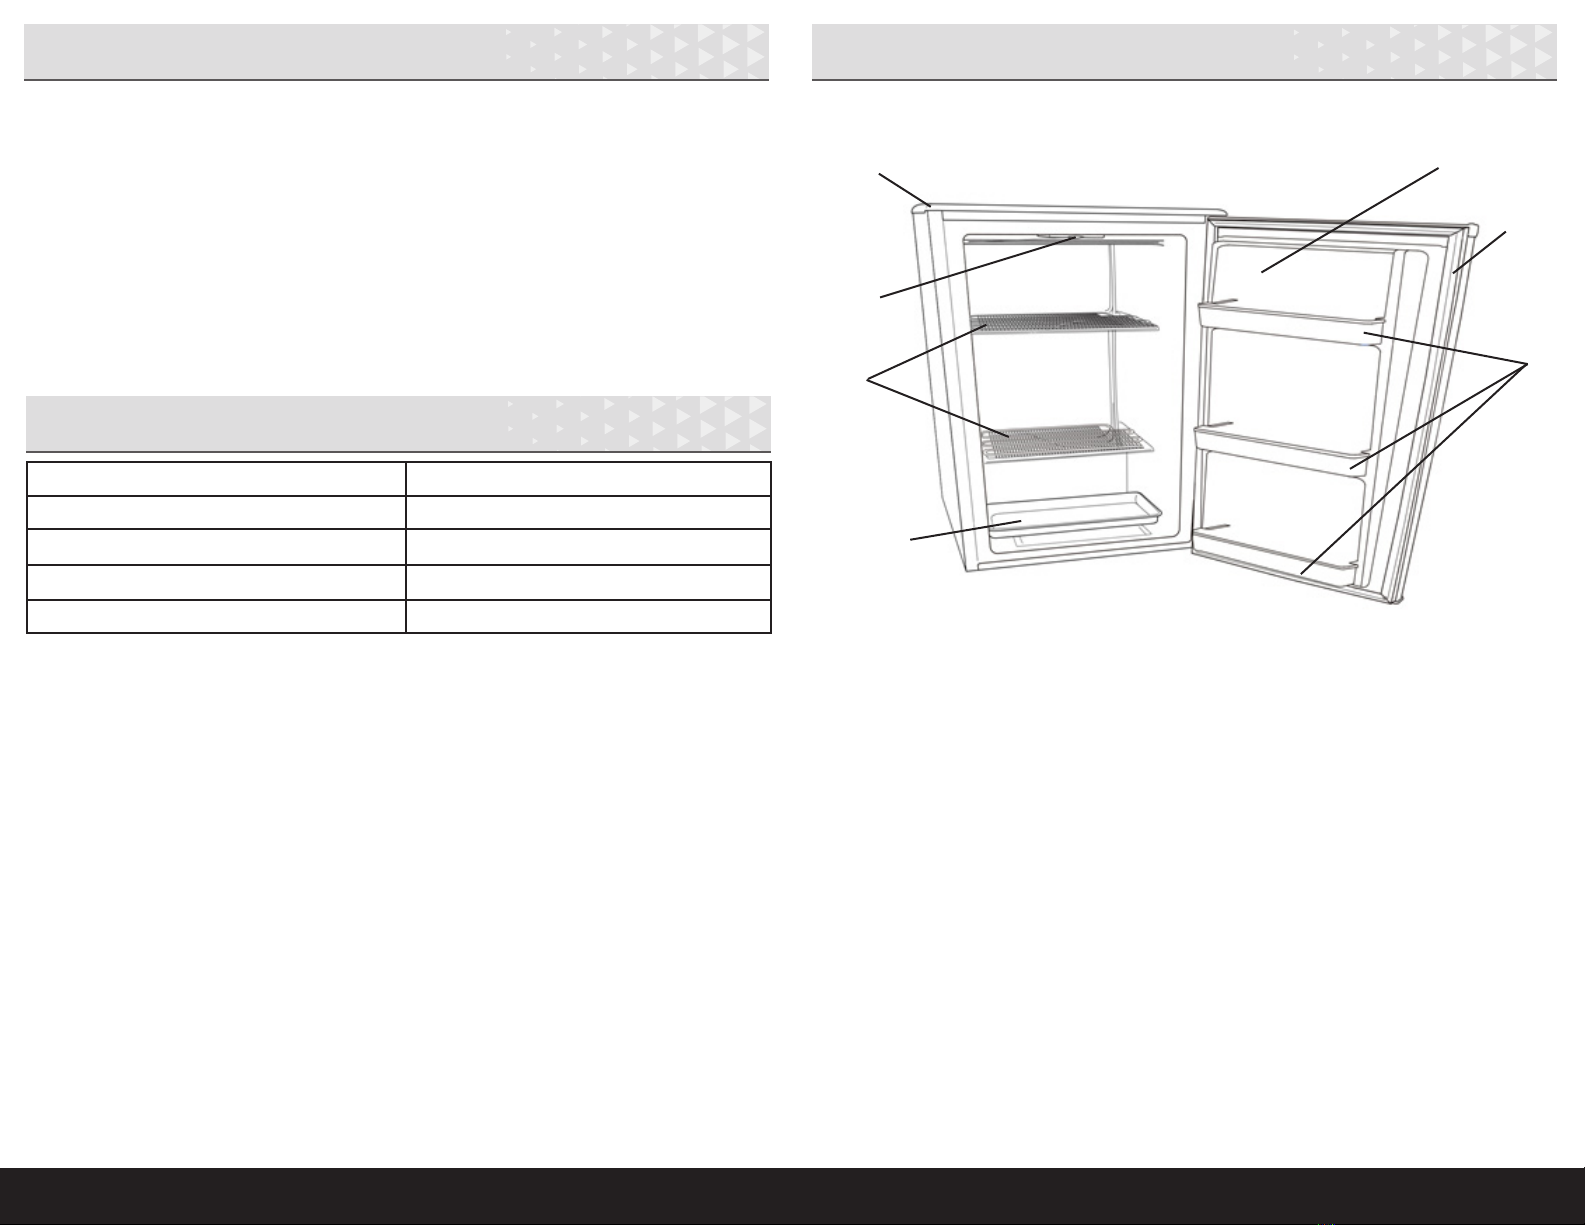
Parts & Features............................... 5
Installation Instructions.............6–7
How to Use......................................... 8
Helpful Hints........................................8
Cleaning & Care..........................9–10
Troubleshooting............................... 11
Return Information ........................12
Warranty..............................................13
Table of Contents
21•888•557•3848
Wards.com
Important Safeguards
READ CAREFULLY BEFORE USING AND SAVE THESE INSTRUCTIONS!
• FOR HOUSEHOLD USE ONLY. DO NOT use this appliance for other than its
intended use.
• REMOVE all packaging materials and labels before rst use. Please dispose
of the packaging materials via the appropriate recycling system, in an
environmentally friendly manner.
• WASH all removable parts before rst use. Wipe inside of freezer with a damp
cloth.
• DO NOT drape the cord where it can be pulled on or tripped over. Never wrap
the cord tightly around the appliance, as this could cause the cord to fray or
break.
• DO NOT use an extension cord with this appliance.
• CLOSE SUPERVISION IS NECESSARY WHEN USING THIS FREEZER NEAR
CHILDREN. DO NOT ALLOW CHILDREN TO CLIMB, STAND ON, OR HANG ON
THE DOOR OR SHELVES.
• Keep ngers out of the clearances between the doors and cabinet. BE
CAREFUL CLOSING DOORS WHEN CHILDREN ARE IN THE AREA.
• A re may occur if this appliance is used near FLAMMABLE MATERIALS,
including curtains, towels, walls, etc. DO NOT put non-food items in the
appliance. DO NOT place the appliance or its cord on or near a heated surface.
• This appliance should always be used on a STABLE, DRY, HEAT-RESISTANT
SURFACE. DO NOT use near water. DO NOT place freezer in extreme cold
or hot temperatures.
• DO NOT use an accessory or attachment not recommended by Wards, as this
may cause injury, or damage the appliance.
• Do not use outdoors.
• Turn OFF AND UNPLUG this appliance when not in use. Turning the
temperature dial to 0 stops cooling but DOES NOT shut off power.
• NO SERVICEABLE PARTS INSIDE THIS APPLIANCE.
• DO NOT USE AN APPLIANCE WITH A DAMAGED CORD OR PLUG, OR AFTER
THE APPLIANCE MALFUNCTIONS, OR HAS BEEN DAMAGED IN ANY MANNER.
• Appliances contain valuable materials that can be recycled. Please dispose of
your old appliances using appropriate collection systems. Disposal of this unit
should be in accordance with federal and local regulations.
• BEFORE YOU DISPOSE OF A REFRIGERATOR OR FREEZER, REMOVE THE
DOORS. KEEP THE SHELVES IN PLACE SO THAT CHILDREN MAY NOT EASILY
CLIMB INSIDE.
Thank you
for your
purchase!
®

Parts & Features
Specications
Electrical Safety
41•888•557•3848
Wards.com
45
This appliance is equipped with a 3-prong grounding plug. This is a safety
feature to reduce the risk of electrical shock. DO NOT use an extension cord with
this appliance. It is recommended that an electrical outlet serving ONLY this
appliance be used. This outlet must be properly installed and grounded. If you
have any questions about the grounding or electrical instructions, contact a
qualied electrician. Do not attempt to modify the plug in any way. Montgomery
Ward cannot accept any liability for damage or injury resulting from failure to
observe these safety procedures.
POWER RATING 60Hz, 115V, 1.30A
CAPACITY 4.3 Cu. Ft.
CORD LENGTH 60"
DIMENSIONS 24"W x 36"H x 24¾"D
MODEL SLF-1131
1. FREEZER CABINET
2. TEMPERATURE DIAL
3. STATIONARY SHELVES
4. DRIP TRAY
5. DOOR
6. MAGNETIC GASKET
7. DOOR BINS
6
5
4
3
2
1
7

1•888•557•3848
Wards.com 7
6
Installation Instructions Installation Instructions (cont.)
LOCATION
1. Select a place with a strong, level oor.
2. Allow 5 inches of space between the back of the freezer and any adjacent wall.
3. Avoid placing the freezer in a narrow recess. Let air circulate freely around the
cabinet.
4. Avoid direct sunlight and heat. Direct sunlight may affect the acrylic coating.
Heat sources nearby will cause higher electricity consumption.
5. Avoid damp places. Too much moisture in the air will cause frost to form very
quickly and your freezer will have to be defrosted more frequently.
6. To avoid overloading the circuit, this freezer should be the only appliance
connected to the wall outlet.
5. Using a at-head screwdriver, remove the door top hinge pin.
6. Re-install the door top hinge pin on the opposite side of the cabinet.
7. Remove the door plug and door bushing located on the top of the door;
interchange their positions.
DOOR REVERSAL INSTRUCTIONS
WARNING: To avoid personal injury to yourself and/or property, we
recommend 2 people perform the door reversal process.
1. To access the lower hinge assembly, carefully tilt the freezer backward.
2. Remove both leveling legs located at the front of the freezer.
3. Remove the screws holding the lower hinge assembly to the cabinet.
4. Remove the door from the freezer cabinet (lift door slightly and pull
downward).
leveling
leg (right)
leveling
leg (left)
8. Re-install door to cabinet.
9. Remove door bushing (bottom of the door) and install on opposite side.
10. Re-install the lower hinge assembly on the opposite side.
11. Make sure the door assembly is properly aligned on the cabinet before
tightening lower hinge screws.
12. Re-install both leveling legs. To avoid vibration, set the cabinet level by
adjusting the leveling legs.
13. Plug the power cord into an electrical outlet.
top hinge pin
door
plug
door bushing

1•888•557•3848
Wards.com
89
• Never place hot food in the freezer.
• Avoid overloading the freezer.
• Only open the door when necessary.
Helpful Hints
How to Use Cleaning & Care
Tips R
1. The temperature dial controls the temperature inside the freezer. To start the
freezer, turn the dial to the desired cooling temperature:
0No Cooling
1Minimum Cooling
3–6 Medium Cooling
7Maximum Cooling
2. The temperature dial will automatically start the freezer motor as soon as the
inside temperature rises above the desired level.
3. The freezer temperature will vary depending on the quantity of the food stored
and on the frequency with which the door is opened.
DEFROSTING
Complete defrosting and cleaning should be done at least once a year. In high
humidity areas, a freezer may need more frequent defrosting and cleaning. Defrost
and clean your freezer when frost has built up to about 1/4" (6mm) thickness.
WARNING: Do not use an ice pick, knife or other sharp-pointed tool to defrost
freezer. Puncturing of refrigerant tubing may cause re or
explosion. Keep ammable materials and vapors, such as gasoline,
away from the freezer. Use only nonammable cleaners.
1. Turn temperature dial to 0 and unplug the power cord.
2. Remove all food (store frozen food in a cooler with ice).
3. Remove frost by propping the door open. Use the drip pan and towels to collect
the water.
4. Wipe water from walls and bottom of freezer with a towel or sponge.
CLEANING
1. Wash inside walls with vinegar and water, baking soda and water, or another
mild cleaner.
2. Rinse and dry thoroughly.
3. Wash glass shelves in a mild detergent solution, then wipe dry with a soft, clean
cloth.
4. Clean the outside of the cabinet with a soft, damp cloth and some mild
detergent or appliance cleaner.
5. Do not immerse any electrical appliance, its cord, or its plug, into water.
6. Plug in power cord and refer to “How to Use” on page 8.
7. Ensure freezer is cooling properly before replacing frozen food.

1•888•557•3848
Wards.com
10 11
Cleaning & Care (cont.) Troubleshooting
POWER FAILURES
1. Power failures which are corrected within an hour or two will not affect your
freezer temperatures. Minimize the number of door openings while the power is
off.
2. During power failures of longer duration, remove the food to a chest cooler
with ice or to another operating freezer.
VACATION OR STORAGE
1. For short vacation periods, leave the freezer on with the temperature dial at its
normal setting.
2. For extended vacation or for storage:
a. Remove all food.
b. Turn temperature dial to 0 and disconnect power cord from electrical
outlet.
c. Defrost and clean the freezer thoroughly (see page 9).
d. Prop the door open to avoid possible formation of condensation,
mold or odors.
MOVING
1. Turn temperature dial to 0 and disconnect power cord from electrical outlet.
2. Remove or securely fasten down all food inside the freezer.
3. To avoid damaging the leveling legs, turn them all the way into the base.
4. When the freezer is in its new location, set the cabinet level by adjusting the
leveling legs.
5. Plug the power cord into an electrical outlet and set the control dial to the
desired setting.
PROBLEM POSSIBLE CAUSES SUGGESTED SOLUTIONS
Freezer does not
work
• No power to unit
• Power cord is unplugged
• Wrong voltage is being
used
• Check connection of
cord to power source
• Plug in unit
• Use proper voltage
Freezer runs
continuously
• Temperature is set too
low
• Door is not closed
• Hot food inserted into
cabinet
• Door opened too long or
too often
• Close proximity to heat
source
• Set temperature dial
to warmer setting
• Close door securely
• Be sure food has cooled
to room temperature
before inserting
• Minimize door openings
and duration
• Do not place unit close
to heat sources or direct
sunlight
Internal temperature
not cold enough
• No power to unit
• Power cord is unplugged
• Temperature is set too
high
• Door is not closed
• Hot food inserted
• Door opened too long or
too often
• Air ow obstruction
• Wrong voltage is being
used
• Close proximity to heat
source
• Check connection of
cord to power source
• Plug in unit
• Check temperature dial
and increase as needed
• Close door securely
• Be sure food has cooled
to room temperature
before inserting
• Minimize door openings
and duration
• Allow room for air to
circulate around the unit
• Use proper voltage
• Do not place unit close
to heat sources or direct
sunlight

1•888•557•3848
Wards.com
12 13
If any item, for any reason, does not meet your expectations, just
return it to us. We’ll gladly either:
• Refund your merchandise amount
• Credit your account
• Send a replacement
You can return any unused item in its original packaging within 60
days of its receipt for a full refund of the purchase price (excluding
shipping and handling charges).
Please send returns to:
Montgomery Ward, Inc.
Attn: Customer Returns
2000 Harrison Suite 100
Clinton, IA 52732-6676
When returning an item:
• Use the original packaging and pack it securely.
• Please adequately insure your item in case you need to
make a claim with the carrier you choose for returning your
item.
• Include your order number and reason for return.
• We recommend keeping the receipt for 4 weeks.
Montgomery Ward, Inc. warrants this product
to be free from defects in material and workmanship
for one year from provable date of purchase.
Within this warranty period, Montgomery Ward will repair
or
replace, at its option, defective parts of this
product at no charge, provided the product is returned,
freight prepaid with proof of purchase to
Montgomery Ward.
Allow 2–4 weeks for return shipping.
This warranty does not cover improper installation, misuse,
abuse or neglect on part of the owner. Warranty is also
invalid in any case that the product is taken apart or
serviced by an unauthorized service station.
This warranty gives you specic legal rights and they may
vary from state to state.
THE FOREGOING WARRANTIES ARE IN LIEU OF ALL
OTHER WARRANTIES AND CONDITIONS,
EXPRESS OR IMPLIED, INCLUDING
BUT NOT LIMITED TO THOSE OF MERCHANTIBILITY
OR FITNESS FOR A PARTICULAR PURPOSE.
1 Year Limited Warranty
Montgomery Ward Customer Service
8:00 am to Midnight CST, Monday through Friday
Wards.com 1•888•557•3848
Returns ®

15
14
This manual suits for next models
1
Table of contents
Other Montgomery Ward Freezer manuals