Mottura Xmode 99688 User manual

POWERED ELECTRONIC LOCK
ESCUTCHEON DISPLAY
99.688 - 99742
GENERAL WARNINGS
Mottura Serrature di Sicurezza S.p.A. thanks you for choosing this product and reminds you:
- to read these instructions very carefully before installing and using this product and before doing any maintenance.
- the escutcheon display is sensitive to electrostatic discharges that may come from your body; before handling the escutche-
on, make sure you have taken all precautions to prevent it from being permanently damaged by an electrostatic discharge.
- to keep these instructions for future use and attach the sales receipt to validate the warranty.
- In case of problems, contact your authorized dealer only.
“DO NOT use a liquid, spray, or wet cloth to clean the escutcheon! If liquids enter the scanner, they will oxidize and permanently
damage its components. Use a dry cloth only. DO NOT paint the escutcheon with any method or substance. Failure to follow
these instructions will immediately void the warranty.”
Mottura Serrature di Sicurezza S.p.A. may change the characteristics of the products described in these instructions at any time
and without notice.
ESCUTCHEON FUNCTIONS
Unless otherwise specied, all of the functions described in this manual refer to both PROTECTED-duplication and FREE-duplication
TAGS (transponder keys).
The escutcheon with color display can be connected to Mottura’s powered “XMODE” lock on the inside of the door to replace
the 3-key escutcheon. It can be used to open and close the lock from inside the door, and can fully manage all of the available
lock functions plus the ones used by means of the internal 3-key escutcheon. Specically, this visual interface displays lock
movement phases (opening and closing), any errors that may be generated during these phases, lock and door status, power
supply status, and programming access.

99298 - XMODE - ESCUTCHEON DISPLAY - REV. 01
2
1 - THE ESCUTCHEON ............................................................................................................................ pag. 3
2 - OPENING AND CLOSING THE LOCK ........................................................................................................ 3
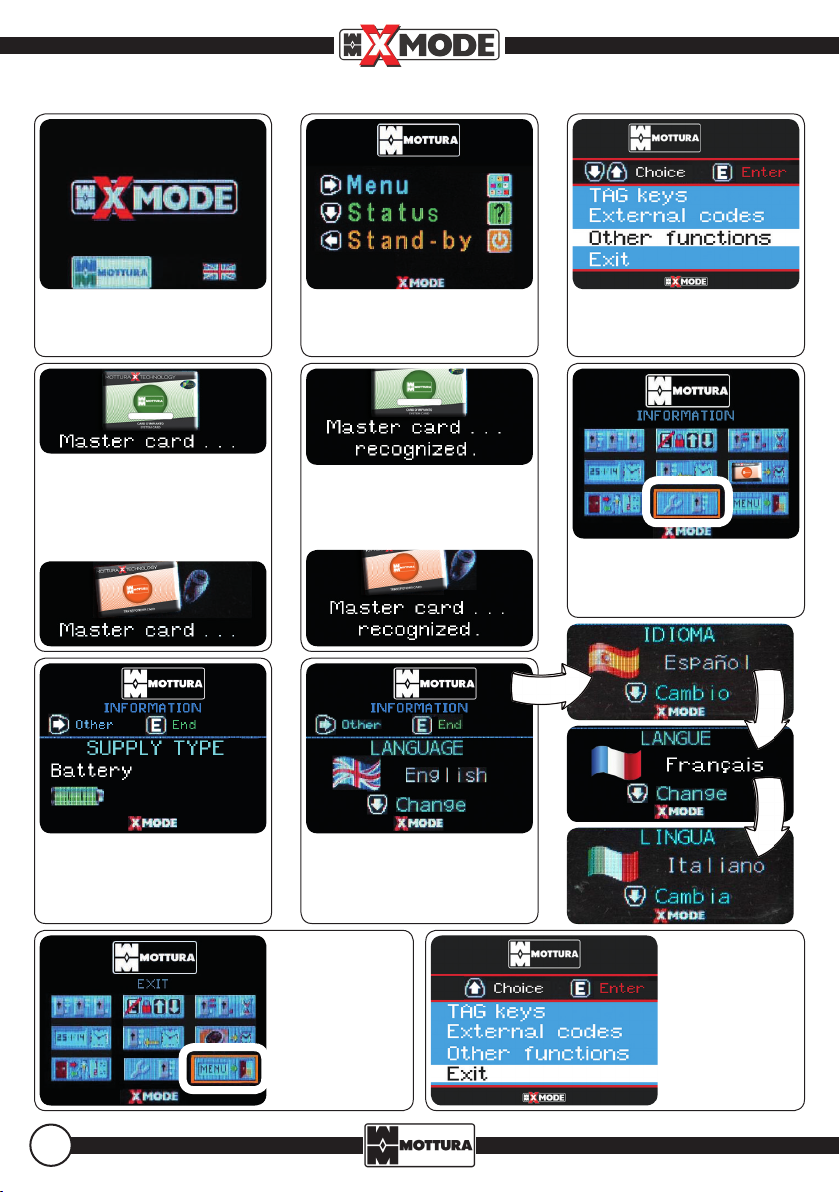
3 - CHANGING THE DISPLAY LANGUAGE ...................................................................................................... 4
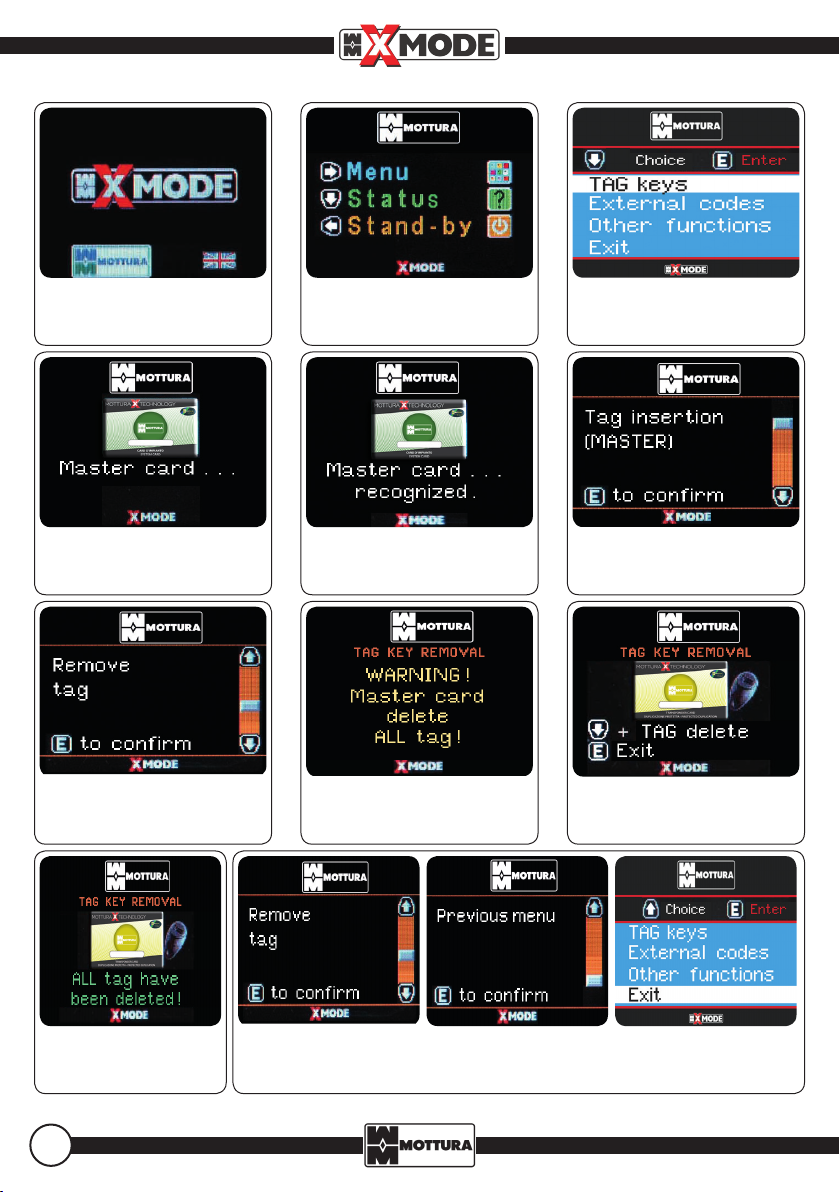
4 - PROTECTED TAG SYSTEM ............................................................................................................................. 5
4.1 - DELETING A SINGLE TAG
4.2 - DELETING ALL TAGS
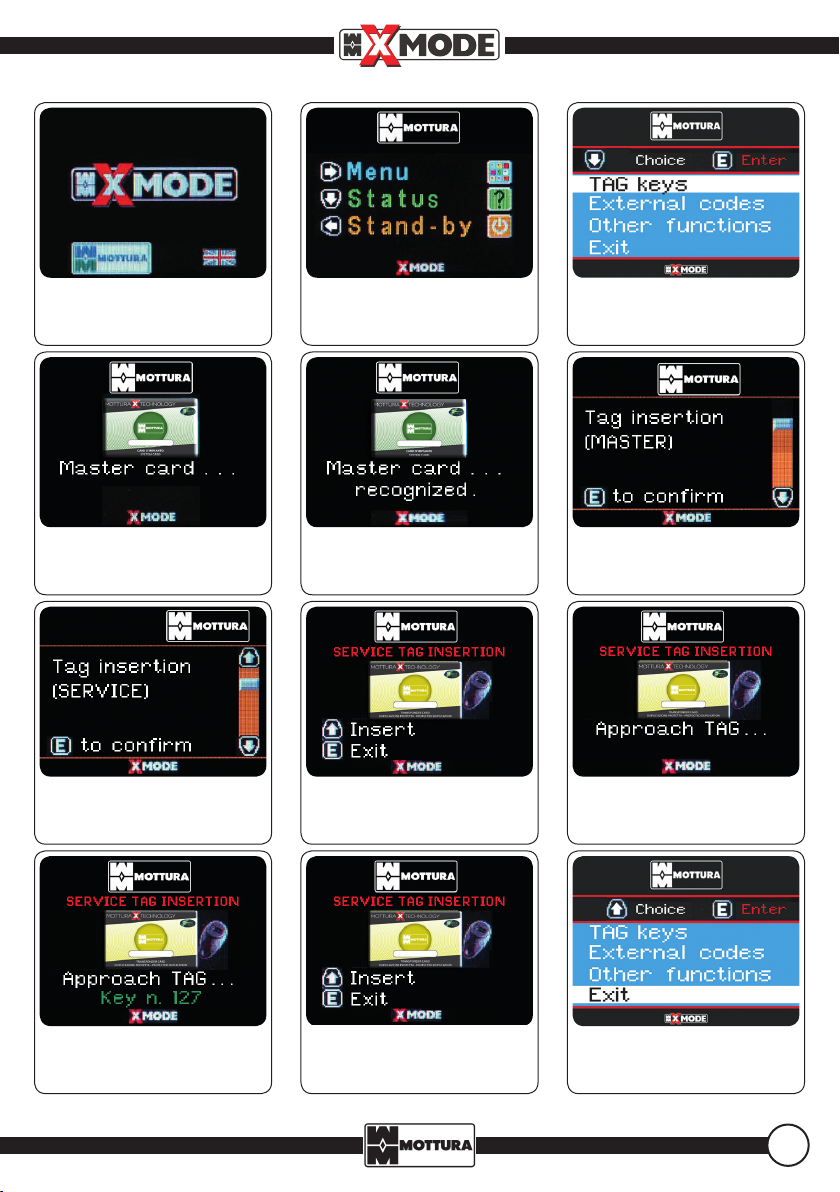
4.3 - ENTERING A SERVICE TAG
4.4 - ENTERING A MASTER TAG
4.5 - MEMORIZED TAG ATTRIBUTES
5 - FREE TAG SYSTEM ....................................................................................................................................... 11
5.1 - ENTERING A MASTER TAG
5.2 - ENTERING A SERVICE TAG
5.3 - DELETING SINGLE TAG
5.4 - DELETING ALL TAGS
6 - DISABLING SERVICE TAG (FREE/PROTECTED TAG SYSTEM) .............................................................. 15
7 - ENABLING SERVICE TAG (FREE/PROTECTED TAG SYSTEM) .............................................................. 16
8 - QUICK LOCK STATUS INFORMATION - DOOR OPEN .......................................................................... 17
9 - QUICK LOCK STATUS INFORMATION - DOOR CLOSED ..................................................................... 17
10 - POWER SUPPLY ....................................................................................................................................... 17
11 - EXTERNAL KEYPAD CODES ............................................................................................................................ 18
11.1 - ENTERING PROGRAMMING MODE
11.2 - INSERTING CODES
11.3 - DELETING A SINGLE CODE
11.4 - DELETING ALL CODES
11.5 - PREVIOUS MENU
12 - CHANGING LOCK CLOSING MODE ............................................................................................................ 21
13 - PARENTAL SECURITY CODES ....................................................................................................................... 22
13.1 - OPENING / CLOSING LOCK ON INSIDE
13.2 - DELETING CODE FROM INSIDE
14 - COURTESY TIMES ....................................................................................................................................... 24
15 - DATE AND TIME ....................................................................................................................................... 25
16 - TIME SLOT BACK STOP .................................................................................................................................... 26
16.1 - DELETE A SINGLE TIME SLOT
16.2 - DELETE TIME ONE DAY SLOT
16.3 - DELETE ALL TIME SLOTS
17 - TAGS IN TIME SLOT ....................................................................................................................................... 30
17.1 - DELETING A SINGLE TIME SLOT
17.2 - DELETING TIME SLOTS ON ONE DAY
17.3 - DELETING ENTIRE USER GROUP
17.4 - DELETING ALL TIME SLOTS /USERS
18 - ACCESS CONTROL ....................................................................................................................................... 34
18.1 - DELETING ALL ACCESS CONTROL INFORMATION
19 - INFORMATION ....................................................................................................................................... 35
20 - EXITING THE MENU ....................................................................................................................................... 36
21 - TROUBLESHOOTING ....................................................................................................................................... 37
CONTENTS
The system automatically returns to stand-by if no keys are pres-
sed for thirty seconds.

3
2. OPENING AND CLOSING THE LOCK
Press the “E”key on the escutcheon to open and close the lock, in the same way as with the internal 3-key escutcheon.
TYPE OF POWER SUPPLY
1Press "E".
Opening operation.
OPENINGCLOSING
1If AUTOMATIC CLOSING mode
is NOT ON, press "E". Closing
operation.
Closing operation in AUTOMATIC
CLOSING mode with COURTESY
time on.
2
Opening .
2
Closing operation completed.
Door closed.
3
Opening operation
completed. Door open
All of the following programming operations must be done with
the door and the lock open.
1. THE ESCUTCHEON
OPERATION IN PROGRESS
PROGRESS OF OPERATION
TAG NO. USED
(FOR PROTECTED SYSTEM ONLY)
FUNCTION KEYS
EXECUTE ” KEY
GREEN LEDRED LED
LANGUAGE
99742 - Rectangular version

99298 - XMODE - ESCUTCHEON DISPLAY - REV. 01
4
3. CHANGING THE DISPLAY LANGUAGE (if not necessary, go to chapter 4)
1
At door open, press any
arrow key to
activate the menu. 2
Functions screen
press (Menu). 3
Press until (Other fun-
ctions) and press "E".
6
Select "INFORMATION"
menu with
and press "E".
7
Press (Other) several
times until reaching
LANGUAGE menu 8
Press (Change) to set the
language you want (English,
Spanish, French, Italian) and
press "E".
9
Select "MENU"
with
and press "E".
10
Pressuntil
(Exit), press
"E" to finish.
4PROTECTED SYSTEM
Place system CARD (GREEN)
or MASTER TAG (ORANGE
TAG/card) on external escutcheon.
FREE SYSTEM 5PROTECTED SYSTEM
Recognition of CARD.
FREE SYSTEM

5
4. PROTECTED TAG SYSTEM (if not necessary, go to chapter 5)
1At door open, press any
arrow key to
activate the menu. 2
Functions screen
press (Menu). 3
Press "E" (TAG Keys).
4
Place system CARD (GREEN)
on external escutcheon. 5
Recognition of CARD. 6
Press to scroll menu.
9
Place TAG to delete on ex-
ternal escutcheon and press
(+ TAG delete).7
Press "E" (Remove TAG). 8
Warning message.
11
Press "E" (Exit). 12
Pressuntil (Exit),
press "E" to finish.10TAG deleted.
In a system with protected key (TAG) duplication, all keys are supplied as MASTERS.
4.1 DELETING A SINGLE PROTECTED TAG

99298 - XMODE - ESCUTCHEON DISPLAY - REV. 01
6
11
Press to scroll
menu.
Pressuntil (Exit),
press "E" to finish.
10
All TAG deleted.
4.2 DELETING ALL TAGS - PROTECTED SYSTEM
Press "E".
1At door open, press any
arrow key to
activate the menu. 2
Functions screen
press (Menu). 3
Press "E" (TAG Keys).
4
Place system CARD (GREEN)
on external escutcheon. 5
Recognition of CARD. 6
Press to scroll menu.
9
Place SYSTEM TAG on exter-
nal escutcheon and press
(+ TAG delete).7
Press "E" (Remove TAG). 8
Warning message.

7
9
Place the SERVICE TAG to be
memorized on the external
escutcheon.7
Press "E" (TAG insertion
SERVICE).
10
TAG recognized and me-
morized.
8
Press (Insert).
4.3 ENTERING A SERVICE TAG
11
Press "E" (Exit).
12
Pressuntil (Exit),
press "E" to finish.
1At door open, press any
arrow key to
activate the menu. 2
Functions screen
press (Menu). 3
Press "E" (TAG Keys).
4
Place system CARD (GREEN)
on external escutcheon. 5
Recognition of CARD. 6
Press to scroll menu.

99298 - XMODE - ESCUTCHEON DISPLAY - REV. 01
8
8
Place the MASTER TAG to be
memorized on the external
escutcheon.7
Press (Insert). 9TAG recognized and me-
morized.
4.4 ENTERING A MASTER TAG
10
Press "E" (Exit).
11
Pressuntil (Exit),
press "E" to finish.
1At door open, press any
arrow key to
activate the menu. 2
Functions screen
press (Menu). 3
Press "E" (TAG Keys).
4
Place system CARD (GREEN)
on external escutcheon. 5
Recognition of CARD. 6
Press to scroll menu.

9
The assigned and changeable attributes are:
-HIERARCHY (Type) denes whether the TAG is "Master" or "Service"
-GROUP lets you assign a TAG in the system to a dened group and then to
time slots. By default, the TAG belong to group “zero,” i.e., DO NOT belong to
any group. For more information, see chapter 17 (TAG IN TIME SLOT).
-ENABLE lets you exclude or reinsert a single TAG from/into the system without
having to delete it from memory.
This function is essential: if a TAG is disabled with this function it NEVER can
have access to the lock, even if inserted in the access check.
4.5 MEMORIZED TAG ATTRIBUTES (FOR PROTECTED SYSTEMS ONLY)
7
Press "E" (Stored tag attri-
butes).
8A
There are no TAG in me-
mory.
8B
Analysis of TAG in me-
mory.
9A
Display TAG detected
(1 of 5), no. rst TAG de-
tected (2), TAG attributes.
1At door open, press any
arrow key to
activate the menu. 2
Functions screen
press (Menu). 3
Press "E" (TAG Keys).
4
Place system CARD (GREEN)
on external escutcheon. 5
Recognition of CARD. 6
Press to scroll menu.

99298 - XMODE - ESCUTCHEON DISPLAY - REV. 01
10
9B
Press to scroll memori-
zed TAG.
Press to change TAG
attributes, "E" to return to previous
menu.
10
Press to display next
TAG (no. 127) with its at-
tributes.
Press to change TAG attributes.
11
Press (Move) to select
attribute.
Press to change value
of selected attribute.
12
Press to change "Type" from MASTER to SERVICE. Press to scroll menu. Press to change "Group" from
0 to C. Press to scroll menu. Press to change "Active" from YES to NO. Press "E" to conrm.
Note: with these settings, TAG no. 127 is NOT enabled to access the lock, even though it is in memory.
Press "E" to return to previous menu.
13
Press to scroll menu.
14
Press "E".
15
Pressuntil (Exit),
press "E" to finish.

11
5. FREE TAG SYSTEM
7
Press (Insert).
11
Pressuntil (Exit),
press "E" to finish.
In a system with free key (TAG) duplication, all the supplied keys must be registered.
5.1 ENTERING A MASTER TAG
8
Place MASTER TAG to be
memorized on external
escutcheon. 9TAG recognized and memo-
rized.
10
Press "E"
(Exit).
* If the system is new the rst TAG placed becomes MASTER TAG.
1At door open, press any
arrow key to
activate the menu. 2
Functions screen
press (Menu). 3
Press "E" (TAG Keys).
4
Place any TAG (only if a new
system*) or a MASTER TAG
on external escutcheon. 5
Recognition of CARD. 6
Press to scroll menu.

99298 - XMODE - ESCUTCHEON DISPLAY - REV. 01
12
5.2 ENTERING A SERVICE TAG
10
TAG recognized and me-
morized.
11
Press "E" (Exit).
12
Pressuntil (Exit),
press "E" to finish.
9
Place the SERVICE TAG to
be memorized on external
escutcheon.7
Press "E" (TAG insertion SER-
VICE). 8
Press (Insert).
* If the system is new the rst TAG placed becomes MASTER TAG.
1At door open, press any
arrow key to
activate the menu. 2
Functions screen
press (Menu). 3
Press "E" (TAG Keys).
4
Place any TAG (only if a new
system*) or a MASTER TAG
on external escutcheon. 5
Recognition of CARD. 6
Press to scroll menu.

13
4
Place MASTER TAG on exter-
nal escutcheon. 5
Recognition of CARD. 6
Press to scroll menu.
5.3 DELETING SINGLE TAG
10
Press "E" (Exit).
11
Pressuntil (Exit),
press "E" to finish.
9TAG deleted.
N.B. The MASTER TAG you have
used to enter programming CAN-
NOT BE DELETED individually.
7
Press "E" (Remove TAG). 8
Place TAG to delete on exter-
nal escutcheon and press
(+ TAG delete).
1At door open, press any
arrow key to
activate the menu. 2
Functions screen
press (Menu). 3
Press "E" (TAG Keys).

99298 - XMODE - ESCUTCHEON DISPLAY - REV. 01
14
5.4 DELETING ALL TAGS
12
Pressuntil (Exit),
press "E" to finish.
9If conrmed, deletes all TAG.
System returns to new
condition.7
Press "E" (Remove ALL tag). 8
Press "E" to conrm.
Press to return to
previous menu.
11
Press "E".
10
Press to scroll menu.
4
Place MASTER TAG on exter-
nal escutcheon. 5
Recognition of CARD. 6
Press to scroll menu.
1At door open, press any
arrow key to
activate the menu. 2
Functions screen
press (Menu). 3
Press "E" (TAG Keys).

15
4
Place System CARD
(PROTECTED SYSTEM)
MASTER TAG (FREE SYSTEM)
on external escutcheon. 5PROTECTED SYSTEM
Recognition of CARD.
FREE SYSTEM
6
Press to scroll menu.
10
Press to scroll menu.
11
Press "E".
9
All SERVICE TAGS are
disabled
7
Press "E" (TAG enable SER-
VICE). 8
Press to disable all memo-
rized SERVICE TAGS.
6. DISABLING SERVICE TAG (FREE/PROTECTED TAG SYSTEM)
12
Pressuntil (Exit),
press "E" to finish.
1At door open, press any
arrow key to
activate the menu. 2
Functions screen
press (Menu). 3
Press "E" (TAG Keys).

99298 - XMODE - ESCUTCHEON DISPLAY - REV. 01
16
7. ENABLING SERVICE TAG (FREE/PROTECTED TAG SYSTEM)
1At door open, press any
arrow key to
activate the menu. 2
Functions screen
press (Menu). 3
Press "E" (TAG Keys).
4
Place System CARD
(PROTECTED SYSTEM)
MASTER TAG (FREE SYSTEM)
on external escutcheon. 5PROTECTED SYSTEM
Recognition of CARD.
FREE SYSTEM
6
Press to scroll menu.
9
All SERVICE TAG are enabled.
7
Press "E" (TAG enable SER-
VICE). 8
Press to enable all memo-
rized SERVICE TAG.
10
Press to scroll menu.
11
Press "E".
12
Pressuntil (Exit),
press "E" to finish.

17
Batteries ecient
Batteries ecient
MAINS power supply.Batteries low charge.
Batteries low charge.
10. POWER SUPPLY
BATTERY
Batteries empty. Replace
immediately.
Batteries empty. Replace
immediately.
RETE+BATTERIE
MAINS
2
Functions screen
press (Status). 3
- DOOR STATUS
- LOCK STATUS
- WORK MODE
- POWER STATUS
8. QUICK LOCK STATUS INFORMATION - DOOR OPEN
1At door open, press any
arrow key to
activate the menu. 2-
DOOR STATUS
-
LOCK STATUS
-
WORK MODE
- POWER STATUS
9. QUICK LOCK STATUS INFORMATION - DOOR CLOSED
Examples :
1At door open, press any
arrow key to
activate the menu.

99298 - XMODE - ESCUTCHEON DISPLAY - REV. 01
18
1At door open, press any
arrow key to
activate the menu. 2
Functions screen
press (Menu). 3
Press to scroll menu.
Select "External codes" and
press "E".
6
Place System CARD
(PROTECTED SYSTEM)
MASTER TAG (FREE SYSTEM)
on external escutcheon.
7PROTECTED SYSTEM
Recognition of CARD.
FREE SYSTEM
4
Progress window. 5
Press "E" (continue) if
keypad is present, otherwise
press to exit.
8
Press to scroll menu.
- Insert codes (see par.11.2)
- Delete single code
(see par.11.3)
- Delete ALL codes
(see par.11.4)
- Previous menu
(see par.11.5)
11. EXTERNAL KEYPAD CODES
IMPORTANT: this choice is always available, but is valid only if the external keypad is present. Selecting this item in the
absence of the keypad has no eect on keypad management of codes.
Remember that code insertion from the keypad can be managed directly from the external escutcheon, as described
in the XMODE lock USER manual (Chapter 8 – Lock operation with keypad).
11.1 ENTERING PROGRAMMING MODE

19
8B
Press to insert
code.
8C
Insert code from external keypad (min. 3 - max. 8 digits), then press "E". You can insert multiple codes
from the external keypad without additional conrmations on the display (max. 100 codes). When
insertion is done, press "E" (End) on the escutcheon display to return to the main menu.
8A
Press "E"
(Insertion codes).
11.2 INSERTING CODES
8C
Insert code to be removed from external keypad, then press "E".
You can delete multiple codes from the external keypad without additional conrmations on the display.
At the end, press "E" (End) on the escutcheon display to return to the main menu.
11.3 DELETING A SINGLE CODE
8B
Press to
remove code.
8A
Press "E"
(Remove single
code).

99298 - XMODE - ESCUTCHEON DISPLAY - REV. 01
20
8APress "E"(Remove
ALL codes). 8B
Warning. 8C
Press to delete all
codes in memory.
11.4 DELETING ALL CODES
8DWait time. 8E
Message: all codes
have been deleted.
8APress "E" to return to
the main menu.
11.5 PREVIOUS MENU
This manual suits for next models
1
Table of contents