Mr. GARDENER Alaska 2 User manual
Inspection Certificate
Controlecertificaat ●Kontrollschein ● Bulletin de contrôle ● Certificato
di controllo ● Certificado de control
Please keep safely!
Zorgvuldig te bewaren! ●Bitte gut aufbewahren! ● A bien conserver,
s.v.p.! ● Da conservare! ● ¡A conservar!
Art. Nr. FRJ70-4738-1/ 514715
28.02.2012
English: The house you have purchased was manufactured in accordance with the high quality norms. The building unit has been carefully inspected and
packed. In order to avoid possible problems during the assembly carried out by yourself or the building company of your choice, we recommend that you
inspect the delivery for its completeness in accordance with the list of pieces before assembly. This inspection must be carried out within 14 days after
delivery to your place. Warranty claims are limited to the exchange of defective materials. Defective building parts, which have already been used or painted,
are excluded from being replaced. All further claims are excluded! In cases of complaints, please pay attention to the following procedures: Please present
this inspection certificate along with the sales receipt to your place of purchase. Only in cases where these documents are presented will the complaint be
dealt with quickly and without complications.
Dutch: Het door U gekochte tuinhuis werd vervaardigd volgens de hoge kwaliteitsnormen. Het tuinhuis werd zorgvuldig gecontroleerd en verpakt. Om tijdens
de montage, uitgevoerd door Uzelf of een door U gekozen aannemer, problemen te vermijden, raden we U aan, vÓÓr de montage, de levering te
controleren op volledigheid in overeenstemming met de onderdelenlijst. Deze controle dient te gebeuren binnen 14 dagen na levering bij U thuis.
Waarborgvorderingen zijn beperkt tot het vervangen van gebrekkig materiaal. Gebrekkige onderdelen die reeds gebruikt of geschilderd zijn, zijn uitgesloten
van vervanging. Alle latere vorderingen zijn uitgesloten! In geval van klachten, gelieve dan te letten op de volgende procedure: Leg dit controlecertificaat,
samen met Uw aankoopbewijs voor aan Uw verkoper. Enkel in gevallen waarbij deze documenten voorgelegd worden, zal de klacht snel en zonder
complicaties behandeld worden.
Deutsch: Das von Ihnen gekaufte Haus wurde nach der hohen Qualitätsnorm gefertigt. Der Bausatz wurde sorgfältig geprüft und verpackt. Um etwaige
auftretende Probleme während des Aufbaus durch Sie oder Ihre Aufbaufirma zu vermeiden, kontrollieren Sie bitte die Lieferung auf Vollständigkeit laut
Stückliste vor dem Aufbau. Diese Kontrolle muss innerhalb 14 Tagen nach Anlieferung bei Ihnen erfolgen. Ansprüche auf Gewährleistung beschränken sich
auf den Austausch von fehlerhaftem Material. Fehlerhafte Bauteile, die bereits verbaut oder gestrichen wurden, sind vom Umtausch ausgeschlossen. Alle
weiteren Ansprüche sind ausgeschlossen! Sollte es zu einer Beanstandung kommen, beachten Sie folgende Vorgehensweise: Legen Sie Ihrem Fachhändler
diesen Kontrollschein zusammen mit dem Einkaufsbeleg vor. Nur bei Vorlage dieser Unterlagen ist eine schnelle und problemlose Bearbeitung Ihrer
Beanstandung möglich.
Français: La cabane que vous venez d’acheter a été fabriqué en respectant de hautes normes de qualité. L’ensemble de construction a été testé et emballé
avec soin. Afin d’éviter des problèmes éventuels pendant la construction par vous-même ou la société de construction mandatée, nous vous prions de bien
vouloir vérifier que toutes les pièces ont été fournies selon la liste des pièces avant que vous ne commenciez la construction. Il vous incombe de faire ce
contrôle dans les 14 jours après la fourniture. Les revendications en dédommagement se limitent à l’échange de matériel défectueux. Des pièces de
construction défectueuses, déjà construites ou peintes, sont exclues de tout échange. Toutes les revendications ultérieures sont exclues ! Si une
réclamation avait lieu, veuillez respecter le déroulement suivant : Il vous faudra présenter, à votre commerçant spécialisé, ce bulletin de contrôle avec le
récépissé de l’achat. Ce ne sera que moyennant présentation de ces documents qu’un traitement rapide et sans problème de votre réclamation sera
possible!
Italiano: La casetta che avete acquistato è stata prodotta secondo la norma di alta qualità. Il kit è stato controllato ed imballato con cura. Per evitare
eventuali inconvenienti durante il montaggio, si prega di verificare, prima del montaggio, la completezza della fornitura in base alla distinta dei pezzi. Tale
verifica deve essere effettuata entro 14 giorni dalla consegna. Eventuali diritti di garanzia si limitano alla sostituzione di materiale difettoso. Gli elementi
difettosi già montati o verniciati sono esclusi dal diritto alla sostituzione. Ogni altro diritto resta escluso! In caso di reclamazione, procedere nel modo
seguente: presentare questo certificato di controllo unitamente alla prova d’acquisto al rivenditore. Solo in questo modo la Sua reclamazione potrà essere
evasa rapidamente e senza problemi.
Español: La casa que ha adquirido ha sido fabricada de acuerdo con normas de alta calidad. Las piezas de la casa han sido cuidadosamente
inspeccionadas y embaladas. Con el fin de evitar posibles problemas durante el montaje, hecho por usted o por la empresa de construcción de su elección,
le recomendamos revisar el paquete entregado, con la lista de piezas, antes de armar la casa. Haga la revisión dentro de 14 días después de recibir el
paquete. La garantía se limita a reemplazar las piezas defectuosas. No se reemplazarán las partes defectuosas que ya hayan sido utilizadas o pintadas. ¡No
se aceptan otras reclamaciones! En casos de queja, por favor, presente este certificado junto con la factura en el lugar donde hizo la compra. Sólo
presentando estos documentos podremos resolver su problema rápidamente y sin complicaciones.
Factory inspection by ● Fabriekscontrole door ● Werkskontrolle durch ●
Contrôle à partir de l’usine par ● Collaudato da ● Inspector de fábrica:
……………………...…………………………………………………….......
Pack number ● Pack Nr. ● Pack Nr.● Packet n° ● Pacco N. ● Paquete No:
…………………Date ● Datum ● Date ● Data ● Fecha :…..............……………
To be completed by buyer! (Please use block letters) ●In te vullen door de verkoper! (Graag in drukletters) ●Vom Käufer auszufüllen! (Bitte in
Druckschrift) ● A remplir par l’acheteur! (en lettres d’imprimerie, s’il vous plaît) ● Da compilare dall’acquirente! (in stampatello) ● ¡Completa el cliente! (en
mayúsculas) :
Place of purchase ● Plaats van aankoop ● Bezugsquelle
● Source d’achat ● Acquistato presso ● Lugar de
compra :
…………………………………………………………………
…………………………………………………………………
Sales receipt No. ● Aankoopbewijs Nr. ● Kaufbeleg-Nr. ●
Récépissé n° ● Prova d’acquisto N. ● Recibo No.…….......
Delivery date ● Leveringsdatum ● Lieferdatum ● Date de
livraison ● Data di consegna ● Fecha de entrega: .……….
Buyer’s address ● Adres koper ● Kundenanschrift ● Adresse du client ● Indirizzo del cliente ●
Dirección del cliente: .……………………………………………………………………………………
Telephone ● Telefoon ● Telefon ● Téléphone ● Teléfono: ...……………………..……...............
Sales receipt date ● Aankoopbewijs -Datum ● Kaufbeleg-Datum ● Date du récépissé ● Data
prova d’acquisto ● Fecha recibo :………….…...…………………………………………………….
Forwarder:
□
Pick-up
□
Others ● Door:□Verzending □Zelf afhalen □Spedition □
Selbstabholer ● Par: □Transporteur □Propres moyens ● Tramite: □Spedizioniere □Mezzo
proprio ● Entrega:Transporte organizado □transporte propio
Description of complaint ● Beschrijving van de klacht ● Schilderung der Beanstandung ● Déscription de la réclamation ● Descrizione della reclamazione
● Descripción del problema: Please keep the parts which are the object of the complaint until the complaint is settled! ● Gelieve de betrokken
onderdelen te bewaren tot de klacht is afgehandeld ● Veuillez garder les pièces contestées jusqu’à ce que la réclamation soit traitée définitivement! ● Si
prega di conservare i pezzi reclamati fino all’evasione della reclamazione! ● Por favor, conserve las piezas objeto de la queja hasta que el problema haya
sido resuelto
………………...........................................................................................………………....................................................………
………....................................................………………....................................................……………….........................................
...........………………....................................................………………....................................................………………....................
................................………………....................................................………………....................................................……………
…....................................................………………....................................................……………….................................................
...………………....................................................………………....................................................………………............................
........................………………....................................................………………....................................................……………….......
........................………………....................................................………………....................................................……………….......
........................………………....................................................………………....................................................……………….......
........................………………....................................................………………....................................................……………….......
.............................................……………….....................................................................................................................................
Norsk
Kontrollskjema
Ta vare på denne!
Norsk:Produktet du har kjøpt, ble produsert i henhold til høye kvalitetskrav. Produktet har blitt kontrollert nøye og deretter omhyggelig
pakket. For å unngå mulige problemer under monteringen, uansett om du gjør det selv eller får en godkjent håndverker til å gjøre det,
anbefaler vi at du kontrollerer leveransen mot delelisten for å se om alle delene er inkludert. Denne kontrollen må gjøres innen 14 dager
etter at delene ble levert til din adresse. Garantikrav begrenser seg til bytte av defekte deler. Defekte elementer som allerede har blitt brukt
eller malt/beiset/limt, vil ikke bli erstattet. Alle andre krav er utelukket! Dersom du har en reklamasjon, vennligst gjør som følger: Lever dette
kontrollskjema med kvitteringen til salgsstedet. Bare når du har med disse dokumentene kan klagen behandles raskt og uten
komplikasjoner.
Fabrikkkontroll utført av:
…………………………………………………….......
Serienr:
……………………………………………………………
Dato …........................................…….....……………..
Fylles ut av kjøper! (Vær vennlig å bruke blokkbokstaver):
Salgssted:
……………………………………………
……………………………………………
……………………………………………
Kvitteringsnr: .……...................................
Leveringsdato: .……..........................…....
Kjøpers adresse:
…………………………………………………………………………
…………………………………………………………………………
Telefon: ...……………………..…..............................................…...
Kvitteringsdato:…………….…...………………….................………
Transportør:
□
Sendes
□
Hentes
Beskrivelse av feil/ mangel: (Please Vær vennlig å ta vare på de aktuelle delene/ produktet inntil saken er avsluttet!)
___________________________________________________________________________________
___________________________________________________________________________________
___________________________________________________________________________________
___________________________________________________________________________________
På dansk
Kontrol Certifikat
Opbevares sikkert
Dansk: Det købte hus er fremstillet i overensstemmelse med de høje kvalitets krav. Produktet er blevet omhyggeligt inspiceret og pakket.
For at undgå eventuelle problemer i løbet af monteringen udført af dig selv eller håndværker af dit eget valg, anbefaler vi, at du undersøger
leverancen for fuldstændighed i overensstemmelse med listen over dele før samling. Denne inspektion skal foretages inden 14 dage efter
levering til din plads. Garantikrav er begrænset til udveksling af defekte materialer. Defekte bygningsdele, som allerede er brugt eller malet,
er udelukket fra at blive erstattet. Alle yderligere krav er udelukket! I tilfælde af klager, skal du være opmærksom på følgende procedurer:
Venligst præsentere denne kontrol certifikat sammen med kvitteringen til det sted hvor produktet er købt. Kun i de tilfælde, hvor disse
dokumenter er forelagt kan klagen behandles hurtigt og uden komplikationer.
Fabriks Kontrol udført af:
…………………………………………………….......
Serienr:
……………………………………………………………
Dato …........................................…….....……………..
Udfyldes af køber! (Benyt venligst Blokbogstaver):
Salgs sted
:
……………………………………………
……………………………………………
……………………………………………
Kasse Bon nr: .……...................................
Leverings dato: …..........................…....
Købers adresse
:
…………………………………………………………………………
…………………………………………………………………………
Telefon nr.…………………..…..............................................…...
Kasse bons dato:…………….…...………………….................………
Transportør:
□
Sendes
□
Hentes
Beskrivelse af fejl / Mangel: (Venligst ta hånd om de aktueller dele / produkt indtil sagen er afsluttet)
___________________________________________________________________________________
___________________________________________________________________________________
___________________________________________________________________________________
___________________________________________________________________________________

The producer shall have the right to make technical changes to the product ● Technische Änderungen vorbehalten ● Le
producteur réserve le droit d’effectuer des modifications techniques au produit ● Il produttore mantiene il diritto di apportare
modifiche tecniche al prodotto ● Reservado el derecho a modificaciones técnicas ● Produsent forbeholder seg retten til å endre
tekniske egenskaper ved produktet ●Alle rechten en technische wijzigingen voorbehouden
Installation manual
Montageanleitung ● Notice de montage ● Istruzioni per il montaggio
Manual de montaje ● Monteringsanvisning ●Installatiegids
Log cabin FRJ70-4738-1/ 514715
Blockhaus ● Maisonnette en poutres ● Casa di travi ● Casa de jardin ● Anneks ●Tuinhuis
Width 470 x Depth 380 cm
Breite/Tiefe ● Largeur/Profondeur ● Lunghezza/Profondita ● Ancho/Profundidad ● Bredde/Dybde ●Breedte/Diepte
Log thickness 70 mm
Bohlenstärke ● Épaisseur des murs ● Spessore delle pareti ●Grosor de pared ● Tykkelse ● Wanddikte
Installation manual
1 General information
Dear client,
We are glad that you have decided in favour of our garden house!
Please read the assembly manual carefully before proceeding with the house installation! You
will thus avoid problems and will not waste time.
Recommendations:
¾Keep the house package until its complete assembly in a dry place, but not in direct contact with
the ground, protected from weather conditions (moisture, the sun, etc.). Do not keep the house
package in a heated room!
¾When selecting the garden house location, make sure that the house will not be subjected to
extreme weather conditions (areas of strong snowfall or winds); otherwise you should attach the
house (for instance, with anchors) to the subsoil.
Warranty
Your house is made from high quality fir and delivered in the natural (unprocessed) form. If, despite
our thorough inspection, you should have complaints, please submit the filled out control sheet and
purchase invoice to the product seller.
ATTENTION: Please be sure to keep the documentation accompanying the house package! The
control sheet includes the control number of the house. We can only review complaints if you
submit the control number of the house to the seller!
The warranty does not cover:
¾Peculiarities of wood as a natural material
¾Wooden details already painted (processed with a wood preservative)
¾Wooden details containing whole branches that do not endanger the stability of the house
¾Colour tone variations caused by wood structure differences that do not influence wood lifetime
¾Wooden details containing (caused by drying) small cracks/gaps that do not pass through and do
not influence the structure of the house
¾Twisted wooden details if they can nevertheless be installed
¾Roof and floor boards that may have on their concealed surfaces some non-planed areas, colour
differences and waning
¾Complaints resulting from an incompetent manner of the installation of the house or the house
subsiding due to an incompetently made foundation
¾Complaints caused by introducing self-initiative changes to the house, such as the deformation of
wooden details and doors/windows due to an incompetent manner of wood processing; the
attachment of storm braces too rigidly, doorframes being screwed onto wall logs, etc.
The complaints covered by the warranty are satisfied to the extent of replacing the
deficient/faulty material. All other demands will be excluded!

Installation manual
Garden house painting and maintenance
Wood is a natural material, growing and adapting depending on weather conditions. Large and small
cracks, colour tone differences and changes, as well as a changing structure of wood are not errors,
but a result of wood growing and a peculiarity of wood as a natural material.
Unprocessed wood (except for foundation joists) becomes greyish after having been left untouched for
a while, and can be turn blue and become mouldy. To protect the wooden details of your garden
house, you must immediately process them with a wood preservative.
We recommend that you cover the floor boards in advance with a colourless wood impregnation
agent, especially the bottom sides of the boards, to which you will no longer have access when the
house is assembled. Only this will prevent moisture penetration.
We definitely recommend that you also process the doors and windows with a wood impregnation
agent, and do that namely both inside and outside! Otherwise the doors and windows can become
twisted.
After the house assembly is completed, we recommend for the conclusive finishing a weather
protection paint that will protect wood from moisture and UV radiation.
When painting, use high quality tools and paints, follow the paint application manual and
manufacturer’s safety and usage instructions. Never paint a surface in strong sunlight or rainy
weather. Consult a specialist regarding paints suitable for unprocessed softwood and follow the paint
manufacturer’s instructions.
Having been properly painted, your garden house’s lifetime will increase substantially. We recommend
that you inspect the house thoroughly once every six months.
2 Preparation for assembly
Tools and preparation of components
To assemble the garden house, you will need the following tools:
assembly aid
water-level
knife
ladder
screwdriver
measuring tape
hammer
saw
pliers
drill
ADVICE: To avoid splinters, we recommend that you wear the corresponding protective gloves during
the assembly process.

Installation manual
Preparation of components:
Sort the components based on
the wall plans (see Technical
specifications) and place them
at the four sides of the house in
the installation sequence.
ATTENTION: Never place the
components directly on grass or
a muddy surface because it will
be very difficult or even
impossible to clean them up
later!
Foundation
A good foundation is the most important aspect guaranteeing the duration and safety of your house.
Only a completely level, rectangular and bearing foundation will ensure problem-free installation of the
house, its stability and especially the matching of the doors. With a good foundation, your house will
stand for many years more.
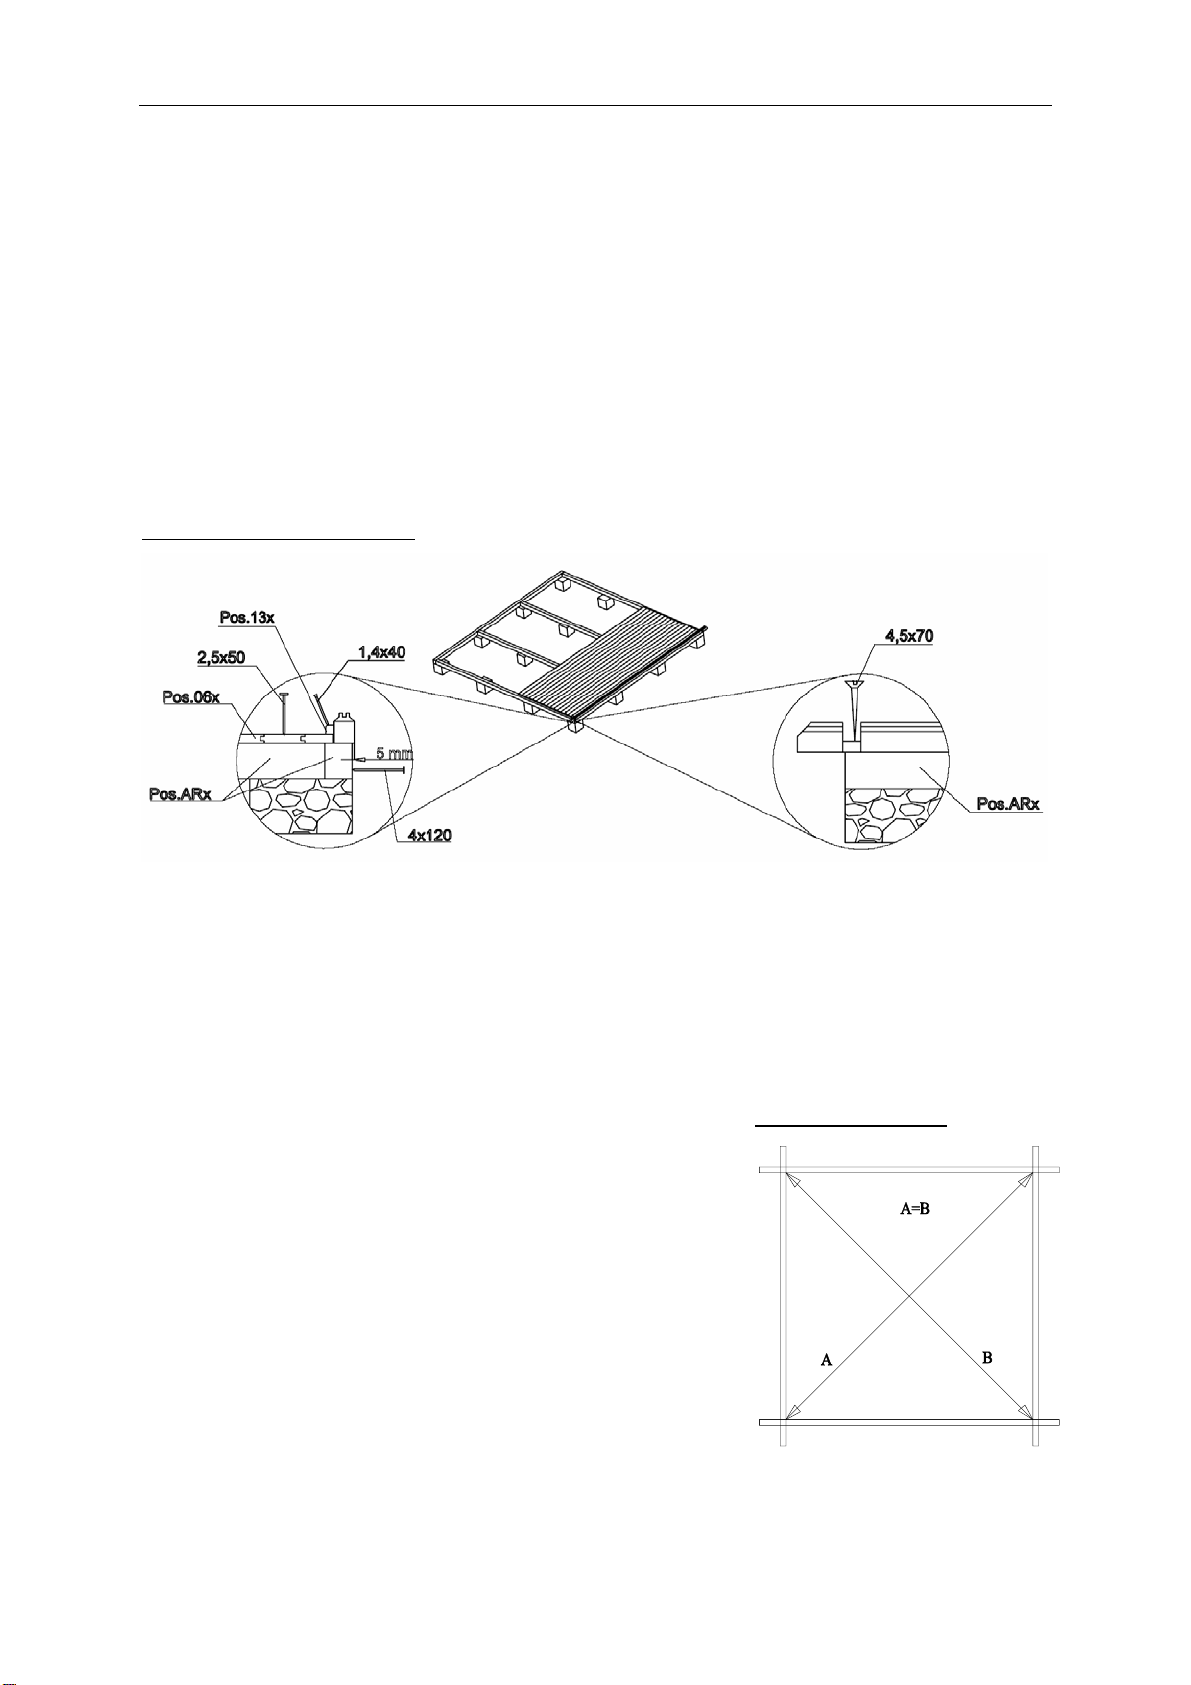
Prepare the foundation so that its upper edge extends from the ground to a height of at least 5 cm. At
the same time make sure that there are sufficient air apertures under the house floor for ventilation.
We recommend the following foundation options:
•Strip or spot foundation
•Foundation from concrete or pavement slabs
•Cast concrete bed
Prepare the foundation so that the foundation joists are propped up on every side with intervals not
exceeding 50-60 cm.
Consult an expert in this field or have the foundation prepared by specialists.
3 Garden house assembly
ATTENTION:
¾You will find included in the house package one spare log (longest wall log).
¾You will find included in the house package one spare board (longest roof or floor board).
¾The house package also includes 2-3 marked hitting blocks (wall profile approximately 20-30 cm
long).
All of the details listed above ARE NOT mentioned in the specification list.
¾The drawings have the details marked with three-digit position numbers. The exact positions of
those details that have the third digit “x” can be found in the specification list.
Installation manual
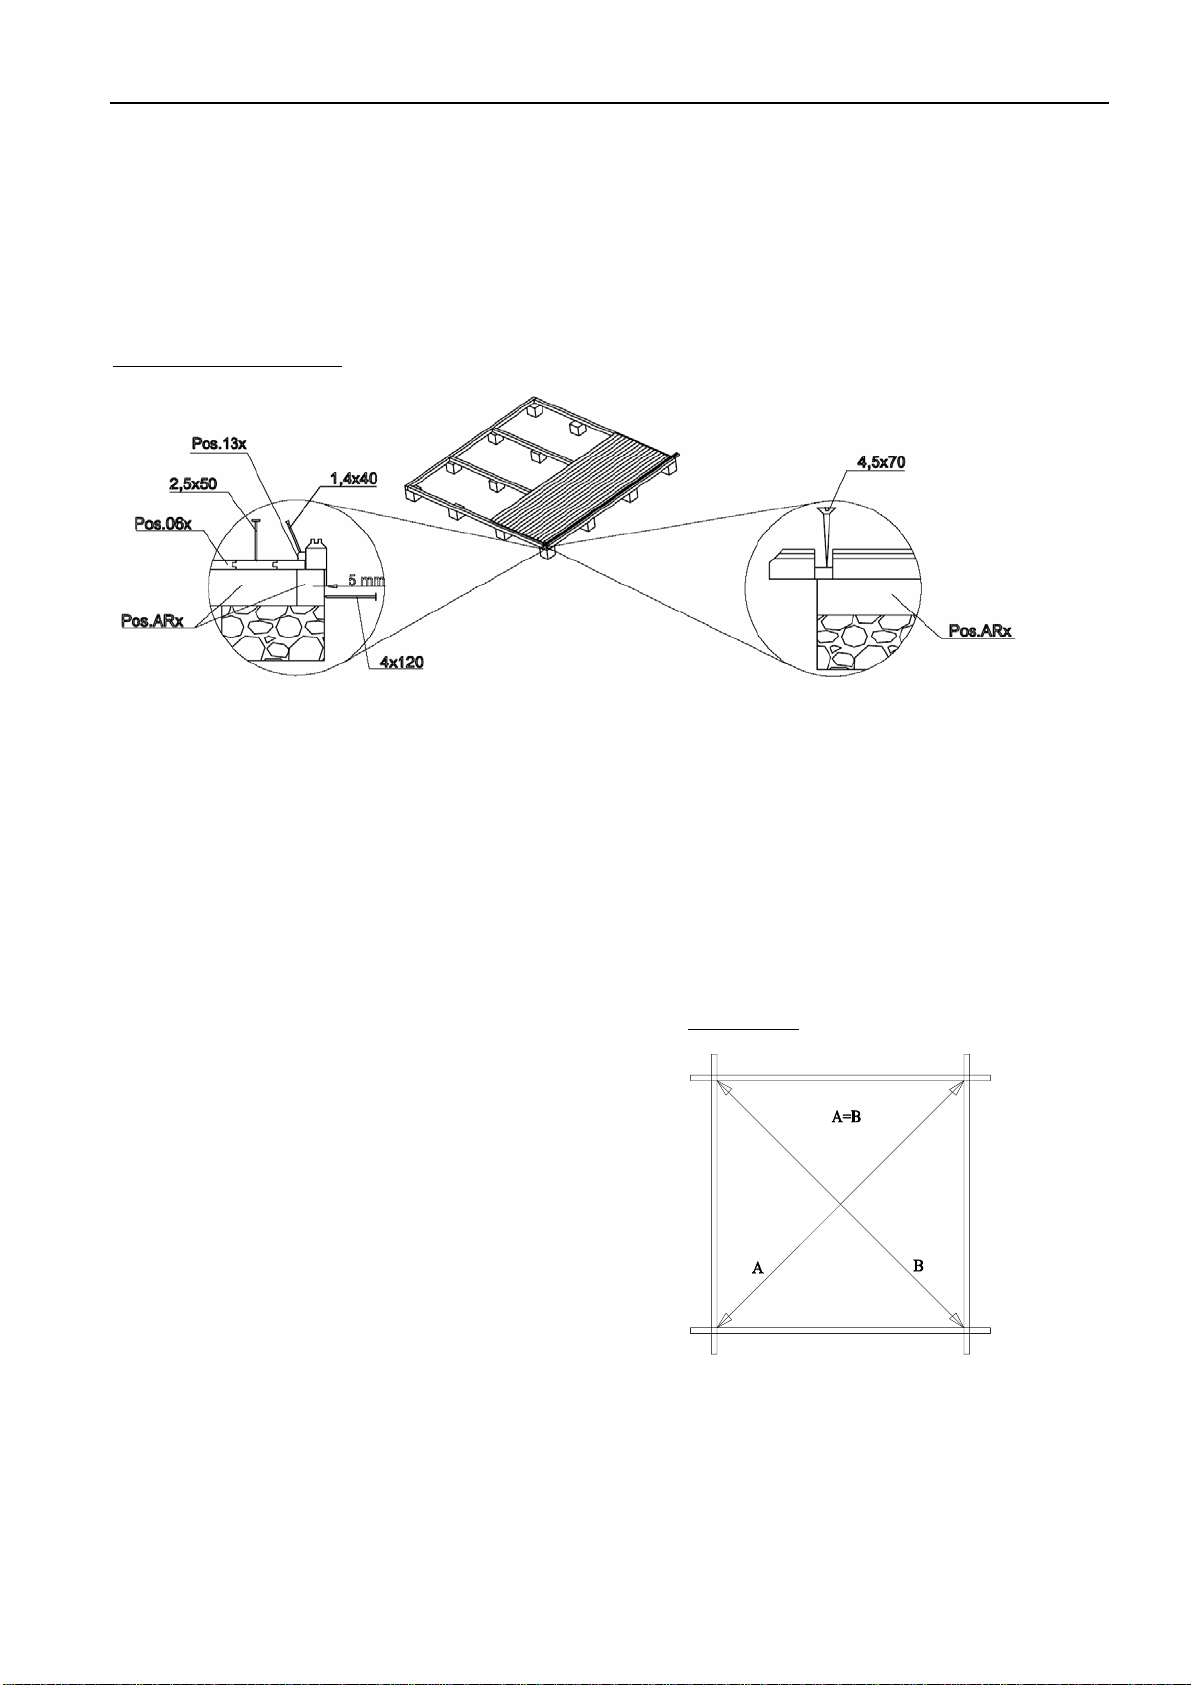
Base frame (Foundation joists)
The base frame of the house must be completely flat and level to ensure that the installation proceeds
without problems.
ATTENTION: different house can have different foundation placements – see the appended
base frame drawing (in Technical specifications)!
Place the impregnated foundation joists on the prepared foundation in accordance with the drawing at
equal intervals. Make sure that the joists are level and rectangular prior to screwing them together.
ADVICE: It is recommended to place between the foundation joists and foundation a damp-proof
course that will protect the house from moisture and decay.
ADVICE: To ensure protection from wind and storm, it is recommended to attach the foundation joists
to the foundation (for this, you can use for instance metal angles, anchors, etc.). The corresponding
materials are not included in the supplied kit!
Installation of foundation joists:
Walls
When installing the walls, it is important to remember that:
¾The logs are always assembled with their tongue upwards!
¾If necessary, use the hitting block and hammer! Never directly hit the tongue with the hammer!
Install the walls in accordance with the appended wall plans (see Technical specifications).
First of all place half logs of front and back wall at the
correct location and attach them with screws to the
foundation joists. Then install the side wall logs. Make sure
that the first layer of logs extends a bit over the foundation
joists: the logs must extend over the joists by some 3-5 mm.
You will thus protect the house from moisture, allowing the
free flow of rainwater into the ground.
ATTENTION: After the first layer of logs, measure the
diagonal lengths and, if necessary, re-install the logs. Only if
the diagonal lengths are completely equal is the base frame
rectangular and you can mutually attach the logs.
The first layer of logs:
Continue the installation of the walls by strongly forcing the wall logs into one another. If necessary,
use the hitting block and hammer. At the same time, do not forget to begin the installation of the door
and windows. You should definitely begin the door installation after the 5th-6th layer of logs.
Installation manual
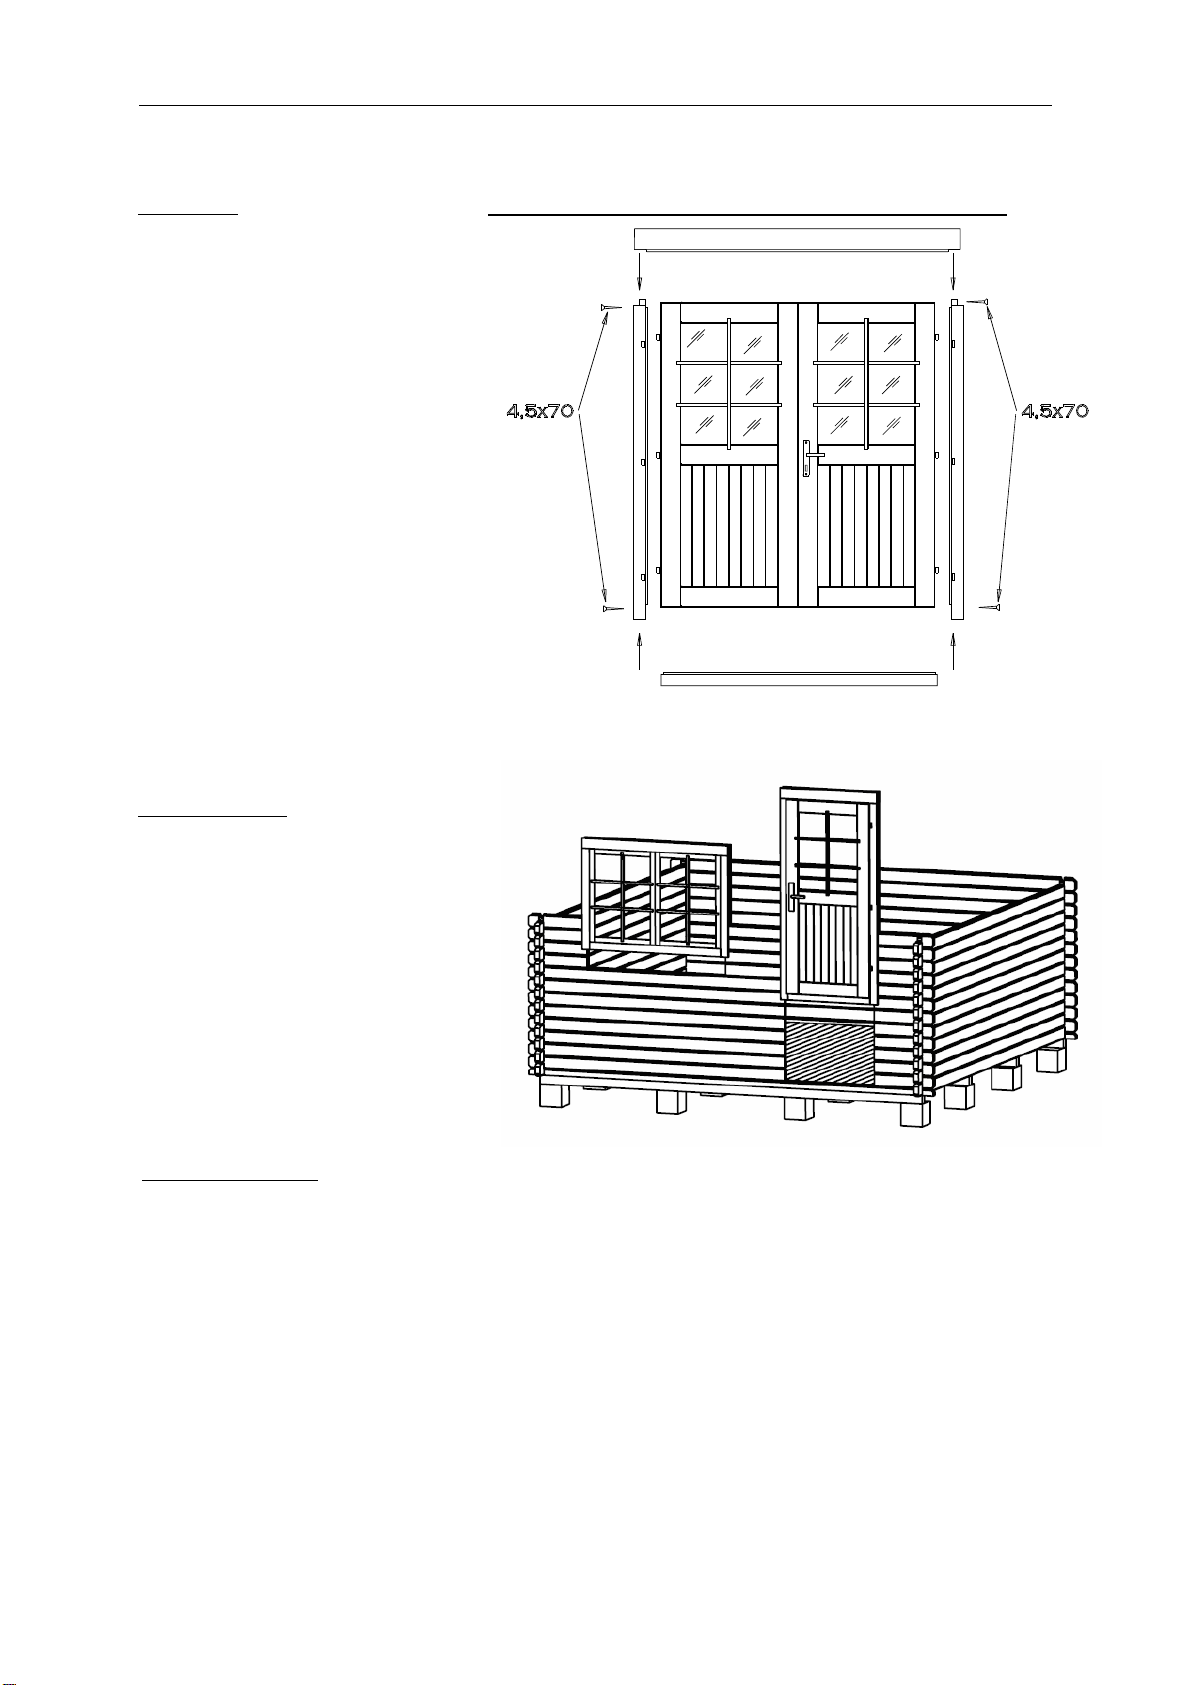
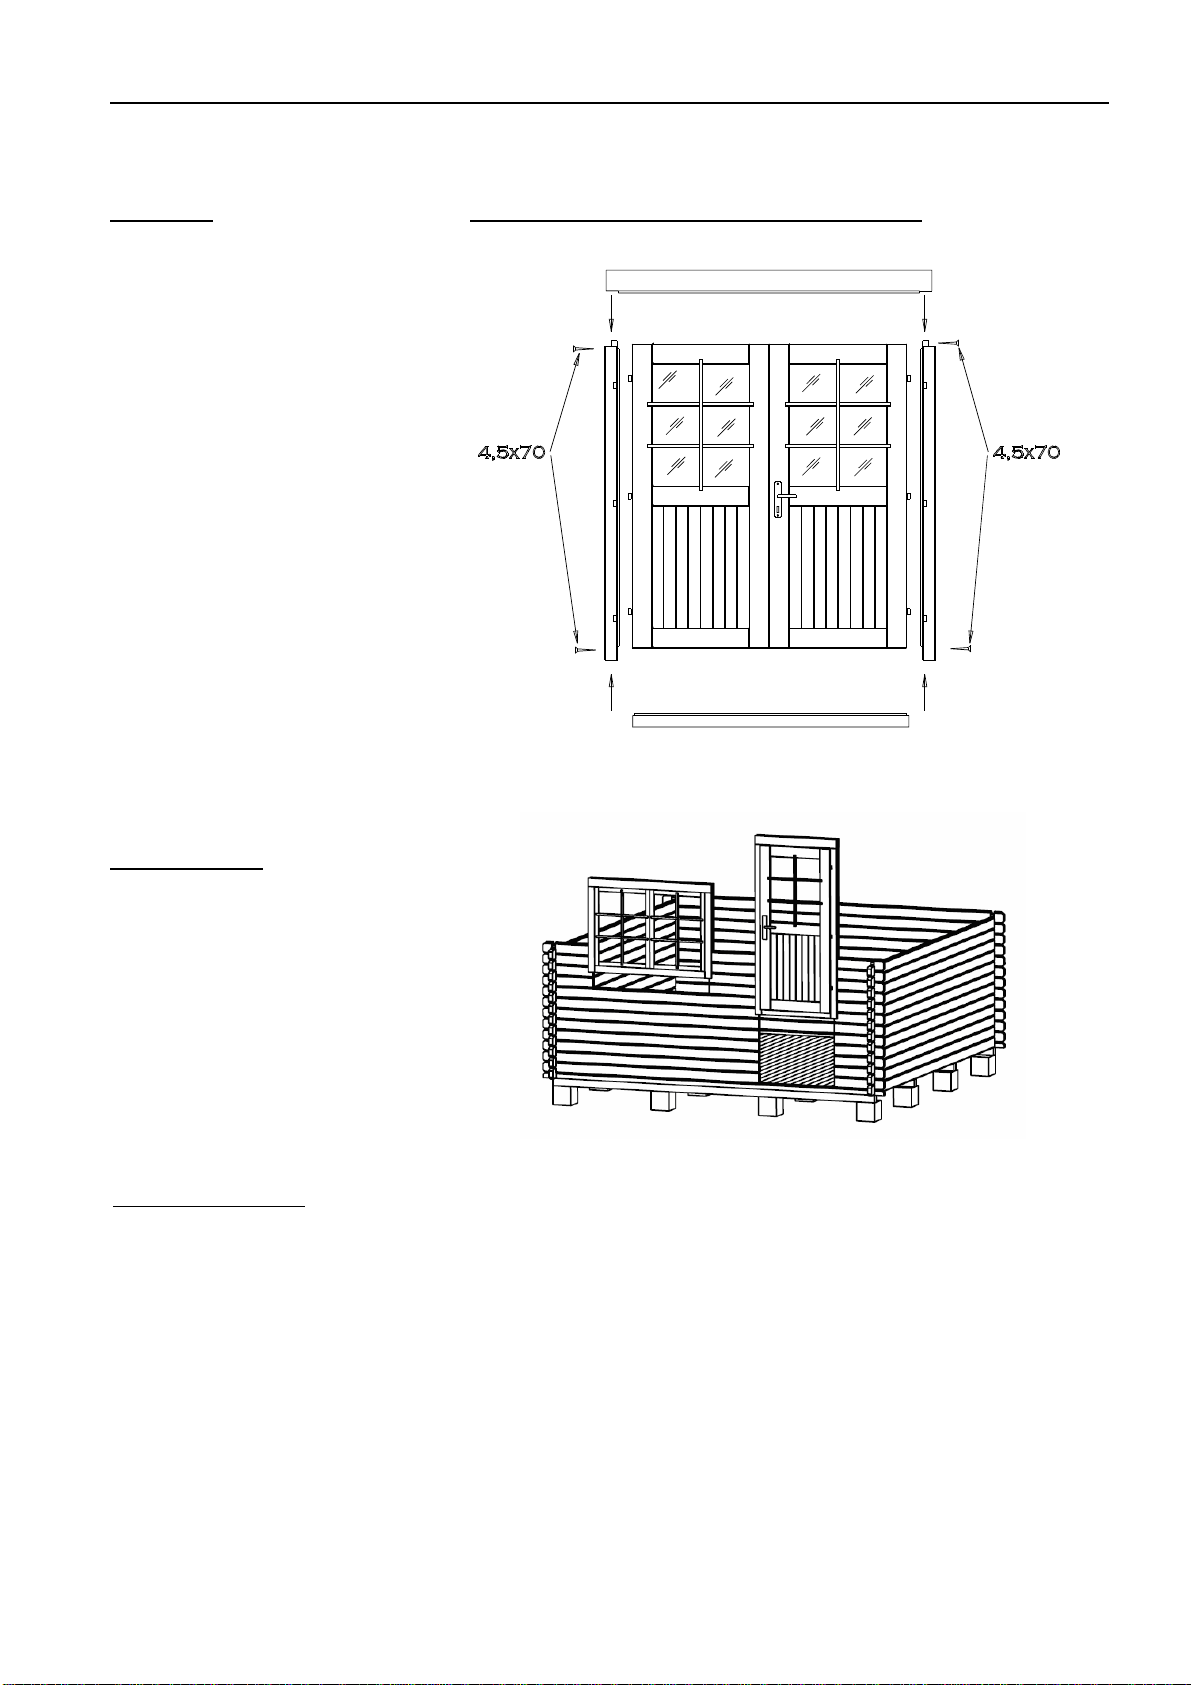
Door and window
Doorframe:
¾If it is a double door, the
doorframe is supplied in
separate parts due to
transportation requirements and
you will have to begin by
assembling it.
¾To do this, place together the 4
parts of the frame and screw
them onto one another.
¾Make sure that the part of the
frame with the deeper notch is
installed upwards. The lateral
jamb parts have hinges and are
mirrored.
¾It is recommended to install the
leaves later.
¾If it is a single door, its frame and
leaf are supplied already
assembled.
Doorframe installation (Only necessary for a double door!):
Door installation:
The doorframe is placed at the
formed aperture and pushed with
force onto the lower log. If it is a
double door, place the leaves on the
hinges now. To open and close the
door, fit the separately packaged lock
and handle.
Window installation:
Continue with the installation of the wall logs until you reach the window height. The wall plans (see
Technical specifications) show how many logs go under the window. Install the window similarly with
the door. Just like the door, push the window frame with the window into the window aperture onto the
lower log, applying force. Make sure that the window is not fitted backwards (topsy-turvy).
ADVICE: Definitely make sure that the windows and doors open in the proper direction. The doors
always open from the inside to the outside. The revolving-tilting windows open to the inside. The
revolving and the slinging windows open to the outside (the window handles are on the inside).
ATTENTION: It is not necessary to fix the doors and windows to the wall logs! If you wish to do this, it
will be sufficient to fix them with a couple of screws in the lower part of the frame because as they dry,
the wall logs will begin subsiding.
You can conduct the final adjustments of the doors and windows only some 2-3 weeks after the house
installation, when the house will have become adapted to weather conditions and its logs settled.
Installation manual
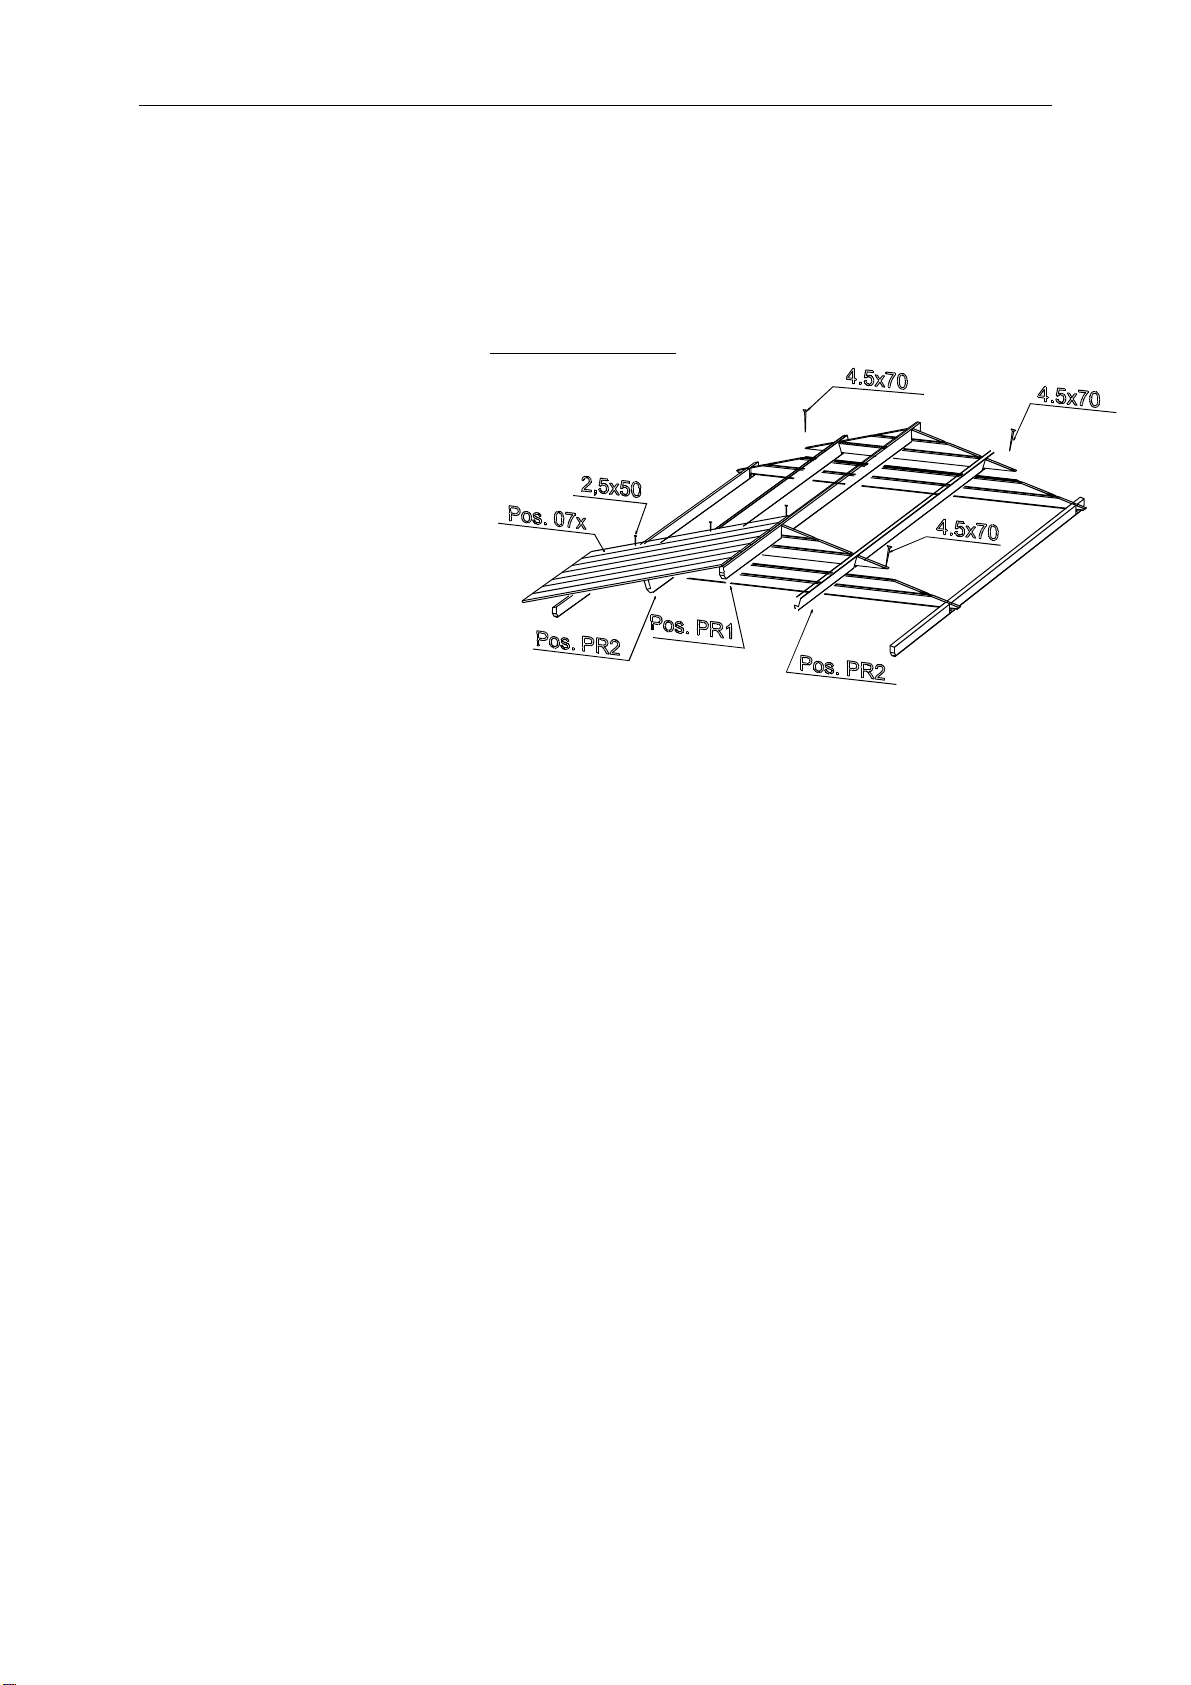
Apex
In most cases, the apex is supplied in one piece (attention: in some house options, the apex can comprise
several parts! In this case, these parts will have to be screwed together prior to other actions). Having installed
the last wall logs, place the apex on the front and back walls and attach them with screws.
The apexes have indents for the rafters. The rafters also have the corresponding indents, ensuring that the
roof is placed firmly and in the right place.
Now place the rafters in the
corresponding indents in the
apexes.
Make sure that the upper wall log,
apexes and rafters are level. Having
fitted the rafters, screw them onto
the apex from above.
Installation of rafters:
ATTENTION: If the wall logs are not properly pressed on top of one another without gaps, the upper wall log
may not be on the same level with the apexes. In this case you should tap the wall logs downwards as
necessary or plane the apex or sidewall log somewhat lower.
Roof
Before installing the roof boards, make sure that the house is completely level. Use the water-level to
check all walls.
ATTENTION: When placing the roof, use a stable ladder. Do not step on the roof as the structure is
suitable to sustain only an even load (snow, wind, etc.), and not a point load!
Begin the installation of the roof boards from the front edge of the roof. Tap the boards lightly and
attach them from above and below with nails to the rafters and upper wall log.
ATTENTION: Do not press the roof boards together too densely and you will avoid moisture-causing
bulging! Leave an interval of about 1 mm between the boards to allow for swelling.
•During the whole process of installing the roof boards, make sure that their crest rafters coincide
and the eave sides of the boards extend at a uniform distance. Verify this with a rope or the lateral
eave lath that you may install for verification purposes.
•The roof boards must be even with the rafter ends in front and behind. If necessary, saw both last
roof boards so narrow that they are even with the rafter ends.

Installation manual
Having installed the roof boards, the roof felt and roof
slats must be attached.
The table of components shows whether the roof
cover material and slats are included with this
house option!
First of all, screw the roof edge reinforcements and eave
edgings under the roof board ends. Then install the roof
cover material.
Installation of roof slats:
Roof cover material (NB! Some house options do not include it in the kit!)
Cut the roof felt in accordance with the roof length into suitable pieces and begin installing them
parallel to the lower edge of the roof, moving toward the crest and placing the felt strips in the direction
from the back wall to the front wall. The felt should extend from the edge by approximately 2-4 cm.
Attach the roof felt to the roof boards with the supplied felt nails at intervals of about 15 cm. Make sure
that the felt strips overlap by at least 10 cm.
Having installed the roof cover material, attach the
wind braces to the roof and the facia boards to the
rafters and upper wall logs.
Installation of wind braces and facia boards:
Floor
Only when the house is built completely can you install the floor boards, thus avoiding unnecessary
smudging on the floor.
Place the floor boards on the base frame, tap them lightly against one another and then nail them with
force to the foundation joists. If necessary, cut the last floor board to the suitable width.
The final operation is the fitting of the floor beadings to cover the spaces between the floor boards and
walls. If necessary, cut the floor beadings to the suitable length.
ATTENTION: Depending on the climate at the house location, the floor boards can either swell or
diminish. If the floor boards are very dry while the climate is damp, they will easily absorb moisture. In
this case, the floor boards should not be attached very densely to avoid likely bulging. Leave some

Installation manual
space (1-2 mm) between the floor boards to allow for swelling. But if your climate is warm and dry, you
can install the boards densely because they will become drier and spaces may appear between them.
Storm braces (NB! Not included in some house option kits!)
Attach the storm braces (if included in
the supplied kit) to the inner sides of
the front (2 units) and back (2 units)
walls with the supplied bolts. It is
important for the logs to be drilled
through in advance. Please keep the
distances indicated in the drawing so
that no problems occur due to wood
swelling or diminishing.
ADVICE: Make sure that the storm
braces are attached to the apex log
from above and to the middle of the
first full-length wall log from below. If
necessary, shorten the upper ends of
the slats.
Do not turn the screws tightly so wood
can further swell or diminish.
With the house having settled, you
should adjust the attachments so the
wall logs can settle.
Installation of storm braces:
General advice:
Problem: Gaps appear between the wall logs
Cause: Additional details are attached to the house that do not allow wood to
swell/diminish.
Solutions: If the door/window is attached to the wall logs with screws/nails, remove these
screws/nails;
If the storm brace is screwed on too tightly, loosen its attachment;
If (rain water) pipes are installed on the wall, loosen their attachments;
Problem: The doors and windows become stuck.
Cause: The house/foundation has settled.
Solution: Check whether the house is level. Level the foundation joists and walls.
Cause: The doors and windows have swelled due to moisture.
Solution: Adjust the door and window hinges; if necessary, plane the door or window narrower.
We wish you total success with the garden house installation and much
joy with this house for many years to come!

Aufbauanleitung – Deutsch
I. Generelles
Sehr geehrter Kunde,
es freut uns, dass Sie sich für unser Gartenhaus entschieden haben!
Es ist wichtig, diese Aufbauanleitung vollständig durchzulesen, bevor Sie mit dem Aufbau Ihres
Blockhauses beginnen! So vermeiden Sie Probleme und unnötigen Zeitverlust.
Tipps:
¾Lagern Sie den Bausatz bis zur endgültigen Montage trocken und nicht direkt auf dem Erdboden, geschützt
vor Witterungseinflüssen (Nässe, Sonneneinwirkung, etc.). Ware bitte nicht in einem geheizten Raum
aufbewahren!
¾Achten Sie bei der Standortwahl darauf, dass das Blockhaus nicht extremen Witterungsbedingungen
(Gebiete mit starkem Wind) ausgesetzt ist, gegebenenfalls sollten Sie das Blockhaus zusätzlich mit dem
Fundament verankern.
Gewährleistung
Ihr Haus besteht aus hochwertigem nordischen Fichtenholz und wird unbehandelt geliefert. Wenn es trotz
unserer sorgfältigen Werkskontrolle zu Reklamationen kommen sollte, legen Sie Ihrem Fachhändler den
ausgefüllten Kontrollschein mit Ihrer Einkaufsrechnung vor!
WICHTIG: Bitte unbedingt die Dokumentation aufbewahren! Auf dem Kontrollschein finden Sie die
Kontrollnummer des Hauses. Es ist möglich die Reklamation nur dann als Garantiefall zu behandeln,
wenn Sie die Kontrollnummer Ihrem Fachhändler weitergeben!
Abweichungen die keinen Reklamationsgrund darstellen:
¾Holz ist ein Naturprodukt, daher gehören die naturgegebenen Beanstandungen nicht unter Garantie.
¾Materialreklamationen werden nicht akzeptiert, wenn bereits ein Anstrich erfolgte!
¾Äste die mit dem Holz fest verwachsen sind.
¾Holzverfärbungen, ohne das dadurch die Lebensdauer beeinflusst wird.
¾Risse /Trockenrisse die nicht durchgehend sind und nicht die Konstruktion beeinflussen.
¾Verdrehungen des Holzes vorausgesetzt es lässt sich noch verarbeiten.
¾An den nicht sichtbaren Seiten von Dach- und Fussbodenbrettern können die Bretter ungehobelt sein, es
können Farbunterschiede und Baumkanten vorkommen.
¾Spätere Reklamation durch unsachgemässe Montage, Absacken des Hauses durch unsachgemässe
Fundamente und Gründungen sind ausgeschlossen.
¾Eigene Veränderungen am Haus wie z.B. Verzug von Bohlen und Fenstern/Türen durch fehlenden
Holzanstrich oder Aufbau, die zu starre Befestigung der Sturmleiste, Verschrauben der Türrahmen mit den
Blockbohlen usw., sind ausgeschlossen.
Ansprüche auf Gewährleistung beschränken sich auf den Austausch von fehlerhaftem Material. Alle
weiteren Ansprüche sind ausgeschlossen!

Aufbauanleitung – Deutsch
Anstrich und Pflege
Holz ist ein Naturprodukt und arbeitet unterschiedlich. Merkmale wie grobe und feine Maserungen,
Farbschattierungen und Veränderungen sowie Verwachsungen haben Ihren Ursprung im Wuchs des Baumes.
Sie sind bei Hölzern, die in der freien Natur wachsen, normal und deshalb nicht als Fehler, sondern vielmehr als
Eigentümlichkeit des Naturwerkstoffes Holz anzusehen.
Das unbehandelte Holz (ausser Lagerhölzer) wird nach einiger Zeit vergrauen, kann verbläuen und
verschimmeln. Um ihr Blockhaus zu schützen, sollten Sie es mit geeigneten Holzschutzmitteln behandeln.
Um Ihr Gartenhaus optimal zu schützen, empfehlen wir die Bodenbretter vorgängig mit einer farblosen
Grundierung zu behandeln. Besonders die Unterseite, welche nach der Montage nicht mehr zu erreichen ist.
Nur auf diese Weise wird das Eindringen der Feuchtigkeit verhindert.
Wir empfehlen unbedingt auch Türen und Fenster mit einer Grundierung zu behandeln. Es ist sehr wichtig
sowohl die Innen- als auch die Aussenseiten der Türen und Fenster auf einmal zu streichen! Andernfalls
können sie sich verziehen.
Nach dem Aufbau empfehlen wir Ihnen die Aussenhaut (ohne Dach) zu Grundieren, sobald diese trocken ist
sollten Sie das Haus mit einer Holzlasur streichen, die das Holz vor Feuchtigkeit und UV-Strahlung schützt.
Beim Anstrich benutzen Sie hochwertiges Werkzeug und Farbe, beachten Sie die Sicherheits- und
Verarbeitungshinweise des Farbenherstellers. Streichen Sie nie in praller Sonne oder beim regnerischen
Wetter. Lassen Sie sich ausführlich bei Ihrem Fachhändler über den Holzschutz für unbehandelte Nadelhölzer
beraten.
Durch einen regelmässigen Anstrich beeinflussen Sie im Wesentlichen die Lebensdauer Ihres Gartenhauses.
Wir empfehlen Ihnen auch eine halbjährliche Inspektion des Gartenhauses.
II. Vorbereitung zur Aufbau
Werkzeuge und Vorbereitung der Details
Beim Aufbau brauchen Sie Folgendes:
Montagehelfer
Wasserwaage
Messer
Stehleiter
Schraubenzieher
Bandmass
Hammer
Säge
Zange
Bohrer
HINWEIS: Um Verletzungen durch eventuelle Holzsplitter zu vermeiden, tragen Sie bitte während der Montage
entsprechende Schutzhandschuhe.

Aufbauanleitung – Deutsch
Vorbereitung der Details:
Sortieren Sie das Material und
legen es an den vier Seiten des
Hauses entsprechend der
Reihenfolge des Aufbauens
bereit.
WICHTIG: Legen Sie die Hölzer
nie direkt auf die Rasenfläche
oder in den Schmutz, da sich
die Hölzer später nur schwer
oder gar nicht säubern lassen!
Fundament
Das Wichtigste für die Sicherheit und Haltbarkeit Ihres Hauses ist ein gutes Fundament. Nur ein absolut
waagerechtes und tragfähiges Fundament gewährleistet eine einwandfreie Montage der Blockbohlen, Stabilität
und vor allem Passgenauigkeit der Türen. Mit einem guten Fundament hält Ihr Blockhaus viele Jahre länger.
Fertigen Sie das Fundament so, dass die Oberkante mindestens 5 cm über die Bodenfläche hinausragt, damit
Ihr Haus besser vor Feuchtigkeit geschützt ist. Bitte beachten Sie dabei auch, dass das Hauses später
ausreichend unterlüftet wird.
Wir machen folgende Fundamentvorschläge:
●Streifen- oder Punktfundament
●Beton- bzw. Gehwegplattenfundament
●geschüttetes Betonfundament
Bereiten Sie das Fundament so vor, dass die Lagerhölzer überall im Abstand von max. 50-60 cm gestützt sind.
Lassen Sie sich ggf. von einem Fachmann beraten bzw. lassen Sie das Fundament von einem Fachmann
erstellen.
III. Aufbau
WICHTIG:
¾Im Paket finden Sie eine Zusatzbohle (längste Wandbohle).
¾Im Paket finden Sie auch ein Zusatzbrett (längstes Dach- bzw. Fussbodenbrett).
¾Im Paket sind auch 2-3 gekennzeichnete Schlaghölzer zur Montagehilfe (ca. 20-30 cm langes Bohlenprofil).
Alle obengenannten Teile sind NICHT in der Stückliste aufgelistet.
¾Auf den Abbildungen sind die Teile mit dreistelligen Positionen bezeichnet. Die genauen Positionen dieser
Teile, deren 3. Stelle auf der Abbildung mit „x“ bezeichnet sind, finden Sie in der Stückliste.
Lagerhölzer
Die Lagerhölzer müssen absolut in der Waage und plan liegen, um eine einwandfreie Montage zu
gewährleisten.
ACHTUNG: Der Fundamentplan kann bei verschiedenen Hausmodellen abweichen. Bitte beachten sie
den beigefügten Fundamentplan (Siehe Technische Daten)!
Aufbauanleitung – Deutsch
Legen Sie die imprägnierten Lagerhölzer in etwa gleichem Abstand zueinander auf das vorbereitete Fundament
(siehe Fundamentplan in Technischen Daten). Achten Sie darauf, dass die Lagerhölzer in Waage sind und im
rechten Winkel liegen, bevor sie zusammengeschraubt werden.
HINWEIS: Es ist empfehlenswert, zwischen die Lagerhölzer und das Fundament eine Feuchtigkeitssperre zu
legen, die vor Nässe und Fäulnis schützt.
HINWEIS: Es ist auch zu empfehlen, die Lagerhölzer mit dem Fundament zu verankern. (Verwenden Sie dafür
z.B. Stahlwinkel, Betonanker o. Ä.) Dieses Material gehört nicht zum Lieferumfang!
Montage der Lagerhölzer:
Wände
Beim Aufbau der Wände ist es wichtig zu wissen:
¾Die Wandbohlen werden immer mit der Feder nach oben zeigend zusammengesteckt!
¾Beim Bedarf benutzen Sie das Schlagholz und den Hammer! Nie mit dem Hammer direkt auf die Feder
schlagen!
Die Wandpläne (Siehe Technische Daten) zeigen Ihnen den Aufbau der Wände.
Als erstes verlegen Sie die halben Bohlen der Vorder- und
Rückwand und befestigen Sie sie mit Schrauben an die
Lagerhölzer. Danach legen Sie die Seitenwandbohlen in
ihre Position. Hierbei beachten Sie, dass der erste
Bohlenkranz etwas über den Lagerhölzern steht: die Bohlen
sollten ca. 3-5 mm über den Lagerhölzern überstehen. Dies
ergibt eine Tropfkante und schützt vor Nässe.
WICHTIG: Nach dem ersten Bohlenkranz, die Diagonale
messen und gegebenenfalls neu ausrichten! Nur, wenn die
Diagonalmasse millimetergenau übereinstimmen, ist der
Rahmen im Winkel und Sie können diesen dann auf
einander befestigen. Beim Bedarf neu ausrichten.
Bohlenkranz
Fahren Sie fort indem Sie die nächsten Bohlen fest ineinander stecken. Beim Bedarf verwenden Sie das
Schlagholz und den Hammer. Vergessen Sie aber auch nicht, mit der Montage der Fenster und Tür zu
beginnen.
Den Einbau der Tür sollten Sie unbedingt schon nach der 5.-6. Bohlenschicht vornehmen.
Aufbauanleitung – Deutsch
Tür und Fenster
Türrahmen:
¾Bei der Doppeltür werden die
Rahmenteile aus
Transportgründen lose geliefert
und müssen zuerst
zusammenmontiert werden.
¾Hierzu fügen Sie die vier
Rahmenhölzer der Doppeltür
zusammen und verschrauben
Sie diese.
¾Beachten Sie, dass das
Rahmenteil mit den tieferen
Rahmenausfräsungen an die
obere Seite der Tür kommt. Die
seitlichen Rahmenteile sind mit
Scharnieren und spiegelbildlich.
¾Es ist empfehlenswert, die
Türenblätter erst später
einzuhängen.
¾Bei der Einzeltür sind die
Rahmenteile und das Türblatt
schon zusammenmontiert.
Montage der Türrahmen (Nur bei Doppeltür nötig!):
Montage der Tür:
Der Rahmen wird von oben in die
entstandene Öffnung geschoben und
fest auf die unterste Bohle gedrückt.
Bei einem Haus mit Doppeltür
hängen Sie nun die Türblätter ein.
Montieren Sie nun die separat
verpackten Türgriffe, so dass Sie die
Tür öffnen können.
Montage der Fenster:
Fahren Sie fort, die Wände hochzuziehen, bis Sie zur Fensterhöhe gelangen. Aus den Wandplänen (siehe
Technische Daten) wird ersichtlich, wie viele Bohlen unter den Fenstern sind. Beim Einsetzen der Fenster
verfahren Sie genauso wie bei der Tür. Schieben Sie den Fensterrahmen mit dem Fenster über die Bohlen und
drücken Sie diesen ganz fest auf die untere Bohle. Achten Sie darauf, dass das Fenster nicht auf dem Kopf
stehend eingebaut wird.
HINWEIS: Bei den Fenstern und Türen bitte unbedingt auf die Einbaurichtung achten. Die Türen gehen immer
vom Innenraum des Hauses nach aussen auf. Die Dreh-Kipp-Fenster gehen nach innen auf. Die Hänge- und
Drehfenster gehen nach aussen auf (Fenstergriffe sind innerhalb des Hauses).
WICHTIG: Es ist nicht nötig, die Tür und Fenster an die Wandbohlen zu befestigen. Wenn sie es wünschen,
dann befestigen Sie diese mit ein oder zwei Schrauben nur im unteren Bereich der Rahmen, damit die
Wandbohlen sich beim Trocknen setzen können.
Das endgültige Einstellen der Tür kann erst in ca. 2 bis 3 Wochen erfolgen, nachdem das Holz sich dem Klima
angepasst hat und die Wandbohlen sich gesetzt haben.
Aufbauanleitung – Deutsch
Giebel
Das Giebeldreieck besteht meistens aus einem Stück. (Achtung: Das Giebeldreieck kann modellbezogen auch
mehrteilig sein! In diesem Fall müssen die Teile zuerst miteinander verschraubt werden.) Nachdem die letzten
Wandbohlen montiert sind, werden die Giebeldreiecke auf die Vorder- und Rückwand aufgesetzt und mit den
Schrauben befestigt.
In den Giebeldreiecken sind Aussparungen, worin die Dachpfetten eingelassen werden. In den Pfetten sind
ebenfalls Aussparungen, so wird ein Verrutschen des Daches verhindert.
Fügen Sie nun die Pfetten, in die
dafür vorgesehenen Ausschnitte der
Giebel ein.
Prüfen Sie, ob die
Verbindungsstellen zwischen
Giebel, obersten Wandbohlen und
Dachpfetten eine plane Fläche
bilden. Nachdem die Pfetten
eingepasst wurden, werden diese
von oben mit dem Giebel
verschraubt
Montage der Dachpfetten:
WICHTIG: Wenn die Oberseiten der Pfetten mit dem Giebel nicht bündig abschliessen, sollten Sie
entsprechend die Wandbohlen nach unten klopfen oder den Giebel bzw. die Seitenwandbohle etwas
nachhobeln.
Dach
Vor dem Verlegen der Dachbretter ist darauf zu achten, dass das Haus hundertprozentig in Waage steht.
Überprüfen Sie mittels einer Wasserwaage alle 4 Seitenwände.
WICHTIG: Der Dachbelag darf nur über eine standfeste Leiter aufgebracht werden. Das Dach darf nicht
betreten werden, da die Konstruktion für eine Gesamtbelastung (Schnee, Wind etc.) ausgelegt ist und nicht für
eine Punktbelastung.
Beginnen Sie mit dem Verlegen der Dachbretter von der Vorderseite des Hauses. Klopfen Sie die einzelnen
Bretter leicht zusammen und vernageln Sie diese oben und unten an die Dachpfetten und an die oberste
Wandbohle.
WICHTIG: Beachten Sie bitte, dass die Dachbretter nicht zu dicht aneinander befestigt werden, damit durch
Feuchtigkeit verursachte eventuelle Aufwölbungen vermieden werden. Lassen Sie ca. 1 mm Abstand zwischen
den einzelnen Brettern, damit das Holz noch etwas arbeiten kann.
•Achten Sie beim gesamtem Dach auf absolute Parallelität der Traufenkanten bei gleichbleibendem
Überstand und gleichmässiger Auflage auf der Firstpfette. Dieses prüfen Sie bitte mit einer Schnur oder
dem seitlichen Traufenbrett, welches Sie zur Kontrolle anlegen.
•Die Dachbretter müssen vorne und hinten mit den Dachpfetten bündig abschliessen. Beim Bedarf die
letzten Dachbretter entsprechend schmaler sägen.

Aufbauanleitung – Deutsch
Wenn die Dachbretter verlegt sind, müssen Dachpappe
und Dachabschlussleisten angebracht werden.
Ob Dacheindeckung und -abschlussleisten zum
Lieferumfang gehören, finden Sie in der Stückliste.
Zuerst schrauben Sie die Dachrandverstärkungen und
Dachrandleisten unter die Enden der Dachbretter (Falls
im Lieferumfang). Danach verlegen Sie die Dachpappe.
Montage der Dachleisten:
Dachpappe (Falls im Lieferumfang)
Schneiden Sie für die Dacheindeckung die Bahnen entsprechend der Dachlänge von der mitgelieferten
Dachpappe ab. Beginnen Sie mit der Befestigung der Bitumenbahnen an der unteren Seite des Daches, indem
Sie die Bahnen längs von der Hinter- zur Vorderwand verlegen. Lassen Sie die erste Bahn seitlich ca. 2-4 cm
überstehen (Tropfkante). Befestigen Sie die Dachpappe mit gelieferten Dachpappenstiften ca. 15 cm Abstand.
Beachten Sie bei der Anbringung der nächsten Lagen, dass diese mindestens 10 cm über die vorherige Lage
überlappen.
Nach dem Einlegen der Dachpappe erfolgt
die Montage der Windbretter und die
Befestigung der Giebelblenden an die
Pfetten und obersten Wandbohlen.
Montage der Windbretter und Giebelblenden:
Fussboden
Erst wenn das Haus komplett aufgebaut wurde, erfolgt das verlegen der Fussbodenbretter, dadurch vermeiden
Sie eine unnötige Verschmutzung des Fussbodens.
Legen Sie die Fussbodenbretter auf die Lagerhölzer, klopfen Sie diese leicht zusammen und befestigen Sie
diese danach fest mit den Nägeln auf die Lagerhölzer. Beim Bedarf die letzten Bretter durch Schneiden
anpassen.
Zum Abschluss wird im Innenraum die Verleistung für den Fussboden angebracht, um evtl. Fugen an den
Wänden abzudecken. Die Leisten müssen ggf. durch Zuschnitt eingepasst werden.
WICHTIG: Aufgrund der unterschiedlichen klimatischen Verhältnisse, wo das Haus aufgestellt ist, können auch
Fussbodenbretter unterschiedlich arbeiten. Wenn die Fussbodenbretter sehr trocken sind, das Klima aber
Aufbauanleitung – Deutsch
feucht, nehmen sie leicht Feuchtigkeit auf. Deswegen ist es ratsam, die Bretter nicht zu dicht nebeneinander zu
befestigen, dadurch können Sie eventuelle Aufwölbungen vermeiden. Lassen Sie ca. 1-2 mm Abstand zwischen
den einzelnen Brettern, damit das Holz arbeiten kann. Wenn das Klima aber heiβund trocken ist, können Sie
die Bretter dicht nebeneinander legen, denn sie trocknen noch mehr aus und es entstehen Spalten zwischen
den Brettern.
Sturmleisten (Falls im Lieferumfang!)
Die Sturmleisten müssen im Innenraum
mit den mitgelieferten Schlossschrauben
an die Vorder- (2 St.) und Rückwand (2
St.) montiert werden. Hierfür ist es
erforderlich, die Bohlen vorher zu
durchbohren. Bitte beachten Sie hier die
auf der Zeichnung gegebenen Abstände,
damit es später keine Probleme mit dem
Arbeiten des Holzes gäbe.
HINWEIS: Beachten Sie, dass die
Sturmleisten oben an die Giebelbohle und
unten in der Mitte der ersten ganzen
Wandbohle befestigt werden. Beim Bedarf
schneiden Sie die Leisten von der oberen
Seite kürzer.
Die Schlossschrauben dürfen nur
Handfest angezogen werden, damit das
Holz weiterhin arbeiten kann.
Wenn das Haus sich gesetzt hat, müssen
die Befestigungen reguliert werden, damit
die Wandbohlen sich nach unten setzen
könnten.
Montage der Sturmleisten:
Allgemeine Tipps:
Problem: Es entstehen Spalten zwischen den Bohlen.
Ursache: Es sind zusätzliche Details an den Wänden angebracht, die das Verarbeiten des Holzes
verhindern.
Lösung: Wenn Fenster/Tür mit Schrauben/Nägeln an die Wandbohlen befestigt sind, sie entfernen;
Wenn die Sturmleisten zu fest an die Bohlen geschraubt sind, sie flexibel montieren;
Wenn eine (Wasser)Leitung an der Wand montiert ist, die Befestigungen flexibler montieren;
Problem: Fenster und Türen klemmen
Ursache: Das Haus/Fundament hat sich gesenkt
Lösung: Überprüfen, ob das Haus in Waage steht. Lagerhölzer und Wände wieder in einen
waagerechten Zustand bringen.
Ursache: Fenster und Türen sind wegen der Feuchtigkeit geschwollen
Lösung: Die Tür-/Fensterscharniere regulieren; beim Bedarf die Tür/Fenster schmaler hobeln
Wir wünschen Ihnen nun viel Spass und Erfolg beim Aufbau und
jahrelange Freude mit Ihrem Gartenhaus!
Notice de montage – Français
I. Généralités
Cher client,
Nous sommes heureux que votre choix se soit porté sur notre maison de jardin!
Il est important de lire entièrement cette notice de montage avant de commencer la construction de
votre maisonnette en poutres! Vous vous éviterez ainsi des problèmes et des pertes de temps inutiles.
Conseils:
¾Avant son montage définitif, entreposez le kit de construction au sec et pas directement sur la terre, en le
protégeant contre les intempéries (humidité, rayonnement du soleil, etc.). Ne pas conserver la marchandise
dans un local chauffé!
¾Au moment de choisir l'endroit de montage, veillez à ce que la maisonnette en poutres ne soit pas exposée
à des conditions atmosphériques extrêmes (zones exposées à des vents forts). Le cas échéant, il serait bon
d'ancrer la maisonnette en poutres dans des fondations.
Garantie
Votre maisonnette est réalisée en bois d'épicéa nordique de haute qualité et elle vous est livrée non traitée. Si
elle devait donner lieu à des réclamations, malgré les soins apportés à notre contrôle en usine, nous vous
demandons de remettre à votre revendeur spécialisé le bon de contrôle rempli et votre facture d'achat!
IMPORTANT: Veuillez impérativement conserver la documentation! Vous trouverez sur le bon de
contrôle le numéro de contrôle de la maisonnette. La réclamation ne peut être traitée dans le cadre de la
garantie que si vous communiquez le numéro de contrôle à votre revendeur spécialisé!
Ecarts qui ne constituent pas un motif de réclamation:
¾Le bois est un produit naturel, ce qui fait que les réclamations reposant sur des phénomènes naturels ne
tombent pas sous le coup de la garantie.
¾Les réclamations concernant les matériaux ne sont pas acceptées si une peinture a déjà été appliquée!
¾Nœuds qui sont inhérents au bois.
¾Décolorations du bois qui n'exercent pas d'influences sur la durée de vie.
¾Fissures / fentes de retrait qui ne sont pas traversantes et qui n'exercent pas d'influences sur la
construction.
¾Déformations du bois, sous réserve qu'il puisse encore être mis en œuvre.
¾Sur les faces non visibles des planches du toit et du plancher, il se peut que les planches ne soient pas
rabotées, on peut observer des différences de couleur et des flaches.
¾Une réclamation tardive résultant d'un montage incorrectement réalisé, d'un affaissement de la maisonnette
par suite de fondations et de soubassements incorrectement réalisés, est exclue.
¾Une réclamation suite à des modifications apportées de son propre chef à la maisonnette, comme par
exemple une déformation des madriers et des fenêtres/portes par suite d'une peinture du bois ou d'une
construction insuffisantes, la fixation trop rigide du contreventement, le vissage des dormants sur les
madriers, etc., est exclue.
Les recours en garantie se limitent au remplacement du matériel défectueux. Tous les autres recours
sont exclus!
This manual suits for next models
2
Table of contents
Languages:
Other Mr. GARDENER Garden House manuals


