Mutant MT2300BT User manual

MT2300BT
BD/ENT
1 PAU 2 RPT 3 INT 4 RDM 5 6
LD/MOD
D
I
S
P
S
C
A
N
A
F
P
T
Y
A/PS
TA
1631 105 7 11 17 27162 3
12 8 9 13 20 21 22 23 24 25 26281430
(1-6)
4
19 18
BD/ENT
1 PAU 2 RPT 3 INT 4 RDM 5 6
LD/MOD
D
I
S
P
S
C
A
N
A
F
P
T
Y
A/PS
TA
1
9
331 30
11
20
21
22
23
24 25
10
7
5
615
4 (1,2,3,4,5,6)
29 (1,2...,9,0 *,#)
2
Operating and Installation Guide English

EN-2
LOCATIONS OF CONTROLS
1. POWER ON/OFF ( )
2. FUNCTION SELECT BUTTON: CONTROLS FOR BASS/TREBLE/
BALANCE/FADER / INITIAL VOLUME / CT / TA VOL / EON / DSP
3. VOL UP/VOL DOWN BUTTON: CONTROLS FOR BASS/TREBLE/
BALANCE/FADER / INITIAL VOLUME / CT / TA VOL / EON / DSP
4. PRESET STATIONS (1,2,3,4,5,6)
5. ‘AF’ function (ALTERNATIVE FREQUENCIES)
6. ‘TA’ function (TRAFFIC ANNOUNCEMENT)
7. ‘PTY’ function (PROGRAM TYPE)
8. DISPLAY BUTTON (DISP)
9. MODE/LOUDNESS BUTTON (LD/MOD)
10. BAND/ENTER BUTTON (BD/ENT)
11. AUTOMATIC OR MANUAL TUNING
(FREQ UP OR FREQ DOWN )
CD TRACK/SEARCH BUTTON
12. AUTO SEEK SEARCH TUNING (A/PS)
13. ‘SCAN’ AUTOMATIC TUNING CONTROL (SCAN)
14. MUTE BUTTON ( )
15. EQUALIZER (DSP)
16. LCD DISPLAY
17. OPEN PANEL BUTTON ( )
18. CD SLOT
19. CD EJECT BUTTON ( )
20. PAUSE BUTTON
21. REPEAT BUTTON
22. INTRO BUTTON (Preview all Tracks)
23. RANDOM BUTTON
24, 25. FOLDER DOWN/UP (MP3/WMA Files only)
26. USB PORT
27. MULTI-MEDIA CARD (MMC) / SD CARD SLOT
28. FRONT AUX IN
29. PHONE NUMBER
30. ANSWER A CALL ( )
31. END A CALL ( )
BD/ENT
1 PAU 2 RPT 3 INT 4 RDM 5 6
LD/MOD
D
I
S
P
S
C
A
N
A
F
P
T
Y
A/PS
TA
1631 105 7 11 17 27162 3
12 8 9 13 20 21 22 23 24 25 26281430
(1-6)
4
19 18
BD/ENT
1 PAU 2 RPT 3 INT 4 RDM 5 6
LD/MOD
D
I
S
P
S
C
A
N
A
F
P
T
Y
A/PS
TA
1
9
331 30
11
20
21
22
23
24 25
10
7
5
615
4 (1,2,3,4,5,6)
29 (1,2...,9,0 *,#)
2
BD/ENT
1 PAU 2 RPT 3 INT 4 RDM 5 6
LD/MOD
D
I
S
P
S
C
A
N
A
F
P
T
Y
A/PS
TA
1631 105 7 11 17 27162 3
12 8 9 13 20 21 22 23 24 25 26281430
(1-6)
4
19 18
BD/ENT
1 PAU 2 RPT 3 INT 4 RDM 5 6
LD/MOD
D
I
S
P
S
C
A
N
A
F
P
T
Y
A/PS
TA
1
9
331 30
11
20
21
22
23
24 25
10
7
5
615
4 (1,2,3,4,5,6)
29 (1,2...,9,0 *,#)
2

EN-3
10
7
1
2
3
4
4
4
5
5
6
6
8
9
Dashboard
2182mm
53mm
34
TAP
1
2
13
Bend these
claws, if necessary
Release screw and
bracket
INSTALLATION
PRECAUTIONS
• Choose the mounting location carefully so that the unit will not interfere with the normal driving functions of the
driver.
• Avoid installing the unit where it would be subject to high temperatures, such as from direct sunlight or hot air
from the heater, or where it would be subject to dust, dirt or excessive vibration.
• Use only the supplied mounting hardware for a safe and secure installation.
• Be sure to remove the front panel before installing the unit.
Mounting angle adjustment
Adjust the mounting angle to less than 20°.
MOUNTING EXAMPLE
Installation in the dashboard
Note: Keep the release key in a safe place as you may need it in the future to remove the unit from the car.
TO SUPPORT THE UNIT
Detaching and attaching the front panel
The front panel of this unit can be detached in order to prevent the unit from being stolen.
FOLDING DOWN AND DETACHING/ATTACHING THE FRONT PANEL
Before detaching the front panel, be sure to press the button (1) to OFF rst.
Then press the button, let the Front Panel arrive in horizontal position and detach the panel by pulling it
towards you as illustrated.
2
1
< 10°
1. UNIT
2. RELEASE CASE
3. DASH BOARD
4. HEX NUT
5. LOCK WASHER
6. PLAIN WASHER
7. CAR BODY
8. REAR SUPPORT STRAP
9. TAPPING SCREW
10. M5 X 15 HEX BOLT

EN-4
B
A
1 3 5 7
2 4 6 8
5 7
4 8
TAL K
ANTENNA
CONNECTOR
L(WHITE) R(RED)
LINE OUT
ISO CONNECTOR
BLUETOOTH ANTENNA
CONNECT TO
EXTERNAL MICROPHONE
Notes:
•Do not press the front panel hard against the unit when attaching it. It can be easily attached by pressing it
lightly against the unit.
•When you carry the front panel with you, put it in the supplied front panel case.
•Do not press hard or give excessive pressure to the display window of the front panel when attaching it to
the unit.
CLEANING THE CONNECTOR
The unit may not function properly if the connectors between the unit
and the front panel are contaminated with dirt. In order to prevent
this from happening, detach the front panel by pressing the
button and clean the connector from time to time.
Clean the connector with a cotton swab together with contact cleaner
as illustrated. Be sure to clean them carefully pin by pin and make
sure not to damage the connecting points.
ISO CONNECTOR
RCA Jack Line Out:
Red (right) White (left)
CONNECTOR A
4. MEMORY +12V
5. AUTO ANTENNA OUTPUT
7. +12V (TO IGNITION KEY)
8. GROUND
Note: (connector A no. 7) must be connected by car igni-
tion key in order to avoid that car battery being drained
when the car will be not used for long period.
CONNECTOR B
1. REAR RIGHT SPEAKER (+)
2. REAR RIGHT SPEAKER (-)
3. FRONT RIGHT SPEAKER (+)
4. FRONT RIGHT SPEAKER (-)
5. FRONT LEFT SPEAKER (+)
6. FRONT LEFT SPEAKER (-)
7. REAR LEFT SPEAKER (+)
8. REAR LEFT SPEAKER (-)
Maintenance
FUSE REPLACEMENT
If the fuse blows, check the power connection and replace the fuse. If the fuse blows again after the re-
placement, there may be an internal malfunction. In this case, consult your nearest repair center.
Warning
Use the specied amperage fuse for each lead. Use of a higher amperage fuse may cause serious dam-
age.
Cotton Swab
Rear of
front panel
Main unit

EN-5
OPERATING INSTRUCTIONS
1. POWER ON/OFF ( )
By pressing this key, the unit is on or off.
This unit is turned on by pressing any key.
2. FUNCTION SELECT BUTTON: BASS/TREBLE/BALANCE/FADER /
INITIAL VOLUME / CT / TA VOL / EON / DSP)
3. VOLUME UP/DOWN
Turning VOL knob (right/left) to adjust VOL/BAS/TRE/BAL/FAD. To select other functions, press the VOL knob shortly
until the desired functions are shown on the display. Figure 1 shows how to control functions that are selected using
the VOL knob.
1 3
24
25
26
2 2
Fig. 1 Selection of sound control functions
1. VOL 2. SEL 3. BASS 4. TRE 5. BAL 6. FAD
Increase or decrease the volume by turning VOL knob (right/left). These buttons can be used to adjust the BASS,
TREBLE, BALANCE and FADER.
IN VOL
SEL
2 sec.
SEL ADJ SEL TA VOL SEL EON SEL DSP
Press and hold VOL knob to adjust INIT VOL /CT/TA VOL/EON ON/DSP
IN VOL: Can adjust Initial Volume level using this mode.
ADJ: Can adjust clock time. Turn VOL knob clockwise to set hours and counter clockwise to set minutes.
TA VOL: Can adjust TA Volume (The volume level when Trafc announcement is transmitted).
EON: Can selected EON condition, ON or OFF.
DSP: Can select DSP mode (Classic, Rock, POP, Flat)
4. PRESET STATIONS (1,2,3,4,5,6)
When pressed momentarily, these keys select a preset station directly. When pressed longer than 1 sec., current
station is stored in preset memory bank.
USING THE RDS FUNCTION
What is RDS?
The RDS (Radio Data System) is a digital information system developed by the EBU (European Broadcast Union).
Piggy-backed on normal FM broadcasts, RDS offers a variety of information services and automatic retuning functions
for RDS-compatible car stereos.
In 1988, RDS became available in the United Kingdom, France, West Germany, Ireland and Sweden. Test transmis-
sions are being conducted in many other European countries. It is expected that RDS will be available in most western
European countries in the near future.
5. ‘AF/REG’ function (ALTERNATIVE FREQUENCIES)
When pressed momentarily, AF/REG switching mode is selected.
When AF/REG switching mode is selected, the radio checks the signal strength of the AF all the time. When pressed
long, it is activated as regional mode ON/OFF.
– Regional mode ON:
AF switching or PI SEEK is implemented to the station which have all PI codes same as current station. REG seg-
ment is turned on, in LCD display.
– Regional mode OFF
The regional code in the format of PI code is ignored when AF switching or PI SEEK is implemented.
6. ‘TA’ function (TRAFFIC ANNOUNCEMENT)
When pressed momentarily, it is activated as TA mode on or off
When TA mode is on and trafc announcement is transmitted
– When the unit in CD/MP3 mode, it will switch to radio mode temporarily.
– If the volume level was under the threshold point, it will be raised to the threshold point.
– When TP station is received, TP segment is turned on in LCD display.
7. ‘PTY’ function (PROGRAM TYPE)
When pressed momentarily, it is activated as TPY ON/OFF function and start to search corresponding PTY informa-
tion then stops if the corresponding PTY information is detected.
By pressing this key longer than 2 sec., you can select PTY mode by turning Volume knob as below.
NEWS--AFFAIRS--INFO--SPORT--EDUCATE--DRAMA--CULTURE--SCIENCE--VARIED--POP--ROCK--EASY M--
LIGHT M--CLASSIC--OTHER M--WEATHER--FINANCE--CHILDREN--SOCIAL--RELIGION--PHONE IN--TRAVEL-
-LEISURE--JAZZ--COUNTRY--NATION. M--OLDIES--FOLK M--DOCUMENT--TEST--ALARM.

EN-6
8. DISPLAY (DISP)
Press DISP button to switch between display informations such as radio frequencies, clock, track and other informa-
tions depending on the playing MODE.
9. MODE/LOUDNESS BUTTON (LD/MOD)
By pressing this key, user can select. AUX/TUNER/CD-MP3/USB/SD/MMC/AD2P mode.
LOUDNESS: By pressing this key longer than 2 sec., you can select LOUDNESS mode.
10. BAND BUTTON (BD)
Each band is toggled cyclically by pressing this key FM1---FM2---FM3--MW(AM)1--MW(AM)2.
11. AUTOMATIC OR MANUAL TUNING (FREQ UP OR FREQ DOWN )
(A) RADIO MODE
When pressed momentarily, these keys are operated as SEEK tuning mode.
When pressed longer than 1 sec., they are operated as MANUAL tuning mode.
(B) CD/MP3/WMA PLAYER MODE
When pressed momentarily, they are operated as TRACK UP or TRACK DOWN mode.
When pressed longer than 1 sec., they are operated as CUE or REVIEW mode.
12. AUTO SEEK SEARCH TUNING (A/PS)
PS - By pressing shortly, the radio searches for each preset station. Each preset station will be played for 5 sec.
AS - By pressing longer than 1 sec, the 6 strongest stations are stored in the corresponding preset memory number.
When Automatic Scan operation is nish, the radio executes the preset scan.
13. ‘SCAN’ AUTOMATIC TUNING CONTROL (SCAN)
Press SCAN button to activate radio scan. The unit will search for every station and will play 5 seconds of each sta-
tion found. To cancel SCAN, press the button once more.
14. MUTE BUTTON ( )
Press this button to turn off the sound. Press it again to return to the previous volume level.
15. EQUALIZER (DSP)
Press DSP to select between (Classic, Rock, POP, Flat) equalizer modes.
16. LCD DISPLAY
The Liquid Crystal Display will display the current state of the unit.
17. OPEN THE FRONT PANEL
Press button and the front panel will open.
CD/MP3/WMA CONTROL LOCATION OF PARTS
TRACK/SEARCH BUTTON (11)
FORWARD AND REVERSE TRACK SEARCH (or changing songs)
Press the SKIP button ( or ) during play to go to the desired track(song).
....REVERSE ....FORWARD
Press and hold the SKIP button ( or ) during play to scan the disc at high speed. When the desired music section
of the disc is found, release the button. Normal play will resume.
18. CD SLOT
19. CD EJECT BUTTON
Press the EJECT ( ) button to remove the CD.
20. PAUSE BUTTON
During “PLAY”, press (20) ‘PAU’ button to “PAUSE”. Press it again to resume play.
21. REPEAT BUTTON
When this button is pressed, “RPT ON” indication is displayed and play of the selected track will be continually
repeated until the Track repeat mode is cancelled by pressing ‘RPT’ button again.
22. INTRO BUTTON (Preview all Tracks)
When this button is pressed, “INT ON” indication is displayed and the rst several seconds of each track of the disc
is played. Press again to stop intro and listen to track.
23. RANDOM BUTTON
When this button is pressed, “RDM ON” indication is displayed and each track of the disc is played in random instead
of normal progression. To cancel RANDOM mode, press ‘RDM’ button again.
24, 25. FOLDER DOWN/UP (In case of MP3/WMA les)
M5: Folder down / M6: Folder up

EN-7
HOW TO SELECT MP3/WMA FILES
1. Searching by Track:
• Press “A/PS”, then search track is activated.
• Turn “VOL” knob to left or right, select rst digit desired.
• Press “VOL” knob, then the rst digit is xed and second digit will ash.
• Turn “VOL” knob to left or right, select 2’nd 3’rd respectively.
• Press “BD/ENT”, the song selected will start.
2. Searching by Character:
• Press “A/PS” twice, then character search mode is activated.
• Turn “VOL” knob to left or right, you can select the desired letter.
• Press “VOL” knob, repeat steps above for 2’nd 3’rd character.
• The songs with the same character that you selected is displayed.
• Turn “VOL” knob to left or right, you can select the desired song.
• Press “BD/ENT”, then the song selected will start.
3. Searching by File Name:
• Press “A/PS” 3 times, then folder search is activated.
• Turn “VOL” knob to left or right, you can select the desired folder.
• Press “BD/ENT”, then the folder is xed and the rst le will be played.
Connecting it to Portable Digital MP3 Player
26. USB PORT
Using USB cable to connect Your Portable Digital MP3 Player.
*Not all USB MP3 players types are supported
27. MULTI-MEDIA CARD (MMC) / SD CARD SLOT
Support MP3/WMA ID3 format music only.
* IMPORTANT INFORMATION:
BECAUSE OFTHE GREAT VARIETY OFPRODUCTS WITH USB, SDAND MMC CARD PORTSAND THEIR SOMETIMES
QUITE MANUFACTURER-SPECIFIC FUNCTIONS WE CAN NEITHER GUARANTEE THAT ALL DEVICES WILL BE
RECOGNIZED NOR THAT ALL OPERATING OPTIONS THAT ARE POSSIBLE IN THEORY WILL ACTUALLY WORK.
28. FRONT AUX IN
Convenient easy to use front “AUX IN” input jack, allows easy connection of Portable Media and digital MP3 Players.
HOW TO USE BLUETOOTH IN YOUR CAR AUDIO
How to Perform Pairing
Before you can dial out from the car stereo, you must rst perform PAIRING. Pairing is a procedure used to connect 2
Bluetooth devices together.
1. This unit’s Bluetooth function is always on, perform the pairing starting from your cellular phone. Refer to your cellular
manual on proper pairing.
2. Perform the search for available Bluetooth devices, “CAR--BT ” will show. Enter ‘0000’ when asking for code.
3. After successful pairing, connect to the head unit if it is not automatically connected.
How to call / receive calls using wired remote controller
• When there is incoming call, press TALK button once to answer.
• During conversation, press TALK button once to end call.
• To make calls using call history
1. Press and hold TALK button to display “REDIAL” history.
2. Using VOL knob on main unit, turn repeatedly to select the phone number you want to make
call to and press “ ” to dial out.
Note: Up to 20 phone numbers will be displayed including previous outgoing and incoming calls.
How to call / receive calls using wireless remote controller
• To make calls, press “ ” button on the remote controller followed by pressing TEL NO using
number keys.
• After entering TEL NO, press “ ” again to dial out.
• During conversation, press “ ” button to end call.
• When there is incoming call, press “ ” button to receive call.
• Press “ ” button to reject incoming calls.
How to make / receive calls using front panel
• To make calls using call history
1. Press and hold “ ” to display “REDIAL” history.
2.
Using VOL knob on main unit, turn repeatedly to select the phone number you want to make call to and press “ ”
to dial out.
• During conversation, press “ ” button to end call.
• When there is incoming call, press “ ” button to receive call.
• Press “ ” button to reject incoming call.
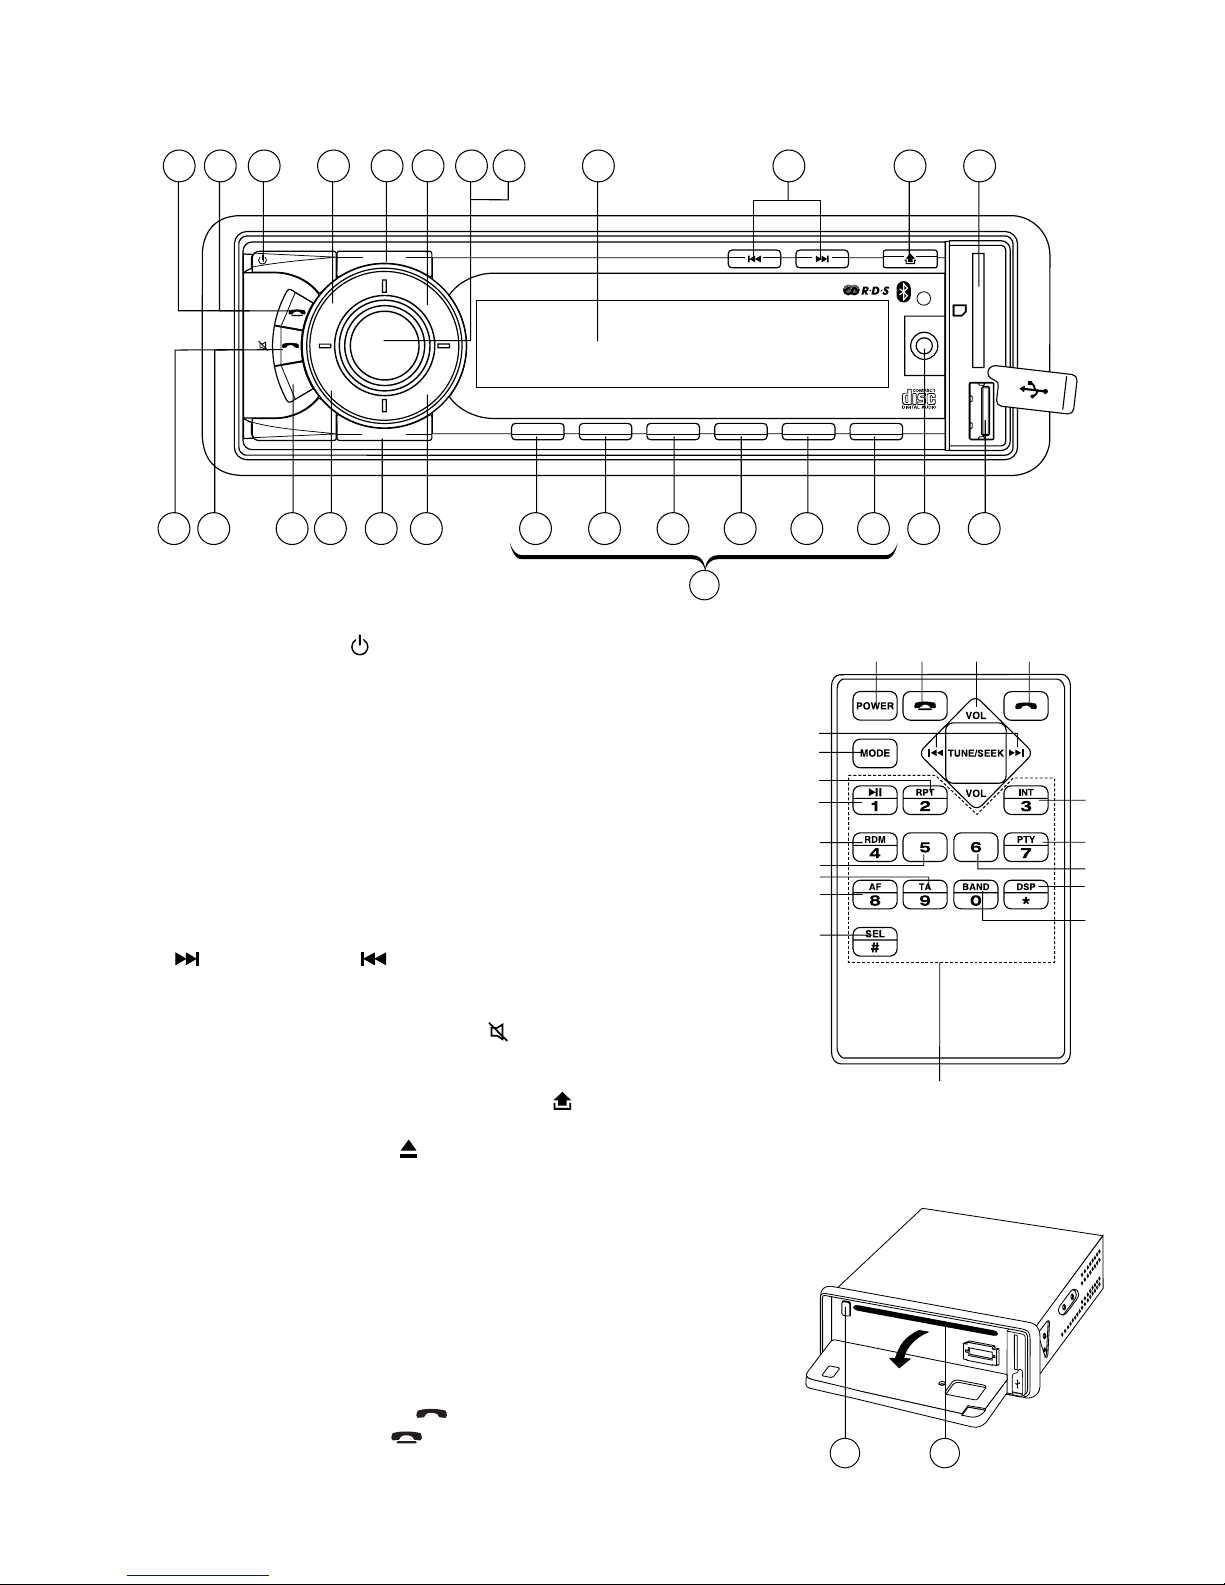
TALK BUTTON
MICROPHONE

EN-8
Audio Streaming
1. If your phone is “A2DP” format is compatible, you can play music in your mobile and the music will be transferred to
car audio unit.
2. Make sure your mobile and the car radio unit is paired and connected.
3. Play the music in your mobile according to your mobile operating method.
4. Unit will display “A2DP” when receiving A2DP music automatically, but for some mobile your have to press LD/MOD
button to change A2DP mode.
5. You can press or on head unit for previous or next tracks.
RESET
Reset button is placed on the housing.
The reset button is to be activated for the following reason:
• Initial installation of the unit when all wiring is completed.
• All the function button do not operate.
• Error symbol on the display.
TECHNICAL SPECIFICATIONS
CD/MP3/WMA PLAYER SECTION
Signal to Noise Ratio > 60 dB
Channel Separation > 50 dB (1kHz)
Frequency Response 20Hz - 20 kHz
TUNER (FM)
Frequency Range 87.5-108 MHz
Channel Step 50 kHz
Intermediate Frequency 150 KHz
Sensitivity 2.8 µV
Stereo Separation 37 dB
Signal to Noise Ratio > 50 dB
TUNER (MW)AM
Frequency Range 522-1620 KHz
Intermediate Frequency 25 KHz
Usable Sensitivity 32 dB
LINE-OUT
Output 1.5V (max.)
Impedance 10k Ohm
GENERAL
Power Supply 12V DC (10.8-15.6V allowable)
Speaker Impedance 4 or 8 ohm
Output Power 50W x 4CH
Fuse 10A
Note: Specications and the design are subject to possible modication without notice due to improvement.
Recycling
This product bears the selective sorting symbol for waste electrical and electronic equipment (WEEE).
This means that this product must be handled pursuant to European Directive 2002/96/EC in order to
be recycled or dismantled to minimize its impact on the environment.
For further information, please contact your local or regional authorities.
Electronic products not included in the selective sorting process are potentially dangerous for the
environment and human heath due to the presence of hazardous substances.
RESET

MT2300BT
BD/ENT
1 PAU 2 RPT 3 INT 4 RDM 5 6
LD/MOD
D
I
S
P
S
C
A
N
A
F
P
T
Y
A/PS
TA
1631 105 7 11 17 27162 3
12 8 9 13 20 21 22 23 24 25 26281430
(1-6)
4
19 18
BD/ENT
1 PAU 2 RPT 3 INT 4 RDM 5 6
LD/MOD
D
I
S
P
S
C
A
N
A
F
P
T
Y
A/PS
TA
1
9
331 30
11
20
21
22
23
24 25
10
7
5
615
4 (1,2,3,4,5,6)
29 (1,2...,9,0 *,#)
2
MANUEL D’INSTRUCTIONS Français

FR-2
DESCRIPTION DES COMMANDES
1. MARCHE / ARRÊT ( )
2. SÉLECTEUR DE FONCTION : GRAVES / AIGUS/BALANCE /
ATTÉNUATEUR / CT / TA VOL / EON / DSP
3. VOL PLUS / VOL MOINS POUR GRAVES / AIGUS/BALANCE /
ATTÉNUATEUR / CT / TA VOL / EON / DSP
4. CANAUX PROGRAMMABLES (1, 2, 3, 4, 5, 6)
5. Fonction ‘AF’ (FRÉQUENCES ALTERNATIVES)
6. Fonction ‘TA’ (INFORMATION DE TRAFIC)
7. Fonction ‘PTY’ (TYPE DE PROGRAMME)
8. BOUTON AFFICHAGE (DISP)
9. MODE (MOD) / FONCTION LOUDNESS (LD/MOD)
10. TOUCHE BANDE (BD) / ENTRER (ENT)
11. BALAYAGE AUTOMATIQUE OU MANUEL (BOUTON FRÉQ HAUT
OU FRÉQ BAS / PISTE CD / RECHERCHE)
12. RECHERCHE BALAYAGE AUTO (A/PS)
13. COMMANDE DE BALAYAGE AUTOMATIQUE (SCAN)
14. BOUTON DE DÉBRANCHEMENT ( )
15. EQUALIZER (DSP)
16. ÉCRAN LCD
17. BOUTON D’OUVERTURE DU PANNEAU ( )
18. COMPARTIMENT CD
19. BOUTON ÉJECTER CD ( )
20. BOUTON PAUSE
21. BOUTON RÉPÉTER
22. BOUTON INTRO (joue le début de toutes les pistes)
23. BOUTON ALÉATOIRE
24, 25. DOSSIER PRECEDENT/SUIVANT
(danslecasdechiersMP3/WMA)
26. PORT USB
27.
FENTE POUR CARTE MULTIMÉDIA (MMC) / SD
28. ENTRÉE AUX FRONTALE
29. NUMÉRO DE TÉLÉPHONE
30. RÉPONDRE À UN APPEL ( )
31. TERMINER UN APPEL ( )
BD/ENT
1 PAU 2 RPT 3 INT 4 RDM 5 6
LD/MOD
D
I
S
P
S
C
A
N
A
F
P
T
Y
A/PS
TA
1631 105 7 11 17 27162 3
12 8 9 13 20 21 22 23 24 25 26281430
(1-6)
4
19 18
BD/ENT
1 PAU 2 RPT 3 INT 4 RDM 5 6
LD/MOD
D
I
S
P
S
C
A
N
A
F
P
T
Y
A/PS
TA
1
9
331 30
11
20
21
22
23
24 25
10
7
5
615
4 (1,2,3,4,5,6)
29 (1,2...,9,0 *,#)
2
BD/ENT
1 PAU 2 RPT 3 INT 4 RDM 5 6
LD/MOD
D
I
S
P
S
C
A
N
A
F
P
T
Y
A/PS
TA
1631 105 7 11 17 27162 3
12 8 9 13 20 21 22 23 24 25 26281430
(1-6)
4
19 18
BD/ENT
1 PAU 2 RPT 3 INT 4 RDM 5 6
LD/MOD
D
I
S
P
S
C
A
N
A
F
P
T
Y
A/PS
TA
1
9
331 30
11
20
21
22
23
24 25
10
7
5
615
4 (1,2,3,4,5,6)
29 (1,2...,9,0 *,#)
2

FR-3
10
7
1
2
3
4
4
4
5
5
6
6
8
9
Tableau de bord
2182mm
53mm
34
TAP
1
2
13
si nécessaire
plier ces griffes
enlever les 2 vis
de blocage
INSTALLATION
Précautions
• Choisissezsoigneusementl’emplacementd’installation,desortequel’appareilnerisquepasd’entraverles
manoeuvresdeconduitenormalesduconducteur.
•
Évitezd’installerl’appareildansunlieuoùilrisqued’êtresoumisàdestempératuresélevées(p.ex.lumièredirecte
dusoleilouairchaudduchauffage),ouexposéàlapoussière,desimpuretésoudesvibrationsexcessives.
• Utilisezseulementlematérieldemontagefournipourassureruneinstallationsureetsansdanger.
• Ayezsoind’enleverlepanneauavantpréalablementàl’installationdel’appareil.
Réglage de l’angle de montage
Réglezl’angledemontagesurmoinsde20°.
EXEMPLE DE MONTAGE
Installationdansletableaudebord
NOTE:Veilleràconserverlaclédedéverrouillagedansunendroitsûrpourvouspermettre,lecaséchéant,
d’extrairel’appareildel’auto.
ACCESSOIRES DE MONTAGE
FACADE DETACHABLE
Commentplaceretenleverlafaçade.Lafaçadepeutêtreenlevéedefaçonàéviterquel’appareilpuisseêtrevolé.
COMMENT ENLEVER ET REMETTRE LA FACADE
Avant tout, s’assurer d’avoir appuyé sur le bouton -off” pour éteindre l’appareil.
Appuyer ensuite sur la touche .Lafaçadebasculeversl’avantenpositionhorizontale.Détacheralorsla
façadeenlafaisantglisserverslagauchepuisentirantdoucementversvouscommeillustré
Pourremettrelafaçadeenplace,insérerd’abordlecotégauchepuisfaireglisserverladroitetoujoursenposition
horizontale,faireensuitebasculerverslehautcommeillustré.
2
1
< 10°
1. UNITE PRINCIPALE
2. FOURREAU
3. TABLEAU DE BORD
4. ECROU HEX
5. RONDELLE
6. RONDELLE PLATE
7. CARROSSERIE
8. BARETTE DE MONTAGE
ARRIERE
9. VIS
10. BOULON HEX. M5X15

FR-4
Nota:
• Nepastroppresserlafaçadecontrel’appareil;ilsuftd’appuyerlégèrementsurl’appareil.
• Lorsquevousemportezlafaçade,rangez-ladanssonétui.
• Nepastropappuyersurl’afcheurdelafaçadelorsquevousleremettezenplace.
NETTOYAGE DES CONNECTEURS
L’appareil ne fonctionnera pas correctement si les connecteurs
del’unitéprincipaleetdelafaçadesontsales.And’éviter que
celan’arrive,nettoyerleconnecteurdetempsentemps.Pourcela
détacherlafaçadeenappuyantsurlebouton etnettoyeravec
uncoton-tigeimbibéd’alcoolblancoud’unnettoyantspécialcon-
necteurcommecelaestillustréci-contre.
Nettoyerdélicatementchaquebrocheenévitantd’endommagerles
pointsdeconnexions.
BRANCHEMENT
Sortie Préampli:
Rouge(Droit)Blanc(Gauche)
CONNECTEUR A
4. MÉMOIRE + 12V
5. SORTIE ANTENNE AUTO
7. +12V (VERS CLÉ DE CONTACT)
8. TERRE
Remarque:(connecteurAno.7)doitêtreconnectéparla
clédecontactpouréviterquelabatteriedelavoiturene
sedéchargelorsquevousn’utilisezpaslavoiturependant
unelonguepériode).
CONNECTEUR B
1. HAUT-PARLEUR ARRIÈRE DROIT (+)
2. HAUT-PARLEUR ARRIÈRE DROIT (-)
3. HAUT-PARLEUR AVANT DROIT (+)
4. HAUT-PARLEUR AVANT DROIT (-)
5. HAUT-PARLEUR AVANT GAUCHE (+)
6. HAUT-PARLEUR AVANT GAUCHE (-)
7. HAUT-PARLEUR ARRIÈRE GAUCHE (+)
8. HAUT-PARLEUR ARRIÈRE GAUCHE (-)
Entretien
REMPLACEMENT DU FUSIBLE
Silefusiblesaute,vériezlesbranchementsetremplacezlefusible.Silefusiblesauteànouveauaprès
avoirétéchangé,ilpeutyavoirunproblèmeinterne.Danscecas,consultezvotrecentrederéparation
leplusproche.
Avertissement
Utilisezunfusibledelabonneintensité.L’utilisationd’unfusibleavecuneintensitéplushautepeutcauser
desdommagesconsidérables.
Cotton Swab
Rearof
frontpanel
Main unit
B
A
1 3 5 7
2 4 6 8
5 7
4 8
TAL K
CONNECTEUR
ANTENNE
G (BLANC)
D (ROUGE)
SORTIE PRÉAMPLI
CONNECTEUR ISO
ANTENNE DE BLUETOOTH
COMMUNIQUEZ AU
MICROPHONE EXTERNE

FR-5
INSTRUCTIONS D’UTILISATION
1. MARCHE/ARRÊT ( )
Appuyezsurceboutonpourallumerouéteindrel’appareil.
L’appareilpeutaussiêtrealluméenappuyantsurn’importequelbouton.
2. SÉLECTIONNER
3. VOLUME PLUS/MOINS
VouspouveztournerleboutonVOLversladroiteouverslagauche(3)pourréglerVOL/GRAVES/AIGUS/BAL/ATT.Pour
changerentrelesmodesderéglageduson,appuyezsurleboutonVOLjusqu’àcequelemodedésirésoitafchésur
l’écran.Figure1indiquecommentfairepourchangerentrelesmodesderéglagedusonavecleboutonVOL.
1 3
24
25
26
2 2
Fig.1Sélectiondumodederéglageduson
1. VOL 2. SEL 3. BAS 4. AIG 5. BAL 6. ATT
TournezleboutonVOLversladroiteouverslagauche.Augmentezoubaissezlevolumeentournant
VOLVOL
ou
VOLVOL
.
CesboutonspeuventêtreutiliséspourréglerlesGRAVES,AIGUS,BALANCEetATTÉNUATEUR.
IN VOL
SEL
2 sec.
SEL ADJ SEL TA VOL SEL EON SEL DSP
MaintenezlatoucheVOLenfoncéependantenviron2secondes,puisappuyezsurlatoucheplusieursfoispourafcher
lesparamètressuivants:INITVOL/CT/TAVOL/EONON/DSP
IN VOL: TournezlatoucheVOLpourdénirlevolumeauquell’autoradios’allumera.
ADJ:
TournezleboutonVOLdanslesensdel’aiguilled’unemontrepourréglerlesheures“versladroite”,etpour
réglerlesminutesensensinversedel’aiguilled’unemontrec’estàdire“verslagauche”.
TA VOL:
TournezleboutonVOLpourdénirlevolumeauquellesinformationssurl’étatdutracroutiers’allumera.
EON: TournezleboutonVOLpouractiverlafonctionEON(EONON)oudésactivez-le(EONOFF).
DSP: TournezlleboutonVOLpoursélectionnerl’undesparamètres:CLASSIC,ROCK,POP,FLAT.
4. CANAUX PROGRAMMABLES (1, 2, 3, 4, 5, 6)
Appuyezunefoissurcesboutonspoursélectionnerlastationdontlafréquenceaétéenregistréesurlecanal.Appuyez
pendantplusd’unesecondepourenregistrerlafréquencedelastationactuellementsélectionnéesuruncanal.
UTILISATION DE LA FONCTION RDS
Qu’est-ce que RDS?
Lesystème RDS (Système de Radiocommunication de données) est un système de radiocommunication de données
numériquesmisaupointparEBU(l’UnionEuropéennedeDiffusion).UtiliséenparallèlesurlesfréquencesFMnormales,
RDSoffreunemultitudedeservicesd’informationetdefonctionsdereréglageautomatiquepourlesstéréosdevoiture
compatibleavecRDS.
5. Fonction ‘AF/REG’ (FREQUENCES ALTERNATIVES)
Lorsquevousappuyezunefoissurcebouton,lemodedesélectionAF/REGestactivé.
LorsquelemodedesélectionAF/REGaétéactivé,laradiovérielapuissancedusignalduAFtoutletemps.Lorsque
vousappuyezdessuspendantplusieurssecondes,lemoderégionalestactivéoudésactivéON/OFF.
- Mode régional ON:
ChangementAFouRECHERCHEPIestutilisépourlastationavectouslesmêmescodesPIquelastationactuellement
sélectionnée.L’icôneREGs’allumesurl’écranLCD.
- Mode régional OFF:
LecoderégionalauformatducodePIestignorélorsquechangementAFouRECHERCHEPIestactivé.
6. Fonction ‘TA’ (INFORMATION DE TRAFFIC)
Appuyezrapidementdessuspouractiveroudésactiver(ON/OFF)lemodeTA.
LorsquelemodeTAestactivéetquedesinformationsdetracsontdiffusées:
-Lorsquel’appareilestenmodeCD/MP3,ilbasculetemporairementaumoderadio.
-Silevolumeesten-dessousdupointlimite,ilseraautomatiquementaugmentéaupointlimite.
-Lorsqu’unestationTPestentraind’êtrereçue,l’icôneTPs’allumesurl’écranLCD.
7. Fonction ‘PTY’ (TYPE DE PROGRAMME)
• PouractiverlarecherchePTY,appuyezsurlatouchePTY.L’indicationPTYs’afchesurl’écran.
Lorsdelarecherchedestations,seulessontprisesencomptelesstationsducodePTYactuellementsélectionné(voir
le tableau des types de PTY).
• PourdésactiverlarecherchePTY,appuyezànouveausurlatouchePTY.
Réglage des codes PTY
• MaintenezlatouchePTYenfoncéeettournezensuitelerégulateurmultiple,pourdénirlesdifférentscodesPTY.
Rechercher la station selon le code PTY
• Siaucoursdel’afchaged’uncodePTY,vousappuyezbrièvementsurlatouchePTYousurlestouches
VOLVOL
/
VOLVOL
,unerecherchedémarreimmédiatementpourtrouverdesstationsquicorrespondentàcecodePTY.
Codes PTY
NEWS--AFFAIRS--INFO--SPORT--EDUCATE--DRAMA--CULTURE--SCIENCE--VARIED--POP--ROCK--EASYM--LIGHT
M--CLASSIC--OTHERM--WEATHER--FINANCE--CHILDREN--SOCIAL--RELIGION--PHONEIN--TRAVEL--LEISURE-
-JAZZ--COUNTRY--NATION.M--OLDIES--FOLKM--DOCUMENT--TEST--ALARM.
1. POWER ON/OFF ( )
Bypressingthiskey,theunitisonoroff.
Thisunitisturnedonbypressinganykey.
2. FUNCTION SELECT BUTTON: BASS/TREBLE/BALANCE/FADER /
INITIAL VOLUME / CT / TA VOL / EON / DSP)
3. VOLUME UP/DOWN
TurningVOLknob(right/left)toadjustVOL/BAS/TRE/BAL/FAD.Toselectotherfunctions,press
theVOLknobshortlyuntilthedesiredfunctionsareshownonthedisplay.Figure1showshow
tocontrolfunctionsthatareselectedusingtheVOLknob.
1 3
24
25
26
2 2
Fig.1Selectionofsoundcontrolfunctions
1. VOL 2. SEL 3. BASS 4. TRE 5. BAL 6. FAD
IncreaseordecreasethevolumebyturningVOLknob(right/left).Thesebuttonscanbeused
toadjusttheBASS,TREBLE,BALANCEandFADER.
IN VOL
SEL
2 sec.
SEL ADJ SEL TA VOL SEL EON SEL DSP
PressandholdVOLknobtoadjustINITVOL/CT/TAVOL/EONON/DSP
IN VOL: CanadjustInitialVolumelevelusingthismode.
ADJ: Canadjustclocktime.TurnVOLknobclockwisetosethoursandcounterclockwiseto
setminutes.
TA VOL: CanadjustTAVolume(ThevolumelevelwhenTrafcannouncementistransmitted).
EON: CanselectedEONcondition,ONorOFF.
DSP: CanselectDSPmode(Classic,POP,Rock,Flat)
4. PRESET STATIONS (1,2,3,4,5,6)
Whenpressedmomentarily,thesekeysselectapresetstationdirectly.Whenpressedlonger
than1sec.,currentstationisstoredinpresetmemorybank.
USING THE RDS FUNCTION
What is RDS?
TheRDS(RadioDataSystem)isadigitalinformationsystemdevelopedbytheEBU(European
BroadcastUnion).Piggy-backedonnormalFMbroadcasts,RDSoffersavarietyofinformation
servicesandautomaticretuningfunctionsforRDS-compatiblecarstereos.
In1988,RDSbecameavailableintheUnitedKingdom,France,WestGermany,IrelandandSweden.
TesttransmissionsarebeingconductedinmanyotherEuropeancountries.ItisexpectedthatRDS
willbeavailableinmostwesternEuropeancountriesinthenearfuture.
5. ‘AF/REG’ function (ALTERNATIVE FREQUENCIES)
Whenpressedmomentarily,AF/REGswitchingmodeisselected.
WhenAF/REGswitchingmodeisselected,theradiochecksthesignalstrengthoftheAFall
thetime.Whenpressedlong,itisactivatedasregionalmodeON/OFF.
– Regional mode ON:
AFswitchingorPISEEKisimplementedtothestationwhichhaveallPIcodessameascurrent
station.REGsegmentisturnedon,inLCDdisplay.
– Regional mode OFF
TheregionalcodeintheformatofPIcodeisignoredwhenAFswitchingorPISEEKisimple-
mented.
6. ‘TA’ function (TRAFFIC ANNOUNCEMENT)
Whenpressedmomentarily,itisactivatedasTAmodeonoroff
WhenTAmodeisonandtrafcannouncementistransmitted
–WhentheunitinCD/MP3mode,itwillswitchtoradiomodetemporarily.
–Ifthevolumelevelwasunderthethresholdpoint,itwillberaisedtothethresholdpoint.
–WhenTPstationisreceived,TPsegmentisturnedoninLCDdisplay.
7. ‘PTY’ function (PROGRAM TYPE)
Whenpressedmomentarily,itisactivatedasTPYON/OFFfunctionandstarttosearchcor-
respondingPTYinformationthenstopsifthecorrespondingPTYinformationisdetected.
Bypressingthiskeylongerthan2sec.,youcanselectPTYmodebyturningVolumeknobas
below.
NEWS--AFFAIRS--INFO--SPORT--EDUCATE--DRAMA--CULTURE--SCIENCE--VARIED-
-POP--ROCK--EASY M--LIGHT M--CLASSIC--OTHER M--WEATHER--FINANCE--CHIL-
DREN--SOCIAL--RELIGION--PHONE IN--TRAVEL--LEISURE--JAZZ--COUNTRY--NATION.
M--OLDIES--FOLKM--DOCUMENT--TEST--ALARM.

FR-6
8. AFFICHAGE (DISP)
AppuyezsurleboutonDISPpourchangerlesinformationsafchéessurl’écran,commelesfréquencesradio,l’horloge,
lespistesetlesautresinformationsdépendantesdumodedelecture.
9. BOUTON MODE / LOUDNESS (LD/MOD)
L’utilisateurpeutappuyersurceboutonpourchoisir:modeAUX/TUNER/CD-MP3/USB/MMC/SDouAD2P.
Remarque: Les modes USB et MMC/SD ne marcheront que si USB ou une carte est insérée dans la fente.
LOUDNESS: enappuyantsurcettetoucheplusdedeuxsecondes,vouspourrezsélectionnerlemodeLOUDNESS.
10. BOUTON BANDE (BD)
Vouspouvezchangerentrechaquebandeenappuyantsurcebouton:FM1--FM2--FM3--MW(AM)1--MW(AM)2.
11. BALAYAGE AUTOMATIQUE OU MANUEL (FRÉQ HAUT OU FRÉQ BAS)
(A) MODE RADIO:
AppuyezunefoissurcesboutonspourlesutilisercommedesboutonsderéglageRECHERCHE.
Appuyezpendantplusd’unesecondesurcesboutonspourlesutilisercommedesboutonsdeMANUEL.
(B) MODE LECTEUR CD/MP3/WMA:
AppuyezunefoissurcesboutonspourlesutilisercommedesboutonsPISTESUIVANTEetPISTEPRÉCÉDENTE.
Appuyezpendantplusd’unesecondesurcesboutonspourlesutilisercommedesboutonsCUEouREVIEW.
12. RECHERCHE BALAYAGE AUTO (A/PS)
Appuyezunefoispourchercherchaquestationprogrammée.
Lorsquelapuissancedusignalestau-dessusd’unpointlimited’arrêt,laradios’arrêtesurcettefréquencependant5
secondesavecmuetengagé,puiscontinuelarecherche.
Lorsquevousappuyezpendantplusd’uneseconde,alorsles6stationsaveclameilleureréceptioncorrespondante
serontprogramméessurlescanauxprogrammables.
LorsquelafonctionASestterminée,laradioexécutelebalayageprogrammé.
13. COMMANDE DE BALAYAGE AUTOMATIQUE (SCAN)
CeboutonfonctionnecommeBALAYAGERADIO.Cetteopérationestsimilaireàlarecherchenormale,maisladifférence
estunarrêtde5secondessurchaquestationdétectéeenmodeBALAYAGERADIO.
14. BOUTON DE DÉBRANCHEMENT ( )
Appuyersurcebouton:lesondisparaît;appuyerdenouveaupourlerétablir.
15. EQUALIZER (DSP)
AppuyezsurlatoucheDSPpoursélectionnerunchoixparmileséqualiseurssuivants:Class–Rock–POP–Flat.
16. ÉCRAN LCD
L’afchageàcristauxliquidesindiquel’étatdel’appareil.
17. BOUTON OUVRIR PANNEAU AVANT
Appuyezsurlebouton pourouvrirlepanneauavant.
EMPLACEMENT DES BOUTONS DE COMMANDE DU CD/MP3/WMA
BOUTON PISTE/RECHERCHE (11)
RECHERCHEDEPISTEAVANTETARRIÈRE(oupourchangerleschansons)
AppuyezsurleboutonSAUTER( ou )pendantlalecturepouralleràlapiste(chanson)désirée.
....ARRIÈRE ...AVANT
AppuyezsurleboutonSAUTER( ou )pendantlalecturepourvousdéplacerrapidementsurledisque.Lorsque
vousatteignezlasectiondésirée,arrêtezd’appuyersurlebouton.Lalecturenormalecontinue.
18. COMPARTIMENT CD
19. BOUTON ÉJECTER CD
Appuyezsurlebouton( )pouréjecterleCD.
20. BOUTON PAUSE
PendantuneLECTURE,appuyezsurleboutonPAU(20)pourfaireunePAUSE.Appuyezunefoisdepluspourcontinuer
lalecture.
21. BOUTON RÉPÉTER
Lorsquevousappuyezsurcebouton,l’indicateur‘RPTON’s’afchesurl’écran;l’appareilrépètelapistesélectionnée
indénimentjusqu’àcequevousannuliezlemodederépétitionenappuyantunedeuxièmefoissurleboutonRPT.
22. BOUTON INTRO (joue le début de toutes les pistes)
Lorsquevousappuyezsurcebouton,l’indicateur‘INTON’s’afchesurl’écran;l’appareiljouealorslesquelquespre-
mièressecondesdechaquepistesurleCD.Appuyezunefoisdeplussurceboutonpourarrêteretcontinuerlalecture
de la piste.
23. BOUTON ALÉATOIRE
Lorsquevousappuyezsurcebouton,l’indicateur‘RDMON’s’afchesurl’écran;l’appareiljouealorslespistesdu
CDdansunordrealéatoireplutôtquedansl’ordredespistesduCD.PourquitterlemodeALÉATOIRE,appuyezune
deuxièmefoissurleboutonRDM.

FR-7
24, 25. DOSSIER PRECEDENT/SUIVANT (dans le cas de chiers MP3/WMA)
Touche de station 5/répertoire précédent / Touche de station 6/répertoire suivant
Comment sélectionner un chier MP3/WMA
1. RECHERCHER PAR TITRES:
• AppuyersurlatoucheA/PSlafonctionestactivée.
• TournerleboutonVOLducôtédroitouducôtégaucheetsélectionnerlepremierchiffresouhaité.
• TournerleboutonVOLle1erchiffreestxéetlesecondclignote.
• TournerleboutonVOLetsélectionnerlesecond,etletroisièmerespectivement.
• AppuyersurBD/ENTetletitresélectionnédémarreimmédiatement.
2. RECHERCHER PAR CARACTÈRES:
• Appuyerune2emefoissurA/PSlafonctionestactivée.
• TournerleboutonVOL(verslagaucheouversladroite)etsélectionnerlalettresouhaitée.
• AppuyerleboutonVOLetrépéterlesétapespourunsecondetuntroisièmecaractère.
• Lestitrescommençantsparlemêmecaractèresontafchés.
• TournerleboutonVOLandesélectionnerletitresouhaité.
• AppuyersurBD/ENTdémarrerlalecture.
3. RECHERCHER PAR NOM DE FICHIER:
• Appuyerune3emefoisA/PS,ensuitelarechercheparchierestactivée.
• TournerleboutonVOLcelavouspermetdesélectionnerlechiersouhaité.
• AppuyersurlatoucheBD/ENTpourconrmerlasélectionetlalecturedupremiertitreduchierdémarre.
Connexion à un lecteur MP3 portable
26. Port USB
UtilisezuncâbleUSBpourconnecterunlecteurMP3portable.
* USB ne sont pas tous les types de lecteurs MP3 sont pris en charge
27. FENTE POUR CARTE MULTIMÉDIA (MMC) / SD
SupportelamusiqueauformatMP3/WMAID3seulement.
* INFORMATIONS IMPORTANTES:
SUITE AU NOMBRE IMPRESSIONNANT D’APPAREILS AVEC DES PORTS USB OU DES CARTES SD/MMC, ET LES
CARACTÉRISTIQUES SPÉCIFIQUES DE CHAQUE FABRIQUANT, NOUS NE POUVONS PAS GARANTIR QUE TOUS
LES APPAREILS FONCTIONNERONT CORRECTEMENT AVEC CET APPAREIL, BIEN QU’EN THÉORIE ILS DEVRAIENT
TOUS FONCTIONNER NORMALEMENT.
28. ENTRÉE AUX FRONTALE
PriseENTRÉEAUXfrontale,facileàutiliser,pourconnecterdesappareilsmultimédiaportablesetdeslecteursMP3.
COMMENT FAIRE POUR UTILISER BLUETOOTH AVEC VOTRE AUDIO DE VOITURE
Branchement du téléphone sur l’autoradio
• Survotretéléphoneportable,effectuezunerecherchesurlesappareilsBluetooth.
• Silarechercheaabouti,l’entréeCAR--BTs’afchesurl’écrandutéléphoneportable.
• Sélectionnezcetteentréeenvued’uneconnexionetlorsdelademandedemotdepassequiyfaitsuite,composerles
chiffres“ 0000 “pourl’autoradio.Vousdevrezéventuellementencoreunefoisconrmerl’établissementdelaconnexion.
Lorsquelebranchementaréussi,CONNECTs’afchebrièvementsurl’écrandel’autoradioetladiodevertesurl’unité
microphones’allume.
Comme appeler / recevoir des appels en utilisant une télécommande à l
• Quandilyaunappelenentrée,presserlatoucheTALKunefoispourrépondre.
• Pendantlaconversation,presserlatoucheTALKunefoispournirl’appel.
• Pourfairedesappelsquiutilisentlachronologied’appel
1.PresserettenirpressélatoucheTALKpourmontrerlachronologiede“REDIAL.”
2.PresserleboutondeVOLsurl’autoradio,puistournerplusieursfoispoursélectionnerle
numérodetéléphoneàappeleretpresser“”pourappeler.
Note: Jusqu’à les 20 numéros de téléphones seront montrés, incluant les appels précédents
en sortie et en entrée.
Comme appeler / recevoir des appels en utilisant une télécommande sans ls
• Pourfaireappels,presserlatouche“ ”surlatélécommandesuivieparlenumérode
téléphoneenutilisantlestouchesnumériques.
•
Aprèsavoirtapélenumérodetéléphonepresser
“ ”
pourfairepartirl’appeldenouveau.
• Pendantlaconversation,presser“ ”pourterminerl’appel.
• Quandilyaunappelenentrée,presser“ ”pourlarecevoir.
• Presser“ ”pourrefuserl’appel.
Comme appeler / recevoir appels en utilisant le panneau frontal
• Fairedesappelsenutilisantlachronologie
1.Presserettenirpressélatouche“ ”pourmontrerlachronologie“REDIAL.”
2.PresserlatoucheVOLsurl’autoradio,tournerplusieursfoispoursélectionnerlenumérodetéléphonequivoulez
appeleretpuispresser“ ”pourfairepartirl’appel.
• Pendantlaconversation,presser“ ”pourterminerl’appel.
TOUCHE TALK
MICROPHONE

FR-8
• Quandilyaunappelenentrée,presser“ ”pourlarecevoir.
• Presser“ ” pourrefuserl’appel.
Audio Streaming
1. Sivotretéléphoneestcompatibleavecleformat“A2DP”,vouspouvezreproduiredelamusiquesurvotretéléphoneet
latransféreràl’autoradio.
2. S’assurerquevotretéléphoneetl’autoradiosoientaccouplésetconnectés.
3. Reproduirelamusiquesurvotretéléphoneselonsesmodalitésd’usage.
4. L’autoradiomontrera“A2DP”automatiquements’ilreçoitdelamusiqueA2DP,maispourquelquestéléphonesvous
devrezpresserlatouche LD/MODpourchangeràlamodalitéA2DP.
5. Vouspouvezpresser ou surl’autoradiopourtrouverlespiècesprécédentesousuivantes.
RÉINITIALISATION
Leboutonderéinitialisationestsurleboîtier.
Leboutonderéinitialisationpeutêtreutilisédanslescassuivants:
• Aprèslapremièreinstallationdel’appareil,unefoisquetouslescâblesontétébranchés.
• Lorsquelesboutonsnemarchentpluscorrectement.
• Sidessymbolesbizarress’afchentsurl’écran.
CARACTÉRISTIQUES TECHNIQUES
SECTION LECTEUR CD/MP3/WMA
Rapportsignalsurbruit >60dB
Séparationdescanaux >50dB(1kHz)
Réponseenfréquence 20Hz-20kHz
TUNER (FM)
Gammedefréquences 87,5-108MHz
Tailledepas 50kHz
Fréquenceintermédiaire 150KHZ
Sensibilité 2,8 µV
Séparationstéréo 37dB
Rapportsignalsurbruit >50dB
TUNER MW(AM)
Plagedefréquences 522-1620KHz
Fréquenceintermédiaire 25KHz
Sensibilité 32 dB
SORTIE LIGNE
Sortie 1,5V(maximum)
Impédance 10kOhm
GÉNÉRALITÉS
Alimentationélectrique 12Vc.c.(10,8-15,6Vacceptable)
Impédanceduhaut-parleur 4ou8Ohms
Puissancedesortie 50Wx4CH
Fusible 10A
Remarque :Caractéristiquesetspécicationssujettesàmodicationsanspréavis.
Recyclant
Onnedoitpasjeterceproduitaveclesorduresménagères,àlandesoncycledevieutile:ondoitledéposerà
uncentredecollectepourlerecyclaged’appareilsélectriquesetélectroniques.Lesymboleapposésurleproduit,le
moded’emploi,oul’emballage,contientlesinformationsnécessairesconcernantlesméthodesd’élimination.
Lematérielestrecyclabledelafaçonpréciséesurlesprésentsmarquages.Enrecyclantetenadoptant
d’autresformesderéutilisationd’appareilsusés,vouscontribuezdefaçonimportanteàlaprotectiondenotre
environnement.
Vousêtespriédevousrenseignerauprèsdevotreadministrationmunicipalesurlescentresd’éliminationautorisés.
RESET

MT2300BT
BD/ENT
1 PAU 2 RPT 3 INT 4 RDM 5 6
LD/MOD
D
I
S
P
S
C
A
N
A
F
P
T
Y
A/PS
TA
1631 105 7 11 17 27162 3
12 8 9 13 20 21 22 23 24 25 26281430
(1-6)
4
19 18
BD/ENT
1 PAU 2 RPT 3 INT 4 RDM 5 6
LD/MOD
D
I
S
P
S
C
A
N
A
F
P
T
Y
A/PS
TA
1
9
331 30
11
20
21
22
23
24 25
10
7
5
615
4 (1,2,3,4,5,6)
29 (1,2...,9,0 *,#)
2
BEDIENUNGSANLEITUNG Deutsch

DE-2
LAGE DER BEDIENUNGSELEMENTE
1. NETZTASTE EIN/AUS ( )
2. WAHL-FUNKTION TASTE: KONTROLLE FÜR BÄSSE/HÖHEN/
BALANCE/FADER / INITIAL VOLUME / CT / TA VOL / EON / DSP
3. LAUTSTÄRKEREGELUNG: KONTROLLE FÜR BÄSSE / HÖHEN
/BALANCE/FADER / INITIAL VOLUME / CT / TA VOL / EON / DSP
4. VORWAHLTASTEN (1,2,3,4,5,6)
5. ‘AF’ Funktion (ALTERNATIVE FREQUENZEN)
6. ‘TA’ Funktion (VERKEHRSDURCHSAGE)
7. ‘PTY’ Funktion (PROGRAMMTYP)
8. DISPLAY TASTE (DISP)
9. MODE/LOUDNESS TASTE (LD/MOD)
10. BAND/ENTER TASTE (BD/ENT)
11. AUTOMATISCHE ODER MANUELLE ABSTIMMEN
(FREQ AUF ODER FREQ AB )
CD SPRUNG/SUCH TASTEN
12. AUTO SEEK SEARCH ABSTIMMEN (A/PS)
13. ‘SCAN’ AUTOMATISCHE ABSTIMMEN / AUFNAHME (SCAN)
14. MUTE TASTE ( )
15. EQUALIZER (DSP)
16. LCD DISPLAY
17. FRONTPANEEL ENTRIEGELUNGSTASTE ( )
18. CD EINGANG
19. CD AUSWURFTASTE ( )
20. PAUSE TASTE
21. REPEAT TASTE (Wiederholen)
22. INTRO TASTE
23. RANDOM BUTTON (Willkürrlich)
24, 25. FOLDER ZURÜCK/NÄCHSTER (nur MP3/WMA Files)
26. USB PORT
27. MULTI-MEDIA CARD (MMC) / SD CARD EIN
28. FRONT AUX IN
29. TELEFONNUMMER
30. EINEM RUF ANTWORTEN ( )
31. EINEN RUF BEENDEN ( )
BD/ENT
1 PAU 2 RPT 3 INT 4 RDM 5 6
LD/MOD
D
I
S
P
S
C
A
N
A
F
P
T
Y
A/PS
TA
1631 105 7 11 17 27162 3
12 8 9 13 20 21 22 23 24 25 26281430
(1-6)
4
19 18
BD/ENT
1 PAU 2 RPT 3 INT 4 RDM 5 6
LD/MOD
D
I
S
P
S
C
A
N
A
F
P
T
Y
A/PS
TA
1
9
331 30
11
20
21
22
23
24 25
10
7
5
615
4 (1,2,3,4,5,6)
29 (1,2...,9,0 *,#)
2
BD/ENT
1 PAU 2 RPT 3 INT 4 RDM 5 6
LD/MOD
D
I
S
P
S
C
A
N
A
F
P
T
Y
A/PS
TA
1631 105 7 11 17 27162 3
12 8 9 13 20 21 22 23 24 25 26281430
(1-6)
4
19 18
BD/ENT
1 PAU 2 RPT 3 INT 4 RDM 5 6
LD/MOD
D
I
S
P
S
C
A
N
A
F
P
T
Y
A/PS
TA
1
9
331 30
11
20
21
22
23
24 25
10
7
5
615
4 (1,2,3,4,5,6)
29 (1,2...,9,0 *,#)
2

DE-3
10
7
1
2
3
4
4
4
5
5
6
6
8
9
Armaturenbrett
2182mm
53mm
34
TAP
1
2
13
Wenn notwendig,
biegen Sie diese Haken.
Schraube und Winkeleisen
losschrauben
INSTALLATION
VORSICHTSMASSNAHMEN
• Wählen Sie sorgfältig, wo Sie Ihr Autoradio einbauen möchten, damit das Gerät nicht die normale Fahrtätigkeit
des Fahrers beeinußt.
• Vermeiden Sie das Gerät dort zu installieren, wo es hohen Temperaturen, wie dem direkten Sonnenlicht
oder Heißluft vom Heizer, oder wo es Staub, Schmutz oder übermäßigen Schwingungen ausgesetzt werden
könnte.
• Verwenden Sie nur das mitgelieferte Montagematerial, um eine sichere Installation zu garantieren.
• Bevor Sie das Gerät installieren, entfernen Sie das Frontbedienteil.
Regulierung des Montagewinkels
Der Montagewinkel muß kleiner als 20° sein.
Montagebeispiel
Einbau ins Armaturenbrett
Hinweis: Bewahren Sie den Entriegelungsschlüssel an einem sicheren Ort auf, Sie könnten Ihn später zum
Entfernen des Gerätes aus dem Auto gebrauchen.
GERÄTEBEFESTIGUNG
Abnehmen und Anbringen der Frontabdeckung
Das Frontteil dieses Geräts kann abgenommen werden und dient als Diebstahlsicherung.
DIE FRONTABDECKUNG ABKLAPPEN, ABNEHMEN UND ANBRINGEN
Drücken Sie zuerst die Taste (1) in die Stellung OFF, bevor Sie die Frontabdeckung abnehmen.
Drücken Sie dann die Taste (17), halten Sie die Frontabdeckung horizontal und ziehen Sie die Abdeckung,
wie abgebildet, in Ihre Richtung.
2
1
< 10°
1. GERÄT
2. ABNEHMBARES GEHÄUSE
3. ARMATURENBRETT
4. SECHSKANTSCHRAUBE
5. SICHERUNGSSCHEIBE
6. BEILAGSCHEIBE
7. FAHRZEUGKAROSSERIE
8. HINTERER HALTESTREIFEN
9. BLECHSCHRAUBE
10. M 5 x 15
SECHSKANTSCHRAUBE

DE-4
B
A
1 3 5 7
2 4 6 8
5 7
4 8
TAL K
Antennen-
anschluss Weiß
(links) Rot
(rechts)
Ausgangsbuchse
ISO-ANSCHLUSS
BLUETOOTH ANTENNE
ANSCHLUSS
EXTERNES MIKROFON
Hinweise:
• Drücken Sie die Frontabdeckung nicht mit Gewalt gegen das Gerät. Die Abdeckung kann einfach angebracht
werden, indem Sie leicht gegen das Gerät drücken.
• Wenn Sie die Frontabdeckung mit sich nehmen, bewahren Sie sie bitte in der mitgelieferten Hülle.
• Drücken Sie nicht fest oder mit Gewalt gegen das Anzeigefenster der Frontabdeckung, während sie diese am
Gerät anbringen.
KONTAKTE REINIGEN
Es kann zu Fehlfunktionen kommen, wenn die Kontakte von Gerät
und/oder Frontblende verschmutzt sind. Nehmen Sie zum Reinigen
der Kontakte bitte gelegentlich die Frontblende mit Tastendruck
auf ab.
Benutzen Sie zur Reinigung der Kontakte ein Wattestäbchen,
bei starker Verschmutzung können Sie etwas Reinigungsalkohol
benutzen. Bitte achten Sie darauf, dass Sie die Kontakte nicht
beschädigen.
ISO-ANSCHLUSSTEIL
RCA-Buchse Ausgangsleitung:
Rot (rechts) Weiß (links)
ANSCHLUSSTEIL A
4. SPEICHER +12V
5. AUTOANTENNENAUSGANG
7. +12V (AN DEN ZÜNDSCHLÜSSEL)
8. ERDUNG
Hinweis: (Anschlußteil A Nr.7) muß an die Autozündung
angeschlossen werden, um zu vermeiden, daß die Auto-
batterie entladen wird, wenn das Auto längere Zeit nicht
benutzt wird.
ANSCHLUSSTEIL B
1. HINTERER RECHTER LAUTSPRECHER (+)
2. HINTERER RECHTER LAUTSPRECHER (-)
3. VORDERER RECHTER LAUTSPRECHER (+)
4. VORDERER RECHTER LAUTSPRECHER (-)
5. VORDERER LINKER LAUTSPRECHER (+)
6. VORDERER LINKER LAUTSPRECHER (-)
7. HINTERER LINKER LAUTSPRECHER (+)
8. HINTERER LINKER LAUTSPRECHER (-)
Wartung
ERSETZEN DER SICHERUNG
Wenn die Sicherung durchgebrannt ist, überprüfen Sie den Netzanschluß und ersetzen Sie die Sicher-
ung. Wenn die Sicherung nach dem Ersetzen erneut durchbrennt, könnte ein internes Funktionsproblem
vorliegen. In diesem Falle wenden Sie sich an Ihr nächstes Kundendienstzentrum.
Achtung
Verwenden Sie für jedes Kabel die vorgeschriebene Amperestärke. Wenn Sie eine Sicherung mit höherer
Amperestärke verwenden, könnte das ernsthafte Schäden verursachen.
Wattestäbchen
Rückseite
frontblende
Gerät
Table of contents
Languages:
Other Mutant Car Receiver manuals