Rosen ZE0800D User manual

8.5” TFT LCD Monitor with DVD Player
ZE0800D
User manual
Please read it carefully before you operate this player

Welcome
Thank you for buying the Roof Mount LCD Monitor with DVD player.
Please read this manual carefully before using the Roof Mount LCD
Monitor with DVD player in order to get the most out of all the features and
functions. Keep this manual in a safe place, as it can be a valuable tool in
helping you to understand all the features and functions.
Contents
Safety information.........................................................................1
DVD player features .....................................................................3
Setting up your DVD player ..........................................................7
Using your DVD player .................................................................10
Troubleshooting ............................................................................13
Specification..................................................................................14
Maintaining ...................................................................................15
Operation flow………………………………………………………….16
Safety information
Do not operate the unit in any way other than described within this
manual. Failure to follow the instructions within the manual will
invalidate your warranty.
SAFETY FIRST! Do not install the display where it may (i) obstruct the
driver’s vision, (ii) impair the performance of any of the vehicle’s
operating systems or safety features, including airbags, or (iii) impair the
driver’s ability to safely operate the vehicle.
When using the system, make sure you are firmly secured by your seat
belt to ensure you do not accidentally hit your head on the screen during
sudden braking or other incidents. If you are ever in an accident, injuries
can be more severe if the seat belt is not properly buckled.
Do not attempt to install or service your display by yourself. Installation
1

or servicing of the display by persons without training and experience in
electronic equipment and automotive accessories may be dangerous
and could expose you to the risk of electric shock or other hazards.
Be careful not to drain the car battery while using the unit with the car
engine stopped. To avoid draining the battery, it is suggested that the
vehicle engine always is running while using the unit.
Do not disassemble or alter the unit in any way. Failure to do so can
cause damage to the unit and invalid the warranty.
Never clean the surface of the screen with chemical solvent or corrosive
detergent, which may cause permanent damage to the TFT LCD
screen.
Avoid installing the unit wherever is under direct sunlight or near hot air
vent. Please note that the normal working temperature of the unit is
between -5℃to +50℃. If the internal temperature of the vehicle is
extremely high, a short cooling down period is necessary before
operating the unit.
WIf the temperature inside the car is very low and the monitor is
used soon after switching on the heater, moisture may form on
the panel of the unit. Turn off the unit immediately! Failure to do
so may cause the internal components to short. Allow the unit to
rest for about one hour to allow the condensation to disappear
before continue operation.
In extremely cold temperatures, the movement of the picture may be
slow and the picture may be dark. It is not a malfunction. The unit will
work normally once it reaches its operating temperature.
Do not drop or hit the LCD panel with a hard object, as it may cause
permanent damage to the LCD panel. Should LCD panel break, avoid
touching glass and fluid. If do, please clean it with plenty of water and
ask for medical attention immediately.
Due to different car specifications, please kindly ensue that the display
monitor is properly located and not obstructing the air-conditioning vent.
Avoid inserting any foreign objects into the slot of the disc Player.
Failure to observe this may cause malfunction due to the precise
mechanism of this unit.
Protect your disc. When you leave the car, be sure to eject the disc from
this unit and store it separately away from direct sun light.
Heat and humidity may damage the disc and you may not be able to
play it again.
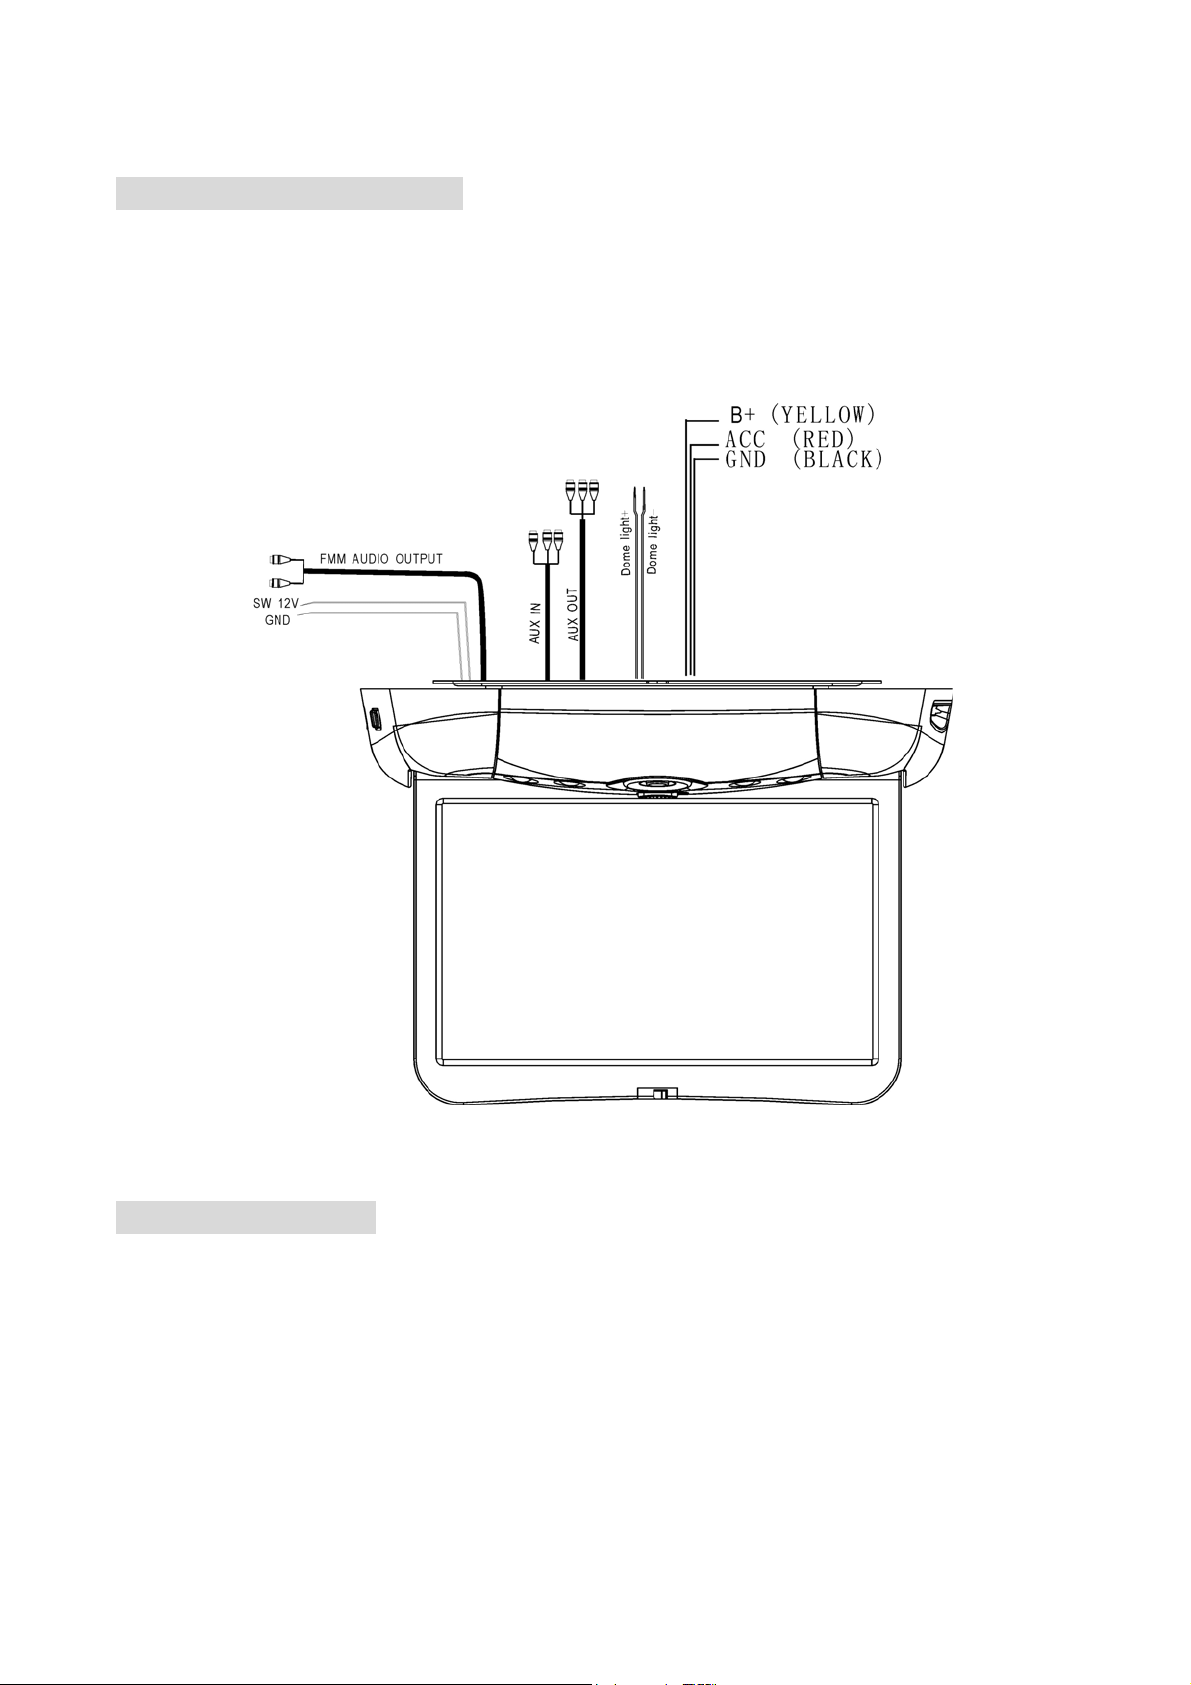
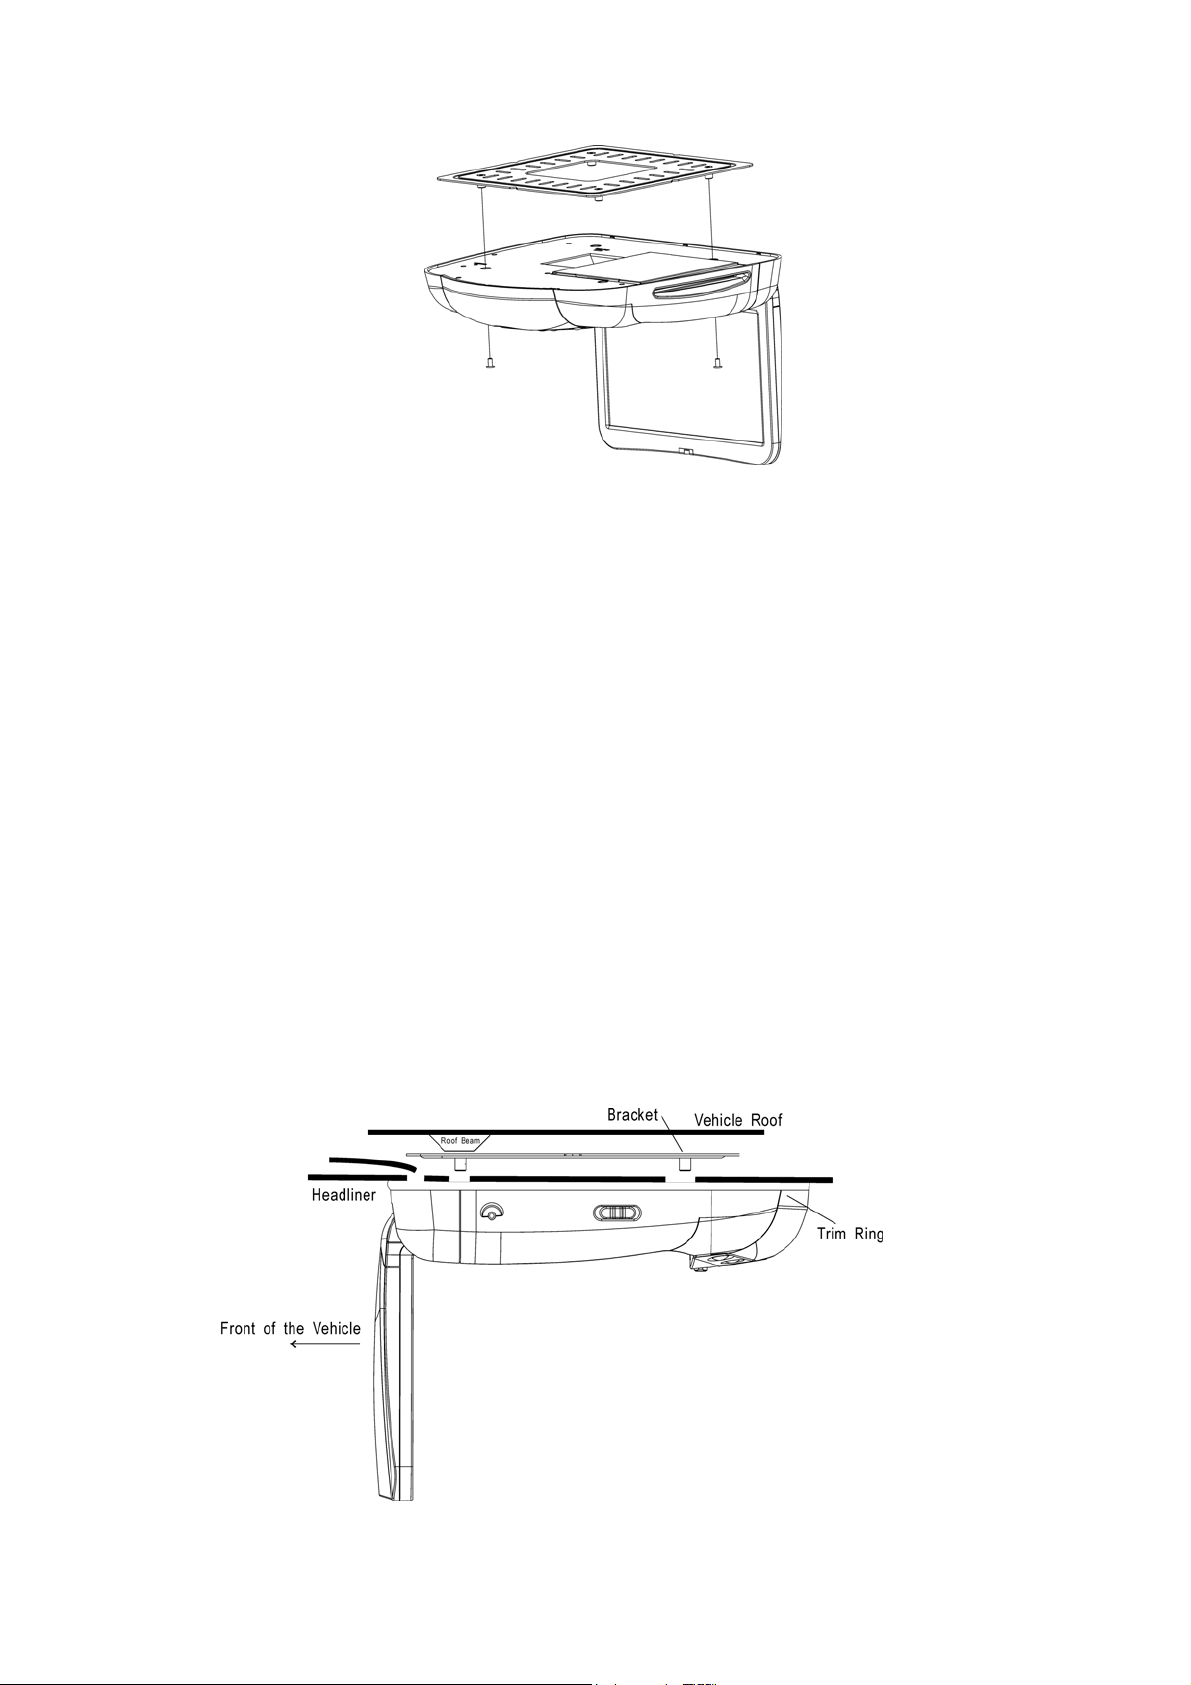
Use the supplied screws to fix the monitor Metal Mounting Plate.
2

FCC NOTICE: This device complies with part 15 of the FCC Rules. Operation is subject of the following
two conditions: (1) this device may not cause harmful interference, and(2) this device
must accept any interference received, including interference that may cause undesired
operation.
DOLBY: Manufactured under license from Dobly Laboratories. “Dolby” and the double-D symbol
are trademarks of Dobly laboratories.
DVD player features
This player is a Roof Mount 8.5" TFT-LCD Color Display with DVD player
that can be used as a stand-alone display, or can be integrated into a
mobile multimedia system. This player has the following features:
8.5" TFT-LCD color monitor (16:9)
Roof Mounting Application
Pixel (dots): 234RGB(W) x 480(H)
Wide Viewing angle (up/down/left/right): 45/55/65/65
NTSC and PAL Compatible
Adjustable Color/Contrast/Brightness/Tint
Manual Viewing Angle Adjustment
Yellow LED Dome Light
Automotive Startup Protection
Built-in IR Transmitter for IR Wireless Headphone
IR Remote Control
On Screen Display
1xAV Input
1xAV Output
Slot-in DVD mechanism
Capability to read: DVD Format
/DVD±R/DVD±RW/CD-DA/CD-RW/MP3
Audio output-FMT: The unit shall have a built in FM Transmitter and an
additional Line Audio Out for FMM, with switched12volt control line
FM Transmitter for listening the audio from your car audio system via
FM radio receiver (setting frequency: 88.1~107.9MHz)
Note: Multi-session CDs and 320kbps WMA files cannot be played on this
player.
3

DVD VIDEO FEATURES
This unit provides the following functions in addition to high image quality
and sound quality of DVD video:
Multi-sound Function
DVD audio can store up to 8 languages for one film. This allows for the
selection of language of ones preference.
Multi-angle Function
A DVD video that is filmed from multiple angle which allows you choosing to
view from different perspectives.
Subtitle Function
A DVD video can record subtitles for up to 32 languages to choose from.
4

DISC PLAYBACK
This DVD player can play the following formats.
About CD Extra discs
A CD Extra disc is a disc in which a total of two sessions have been
recorded. The first session is Audio session and the second session is the
Data session.
Your personally-created CDs with more than 2 data sessions recorded
cannot be played on this DVD Video Player.
MP3 Playback
This unit can play back CD-R/CD-RW discs on which MP3 music data have
been recorded.
Region Numbers
The DVD Video System assigns a region number to DVD video player and
DVD disk by Sales area. The DVD video region number is marked on the
disk Jacket as shown below.
Ex.
5

DISPLAY
1. Reset button: Press with a pencil or other narrow-tipped tool to rest the
player.
2. Dome Light: Provides an interior light for the vehicle.
3. : Press to eject the disc.
4. : Press to play or pause a disc.
5. : Press to move cursor left or skip the previous chapter on DVD or
track on CD;
6. ENTER: Press to confirm the items or settings.
7. ▲: Press to move cursor up; Press and hold it to fast reverse playback at 2x,
4x, 8x, 16x and 32x speeds.
8. IR window: Receives IR signals from the remote control and sends IR
signals to IR wireless headphone.
9. : Press to move cursor right or skip the next chapter on DVD or track
on CD;
10. ▼: Press to move cursor down; Press and hold it to fast forward playback
at 2x, 4x, 8x, 16x and 32x speeds
11. SOURCE: Press to switch DVD PLAYER, INTERNAL GAME and
EXTERNAL DVD.
12. :
6

In the FMT mode, press to turn on or off FM transmit
Hint: Please slide the switch of the player back to the FMT position.
In the FMM mode, press to switch audio output mode speaker or IR
headphone.
Hint: Please slide the switch of the player back to the FMM position.
13. Panel open button: Press to open the LCD panel.
14. LCD screen shut off switch: Press to turn off the LCD screen
15. AVX IN: Use to the extra audio or video input.
16. Dome Light switch: Move to the ON/OFF position, then press it to turn
the dome light on or off.
This function can be operational only when the green wire of the
dome light is connected to the door sensor.
The dome light will switch off after the car door is closed.
Setting up your DVD player
PACKAGE CONTENTS
Name of parts Quantity
Player 1
IR remote control with battery 1
AV cable 1
ST4.2x16 screw 6
CM 4x10 screw 4
Metal mounting plate 1
User’s manual 1
Rubber gasket 1
Use only the contents of this package to install and use the DVD
player. Use of any accessories not provided with this player may
7

result in damage to the player.
Installing your DVD player
Note: Do not attempt to install or service your player by yourself. Installation or
servicing of the player by persons without training and experience in electronic
equipment and automotive accessories may be dangerous and could expose
you to the risk of electric shock or other hazards.
Wiring and connections
To install the player
1. To prevent short circuits, remove the key from the ignition and disconnect the
terminal of battery.
2. Attach the metal mounting plate to the roof using the screws.
3. Connect input and output cables.
4. Connect the wire harness in the following order: ground wire, battery wire,
ACC wire and door wire.
5. Attach the DVD player to the metal mounting plate using the CM 4x10
screws.
8

6. Reconnect the terminal of the battery.
Cutting the headliner and mounting the bracket.
STEP1: LOCATE THE MOUNTING POSITION
Using masking tape or chalk, mark the side-to-side centerline of the headliner.
Next, mark forward to aft position, which locates the display as far forward as
possible, but rearward of the front seats.
STEP2: CHECK THE CONTOURS
Using the cutout template located in the mounting position from Step 1, check
the headliner for contours. Contours in the headliner will require modifications
to the trim ring. For extreme contours, you may need to use an optional tall trim
ring. Modifying the trim ring to follow the contours is required to avoid problems
ranging from no disc eject to poor latch retention.
STEP3: CUT THE HEADLINER
Once you are satisfied with the location, using the cutout template cut the
openings for the cabbies and four mounting screws. You may also need to cut
an opening to slide the mounting bracket through the headliner.
9

Notes:
Do remember to connect the red wire to the ACC of the ignition switch. Or
the battery charge might be drained off prematurely.
If the fuse is opened, first make sure that the cables have not caused a
short circuit, and then replace the old fuse with a new one of the same
ratings.
Do not have unconnected cables or terminals touch the metal on the car or
any other conducting material.
To prevent short circuits, do not remove the caps from unused terminals or
from the ends of the unconnected cables.
After the display unit is installed, check and make sure the brake lights,
blinkers, wiper, etc. on the vehicle are working properly.
Insulate unconnected wires with vinyl tape or other similar material.
Using your DVD player
Adjusting the DVD player
To open the DVD player
1. Press Open Button to unlock the LCD panel.
10
2. Swing the DVD player downward to the desired angle.
The LCD display opens to a maximum angle of 120° degrees. Do
not attempt to open it further.
120°
OPEN BUTTON
Caution

To close the DVD player
Swing the LCD panel upward until you hear the lock click.
close
11
Make sure that cords and other items do not get caught in the panel
when you close it.
For your safety, be sure to close the LCD panel when not use it.
CAUTION
Using remote control
1. Pull out the battery holder.
Follow the arrow 1 slide it to the right toward the battery while at the same
time pull the battery holder away from the remote control.
2. Place the battery.
Place the new lithium battery with the (+) side up. (The type of battery:
Crd2025)
3. Push the holder back.
Using the finger to push in the holder back until the locking sound is heard.

4.Aim the IR Remote Control directly at the DVD player, then press any button.
Use the remote control only inside the vehicle
12
Use the IR Remote Control no further than five feet( 3 meter)
from the sensor.
Direct sunlight or very bright light reduces sensitivity to the
remote signal commands. Be sure the player is not located in
direct sunlight.
Any obstruction between the remote sensor and remote control
may disrupt reception.
Note
Replacing the battery
If the remote control does not function, or if the operating range becomes
reduced, replace the old battery with new one.
Note Dispose used battery properly.
Do not misuse battery by shorting the positive + and - negative
terminal or put into fire which may cause the battery to explode.
Battery and battery holder can be a choking hazard. Keep the
remote control away from young children.

13
Troubleshooting
If operation freezes, the screen goes black or the unit should otherwise not
function properly, try turning the unit on and off. If the unit does not respond,
press the reset switch on the Front Panel.
Problem Cause Solution
Disc inserted incorrectly
Reinsert the disc with the
label side up(facing the
ceiling).
Disc format is not
supported Check the disc format.
Player does not
play disc
Disc is dirty or scratched Clean or replace the disc.
The player
suddenly
stopped working
or the screen
went black
Player error
Try turning the player off
and on. If the player still
doesn’t respond, press the
reset button.
The car ignition (or
ACC/Accessory) is off
Insert the key into the
ignition and turn it to
ACC/Accessory.
Player doesn’t
turn on
Condensation in the player
Wait for about one hour or
until condensation
evaporates.
Battery needs replacing Replace the battery.
Dirty IR window on the
Player or remote control
Clean the player’s and the
remote control’s IR
windows.
Player operates
erratically
Loose connections Check and tighten all
connections.
Picture Skips
Occasions Disc is dirty or scratched Clean or replace the disc .
Blur picture on
the screen.
Interfered by
short-distanced strong
interference.
(E.g. high voltage wire,
transformation station or
aircraft etc…)
Move the vehicle away
from the interference.

14
Problem Cause Solution
The picture on
the screen is
dark.
1. The equipment locates
at a low temperature
area.
2. Brightness is set too
low.
1. This is the
characteristics of LCD
display in low
temperature, it will
restore to normal
brightness after starting
the display for few
minutes.
2.Adjust the brightness
setting.
No sound can
be heard from
the IR wireless
headphones.
1. Headphones are not
turn on.
2. The battery in the
headphone is low.
3. There is object blocking
the transmitting module
or beyond the effective
receiving area.
1.Turn on the headphones.
2.Replace or recharge the
batteries.
3.Remove the blocking
object or move back to
the receiving area.
Specification
Design and specifications are subject to change without notice.
Power Source Vehicle batter
y
(
DC +10V ~ +16V
)
O
p
eratin
g
Volta
g
eDC +14V
Mechanism Manual O
p
en / Close
Dis
p
la
y
An
g
le Vertical Adjustable: Up/Down<120°
Pixel 234RGB(W)x480(H)
Viewin
g
an
g
le
(
u
p
/down/left/ri
g
ht
)
45/55/65/65
Operating current <2000mA(Typical VDD=14V)
Dome Li
g
ht 2W
Operation Temperature -5℃to +50℃
Storage Temperature -20°C to +70°C

Maintaining
Handling discs
To keep a disc clean, do not touch the play side (non-label side) of the
disc.
Do not attach paper or tape to the disc.
Keep the disc away from direct sunlight or heat source.
Store the disc in a disc case after playback.
Cleaning discs
Before playback, wipe the disc outwards from the center with clean cloth.
LCD Panel Maintenance
Wipe off any dust gently with a soft, dry cloth.
The surface is easily scratched; do not rub it with hard objects.
Do not use any chemical solvent, cleaning agent or corrosive detergent to
clean away dirt on the surface of the screen.
15

EJECT
PLAY/PAUSE Play or pause playback of the internal
DVD PLAYER Does nothing. Does nothing.
In Menu Mode: Navigation UP In
Playback Mode: Fast Forward through all
steps for each button press. In FMT/FMM
control mode: toggles between
FMM/FMT On and Headphones Only. In
picture tuning mode: Navigates option
settin
g
s
.
In FMT/FMM control mode: toggles
between FMM/FMT On and Headphones
Only. In picture tuning mode:
Navigates option settings.
In FMT/FMM control mode: toggles
between FMM/FMT On and Headphones
Only. In picture tuning mode:
Navigates option settings.
PRESS & HOLD
FOR 2 SECONDS
Bring up FMT or FMM control OSD and
function.
Bring up FMT or FMM control OSD and
function.
Bring up FMT or FMM control OSD and
function.
DOWN In Menu Mode: Navigation DOWN. In
Playback Mode: Fast Rewind through all
steps for each button press. In picture
tuning mode: Navigates option settings.
In picture tuning mode: Navigates
option settings.
In picture tuning mode: Navigates
option settings.
LEFT In Menu Mode: Navigation LEFT In
Playback Mode: Fast Rewind. In FMT
mode: Changes stations downward. In
picture tuning mode: Decreases option
levels
.
In FMT mode: Changes stations
downward. In picture tuning mode:
Decreases option levels.
In FMT mode: Changes stations
downward. In picture tuning mode:
Decreases option levels.
RIGHT In Menu Mode: Navigation RIGHT In
Playback Mode: Fast Forward In FMT
mode: Changes stations upward. In
picture tuning mode: Increases option
levels
.
In FMT mode: Changes stations upward.
In picture tuning mode: Increases
option levels.
In FMT mode: Changes stations upward.
In picture tuning mode: Increases
option levels.
ENTER ** In Menu Mode: Menu Action
Confirmation. In Playback Mode: Does
Nothing. In FMT/FMM control mode:
clears OSD and exists function.
In FMT/FMM control mode: clears OSD
and exists function.
In FMT/FMM control mode: clears OSD
and exists function.
SOURCE Change source to INTERNAL GAME Change source to AUXILIARY 1 Change source to DVD PLAYER
DOMELIGH
T
Pod is OF
F
Pod is ON
PAUSE Pause or Step playback of the internal
DVD PLAYER Does nothing. Does nothing.
1st Press MPEG pre-stop. Does nothing. Does nothing.
2nd Pres
s
MPEG stop. Does nothing. Does nothing.
PLAY Start or Resume playback of the internal
DVD PLAYER Does nothing. Does nothing.
CHAPTER BAC
K
Chapter back to previous chapte
r
Does nothing. Does nothing.
FAST REWIND Fast Rewind through all available FR
steps for every press. Does nothing. Does nothing.
FAST FORWARD
Fast Forward through all available FR
Dhi
Dhi
CPM BUTTONS
UP
z-Series CPM/Remote Control Reference Table
POWER Power OFF system to Standby Mode
Power ON system.
STOP
DVD PLAYER INTERNAL GAME AUXILIARY 1
Ejects the Disc
Toggle dome light ON and OFF.
DVD PLAYER INTERNAL GAME AUXILIARY 1
INFOSOURCE
DISPLAY
SUB
TITLE
RES
DISC
MENU
SETUP
+
+
FAST
FORWARD
Fast
Forward
through
all
available
FR
steps for every press. Does nothing. Does nothing.
CHAPTER NEX
T
Chapter forward to the next chapte
r
Does nothing. Does nothing.
EXT FMM: Of
f
EXT FMM: On
RES Toggles throught the DVD surround
settings.
Does nothing. Does nothing.
MUTE
EJECT
SOURCE Change source to INTERNAL GAME Change source to AUXILIARY 1 Change source to DVD PLAYER
UP In Menu Mode: Navigation UP. In
picture tuning mode: Navigates option
settings.
In picture tuning mode: Navigates
option settings.
In picture tuning mode: Navigates
option settings.
INFO DVD info display: Title Remain, Chapter
Elapsed, Chapter Remain, etc. Does nothing. Does nothing.
DISC ZOOM Enable and scroll through with every
press, the available disc zoom modes of
the MPEG.
Does nothing. Does nothing.
LEFT In Menu Mode: Navigation LEFT In
picture tuning mode: Decrease option
levels. In FMT control mode: Scrolls
down throu
g
h FMT station
s
In picture tuning mode: Decrease
option levels. In FMT control mode:
Scrolls down through FMT stations.
In picture tuning mode: Decrease
option levels. In FMT control mode:
Scrolls down through FMT stations.
ENTER In Menu Mode: Menu Action
Confirmation. In Playback Mode: Does
Nothing. In FMT/FMM control mode:
clears OSD and exists function.
In FMT/FMM control mode: clears OSD
and exists function.
In FMT/FMM control mode: clears OSD
and exists function.
RIGHT In Menu Mode: Navigation RIGHT In
picture tuning mode: Increase option
levels. In FMT control mode: Scrolls up
throu
g
h FMT stations
In picture tuning mode: Increase option
levels. In FMT control mode: Scrolls up
through FMT stations.
In picture tuning mode: Increase option
levels. In FMT control mode: Scrolls up
through FMT stations.
Sin
g
le Pres
s
Press & Hold for 2
seconds
.
SETUP Access the DVD PLAYER mpeg setup
menu. Does nothing. Does nothing.
DOWN In Menu Mode: Navigation DOWN. In
picture tuning mode: Navigates option
settin
g
s
.
In picture tuning mode: Navigates
option settings.
In picture tuning mode: Navigates
option settings.
DISC MENU Acces the DVD's main or root menu. Does nothing. Does nothing.
DAY/NIGH
T
1
2
3
DOMELIGH
T
4
5
6
SUBTITLE Enables and toggles through the DVD's
subtitle features.
7
8
9
0
Used for entry of backdoor commands,
parental codes and chapter/track direct
entry selection.
Display "Speaker Sound Enabled" or "Headphone Sound Only"
Mute or Un-Mute audio and display correct OSD.
Does nothing.
DISPLAY
Toggle back and forth between the DAY-TIME and NIGHT-TIME brightness level settings.
Toggle dome light ON and OFF.
Ejects the Disc
Toggle between the WIDE ZOOM (16:9), STANDARD (4:3), and WIDE (16:9) display modes for each press.
Bring up picture adjustment settings menu.
Used for entry of backdoor commands,
parental codes and chapter/track direct
entry selection.
Does nothing.
Used for entry of backdoor commands,
parental codes and chapter/track direct
entry selection.
Does nothing.
REMOTE BUTTONS
SPEAKER
Does nothing.
Display "Speaker Sound on FM xxx.x" or "Headphone Sound Only"

Page
46
Rosen Entertainment Systems All-In-One DVD Overhead System
FCC ID:TI7ZE0800D
NOTE: THE MANUFACTURER IS NOT RESPONSIBLE FOR ANY RADIO OR TV
INTERFERENCE CAUSED BY UNAUTHORIZED MODIFICATIONS TO THIS
EQUIPMENT. SUCH MODIFICATIONS COULD VOID THE USER’S AUTHORITY
TO OPERATE THE EQUIPMENT.
Table of contents
Other Rosen Car Receiver manuals

Rosen
Rosen ClearVue II User manual

Rosen
Rosen XR1020U User manual

Rosen
Rosen DS-MZ0750 User manual

Rosen
Rosen In-Dash Multi-Media System User manual

Rosen
Rosen AV8900H User manual

Rosen
Rosen 410X User manual

Rosen
Rosen X10 User manual

Rosen
Rosen DS-HD0710 User manual

Rosen
Rosen G10 User manual

Rosen
Rosen ClearVue II User manual

Rosen
Rosen RE9269D User manual

Rosen
Rosen XR1020U User manual

Rosen
Rosen DS-GM1010 GM Series User manual

Rosen
Rosen DS-TY1070 User manual

Rosen
Rosen RE1043D User manual

Rosen
Rosen DS-TY1080 User manual

Rosen
Rosen R6400V User manual

Rosen
Rosen Mazda 3 User manual

Rosen
Rosen DS-VW0710 User manual

Rosen
Rosen RE8169D User manual