Muzak CP-2500 User manual

CP-2500
OPERATION & INSTALLATION
MANUAL
muzak

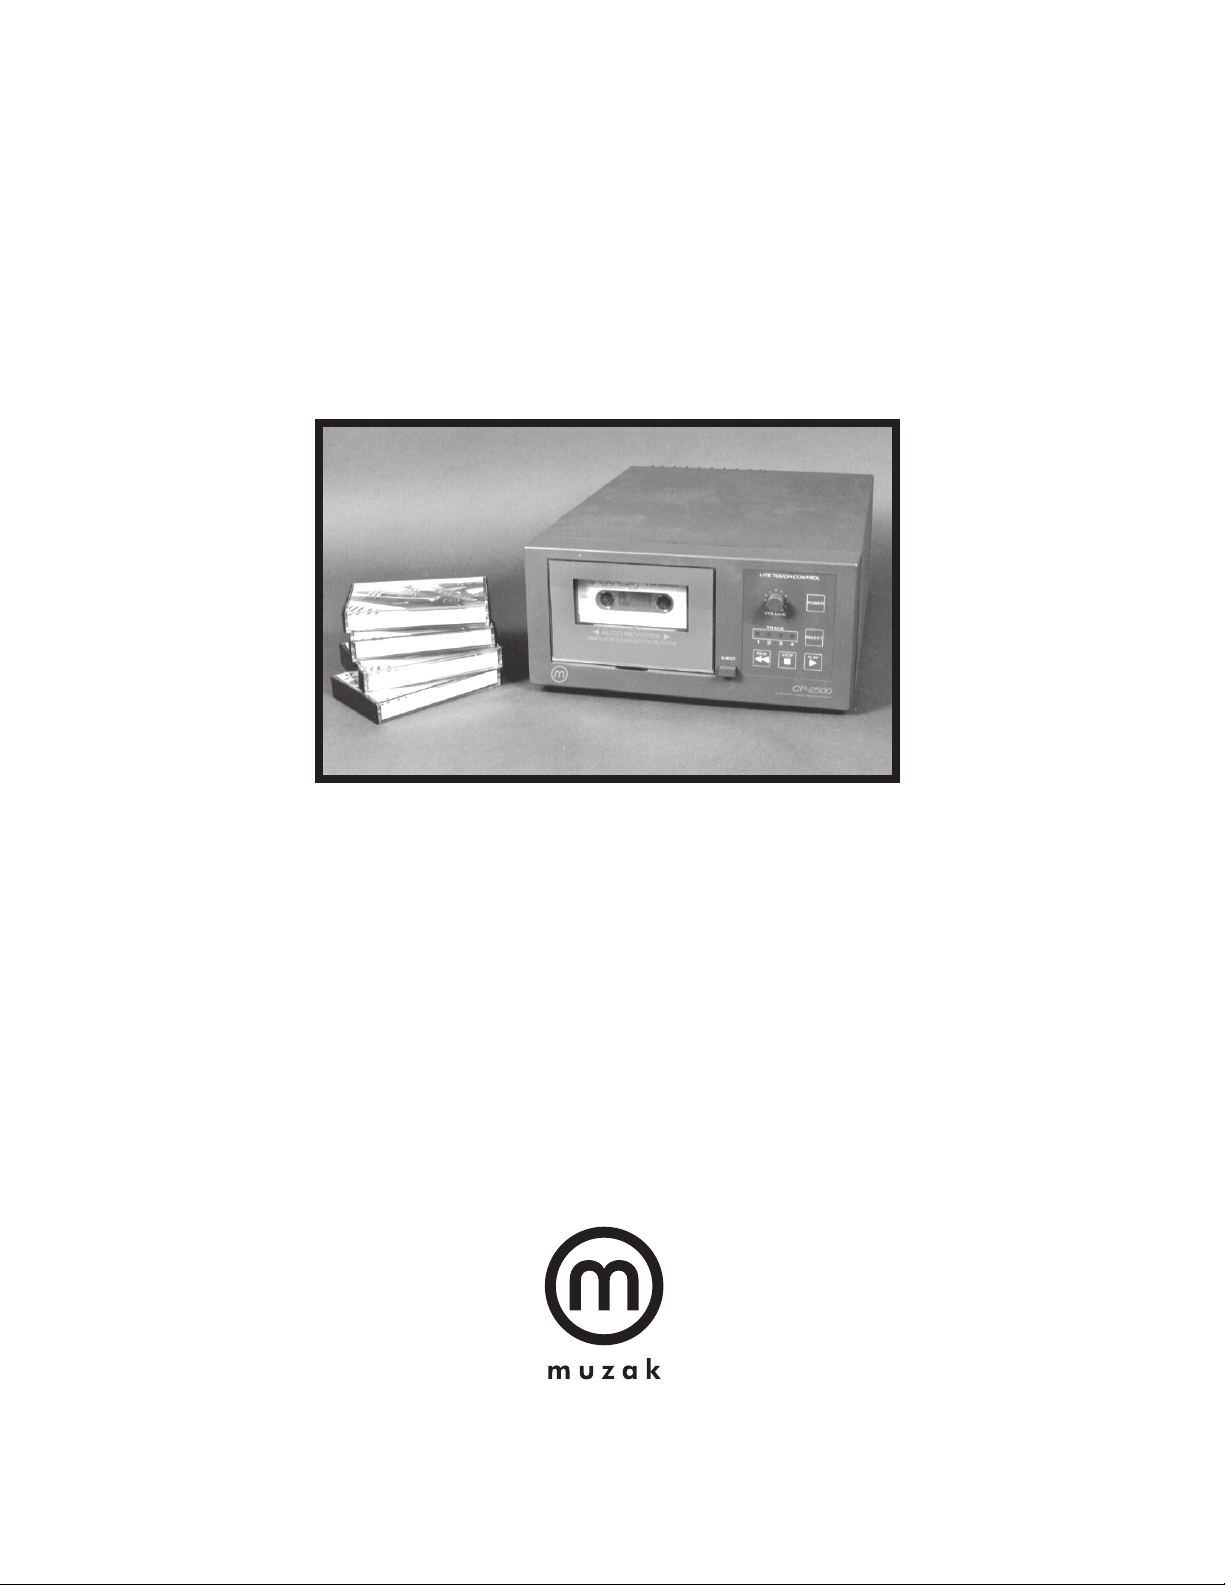
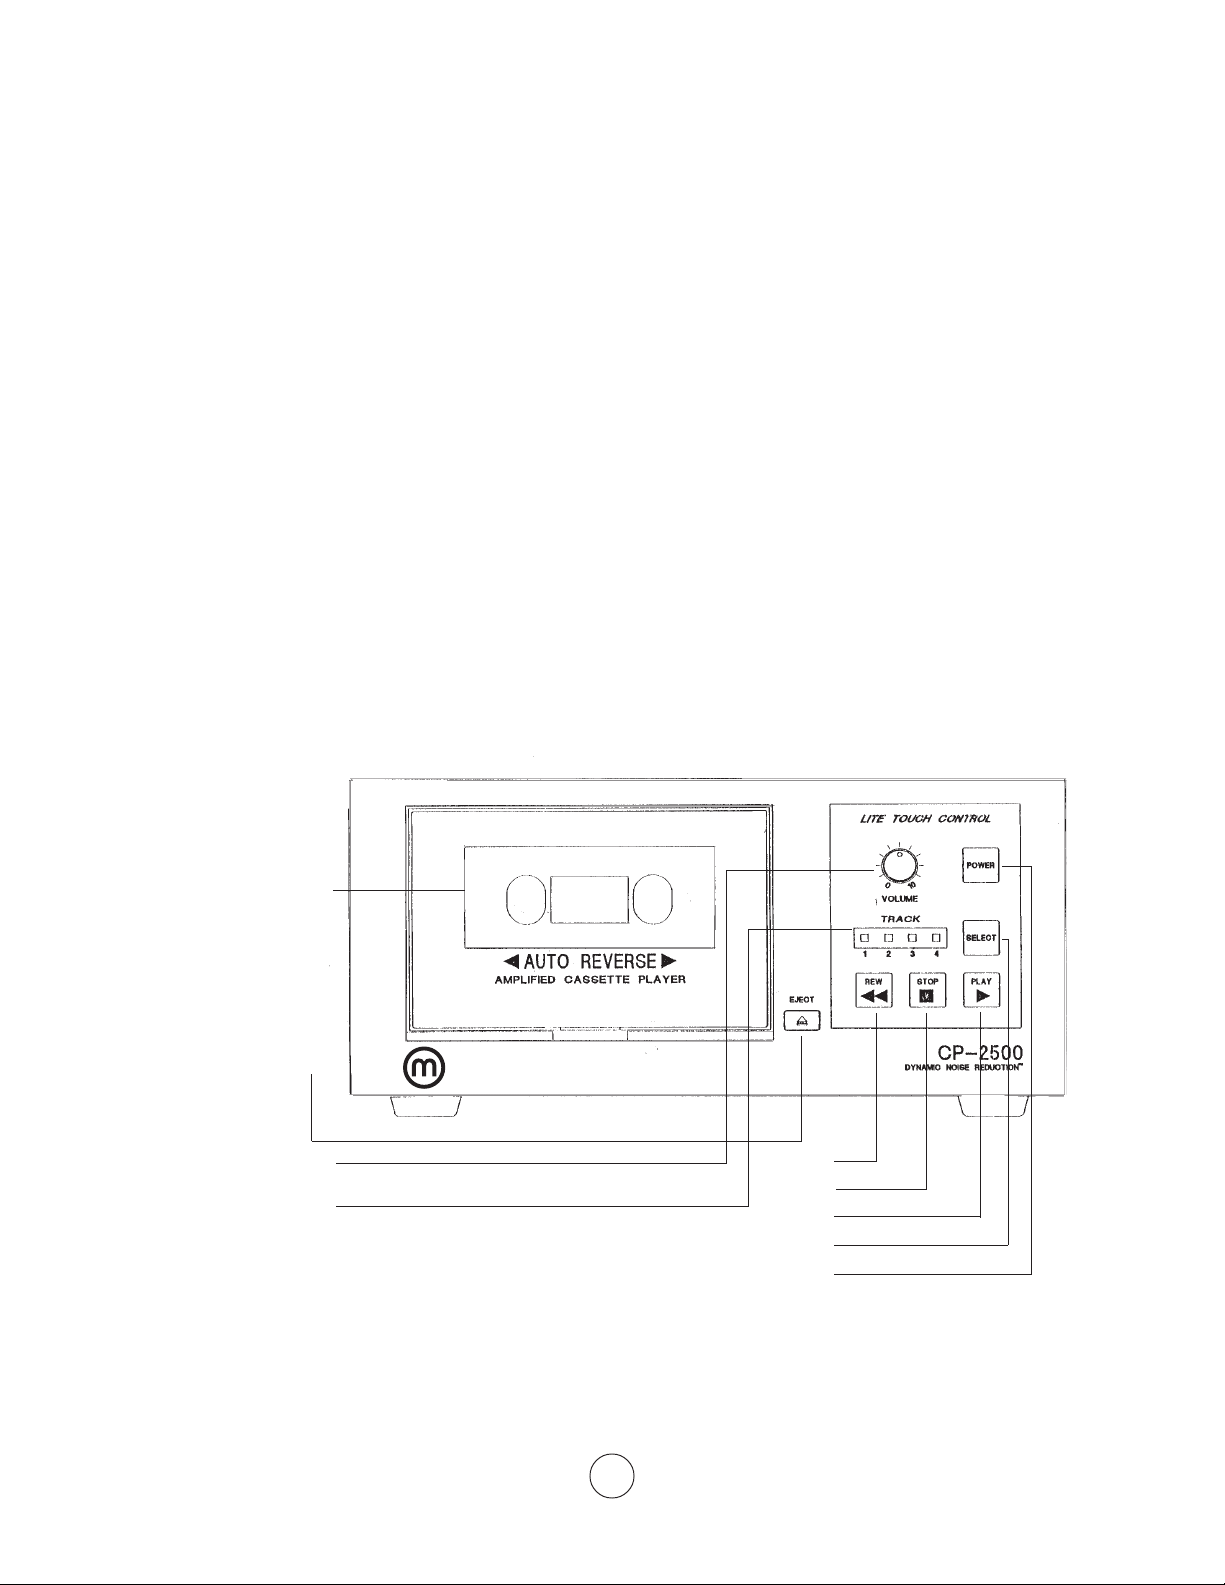
The Muzak CP-2500 is a four-hour, continuous play cassette deck with a built-in
25-watt amplifier.
This high-efficiency, single cassette transport unit plays Muzak's specially formatted
tapes, so you’ll enjoy four hours of uninterrupted, non-repeating music. And its auto-
reverse feature gives you continuous play until you’re ready to change tapes. The unit
is also equipped with volume and tone controls and simple push-button controls for
play, rewind, and stop.
This cassette deck is designed for commercial environments, with a four-track format
and an LED (Light Emitting Diode) display that lets you monitor which track is playing.
Its built-in Dynamic Noise Reduction* (DNR) assures a crisp, clean, full range of sound.
And its compact, contemporary design means it fits anywhere.
One of the best features of the CP-2500 is its built-in 25-watt amplifier, eliminating the
need and cost of a separate amplifier. If extra amplification is desired, this unit allows
you to bypass the internal 25-watt amplifier and connect to an amplifier that fits
your needs.
Best of all, it’s from Muzak! That means your tapes will carry only superior quality
music selections artistically designed to create an experience for your customers and
employees. Plus, you'll have the ongoing support of Muzak nationwide sales and
service network.
Muzak — creating experiences with audio architecture.
*DNR is a registered trademark of National Semiconductor.

&
SPECIFICATIONS
GENERAL INSTALLATION INSTRUCTIONS
FRONT & REAR PANEL DESCRIPTIONS
CONNECTION INSTRUCTIONS
SEPARATE AMPLIFIER CONNECTION
REMOTE CONTROL CONNECTION
OPERATION INSTRUCTIONS
ROUTINE CLEANING
TROUBLESHOOTING
CUSTOMER SERVICE AND SHIPPING
table of contents
1
2
3
7
9
10
11
12
13
16

120 V AC 60 Hz
50 W at rated output
25 W at 4 Ωor 70 volts
0 dBV (1 volt) +/- 2 dB
<1.5% (at 1 kHz)
>50 dB
>40 dB
50 Hz-13 kHz
Cassette tape C-90, Type I
3.57 cm/sec., <+/- 1% (3/4 of standard speed)
4 track mono, auto reverse (25 Hz detector)
<.25%
<140 sec.
4 track/2 channel
DC motor
Dynamic Noise Reduction (DNR)
Bass and treble, >+/- 8 dB
Front panel-injection mold
9.45" W x 12.6" D x 4.33" H
12.1 lb. (5.5 kg)
15 lb. (6.8 kg)
32-113 deg. F (0-45 deg. C)
0-95% (no condensation)
Operation and Installation Manual
Patch cord
Cleaning kit
UL, C/UL, FCC-B
90 days on transport mechanism; 1 year on circuitry and chassis
specifications
POWER SOURCE:
POWER CONSUMPTION:
OUTPUT POWER:
LINE OUTPUT:
DISTORTION:
SIGNAL/NOISE RATIO:
CROSSTALK:
FREQUENCY RESPONSE:
TAPE:
TAPE SPEED:
TRACK CONFIGURATION:
WOW & FLUTTER:
REWIND TIME:
PLAYBACK HEAD:
MOTOR:
NOISE REDUCTION:
TONE CONTROLS:
FINISH:
DIMENSIONS:
WEIGHT:
SHIPPING WEIGHT:
TEMPERATURE:
HUMIDITY:
PARTS INCLUDED:
SAFETY STANDARDS:
WARRANTY:
1

CAUTION
1. Plug deck into grounded 120 V AC outlet. If a grounded outlet is not available, use an AC outlet
adapter available from local hardware or electrical stores. Follow the instructions supplied with
the adapter.
2. Do NOT remove the round ground pin from the AC plug.
3. Always use replacement fuses of the proper rating. The CP-2500 requires a 5x20 mm GMA 1.6 amp/250
volt fuse. You may substitute a GMA 1.5 amp/250 volt fuse if you are unable to find a 1.6 amp fuse. If the
fuse continues to blow, there may be a fault in your speaker wiring or in the deck. Call your local Muzak
Affiliate for service.
4. Unplug the deck in the event of lightning. High voltage surges may cause damage to the circuitry.
5. Do not block the top cover air vents; overheating may result.
LOCATION
1. Locate the deck where there is good air circulation, low dust, low humidity and normal room temperature.
NOTE: Do not locate in direct sunlight or near heating units. Avoid kitchen areas where grease, smoke or
steam may contact the deck.
general installation instructions
2

FRONT PANEL
1. CASSETTE DOOR
Open the cassette door for changing the cassette or cleaning the cassette mechanism. Load the cassette with
the label and program number facing out.
2. EJECT BUTTON
Press the eject button to open the cassette door.
3. LED INDICATOR
The LED (Light Emitting Diode) indicator displays the operational status of the deck.
All LEDs off indicates the power is off.
A single flashing LED indicates the standby mode.
An LED on continuously indicates the play mode and the music track.
All four LEDs moving in sequence indicates the rewind direction.
4. VOLUME CONTROL
Turning this control sets the volume of the line output and the audio output (amplifier output).
5. POWER
Pressing this turns the power on and off.
NOTE: Power will come on when the power cord is first plugged in.
6. SELECT
Pressing this will change the music track.
front and rear panel descriptions
3

7. PLAY
Pressing this will play the cassette.
8. STOP
Pressing this will stop the cassette.
9. REW
Pressing this will stop the cassette and commence rewinding.
NOTE: Because the CP-2500 is an auto-reverse deck, rewind is always relative to the direction of play.
4
muzak
CASSETTE DOOR
EJECT BUTTON
VOLUME
LED INDICATOR
REW
STOP
PLAY
SELECT
POWER

REAR PANEL
1. LINE OUT
These terminals are for connecting the CP-2500 to a separate amplifier. Leave these terminals
disconnected if you are connecting your speakers to the built-in amplifier (Audio Output). See page 7.
Connect the +terminal to the “hot” or center conductor of the supplied patch cord.
Connect the -terminal to the “ground” or shield conductor of the supplied patch cord.
2. REMOTE CONTROL
The remote control terminals are for starting and stopping the deck from a remote location:
Shorting the start terminal to the ground terminal through a remote switch will place the deck in the
play mode.
Shorting the stop terminal to the ground terminal through a remote switch will place the deck in the
stop mode.
3. BASS & TREBLE CONTROLS
Turning these controls will increase or decrease the amount of bass and treble.
4. AUDIO OUTPUT
Connect these terminals to your speaker wires. See the connection diagrams on page 8 for more
details.
The 4 Ω(ohm) terminals are for speakers without transformers which are labeled 4 or 8 Ω.
The 70 V (volt) terminals are for speakers with transformers which are labeled 70 V.
5. AC INLET
Connect the detachable AC power cord to this receptacle.
5

6. FUSE HOLDER
This holds the AC line fuse. The AC power cord must be removed to gain access to the fuse. See page 14
for details on fuse replacement.
LINE OUT
REMOTE CONTROL
BASE & TREBLE CONTROLS
FUSE HOLDER
AC INLET
AUDIO OUTPUT
6

A majority of commercial speaker installations are 70-volt
systems. Relatively few are 4 Ωor 8 Ω. This is determined
at the time of installation. 70-volt systems can be identified
by the presence of a transformer mounted on each speaker
or the 70 V label. If in doubt, consult the local Muzak
Affiliate who installed the system.
NOTE: When connecting an 8 Ωspeaker load to the CP-2500
4 Ωterminals, the output power is 15 watts. A 16 Ωspeaker
load is not recommended due to the reduced output power.
The CP-2500 volume control adjusts both the amplifier audio
output and the line out.
Proper positive (+) and negative (-) polarity must be maintained
throughout your speaker wiring. There are two types of speaker
wire commonly used. The first type is color coded red (+) and
black (-). The second type, sometimes referred to as zip cord,is
polarized with a ribbed or striped conductor (+) and a plain
conductor (-).
See the wiring diagrams to the right for additional details.
CONNECTION TO A 70 V SPEAKER SYSTEM:
Connect the CP-2500 70 V + (red) push terminal to the positive speaker wire.
Connect the CP-2500 70 V - (black) push terminal to the negative speaker wire. See diagram on next page.
connection instructions
COLOR CODED WIRE
RED (+
)BLACK (-)
RIB OR TRACER (+)
PLAIN (-)
"ZIP CORD" WIRE
7

2-SPEAKER HOOK-UP
4-SPEAKER HOOK-UP
6-SPEAKER HOOK-UP
8-SPEAKER HOOK-UP
CONNECTION TO 4-8-ΩSPEAKER SYSTEM:
Connect the CP-2500 4 Ω+ (red) push terminal to the positive speaker wire.
Connect the CP-2500 4 Ω- (black) push terminal to the negative speaker wire.
+
SPEAKER
TRANSFORMER
-
+
SPEAKER
TRANSFORMER
-
+
SPEAKER
TRANSFORMER
-
+
SPEAKER
TRANSFORMER
-
CP-2500
RED (+)
70-VOLT
SPEAKER
OUTPUT
BLACK (-)
70-VOLT SPEAKER/TRANSFORMER WIRING DIAGRAM (CONNECT TO 70-VOLT TERMINALS)
8 ΩSPEAKER WIRING DIAGRAM (CONNECT TO 4-ΩTERMINALS)
CP-2500
RED (+)
70-VOLT
SPEAKER
OUTPUT
BLACK (-)
+
8 OHM
-
+
8 OHM
-
CP-2500
RED (+)
70-VOLT
SPEAKER
OUTPUT
BLACK (-)
+
8 OHM
-
+
8 OHM
-
+
8 OHM
-
+
8 OHM
-
CP-2500
RED (+)
70-VOLT
SPEAKER
OUTPUT
BLACK (-)
+
8 OHM
-
+
8 OHM
-
+
8 OHM
-
+
8 OHM
-
+
8 OHM
-
+
8 OHM
-
CP-2500
RED (+)
70-VOLT
SPEAKER
OUTPUT
BLACK (-)
+
8 OHM
-
+
8 OHM
-
+
8 OHM
-
+
8 OHM
-
+
8 OHM
-
+
8 OHM
-
+
8 OHM
-
+
8 OHM
-
8

Larger speaker systems (more than 10 speakers) may require a higher wattage amplifier than the
built-in 25-watt amplifier. A separate amplifier must be connected to the CP-2500 line out screw
terminals. The CP-2500 accessory kit contains a patch cord with stripped bare wires on one end and
a phono (RCA) plug on the other end for this purpose. It is okay to connect the line out and audio
output terminals at the same time.
Connect the patch cord center conductor to the line out + terminal.
Connect the patch cord shield (ground) conductor to the line out - terminal.
Connect the phono (RCA) plug on the other end to the separate amplifier's program, aux, or
line input.
Connect the speaker wires to the separate amplifier 70-volt, 4 Ω, or 8 Ωspeaker terminals depending
on your speaker system.
NOTE: Do not set the CP-2500 Volume or separate amplifier volume extremely low or high (below 9
o’clock or above 3 o’clock). For instance: do not set the volume very low and then compensate for it
by setting the separate amplifier volume very high.
The marking for the negative speaker terminal varies with different brands of amplifiers. Neg, -, Com,
and Gnd all refer to the negative or speaker “ground” connection. Consult the amplifier owner’s
manual for more details.
separate amplifier connection
+ -
CP-2500 REAR PANEL AMPLIFIER
PATCH CORD
CENTER
CONDUCTOR (+)
SHIELD
CONDUCTOR
(-) RCA PLUG
LINE INPUT
SPEAKER OUT
LINE OUT
9

REMOTE STOP
Connect a momentary contact switch between the remote stop and ground terminals.
The CP-2500 will stop when the switch is closed.
REMOTE START
Connect a momentary contact switch between the remote start and ground terminals.
The CP-2500 will start to play when the switch is closed.
remote control connections
10

Operating the CP-2500 is very similar to operating a consumer format, auto-reverse cassette deck.
NOTE: The cassettes for the CP-2500 are a proprietary format and will not play correctly on a consumer
cassette deck. Conversely, consumer cassettes will not play correctly on the CP-2500.
1. Attach the enclosed AC power cord to the AC inlet on the CP-2500 rear panel.
2. Plug the AC power cord into a grounded (3 prong) 120-volt AC outlet. DO NOT REMOVE THE ROUND
GROUND PIN FROM THE AC PLUG.
NOTE: The CP-2500 is designed so the power will come on as soon as the AC power cord is plugged in.
This is normal operation. Power on is indicated by the illumination of one of the track indicators or LEDs
(light emitting diodes).
3. Press the eject button and insert the cassette with the program label and screws facing forward and the
tape opening facing down.
4. Press the play button.
5. Set the volume control for the desired volume level.
6. Set the rear panel bass and treble controls for the desired tone balance.
7. The cassette will play continuously (auto-reverse format) until the stop, rew (rewind), or power buttons
are pressed.
NOTE: Because the CP-2500 is an auto-reverse cassette deck, rewind is always relative to the play
direction. This is the same as an auto reverse car stereo cassette deck.
The rewind direction is indicated by the sequencing of the track LEDs.
It is not necessary to press stop when going from play to rewind or vice versa.
8. Press the select button to change music tracks. The cassette will advance one track and change direc-
tions each time the select button is pressed.
NOTE: Both the play and rewind directions are reversed by the select button. This allows you to fast
rewind (or fast forward) in either direction by pressing the select button.
9
operating the CP-2500
11

There are two cleaning methods. Muzak supplies alcohol and swabs with your CP-2500 cassette deck. Additional
cleaning kits may be ordered from Muzak’s Customer Services at 800 223.0686. Other sources of cassette cleaning kits
are: local music and video stores, local stereo stores, and local Radio Shack stores. It is extremely important to clean
the playback head, the two capstan shafts and the two rubber pinch rollers once a week. This is even more important if
the CP-2500 is used in a hot and/or humid environment.
CLEANING CASSETTE METHOD:
The cleaning cassette is the easiest way to keep your CP-2500 clean, but must be used weekly to be effective.
1. Follow the directions supplied with the cleaning cassette.
2. Apply several drops of cleaning fluid to the felt pads.
3. Insert the cleaning cassette and press play. Play for 10-20 seconds and press select to reverse the mechanism.
4. Play the cleaning cassette in the reverse direction for an additional 10-20 seconds and then remove it.
5. Let the cleaning fluid dry for 10 to 20 seconds before playing an audio cassette. THIS DRYING PERIOD IS
EXTREMELY IMPORTANT TO PREVENT TAPE DAMAGE.
ALCOHOL & COTTON SWABS METHOD:
Alcohol and cotton swabs are less convenient to use but are more effective on a dirty mechanism. Do this if the cleaning
cassette fails to remove all visible dirt and tape oxide
(metallic powder).
1. Press the eject button and remove the
music cassette.
2. Moisten a cotton swab in alcohol so it is
wet but not dripping.
3. Rub the swab on the playback head, the two
capstan shafts and the two rubber pinch rollers.
NOTE: Never attempt to clean the mechanism
with sharp or metallic objects.
routine maintenance
PLAYBACK HEAD
2 METAL CAPSTAN
SHAFTS
2 RUBBER
PINCH ROLLERS
12

In the event of a problem with your CP-2500, use the following troubleshooting chart to remedy or isolate the
cause. If you are unable to remedy the problem, call your local Muzak affiliate or Muzak Customer Services at
800 223.0686.
SYMPTOM/PROBLEM POSSIBLE CAUSE/SOLUTION
No power AC cord loose or not plugged in
Blown fuse — see next page
Tape does not play Power not on
Cassette door not fully closed
Jamed cassette — see next page
Broken or damaged tape — see next page
Defective mechanism — see page 16
Low or no volume Speaker wire disconnected
Mistmatched output connection — see page 14
Volume control turned down
Dirty playback head — see page 12
Separate amplifier tuned down
Muffled sound Dirty playback head — see page 12
Damaged cassette — see page 16
Music plays slowly Dirty capstan/pinch roller — see page12
Consumer cassette — see page 15
troubleshooting
13

what you should do
FUSE REPLACEMENT PROCEDURE
1. Remove the AC power cord from the AC inlet on the CP-2500 rear panel.
2. The fuse holder is in a small compartment directly under the AC power cord.
3. Pry the fuse holder open with your fingernail or straight tool such as a pen or small screwdriver.
4. Remove the blown fuse and replace it with the spare fuse that comes with the CP-2500. This fuse is referred to
as a GMA or 5 X 20 mm type fuse. Additional fuses may be obtained from your local Muzak Affiliate, or from
your local Radio Shack store (part # 270-1051).
CAUTION — DO NOT USE SLO-BLO OR TIME DELAY FUSES.
REMOVING A JAMMED CASSETTE
1. Press the Eject button.
2. Do not force open the cassette door. If the cassette door won’t open, call your local Muzak Affiliate.
3. If the cassette door will open, gently lift the cassette out.
4. Remove any tape that has wrapped around the capstan shafts.
5. Do not use excessive force to remove the cassette. If the cassette cannot be removed, call your local
Muzak Affiliate.
LOW VOLUME CAUSED BY MISMATCHED AUDIO OUTPUT CONNECTION
1. If your speaker wires are connected to the 4 Ωterminals, switch the power off and connect them to the 70 V
terminals.
14
CONTINUED

2. Switch the power on again and play a cassette.
3. If this fails to correct the problem, call your local Muzak Affiliate.
THE CP-2500 PLAYS AT NON-STANDARD SPEED
1. The CP-2500 plays at a non-standard speed. Regular consumer cassettes will not play correctly on the CP-2500.
15

&
Sould any problems occure with you CP-2500, be sure to consult your local Muzak Affiliate or Muzak
Headquarters before sending the deck anywhere for repair. This will help to identify any specific problems
and possibly avoid the necessity of shipment altogether. If shipment to Muzak becomes necessary, please
call the Muzak Customer Services Department at 800 223.0686 for a Return Authorization (RA)
Number before shipping the deck to Muzak. When packaging the deck for service, be sure to enclose a
complete description of any problems with the player along with your:
•RETURN ADDRESS
•NAME
•PHONE NUMBER
•(RA) RETURN AUTHORIZATION NUMBER
Include a copy of the original sales recept for warranty verification, if applicable. Never ship the deck in any
shipping carton other than the original or a replacement carton supplied by Muzak.
CAUTION — MAKE SURE THAT ALL THE PROTECTIVE SHIPPING LINERS ARE INSTALLED. DO NOT PACK THE
DECK IN STYROFOAM "PEANUTS" OR SIMILAR LOOSE PACKING MATERIAL. THEY ALLOW THE DECK TO
SHIFT AROUND IN SHIPPING.
Players damaged as a result of improper packaging will be the responsibility of the shipper. Avoid the use of
carriers who do not offer proof of delivery or tracing services. Insure or declare the player for its full value.
For more information, please call Customer Service at 800 223.0686.
customer services and shipping
16

11
2901 Third Avenue Suite 400 Seattle, WA 98121 800 223.0686 www.muzak.com
creating experiences with audio architecture
CP-2500-02
Other manuals for CP-2500
1
Table of contents
Other Muzak Cassette Player manuals