Neuton CE5.4 Quick start guide

Battery-Powered Mower
Safety & Operating Instructions
Model: CE5.4
NEUTON Power Equipment
75 Meigs Road
Vergennes, VT 05491
Toll-Free phone: 1-866-NEUTON1 (638-8661)
Fax: 1-802-877-1213
Web site: www.neutonpower.com
E-MAIL: INFO@NEUTONPOWER.COM
Read and understand this manual and all instructions before operating this Mower.

ii www.neutonpower.com
Table of Contents
Chapter 1: Important Safety Considerations................................................................................................................... 1
Chapter 2: Setting Up Your NEUTON Mower ................................................................................................................... 4
Chapter 3: Operating Your NEUTON Mower.................................................................................................................. 14
Chapter 4: Charging and Caring for the Battery............................................................................................................ 15
Chapter 5: Servicing Your NEUTON Mower ................................................................................................................... 17
Chapter 6: Troubleshooting Tips .................................................................................................................................... 19
Chapter 7: Parts Lists, Schematic Diagrams, and Warranty ......................................................................................... 21
Conventions used in this Manual
This indicates a hazardous situation, which, if not avoided, could result in death or serious injury.
This indicates a hazardous situation, which, if not avoided, could result in minor or moderate injury.
This information is important in the proper use of your mower. Failure to follow this instruction could result in damage to
your machine or property.
This is a helpful hint to guide you in getting the most out of your NEUTON Mower.
NOTE: This information may be helpful to you in using your Mower.
Tools Needed: This indicates you will need a special tool to perform a maintenance function on your Mower.
Neuton Power Equipment reserves the right to discontinue, change, and improve its products at any time without notice or
obligation to the purchaser. The descriptions and specifications contained in this manual were in effect at the end of printing.
Equipment described within this manual may be optional. Some illustrations may not be applicable to your machine.
TIP

NEUTON CE5.4 Battery-Powered Mower -
Safety & Operating Instructions
1
Battery Charger WARNING Label (269341)
Chapter 1: Important Safety Considerations
We want you to enjoy years of safe and productive use from your NEUTON Battery-Powered Mower. Please take time to
read the following instructions for safely operating your new Machine.
Protecting Yourself and Those around You
Tragic accidents can occur if the operator is not alert to the presence of children. Children are often attracted to the Mower and
the activity of mowing. Never assume that children will remain where you last saw them.
This cutting machine is capable of amputating hands and feet, and throwing objects. Failure to observe the following safety
instructions could result in serious injury or death.
• Be sure the area is clear of other people before mowing. Never allow children, other bystanders, or pets in your work area
when operating the Mower. Stop the machine if anyone enters the area.
• Only allow responsible individuals who have a thorough understanding of these instructions to operate the Mower. Never
allow children to operate the machine.
• Before and while pulling the machine backwards, look behind and down for small children and for secure footing. Be sure
to shut off the motor before pulling the machine backwards.
• Use extra care when approaching blind corners, shrubs, trees, or other objects that may obscure your vision.
• If you are ever unsure about an action you are about to take, please do not do it.
Dressing Appropriately
• Always wear protective goggles or safety glasses with side shields when using your NEUTON Mower to protect your eyes
from possible thrown objects. Use a face or dust mask when operating in dusty conditions.
• Wear shoes with non-slip treads when using your machine. If you have safety shoes, wear them. Do not use the Mower while
barefoot or wearing open sandals.
• Wear long pants while mowing.
WARNING Label (259931) Danger Label (268971)

2www.neutonpower.com
Preparing to Use Your Mower
• Read, understand, and follow all instructions on the machine and in the manual. Be thoroughly familiar with the controls
and the proper use of the Mower before starting.
• Never operate the NEUTON Mower without the proper guards, or other safety and protective devices in place and properly
connected. Inspect the machine and cutting blade to determine proper installation of these devices to determine they are
in good repair, and they operate properly. If the condition or operation of these devices is questionable, you must repair
them or replace them before using the machine.
• Follow the instructions for the proper installation and operation of accessories. Use only accessories approved by the
manufacturer. Do not alter any aspect of the Mower, Attachments, or Accessories in any way. Modifying or changing your
Mower or its Attachments and Accessories in any way could cause personal injuries and property damage, and will void
your warranty.
• Thoroughly inspect the area where you will be using the Mower, and remove all stones, lawn toys, wire, bones, sticks, pet
supplies, and any other foreign objects which could be picked up and thrown by the Mower blade. Objects struck by the
Mower Blade can cause severe injuries. Also, note the location of holes, ruts, bumps, stumps, and other possible hazards to
avoid.
• Never turn the Mower over while the motor is running. The Blade may throw objects or come loose and cause injury.
• Mow only in daylight or in an area well lit by artificial light.
• Do not charge the Mower battery in wet or rainy conditions.
Operating Your Mower Safely
Your Mower can operate as a Discharging, Mulching, or Bagger Mower. Learn how to use the Side Discharge Chute (sold
separately), Mulching Plug, and Rear Bagger as appropriate.
• Always stop the Motor and wait for the Blade to stop moving whenever you leave the operating position (behind the
handlebar) for any reason. In addition, remove the Battery when inspecting and cleaning the machine, performing routine
maintenance, clearing grass, making adjustments, and attaching or removing accessories.
• The Cutting Blade always turns when the Motor is running. To quickly stop the machine’s Motor – simply release the
orange Control Lever(s). Remember that the Blade will continue to rotate for up to three (3) seconds after you release the
Control Lever(s).
• Always allow the Motor to come to a complete stop before inserting, or removing the optional Neuton Trimmer/Edger
Attachment.
• Do not put your hands or feet near or under the Deck or the rotating Blade. Keep clear of the discharge area at all times.
• Never operate the Mower in the rain or when the grass is wet. Always be sure of your footing.
• Keep a firm hold on the Handlebar, and walk – never run.
• Stay alert and watch what you are doing.
• Watch out for traffic when mowing near roadways.
• Stop the Motor when crossing over loose materials such as gravel drives, walks, or roads, as objects discharged by the
Mower can be hazardous.
• Do not operate the machine when you are tired or under the influence of medication, drugs, or alcohol.

NEUTON CE5.4 Battery-Powered Mower -
Safety&OperatingInstructions
3
• Keep the Blade cutting edges sharp and clean for the best and safest performance. To be sure the Mower is in safe
operating condition, keep all nuts, bolts, and screws tight. Follow the instructions in this manual for changing accessories.
• Never pull the Mower toward you while cutting grass. By design, you should only push the NEUTON Mower forward
while cutting.
• Use extreme caution when maneuvering backwards. Always stop the Motor, look first to check your footing, look down
and behind you before moving backwards.
• If you strike a foreign object, or if the Mower vibrates abnormally, stop the motor, remove the Battery, and inspect the
machine for any damage. Repair the damage before restarting and operating the machine. Striking an object may loosen
the blade. Note: Excessive vibration is generally a sign of trouble.
• Do not use your NEUTON Mower for any job other than the intended use.
• Do not operate the machine if it does not start normally or stop normally when you release the Control Lever(s).
• Empty the rear Bagger of all debris following each use. The fabric will wear and deteriorate under normal usage. Before
each use, check the Bagger for wear and replace if it is torn or worn.
Handling the Battery Safely
• Never charge the lawn mower Battery in the rain or in wet conditions.
• Use only the Charger provided to charge the Battery. Use of a different charger may not allow the Battery to fully
recharge and may cause a fire or explosion.
• Exercise care in handling the Battery in order not to short-circuit it with conducting materials such as rings, bracelets, and
keys. When short-circuited, the Battery or conductor may overheat and cause burns.
• Never attempt to replace the individual Battery cells inside the Battery. Mixing fresh and discharged Batteries could
increase internal cell pressure and rupture the discharged Battery. Improper wiring within the Battery could result in
leakage or explosion.
• Never dispose of Batteries in a fire, as the Battery cells may explode. Never open or mutilate the Battery. Released
electrolyte (battery acid) is corrosive and will cause damage to eyes, skin, or clothes. Battery acid is toxic if swallowed or if
you inhale the fumes.
• Never throw away used Batteries in your household trash. Bring them to a recycling center or household hazardous
waste depot for proper disposal. Please refer to “Recycling your used Battery” on page 15 for more information.
NOTE: See additional details on Battery care in “Chapter 4: Charging and Caring for the Battery”.
No list of Warnings and Cautions can be all-inclusive. If situations occur not covered by this manual, the operator must apply
common sense and operate the NEUTON Mower in a safe manner. Visit our website at www.neutonpower.com or call Toll
Free: 1-866-NEUTON1 (638-8661) for assistance.

4www.neutonpower.com
Chapter 2: Setting Up Your NEUTON Mower
NEUTON Mower Package Contents
NEUTON CE5.4 Mower Body Assembly (269011)
Upper Handlebar Assembly (268761)
Mulching Plug (203831)
(2) Handlebar Connector Knobs (175791)
(2) Upper Handlebar Carriage Bolts (175781)
(2) Green Quick-Connect Knobs (243751)
(2) Lock Washers (200061)
(2) Main Cable Retainers (268961) Lower Handlebar (268801)
Bagger (208921)
Battery (268611) Battery Charger (268591) 36mm Wrench (176281)
Figure 1
Safety & Operating Instructions Manual
(268001)

NEUTON CE5.4 Battery-Powered Mower -
Safety&OperatingInstructions
5
Assembling Your NEUTON Mower
To allow you to quickly begin using your NEUTON Mower, it was shipped to you partially assembled. The assembly process is
easy and does not require any special tools, knowledge, or strength.
Assembling your NEUTON Mower takes just a few steps:
Step 1: Read the Safety & Operating Instructions before proceeding.
Step 2: Remove the Battery.
Step 3: Charge the Battery before your first use.
Step 4: Attach the Lower Handlebar.
Step 5: Attach the Upper Handlebar Assembly.
Step 6: Attach the Mulching Plug, Rear Bagger, or the Side Discharge Chute (sold separately).
Step 7: Insert the Battery after being fully charged.
Step 8: Adjust the Cutting Height.
NOTE: See Figure 18 on page 11 for a photograph of the fully assembled Mower.
Remove the Battery during assembly, cleaning, Blade replacement, or when the Mower is not in use. Removing the Battery will
prevent accidental starting, and help avoid serious personal injury.
Step 1: Read the Safety & Operating Instructions before proceeding.
The NEUTON Mower is a motorized cutting machine that uses a sharp Blade. For your safety, and for best results, it is
important to read the information in “Chapter 1: Important Safety Considerations” before you assemble or use the Mower.
To familiarize yourself with the assembly, features, and operation of your Mower, please read the remainder of this manual
before proceeding.
NOTE: Do not discard the shipping box and packaging material until you are fully satisfied with your new NEUTON Battery-Powered
Mower.
Step 2: Remove the Battery.
You can quickly and easily remove the Battery from your Mower.
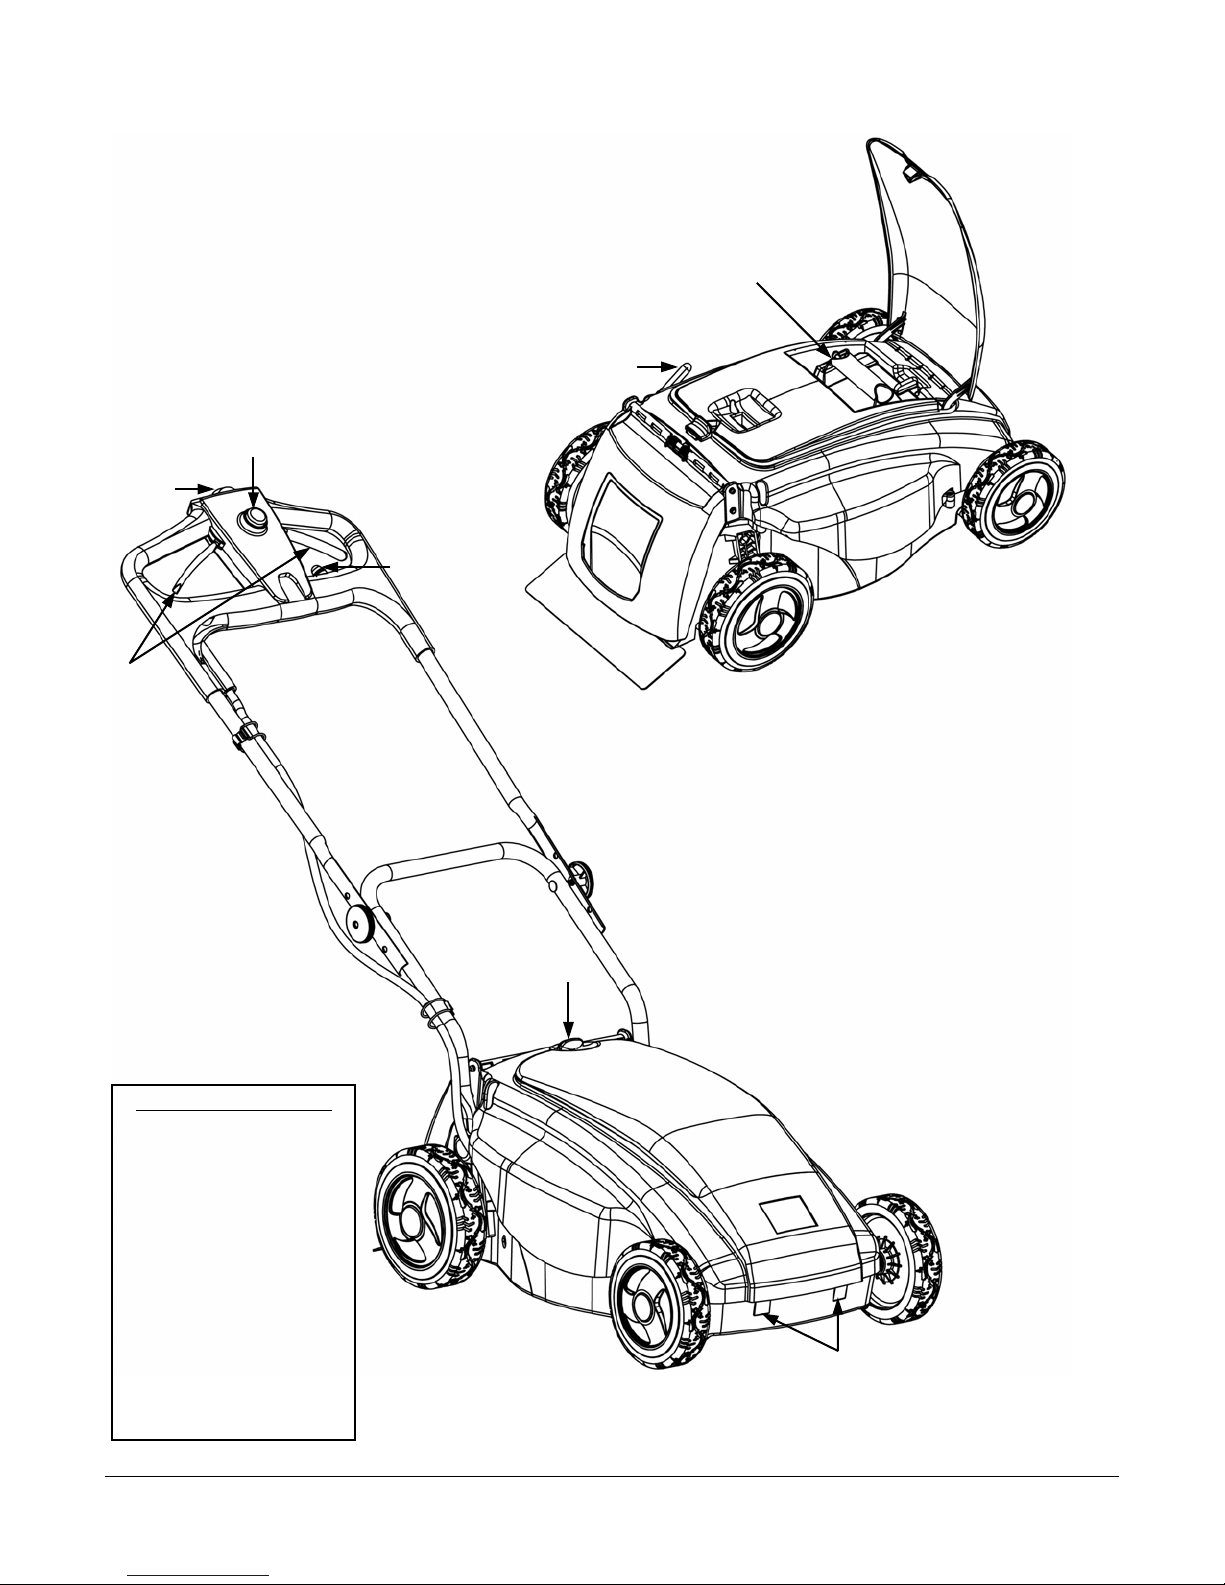
1. Push the Cover Latch (Figure 2) back and open the Access Cover.
Push the Cover Latch back with one hand and open the
Cover with the other.
2. Turn the Battery Retainer Arm until it is no longer blocking the
Battery (Figure 2).
To help keep the Mower from rolling while removing
the Battery, put one foot behind a wheel for stability.
3. Pull the Battery straight up and remove it.
TIP
TIP
Figure 2
Battery Retainer Arm
Cover Latch
A
ccess
Cover

6www.neutonpower.com
Step 3: Charge the Battery before your first use.
Use the NEUTON 24V Charger only with the NEUTON 24V Battery. Use of other Chargers or the NEUTON 24V Charger
with other Batteries may result in bursting of the Battery, which could cause personal injury and property damage.
You MUST charge the Battery for eight (8) to fourteen (14) hours before you use the Mower for the first time. If you do not
charge it before using the Mower, the Battery’s charging capacity may decrease.
NOTE: Always charge the Battery while it is out of the Mower.
1. Remove the Protective Plug from the Charger Receptacle on the Battery and
plug in the round Charger Connector (Figure 3).
2. Plug the Charger into a standard 110V wall outlet. The RED light on the
Battery will light up indicating a connection between the Battery and the
Charger and the RED light on the Charger will light indicating that the Battery
is charging.
3. Once charging is complete, the LED on the Charger will change from RED to
GREEN and the RED LED on the Battery will turn OFF indicating that the
Battery is fully charged and is ready for use.
NOTE: For the first five (5) hours, the Charger will be warm to the touch. This is
normal and does not indicate a problem.
Step 4: Attach the Lower Handlebar
To keep the Mower from moving while you assemble it, place your foot behind one of the wheels.
NOTE: You will use the green Quick-Connect Knobs to attach the Lower Handlebar to the Mower.
1. Set the Cutting Height Lever (Figure 4) to the highest adjustment (position 6 – Lever all the way down). This makes it
easier to reach the slots on the Mower frame.
2. Position the Lower Handlebar with the smooth side against the frame of the Mower. Slide it down fully into the slot on the
frame until the holes line up (Figure 4).
NOTE: Be sure you slide the Handlebar all the way down to the bottom of the slot. When you do this, the cutout notch on the end of
the Handlebar aligns with the base of the channel in the Mower’s frame.
3. Insert a green Quick-Connect Knob with a Lock Washer through the lined-up holes on the Handlebar and Mower Frame.
Turn the Knob clockwise until firmly snug. Repeat this step for the other side.
Be sure to tighten the green Quick-Connect Knobs by hand. Do not use a tool to tighten them; you could easily over tighten
them and damage the parts.
Figure 4
Cutting Height Leve
r
(Adjust all the way down.)
TIP
Green Quick-Connect Knob
Holes aligned
Lock Washe
r
Lower Handleba
r
Figure 3
Protective
Plug
Battery Charge
r

NEUTON CE5.4 Battery-Powered Mower -
Safety&OperatingInstructions
7
Step 5: Attach the Upper Handlebar Assembly
NOTE: You will use the black Connector Knobs and Bolts to
connect the Upper and Lower Handlebars together.
1. Remove the black Connector Knobs and Connector Bolts
from the NEUTON Product Pack included with your
Mower.
Let the Upper Handlebar Assembly lean on the
ground during this process (Figure 5). It is easier to
start with the Upper Assembly in this position, so
you don’t have to hold and balance it while
connecting the sections.
2. Line up the holes of the Upper Handlebar Assembly with
the holes in the Lower Handlebar.
NOTE: There are three (3) height positions (holes in the Upper
Handlebar) for the Upper Handlebar Assembly. Connect the
Upper and Lower Handlebars together using the
appropriate holes at a height that is most comfortable for
you.
3. Slide the Connector Bolts (from the inside of the Handlebars,
outward) through the predetermined holes in the Upper and
Lower Handlebars on each side of the Mower and lightly
screw on the black Connector Knobs just enough to hold the
Upper and Lower Handlebar sections together (Figure 5).
4. Swing the Upper Handlebar Assembly into an upright position
so that the Upper and Lower Handlebars line up and slide into
place (Figure 6). Tighten the black Connector Knobs by hand
until they are snug.
5. Check the length of the Handlebar for comfort. If necessary,
reconnect the Upper and Lower (up or down) to a height that is
best for you.
6. Position the Main Cable along the Handlebars (Figure 6) and
secure it in place by holding the two (2) Main Cable Retainers in
place while stretching the rubber strap around the Cable, and
securing it into the Hook on the Retainer (Figure 7).
Black
Connector
Knob
Figure 5
TIP
Lower
Handlebar
Upper
Handlebar
Black
Connector
Knobs
Figure 6
Main Cable
Main
Cable
Retainer
Main
Cable
Retaine
r
Figure
7
Main Cable
Retainers in place
Black
Connector
Knob
Bolts

8www.neutonpower.com
Step 6: Attach the Mulching Plug, Rear Bagger, or the Side Discharge Chute (sold separately)
Mulching Plug
To mulch your grass, install the Mulching Plug.
1. If necessary, remove the Rear Bagger or Side Discharge Chute from
the Mower.
2. Install the Mulching Plug (Figure 8). Be sure to push the Plug all the
way in until the Notch in its bottom is engaged.
There’s a slight knack to installing the Plug; push the Plug in
with a slightly arcing motion as follows:
• Align the Plug in the Mower.
• Start to push the top of the Plug in first.
• Then put pressure towards the bottom and slide in the Plug.
Rear Bagger
The NEUTON Rear Bagger lets you cut and catch your grass clippings,
eliminating the need to rake. The Rear Bagger easily attaches to the rear
of the Mower (Figure 9). The Bagger shipped unassembled. The
following instructions outline the steps necessary to assemble, install,
and remove the Bagger.
Assembling the Bag to the Bag Frame
1. With the Bottom Stiffener Board facing down, insert the Frame into the
Bag (Figure 10).
2. Snap the Bag Clips around the Frame top, sides and bottom (Figure 11)
to secure the Bag to the Frame.
TIP
Figure 8
Engage Notch
Rear Bagge
r
Figure 9
Frame
Figure 10
Stiffener Board
Bag Clips
Figure 11

NEUTON CE5.4 Battery-Powered Mower -
Safety&OperatingInstructions
9
Installing the Bagger
1. Raise the Discharge Guard on your Mower (Figure 12) and
note the metal Support Rod at the rear of the Mower.
2. Grasp the Bagger by the Top Handle and center it at the
back of the Mower.
3. Align the Metal Latch Hooks (Figure 13) over the Support
Rod and lower the Bagger in place until the Wire Frame at
the bottom of the Bagger rests on the Mower.
4. Lower the Discharge Guard.
Removing and Emptying the Bagger
1. Raise the Discharge Guard.
2. Using the Top Handle of the Bagger, lift the Bagger off the
Support Rod and away from the Mower.
3. Lower the Discharge Guard.
4. To empty the Bagger, tilt the Top Handle forward. Use the
Cloth Handle (Figure 14) at the rear of the Bagger to move
the contents toward the front as you empty the Bagger.
Step 7: Insert the Battery after being fully charged.
1. Orient the Battery with the indentations on the bottom of
the Battery lining up with the metal tabs in the bottom of
the Battery compartment.
2. After confirming the correct orientation of the Battery, insert
the Battery fully into the Battery compartment.
3. Turn the Battery Retainer Arm back over on top of the
Battery to secure it in place (Figure 2 on page 5).
NOTE: If the Battery is not oriented correctly, it will not fully depress
into the opening. If this happens, remove the Battery,
recheck the orientation, and try again.
Figure 12
Cloth Handle
Discharge Guard
Support
Rod
Latch Hook
Support
Rod
Figure 13
Figure 14

10 www.neutonpower.com
Lever Position Cut Height
1 1.2" (30 mm)
2 1.5" (38 mm)
3 1.9" (47 mm)
4 2.2" (56 mm)
5 2.6" (65 mm)
6 3.0" (75 mm)
Side Discharge Chute (sold separately)
The Side Discharge Chute (Figure 15) allows for proper discharge of the grass, which prevents clogging.
1. Raise the hinged Discharge Guard on the back of the Mower (Figure 12 on the previous page).
2. Position the Top Front Groove (Figure 16) of the Chute over the Support Rod (Figure 12) and lower the Chute into place
(Figure 15).
3. Lower the hinged Discharge Guard.
Step 8: Adjust the Cutting Height.
Using the Cutting Height Lever (Figure 17), adjust the Cutting Height so that you cut off only one (1) to two (2) inches of grass
at a time.
1. Make sure all four (4) Wheels are level.
2. Pull the Lever out of its present notched position and rotate the
Lever up or down to the desired level. When you reach the
desired level, simply release the Lever into the notch.
NOTE: Each position adjusts the Mower’s Blade level to a different
Cutting Height. Rotating the Cutting Height Lever towards
Position 6 (down) cuts less grass (which leaves your grass
longer); rotating the Lever towards Position 1 (up) cuts more
grass (leaving your grass shorter).
The following table lists the final cut grass heights.
Figure 15 Figure 16
Discharge Guard
Side Discharge Chute
Top Front Groove Side Discharge Chute
Figure 1
7
Cutting
Height
Leve
r
NEUTON CE5.4 Battery-Powered Mower -
Safety&OperatingInstructions
11
Your Fully Assembled NEUTON Mower
Figure 18
Cutting Height Lever
A
ccess Cove
r
Control
Lever(s)
Start Button
Optional Trimmer/Edger
insertion Ports
A
ccess Cover Latch
OPTIONAL ACCESSORIES:
NEUTON Trimmer
Trimmer Cord
Spare Battery
Spare Cutting Blade
Blade Sharpener
Protective Cover
Rear Side Discharge Chute
To learn more about these
accessories, call us at 1-
866-Neuton1 (638-8661) or
visit us on our web site:
www.neutonpower.com
Shown without the
Rear Discharge Chute or Bagger
Batter
y
Circuit
Breaker
Button
Analog
Battery
Gauge

12 www.neutonpower.com
Feature:
Analog Voltage Gauge
The Analog Voltage Gauge (Figure 19) indicates the amount of
Battery life remaining. The yellow area indicates acceptable
voltage whereas the red area indicates low voltage. You should
raise the Cutting Height or mow slower if the gauge
momentarily drops into the red area. Recharge the Battery if the
Gauge stays in the red area.
Figure 19
Analog Voltage Gauge

NEUTON CE5.4 Battery-Powered Mower -
Safety&OperatingInstructions
13
Neuton CE5.4 Product Specifications
Motor
RPM 4300
Tip Speed 16,000 ft./min.
AMPIdle 4–5
AMP Cutting 8 – 10
Size 500W, 24V DC/32 Amp
Noise Under 80 Decibels
Controls
Start/Stop Safety Control Lever(s), Start and Stop
Shape Comfortable, Ergonomically Designed Housing
User Interface Battery Voltage Level Indicator
Housing
Material Injected Polypropylene
Handlebar Height Adjustment 34.6" – 37.5" (at lowest Housing height)
Wheels, Front 7" x 1.6", Molded Rubber Tread
Wheels, Rear 8" x 1.9", Molded Rubber Tread
Weight 50 lbs. (including Battery)
35 lbs. (without Battery)
Housing Length 30"
Housing Width 18"
Housing Height 12.5"
Cutting
Cutting Deck Width 14.2
Blade 14" Steel Aero Blade (extra Blades available)
Mulching Blade optional
Blade Nut Torque 16.6 ft-lbs.
Blade Function Cutting and Mulching
Cutting Height Easily Adjustable from 1.2 – 3.0 inches
Discharge Rear Discharge Chute (sold separately)
Bagger Rear Bagger Included
Bagger Capacity 1 Bushel (1.26 cubic ft.)
Mulching Mulching Plug Included
Trimming Optional Trimmer/Edger Attachment
Lawn Size Up to 1/4 acre on a single Battery charge
Battery
Voltage 24V DC
AMP 10 Amp-Hour
Type Sealed, Lead/Acid
Weight 15 lbs. 5 oz.
Approximate Run Time 45 - 60 minutes for fully charged Battery
Battery Charger Included. 24V Charger, plugs into standard electrical outlet
Charge Time 8-14 Hours
Replacement Easy to lift out and replace with optional spare Battery
OptionalAccessories
Trimmer Plug-in Trimmer/Edger w/2 extra spools
Trimmer Cord 80 MIL/2.0mm Diameter x 14.6 Feet/Spool
Blade Sharpener Hand-Held Sharpener
Protective Cover Fits machine with Handlebars up or down
Rear Side Discharge Chute Attaches to back of Mower
Spare Battery 24V DC, 10 Amp-Hour
Spare Cutting Blade
Meets CPSC Mower Safety Standards
Lever Position Cut Height
1 1.2" (30 mm)
2 1.5" (38 mm)
3 1.9" (47 mm)
4 2.2" (56 mm)
5 2.6" (65 mm)
6 3.0" (75 mm)

14 www.neutonpower.com
Chapter 3: Operating Your NEUTON Mower
NOTE: If the Mower Battery is not fully charged or if you are unpacking a new Mower for the first time, read “Chapter 4: Charging and
Caring for the Battery” before operating the Mower. You should charge the Battery for eight (8) to fourteen (14) hours before
use.
Starting the Motor and Engaging the Blade
• Starting, stopping, and restarting an electric Motor repeatedly within a few seconds can generate a great deal of heat and
damage the Motor. To protect the life of your NEUTON Mower, always wait at least five (5) seconds after stopping before
restarting the Mower.
• The cutting Blade always turns when the Motor is running; there is no clutch to allow the Blade to stop rotating while the
Motor is running.
• Perform the Daily Checks listed on the back cover of this manual.
Starting the Mower
1. Depress the orange Start Button (Figure 20).
2. Squeeze and hold the orange Control Lever(s) (Figure 21).
3. Continue to hold the Control Lever(s) against the Handlebar for as long
as you want the Motor to run.
If the Mower does not start, first check for simple solutions:
• Make sure that you correctly installed the Battery.
• Make sure the optional NEUTON Trimmer/Edger Accessory is not in
the Trimmer/Edger ports if you are intending to cut with the Blade.
• Make sure the black Circuit Breaker Button on the Handlebar is
depressed (Figure 20).
• Did you follow the two (2)-step Start sequence: depress the orange
Start Button, then squeeze and hold the Control Lever(s)?
NOTE: If the Mower still does not start, follow the steps in “Chapter 6:
Troubleshooting Tips”.
The orange Start Button and Control Lever(s) are safety devices; do not
tamper with them.
Stopping the Motor and Blade
Simply releasing the orange Control Lever(s) stops the Motor and Blade.
The Blade continues to rotate for a few seconds after you shut off the Motor.
Figure 20
Figure 21
Control Lever(s)
against Handlebar
Circuit Breake
r
Start Button

NEUTON CE5.4 Battery-Powered Mower -
Safety & Operating Instructions
15
Chapter 4: Charging and Caring for the Battery
Before charging the Battery, read all instructions and cautionary markings in this manual and on your Mower. Do not operate
your Mower until you have read and understand all instructions and the Battery is fully charged.
The Battery
The NEUTON Mower comes with a sealed, lead acid Battery already installed at the factory. The Battery is 24 volts and rated at
10 amp-hours. The Battery should not leak, regardless of the position in which it is stored. Read “Handling the Battery Safely” in
Chapter 1 for additional information.
The Battery is completely maintenance free. You never need to add water. With all rechargeable Batteries, after years of use,
they will eventually need replacement. With proper care, the Battery can last up to three (3) to five (5) years.
• Never attempt to alter or open the Battery. Use normal household voltage (110 volts) when charging the Battery. Plug the
Charger directly into the electrical outlet.
• Use the NEUTON 24V Charger only with the NEUTON 24V Battery. Use of other Chargers or the NEUTON 24V Charger
with other Batteries may result in bursting of the Battery, which could cause personal injury and property damage.
• Under normal conditions, the Battery charge should last for approximately forty-five (45) to sixty (60) minutes per
use with a fully charged Battery. The length of time depends on the length, density, and dampness of the grass,
cutting height setting, current Battery charge level, and ongoing Battery care/charging. If the Battery does not
provide a forty-five (45) minute run time, it does not mean that your Battery is defective. If you generally intend to
use your Mower for a longer duration, Neuton Power Equipment recommends that you purchase an extra Battery.
Whereby, you could have a second fully charged Battery ready so you can continue mowing.
• It may take up to five (5) charging and discharging cycles before your Battery provides maximum life.
• A Battery may last much longer if you charge it as soon as it starts to lose power and not let it completely
discharge. You should not try to coax a little more power out of your Battery. Recharge the Battery as soon as
possible after each use for eight (8) to fourteen (14) hours and remove it from the Charger.
• Your Charger is designed to automatically shut itself off after fourteen (14) hours, however avoid leaving the
Battery on the charger for a period of more than a week
• For superior Battery performance, always store the Battery in a DRY environment with temperatures between -
40ºF (5ºC) and +95ºF (+35ºC). Make sure the storage temperatures will never be outside these limits. The lower
the storage temperature is within the specified range, the better. The Battery will discharge more slowly at low
temperatures. Charge the Battery for eight (8) to fourteen (14) hours prior to storage and then every one (1) to two
(2) months; and then again prior to the first use of the season. Be sure to remove the Charger from the Battery after
charging. Also, do not store the Battery near children or pets or close to a source of heat, sparks, open flame or on
the floor as it may be damp or subject to accidental flooding. In addition, never expose the Battery to abnormal
shaking or shocks. Regularly observe the external appearance of the Battery. Never use a Battery that shows
cracks, changes shape, leaks, or is obviously damaged.
Periodically inspect the Cord on the Charger unit for damage. If damage occurs, do not use the Mower until you have replaced
or repaired the Cord. Do not abuse the Cord. Never carry the Charger by the Cord. Always pull the plug – and not the Cord –
when disconnecting the Cord from the electrical outlet (wall outlet) and from the Charger. When using an extension Cord with
your Charger, use a heavy-duty extension Cord of a type “suitable for outdoor use” (although you should never charge the
Battery in the open outdoors).
TIPS

16 www.neutonpower.com
Recycling your Used Battery
Never attempt to dispose of your Battery in a fire; the cells may explode.
Please dispose of used batteries responsibly, according to your local hazardous materials regulations. Never throw away used
batteries in your household trash.
Please dispose of your used Batteries responsibly by recycling them. We have partnered with East Penn Manufacturing,
one of the leading producers of lead-acid batteries in the U.S., to recycle your Battery when it reaches the end of its life.
East Penn has nearly 100 distribution centers throughout the U.S. and Canada that will accept your Battery for recycling.
East Penn will separate and reuse everything in your old Battery: the plastic cover, the lead, and even the Battery acid
using a patented process. To find the location of the East Penn distribution center nearest you, visit
http://www.dekabatteries.com.
You can also visit the Web site of Earth 911 for more information [www.earth911.org]. Once there, click the Household tab at
the top of the page and then enter your zip code. The site lists recycling centers located near you. You can also visit our
website www.neutonpower.com and click on “Customer Service” to find distribution centers across the country that will
accept your Battery for 100% recycling of the plastic, lead, and acid.
For a fee, you can recycle your Batteries with the International Metals Reclamation Company. Visit them at www.inmetco.com
and click Services; or contact them at:
INMETCO, P.O. Box 720, 245 Portersville Road, Ellwood City, PA 16117, (724) 758-2825; fax (724) 758-2845
To learn more about hazardous waste recycling, visit the Web site for Battery Council International [www.batterycouncil.org]
or for the Environmental Protection Agency [www.epa.gov].

NEUTON CE5.4 Battery-Powered Mower -
Safety & Operating Instructions
17
Chapter 5: Servicing Your NEUTON Mower
This chapter explains how to clean your Mower, and change and sharpen the Blade.
Servicing Your Mower
• Never make adjustments or repairs with the Motor running. Always stop the Motor, wait for the Blade to stop moving, and
remove the Battery to prevent accidental starting.
• Never tamper with safety devices. Check their proper operation regularly.
• Never attempt to make wheel-height adjustments while the Motor is running.
• Grass catcher components are subject to wear, damage, and deterioration, which could expose moving parts or allow the
Blade to throw objects. Check components frequently, and replace them with the manufacturers recommended parts
when necessary.
• Check the Blade and Motor mounting bolts at frequent intervals for proper tightness. Use only authorized NEUTON
replacement parts.
• Keep your Mower free of grass, leaves, or other debris build-up.
• Allow the Mower to cool for at least five (5) minutes before servicing or storing.
• The Mower Blade is sharp, it can and will cut. Wrap the Blade or wear gloves, and use extra caution when working on it.

18 www.neutonpower.com
Removing and Attaching the Blade
• You must remove the Blade to sharpen it.
• Always check the Blade for sharpness, damage, and tightness before and after each use. If the Blade is bent or damaged,
replace the Blade promptly.
• Replace the Blade when worn, damaged, or at least every five (5) years.
Tools and Supplies Needed:
• 36mm Wrench (supplied with Mower)
• 3/4" Wrench or Socket
• Torque Wrench (optional)
• Heavy Gloves
Wear heavy gloves to protect your hands when removing and attaching the Blade.
1. Place the 36mm Wrench over the Steel Hex Adapter (the large metal piece that holds the Blade in position) and place a
3/4" Wrench or Socket over the Blade Nut (Figure 22).
2. While holding the Hex Adapter in place, loosen the Blade Nut by turning counterclockwise. Be careful, hold the Hex
Adapter firmly in place so that the Blade does not spin and strike your hand. The safest way to keep the Blade from
spinning is to block it with a piece of 2" x 4" wood against the Mower frame.
3. Remove the Blade Nut, Steel Hex Adapter, Blade, and Steel Blade Adapter in that order (Figure 23).
4. To install a sharpened Blade or a new Blade, reverse the order of step 3. Be sure to replace all parts exactly as you
removed them (Figure 23) and make sure to properly seat the Blade.
NOTE: Be sure that the stamping on the Blade “THIS SIDE TOWARDS MOWER” is facing the Mower. Also, if replacing the Blade with a
new one, use the new Nut supplied. If you assemble the Blade more than ten (10) times, replace the Blade Nut with a new
one.
5. Place the 36mm Wrench over the Steel Hex Adapter, then place a 3/4" Wrench (or optional Torque Wrench with a 3/4"
Socket) over the Blade Nut (Figure 22) and while holding the Hex Adapter in place; tighten the Blade Nut securely (16.6 Ft-
Lbs) by turning clockwise. Again, be careful, hold the Hex Adapter firmly in place so that the Blade does not spin and strike
your hand.
Sharpening the Blade
When the Blade is dull, the cut ends of the grass end up ragged and may turn brown soon after mowing. A dull blade also
causes the Battery to discharge faster. When this occurs, sharpen the Blade (assuming the Blade is otherwise in good
condition).
Tools and Supplies Needed:
• Fine-Toothed File or NEUTON Blade Sharpener (optional)
• Safety Glasses
• Vise
1. Remove the Blade (see “Removing and Attaching the Blade”).
2. Secure the Blade in a sturdy Vise and while wearing Safety Glasses, carefully
file the Cutting Edges of the Blade using even strokes. Be sure to file both
sides and both ends equally.
Simply counting the number of strokes per edge will help to keep the
sharpening equal.
Figure 22
36mm Wrench
3/4" Wrench
Figure 23
TIP
Blade Adapter
Hex Adapte
r
Blade Nu
t
To
Mower
Table of contents
Languages:
Other Neuton Lawn Mower manuals

Neuton
Neuton CE6.4 Quick start guide

Neuton
Neuton CE5.2 Quick start guide

Neuton
Neuton CE 5.3 Quick start guide

Neuton
Neuton CE6.3 Quick start guide

Neuton
Neuton CE 6.2 Maintenance and service guide

Neuton
Neuton CE6.4 Quick start guide

Neuton
Neuton CE 5.3 Quick start guide

Neuton
Neuton CE6.3 Quick start guide

Neuton
Neuton CE6.4 Quick start guide

Neuton
Neuton CE 6.2 Quick start guide


