New World FDW600W User manual

Control Panel . . . . . . . . . . . . . . . . . . . . . . . . 2
Dishwasher Features . . . . . . . . . . . . . . . . . 2
Wash Cycle Table . . . . . . . . . . . . . . . . . . . . 3
Water Softener . . . . . . . . . . . . . . . . . . . . . . 4
Deter
g
ent . . . . . . . . . . . . . . . . . . . . . . . . . . . 5
Rinse Aid . . . . . . . . . . . . . . . . . . . . . . . . . 6
Loading the Dishwasher Rack . . . . . . . . 7
At the end of the wash cycle. . . . . . . . . . . 9
Filtering System . . . . . . . . . . . . . . . . . . . . 10
Caring for the Dishwasher . . . . . . . . . .
Turning On the Appliance . . . . . . . . . . . . . . 3
. 11
About Electricity connection . . . . . . . . . . 11
Water Connection . . . . . . . . . . . . . . . . . . . 12
Dimensions . . . . . . . . . . . . . . . . . . . . . . . . 12
Before calling for service. . . . . . . . . . 13,14
. . . . . . . . . . . . . . . . . . 1
Error codes . . . . . . . . . 14. . . . . . . . .
Before you do anything with your new appliance,
you should read this manual. This manual
contains information about Safety, Operation,
Installation and Troubleshooting - all of which
will help you get the most from your appliance,
and save time and effort when installing.
In the unlikely event of there being any
problems with your appliance, please refer to
the Troubleshooting guide at the back of the
handbook - you may find the solution to your
problem there.
If the problems persist, or are not covered, call
0870 458 9661 and book a service engineers
visit.
Please be aware that service engineers may
charge if the fault in not electrical or mechanical.
Due to constant development, the manufacturer may make
changes to products without prior notice.
This appliance must be . In the event
of a malfunction or breakdown, grounding will
reduce the risk of electric shock by providing a
path of least resistance of electric current.
The plug must be plugged into an appropriate
outlet that is installed and in accordance
with all local codes and ordinances.
earthed
This
appliance is fitted with a power lead and plug.
earthed
1
Kee
p
children awa
y
from deter
g
ent and rinse aid, kee
p
child away from the open door of the dishwasher,
there could still be some detergent left inside.
ren
Do not abuse, sit on, or stand on the door or dish
rack of the dishwasher.
Do not touch the heating element during or
immediately after use.
Do not wash plastic items unless they are marked
dishwasher safe or the equivalent. For plastic
items not
so
marked,
check
the
manufacturer's
recommendations.
Use only detergent and rinse additives designed
for an automatic dishwasher. Never use soap,
laundry detergent, or hand washing detergent
in your dishwasher. Keep these products out of
the reach of children.
During installation, the power supply must not
be excessively or dangerously bent or flattened.
The door should not be left in the open position
since this could present a tripping hazards.
Do not tamper with controls.
Do not
p
lace an
y
heav
y
ob
j
ects or stand on the door
when it is open. The appliance could tip forward.
When loading items to be washed:
1) Locate sharp items so that they are not likely to
damage the door seal;
2) Load sharp knives with the handles up to reduce
the risk of
3 Warning:Knives and other utensils with sharp
points must be loaded in the basket with their
points down or placed in a horizontal position.
)
hand injuries (cuts etc.).
When using your dishwasher, you should prevent
plastic item from contacting with heating element.
If the supply cord is damaged, it must be replaced
by the manufacturer or its service agent or a
similarly qualified person.
Please dispose of packing materials properly.
Use the dishwasher only for its intended function.
Remove the door to the washing compartment when
removin
g
an old dishwasher from service or discardin
g
it.
The appliance is not intended for use by young
children or infirm persons without supervision.
Dishwasher detergents are strongly alkaline,they
can be extremely dangerous if swallowed.Avoid
contact with skin and eyes and keep children away
from the dishwasher when the door is open.
Young children should be supervised to ensure that
they do not play with the appliance.
Check that the detergent receptable is empty after
completion of the wash cycle.
Other means for disconnection from the supply must
be incorprated in the fixed wiring with at least 3mm
contact separation in all poles.
The maximum number of place settings to be washed
is 9.
The maximum
p
ermissible inlet water
p
ressure is 1M
p
a.
The minimum permissible inlet water pressure is 0.04Mpa.
Improper connection of this appliance to the
electrical supply is dangerous!
Make sure that your supply is suitable for this
appliance - if in doubt consult a qualified electrcian
for advise.
If the plug fitted to power lead is not suitable,
ensure that it is changed by a qualified person - do
not modify the plug in anyway.
Always use a new hose set to connect to the water
supply. Do not re-use old hose sets.
To get the best performance from your dishwasher,read all operating instructions before using it for the
f i r s t t i m e .
2
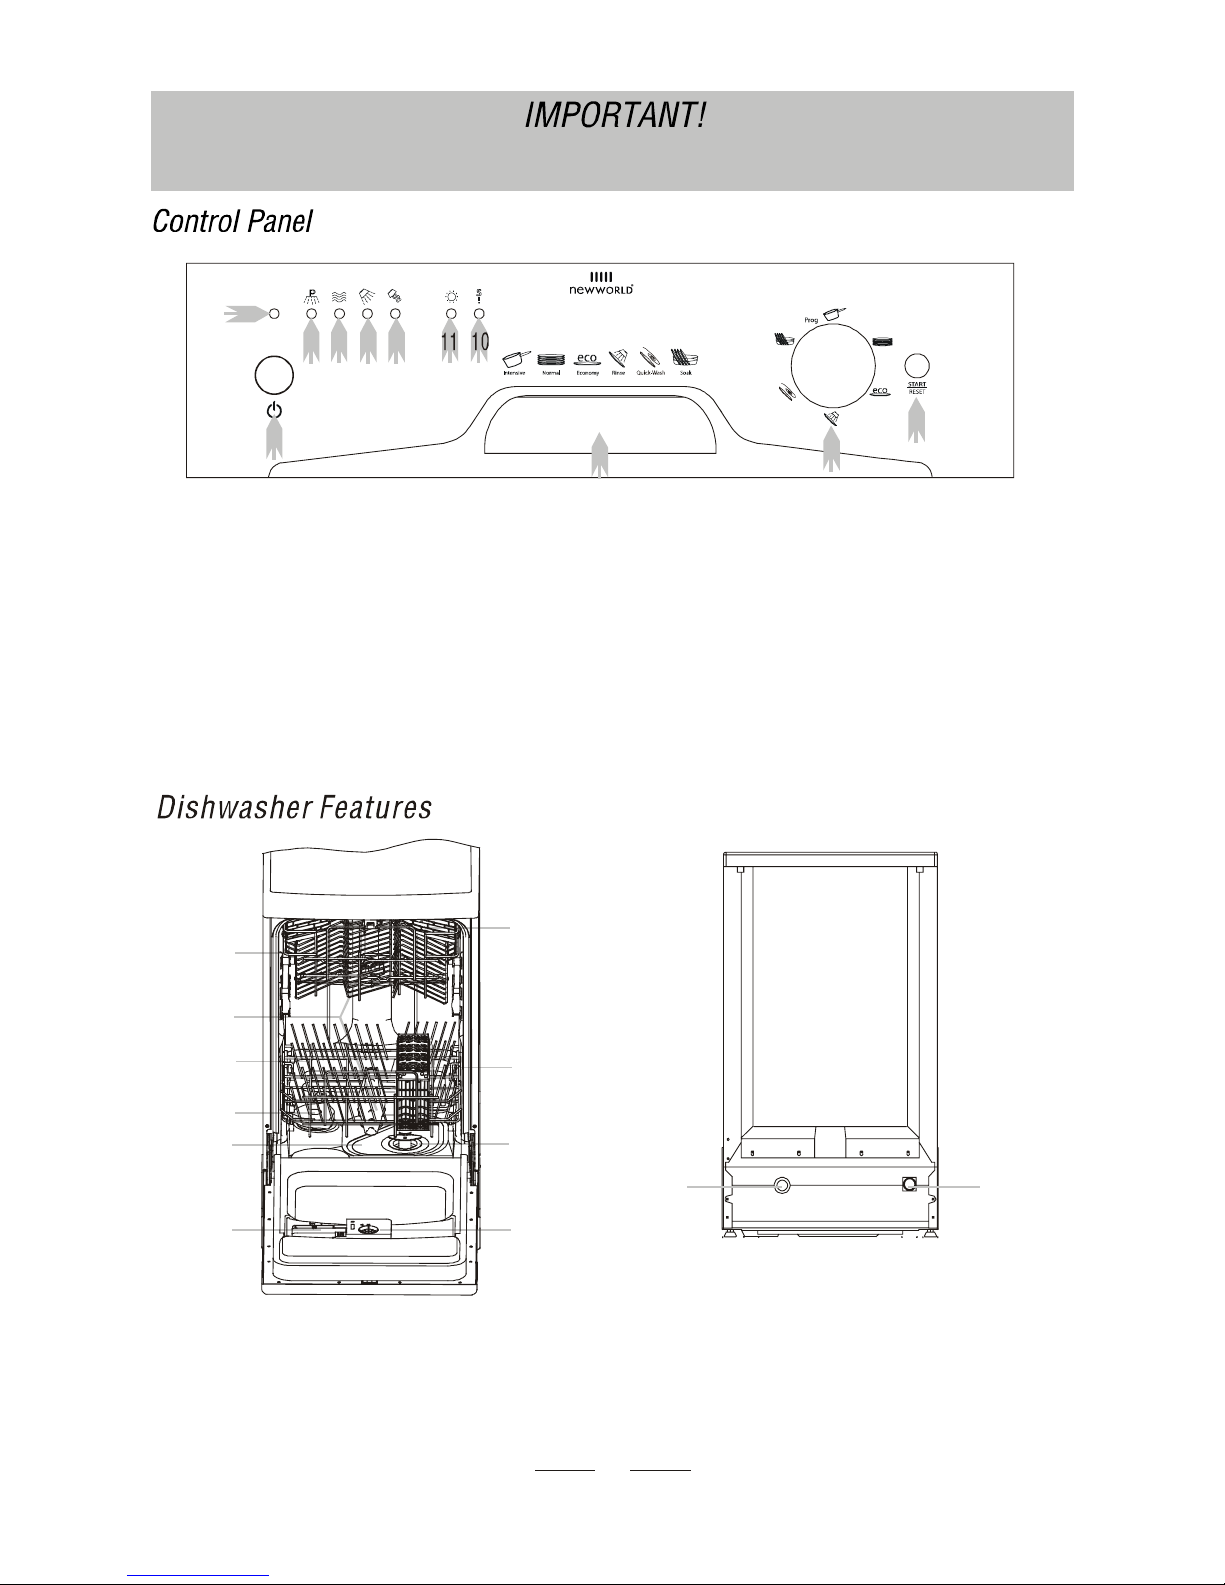
Upper Basket
Spray Arms
Lower Basket
Water Softener
Detergent Dispenser
Silverware BasketMain Filter
Cup Shelf
5
6
7
8
Rinse Aid Dispenser
Coarse Filter
Drain pipe connector
Inlet pipe connector
9
10
12
11
3
2
14
11 12
1
2
3
4
5
6
7
8
9
10
9
8
43
2
1
6
7
5
1. Pre-rinse light: Illuminates when the pre-rinse cycle is
active.
2. Wash light: Illuminates when the wash cycle is active.
3. Rinse light: Illuminates when the rinse cycle is active.
4. Drying light: Illuminates when the drying cycle is active.
5. Door handle: Use the door handle to open and close the
door.
6. Start/Stop button: Use this button to start the
dishwasher, and also the pause cycles.
7. Washing program selector: Turn the control knob
clockwise to select the required wash cycle.
8. ON/OFF button: Switches on the power supply.
NOTE: This model has a "memory function".
Should the power supply be interrupted while a
program is running, it will resume in the same
place once power is restored. You cannot cancel
a program by cutting off the power.
9. Power on light: Illuminates to show that the
appliance is switched on.
10. Salt aid warning light: Illuminates to show that
salt needs to be added.
11. Rinse aid warning light: Illuminates when rinse
aid needs to be added.

3
3
4
5
6
7
8
1
Draw out the lower and upper basket, load the dishes and
push them back. It is commended that loading the lower
basket first, then the upper one (see the section entitled
" Loading the Dishwasher " ).
2
Insert the
p
lu
g
into the socket.
The
p
ower su
pp
l
y
is 220-240VAC 50HZ, the s
p
ecification
of the socket is 12A 250 VAC, Make sure that the water
supply is turned on to full pressure.
1
2
3
For normall
y
soiled loads,
such as , plates,glasses
and lightly soiled pans.
standard daily cycle.
pots
Pre-wash
-wash
Wash (47 ℃)
Rinse (70 ℃)
Drying
Pre
For the heaviest soiled loads,
such as pots,pans,casserole
dishes and dishes with food
dried onto them.
For lightly soiled loads,such
as plates,glasses,bowls and
lightly soiled pans.
15
g
4/20 g
4/20 g
20 g
Pre-wash
-wash( 0℃
Wash (50 ℃)
Rinse
Rinse (70 ℃)
Drying
Pre 5 )
Wash (40 ℃)
Rinse (60 ℃)
Drying
Wash (45 ℃)
Rinse (70 )
Drying
℃
Normal Wash
(EN 50242)
For dishes that need to rinsed
and dried only
To rinse dishes that you
plan to wash later that day.
Pre-wash
15 g
A shorter wash for lightly
soiled loads that do not
need drying.
Wash (40 ℃)
Rinse (55 ℃)
Rinse
Enusre that the door is properly closed.
A click will be heard when the door is full
y
closed.
When the program has finished, switch off the dishwasher by
pressing the on/off button.
Changing the program
A
p
ro
g
ram can be chan
g
ed if it has been runnin
g
for a short
time, otherwise the deter
g
ent ma
y
have been released into the
appliance and you may need to re-fill the dispenser. You
cannot cancel a program by switching off the power.
Press and hold the re-set button for more than 3 seconds.
This cancels the current program.
Turn the washing program selector control knob to the
revised wash program.
Press the start / stop button to start the revised wash
program.
Note: You can open the door while the appliance is in use. The
wash cycle will pause while the door is open, and resume again
10 seconds after the door is closed.
If all of the lights on the control panel begin to flash, this indicates that the dishwasher is faulty. Please turn off the main electric
supply, and the water before calling for a service engineer. Do not use the appliance until a service engineer advises you to do so.
New World Customer Care Centre Helpline: 0870 458 9661
4
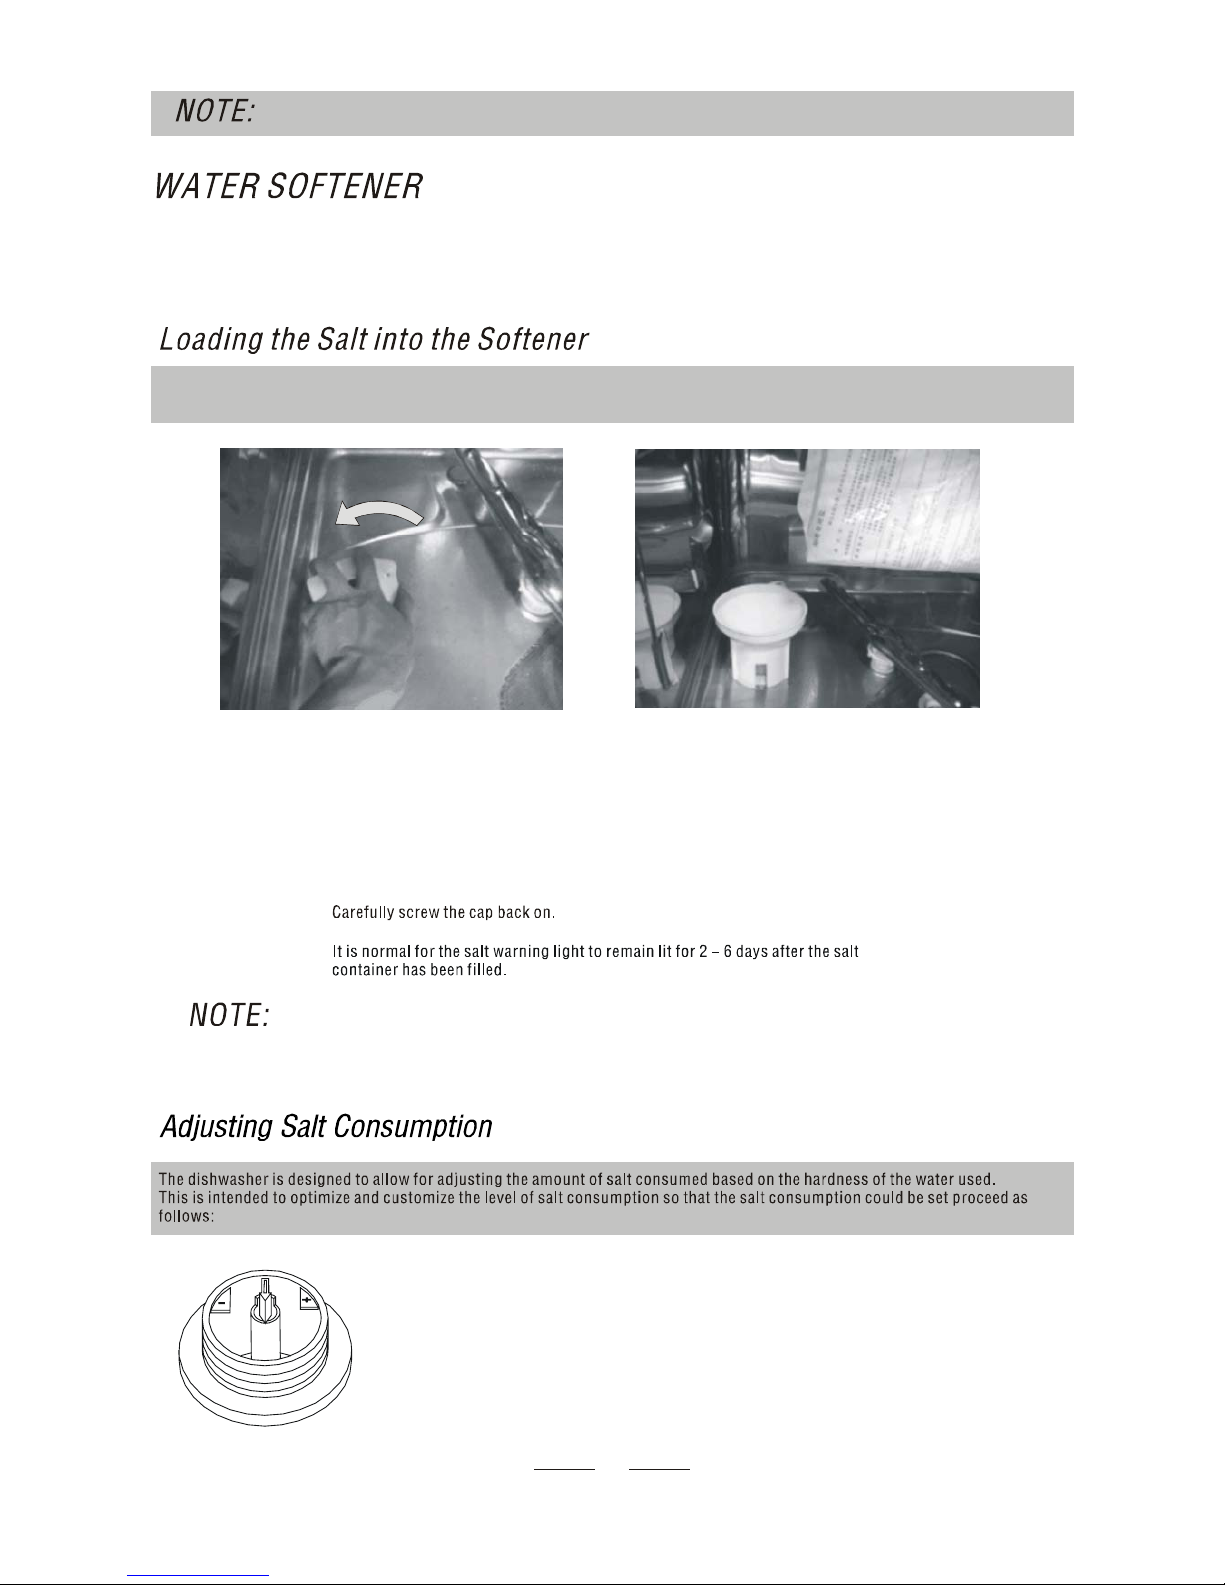
Remove the lower basket and then unscrew and remove the cap from the salt
container.
If you are filling the container for the first time ,fill 2/3 of its volume with water
(around 500ml).
Place the end of the funnel(supplied) into the hole and add about 1.2kg of
salt .It is normal for a small amount of water to spill out of the salt container
1
2
4
3
5
Always use salt which is intended for use with dishwashers - never use ordinary table salt.
The salt container is located beneath the lower rack and should be filled as follows:
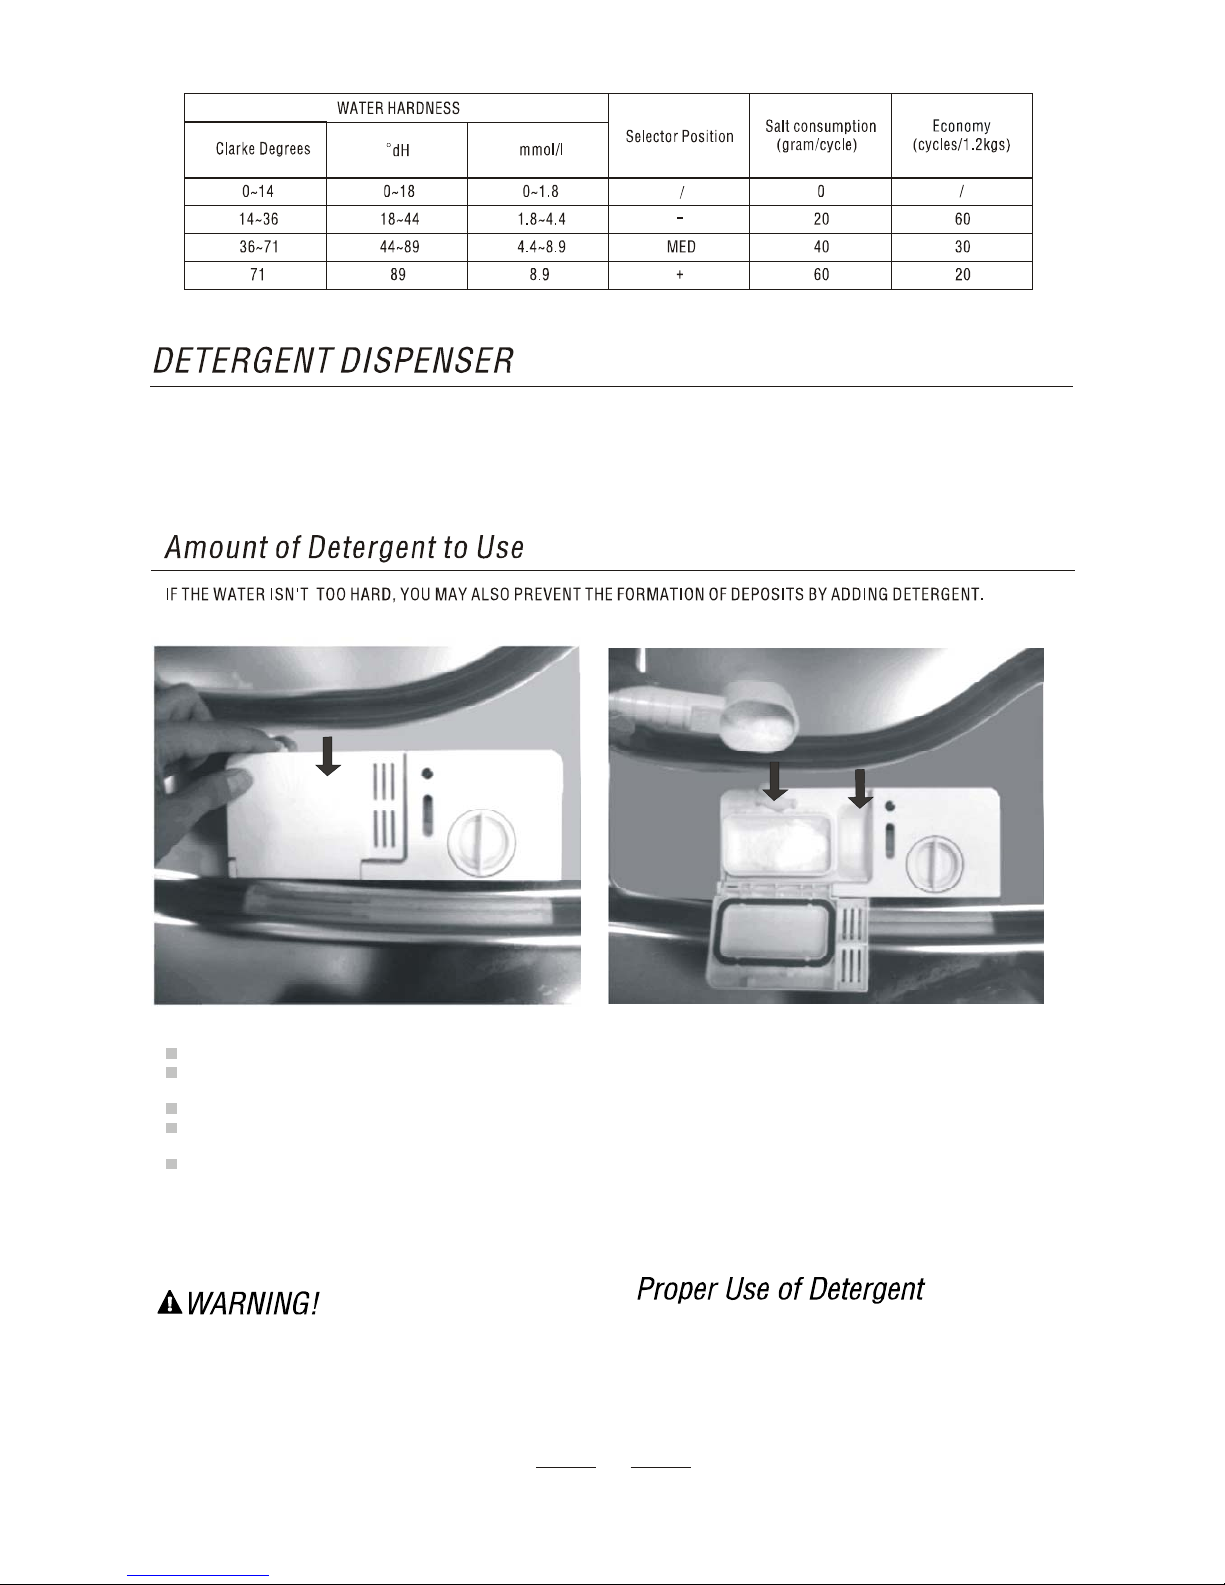
The hardness of the water varies from place to place. If hard water is used in the dishwasher, deposits will form on the dishes
and utensils.
The appliance is equipped with a special softener that uses a salt specifically designed to eliminate lime and minerals from the
water.
If your model does not have a water softening facility, you may skip this part.
Unscrew the ca
p
from the salt container.
There is a rin
g
on the container with an arrow on it
(
see Fi
g
ure to the side
)
, if
necessary, rotate the ring in the anticlockwise direction from the "-" Setting
toward the "+" sign, based on the hardness of the water being used.It is
recommended that adjustments should be made in accordance with the following
schema:
1
2
1
2
. The salt container must be filled when the warning light is illuminated. On some occaisions, the
warning light may remain lit until the salt has fully dissolved.
. Should any salt spill into the inside of the appliance, run the soak program and this will rinse the salt
safely away.
Contact your local water board for information on the hardness of your water supply.
To remove hard water spots, try the following:
Run dishes through a normal wash program.
Remove all metal dishware, such as cutlery, pans, etc.,
from the dishwasher.
Do not add detergent.
Pour two cups of vinegar into a bowl and set the bowl face
up on the lower rack of the dishwasher.
Run the dishes through a normal wash program.
If this doesn't work, try the same process with 1 / 4 cup of
citric acid crystals instead of vinegar.
Use only detergent specifically made for use in dishwashers.
Keep your detergent fresh and dry. Don't put powder detergent
into the dispenser until you're ready to wash dishes.
Dishwasher detergent is corrosive! Take care to keep it out
of reach of children.
Deter
g
ent
for
p
re-wash
Detergent
for main wash
5
You should not need to add excess detergent to you dishwasher as it incorporates specially designed water softeners.
Always fill the detergent dispenser at the start of each cycle - see the wash cycle table above.
A normal wash usually requires one tablespoon of detergent - items which are heavily soiled may require extra.
Always make sure that you do not add the detergent too early - if left in the appliance for too long the detergent may become damp,
which can cause problems with dissolving.

As the rinse aid diminishes, the size of the black dot on the rinse
aid level indicator changes, as illustrated below.
Full
3 / 4 full
1 / 2 full
1 / 4 full - Should refill to eliminate spotting.
Empty
Try to ensure that the rinse aid never drops below 1/4 full.
To open the dispenser, turn the cap to the "open" (left)
arrow and lift it out.
Pour the rinse aid into the dispenser, being careful not to
overfill.
Replace the cap by inserting it aligned with "open" arrow
and turning it to the closed (right) arrow.
The rinse aid is released during the final rinse to prevent water
from forming droplets on your dishes that can leave spots and
streaks. It also improves drying by allowing water to "sheet" off
the dishes.
Your dishwashers are designed to use liquid rinse aids. The
rinse aid dispenser is located inside the door next to the
detergent dispenser. To fill the dispenser, open the cap and
pour the rinse aid into the dispenser until the level indicator
turns completely black. The volume of the rinse aid container is
about 140ml.
Be careful not to overfill the dispenser, because this could
cause oversudsing. Wipe away any spills with a damp cloth.
Don't forget to replace the cap before you close the dishwasher
door.
If you have soft water, you may not need rinse aid for it may
cause a white film to develop on your dishes.
A measured amount of rinse aid is released during the final rinse. As with detergent, the amount
of rinse aid needed for your dishes depends on the hardness of the water in your area. Too much
rinse aid can result in lather of foaming and cause cloudiness or streaks on your dishes. If the
water in your area is very soft, you may not need rinse aid. If you do,you can dilute the rinse aid
with an equal amount of water.
The rinse aid dispenser has six or four settings. Always start with the dispenser set on " 2 ". If spots
and poor drying are problems, increase the amount of rinse aid dispensed by removing the dispenser
lid and rotating the dial to "3". If the dishes still are not drying properly or are spotted, adjust the
dial to the next higher number until your dishes are spot-free. We suggest you to set on "4" .
(Factory value is "4".)
6
5
4
3
2
1
6
7
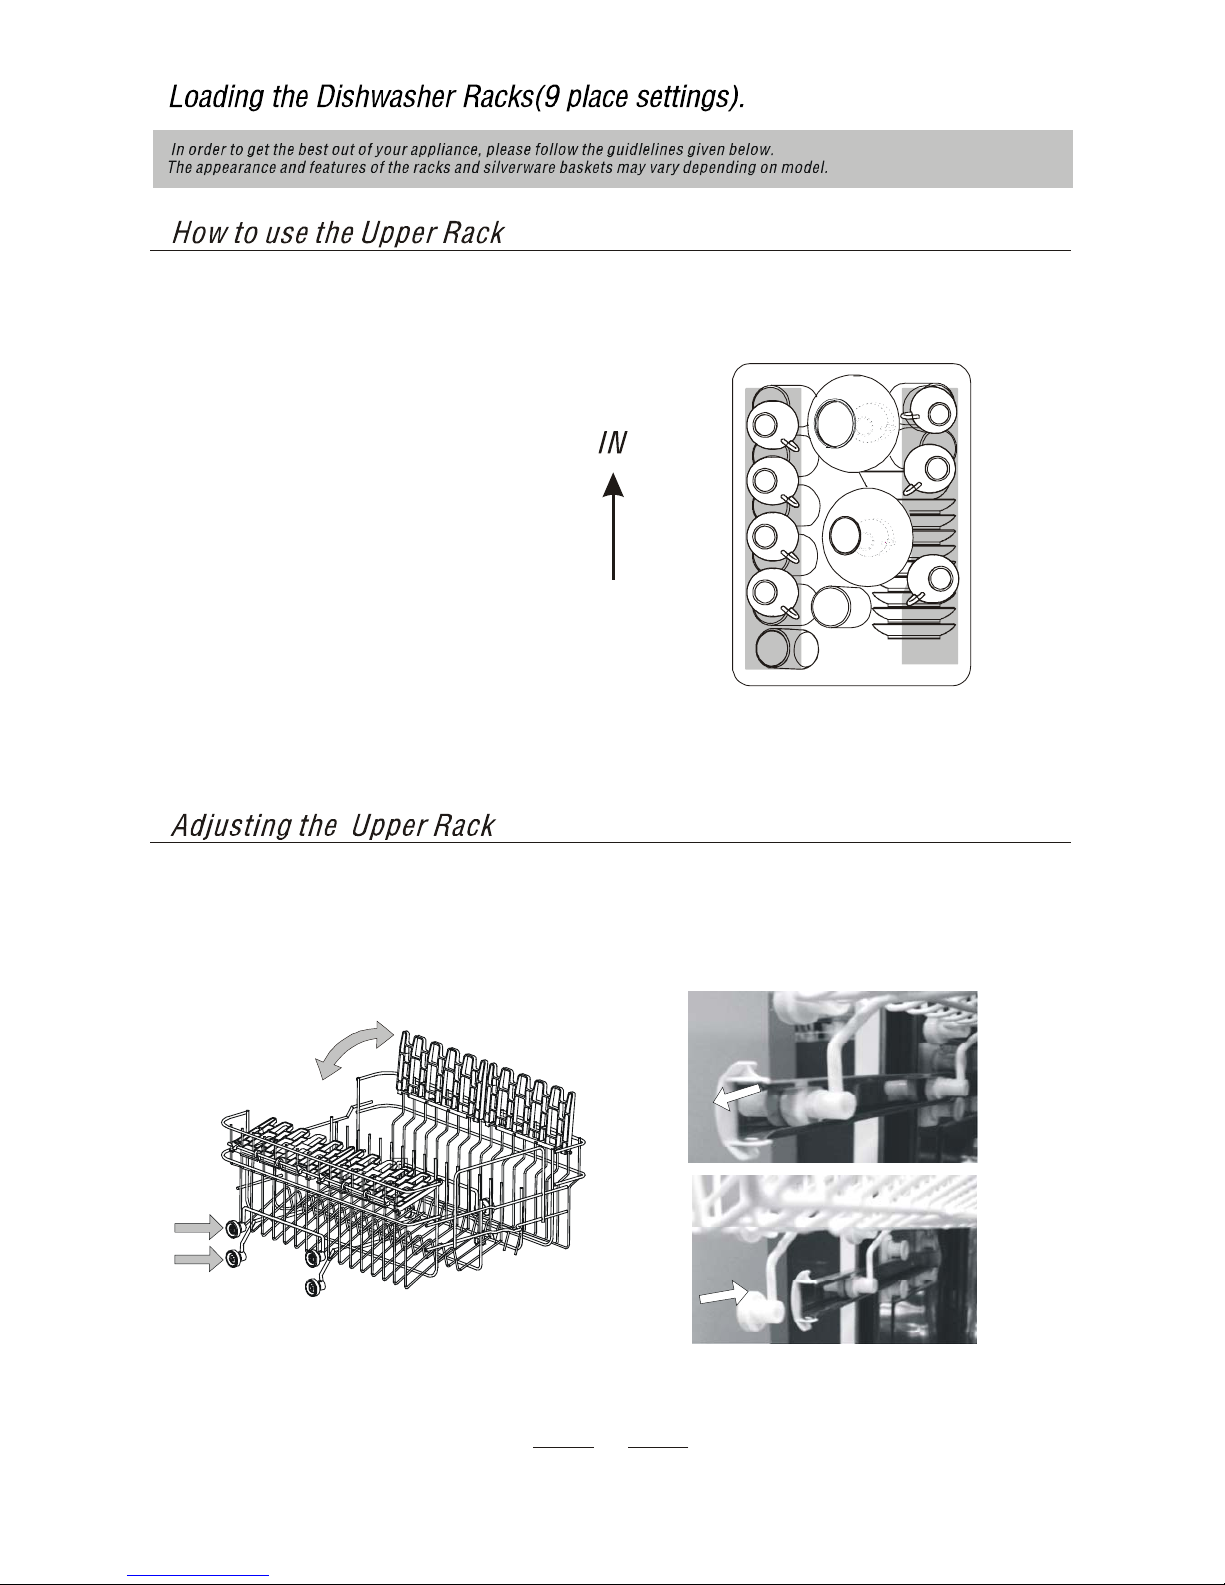
If re
q
uired,the hei
g
ht of the u
pp
er rack can be ad
j
usted in order to more s
p
ace for lar
g
e utensils either in the u
pp
er rack
or lower rack.
Lon
g
items,servin
g
cutler
y
,salad servers or knives should be
p
laced on the shelf so that the
y
do not obstruct the rotation of the
spray arms. The shelf can be folded back or removed when not required for use.
The upper rack can be adjusted for height by putting wheels of different height into the rails.
create
1
Cups
2
Small serving bowl
3
Large serving bowl
4
Glasses
Saucers
5
6
Dish
31
1
4
6
5
2
The upper rack is designed to hold more delicate and lighter dishware such as glasses, coffee and tea cup and saucers, as well
as plates, small bowls and shallow pans(as long as they are not too dirty).
Position the dishes and cookware so that they do not get moved by the spray of water.

8
We recommend that you place large items which are most difficult to clean into the lower rack: pots, pans, lids,
serving dishes and bowls, as shown in the figure to the right.
It is preferable to place serving dishes and lids on the side of the racks in order to avoid blocking the rotation of the
top spray arm.
Pots, serving bowls, etc, must always be
placed top down.
Deep pots should be slanted to allow water
to flow out.
The
bottom
rack
feature
fold
down
tine
rows
so
that
larger
or
more
pots
and
pans
can
be
loaded.
1
Oval platter
3
Soup plates
Dessert dishes
4
2
Dinner plates
5
Silverware basket
3
1
5
3
2
4
Note: Not all dishes are suitable for cleaning in a dishwasher.
If in doubt, please check.

When the workin
g
c
y
cle has finished, the buzzer of dishwasher will ,then sto
p
.
Turn off the a
pp
liance usin
g
the ON/OFF button, shut off the water su
pp
l
y
and o
p
en the door of
the dishwasher. Wait a few minutes before unloading the dishwasher to avoid handling the
dishes and utensils while the
y
are still hot and more susce
p
tible to breaka
g
e. The
y
will also dr
y
better.
sound for 8 seconds
9
Wooden cutlery and utensils-these will leach out and become unsightly.
Sensitive ornamental
g
lasses, craft utensil and vases,s
p
ecial anti
q
ue or irretrievable utensils.
It is highly unlikely that these items will be dishwasher-safe.
Plastic parts sensitive to hot water.
Copper and tin utensils.
Utensils which are soiled with ash,wax,lubricating grease or ink.
Absorbent materials such as sponges and cloths.
Aluninium and silver
p
arts have a tendenc
y
to discolour and fade durin
g
the wash c
y
cle.Even some t
yp
es of
g
lass ma
y
turn
cloudy after many wash cycles.
In future bu
y
utensils which identified as dishwasher-
p
roof.
Possible causes:
Type of glass or manufacturing process.
Chemical composition of detergent.
Water temperature and duration of dishwasher programme.
Suggested remedy:
Use glassware or porcelain dishes that have been marked 'dishwasher-proof' by the manufacturer .
Use a mild detergent that is described as 'kind to dishes'.if necessary,seek further information from degergent manufacturers.
Select a programme with as low a temperature.
To prevent damage,take glass and cutlery out of the dishwasher as soon as possible after the programme has ended.
Silverware should be
p
laced into the silverware basket - with the handle end downwards. If the rack has side baskets s
p
oons
should be loaded individually into the appropriate slots.
Place long items horizontally into the front of the upper rack.
Teas
p
oons
4
Sou
p
s
p
oons
2
Forks
1
Servin
g
fork
8
Servin
g
s
p
oon
6
Knife
5
3
Dessert spoons
7
Gravy ladle
4+4
3
3
3
2
8
6
5
5
5
5
5
5
5
5
5
3
3
6
1
3
3
3
4
4
4
4
4
4
4
1
1
1
1
1
1
1
1
2
2
2
2
2
2
2
2
7
3
Do not let items dro
p
throu
g
h the bottom of the basket.

10
Coarse filter
Lar
g
er items, such as
p
ieces of bone or
g
lass, that could clo
g
the drain are tra
pp
ed in the
coarse filter. To remove an item cau
g
ht in this filter,
g
entl
y
s
q
ueeze the tabs on to
p
of this
filter and lift it out.
For your convenience, we have placed the drain pump and filtering system within easy reach inside the tub. There are three
components of the filtering system: the main filter, the coarse filter, and the fine filter.
2
Fine filter
This filter holds soil and food residue in the sump area and prevents it from being
redeposited on the dishes during a cycle.
Main filter
Food and soil particles trapped by this filter are pulverized by a special jet on the lower spray
arm and washed down the drain.
1
3
Filter assembly
For best
p
erformance and results, the filter assembl
y
must be cleaned.
The filter efficientl
y
removes food
p
articles from the wash water, allowin
g
it to be
recirculated durin
g
the c
y
cle. For this reason, it is a
g
ood idea to remove the lar
g
er
food
p
articles tra
pp
ed in the filter after each wash c
y
cle b
y
rinsin
g
the semicircular
filter and cup under running water. To remove the filter assembly, pull on the cup
handle in the upward direction. The entire filter assembly should be cleaned
once a week.
To clean the coarse filter and the fine filter, use a cleanin
g
brush. Then, reassemble
the filter parts as shown in the figures left and reinsert the entire assembly in the
dishwasher, positioning in its seat and pressing downward.
The dishwasher must never be used without the filters. Improper replacement of the
filter ma
y
reduce the
p
erformance level of the a
pp
liance and dama
g
e dishes and utensils.
If your dishwasher is left in an unheated place during the winter, ask a service technician to:
Cut off electrical power to the dishwasher.
Turn off the water supply and disconnect the water
inlet pipe from the water valve.
Drain water from the inlet and water valve. pipe
(Use a pan to catch the water.)
Reconnect the water inlet to the
water valve.
pipe
Remove the filter in the tub the bottom
and use a sponge to soak up water
in sump.
5
4
3
2
1
ATTENTION: Do not put the fine filter upside down
.
A forgotten dish can be added any time before the detergent cup opens.
Please press the start button
.
Do not open the door until the water spray action stops.
Steam may rise out of the dishwasher.
Add forgotten dishes.
Close the door and Press the Start button to start washing.
4
3
2
1
It is necessar
y
to clean the s
p
ra
y
arms re
g
ularl
y
for hard water chemicals will clo
g
the
s
p
ra
y
arm
j
ets and bearin
g
s. To remove the s
p
ra
y
arm, screw off the nut clockwise to take
out the washer on top of the spray arm and remove the arm. Wash the arms in soapy and
warm water and use a soft brush to clean the jets. Replace them after rinsing them
thoroughly.
11
Never use a s
p
ra
y
cleaner the door
p
anel for it could dama
g
e the door lock and electrical com
p
onents. It is not
allowed to use the abrasive a
g
ent or some
p
a
p
er towel becauseof the risk of scratchin
g
or leavin
g
s
p
ots on the stainless steel surface.
or steam cleaners
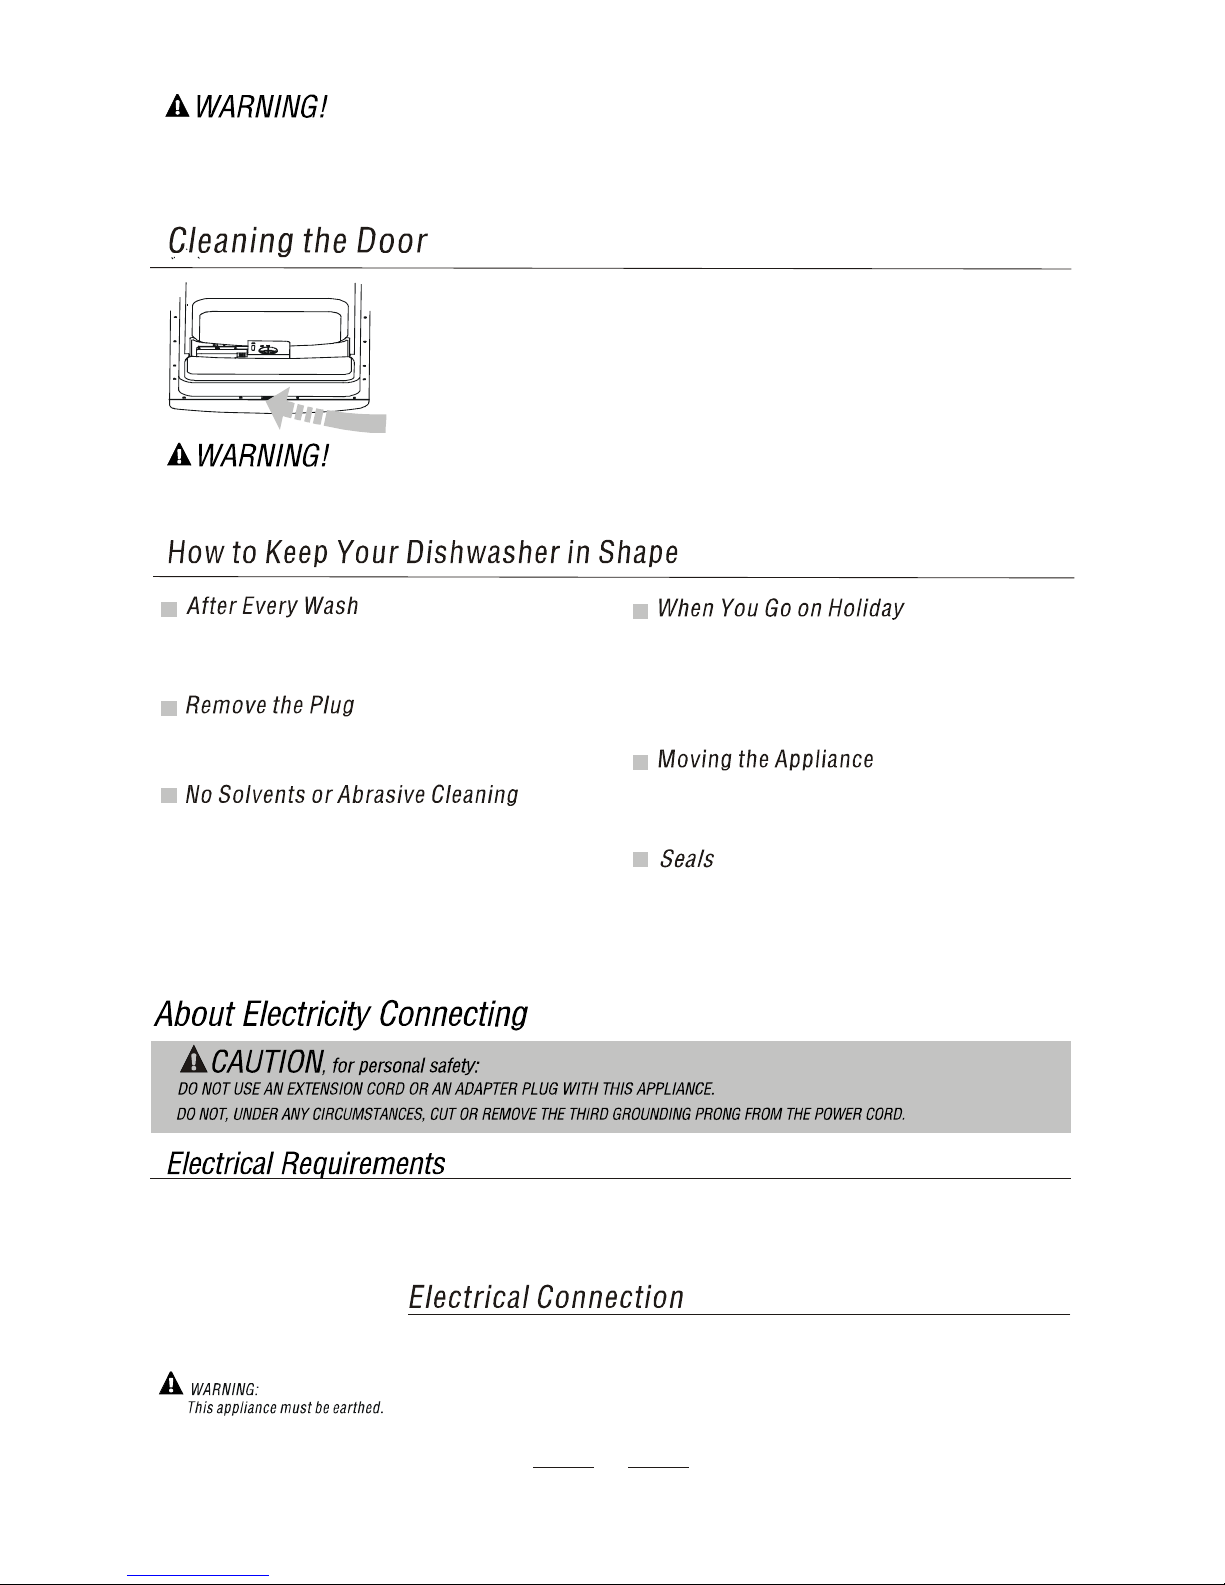
To clean the ed
g
e around the door,
y
ou should use onl
y
a soft warm, dam
p
ra
g
. To
p
revent
p
enetration of water into the door lock and electrical com
p
onents, do not use a s
p
ra
y
cleaner
of any kind.
Also, never use abrasive cleaners or scouring pads on the outer surfaces because they will
scratch the finish. Some papers towels can also scratch or leave marks on the surface.
After every wash, turn off the water supply to the
appliance and leave the door slightly ajar so that
moisture and odors are not trapped inside.
Before cleanin
g
or
p
erformin
g
maintenance, alwa
y
s
remove the
p
lu
g
from the socket. Do not run risks.
To clean the exterior and rubber
p
arts of the dishwasher,
do not use solvents or abrasive cleaning products.
Rather, use only a cloth and warm soapy water.
To remove spots or stains from the surface of the
interior, use a cloth dampened with water and a little
white vinegar, or a cleaning product made specifically
for dishwashers.
When
y
ou
g
o on holida
y
, it is recommened that
y
ou run a
wash cycle with the dishwasher empty and then remove
the
p
lu
g
from the socket, turn off the water su
pp
l
y
and
leave the door of the a
pp
liance sli
g
htl
y
a
j
ar. This will hel
p
the seals last longer and prevent odors from forming
within the appliance.
If the a
pp
liance must be moved, tr
y
to kee
p
it in the vertical
position.If absolutely necessary, it can be positioned on
its back.
One of the factors that cause odors to form in the
dishwasher is food that remains tra
pp
ed in the seals.
Periodic cleanin
g
with a dam
p
s
p
on
g
e will
p
revent this
from occurring.
Please see the ratin
g
lable to know the ratin
g
volta
g
e and connect the dishwasher to a
pp
ro
p
riate
p
ower su
pp
l
y
,Use re
q
uired fuse
13 amp. Fused electrical supply is required-copper wire only. Time delay fuse or circuit breaker recommended and provide
separate circuit serving only this appliance. Outlet should be placed in adjacent cabinet.
After making sure that the voltage and the frequency values for the current in the home
correspond to those on the rating plate and that the electrical system is sized for the
maximum voltage on the rating plate, insert the plug into an electrical socket which is
earthed properly. If the electrical socket to which the appliance must be connected is not
appropriate for the , replace the socket,rather than using a adaptors or the like as
they could cause overheating and burns.
plug
Never run the dishwasher without the filters in
p
lace.
When cleanin
g
the filters, take care not to dama
g
e them. Filters can become dama
g
ed
q
uite easil
y
, leadin
g
to
p
erformance
being compromised.
12
If the sink is 1000 or hi
g
her from the floor, the excess water in hoses
cannot be drained directl
y
into the sink. It will be necessar
y
to drain excess
water from hoses into a bowl or suitable container that is held outside and lower
than the sink.
Connect the cold water supply hose to a threaded 3/4(inch) connector and make sure that it is
fastened tightly in place.
If the water
p
i
p
es are new or have not been used for an extended
p
eriod of time, let the water
run to make sure that the water is clear and free of impurities. If this precaution is not taken,
there is a risk that the water inlet can get blocked and damage the appliance.
The water su
pp
l
y
to the a
pp
liance can also be connected to the house hot water line
(
centralized s
y
stem, heatin
g
s
y
stem
)
,as lon
g
as it does not exceed a tem
p
erature of 60 C.
In this case, the wash cycle time will be shortened by about 15 minutes and the wash
efficiency slightly reduced.
The connection must be made to the hot water line following the same procedures as those
for the connection to the cold water line.
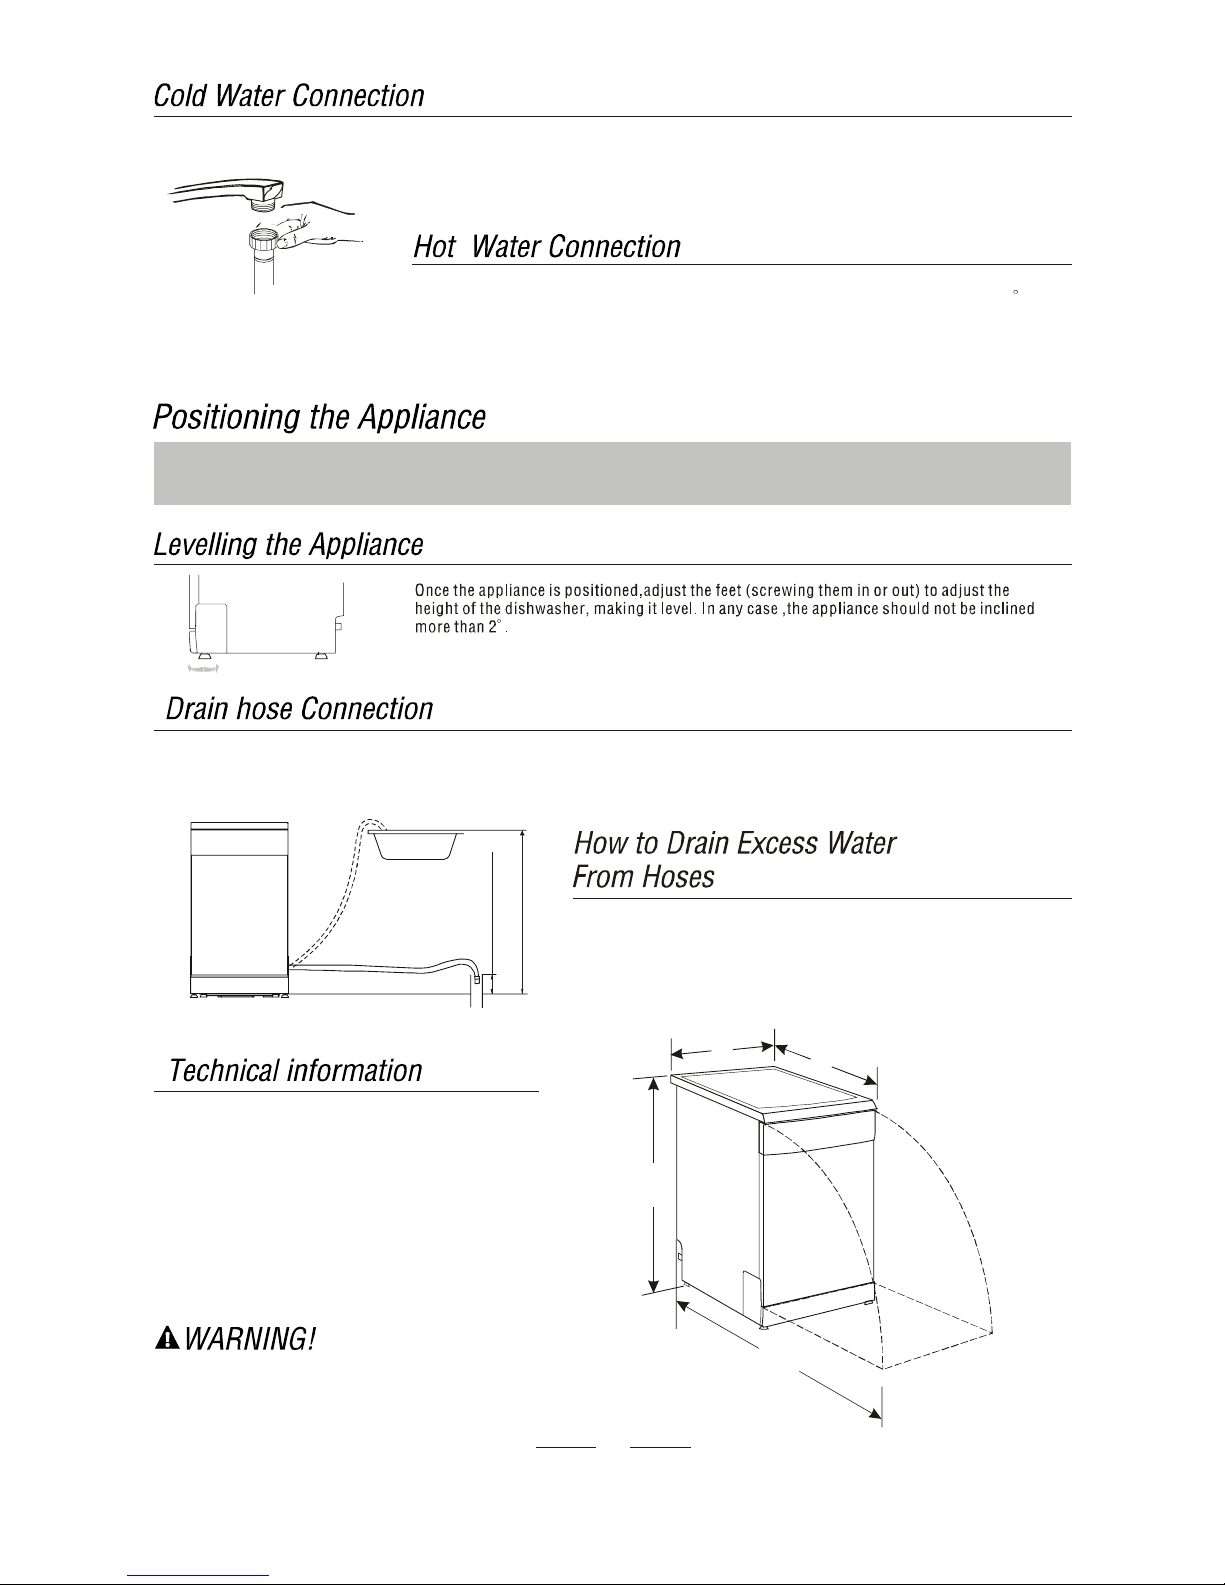
Insert the drain hose into a drain
p
i
p
e with a minimum diameter of 4 cm, or let it run into the sink, makin
g
sure to avoid bendin
g
or crimping it. Use the special plastic support that comes with the appliance. The free end of the hose must be at a height
between 40 and 100cm and must not be immersed in water.
Max 1000mm
Min 400mm
Position the appliance in the desired location. The back should rest against the wall behind it, and the sides, along the adjacent
cabinets or wall. The dishwasher is equipped with water supply and drain hoses that can be positioned to the right or the left to
facilitate proper installation.
Dimension: 450x600x850(mm)
Capacity: 9 Place setting
ater pressure: 0.04-1.0MPa
Power supply: See rating label
W
450 600
850
1155
In order to
p
revent excess water remainin
g
in the inlet hose,
please shut off the water supply. (For models with no safety
inlet hose)
Fuse blown, or the
circuit breaker activated
Replace fuse or reset circuit breaker. Remove any other
appliances sharing the same circuit with the dishwasher
Sound from soft food shredding action and detergent cup
opening.
Utensils are not secure
in the baskets or something
small has dropped into
the basket
Make sure that all dishes are secure and correctly placed.
Motor hums Dishwasher has not been used regularly. If you do not use it
often, remember to set it to fill and pump out every week,
which will help keep the seal moist.
Improper detergent
Add 1 gallon of cold water to the tub. Close and latch the
dishwasher, then drain out the water by slowly turning the
Dial until a drain period is reached. Repeat if necessary.
Spilled rinse agent Always wipe up rinse agent
spills immediately.
Detergent with
colorant was used
Make sure that the detergent is the one without colorant.
Rinse agent dispenser
is empty
Make sure that the rinse agent dispense is filled.
Improper program
Improper rack loading Make sure that the action of the detergent dispenser and
spray arms are not blocked by large dishware.
Extremely hard water
Low inlet
temperature
Overloading the
dishwasher
Improper loading
Old or damp powder
detergent
Empty rinse agent
dispenser
Incorrect dosage of
detergent
To remove spots from glassware:
Take out all metal utensils out of the dishwasher.
Do not add detergent.
Choose the longest cycle.
Start the dishwasher and allow it to run for about
18 to 22 minutes, then it will be in the main wash.
Open the door to pour 2 cups of white vinegar
into the bottom of the dishwasher.
Close the door and let the dishwasher complete
the cycle. If the vinegar does not work: Repeat
as above, except use 1/4 cup (60 ml)of citric acid
crystals instead of vinegar.
Some audible sounds are
normal
'
Make sure the dishwasher is turned on and the door is
closed securely.
Check that the water supply is connected properly and
the water is turned on.
Ensure that the appliance is properly plugged in.
Power supply is not
turned on
Water pressure is low
'
Overflow The system is designed to detect an overflow. When it
does, it shuts off the circulation pump and turns on the
drain pump.
Select stronger program
Use only the special dishwasher detergent to avoid suds.
If this occurs, open the dishwasher and let suds evaporate.
13
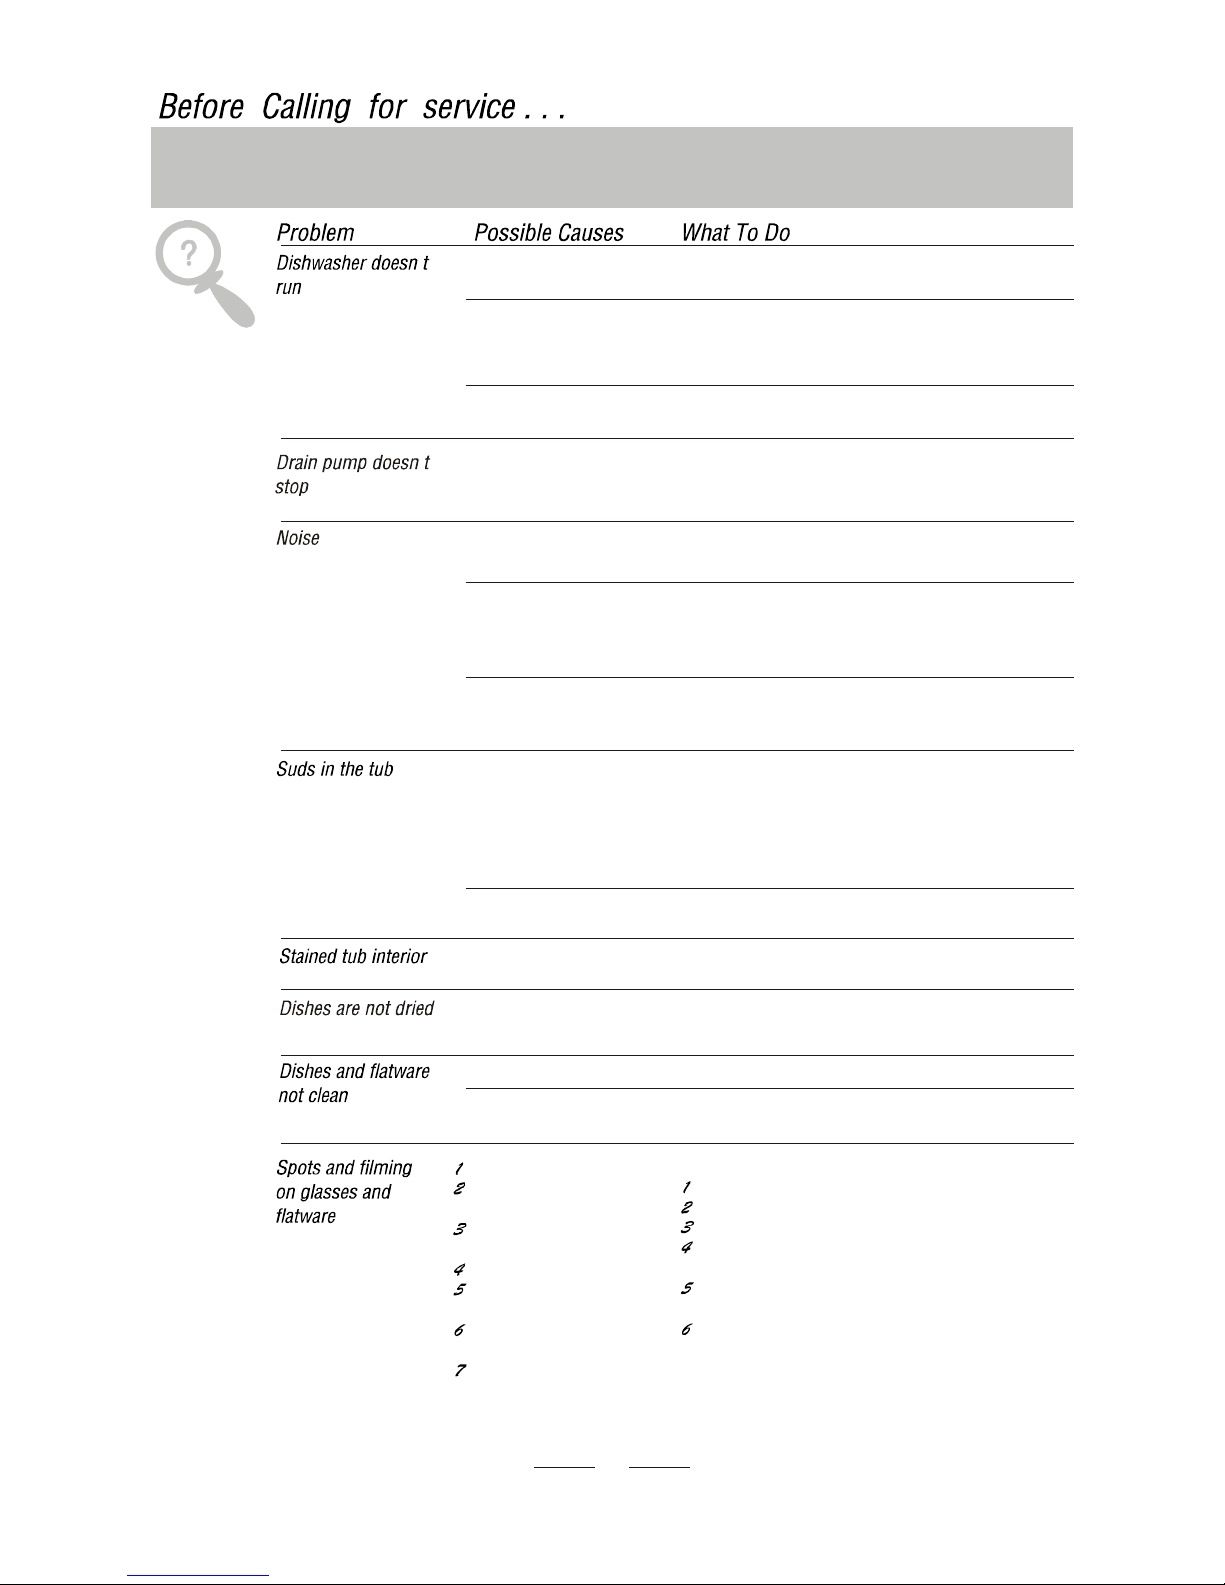
Troubleshooting tips.
The tips below may save you calling for a service engineer. Always make sure that you read these tips should you encounter any
difficulty when using your appliance.
Note: A service engineer may charge for his time and labour if he does not find a fault which is electrical or mechanical.
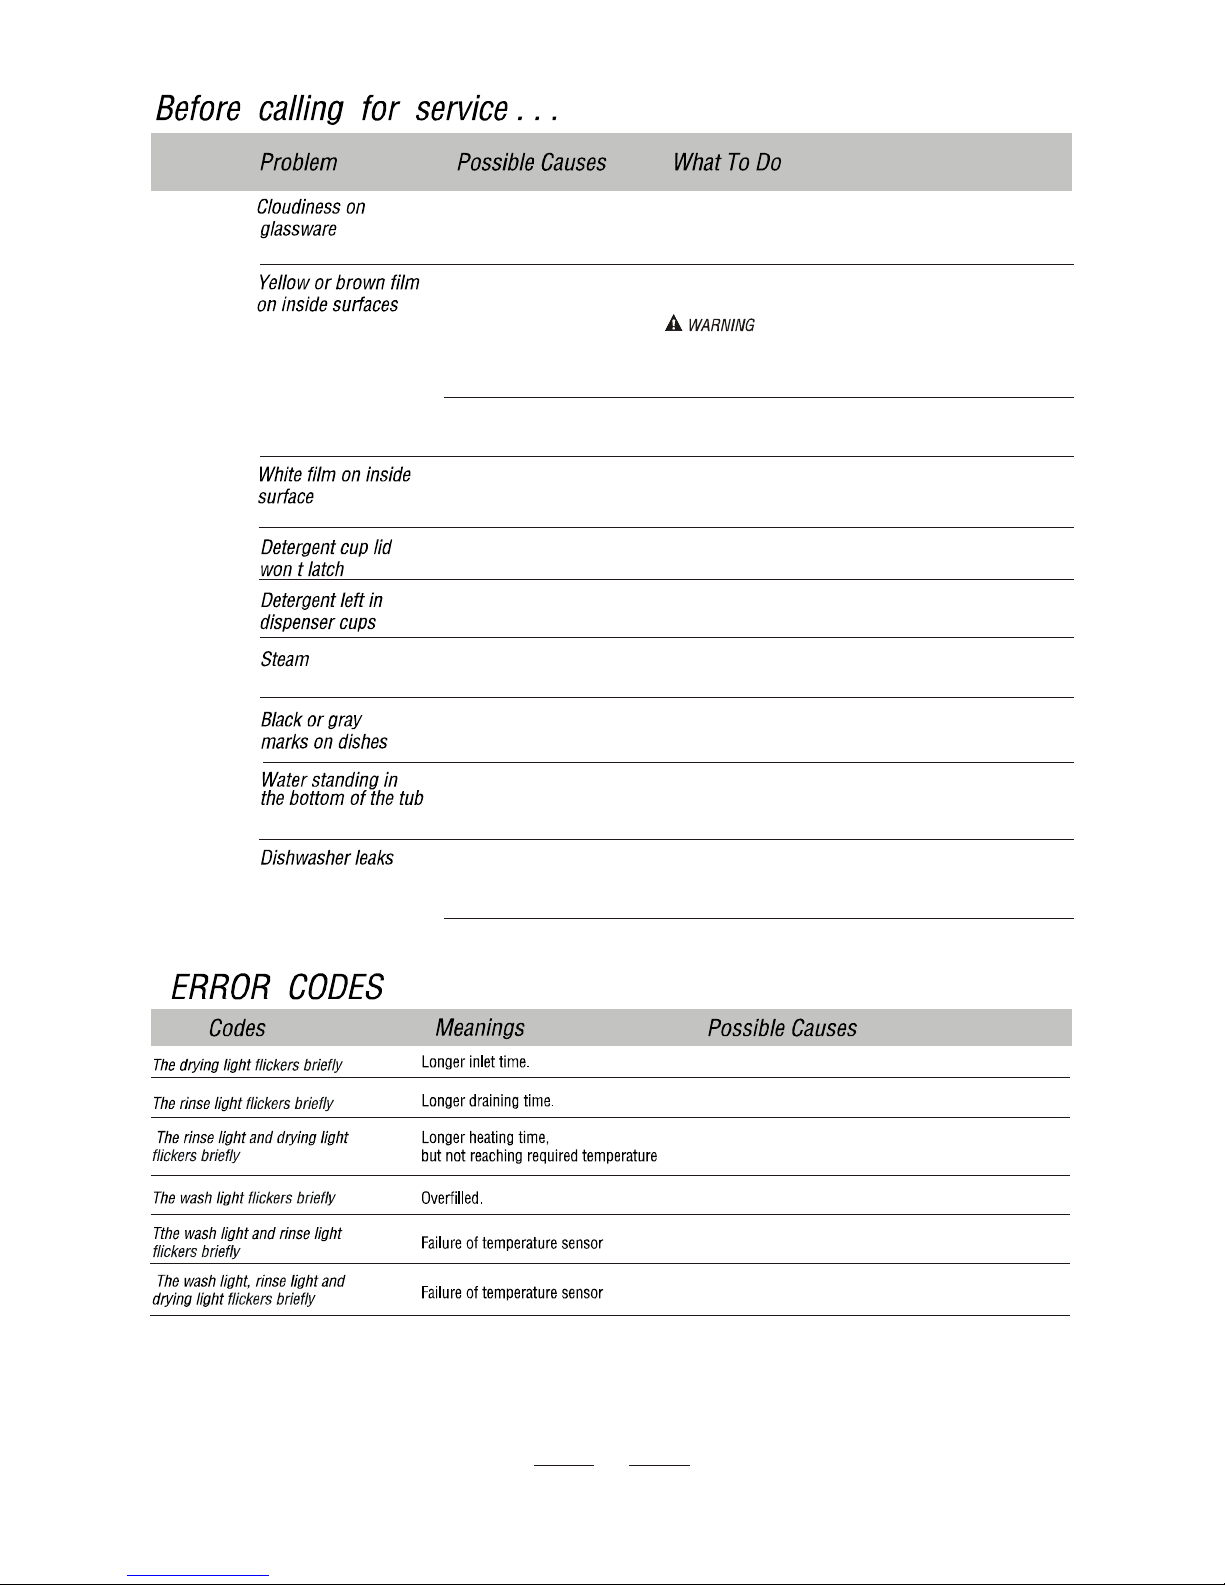
Combination of soft
water and too much
detergent
Use less detergent if you have soft water and select the
shortest cycle to wash the glassware and to get them clean.
Tea or coffee stains using a solution of 1/2 cup of bleach and 3 cups warm water
to remove the stains by hand.
You have to wait for 20 minutes after a cycle to let the heating
elements cool down before cleaning interior; otherwise, burns
will happen.
Iron deposits in water
can cause an overall film
You have to call a water softener company for a special filter.
Hard water minerals To clean the interior, use a damp sponge with dishwasher
detergent and wear rubber gloves. Never use any other cleaner
than dishwasher detergent for the risk of foaming or suds.
Dial is not in the
position
OFF Turn the Dial to OFF position and slide the door latch to the
left.
Dishes block detergent
cups
Re-loading the dishes properly.
Normal phenomenon There is some steam coming through the gap under the door
during drying and water draining.
Aluminum utensils have
rubbed against dishes
Use a mild abrasive cleaner to eliminate those marks.
'
This is normal A small amount of clean water around the outlet on
the tub bottom at the back of the tub keeps the water
seal lubricated.
Be careful not to overfill the rinse aid dispenser.
Spilled rinse aid could cause oversudsing and lead
to overflowing. Wipe away any spills with a damp cloth.
Make sure the dishwasher is level.
Overfill dispenser or rinse
aid spills
Dishwasher isn t level
'
Faucets is not opened.
The installation position of the drain pipe is too high.
Malfunction of temperature sensor or of heating element.
Too much inlet water. .
Short circuit or break of temperature sensor
Open circuit or break of temperature sensor
14
If none of the above improves the working of the appliance, you may need a service engineers visit.
Please call the New World Customer Care Centre Helpline on 0870 458 9661.
New World address: Stoney Lane, Prescot, Merseyside, L35 2XW
Table of contents
Other New World Dishwasher manuals

New World
New World FDW600W User manual

New World
New World NW60DWFSW User manual

New World
New World NWLCSL10FS User manual

New World
New World NW60DWINT User manual

New World
New World NWLC15FSBC User manual

New World
New World NW45DWINT User manual

New World
New World NWECO13FSW User manual

New World
New World NWINT15FSW User manual

New World
New World NWINT15FSW User manual


