NEXUSCCTV NEXUS XVR Series User manual

Coaxial HD XVR
User Manual
Version 20.1.29.3

III
Declaration
Copyright ©2020. All rights reserved.
Without the written permission of the company, any company or individual
should not extract, duplicate part of or all of contents of this manual and no
spreading in any form.
As the upgrade of the products or other reason, the contents of manual will
be upgraded periodically. Unless otherwise stipulated, the manual is used as
a Caution. All statements, information and suggestions of the manual do not
constitute any ostensive or implied guarantee.
Photographs, graphics, charts, and illustrations provided in the manual are
for explanation and illustration purposes only, and may differ from specific
products. Please prevail in kind.
Safety Precautions
CAUTION
Please modify the default password in time after the device is
controlled to avoid being stolen.
Please do not place and install equipment directly under the sunlight or
near heating device.
Please do not install equipment at moist place or place with dust or
soot.
Please keep equipment installed horizontally, or install equipment in a
stable place, avoid the equipment falling down.
Please avoid liquid dropping on the equipment, make sure no objects
filled (eg cups) with liquid on the equipment and prevent liquid from
leaking.
Please install the device in a well-ventilated place, do not block the
vents of the equipment.
Please only use equipment within rated input/output.
Please do not dis-assembly at liberty.
Please transport, use and reserve the equipment within allowing
humidity(10%~90%)and temperature(-10℃~+55℃).

IV
When cleaning the device, unplug the power cord and completely shut
off the power.
The dust on the circuit board inside the XVR may cause a short circuit
after being exposed to moisture. Regularly clean the circuit board,
connectors, chassis, and chassis fan with a soft brush. If dirt is difficult
to remove, wipe it off with a neutral detergent diluted in water and
wipe it dry.
Do not use volatile solvents such as alcohol, benzene, or thinner when
cleaning the device. Do not use strong or abrasive cleaning agents. This
can damage the surface coating.
Please purchase the XVR dedicated hard drive recommended by the
equipment manufacturer from the formal channels to ensure the
quality and usage requirements of the hard drive.
Make sure that there is no threat due to uneven mechanical load.
Make sure that the video and audio cables have enough controls to
install the cable. The bend radius of the cable should not be less than 5
times the cable diameter.
Make sure that the alarm cable is firmly installed and the contact is
good.
Make sure that the XVR is reliably grounded.
WARNING
Please do use the battery as requested, or it may lead to a battery fire,
explosion or risk of burning!
Please use the same type of battery when changing it.
Please do use recommended cord sets (power cords), do use within the
rated specifications.
If you connect the product to the Internet at your own risk, including
but not limited to products that may be subject to cyber-attacks,
hacking attacks, virus infections, etc., the company will not be
responsible for product abnormality, information leakage, etc., but the
company will timely to provide you with product-related technical
support.

V
NOTE
After receiving the product, please open the packing box, take out the
equipment, and confirm the packing product and accessories according
to the packing list in the box.
If you find any damage to the contents of the box or any missing parts,
please contact your dealer promptly.

VI
Contents
Chapter 1 Outline and Feature.......................................................................... 8
1.1 Outline..................................................................................................8
1.2 Default..................................................................................................8
1.3 Descriptive content agreement........................................................... 8
1.4 Function Features................................................................................ 9
Chapter 2 XVR Appearance..............................................................................13
2.1 Front Panel Introduction....................................................................13
2.2 Rear Panel Introduction..................................................................... 14
2.3 Mouse Operation Instructions...........................................................15
2.4 Input Method Introduction................................................................15
Chapter 3 Connecting XVR...............................................................................17
3.1 Hard Disk Installation......................................................................... 17
3.2 Device Connection............................................................................. 18
Chapter 4 XVR Startup..................................................................................... 19
4.1 System Initialization........................................................................... 19
4.2 Boot wizard........................................................................................ 20
4.2.1 Quick Startup Wizard..............................................................20
4.2.2 Forget Password......................................................................25
4.3 Preview Interface............................................................................... 29
4.4 Quick add device................................................................................30
4.5 Channel shortcut menu..................................................................... 33
4.5.1 PTZ...........................................................................................34
4.5.2 Image.......................................................................................36
Chapter 5 XVR Menu........................................................................................38
5.1 Shortcut menu................................................................................... 38
5.1.1 Manual Screenshot................................................................. 39
5.1.2 Alarm Status............................................................................40
5.1.3 System Info..............................................................................40
5.1.4 Poll...........................................................................................41
5.2 Main Menu.........................................................................................42
5.3 Operation........................................................................................... 44
5.3.1 Preview....................................................................................44
5.3.2 Playback.................................................................................. 45
5.3.3 File Management.................................................................... 53
5.3.4 Smart Analysis.........................................................................57
5.3.4.1 Face Database...................................................................... 57
5.3.5 Channel................................................................................... 69
5.3.6 Storage.................................................................................... 87

VII
5.3.7 System..................................................................................... 94
5.3.8 Maintenance......................................................................... 140
5.3.9 Alarm Information................................................................ 152
5.3.10 Backup Process................................................................... 154
5.3.11 Shutdown............................................................................155
Chapter 6 WEB Operation..............................................................................157
6.1 Internet connection......................................................................... 157
6.2 Browser Login...................................................................................158
6.3 Active X install.................................................................................. 159
6.4 Live View.......................................................................................... 160
6.5 Configuration................................................................................... 163
6.5.1 Local Config...........................................................................163
6.5.2 Channel................................................................................. 163
6.5.3 Storage.................................................................................. 168
6.5.4 System...................................................................................173
6.5.5 Maintain................................................................................191
6.6 Playback........................................................................................... 195
6.7 Picture.............................................................................................. 197
6.7.1 Search by Event Type............................................................ 197
6.7.2 Search by Face Comparison..................................................198
Chapter 7 Appendixes....................................................................................200
7.1 Q&A..................................................................................................200
7.2 Maintenance.................................................................................... 200

8
Chapter 1 Outline and Feature
1.1 Outline
The item is a five hybrid coaxial HD hard disk video recorder, compatible with
HDTVI, AHD and other coaxial HD specifications, free access to HDTVI, AHD,
CVI, CVBS, and network signal. You can disable the analog channels to
increase the number of IP channels, which combines the dual functions of
DVR and NVR. It characterizes local previewing, multi-picture division
displaying & local real-time storage of recorded files. It supports shortcut
operating of mouse and remote managing and controlling. It has two ways of
storage--Front storage & client-side storage. Front-end monitoring points can
be located anywhere on the network without geographical restrictions. And
the use of a number of IT high and new technology, both to achieve
independent HD monitoring, but also can be networked to form a strong
security system.
XVR can be widely used in financial, public security, military,
telecommunications, transportation, power, education, water conservancy
and other areas of security.
1.2 Default
The factory default super administrator account is admin and the
password is 12345.
XVR factory default IPv4 address: 192.168.1.88.
1.3 Descriptive content agreement
In order to simplify the description in this manual, the following conventions
are made:
The "device" mentioned in this manual mainly refers to the XVR.
The "IP device" mentioned in this manual mainly refers to IPC, IP DOME,
or DVS.
The "channel" mentioned in this manual refers to the XVR's IP channel.
Click the "X" or "Cancel" button to return to the previous screen.
Click All Interfaces Default to restore the current factory default
settings.
Click "Apply" and "Save" on all screens to save the current settings.

9
Click all the interfaces "Copy" to enter the copy channel interface, select
the channel, and copy the current channel configuration to the selected
channel.
1.4 Function Features
The XVR features are as follows:
● High-definition XVR series, support HDTVI, AHD, CVI, CVBS, IP input (5 in 1
hybrid).
● Support network equipment access and can work with network cameras,
network dome and network video server which with ONVIF protocol; Can
increase the number of IP channels by disable the Analog channels, come
with dual function of DVR and XVR.
● Each channel supports dual-stream encoding.
● The video coding parameters of each channel are independently adjustable,
including resolution, frame rate, code rate, image quality etc.
● Support composite stream and video stream encoding. Audio and video
synchronized when it is composite stream encoding.
● Each analog channel supports configuration of front-end camera OSD
information.
● Support HDTVI signal and analog switching adaptive.
● Support for watermarking technology.
● Support H.264/H.264+/H.265/H.265+ video compression format IPC
access(some HI3520DV400 series does not support H.264 +/H.265+).
HI3520DV400 (pure network) maximum supports up to 500W resolution
network camera access, HI3521D and HI3531D series (pure network)
maximum support 800W resolution network camera access.
● Support G711µ/G711A audio compression format, analog channels
support AAC audio compression format.
● USB2.0 or USB3.0 interface, support backup, software upgrades, mouse
operation.
● Support U disk or mobile hard disk in FAT32, NTFS, exFAT and other
formats.
● Support 23 languages: Chinese Simplified / Chinese Traditional / English /
Polish / Czech / Russian / Thai / Hebrew / Arabic / Bulgarian / Persian /
German / French / Portuguese / Turkish / Spanish / Italian / Hungarian /
Romanian / Korean / Dutch / Greek/Vietnamese.
● Support BitVision App, iVMS320 platform access.

10
Local Monitoring
Local Monitoring features as below:
● Supports local VGA and HD homology output, and HD supports up to 4K
resolution output.
● 4-channel XVR support 1 / 4 / 8 / 9 screen preview, 8-channel XVR support
1 / 4 / 8 / 9 / 16 screen preview, 16 channel XVR support 1 / 4 / 8 / 9 / 16
screen preview, 32-channel XVR support 1 / 4 / 8 / 9 / 16 / 25 / 32 screen
preview.
● Support adjust the preview channel order by drag the mouse.
● Support preview manually or auto-tour preview, automatic polling cycle
can be set.
● Supports video motion detection, video loss detection and intelligent
detection.
● Support UTC coaxial visual control protocol, can access the menu easily
when connect to HD-Analog camera; For HD-PTZ Camera, no need to
connect RS485, simple and convenient.
● Support a variety of mainstream PTZ decoder control protocols, support
preset points, cruise paths.
● Achieve IP PTZ camera control through the ONVIF protocol.
Hard disk management
Hard disk management features as below:
● Each SATA interface support up to 8T hard drive.
● Support hard disk formatting.
● Supports hard disk loss and hard disk abnormal alarm.
Video Record and Playback
Features as below:
● Video compression standard is H.264 / H.264+ / H.265 / H.265+, with
timed recording function.
● Support for setting up recording schedules using drawing and editing
methods.
● Support the main, sub-stream recording at the same time.
● Support cyclic writing.
● Maximum 6 recording time can be set in each day, and the recording
trigger mode can be set independently for different time periods.

11
● Recording trigger modes include timing, alarm, motion detection, motion
detection or alarm, and intelligent detection.
● Support video data retrieval and playback through channel number, video
type, file type, start and end time.
● Support electronic zooming of preview & playback images.
● Support pause, frame forward, frame rewind, fast forward, fast rewind,
slow play during playback, support mouse drag positioning.
● Support multi-channel simultaneous playback of video.
Data backup
Features as below:
● Support backup by USB interface and FTP server.
● Support U disk or mobile hard disk in FAT32, NTFS, exFAT and other
formats.
● Support batch backup by file and time.
● Support for iVMS320 clip-by-clip backups.
Alarm and exception management
Features as below:
● Some models support alarm input / output arming time setting.
● Some models support multi-channel external alarm input and output.
● Supports video motion detection alarm, video loss alarm, humanoid
detection alarm, face comparison alarm, network disconnection alarm, IP
Conflict alarm, Disk error alarm and Disk loss alarm.
● Various alarms can trigger pop-up alarm screen, voice warning, email
sending and trigger alarm output. Besides, video motion detection can
trigger any channel for video inspection; Various exceptions can trigger
audible alerts, email sending, and trigger alarm output.
Other Local Functions
Features as below:
● Users can quickly and easily set the system parameters by XVR buttons
frontal, USB mouse.
● Administrator can create multi-user and set permissions, which can be
refined to the channel.
● Complete operations, alarms, exceptions, and information logging and
retrieval.
● Some models support local alarms and upgrade front-end features.

12
Network Function.
Features as below:
● Support a 10M / 100M adaptive network interface, 3531D series support
10M /100M/ 1000M adaptive network interface.
● Support remote client privileged access, improve system security.
● Support TCP / IP protocol cluster, support DHCP, DNS, HTP, SMTP, RTSP,
UPnP and other protocols.
● Embedded WEB SERVER, support HTTPS protocol, improve the security of
network access.
● Support remote search, playback, download.
● Support remote access and configure parameters.
● Support remote access to equipment running status, system log and alarm
status.
● Support remote formatted hard disk, upgrade program, restart and other
operations for system maintenance.
● Support remote manual trigger & stop recording.
● Support remote manual trigger & stop alarm output.
● Support alarm pushes function.
● Support remote FTP server configuration.
● Support remote PTZ control.
● Support for BitVision App.
●Support ONVIF protocol access to platform.

13
Chapter 2 XVR Appearance
2.1 Front Panel Introduction
Figure 2-1
Table2-1
NOTE
The panel diagram does not reflect the product size and ratio. Please
refer to the actual product for details.
No.
Name
Description
1
Power switch
Turn the device on/off.
2
HDD indicator
The hard disk is blue when it is being read or
written.
3
Power indicator
It turns solid red when the device is turned
on.
4
Internet indicator
Green when the network connection is
normal.
5
USB interface
Can be connected to a mouse, U disk, mobile
hard disk and other equipment.
14
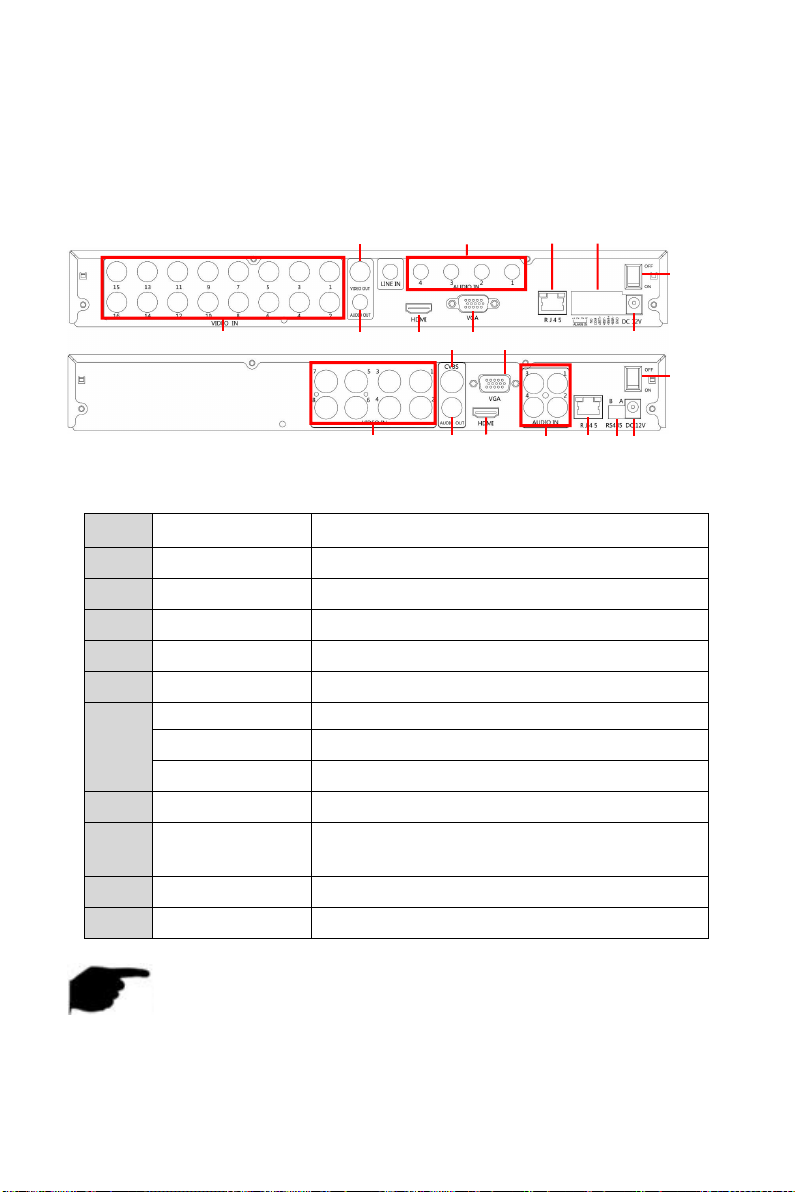
2.2 Rear Panel Introduction
The schematic diagram of the rear panel of the common equipment is as
follows:
Figure 2-2
Table 2-2
NOTE
For informational purposes only, subject to object.
No.
Name
Description
1
Power input
DC12V power input
2
switch
Power on/off
3
Video output
TV or monitor output(BNC)
4
Video input
Standalone analog video input(BNC)
5
Audio input
Standalone audio input
6
Alarm input
Alarm input port 4 /I
Alarm output
Alarm output port I/O
RS485
RS485 connect PTZ
7
network
Ethernet
8
VGA
VGA interface,for connecting to the
monitor
9
Audio output
Audio output port
10
HD
HD interface,for connecting to the monitor
3
9
10
4
6
7
10
5
9
4
2
2
5
7
8
3
8
1
1
6

15
2.3 Mouse Operation Instructions
Operate XVR through mouse left button, right button & scroll wheel.
Mouse actions
Function
Click left mouse
button
1. Select one of the options
2. Insertion cursor, enter or modify the value of a
parameter
3.During playback, click the timeline to switch the
playback progress.
Click right
mouse button
1. When interface not locking, click right mouse
button, system menu pops up
2. When interface locking, click right button on
real-time preview interface, login interface pop up
3.Click the right mouse button on the submenu, return
to the previous menu
Double-click
the mouse left
button
In the preview and playback state, switch between
single screen and multi screen.
Mouse drag
1. In the pan/tilt control state, the direction is rotated.
2. In the video occlusion alarm and motion detection
alarm area settings, set the area range.
3. Drag the area of the electronic zoom.
4. In the preview interface, select a channel and press
and drag to switch to other channel locations.
5. When playing back the video, drag the progress bar
to switch the video file to be played.
Slide mouse
scroll wheel
1.Time setting
2.Select the drop-down menu values
3.When previewing, you can switch the preview
channel.
4.When zooming in electronically, you can zoom in and
out of the video image.
Table 2-3
2.4 Input Method Introduction
Input method includes lowercase and uppercase English letters. Clicking
“ ” button on the left can switch the input method and the symbol

16
“ ” represents deleting incorrect input, as shown in Figure 2-3 and Figure
2-4:
Figure 2-3 Uppercase English input
Figure 2-4 Lowercase English input
17
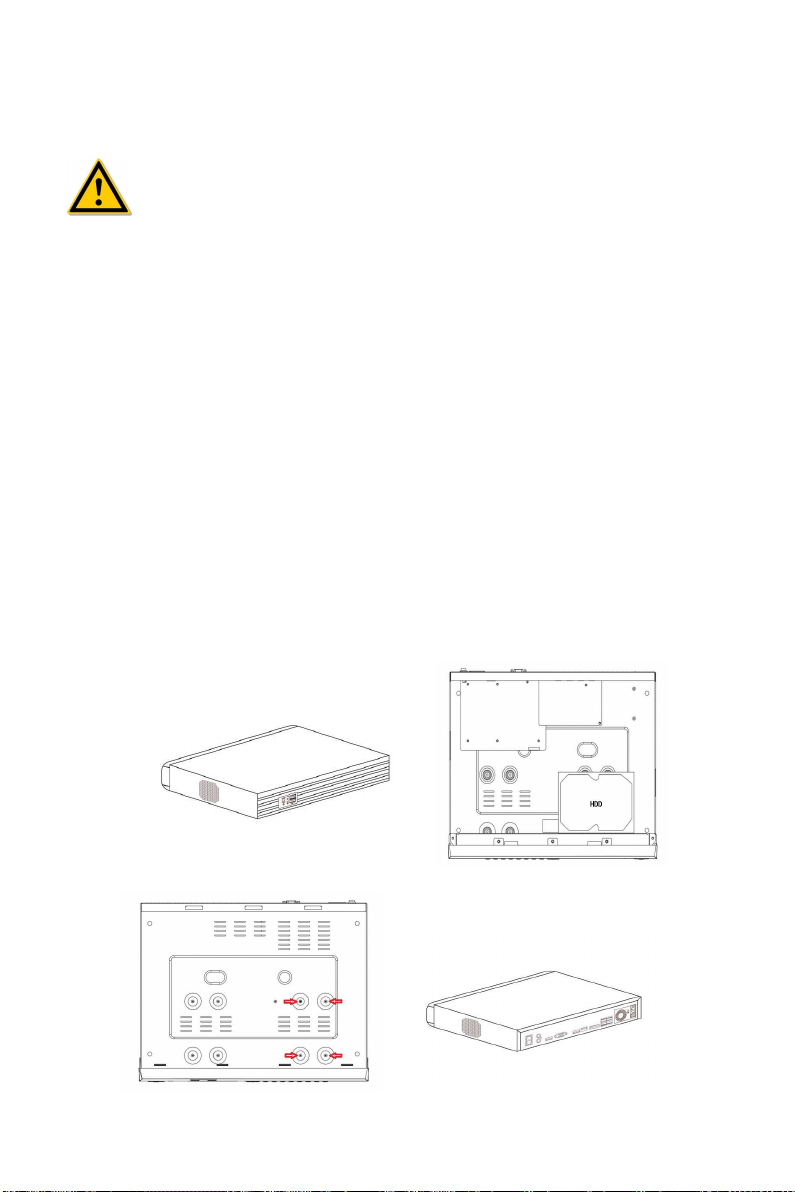
Chapter 3 Connecting XVR
3.1 Hard Disk Installation
CAUTION
Before installation, please confirm that the power has been
disconnected.
Please use the NVR dedicated monitor hard drive recommended by the
device manufacturer.
Installation tools
A Phillips screwdriver
Hard disk installation
The hard disk is installed as shown in Figure 3-1.
(1) Loosen the fixing screw on the cover, open the cover.
(2) Connect one end of the hard disk data cable and power cable to the
motherboard, and connect the other end to the hard disk.
(3) Hold the hard disk with hand, turn over the chassis, and fix the hard disk
with screw at the indicated position.
(4) Turn over the chassis, fix the cover with screw.
(1) (2)
18
(3) (4)
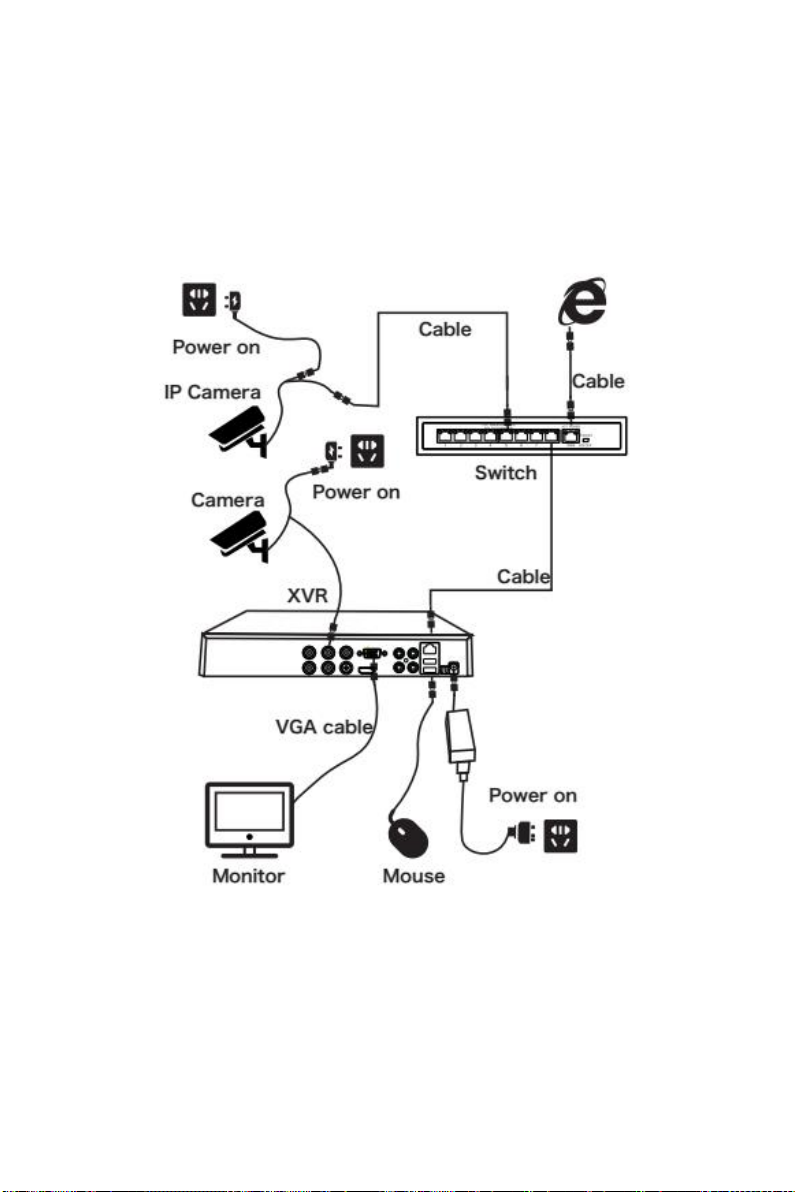
3.2 Device Connection
Use VGA cable/HD cable to connect the monitor to output video, or use BNC
coaxial cable to connect to the CVBS interface to output video. If the camera
is a controllable PTZ, connect the RS485 A and B lines of the PTZl to the
corresponding RS485 ports of XVR with wires, as shown in Figure 3-2 below:
Figure 3-2

19
Chapter 4 XVR Startup
4.1 System Initialization
The Step to turn on XVR are as follows:
○
1Connect the device to the analog camera, monitor and plug in the
mouse and power cord.
○
2Turn on the power switch on the rear panel to start the device. The
system initialization screen appears, as shown in Figure 4-1.
Figure 4-1
CAUTION
Please make sure that the connected voltage matches the requirements
of XVR, and ensure that the XVR ground terminal is well grounded.
When the power supply is not normal, it will cause the XVR to not work
properly, or even damage the XVR. It is recommended to use a
regulated power for power supply.
NOTE
After the device is started, you can perform simple configuration
through the startup wizard to make the device work normally.
20
4.2 Boot wizard
4.2.1 Quick Startup Wizard
Quickly configuration the XVR as shown in Figure 4-2:
○
1After the device starts, enter the "Boot Wizard" and click "Next Step".
Figure 4-2 ○
1
○
2 Then select a user, enter the password, select the system language and
click "Login" to login the system (the default username is admin, password is
12345).

21
Figure 4-3 ○
2
○
3When the login password is too simple, a security password prompt will
pop up. Click "Modify ".
Figure 4-2 ○
3
○
4Click the "New password" box, enter a new password, confirm the new
password, select the security question, enter the corresponding answer, click
"Save"; insert a USB flash drive on the device, and click "Export key".
Table of contents
Other NEXUSCCTV DVR manuals


