NGS Box User manual

User’s Manual
English 2
Français 16
Español 30
Deutsch 44
Italiano 58
Português 72
Polski 86
Box
Box TV
2
WARNING
1. Read this instructions.
2. Keep this instructions in a safe place for future
use.
3. Do not use this device close to the water.
4. Clean only with a dry cloth.
5. Do not block the ventilation grids.
6. Do not place the device close to high heat emit-
ters like heaters, high end ampliers, etc…
7. Do not damage the polarized plug and make
sure that the “Ground” connector of the plug is
properly connected to the ground. If this is not
the case, contact an electrician to repair your
electrical power installation.
8. Prevent the power cord from being stepped on
or cut to avoid shotrcircuits.
9. Only use the provided accessories to connect
your device do not trust accessories from other
vendors.
10. Unplug the device from power when thunder is
occurring of if it will not be used for a long time.
11. Please contact our after sale service in case
you detect any damage or malfunction on the
device. Do not try to repair on your own
(www.ngs.eu/support).
12. Do not place liquids or recipients with liquids
close to or on the device to avoid any liquid
getting into the device. This might damage the
device completely.
-
The precaution and risks plate is situated on the base of the device.

3
User’s Manual English
1. SPEAKERS
2. AUDIO IN JACK
3. MIC JACK
4. MIC LEVEL CONTROL
5. USB PORT
6. SD/MMC CARD SLOT
7. TFT DISPLAY
8. FUNCTION CONTROL
9. HANDLE
10. VOLUME CONTROL
11. BASS BOOST ON/OFF BUTTON
12. DVD/DVB BUTTON
MODE BUTTON
13. PREV/LEFT BUTTON
14. NEXT/RIGHT BUTTON
15. DVD DOOR
16. DVD DOOR OPEN AREA
17. FR/DOWN BUTTON
18. STOP/MENU BUTTON
19. PLAY/PAUSE & ENTER BUTTON
20. FF/UP BUTTON
21. TUNING CONTROL
22. BAND CONTROL
23. POWER INDICATOR
24. REMOTE SENSOR
25. FM STEREO INDICATOR
26. TELESCOPIC FM ANTENNA
27. VIDEO JACK
28. AUDIO RIGHT JACK
29. AUDIO LEFT JACK
30. DISPLAY ON/OFF SWITCH
31. BATTERY COMPARTMENT
32. TV ANTENNA
33. AC SOCKET
34. PHONES JACK
4
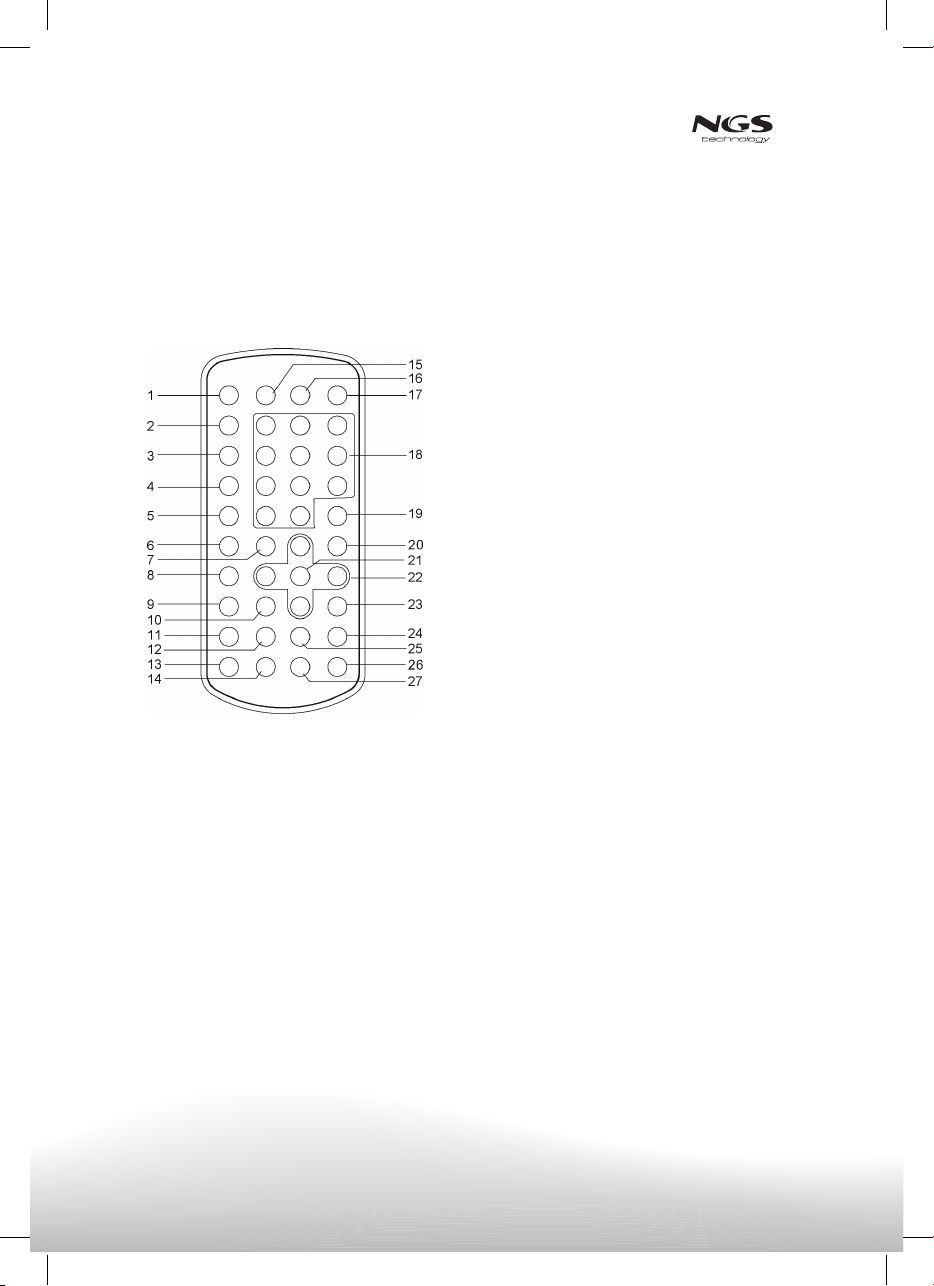
1. USB/DVD/CARD button
2. P/N button
3. PROGRAM/EPG button
4. REPEAT 1/ALL button
5. MENU button
6. SUBTITLE button
7. PLAY button
8. TITLE button
9. AUDIO button
10. PAUSE/STEP button
11. ANGLE button
12. ZOOM button
13. DVD/DVB button
14. TV/RADIO button
15. DISPLAY button
16. SETUP button
17. TFT ON/OFF button
18. NUMERIC buttons
19. CLEAR button
20. STOP button
21. SELECT button
22. NAVIGATION buttons
a. NAVIGATION LEFT button
b. NAVIGATION RIGHT button
c. NAVIGATION UP/CH+ button,
d. NAVIGATION DOWN/CH- button
23. SLOW button
24. NEXT&F.FWD button
25. PREV.&F.BWD button
26. SEARCH button
27. TEXT button

5
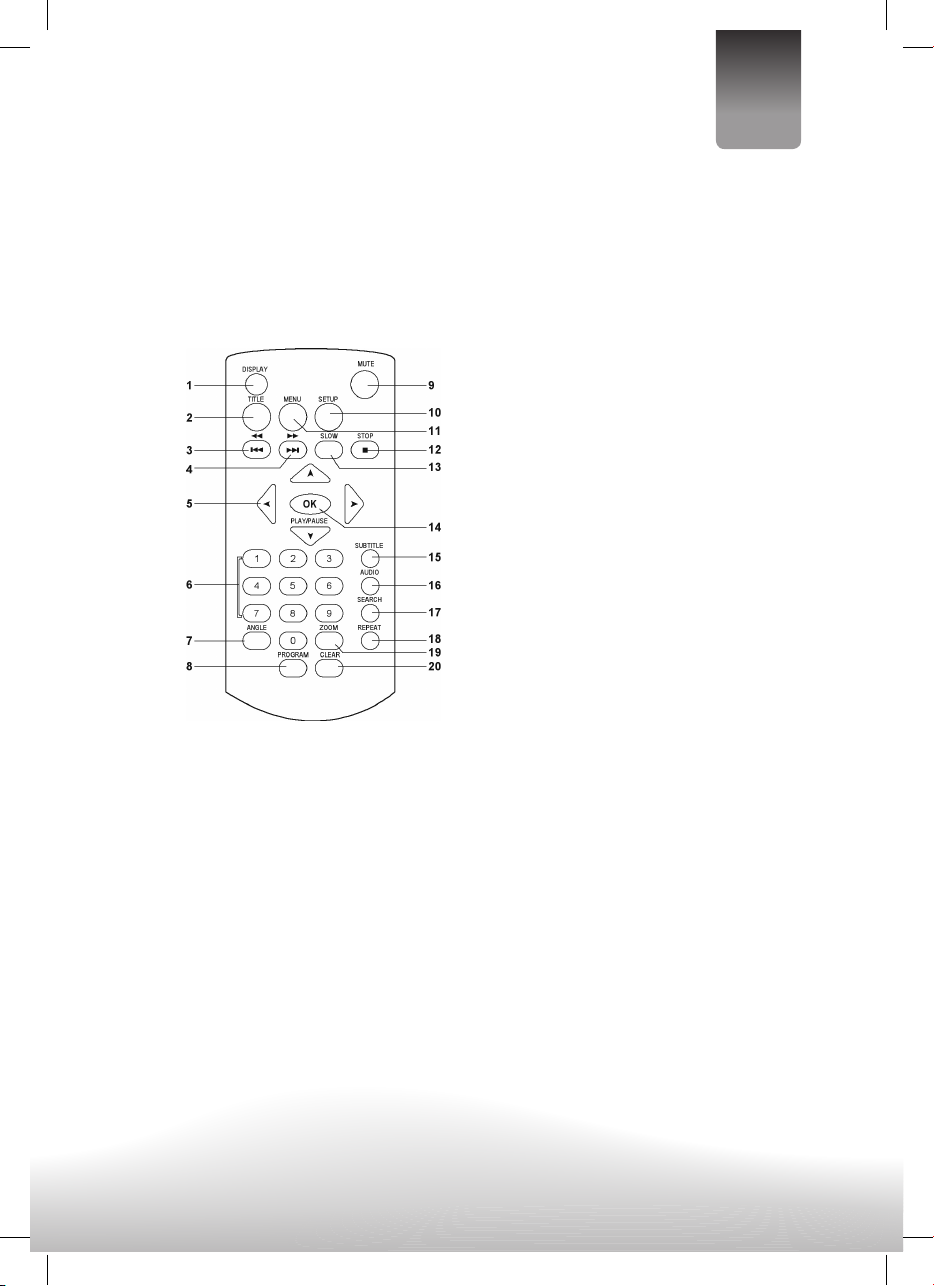
User’s Manual English
1. Screen Button
2. Title Button
3. PREV*F.BWD Button
4. NEXT* F.FWD Button
5. NAVIGATION Button
6. NUMÉRIC Buttons
7. ÁNGLE Button
8. PROGRAMM Button
9. MUTE Button
10. SYSTEM Button
11. MENU Button
12. STOP Button
13. Slow Button
14. OK (PLAY/ PAUSE) Button
15. SUBTÍTLE Button
16. AUDIO
17. SEARCH
18. REPEAT Button
19. ZOOM Button
20. CLEAR Button

6
· The mains plug is used as disconnect device, this device shall remain accessible for operation.
∙ In case of connection to a TV system It is recommended to use a multi-system TV.
∙ Ensure that all devices are completely disconnected from power before doing the connections between
them.
∙ Make sure you follow the colour coding when connecting audio, video cables.
∙ During DVD play, the TV volume may be at a lower level than during TV broadcasts, etc. If this is the
case, adjust the volume to the desired level.
∙ If the DVD/CD player is connected to the TV through a video cassette recorder, the image quality, might
not be satisfying, in this case connect the player directly to the TV.
∙ Batteries must be inserted taking care to match
the polarities shown. Make sure that the (+) and
(-) terminals are placed in the right direction.
∙ Never use batteries that show signs of electrolyte
leaks or cracking.
∙ Never dispose of used batteries in an open re.
∙ Keep batteries out of reach of children.
∙ Never recharge disposable batteries.
∙ Never short circuit battery terminals.
∙ Always remove used batteries from the appliance
case.
∙ Do not try to open the batteries.
∙ Do not mix up different kind of batteries or new
and already used batteries together.
∙ Only use batteries of the recommended or
equivalent type.
∙ When replacing used batteries, please comply
with applicable regulation relating to their
disposal. Please return them to a suitable
collection facility for environmentally friendly
disposal.
∙ For Lithium batteries, there is a risk of explosion
if battery is replaced by an incorrect type.
7
User’s Manual English
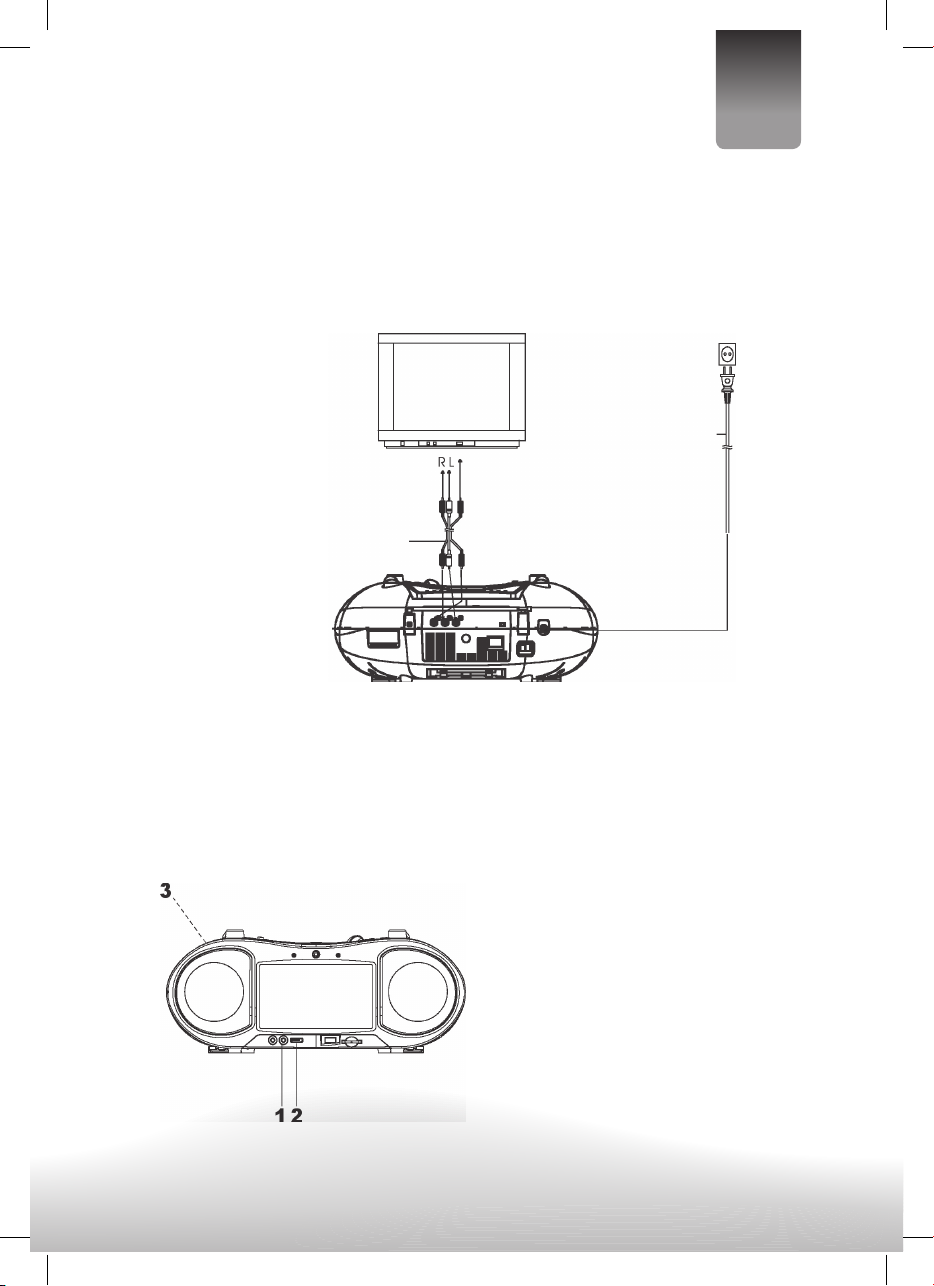
To video input connector (yellow)
To audio input connectors (red, white)
Video/audio cable
AC power cord
To power outlet
1 Plug the microphone jack to the microphone
connector (1)
2 Adjust the volume of the microphone with the
volumen wheel (2)
3 Connect the earphones jack to the earphone
connector (3)

8
Power on the TV set and select video input mode.
1. Turn on the player and adjust the FUNCTION
control to DVD for BOX model or DVD/DVB for
BOX TV model. and press DVD/DVB or MODE but-
ton to select DVD play mode.
2. Open the disc tray.
3. Place a disc onto the disc tray.
4. Close the disc tray and the playback starts
automatically.
5. When a menu screen appears on the TV, move
the navigation buttons or press the numeric but-
tons to select a preferred track number to start
playback.
Adjust the volume to your favorite by rotating the
volume control.
Press NEXT SKIP or PREV SKIP button once during
play to skip a chapter(DVD) or a track (CD) ahead
or backwards.
During playback, press F.FWD button or F. BWD
button several times to scan the disc forward or
backward at X2, X4, X8, X20 normal speed.
Press PLAY button to resume normal play.
Press PAUSE/STEP button during playback to pause.
during pause mode, each time the PAUSE/STEP
button is pressed, the player will only play one
frame; to resume normal play, press PLAY button.
Press STOP button during playback to stop play-
back; the player activates its resume function
when STOP is pressed in PLAY mode; press PLAY
button again, playback resumes at the point it
stopped previously; open the disc tray or press the
STOP button one more time to clear the resume
function.
Press SLOW button on the remote control during
playback, the disc will be played at 1/ 2 normal
speed at rst, each time this button is pressed,
the play speed becomes slower (down to 1/7
normal speed.) Press PLAY button, normal play will
resume.
Press REPEAT 1/all button during play, it will repeat
play one chapter/title or repeat all (for DVD disc),
or repeat play a track or all tracks (for CD), or
repeat the specied points (A-B).
1. Press SEARCH button during play and highlight
the item to be played (Title, Chapter, or Chapter
time)by navigation buttons.
2. Input the desired number or time via the
numeric buttons.
3. Press ENTER button to conrm and the playback
from the located scene starts.
4.To exit search menu, press SEARCH button
directly.
1. Press PROGRAM/EPG during playback to display
the program menu.
2. Select location(s) to be memorized via naviga-
tion buttons and then enter desired Titles/
Chapters numbers via numeric buttons.
Note: Inputting leading zero is not necessary. If the
chapter/title/track number is behind the cardi-
nal 10, press the +10 rst and then another unit
digit. Some gure inputs may be useless, because
it’s greater gure than total title/chapter/track
number on the disc. Example:
Track 3, press “3”
Track 12, press “+10” and then “2”
Track 21, press “+10” twice, and then “1”
3. To start programmed playback, select PLAY
on the menu and press SELECT button on the
remote control; pressing PROGRAM button again
to exit programming.

9
User’s Manual English
4. To clear a certain item,scroll to the item you
wan to delect by navigation buttons and then
press CLEAR button on the remote. To clear all
items, select the <CLEAR> on the menu, and then
press ENTER button on remote control.
5. You can also cancel program mode by clearing
all the items in the program menu.
Press the ZOOM key continuously to zoom in the
picture by 2, 3, and 4 times, zoom out by 1/2, 1/3,
1/4 normal size. Press this key once more when
the picture is at 1/4 size to return to the normal
size display. Scroll to view the enlarged picture
using Navigation buttons.
When the player is in operation, press DISPLAY but-
ton continuously on the remote control, the screen
will display parts of information (current disc type,
title number, chapter number, playtime, audio
language, audio type, subtitle language and multi
angle, etc) in a sequence.
It is possible to change the audio soundtrack
language to a different language from the one se-
lected at the initial settings (This operation works
only with discs on which multiple audio soundtrack
languages are recorded).
Press AUDIO button during DVD disc play, the sound
track language changes with the current sound
track number shown on the TV screen.
Press ANGLE button during playback to display the
number of angles being played and then select a
desired angle to view the scene.
Press SUBTITLE button during playback, the subtitle
language shown on the screen will change as a
response to each press;
When the desired language appears, release the
button to view the subtitle in that language.
1. Load the MP3/MPEG 4 disc onto the disc tray
and the TV screen will show all its folders after
a few seconds.
2. Select the folder you want by the navigation
buttons and then SELECT button to conrm.
3. The les in this folder are displayed and select
your favourable song via navigation buttons and
press SELECT button to start playback.
4. Press NEXT and PREV button to select track
directly.
5. Press REPEAT button change play mode.
∙ “REP 1” > repeats 1 track
∙ “REP DIR” > repeats all tracks of actual folder
∙ “REP ALL” > repeats all tracks in cd/dvd
∙ “REP APA” > cancel any repeating mode
Slide show of Kodak Picture CD after being loaded
begins automatically;
Folders of JPEG picture CD after being loaded are
displayed on the TV screen; use the navigation
buttons to select the desired pictures to start
playback.
Preview of the picture will be displayed while you
scroll across the lenames.

10
Press repeat button during play to change the
play modes. During playback, press STOP to enter
preview mode.
∙ “REP 1” > repeats 1 track
∙ “REP DIR” > repeats all tracks of actual folder
∙ “REP ALL” > repeats all tracks in cd/dvd
∙ “REP APA” > cancel any repeating mode
Press NEXT button to skip to the next picture or
PREV button to the previous picture.
If no key is pressed for a few seconds, it will skip to
next picture automatically.
Press RIGHT and LEFT navigation buttons to
rotate the picture Clockwise and anti-clockwise
respectively.
Press UP/CH+ navigation button to ip the picture
vertically. Press DOWN/CH- navigation button to
ip the picture horizontally.
Press ZOOM button continuously ,the picture zooms
in by 2, 3, 4 times or zooms out by 1/2, 1/3, 1/4
the original size. Press this button once more when
the picture getting 1/4 size to return to the normal
play. If the picture is enlarged, you may use the
navigation buttons to view blocked parts of the
picture.
During slide show playback, press the PROGRAM
button cyclically to select one of the modes to
play.
Press P/N button on the remote to directly change
the TV mode among PAL, NTSC and AUTO.
Prepare the player for External Memory media op-
eration plug a USB data traveller into the USB port
or insert the SD/MMC card to SD/MMC card slot.
Turn the FUNCTION control to the position DVD and
press MODE button to select between DISC, CARD
and USB.
Turn the FUNCTION control to the position
DVD/DVB and press DVD/DVB button to select DVD
Mode. Once in DVD mode, press DVD/USB/CARD
button on the remote to select the USB or CARD
according to the device you wish to explore.
After successfully detected and read, all folders
will be shown on the screen, select your favorite
folder with the navigation buttons,press SELECT or
OK button to conrm.
Choose the desired track also by navigation buttons
and conrm by pressing SELECT or OK button.

11
User’s Manual English
Initial settings page is for you to make your pre-
ferred settings up for your player. Once the initial
settings are done they are retained in the CPU of
the player until otherwise modied.
1. Press SETUP button.
2. Use the navigation buttons to select the item
you want to modify, setting page with further
setting items displayed shows on the TV screen.
Again use navigation buttons to make changes.
Press OK/SELECT button to conrm modica-
tions.
3. Use navigation buttons to switch to another set-
ting on the main setting page.
4. Press SETUP button to exit main setting page.
∙ it is used to select the TV mode.
Options: NTSC, PAL, AUTO. Please select this
option as per your TV set.
∙ when the play is not used for
several minutes, a running DVD logo will move
across the TV screen to protect it. Options:
ON: screen saver is enabled
OFF: screen saver is disabled.
∙ it is used to select the TV scan mode,
please set as per your TV set. Options:
4:3PS : Normal Pan & scan mode
4:3LB : Normal Letter box mode
16:9 : 16:9 wide screen mode
∙ input password to unlock the sys-
tem. The steps are as follows:
1. Enter SYSTEM SETUP, select the PASSWORD item
by scrolling the down navigation button, and
then press the right navigation button to select
the input box.
2. Input user’s password “0000” to unlock it, in
this case, select the input box again to change
the password by inputing another new four
numeric numbers and then press ENTER button
to conrm. When the password is changed, you
are needed to input the new one to unlock the
system.
3. Once you forget your own password, use the
supervisor’s password “8200” to unlock it.
∙ Set the rating of this player. If you want
to change the rating of parental lock, please
input the password to unlock rst. Options: 1 KID
SAFE / 2 G / 3 PG / 4 PG 13 / 5 PG-R / 6 R /7
NC-17 / 8 ADULT
∙ Reset to factory settings. Options:
RESTORE
∙ Select it to exit the setup menu.
∙ It is used to select different On
Screen Display language for different user.
∙ select preferred audio language.
(DVD only, need disc software support)
∙ Select preferred subtitle lan-
guage. (DVD only, need disc software support)
∙ Select preferred disc menu lan-
guage. (DVD only, need disc software support)
∙ Select it to exit the setup menu.
∙ to set the brightness for the
display. Options: 0/2/4/6/8/10/12
∙ to set the contrast effect for display.
Options: 0/2/4/6/8/10/12
∙ to set the colour impression for display.
Options: -6/-4/-2/0/+2/+4/+6
∙ to set the saturation level for
display. Options: 0/2/4/6/8/10/12
∙ Select it to exit the setup menu.
∙ Options:
LT/RT- Left/Right mix mode
STEREO- Stereo mode
∙ Select it to exit the setup menu.
Slide TFT on/off switch to turn on or turn off the
TFT screen during playback.
12
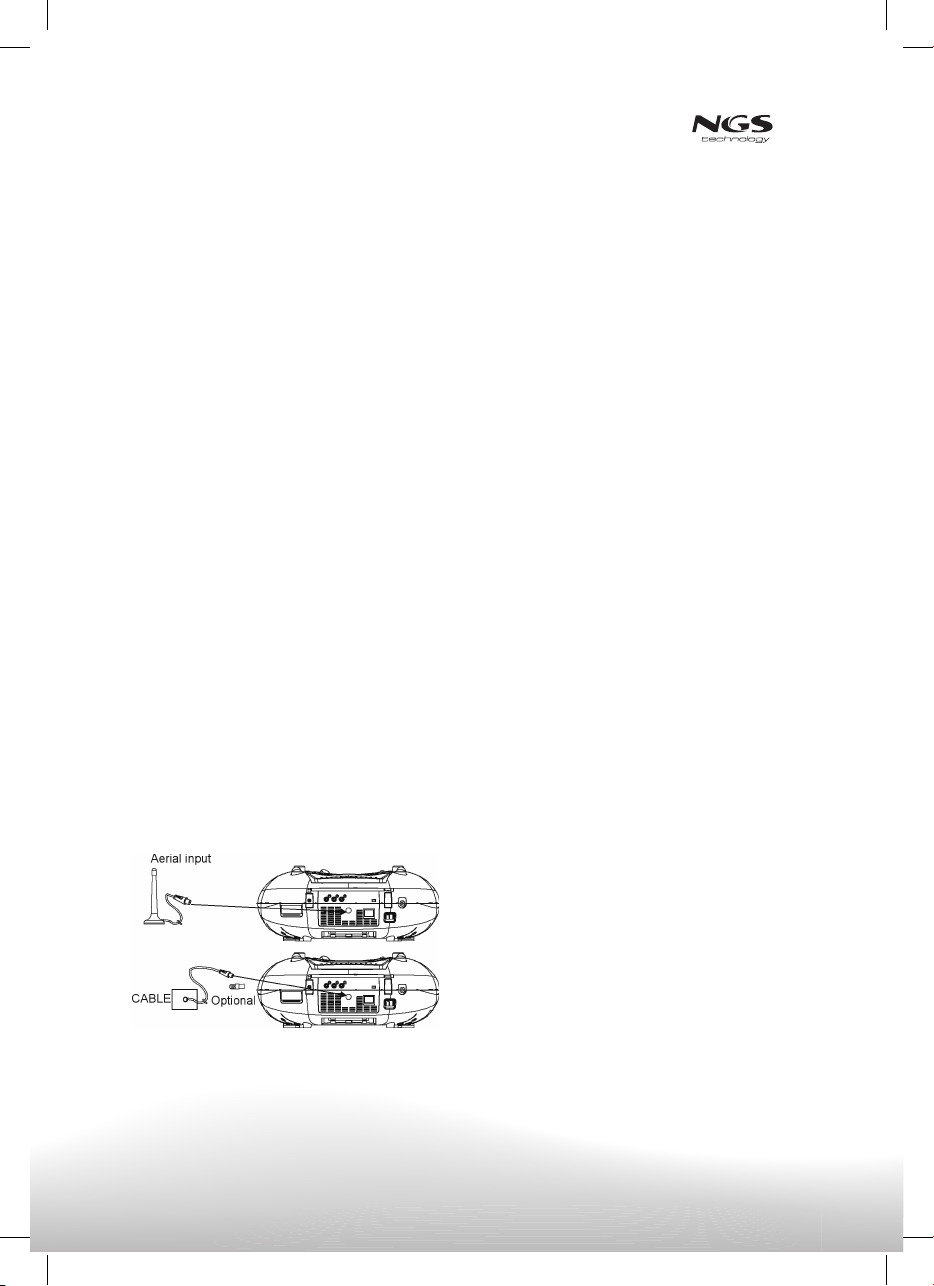
∙ Be sure the TV antenna is connected to your
player properly;
∙ Power on the player and adjust the FUNCTION
control on the main unit to DVD/DVB position,
then press DVD/DVB button to select DVB play
mode.
A dialogue of rst time installation shows on the
screen, select YES option to perform the rst time
installation, then select the options as mentioned
in the dialogue to nish the rst time installation,
select NO option to exit this interface.
Press AUDIO button on the remote to change differ-
ent Ianguage supplied by TV programs in DVB mode.
Press TEXT button on the remote to display
some incident letter information in TV programs
(subtitle,weather forecast, Advertisement informa-
tion, etc) in DVB mode.
1. Adjust the FUNCTION control to the RADIO posi-
tion, the POWER Indicator will light up.
2. Select the desired band with the BAND switch.
3. Tune to the desired station by rotating the
TUNING control (Move the control back and forth
until you get the strongest clearest sound).
4. The built-in AM antenna and external FM
TELESCOPIC ANTENNA are directional.
∙ When receiving an FM broadcast, fully extend
the TELESCOPIC ANTENNA and position for the
best reception.
∙ For AM broadcasts, rotate the whole set until
the best reception is heard.
5. Adjust the volume level to a comfortable listen-
ing level.
6. To turn off the radio, adjust the FUNCTION
control to OFF position.
A stereo phones jack has been provided on the back
of the unit so that you can listen to the unit without
disturbing others. To use this jack, plug in the head-
phones/earphones (not included) and adjust the
VOLUME control to a comfortable listening level.
-

13
User’s Manual English
Press PROGRAM/EPG on the remote button to enter
into electronic program guide in DVB mode.
DISPLAY PROGRAM DETAIL INFORMATION
Press DISPLAY button during DVB play mode to show
the program detail information.
∙ Press NAVIGATION UP/CH+ button or NAVIGATION
DOWN/CH- button to change the channel
number.A desired channel can be reached using
these two keys.
∙ During DVB play mode, press TV/RADIO on the
remote to switch to RADIO play mode. In this
mode you will listen to Radio digital channels,
broadcasted via DVB-T.
Press SETUP remote control button once to enter
the setup menu for DVB-T. You can navigate
through the different options with the navigation
buttons on your remote.
It is used to enter the TV channels
list for you to select or sort the TV channels as
you desire.
It is used to enter the Radio
channels list for you to select or sort the Radio
channels as you desire.
Select this option to edit the
programs as your desired.
Select this option to edit the
channels name, move or delete the channels as
your desire.
TV system: it is used to select TV system. Options:
NTSC, PAL, AUTO
TV type: it is used to select the TV scan mode,
please set as your TV set. Options:
4:3PS - Normal Pan & scan mode
4:3LB - Normal Letter box mode
16:9 - 16:9 wide screen mode
BRIGHTNESS - to set the brightness for the display.
CONTRAST - to set the contrast effect for display.
HUE - to set the colour impression for display.
SATURATION - to set the saturation level for
display.
: Please select one of desired language
for the system.
: Change pin-It is used to change
the password. Input user’s password “0000” to
unlock it.
1) Enter old password in the Old Pin row
2) Enter new password in the New Pin row
3) Enter the new password again in the Conrm
row
it is used to Lock the channels.
: Time zone-it is used to select local
time zone.
it is used to select sleep time (OFF,10,20,30,
40,50,60,90,120 min).
: Select this option, to show system
info on the screen such as, Update date, Tuner
info, F/W version ,Model version etc. Press SETUP
button to exit.
Press setup button to return previous
setup menu.
Select one country from <select
area> row, then enter <start scan> row with the
navigation buttons to begin scanning the channels.
A dialogue box shows on the screen
for you to set, after that, select <start scan> option
to begin scanning the channels.
select this option to restore the
factory setting.
Your player can be used as a power amplier to
playback the programs from portable radio, TV
set, MP3 player or whatever audio device with and
audio output jack.
Follow these steps to connect the player to another
device:
1. Slide Function Switch to AUDIO IN position.
2. Connect the external device to the player’s
AUDIO-in socket with the supplied LINE OUT
cable.
3. Power on the external device and begin
playing.

14
If your DVD player does not seem to be functioning properly, check the items below before you contact an
authorized service center.
Power does not turn on or
suddenly turns off. ∙ Make sure the AC cord is securely plugged into AC socket and an AC
outlet.
∙ Turn the power off and then back on.
Battery pack is in place but
the power does not turn on
or suddenly turns off.
∙ Check that the battery pack is charged. If not, recharge it.
Remote control won’t work. ∙ Check that the battery is inserted in the Direction properly.
∙ The battery may be at. Replace it with a new one.
∙ Check that the signal transmission is directed at the remote control
sensor on the DVD player.
∙ Remove the obstacle between the remote controller and remote
control sensor.
No picture or sound. ∙ Check that the A/V cables are securely connected.
∙ Check that the disc is a DVD (region number 1 or all), DVD-RW or
AUDIO CD.
∙ Do not use a disc that has scratches or dirt.
∙ Check that the label-side of the disc is facing up.
∙ The pick-up lens of the DVD player may be dirty. Contact the service
center for lens cleaning.
∙ Check that the TV channel is set to VIDEO or AV if viewing with a TV.
∙ Check image brightness and contrast settings.
∙ Check if TV signal is strong or not.
No picture. ∙ Check that the LCD display is turned on.
No sound. ∙ Check the volume setting. If set to zero, turn up volume level.
∙ Check that the headphones are plugged into the PHONES socket.
Speakers cannot be used with the headphones.
No picture and sound. ∙ Check that the battery is properly installed and AC cord is properly
connected.
Distorted video or sound
Image is unclear or distorted. ∙ Use a disc without scratches or dents.
∙ Check the direction, position and connection of the antenna.
No image or image is black
and white. ∙ Adjust color settings.
∙ Check color settings.

15
User’s Manual English
230V 50Hz
DC 12V (Lr14 or C) x 8 pcs
20W
PAL/NTSC/AUTO
+5ºC a +35ºC
150 minutos
406(L) x236(W) x 149.5(H) mm
10% a 75%
AM: 540 - 1600 KHz
FM: 88-108 MHz
12 cm one side one layer
12 cm one side two layers
12 cm double side two layers
8 cm one side one layer
8 cm one side two layers
8 cm double side two layers
12 cm Discs
8 cm Discs
(1) Frequency response: 20Hz-20KHz (sampling at 48KHz) & 20Hz-20KHz (sampling at 96KHz)
(2) Ratio S/N: >45dB
(3) Dynamic Range 90dB
(4) Wow y utter: under measurable parameters.
(1) Frequency response 0Hz-20Hz
(2) Ratio S/N: >45dB
(3) Dynamic Range: 90dB
(4) Wow y utter: under measurable parameters.

16
1. Lisez ces consignes.
2. Conservez ces consignes.
3. N’utilisez pas l’appareil à proximité d’eau.
4. Nettoyez-le uniquement avec un chiffon sec.
5. N’obstruez pas les ouvertures de ventilation.
Réalisez l’installation en suivant les instructions du
fabricant.
6. Ne placez pas l’appareil près de sources de chaleur
telles que radiateurs, bouches de chauffage, poêles
ou autres appareils produisant de la chaleur (y
compris les amplicateurs).
7. N’endommagez pas la che de sécurité de prises
polarisées ou connectées à la terre. Une prise
polarisée présente deux ches, une large et une
plus petite. Une prise connectée à la terre présente
deux ches et une autre connectée à la terre. La
che large ou la troisième assure leur sécurité. Si la
prise n’entre pas dans la prise de courant, consultez
un électricien pour qu’il change la prise de courant.
8. Protégez le câble électrique pour qu’on ne puisse
l’écraser ou le percer et plus particulièrement la
prise, le réceptacle et la sortie de l’appareil.
9. Utilisez uniquement les accessoires joints préconi-
sés par le fabricant.
10. Débranchez l’appareil pendant les orages avec
éclairs ou si vous n’allez pas l’utiliser pendant une
longue période.
11. Consultez du personnel spécialisé pour le service
après-vente. Cela sera nécessaire lorsque l’appareil
sera endommagé à la suite d’une détérioration du
câble d’alimentation ou de la prise, de présence de
liquide ou d’objet dans l’appareil, d’exposition à la
pluie ou à l’humidité et qui provoqueraient un mau-
vais fonctionnement. Mettez-vous en contact avec
notre service technique sur: (www.ngs.eu/support)
12. L’appareil ne doit pas être exposé à des lieux
où de l’eau s’égoutte ou à des éclaboussures, ni à
des récipients remplis de liquides tels que vases et
ceux-ci ne doivent pas être posés sur l’appareil.
La plaque indiquant les risques et les précautions à prendre se situe à la base de l’appareil.

17
Français
1. HAUT-PARLEURS
2. JACK D’ENTREE AUDIO
3. JACK DU MICROPHONE
4. CONTROLE NIVEAU VOLUME MICROPHONE
5. PORT USB
6. LECTEUR CARTES SD/MMC
7. ECRAN TFT
8. CONTROLE DES FONCTIONS
9. POIGNEE POUR LE TRANSPORT
10. CONTROLE DU VOLUME
11. ACTIVATIÓN BASS BOOST
12. TOUCHE DVD/DVB
TOUCHE MODE
13. TOUCHE PREV/LEFT
14. TOUCHE NEXT/RIGHT
15. COUVERCLE DVD
16. ZONE POUR OUVRIR COUVERCLE DVD
17. TOUCHE FR/DOWN
18. TOUCHE STOP/MENU
19.TOUCHE PLAY/PAUSE&ENTER
20. TOUCHE FF/UP
21. MOLETTE POUR RECHERCHE STATIONS
22. SELECTION DE LA BANDE
23. TEMOIN DE MISE SOUS TENSION
24. CAPTEUR POUR COMMANDE A DISTANCE
25. INDICATEUR DE FM STEREO
26. ANTENNE DE FM TELESCOPIQUE
27. JACK VIDEO
28. JACK AUDIO DROIT
29. JACK AUDIO GAUCHE
30. INTERRUPTEUR ACTIVATIÓN ECRAN
31. COMPARTIMENT PILES
32. ANTENNE TV
33. CONNECTEUR ALIMENTATION
34. CONNECTEUR ECOUTEURS

18
1. Touche USB/DVD/CARD
2. Touche P/N
3. Touche Guide Electronique de Programmation
(EPG)
4. Touche REPEAT 1/ALL
5. Touche MENU
6. Touche SUBTITLE
7. Touche PLAY
8. Touche TITLE
9. Touche AUDIO
10. Touche PAUSE/STEP
11. Touche ANGLE
12. Touche ZOOM
13. Touche DVD/DVB
14. Touche TV/RADIO
15. Touche DISPLAY/Ecran
16. Touche SETUP/Conguration
17. Touche TFT ON/OFF
18. Touches NUMERIQUES
19. Touche CLEAR
20. Touche STOP
21. Touche SELECT
22. Touches de NAVIGATION
a. NAVIGATION GAUCHE
b. NAVIGATION DROITE
c. NAVIGATION APRES/CANAL+
d. NAVIGATION AVANT/CANAL-
23. Touche SLOW/avance LENTE
24. Touche NEXT&F.FWD/suivant/avance rapide
25. Touche PREV.&F.BWD/précédent/retour rapide
26. Touche SEARCH/recherche
27. Touche TEXT
19
Français
1. Touche Ecran
2. Touche TITRE
3. Touche PREV*F.BWD
4. Touche Suivant* F.FWD
5. Touches de NAVIGATION
6. Touches NUMÉRIQUES
7. Touche ANGLE
8. Touche PROGRAMME
9. Touche MUET
10. Touche SYSTEME
11. Touche MENU
12. Touche ARRET
13. Touche LENT
14. OK (REPRODUIRE/ PAUSE) Touche
15. Touche SOUS TITRE
16. Touche AUDIO
17. Touche RECHERCHE
18. Touche REPETER
19. Touche ZOOM
20. Touche CLEAR

20
· La che d’alimentation permet de débrancher l’appareil et doit rester facilement accessible.
∙ Si l’appareil était connecté à un téléviseur il est conseillé que ce dernier soit multi-standards (PAL/
SECAM/NTSC)
∙ Avant de réaliser les connexions entre eux, ASSUREZ-VOUS que ce LECTEUR et l’autre équipement sont
débranchés.
∙ Tenez compte de la codication de couleur au moment de connecter les câbles audio et vidéo.
∙ Durant la lecture du DVD, il est possible que le volume du téléviseur soit inférieur à celle des émissions
de TV. S’il en est ainsi, réglez le volume au niveau souhaité.
∙ Si le dispositif BOX DVD/CD est connecté à la TV par le biais d’un magnétoscope, il est possible que certains
DVD ne se voient pas correctement. S’il en est ainsi, connectez directement la BOX DVD/CD au téléviseur.
∙ Insérez les correctement en tenant compte de la
polarité et des symboles + et – de la batterie et
de l’appareil.
∙ N’utilisez jamais des piles/batteries ssurées d’où
s’écoulerait un liquide
∙ Ne jetez jamais les batteries dans le feu.
∙ Maintenez les piles hors de la portée des enfants.
∙ N’essayez jamais de recharger des piles, seules
les batteries rechargeables pourront être
rechargées.
∙ Ne court-circuitez jamais les terminaux des
batteries.
∙ Retirez les batteries vides de l’appareil.
∙ N’essayez jamais d’ouvrir les batteries.
∙ Ne mélangez jamais différents types de batteries
ou de piles vides ou semi-usagées avec des piles
neuves.
∙ Utilisez uniquement des batteries du modèle
indiqué.
∙ Au moment de retirer les batteries vides, respec-
tez les normes en vigueur en ce qui concerne
l’élimination des batteries et des piles. Déposez
les batteries dans un conteneur ou récipient
prévu à cet effet.
∙ Faites particulièrement attention lors du rempla-
cement de la batterie au lithium de la commande
à distance, car l’emploi d’une pile erronée peut
provoquer une explosion.
This manual suits for next models
1
Table of contents
Languages:
Other NGS DVD Player manuals


