Eltax DV-100 User manual
DVD
DV-100
Instruction manual

1
INDEX
WARNINGS & IMPORTANT ......................................... i~ii
INDEX ................................................................................1
FEATURES ........................................................................2
PACKAGE CONTENTS ....................................................3
PRECAUTIONS.................................................................4
DISC CARE .......................................................................5
DISC COMPATIBILITY CHART ........................................7
REMOTE CONTROL UNIT ...............................................8
FRONT PANEL/DISPLAY WINDOW...............................10
FRONT PANEL ..............................................................................10
REAR PANEL ................................................................................10
DISPLAY WINDOW ........................................................................11
REAR PANEL AND CONNECTIONS..............................11
VIDEO OUTPUT TERMINALS AND CONNECTIONS ...............................11
AUDIO OUTPUT TERMINALS AND CONNECTIONS...............................12
INITIAL SETTING............................................................13
TV SETUP.................................................................................13
TV DISPLAY ..................................................................................13
TV TYPE........................................................................................13
TV OUTPUT (in stop mode) ..........................................................13
AUDIO SETUP (5.1CH MODEL)...................................................14
AUDIO OUT................................................................................... 14
DOWN MIX ....................................................................................14
TEST TONE...................................................................................15
DOLBY DIGITAL SETUP...........................................................16
LINEAR PCM SETUP................................................................17
Linear PCM OUT ........................................................................... 17
GENERAL SETUP ....................................................................17
ANGLE MARK ...............................................................................17
OSD LANGUAGE ..........................................................................17
CAPTIONS ....................................................................................18
SCREEN SAVER...........................................................................18
PREFERENCES .......................................................................18
AUDIO ...........................................................................................18
SUBTITLE......................................................................................18
DISC MENU...................................................................................19
PARENTAL ....................................................................................19
PASSWORD ..................................................................................19
DEFAULTS.....................................................................................19
ON-SCREEN DISPLAY (OSD)........................................20
DVD OSD MODES ..................................................................... 20
AUDIO CD / VCD OSD MODES ................................................... 20
BASIC OPERATION OF PLAYBACK.............................21
START PLAYBACK ...................................................................... 21
SKIP PLAYBACK ......................................................................... 21
STILL/PAUSE PLAYBACK ........................................................... 21
FAST FORWARD/REVERSE SCAN ........................................ 22
SLOW-MOTION PLAYBACK ....................................................... 22
STOP PLAYBACK ........................................................................ 23
ADVANCED OPERATION OF PLAYBACK....................24
REPEATED PLAYBACK .............................................................. 24
TITLE MENU (DVD ONLY) ........................................................ 24
DVD MENU (DVD ONLY) .......................................................... 24
MULTI-ANGLE PLAYBACK.......................................................... 25
CHANGING SUBTITLE DURING PLAYBACK.................................... 25
CHANGING AUDIO LANGUAGE DURING PLAYBACK..................... 25
GOTO / DIRECT FUNCTION ....................................................... 25
DVD Search Functions ..................................................................25
VCD/Audio CD DIRECT Functions................................................26
VCD PLAYBACK CONTROL (PBC) ......................................... 26
Digit Buttons ..................................................................................26
JPEG / MP3 - FILES .......................................................28
PLAYING YOUR JPEG FILES.................................................. 28
MP3 COMPATIBLE FORMAT .......................................................... 29
ADDITIONAL INFORMATION ........................................31
GLOSSARY.............................................................................. 31
REGION MANAGEMENT INFORMATION ............................... 31
How to change the regional coding! ..............................................31
LICENSE .................................................................................. 31
WARNING ................................................................................... 31
TROUBLE SHOOTING............................................................. 32
SPECIFICATION ...................................................................... 33
i
WARNING & IMPORTANT
INFORMATION:
This equipment has been tested and found to comply with the limits for a Class B digital device, pursuant to Part 15 of the
FCC Rules. These limits are designed to provide reasonable protection against harmful interference in a residential
installation. This equipment generates, uses and can radiate radio frequency energy and, if not installed and used in
accordance with the instructions, may cause harmful interference to radio communication. However, there is no
guarantee that interference will not occur in a particular installation. If this equipment dose cause harmful interference
to radio or television reception, which can be determined by turning the equipment off and on, the user is encouraged to
try to correct the interference by one or more of the following measures:
─Reorient or relocate the receiving antenna.
─Increase the separation between the equipment and receiver.
─Connect this equipment into an outlet on a circuit different from that to which the receiver is connected.
─Consult the dealer or an experienced radio/TV technician for help.
CAUTION:
TO REDUCE THE RISK OF ELECTRIC SHOCK, DO
NOT REMOVE COVER. NO USER-SERVICEABLE
PARTS INSIDE. REFER SERVICING TO QUALIFIED
SERVICE PERSONNEL.
This symbol warns the user of
un-insulated voltage within the
unit that can cause dangerous
electric shocks.
This symbol alerts the user that
there are important operating
and maintenance instruction in
the literature accompanying this
unit.
WARNING: TO REDUCE THE RISK OF FIRE OR ELECTRIC SHOCK, DO NOT
EXPOSE THIS APPLIANCE TO RAIN OR MOISTURE.
CAUTION:
THIS DVD VIDEO PLAYER IS A CLASS 1 LASER PRODUCT. USE OF CONTROLS OR ADJUSTMENTS OR
PERFORMANCE OF PROCEDURES OTHER THAN THOSE SPECIFIED HEREIN MAY RESULT IN
HAZARDOUS RADIATION EXPOSURE. DO NOT OPEN COVERS AND DO NOT REPAIR YOUSELF. REFER
SERVICING TO QUALIFIED PERSONNEL.
This device complies with Part 15 of the FCC Rules. Operation is subject to the following two conditions: (1)
This device may not cause harmful interference, and (2) this device must accept any interference received,
Including interference that may cause undesired operation.
Note:
This product incorporates copyright protection technology that is protected by method claims of certain
U.S. patents and other intellectual property rights owned by Macrovision Corporation and other rights
owners. Use of this copyright protection technology must be authorized by Macrovision Corporation, and is
intended for home and other limited viewing uses only unless otherwise authorized by Macrovision
Corporation. Reverse engineering or disassembly is prohibited.
WARNING: TO PREVENT ELECTRIC SHOCK, MATCH WIDE BLADE OF PLUG TO WIDE SLOT,
FULLY INSERT.

ii
IMPORTANT SAFEGUARDS AND PRECAUTIONS
READ THE SAFETY AND OPERATING INSTRUCTION before operating your DVD-receiver.
FOLLOW INSTRUCTIONS AND HEED ALL WARNINGS on your DVD player in this manual.
1. Save these instructions for later use.
2. Unplug this product from the wall outlet before cleaning. Do not use liquid cleaners or aerosol cleaners.
Use a damp cloth for cleaning.
3. Do not use this DVD-receiver near water.
4. Do not place this DVD-receiver on an unstable cart, stand or table. The DVD-receiver may fall, causing
serious damage to the DVD-receiver.
5. Slots and openings in the cabinet and the back or bottom are provided for ventilation. To ensure reliable
operation of the DVD-receiver and to protect it from overheating, those openings must not be blocked or
covered. Placing the DVD-receiver on a bed, sofa, rug, or other similar surface should never block the
openings. This DVD player should never be placed near or over a radiator or heat register. This
DVD-receiver should not be placed in a built-in installation unless proper ventilation is provided.
6. This DVD-receiver should be operated from the type of power source indicated on the marketing label. If
you are not sure of the type of power available, consult your dealer or local service.
7. As a safety feature, your DVD-receiver is equipped with either a 2-wire EU class-II plug (UK optional
adaptor necessary for UK) or a 3-wire grounded plug (a third pin for grounding). The 3-wire grounded plug
will fit only into a grounding-type power outlet.
8. Do not allow anything to rest on the power cord. Do not locate this DVD-receiver where persons will walk
on the cord.
9. If an extension cord is used with this DVD-receiver, make sure that the total of the ampere ratings on the
products plugged into the extension cord do not exceed the extension cord ampere rating.
10. Never push objects of any kind into this DVD-receiver through cabinet slots as they may touch dangerous
voltage points or short out parts that could result in a risk of fire or electric shock. Never spill liquid of any
kind on the DVD-receiver.
11. Do not attempt to service this DVD-receiver yourself, as opening or removing covers may expose you to
dangerous voltage points or other risks. Refer all servicing to service personnel.
12. An appliance and cart combination should be moved with care. Quick stop, excessive force, and uneven
surfaces may cause the appliance and cart combination to overturn.
13. Unplug this DVD-receiver during lightning storms or unused for long periods of time.
14. Unplug this DVD-receiver from the wall outlet and refer servicing to qualified service personnel under the
following conditions:
A. When the power cord or plug is damaged or frayed.
B. If liquid has been spilled into the DVD-receiver.
C. If the DVD-receiver has been exposed to rain or water.
D. If the product has been dropped or the cabinet has been damaged.
E. If the product exhibits a distinct change in performance, indicating a need for service.
This digital versatile disc (DVD) video player uses NTSC video signals and
100-240V AC, 50/60Hz (standard household current).
For future reference, record the model and serial number (located on
the rear of the DVD-receiver) in the space provided.
Model No: ______________
Serial No: _______________

2
FEATURES
Compatible With DVD, Super VCD, VCD,
CDDA, CVD, CD-DVD, Mini-DVD and MP3
Media Format.
This DVD player can play a variety of disc media
including DVD Video, Video CD, CDDA, Super VCD,
CVD, CD-DVD, Mini-DVD and MP3 media format.
S-Video Output
This DVD player’s S-Video output can send DVD video
signals directly to a S-Video input-equipped television
without the degradation of video quality.
2 Channel Analog Audio Output
This DVD player can output down mixed audio with
LT/RT, Stereo and VSS modes.
Virtual 3D Surround Sound
This DVD player features the virtual 3D surround
sound effect through standard analog outputs.
Coaxial Digital Audio Outputs
The DVD player features one coaxial digital audio
output. User selectable SPDIF/RAW and SPDIF/PCM
digital audio maximizes convenience when switching
between DVD and CD playback.
Dolby® Digital & DTS® Digital Audio Output
Support
This DVD player can send Dolby®Digital or DTS®
Digital audio data via its built-in digital audio output to
an external Dolby®Digital or DTS®Digital decoder.
High Quality 96kHz/24bit Audio D/A Converter
This DVD player features a 96KHz/24Bit D/A converter
for superior audio reproduction of encoded discs.
10-Bit 27Mhz D/A Video Converter
This DVD player’s 10-bit D/A converter is four times
more accurate than conventional 8-bit converters. The
result is artifact-free and crystal clear video image.
Auto NTSC and PAL Video Disc Conversion
This unit can play NTSC and PAL formats discs. This
DVD player can automatically convert either format to
match your TV set. For example, if your TV set is a
NTSC system TV and you’re playing a PAL format disc,
this DVD player will automatically convert the PAL
format signal to NTSC format signal to play on your TV.
X1.5/X2X3 Video Zoom Support
The user selectable digital video zooms out zoom-in
on a specific portion of a video image.
Multi-Speed Fast Forward/Reverse Scan
The digital fast forward/reverse scan is capable of
scanning speeds of X2, X4, X6, and X8.
Multi-Speed Slow Motion Forward / Reverse
Scan
This DVD player offers perfect slow motion scans in
the following speeds: X1/2, X1/4, and X1/8.
Volume Control of Analog Audio Output
This DVD player can control the volume of analog
audio output from remote control.
Auto Power Shut Down Function
This DVD player offers auto power shut down function.
When the player is not in use for 20 minutes, the player
will shut down automatically to save the power
consumption and prolong the life of DVD player.
3
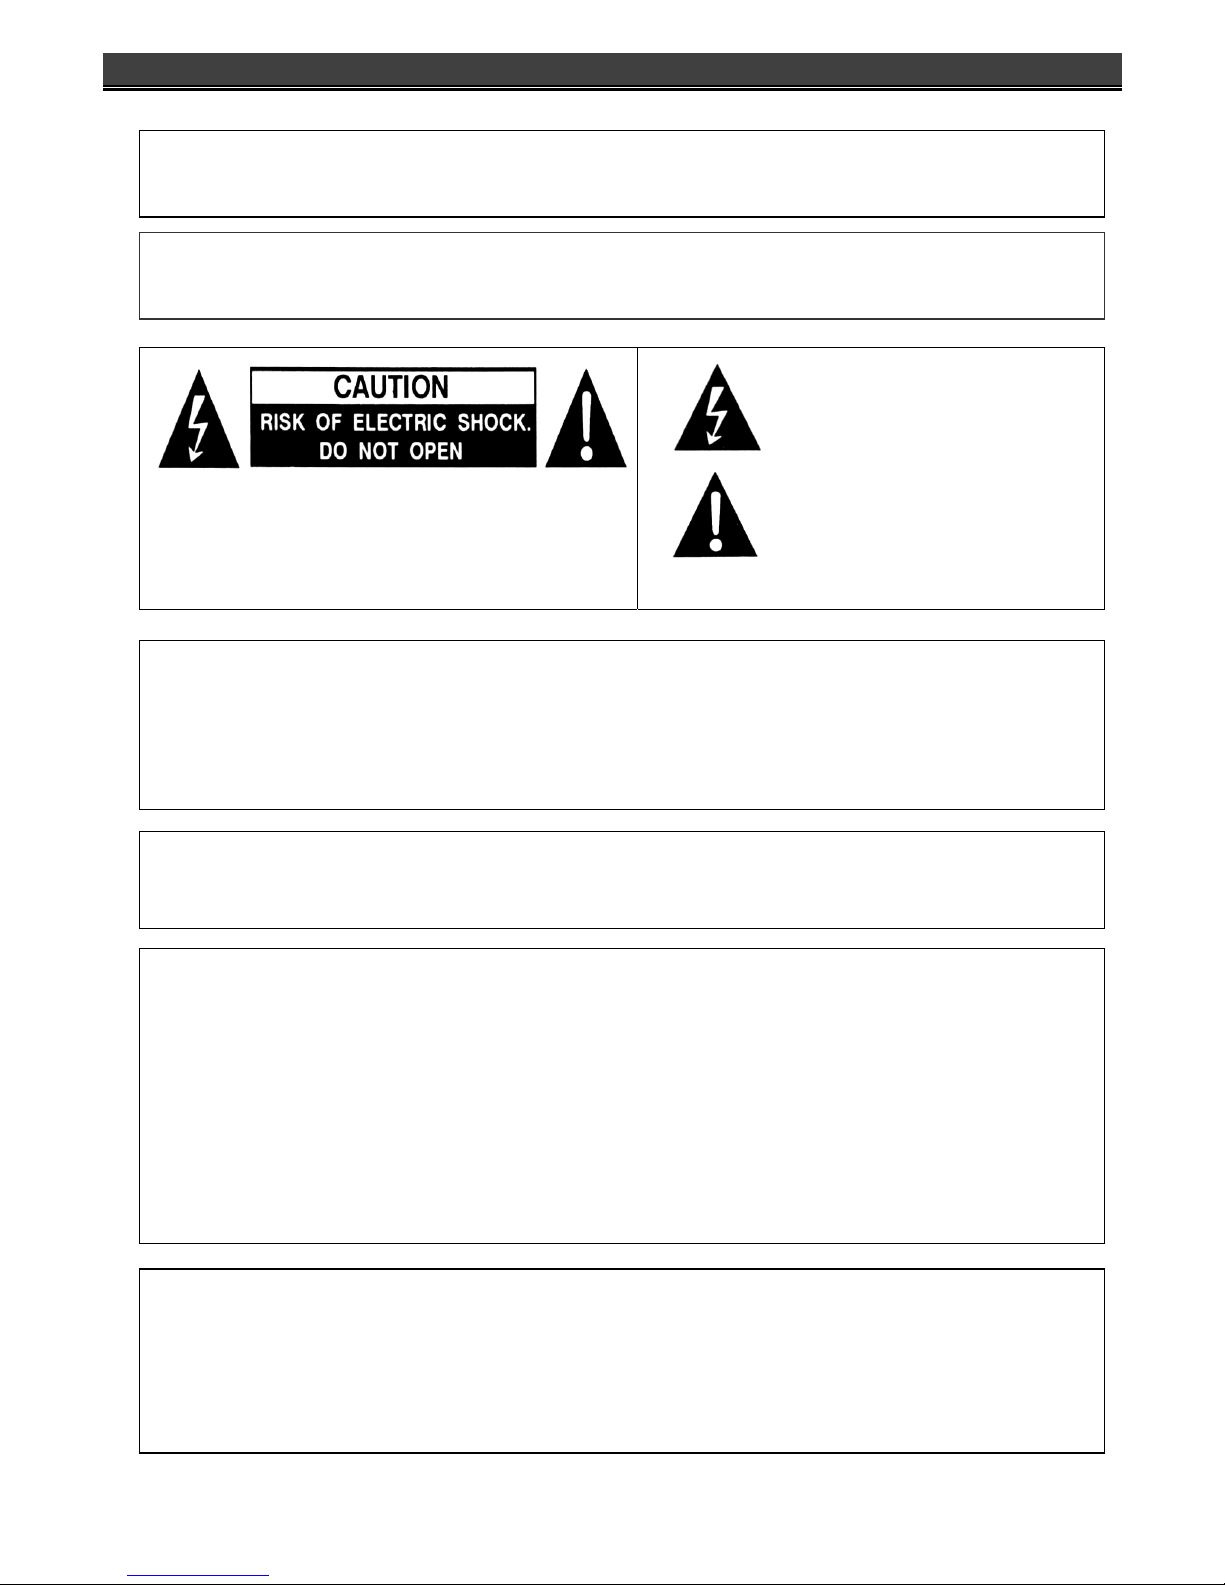
PACKAGE CONTENTS
Please verify that the following items are included within the DVD carton. If items are missing, please promptly return this unit to
the retailer for an exchange.
DVD Player x1
Remote Control Unit x1
AAA Batteries x2
SCART Cable x1
Video & Audio (L/R) Cable x1
User Manual x1
4
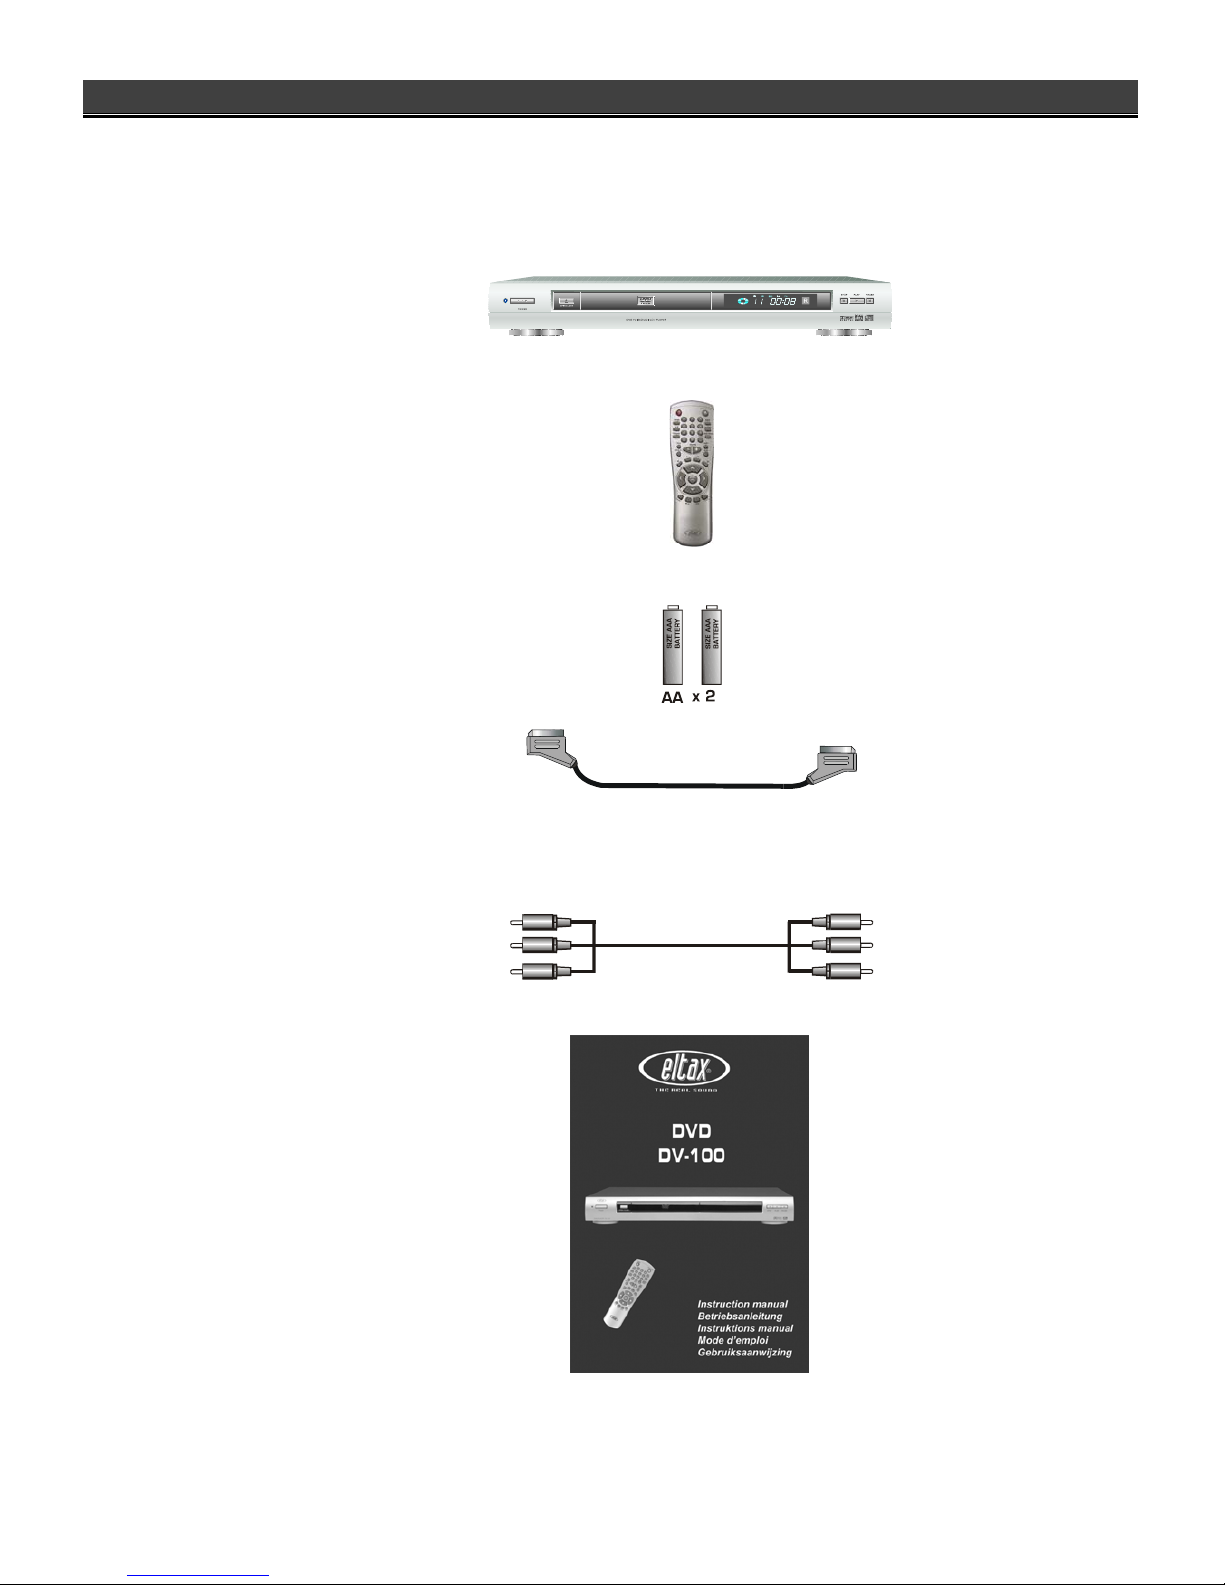
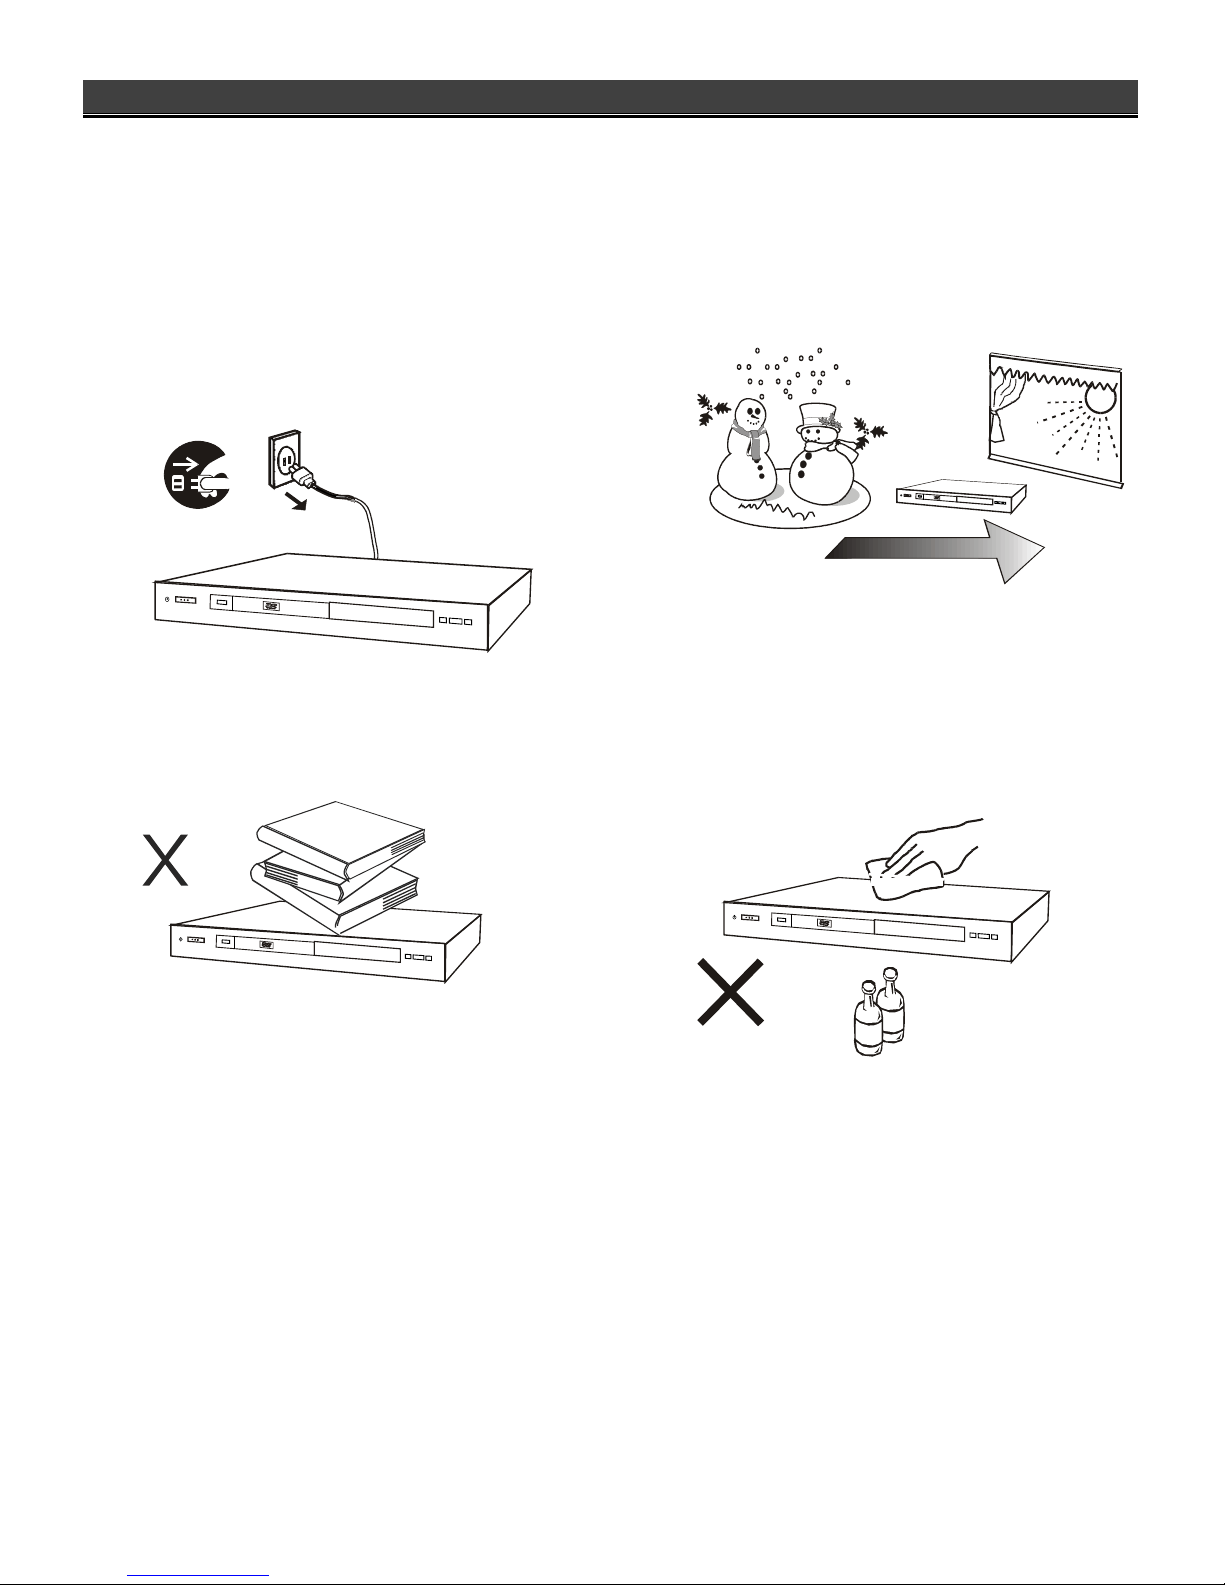
PRECAUTIONS
Please read the following carefully to get the best and safest performance from this DVD player
Power Supply
Make sure to use the correct power outlet as rated on the
back of the DVD unit. (AC 100 – 240V)
Power Cord
Do not put any heavy objects on top of the power cord to
avoid fires or electrical shocks caused by cord damage.
Unplug the power cord if the unit will not be used for a
long time.
Usage and Storage
Do not remove the top cover to avoid possible electric
shock from touching the inside of this unit.
Do not place any heavy objects on top of this unit.
Unit Placement
Do not place this unit in locations with:
Vibrations
High humidity
Poor ventilation
Direct sunlight
Extremely high or low temperatures
This unit should be placed on a horizontal surface only.
Keep this unit away from television sets, radios,
computers and loudspeakers to avoid magnetic field
interference.
Condensation
Condensation may result from moving the unit from a
cold place to a hot place. Please turn the power on for 1
to 2 hours before using this unit if condensation occurs.
Unit Cleaning
Clean the front panel and the body of the unit with a dry
soft cloth. Other areas can be cleaned using a soft cloth
moistened with a mild detergent. Do not clean with
evaporative solutions to avoid possible damage to the
unit.

5
DISC CARE
Disc Usage
Please hold all discs by their edges or the center
opening as shown below. Do not touch the shiny
surface of the discs.
Do not stick labels or tape on the discs, and do not
scratch or damage the discs.
The disc spins at a high speed during playback. Do not
use damaged, cracked, or warped discs because they
could damage the unit.
Disc Cleaning
Fingerprints or dirt on disc surfaces can weaken the
light reflected from the disc and directly influence the
signal quality. The poorer the signal quality, the poorer
the playback performance. Keep the disc clean by
wiping it straight out from the center with a dry soft
cloth.
If the disc is very dirty, wipe with a moist soft cloth,
then follow with a dry soft cloth.
Do not use record cleaning sprays, benzene, thinner,
anti-static electricity liquids, or any other solvent.
These may damage the disc surface.
Disc Storage
Please keep the discs in their original cases to avoid
bending the discs. Do not keep discs in locations with
high temperature, high humidity, or direct sunshine.
These conditions may also cause damage to the
discs.
Carefully read all instructions on the disc label.

7
DISC COMPATIBILITY CHART
This DVD player can play the following types of discs:
Disc-Typ Format/Seite/Beschichtung Max. Wiedergabedauer (Speicherkapazität)
DVD MPEG2-TYP
12 cm (5’’) /single sided/single layer
12 cm (5’’) /single sided/double layer
12 cm (5’’) /double sided/single layer
12 cm (5’’) /double sided/double layer
133 Min. (4,7 GB)
242 Min. (8,5 GB)
266 Min. (9,4 GB)
484 Min. (17 GB)
DVD-Video
8 cm (3’’) /single sided/single layer
8 cm (3’’) /single sided/double layer
8 cm (3’’) /double sided/single layer
8 cm (3’’) /double sided/double layer
41 Min.
75 Min.
82 Min.
150 Min.
VCD MPEG1- TYP
12 cm (5’’)/single sided/single layer 74 Min.
Video-CD
8 cm (3’’)/single sided/single layer 20 Min.
12 cm (5’’)/single sided/single layer 74 Min.
S -VCD
8 cm (3’’)/single sided/single layer 20 Min.
CD CD
12 cm (5’’)/single sided/single layer 74 Min.
Audio-CD
8 cm (3’’)/single sided/single layer 20 Min.
MP3 12cm (MP3:Digital Audio) More than 8 hours
Notes:
DVD and VCD Discs contain both video and audio and can support multiple audio tracks.
CD: Discs have audio only.
Do not insert DVD-ROMs, CD-ROMs intended for computer use in this DVD player.
This unit complies with VCD ver. 1.1, ver. 2.0, and ver. 3.0.
This unit is compatible with CD-R & CD-RW.
The playback time of SVCD is approx. 37 minutes.
8
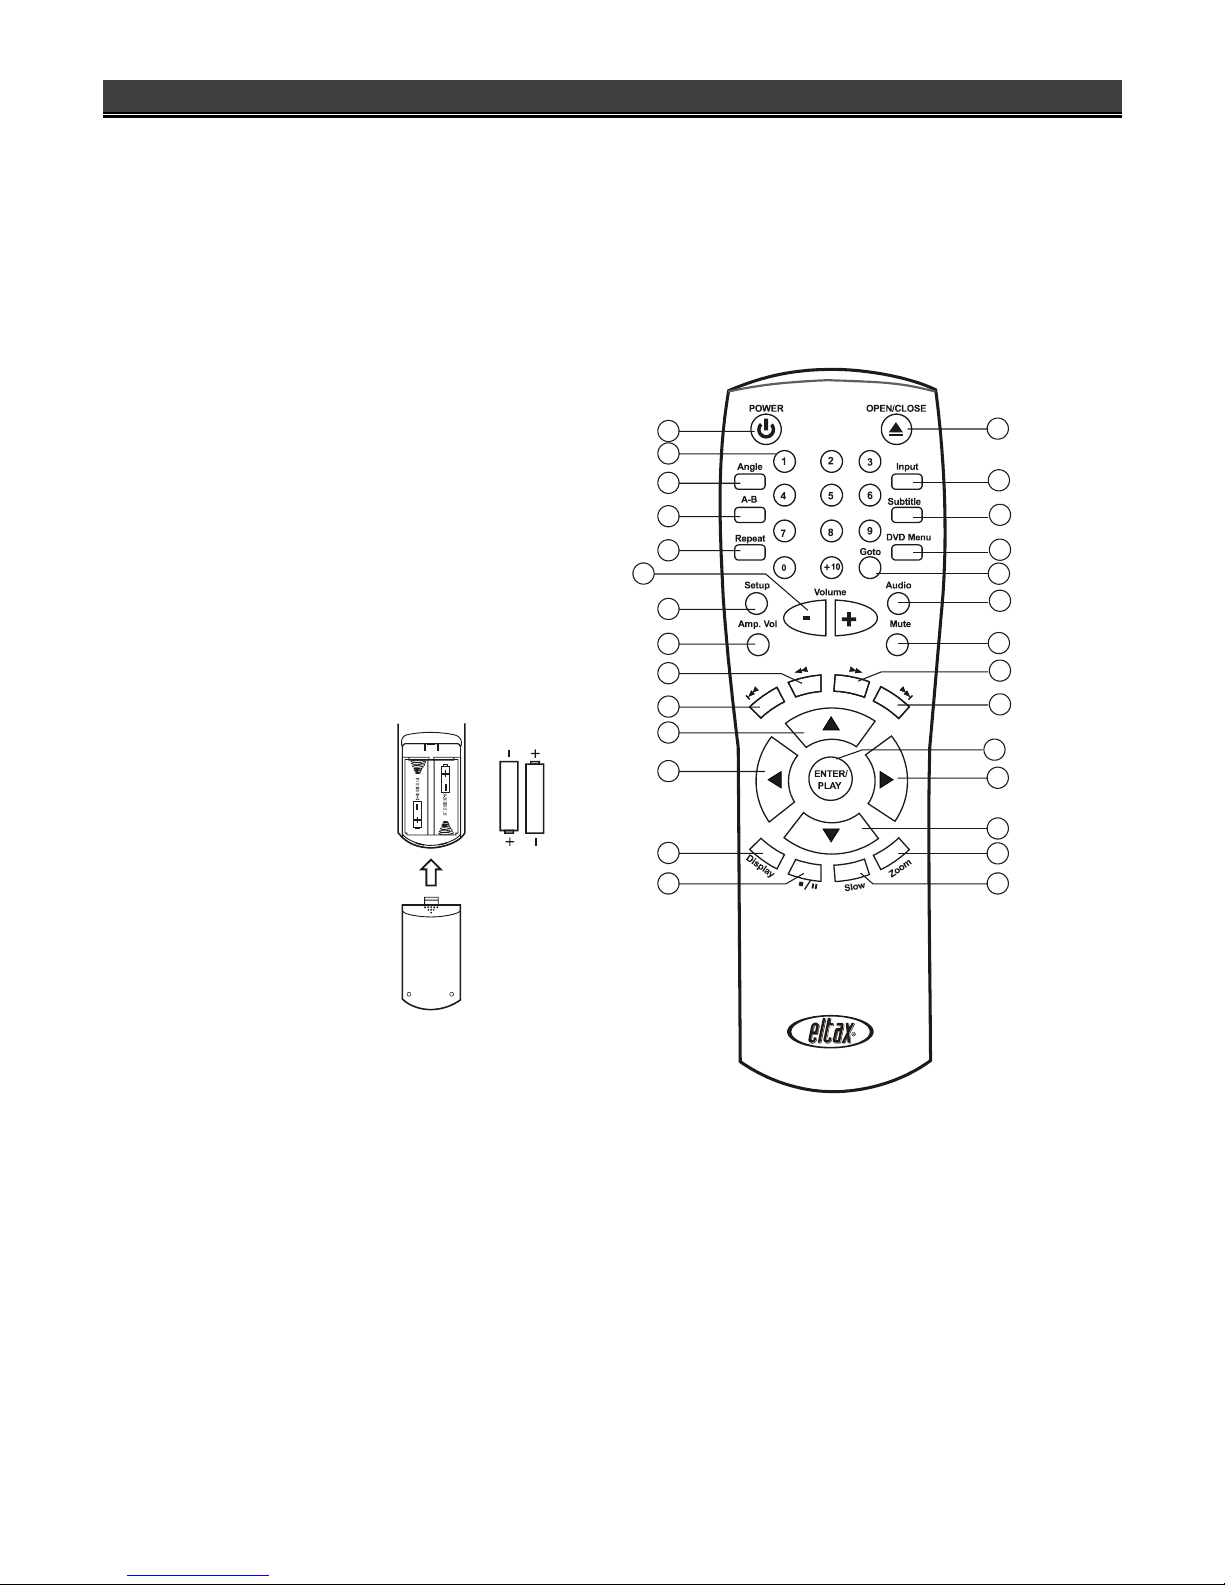
REMOTE CONTROL UNIT
To use the remote control unit to operate the DVD
player, insert two batteries (size AA) making sure that the +
and – ends of the batteries are matched to the +/– marks
printed inside the battery compartment. To use the remote
controller, please point the remote control unit at the
remote sensor on the DVD player.
Notes:
Do not use different types of batteries together, or mix old and new
batteries.
.When the remote control unit does not function correctly or its
operation range reduces, please replace both batteries at the same
time.
If the remote control unit will be not used for a long time, please
remove the batteries to avoid possible damage from battery leakage
or corrosion.
Keep the remote controller away from extremely hot or humid
locations.
Do not open the remote controller unit.
2
3
4
7
8
9
10
11
12
13
15
1
5
6
14
16
17
18
19
20
21
22
23
24
25
26
27
28

9
1. POWER Turns on/off the DVD player unit.
2. Digits
Used for direct selection of menu choices, audio tracks,
and other inputs such as time and password.
3. ANGLE
If the DVD disc contains multiple view angles, this
button will change the viewing angle displayed by the
DVD player. Refer to p.25.
4. A-B REPEAT
Displays A-B REPEAT playback. Refer to p.24.
5. REPEAT
Shows repeat playback for one title, or all titles on the
disc. Refer to p.24.
6. Volume
/
Reduce / Increase the volume of analog audio output.
7. SETUP
Customizes DVD player settings. Refer to p.13.
8. Amp.Vol
No function on this unit.
9.
REV
Fast reverse scans during playback. Refer to p.22.
10.
PREV
Goes back to the previous chapter during play. Refer
to p.21.
11.
Used for navigation within a selection menu.
12.
Used for navigation within a selection menu.
13. DISPLAY
On-Screen display of the DVD player’s operational
status. Refer to p.20.
14. ■/ II
Pause the playback once pressed, to pre-stop after
being pressed twice and to stop the playback
completely by pressing thrice. Refer to p.21.
15. SLOW
Engages slow-motion forward/reverse playback. Refer
to p.22.
16. ZOOM
Enters the zoom mode during playback.
17.
Used for navigation within a selection menu.
18.
Used for navigation within a selection menu.
19. ENT/PLAY
Confirms selection of an item in the menu or starts
playing the disc.
20. NEXT
Skips to the next chapter during playback. Refer to
p.21.
21. FWD
Fast forward scan during playback. Refer to p.22.
22. MUTE
To mute the sound of playback.
23. AUDIO
During playback of a DVD disc with more than one
audio language, this button changes the audio
language played. Refer to p.26.
24. GOTO
Enables search mode by title/chapter and time. Refer
to p.26.
25. DVD MENU
Some DVDs have complex submenus. This button
allows access to these submenus. Refer to p.25. And
also the button turns off/on the Playback Control
function during SVCD or VCD playback. Refer to p.27.
26. SUBTITLE
During playback of DVD discs with more than one
subtitle language, this button toggles between
available subtitle languages. Refer to p.26.
27. INPUT
No function on this unit.
28. OPEN/CLOSE
Opens or closes disc tray.

10
POWER OPEN/CLOSE STOP PLAY STILL/
PAUS E
42 3 51 6 7 8
STANDBY
FRONT PANEL/DISPLAY WINDOW
Front Panel
1. Standby Indicator 5. VFD Display Window
Lights up in standby mode when the unit is turned off. Displays operation information.
2. POWER Switch 6. STOP Button
Turns the unit’s power on and off. Stops playback.
3. OPEN/CLOSE Button 7. PLAY Button
Opens or closes the disc tray. Plays the inserted disc.
4. Disc Tray 8. STILL/PAUSE Button
To place DVD, VCD, CD, and MP3 discs on. Pauses the playback
Rear Panel
1. L/R Front Mixed Audio Output Jacks 6. L/R Surround Audio Output Jacks
2. Center Audio Output Jack 7. SUB WOOFER Output
3. Coaxial Digital Audio Output 8. S-Video Output Jack
4. Composite Video Jack 9. SCART Out
5. OPTICAL Output
11
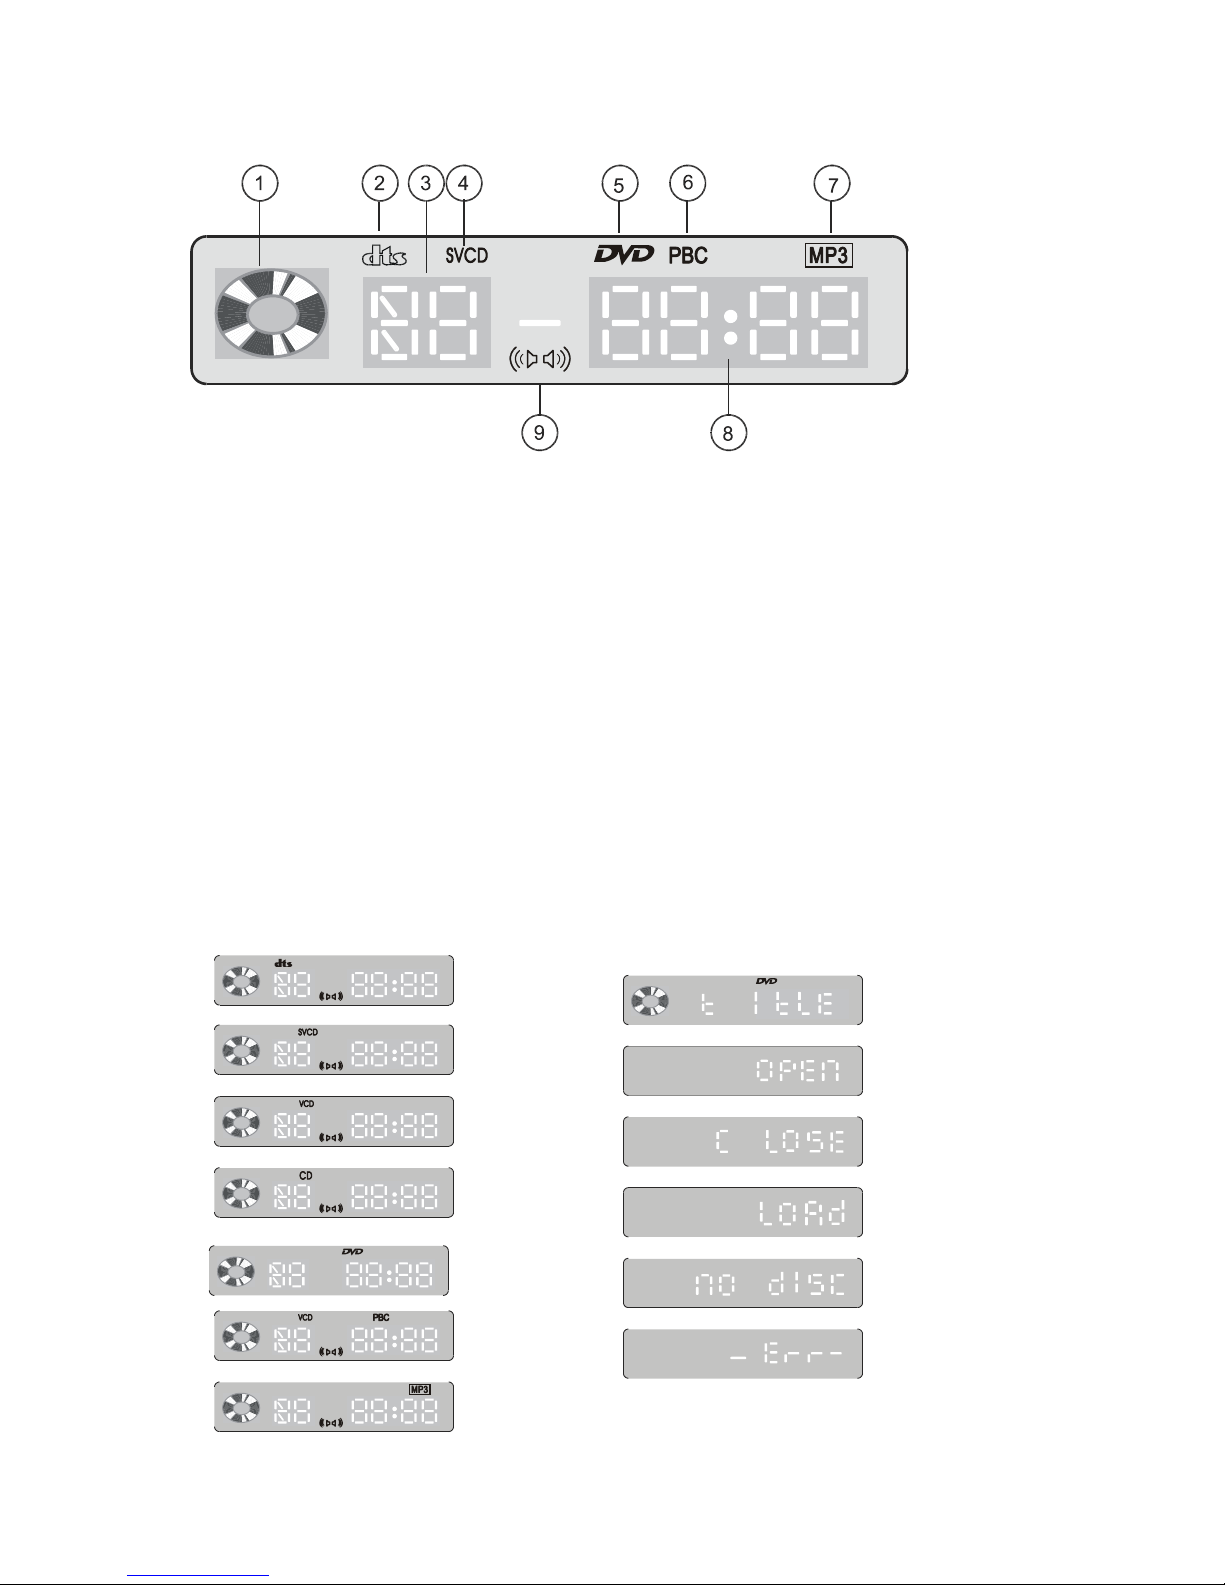
Display Window
1. Disc inside indicator
2. DTS®Digital Audio Indicator (See Fig. 1 below)
Indicates the disc played contains DTS®Digital audio
encoding.
3. Title/Track Number Indicator
Some DVDs contain multiple title pages. This indicato
r
displays the title number currently in use or track
number (CD) currently playing.
4. SVCD/CD/VCD Indicator (See Fig. 2- 4 below)
Identifies the inserted disc as audio SVCD and CD o
r
Video CD.
5. Dolby® Digital Audio Indicator (See Fig. 5 below)
Indicates the disc played contains Dolby® Digital
audio encoding.
6. DVD Indicator (See Fig. 5 below)
Identifies the inserted disc as a DVD disc.
7. PBC Indicator for VCD Disc (See Fig. 6 below)
Playback Control indicator.
8. MP3 Indicator (See Fig. 7 below)
Identifies the inserted disc as a MP3 disc.
9. Analog Audio Output Indicator
Indicates the audio sound output from analog audio
jacks.
10. Elapsed Playback Time/Remaining Playback Time
Indicator
Displays elapsed playback time and playback
remainder time..
DVD TITLE is being read.
The disc tray is open.
The disc tray is being
closed.
The system is loading
information from the disc.
No disc is loaded.
Bad disc or Wrong
region disc is being
loaded.
(1)
(2)
(3)
(4)
(5)
(6)
(7)

11
REAR PANEL AND CONNECTIONS
Video Output Terminals and Connections
Composite Video Output Terminal
Composite video output is the most commonly used
video connection in use today and is supported by
most televisions and A/V receivers. Composite video
is set to display without user setup.
S-Video Output Terminal
You will want to use S-video output with televisions
or monitors equipped with an S-video input
whenever component video inputs are not available.
To activate the S-video output, you must set the DVD
player’s “TV SETUP PAGE”/ “TV OUTPUT” setting
to S-VIDEO (Refer to p.13).
NOTE:
S-video cable is not included with this player.
SCART Terminal
The SCART terminal can be connected to the TV set
equipped with SCART connectors. The audio
transmitted on the SCART is stereo sound.
Whenever the SCART terminal is used, you must set
the DVD player’s “TV SETUP PAGE”/ “TV OUTPUT”
setting to “SCART” (Refer to p.13).
NOTE:
For selected TVs, when the TV set is at standby mode, power on the DVD player will automatically power on the TV and switch to the SCART
video input channel.
WARNING:
1. S-Video and SCART video jacks cannot output signals simultaneously.
2. When DVD player is in POWER OFF status, the LOOP THROUGH function does not work.

12
Audio Output Terminals and Connections
Down-Mixed Audio Output Terminals (L/R)
Use down-mixed (stereo) audio output terminals for
connection with your television or other non-Dolby®
Digital A/V receivers or amplifiers. These terminals
provide down-mixed Dolby®Digital audio signals
for standard 2-channel playback.
Coaxial and Optical Digital Audio Output
Terminals
Use digital audio outputs for connection with an
external Dolby®Digital or DTS®decoder. To use the
coaxial or Optical output, you will need to purchase a
coaxial or an Optical cable for connection with the
Coaxial or Optical Input Terminal of an AV amplifier.
(Digital cable is not included with this player.)
Note when connecting the Optical digital cable
(optional):
Remove the dust protection cap from the
connector and connect the cable firmly so
that the configurations of both cable and
connector match.
Keep the dust protection cap and always
re-attach the cap when not using the
connector to protect against dust.
5.1ch Audio Output Terminals
Use 5,1ch audio output terminals for connection
with your 5.1ch A/V receiver or amplifier.

13
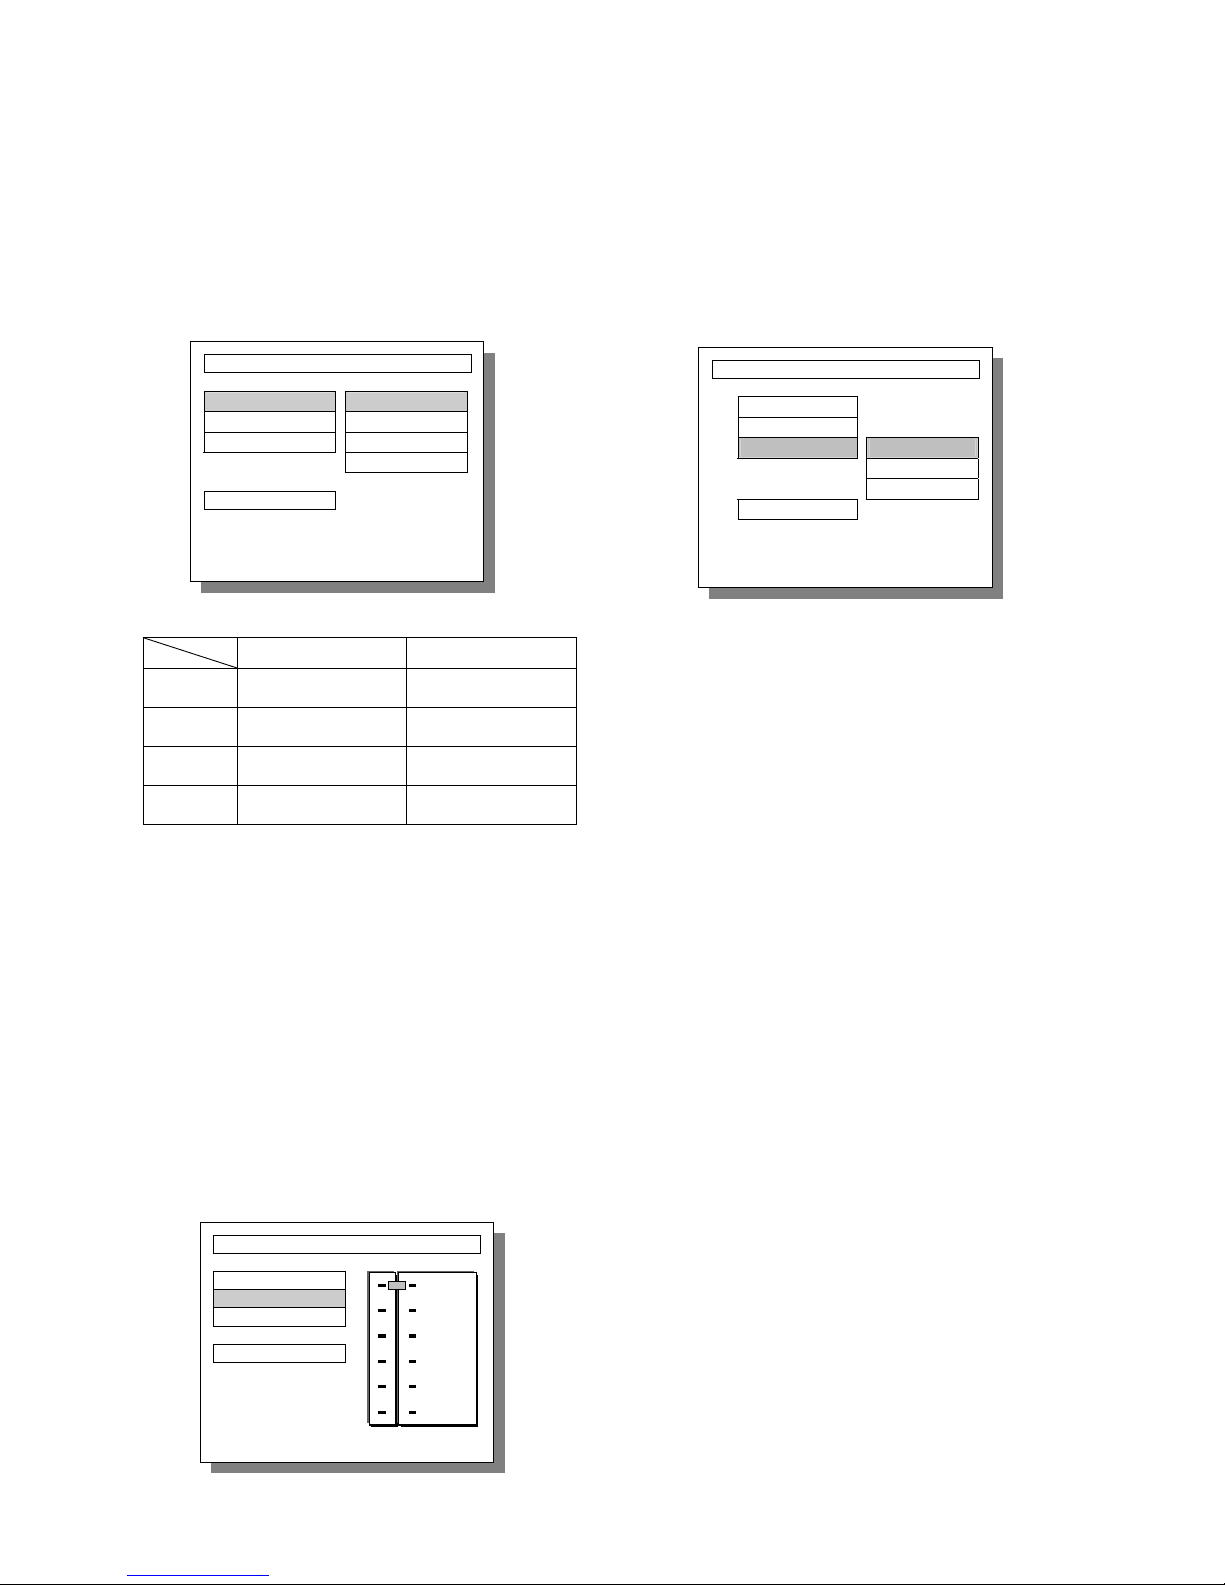
INITIAL SETTING
Press the SETUP button on the remote controller to set up
the initial setting. The On-Screen Display (OSD) will
display below:
TV SETUP
There are three available items: They are TV
DISPLAY, TV TYPE, and TV OUTPUT.
TV DISPLAY
NORMAL/PS
4:3 Pan & Scan video output for a normal TV set
NORMAL/LB
4:3 Letterbox video output for a normal TV set
WIDE
16:9 Wide Screen video output for a wide screen TV
set
NOTES:
Aspect ratios available for playback will be printed on the DVD
rear packaging.
Some DVDs are recorded in the Cinema Wide format (16:9
aspect ratio), and some are recorded in the standard format (4:3
aspect ratio). Some DVD discs are recorded in both formats and
may have the Pan Scan feature available. The Pan Scan feature
if available will fill the entire screen in 4:3 TV screen. However, it
will cut some of the picture off at the two sides.
TV TYPE
MULTI
The DVD player will choose the correct system to
display the playback of inserted disc.
NTSC
The DVD player will output in NTSC format
regardless of what format the disc was designed for.
PAL
The DVD player will output in PAL format regardless
of what format the disc was designed for.
TV OUTPUT (in stop mode)
The TV OUTPUT has two kinds of output ways; they
are S-VIDEO and SCART terminal. If you are using
S-video output, please set this setting to “S-VIDEO”. If
you are using SCART output set to “SCART”, which
matches with your TV’s SCART input.
NOTES:
SCART video output and S-Video output cannot be used
simultaneously.
Press ■/ II key on the Remote Control to pause the playback,
to pre-stop it, press twice and to stop the playback completely
by pressing thrice.
SETUP MENU - - MAIN PAGE
TV SETUP
AUDIO SETUP
DOLBY DIGITAL SETUP
LPCM SETUP
GENERAL SETUP
PREFERENCES
EXIT SETUP
GOTO TV SETUP
- - TV SETUP PAGE - -
TV DISPLAY NORMAL/PS
TV TYPE NORMAL/LB
TV OUTPUT WIDE
MAIN PAGE
SET TV DISPLAY MODE
- - TV SETUP PAGE - -
TV DISPLAY
TV TYPE MULTI
TV OUTPUT NTSC
PAL
MAIN PAGE
SET TV STANDARD
- - TV SETUP PAGE - -
TV DISPLAY
TV TYPE
TV OUTPUT S-VIDEO
SCART
MAIN PAGE
SET TV OUTPUT

14
AUDIO SETUP (5.1Ch model)
There are eight available settings:
AUDIO OUT
You can choose to send the player’s audio signals to
an external receiver using the following outputs:
ANALOG:
Audio signals are sent using stereo (L/R) audio
terminals. Selecting this choice will disable the
digital audio outputs.
SPDIF/RAW:
Set to this selection will output the raw bit stream
signal of Dolby®Digital or DTS from the coaxial jack.
In order to enjoy Dolby®Digital DTS discs, this unit’s
digital output jack must be connected to the
digital-input jack of a Dolby®Digital or DTS
compatible receiver or processor.
SPDIF/PCM:
PCM stands for Pulse Code Modulation and is digital
audio. Connecting this unit to an amplifier with a
built-in D/A converter can play the same digital audio
format as on CDs. Additionally, 2-channel analogue
audio will output from the audio output jacks of
amplifier.
NOTES:
Analogue and digital audio signals cannot output simultaneously.
This player has a conversion function for converting Dolby®
Digital and MPEG audio into the LPCM format. This allows
playback of CDs with the regular playback system without the
need for a special converter.
DOWN MIX
LT/RT
Please connect to a built-in Dolby Pro Logic receiver
or amplifier to enjoy the Dolby Pro-Logic surround
sound.
STEREO
Down mixed Stereo L/R audio output.
VSS
Virtual Surround Sound audio output.
OFF
Turn off the DOWN MIX function to enable the 5.1ch
setting items.
- - AUDIO SETUP PAGE - -
AUDIO OUT
DOWN MIX LT/RT
CENTER STEREO
REAR VSS
SUBWOOFER OFF
CNTR DELAY
REAR DELAY
TEST TONE
SET DOWNMIX MODE
- - AUDIO SETUP PAGE - -
AUDIO OUT ANALOG
DOWN MIX SPDIF/RAW
CENTER SPDIF/PCM
REAR
SUBWOOFER
CNTR DELAY
REAR DELAY
TEST TONE
SELECT AUDIO OUTPUT

15
CENTER
Set the CENTER output ON/OFF.
REAR
Set the REAR output ON/OFF.
SUBWOOFER
Set the SUBWOOFER output ON/OFF.
CNTR DELAY
Adjust the delay time of CENTER output.
Note:
Please set the “CENTER” item to ON first.
REAR DELAY
Adjust the delay time of REAR output.
Note:
Please set the “REAR” item to ON first.
TEST TONE
Test the output ability of left, center, right, right surround,
and left surround speakers in sequence.
Note:
Please set the “DOWN MIX” item to OFF first.
- - AUDIO SETUP PAGE - -
AUDIO OUT
DOWN MIX
CENTER ON
REAR OFF
SUBWOOFER
CNTR DELAY
REAR DELAY
TEST TONE
SETUP CENTER SPEAKER
- - AUDIO SETUP PAGE - -
AUDIO OUT
DOWNMIX
CENTER
REAR ON
SUBWOOFER OFF
CNTR DELAY
REAR DELAY
TEST TONE
SETUP REAR SPEAKER
- - AUDIO SETUP PAGE - -
AUDIO OUT
DOWN MIX
CENTER
REAR
SUBWOOFER ON
CNTR DELAY OFF
REAR DELAY
TEST TONE
DO YOU HAVE A SUBWOOFER?
- - AUDIO SETUP PAGE - -
AUDIO OUT
DOWN MIX
CENTER
REAR
SUBWOOFER
CNTR DELAY
REAR DELAY
TEST TONE
SET CENTER DELAY
OFF
-
-
-
-
-
-
-
-
-
-
-
-
1MS
3MS
5MS
- - AUDIO SETUP PAGE - -
AUDIO OUT
DOWN MIX
CENTER
REAR
SUBWOOFER
CNTR DELAY
REAR DELAY
TEST TONE
SET SURROUND DELAY
OFF
-
-
-
-
-
-
-
-
-
-
-
-
3MS
9MS
15MS
- - AUDIO SETUP PAGE - -
AUDIO OUT
DOWN MIX
CENTER
REAR
SUBWOOFER
CNTR DELAY
REAR DELAY
TEST TONE ON
OFF
TEST TONE
16
DOLBY DIGITAL SETUP
There are two available items: They are DUAL
MONO and “DYNAMIC”.
DUAL MONO
There are four available modes: STEREO, L-MONO,
R-MONO, and MIX-MONO.
Audio output description
MODE LEFT SPEAKER RIGHT SPEAKER
STERO STEREO -L STEREO -R
L-MONO L-MONO L-MONO
R-MONO R-MONO R-MONO
MIX-MONO L-MONO+R-MONO L-MONO+R-MONO
DYNAMIC
“Dynamic Range” is the difference between the
maximum level and the minimum level of sounds. Sounds
on a movie originally designed for movie theaters feature
a very wide dynamic range, so sometimes it is not
suitable for home use. Depending on the condition of your
listening environment, Dynamic Range function can
reduce the instant sound effect alteration of the movie
while playing back. When seeing movies in the night, turn
this function on to avoid the suddenly loud sound to
influence your neighbors. (Default value is FULL, no
compression to be done.)
NOTES:
This function works only during playback of Dolby Digital
recorded discs.
The level of Dynamic Range Reduction may differ depending on
the DVD discs.
Pro Logic
NOTES:
This function works only during playback of Pro Logic effect
recorded discs.
- - DOLBY DIGITAL SETUP - -
DUAL MONO STEREO
DYNAMIC L-MONO
Pro Logic R-MONO
MIX-MONO
MAIN PAGE
DUAL MONO
(
1 + 1
)
SETUP
- - DOLBY DIGITAL SETUP - -
DUAL MONO
DYNAMIC
Pro Logic
MAIN PAGE
DYNAMIC RANGE COMPRESSION
FULL
6/8
4/8
2/8
OFF
- - DOLBY DIGITAL SETUP - -
DUAL MONO
DYNAMIC
Pro Logic OFF
ON
AUTO
MAIN PAGE
SET Pro Logic ON / OFF
17
LINEAR PCM SETUP
This option sets the audio output format sent using the
unit’s coaxial digital audio output.
Linear PCM OUT
LPCM 48K
In the Linear PCM setting, “48K” means “the digital
audio output maximum sampling rate is 48KHz”;
therefore, when the title’s encoding sampling rate* is
96KHz, the output will be forced converted to 48KHz.
LPCM 96K
If “96K” is selected, then the maximum output
sampling rate is 96KHz and no conversion will take
place.
DISC CODING AND OUTPUT FORMAT
Disc Audio encoding format Digital output format
Dolby®Digital
Dolby®Digital Bit stream
(1~5.1 ch) or 48kHz/16bits
2ch Linear PCM
DTS®Bit stream (1~5.1 ch) or OFF
Linear PCM
(48/96kHz, 24bits)
Linear PCM
(48KHz/16 bits up to
96kHz/24bits)
DVD
MPEG PCM (2ch) (48KHz/16 bit) or
MPEG audio bit stream (1-7.1 ch)
Video
CD MPEG I Linear PCM (44.1KHz sampling)
Audio
CD Linear PCM Linear PCM (44.1kHz/16bit)
NOTES:
Sampling rate:
When a sound wave is converted to a digital signal, the sound is
sampled and converted to data at a specific frequency rate. For
example, a signal with a 96 kHz sampling rate indicates that in
one second, the analog signal was sampled 96000 times to
produce the digital signal.
In LPCM set-up menu, there will be a case that even when
“LPCM 96K” is selected, output signal is converted to 48KHz if the
disc has the copy guard management system in it.
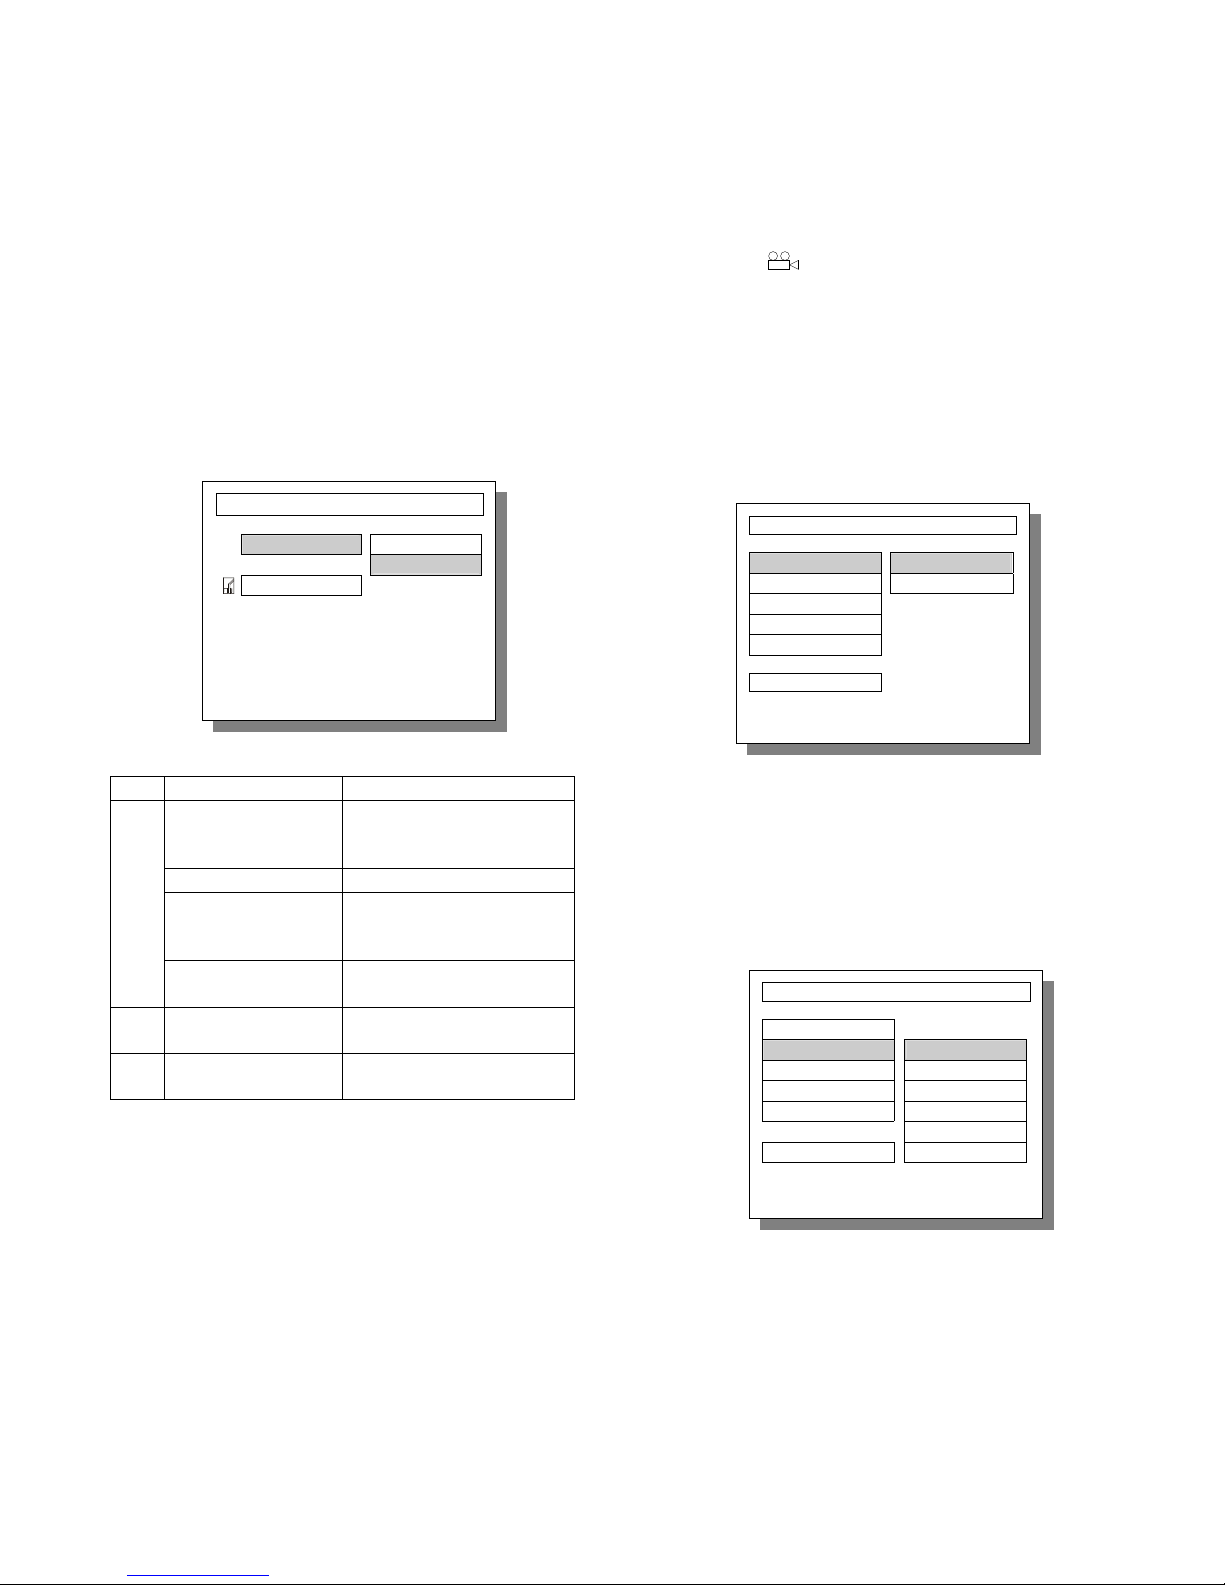
GENERAL SETUP
There are four available selections: ANGLE MARK,
OSD LANG, CAPTIONS, and SCR SAVER.
ANGLE MARK
During playback of a title with multiple angle sections,
the message " " will appear on the upper corner of the
screen.
When ANGLE MARK is set to "ON", the angle mark
OSD will stay on the screen until the end of the
playback title or chapter.
When ANGLE MARK is set to "OFF", the angle
mark OSD will stay on the screen for 3 sec and then
disappear.
OSD LANGUAGE
You can select the language for the setup menu or
the operation message display. There are four available
OSD languages: ENGLISH, FRENCH, SPANISH and
CHINESE for display. Default setting is “English”.
- - GENERAL PAGE - -
ANGLE MARK
OSD LANG ENGLISH
CAPTIONS FRENCH
PIC MODE GERMAN
SCR SAVER SPANISH
DUTCH
MAIN PAGE DANISH
SET OSD LANGUAGE
- - LPCM SETUP - -
LPCM OUT LPCM 48K
LPCM 96K
MAIN PAGE
SET LPCM OUTPUT TO 48K / 96K
- - GENERAL PAGE - -
ANGLE MARK ON
OSD LANG OFF
CAPTIONS
PIC MODE
SCR SAVER
MAIN PAGE
ANGLE MARK ON/OFF
Table of contents
Other Eltax DVD Player manuals


