Nogueira SDN-170A User manual

Disc Mower - Segadora de Discos
SDN-170A
Instructions Manual
Manual de Instrucciones


3
SDN-170A
Dear Owner
Congratulations for your purchase of the SND-170A Nogueira Disc Mower.
It is a top-notch quality product, especially designed to meet your needs.
This manual contains operating and maintenance instructions, when
properly abided by it assures good operation, safety, and durability to your
SDN-170A Nogueira. We recommend carefully reading it, before beginning
to operate the machine.
There is an identification plate fastened on the machine, which displays the
manufacturing serial number. Write this number, in the end of this manual.
This information is extremely important to identify your machine, in cases
when you need technical support or replacement parts.
Nogueira S/A is always at your disposal to answer any questions or doubts
and supply efficient and permanent technical support.
The images displayed in this manual are only for illustrative purposes. Thus to facilitate your
viewing, the images show cutaway or the safety shielding removed to display it more clearly. Do
not operate the machine under any circumstances without these respective protective shields.
The reproduction of this manual is not allowed except when previous written permission is
granted by the Nogueira Indústria e Comércio de Implementos e Máquinas Agrícolas S.A.
English

4Instructions Manual
Index
Notes:
1- Nogueira seeks to constantly and improve its products; it reserves the right to introduce
modificationsinitscomponentsandaccessorieswithoutpreviousnotice.
2- The illustrations contained in this manual are merely illustrative. All safety instructions
mustbeabidedbyforbothmachineconfigurations.
Introduction 03
Introducingthemower 05
Environmentalconservation 06
Safety 06
Safetyadhesivelabels 09
Application 11
Actuation 11
Couplingtothetractor 11
Preparingthedriveshaft 12
Liftingthecuttingbar 13
Transportandoperatingpositions 14
Cuttingheight 15
Cuttingmarker 15
Protectivecoveringtarp 16
Initialoperation 16
Cutting 16
Maintenance 17
Safetydevice 17
Tighteningthebelts 18
Blades 18
Lubrication 19
Technicalcharacteristics 23
Conservationtips 24
Practicalguide 24
Additionalinformation 25
Technicalsupport 26
Warrantycertificate 27
Warrantycontrol 29

5
SDN-170A
Introducing the mower
English

6Instructions Manual
Nogueiraiscontinuallyconcernedwiththeenvironmentalconservation,inthedevelopmentphase,as
well in the utilization of processes and materials ecologically appropriate in its production and its
products.
PROTECT AND RESPECT THE ENVIRONMENT, remember that conservation is the social
responsibility of everyone. These concepts include compliance with legally defined disposal of used
lubrication products and fluids, old tires, and packaging. Never dispose of these products or empty
packaging in swamplands, lakes, rivers, puddles etc. Share these recommendations with others and
makeotherpeopleawareoftheimportanceofconservingtheenvironment.
TheNogueiraCompanyisconcerned about the safety ofpeopleinvolvedinoperatingandperforming
maintenanceproceduresonthemower.
In developing this design, we have considered every detail in order to avoid unexpected accidents
whileoperatingit.Wehavedevelopedsafetyshieldingandeliminateddangeroussituations.
Remember, keeping people healthy and their physical integrity must always be considered to the
upmost.
We have prepared this manual to make your familiar with your mower and, so that you can use it
correctlyandsafely.
Werecommendcarefullyreadingitbeforeoperatingthemachinethefirsttime.Ifyouhaveanydoubts
or questions, please get in touch with us at your Nogueira reseller or our Technical Support
Department.
Safety warning labels alert users on situations which pose some type of danger. They are
accompaniedbyinstructionsforprotectingthesafetyoftheoperatorandotherusers.
These warnings refer to dangerous situations, which may result in
serious accidents and be life threatening, if the instructions are not
strictlyabidedby.
This type warns on dangerous situations and informs on necessary
precautionsinordertoavoidanypossibleaccidents.
SAFETYALERT
SYMBOL
SAFETYWARNINGLABELS
DANGERwarnings!
CAUTIONwarnings!
Environmental conservation
Safety

7
SDN-170A
- Read the instruction manual before turning on the machine. Pay attention and respect all the
operating and safety recommendations while running the machine. SHARE THIS INFORMATION
WITHALLOTHERUSERS.
- Do not operate the machine while or after drinking alcoholic beverages or medications which affect
your normal condition. Pay attention to what you are doing and use your good sense. Any lack of
attentionwhileoperatingthemachinecanresultinaseriousaccident.
- Disconnect from the power take-off, the tractor motor, and remove the key from the ignition before
performing any adjustment, lubrication, or any maintenance job on the machine. Never try to perform
anyrepairswhilethemachineisturnedon.Alwayspaycompleteattention!
-Beforeturningonthemachine,checktoseeiftherearenotoolsoranyotherobjectonit.
- Look around the machine before operating it. Keep animals and spectators at a safe distance, away
fromthepowersupplyarea.Payspecialattentiontoanychildrennearby.
- Dress appropriately for operating the machine. Keep long hair tied up and do not wear loose-fitting
clothing. Remove rings, chains, and any other objects which can become stuck in the moving parts or
mechanisms.
- Wear personal protective equipment - PPE while operating the machine. Exposure to noise for
prolongedperiodcancausehearingdamageorloss.Wearearplugsandsafetyglasses.
- Never try to clean or remove remnants of products while the machine is turned on. This type of
procedure can only done while the power take-off is disconnected, the key removed from the ignition,
andthemachineiscompletelymotionless.
-Keeptheshieldsandprotectionsintheproperplacesanddonotoperatethemachinewithoutthem.
-Keepthesafetylabelsingoodconditionandlegible.Replacethemwhenevernecessary.
- It is prohibited for people to stand on any part of the machine while operating. Whenever it is
necessary to get on the machine for any adjustment or repair, disconnect the power take-off from the
tractorandwaituntilthecomponents/partsarecompletelymotionless.
Safety
English

8Instructions Manual
-Keepatasafedistancefromthemachinewhenitisoperating.
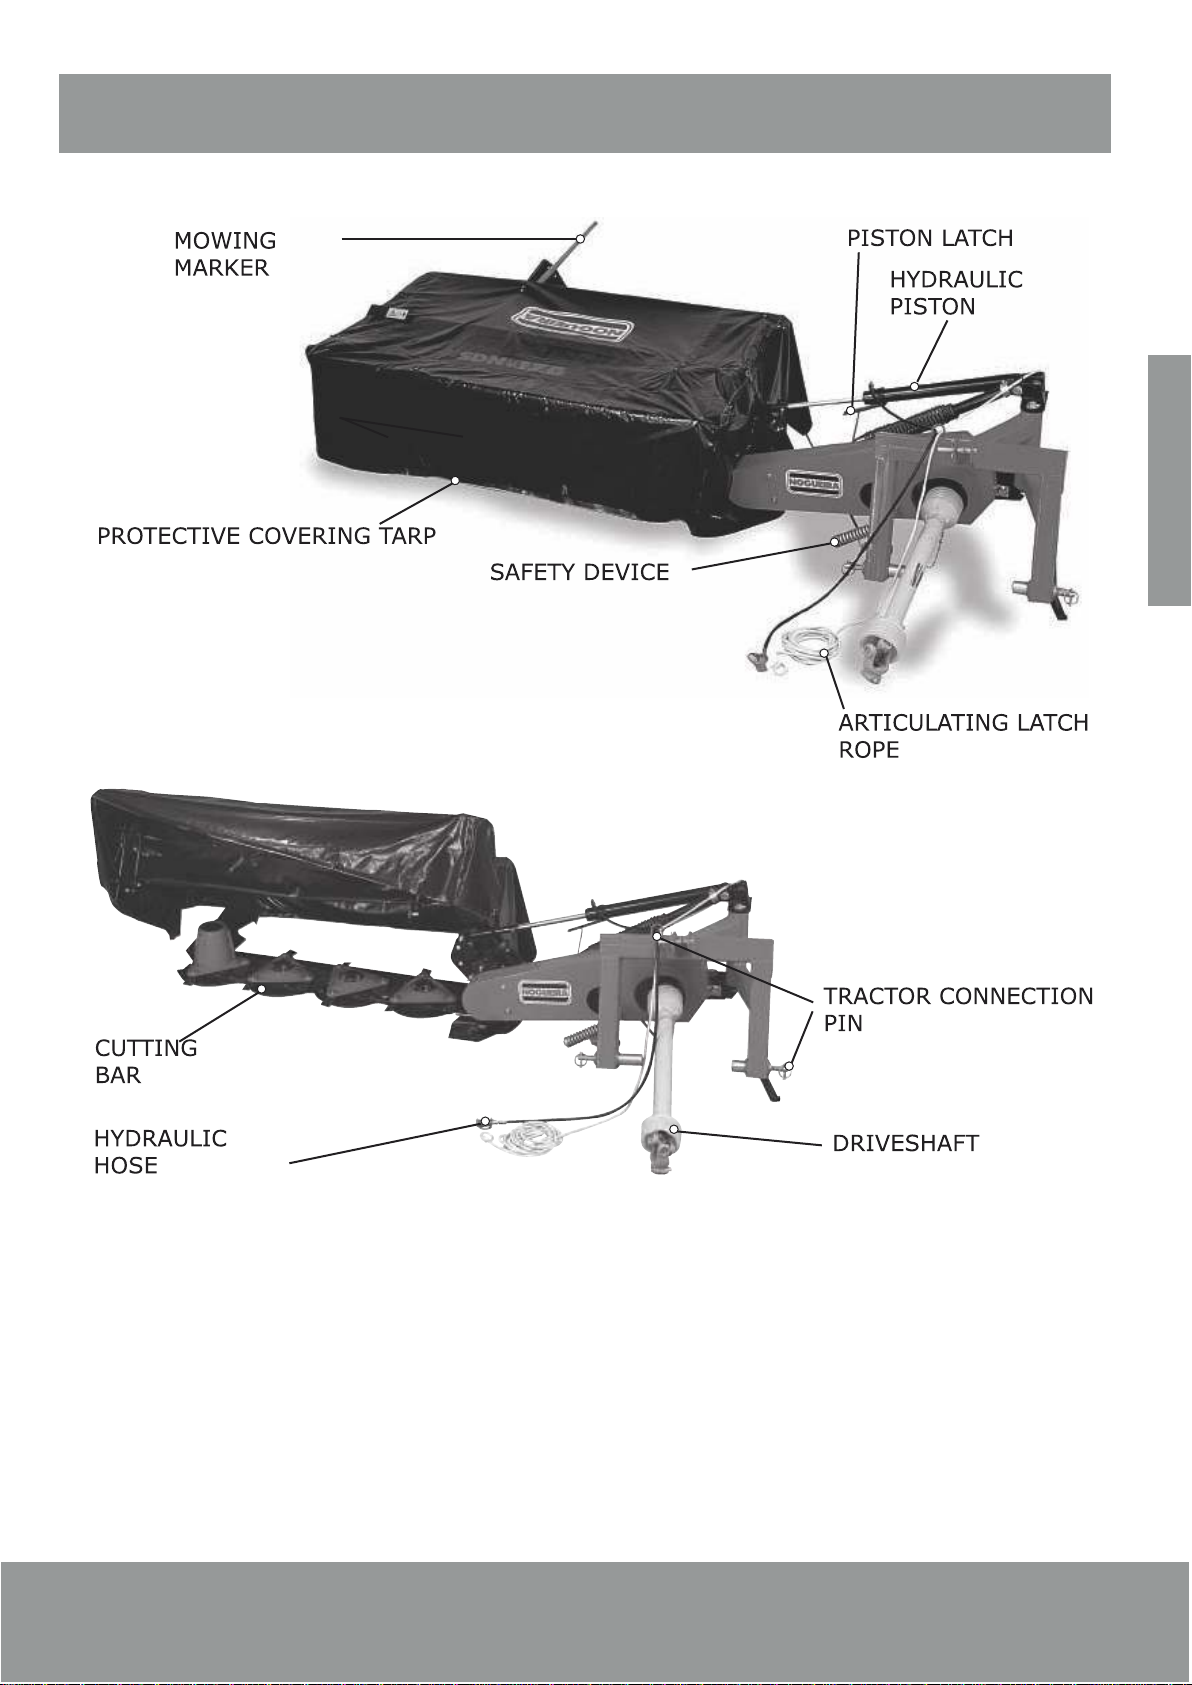
-Nevertrytousethemachinewithoutplacingtheprotectivecoveringtarp,asobjectscanbethrownby
the blades, which can injure people. Be especially careful when working around roadways and
constructions.
-Checktheterrainbeforestartingyourwork. Markthe dangerousareasorobstacleswhichmaymake
theworkdangerous.
-Beespeciallycarefulwhencouplinganduncouplingthemachinefromthetractor.
- Never operate the machine inside closed surrounding without ventilation, gases released from the
tractormotorareveryharmfultothehealthoftheoperator.
-Placethemachineinanappropriatepositionfortransporting.
-Whentransporting the machine on public roads, obey the local regulations ontrafficand safety. Find
out the legal limits on the maximum height and width for transport. Pay special attention to the height,
especiallywhengoingunderoverpasses.
- Never leave the tractor when the machine is turned on. Stop the motor, disconnect it from the power
take-off,engagetheparkingbrake,andremovethekeyfromtheignitionbeforegettingout.
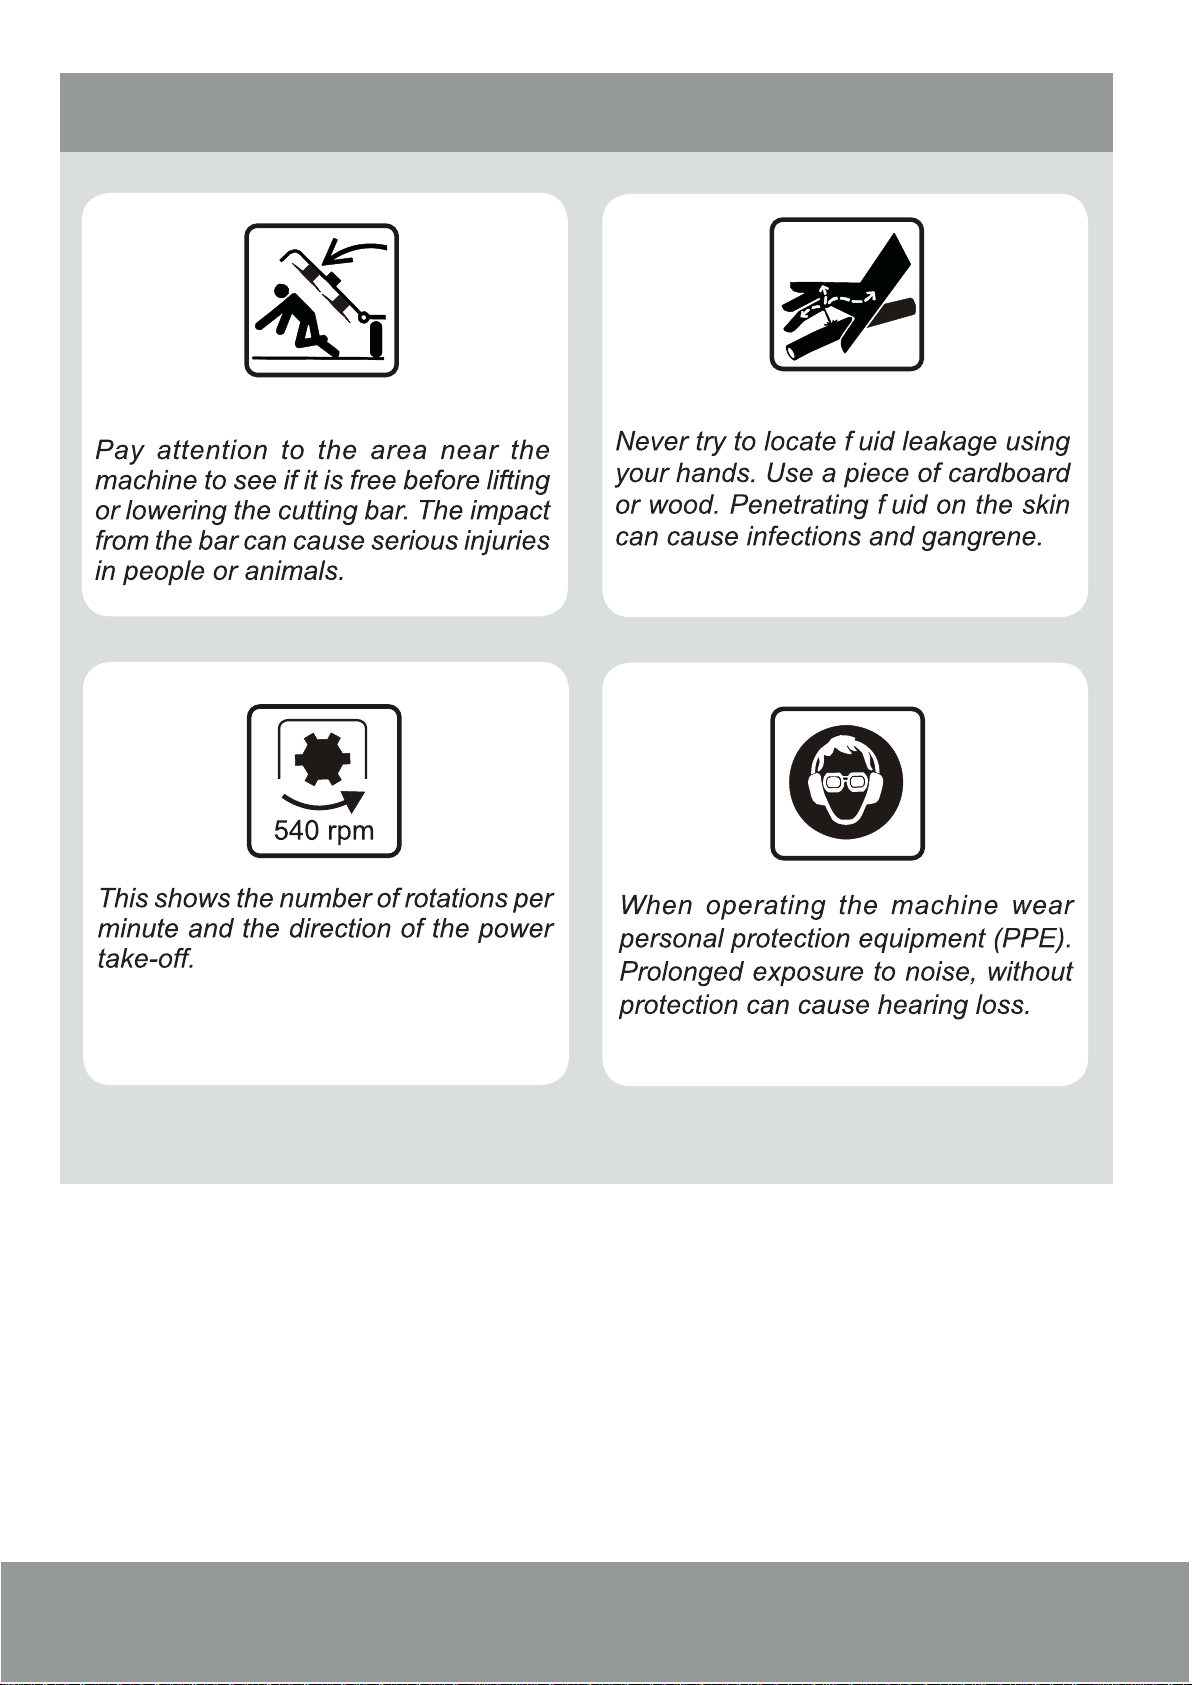
- Leakage of the fluid from the hydraulic system is almost imperceptible. Use a piece of wood or
cardboard but never your hands to check for leakage. Protect your hands and body, as these fluids
may be released at high pressure and cause serious injuries. In case of any accident, consult with a
doctorimmediately.
-Alwaysadjustthespeedofthetractortothelocalconditions.Avoidsudden maneuvers, especially in
uneven locations. When the load hitched to the tractor is heavier than the tractor, do not exceed 16
km/hour.
- Pay double attention when working on sloped terrains and if you notice any signs of being
imbalanced,reduceacceleration.Keepthetractoralwaysengagedwhengoingdownslopes.
- The tractor must always be maneuverable. Place enough counterweights on the tractor, so the front
tiresstayinfirmcontactwiththeground.
-Bepreparedincaseofanaccident.Keepafirst-aidkitinaneasilyaccessiblelocation.Andknowhow
touseit.
-Complywiththe safetyrecommendationsandpayattention.Anylackofattention whileoperatingthe
machinecancauseaccidents.
Safety

9
SDN-170A
Safety adhesive labels
English

10 Instructions Manual
Safety adhesive labels

11
SDN-170A
The SDN-170A Disk Mower was manufactured exclusively for mowing plants used for making pre-
dried hay or silage, such as alfalfa, oatmeal, ryegrass, coast-cross, clover, rhodes, in fact, any plants
withthinstalkswhichgrowneartheground,especiallyherbs.
TheSDN-170Aisactuatedbythepowertake-offconnectedtocategoryIorIIagriculturaltractors,with
aminimumpowerof35HPat540RPM.
Itmustbecoupledusingthethreepointhydraulicliftingsystemofthetractor,inthefollowingmanner:
-Placethetractorsothatthepowertake-offandtheSDN-170Aactuationaxleofthearealigned;
- Adjust the height of the tractor hydraulic arms so that they are the same height as the SDN-170
connectingpins;
-Firstconnecttheleftarmofthehydraulicsystemandnexttherightarm,andfinallytheupperarm(3rd
point),latchingthemusingthecotterpins.
Aftercouplingthemachine,liftthemachine,removethecotterpinAandliftthesupportfootB,placingit
inarestingposition.
IMPORTANT:
Adjust the tractor stabilizers, so that they prevent sideway movements of the machine after coupling,
therebyavoidingitfromtouchingthetractortirewhileoperating.
Application
Actuation
Coupling to the tractor
fig.01 fig.02
English

12 Instructions Manual
Note: See the following illustrations to see the correct positioning for connecting to category I and
II tractors.
In order to connect the SDN-170A to category II tractors, it is necessary to use coupling bushings
type C.
It is possible to invert the position of the connecting pin, as shown in figures 4 and 5. Remove
screws D to dissemble the connecting pin.
fig.03
fig.04 fig.05
Dependingonthetractormodelbeingused,youmayneedtoshorterthedriveshaft.Thisoccursdueto
the variation in the distance between the power take-off and the machine actuation axle, among
differenttractormodels.
If this is necessary, connect the machine to the tractor properly and the power take-off must be
disconnected,thenproceedasfollows:
-Separatethetwopartsofthedriveshaft;
- Connect the tubular part (female) to the mower axle and the solid part (male) to the tractor power
take-off;
-Placethetwoparts(maleandfemale)side-by-side.Checkifthereisanyplay,atleast25mmonboth
endsofthedriveshaft.Ifthereisnotenoughplay,thenmarkthepointsforcuttingthedriveshaft;
-Removethedriveshaftfromthemachineandthetractorandcutbothends;
-Assemblebothpartsofthedriveshaft.Seeifthebracketsarealigned;
-Connectthetubular part (female) to machine axle and the solid part (male) to thetractorpowertake-
off.
Preparation for installing the driveshaft

13
SDN-170A
fig.06 fig.07
fig.08
Note:Thepartscutfromthesolidandtubulardriveshaftmustbethesamelength.
Itisnecessarytoleave25mmofplayonbothendsofthedriveshaft.
The instructions for cutting, lubricating, and placing the protection chain on the driveshaft are found in
thepamphletsuppliedbythemanufacturer,fastenedonthedriveshaft.Itistheexclusiveresponsibility
of the authorized Nogueira reseller to install and prepare the driveshaft and the first operation of the
machine.
The SDN-170A is equipped with a hydraulic piston for placing the cutting bar in a vertical position,
appropriatefor transportingthemachineconnectedtothetractor.Thetractormustbeequipped witha
remotecontrollervalvetooperatethisbyasingleaction.
Connectthehydraulichosetothetractorvalue.
Beforeactivatingthehydraulicpiston,readtheinstructionson“Transportposition”inthismanual.
Keep the hose in good condition. Oil leaks can cause problems to the operation of the hydraulic
system,andevencauseaccidents.
Lifting the cutting bar
English

14 Instructions Manual
Transport and operating position
TRANSPORTPOSITION
Fromthetractorseat,pullropeAtoreleasethecuttingbarlatch.
Activatetheremotecontrollervalveofthetractor,andthenthepistonwillliftthecuttingbar,placingitin
thetransportposition(vertical).
Then, assemble the SAFETY LATCH on piston B and place the cotter pin C (fig.11). The SAFETY
LATCH prevents the bar from lowering in cases of eventual failure in the hydraulic system. It is
extremelyimportantinordertoavoidaccidents.
WORKPOSITION
Remove cotter pin C and release the SAFETY LATCH from piston B (fig.11). Activate the remote
controllervalveonthetractorandlowerthebaruntilitisintheworkingposition(horizontal).
fig.09 fig.10
fig.11

15
SDN-170A
Placethemowerconnectedtothetractoronaflatplaceandthenproceedasfollows:
Liftthemowerusingthehydraulicsystem,untilthecuttingbarisapproximately30cmfromtheground
(fig.12).
Using the remote controller value on the tractor, activate the piston in the machine and lower the
cuttingbaruntilitis10cmfromtheground(fig.12).
Now,activatethe hydraulicsysteminthe tractorandlower themower,untilthe connectingpinsare40
to45cmabovetheground(fig.13).
SHORTENINGTHEARM:FORCUTTINGLOWER.
LENGTHENINGTHEARM:FORCUTTINGHIGHER.
As the mower performs it cutting work, the marker forms a small furrow to show the area which has
already been cut. SpringAon the marker can be adjusted, for increased or decreased tension, based
ontheconditionsoftheproductbeingharvested.
If necessary, the wooden shaft B can also be repositioned, by changing the assembly position of the
fasteningholes.
Cutting height
Cutting marker
fig.12
fig.14 fig.15
fig.13
English

16 Instructions Manual
If necessary, it also possible to increase the height of the protective covering tarp A by changing the
positionofthebushinginsupportB,totheupperhole.
BeforeoperatingtheSDN-170A,carefullycheckthefollowing:
-Seeiftherearenoobjectsortoolsonthemachine.
-Seeiftherearenoanimalsorpeoplenearby.
After the mower is properly connected and lubricated, start the tractor motor and let it run for a few
minutes idling. Connect the power take-off and slowly increase the acceleration until reaching 540
RPM.
Observethecorrespondingreading of 540 RPM forthepowertake-offonthetractor dashboard. Most
tractorsrunatbetween1700to2100RPM,onthetachometer.
The recommended tractor speed is from 7 to12 km/hour. When cutting the sides of the planted crop
area, reduce the speed due to the possible hitting of obstacles or uneven terrain (curved levels,
ditchesetc).
CUTTINGONEMBANKMENTS:
It is necessary to adjust the position of the cutting bar when cutting on sloped surfaces, using the
hydraulicpiston.
Ifyouhaveanydoubtsonhowtoslantthecuttingbar,consultthismanual.
Protective covering tarp
Initial operation
Cutting
fig.16 fig.17

17
SDN-170A
Your SDN-170Arequires minimal maintenance in order to remain in good working order and achieve
maximum durability. Therefore, it is essential to perform the following preventive maintenance
procedures.
The SDN-170A is equipped with a safety device for protecting the cutting bar if it hits any obstacle
during its operation. If this occurs, the cutting bar will automatically articulate backwards, thereby
avoidingpossibledamagetotheequipment.
Inthiscase,movethetractorinreverse,thenthesafetydevicewillbeactivatedagain.
Sotoassureperfectprotection,itisnecessarytokeepthenecessarycompressiononthespringinthe
device.
MeasureM=150millimeters(fig.18).
Maintenance
Safety devices
Disconnect the power take-off and remove the key from the tractor ignition,
before performing adjustments, lubrication, or maintenance on the machine.
Wait until all the parts are motionless before touching any part of the machine.
Keep the maintenance area clean. Wet or oily floors are slippery and can be
dangerous. Always place the machine in a flat location. Always wear safety
glasses when hammering any part of the machine. Always use the same
specificationsofscrewsandnutsastheoriginalwhenreplacingthem.
Before starting a hydraulic repair job, release the pressure from the system.
Replacealltheshieldingbeforeturningthemachineonagain.
fig.18
English

18 Instructions Manual
Inspect the belts daily. Stretch them whenever necessary and replace them when the belts look dried
outandwornout.
Thetensionofthebeltmustbeonlyenoughtoavoidslippagewhile operating.Remember thataloose
beltslips andthengetsworn outprematurely.However,whenthe beltisexcessively tight,itoverloads
thepartsofthetransmissionandtherebydamagethem.
Continuallycheckthebelts,duringthefirstworkinghours.Itiscommonfornewbeltstobecomelooser
whenfirstbeingoperated.
ThebladesinSDN-170Aarereversible.Changesideswhenyouobserveaccentuatedwear.
CHANGINGTHEBLADE:
When the cutting bar is in the normal operating position, place a wooden shim or something similar
betweenthediscstopreventtheirmovement.Removethebladefasteningscrew(fig.20).
Changethecuttingsideofthebladeandassembleitagainonthesamedisc.
Loosenthe2screwsA.
TightennutBtotightenthebelts.
RetightenscrewsA.
NOTE: It is not recommended to mix used and old
belts.Whennecessary,replaceallthebelts.
Tightening the belts
Blades
fig.19
fig.20

19
SDN-170A
WARNING!Keep the blades on the same disc;donotchangediscs,asthiswillaffectthebalancingof
theset,causingprematurewearoftheparts.
Afterassemblingtheblades,carefullyverifytomakesurethefasteningscrewsarewell-tightened.
Routinelubricationisthebetsguaranteeofgoodoperationanddurabilityinequipment.Italsohelpsto
reducemaintenancecosts.The recommended interval depends ontheutilizationinnormal operating
conditions. We recommend performing periodic inspections and using clean and good quality
lubricants.
Lubrication
fig.21
English

20 Instructions Manual
CUTTINGBAR
DAILYVERIFICATIONOFTHEOILLEVEL:
Placethemachineonaflatsurface,sothatthebarisleveledinbothdirections.Usealeveltoverifythe
leveling.Ifnecessary,adjustthepositionofthebarwhenusingwoodedshims.
-Hotoil:Waitforabout5minutes;
-Coldoil:Waitforabout15minutes.
RemoveoilplugA.
Placethedipstickatthesameplaceasthebottomofthebar.
NOTE:Thedipstickissuppliedwiththemachine,fastenedtothebeltshieldingcover(fig.24).
TheoillevelmustbebetweentheMINandMAXmarkingsonthedipstick(fig.26).
Iftheoillevelislow,fillitwithSAE-90oiltillthemaximumlevel.
fig.22 fig.23
fig.24 fig.25
fig.26
Table of contents
Languages:
Other Nogueira Lawn Mower manuals
Popular Lawn Mower manuals by other brands

EcoFlow
EcoFlow Blade Lawn Sweeper Kit quick start guide

MTD
MTD 116-670A Owner's operating service instruction manual

Toro
Toro 30626 Groundsmaster 328-D Operator's manual

Mountfield
Mountfield SP 554 Operator's manual

Fieldmann
Fieldmann FZR 2035 E user manual

Yard Machines
Yard Machines 540 Series Operator's manual

Black & Decker
Black & Decker BEMW213 instruction manual

Craftsman
Craftsman 247.203710 Operator's manual

Craftsman
Craftsman 917.374101 owner's manual

Gude
Gude Big Wheeler TRIKE 515D Translation of the original instructions

Craftsman
Craftsman 917.370440 owner's manual

Husqvarna
Husqvarna RZ4619 CA Operator's manual