Northern Industrial Tools 100501 User manual


Thank you verymuch for choosinga NORTHERN TOOL + EQUIPMENT CO., Inc.,Product! For future
reference, please completethe owner's recordbelow:
Model: _______________ PurchaseDate: _______________
Save the receipt,warranty and theseinstructions. It isimportant that youread the entiremanual to
become familiar withthis product beforeyou begin usingit.
This machine isdesigned for certainapplications only.Northern Tool + Equipmentstrongly recommends
that this machineis not modifiedand/or used forany application otherthan that forwhich it wasdesigned.
If you haveany questions relativeto a particularapplication, DO NOTuse the machineuntil you havefirst
contacted Northern Tool + Equipmentto determine ifit can orshould be performedon the product.Before
using this product,please read thefollowing instructions carefully.
For technical questionsand replacement parts,please call 1-800-222-5381.
DESCRIPTION
This reversible airdrill has durablelightweight aluminum housing,a variable speed trigger for precision
and includes aquick release coupler. This productis an ergonomicchoice for drilling,honing and hole
sawing.
TECHNICAL SPECIFICATIONS
Save These Instructions.
This manual hasall the necessarysafety warnings andprecautions. It alsocontains assembly,operating,
and maintenance procedures.Look in theback for theparts list andassembly diagram. Keepthis manual
and invoice ina safe anddry place forfuture reference.
WARNINGS AND SAFETY RULES
WARNING: The warnings, cautions,and instructions inthis owner's manualcannot cover all
possible conditions andsituations that mayoccur. Itmust be understoodby the operatorthat common
sense and cautionare factors thatcannot be builtinto this product,but must besupplied by theoperator.
1.Keep thework area clean.An untidy andcluttered work areaincreases the riskof accidents.
2.Always wearsafety glasses orgoggles. Afacemask should beworn when dustis generated.
3.Wear suitablework clothes. Do not wearloose fitting clothesor jewelry.They can becaught in
moving parts andmay cause injury. For outdoor work, rubber gloves and non-slip footwear are advised.
Wear a protectivehair net tocontain long hair.
4.Takeprecautions with compressedair. Do not disconnect air hoses ortools when theline is under
pressure. Close offair supply andrelease pressure first.Do not pointtools or directcompressed air at
people or animals.
5.Observe workarea environment. Do not expose air tools to rain or wet conditions. Do not use air tools
in close proximityto flammable liquidsor gases. Thework area shouldbe well litand ventilated.
6.Keep pets,untrained operators andchildren away.Children should be kept away fromthe work area.
Do not permitthem to handlethe tool ortool cable.
7.Secure thework pieces. Use clamps or a vice to hold your work. This will freeup both handsto
operate the tool.
8.Do notoverreach when working.Keep a balancedfooting at alltimes. Avoidabnormal stances and
awkward body positioning.
9.Do notoverload or forcetools. Toolsoperate better inthe specified performanceranges. Forcing the
tool may causemotor damage.
10.Check fordamage. Always check theprotection guards carefullyto ensure properoperation and
performance before use.Check for alignmentof moving parts,binding of movingparts, breakage of
parts, mountings, andany other conditionsthat may effectthe tool's operation.In cases ofsevere
impact, a crackor damage mayoccur do notuse a toolif a crackdevelops or ifair is escaping.
11.Useair tools fortheir intended purpose.Do not forcea small toolor accessory todo the jobof a
Heavy-duty tool. Donot exceed therecommended air pressure.
1 OF 4
Item
Chuck Size
No-load Speed
Air Consumption
Air Inlet Diameter
Min. Hose Size
Max. Air Pressure
Description
3/8" (10mm)
2200 RPM
4 CFM @90 PSI
1/4" -18 NPT
3/8" ID
90 PSI
12.When changingtools or accessories.Always closeoff air supplyand release pressure before
attempting to loosenany connection.
13.Beware oftemperature extremes. The expanding air causes the air tools to run very cold. Light
gloves are advisablefor operator comfort.Conversely, thecylinder head and air delivery pipe of the
compressor tank willrun quite hot.Avoid contact.
14.Maintain toolswith care. For efficient andsafe operation, toolsshould be keptclean. Check the
connections and hoses.If damaged theyshould be replaced.
15.Avoid unintentional triggering. Do not carry the tool or connect it with your finger on the trigger.
16.Do notabuse hoses. Do not carry tools by the hose or use the hose to drag the compressor. Protect
hoses from heat,oil, and sharpobjects. Avoiddraping the hose over the compressor cylinder head.
17.Storage. When not inuse, air toolsshould be storedin a dryarea that isnot accessible tochildren.
18.Stay alert.Do not usewhen you aretired or underthe influence ofalcohol and drugs.Use common
sense and payattention to avoidserious injury.
19.Remove keysand spanners. Do not forget to remove any adjustment keys, spanners, or wrenches
before operating thetool.
20.Do notleave unattended. Do not leave the compressor operating while unattended for extended
periods of time.If you havefinished using thecompressor and associatedtools, switch offthe air
supply and removethe plug.
21.Use onlycompressed air.This tool isintended for usewith compressed aironly. Neverattempt to
operate the toolusing compressed bottledoxygen or combustiblegases.
22.Use propersize and typeof air pressureline and fittings.Air hosesrated for amaximum of 150PSI or
Greater must beused with thistool.
OPERATING INSTRUCTIONS
GENERAL
1.Shut offthe air supply, disconnect air hose and releasepressure when changingbits.
2.Only operatethis tool withinthe recommended pressurerange 60 90PSI. Use outsidethis range will
cause poor performance,excessive wear andpossible danger.
3.Safety glassesmust always beworn for eyeprotection. Earplugs arestrongly recommended when
operating for longperiods.
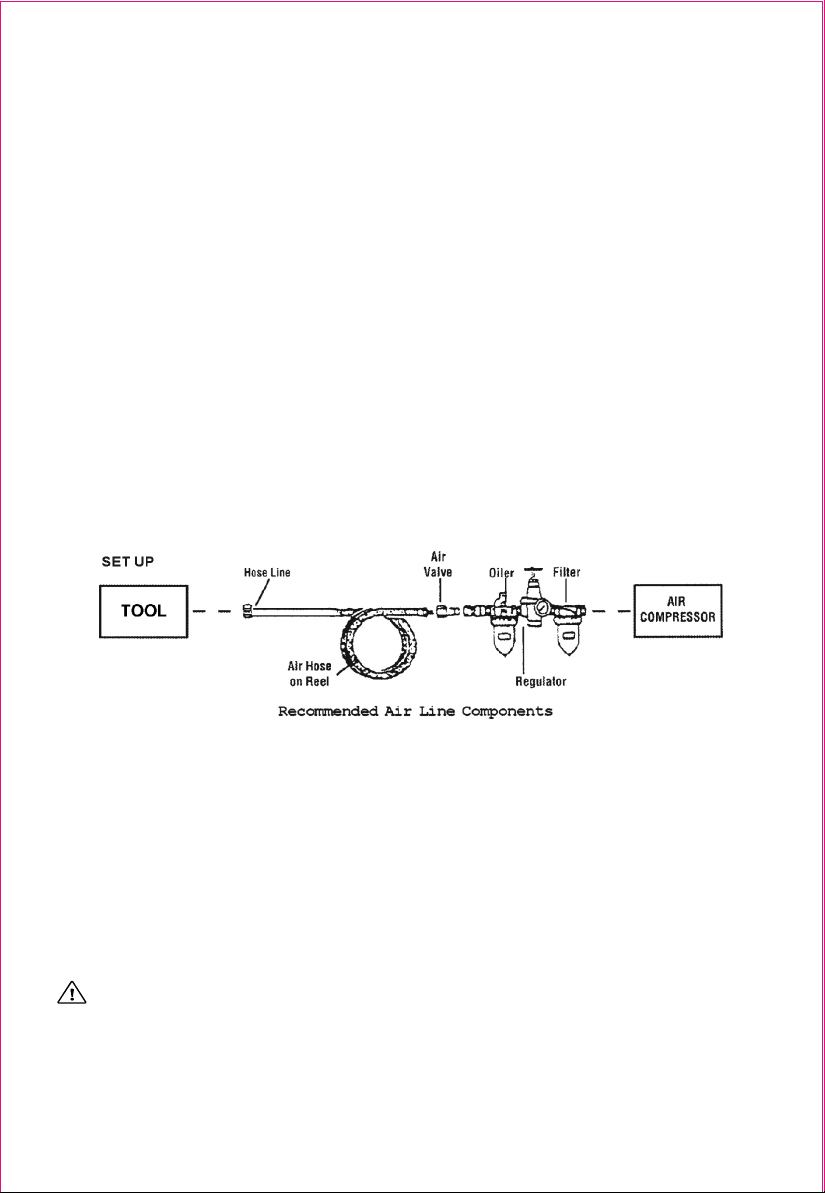
TOOL SET UP
Fig. 1 (Above)shows an optimalset-up that includesan inline filter, regulator and oiler. All of these
components are soldseparately through NorthernTool+ Equipment.
NOTE: If you arenot using anautomatic oiler system,before operation, adda few dropsof Pneumatic
ToolOil to theairline connection.Add a fewdrops more afteran hour ofcontinual use.
1.Prepare the1/4" air nipple(#37) to connectto the airinlet on theair drill. First,wrap the 1/4"air nipple
with pipe threadseal tape (notincluded) before threadingit into theinlet. Connect the3/8" I.D. airhose
(not included) toa quick-disconnect coupler(not included) andthen to theair nipple.
2.Turn on the air pressure on your compressor to 90 PSI. Do not exceed the recommended air pressure of
90 PSI.
3.Check theair connection forleaks.
AIR SUPPLY
WARNING: Ensure the airsupply is cleanand does notexceed 90 PSIwhile operating thetool. Too
much air pressureand unclean airwill shorten theproduct life dueto excessive wear, and may cause
damage and/or personalinjury.
1.Make surethat the airvalve (or trigger)is in the"off" position beforeconnecting to the air supply.
2.An airpressure of 90psiis required.
3.Drain theair tank daily. Water in the airline can damage the tool.
4.Clean theair inlet filterweekly.
2 OF 4
Fig. 1

5.Line pressureshould be increasedto compensate forlonger air hoses(over 26 feetor 8 meters).The
hose diameter shouldbe 3/8" I.D.
6.Keep thehose away fromheat, oil andsharp edges. Checkthe hose forwear and makecertain that all
connections are secure.
LUBRICATION
NOTE: It is importantthat the toolis properly lubricatedat all timesto ensure efficientoperation and to
avoid premature componentwearing. Use onlyrecommended lubricants, speciallymade for pneumatic
applications. Substitutes mayharm the rubbercomponents, e.g. O-ringsand other rubberparts.
1.Always lubricatethe tool byintroducing a fewdrops of airlinelubricating oil intothe air inletof the tool
before use.An automatic in-linefilter-regulator-lubricator is recommendedin cases wherethe tool is
used regularly asit increases toollife and enablessustained operations.
2.In the eventthat it becomesnecessary to storethe tool foran extended periodof time, ensureit is
thoroughly lubricated beforeuse. The toolshould be run for approximately 30 seconds to ensure oil is
Evenly distributed throughout.
APPROPRIATE USAGE
1.Run thecompressor and adjustthe compressor regulatorto the correctoperating range of6090 PSI.
2.Open theoutlet tap ofthe compressor tothe drill connection.
3.Select thedirection of rotationand press thetrigger to operate.
WARNING: When changing bits,shut off theair supply to the tool, disconnect drill from air hose
and release thepressure first, toavoid accidental operation.
OPERATIONAL HINTS
1.Always ensurethat the workpiece is firmlyclamped, so thatyou can use2 hands toguide and control
the drill.
2.When drillingwood, to preventsplintering on thereverse face whenthe drill breaksthrough, clamp a
scrap piece ofwood beneath thepoint where youare drilling.
3.When drillingmetals, mark thepoint to bedrilled using acentre punch toassist in startingthe hole in
the correct place.
4.To prevent damage to the drill, apply coolant to the bit if necessary, but do not wetthe tool itself.
5.When drillingwood, plastic, hardrubber, orcast iron nolubricant is needed.Use light mineraloil for
Brass or bronze.Use kerosene foraluminum. Use solubleoil for steeland other metals.
MAINTENANCE
WARNING! Disconnect the toolfrom the airsupply before changingaccessories, servicing or
performing maintenance. Replaceor repair anydamaged parts immediately. Use genuine parts only.
1.Lubricate theair tool dailywith a fewdrops of airtool oil drippedinto the airinlet.
2.Clean thetool after use.DO NOT usea worn, or damaged chuck.
3.Loss ofpower or erraticaction may bedue to thefollowing:
· Excessive drain onthe airline. Moistureor restriction inthe air lineexists. Incorrect sizeor type ofhose
connectors being used.Toremedy, checkthe air supply.
· Grit or debrisdeposits in thetool may alsoreduce performance.
4.When notin use, disconnectthe tool fromthe air supply. Clean thetool and storeit in asafe, dry,
Childproof location.
3 OF 4

DIAGRAM
PARTS LIST #34-39 not shown
For replacement partsand technical questions,please call 1-800-222-5381.
WARRANTY
One-Year Limited Warranty
4 OF 4
Part No.
1
2
3
4
5
6
7
8
9
10
11
12
13
14
15
16
17
18
19
20
Description
Housing
O-Ring
O-Ring
Valve Stem
O-Ring
Bushing
Trigger Spring
Trigger
Trigger Screw
Pin
Muffler Cover
Screw
Air Inlet
Bearing
End Plate
Rotor
Rotor Blade
Cylinder
Pin
Front Plate
Qty.
1
1
1
1
3
1
1
1
1
1
1
2
1
2
1
1
5
1
1
1
Part No.
21
22
23
24
25
26
27
28
29
30
31
32
33
34
35
36
37
38
39
Description
Washer
Gear
Gear
Pin
Gear Plate
Gear
Work Spindle
Tread Ring Gear
Bearing
Clamp Nut
Washer
Chuck
Chuck Screw
Drill Bits 1.5-6mm
Screwdriver Bits
Bit Holder
Nipple
Oil Pot
Key
Qty.
1
1
6
6
1
1
1
2
2
1
1
1
1
10
6
1
1
1
1

WARNING
Some dust createdby power sanding, sawing, grinding, drilling, and other construction
activities contains chemicalsknown to the State of California to cause cancer, birth defects
or other reproductiveharm. Some examples of these chemicals are:
Lead from lead-basedpaints
Crystalline silica frombricks and cement and other masonry products, and arsenicand
chromium from chemically-treatedlumber.
Your risk from theseexposures varies, depending on how often you do thistype of work. To
reduce your exposureto these chemicals: work in a well ventilated area,and work with
approved safety equipment,such as those dust masks that are specially designedto filter
out microscopic particles.
·
·
Table of contents
Other Northern Industrial Tools Drill manuals


