Nuvair Pro CO O2 Alarm User manual

User Manual
Pro CO O2 Alarm
Carbon Monoxide and Oxygen Analyzer
REV: 06.20

Quick Reference Guide for CO Analyzer
READ ENTIRE MANUAL BEFORE USE
1. To switch on, hold the On/Off button until the display powers up.
2. To turn off, hold the On/Off button until the display goes blank.
3. Gas flow to the analyzer should be regulated to .5-5 L/min with no pressure on the
sensor. Pressurizing the sensor will lead to inaccurate readings and could damage it.
4. If using a Nuvair 9517.6 flow reducer for sample flow, the incoming pressure should be
75-100 psi.
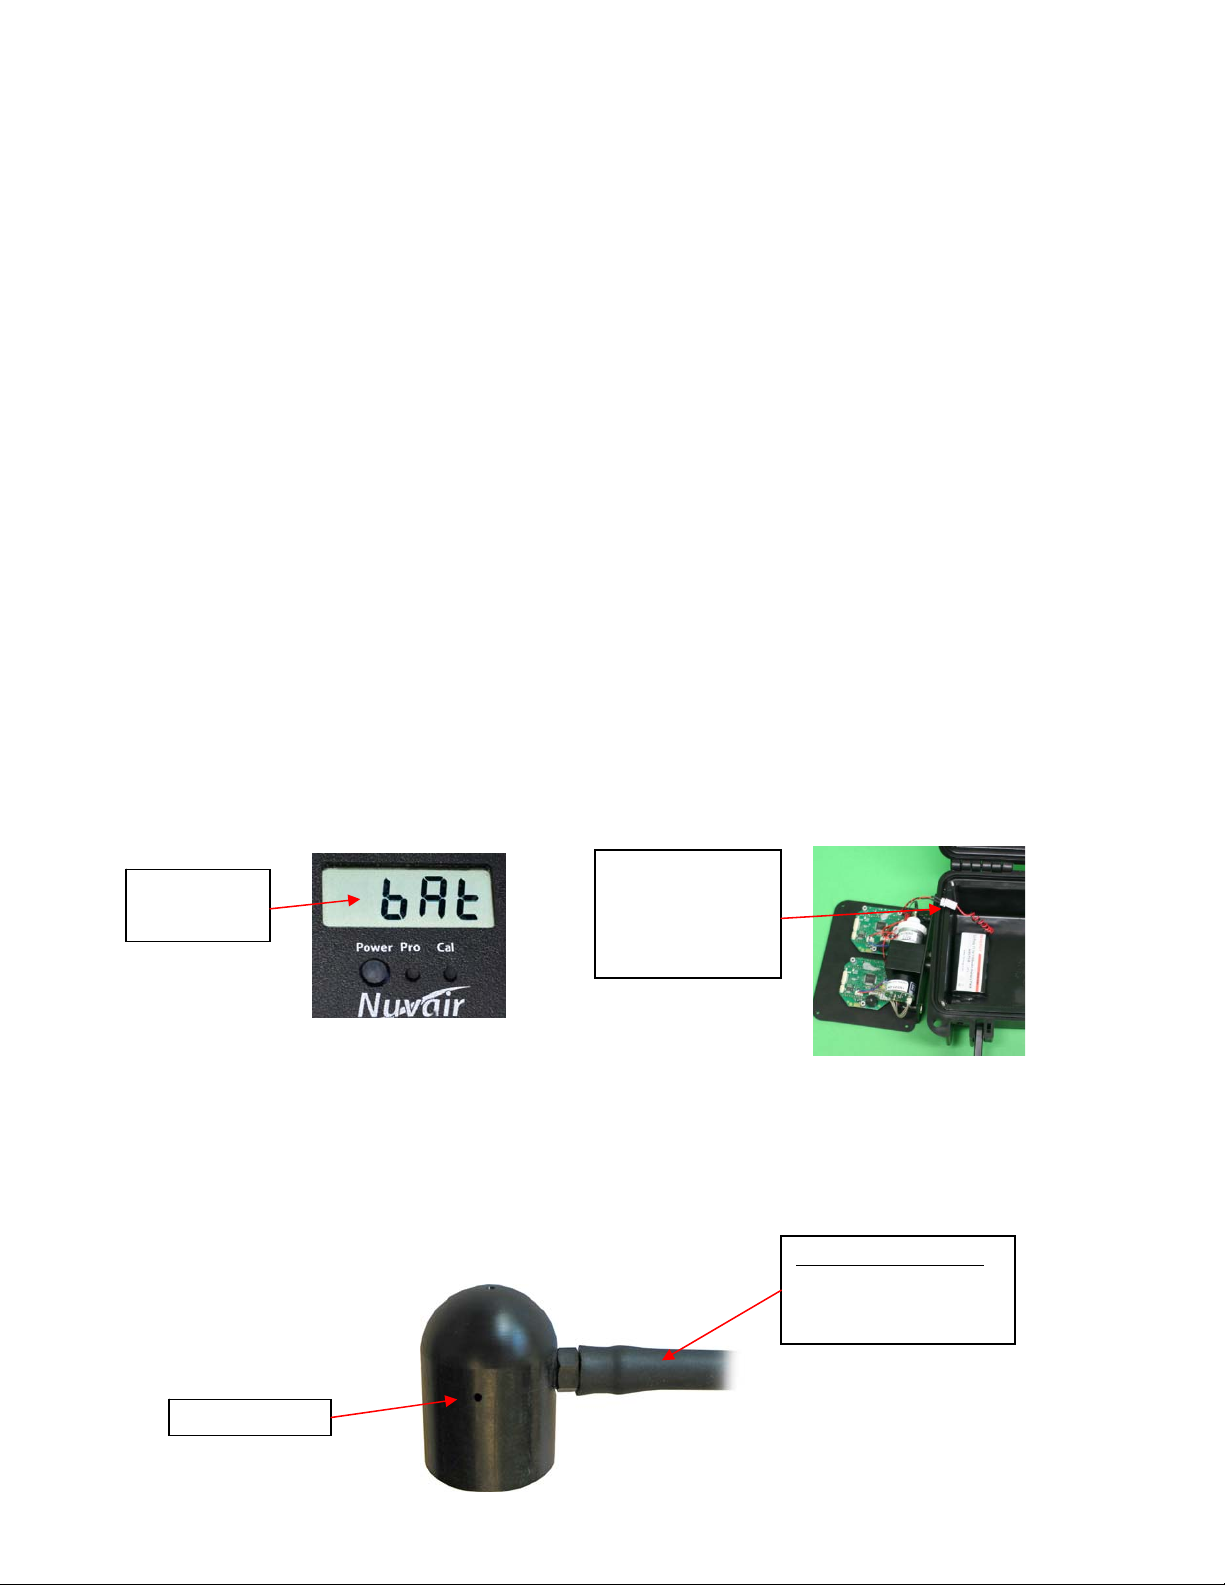
5. Press and hold the Adjust button to view the battery voltage and current ambient
temperature in Celsius.
a. Conversion formula to Fahrenheit: (°C x 1.8)+32=°F
6. Press and hold the Prog button to access the programming pages for:
a. Alarm 1 (AL1) sets the low level alarm (setting to 300 turns this off).
b. Alarm 2 (AL2) sets the high level alarm (setting to 300 turns this off).
c. Full Scale Value (FSC) sets the mA value for the optional output.
d. Conversion Value (nA) is only to be set when a new sensor is installed.
e. Gain Factor (Fct) is only to be set when a new sensor is installed.
f. Calibration value (CAL) is to be adjusted to the CO content of the certified
calibration test gas being used.
g. End is displayed after the last programming page. The display will then return to
the current gas reading value.
7. Press the On/Off button to cycle through the programming screens, the Prog button to
change the value of the blinking digit, and the Adjust button to select which digit to
program.
8. To calibrate the Analyzer Span:
a. Turn on the analyzer and program the CAL value to the CO content of the
calibration gas to be used.
b. Connect the sensor to calibration gas and allow to flow for 2-3 minutes. Flow
should be regulated to 1 L/min with no pressure on the sensor.
c. When the reading is stable, press the On/Off and Adjust buttons
simultaneously and hold until the display flashes “Cal”.
d. The unit is calibrated once the screen returns to the gas reading display. If the
reading drifts after calibration, allow the unit to sit while turned on for a few
minutes so the sensor temperature can stabilize, then repeat steps a-c.
9. To calibrate the Analyzer Zero:
a. Turn on the analyzer.
b. Attach a flow of certified 0 PPM CO, 100% Nitrogen test gas regulated to .5-3
L/min.
c. Press the On/Off and Prog buttons simultaneously and hold until the display
flashes “Cal”.
d. When the display returns to reading 000, the zero has been set.
10. If equipped with a lithium battery, read and understand all instructions included with
the battery charger.
11. Any wind or breeze present while using the analyzer can affect readings.

Pro CO O2Carbon Monoxide and Oxygen Analyzer
3
www.nuvair.com
If you have any questions on this equipment please contact Technical Support at:
Nuvair
1600 Beacon Place
Oxnard, CA 93033
Phone: 805-815-4044
FAX: 805-486-0900
Hours: Monday through Friday
8:00 AM to 5:00 PM PST USA
This User Manual contains important safety information and should always be
available to those personnel operating this equipment. Read, understand, and retain
all instructions before operating this equipment to prevent injury or equipment
damage.
Every effort was made to ensure the accuracy of the information contained within this manual;
however, we retain the right to modify its contents without notice. If you have problems or questions
after reading the manual, stop and call for information.

Pro CO O2Carbon Monoxide and Oxygen Analyzer
4
www.nuvair.com
Table of Contents
1.0 Introduction
2.0 System Description
2.1 Controls
2.2 Display
2.3 Alarm
2.4 Sensor
2.5 Battery
2.6 Flow Adapter Cap
3.0 Calibration
4.0 Operation
4.1 Sample Flow Method
4.2 Programming Procedures
4.3 Alarm Setting
4.4 Full Scale Value Setting (FSC)
4.5 Conversion Value of Carbon Monoxide Sensor (nA)
4.6 Gain Factor (Fct)
4.7 Calibration Value
5.0 Threshold Alarms
6.0 Powering Off
7.0 Factory Reset
8.0 Maintenance
8.1 Analyzer Care
8.2 Battery Replacement
8.3 Sensor Replacement
8.3.1 Handling Sensor
9.0 Spares and Accessories
9.1 Sensor
9.2 Calibration Equipment
10.0 Troubleshooting
Appendix
Analyzer Specifications
Warranty

Pro CO O
2
Carbon Monoxide and Oxygen Analyzer
5
www.nuvair.com
1.0 Introduction
This manual will assist you in the proper set-up, operation and maintenance of the Pro CO-O
2
Carbon Monoxide and Oxygen Analyzer. Be sure to read the entire manual.
Throughout this manual we will use certain words to call your attention to conditions,
practices or techniques that may directly affect your safety. Pay particular attention to
information introduced by the following signal words:
Indicates an imminently hazardous situation, which if not avoided, will result in serious
personal injury or death.
Indicates a potentially hazardous situation, which if not avoided, could result in
serious personal injury or death.
Indicates a potentially hazardous situation, which if not avoided, may result in minor or
moderate injury. It may also be used to alert against unsafe practices.
Notifies people of installation, operation or maintenance information which is
important but not hazard-related.

Pro CO O
2
Carbon Monoxide and Oxygen Analyzer
6
www.nuvair.com
2.0 System Description
The Pro CO-O
2
Analyzer measures Carbon Monoxide (CO) levels in gases in the range of 0
to 50 parts per million (ppm), and Oxygen (O
2
) levels in the range of 0.0 to 100%.
The analyzer case is a water and impact resistant unit compatible with outdoor and marine
environments. The analyzer interface includes a Digital Display and controls that are
environmentally sealed.
The CO analyzer can be used to measure the CO content in gas mixes that may be
contaminated due to the introduction of CO from internal combustion engines or other
devices where CO is a byproduct. The analyzer is designed to verify CO concentration in
stored gas cylinders as well as during breathing air production.
The O
2
analyzer is designed to verify O
2
concentration in stored gas cylinders and with
compressors pumping breathing air or Nitrox. When used in breathing gas applications,
redundant Analyzers must be used for verification. In diving, for example, one Analyzer must
be used to monitor oxygen during breathing gas production and a second independent
Analyzer must be used to verify the oxygen content of the breathing gas prior to diver use.
Carbon monoxide is a colorless, odorless, tasteless gas that will not support life.
Exposure to carbon monoxide can lead to unconsciousness and death.
The Analyzer is lithium battery powered and
includes an internally mounted Sensor with audible
alarm. The battery charger may be used as a
constant power source. If this option is exercised,
the battery should be disconnected inside the case
to avoid damaging either the battery or analyzers.
The Analyzer uses a Flow Adapter Cap and Flexible
tubing to deliver sample gas to the Sensor.
Pressurized gases must be regulated to .5-5 L/min
to avoid damage to the analyzer. Use of this
Analyzer in a hyperbaric chamber will void the
owner’s warranty.
The Analyzer comes in a high impact storage case.
It is ready for use after calibration with an
appropriate certified calibration gas.
Flow
Adapter Cap
Water-
Resistant
Case

Pro CO O
2
Carbon Monoxide and Oxygen Analyzer
7
www.nuvair.com
This analyzer is designed for use at atmospheric pressures only. It is not designed for
exposures in a hyperbaric chamber. Use of this analyzer in a hyperbaric chamber will
result in incorrect readings and may damage the unit.
Although the Analyzer is a rugged instrument, careless handling or abuse may result
in damage to the Analyzer resulting in inaccurate gas analysis. Inaccurate gas analysis
can lead to serious personal injury or death.
Extreme CO exposure levels directed at the Analyzer sensor may damage the sensor.
Don’t test the sensor in the direct flow of any engine mufflers/exhausts or any other
known high concentrations of CO.
2.1. Controls
2.2. Display
Carbon Monoxide
Reading
0 – 50 ppm
In 1 ppm
increments
Digital
Displays
Power Button,
Program,
And Adjust
Buttons
Oxygen Reading
0.0%-100%
in .1%
increments

Pro CO O2Carbon Monoxide and Oxygen Analyzer
8
www.nuvair.com
2.3. Alarms
The CO analyzer includes an audible alarm that is activated when the Sensor reaches 10
ppm CO or user programmed level. The alarm will not clear until the concentration of CO
drops below 10 ppm or user programmed level.
The O2 analyzer includes an audible alarm that is activated when the sensor reaches a user
programmed minimum % of oxygen and maximum % of oxygen. The alarm will not clear until
the concentration of O2 moves into the threshold programmed by the user.
2.4. Sensors
The CO and O2 Analyzers use electrochemical sensors to measure CO and O2 content in
gases. The sensors are disposable and user-replaceable, with a life expectancy of up to 24
months depending on usage. The sensors are designed for use with a gas flow of .5-5 L/min
at zero (0) P.S.I. The gas mixture to be analyzed must be regulated accordingly, and any
potential for pressure or vacuum must be avoided.
2.5. Battery
One rechargeable lithium battery provides power to the unit. The battery is located inside the
Analyzer. The battery should be removed any time the Analyzer will be stored without use for
extended periods of time. Screen will blink alternately from “000” to “bAt” at start up when
battery is low.
The battery charger may be used as a constant power source. If this option is exercised, the
battery should be disconnected inside the case to avoid damaging either the battery or
analyzers.
2.6. Flow Adapter Cap
The unit includes a Flow Adapter Cap with flexible tubing and flow orifice. It attaches to the
Sensor Port and is sealed by an o-ring. It is used to direct the gas sample flow to the
analyzers:
Low Battery
Indication
Sample Flow Method
Flow is Delivered from
Low Pressure Source
via Flexible Tubing
Vent Hole
Disconnect
Battery here if
using charger as
a power supply

Pro CO O
2
Carbon Monoxide and Oxygen Analyzer
9
www.nuvair.com
3.0 Calibration
CO Analyzer calibration must be verified on a weekly basis. Improper calibration may
result in an incorrect reading, exposing the user to dangerous levels of carbon
monoxide. Exposure to carbon monoxide can lead to unconsciousness and death.
Oxygen Analyzers must be calibrated before each use. Improper calibration may
result in the use of incorrect breathing gas mixtures, which may cause serious injury
or death to the person using the gas mixture.
The CO Analyzer must always be checked against a calibration gas and used with
gases regulated and supplied at atmospheric pressure (0 P.S.I.). Use of gases at
higher pressures may result in incorrect readings and may damage the Analyzer.
Incorrect readings may expose the user to high levels of carbon monoxide resulting in
personal injury or death.
When Analyzer calibration is performed at different atmospheric conditions than the
gas being measured, a calibration correction value may be required. Improper
calibration may result in the use of incorrect breathing gas mixtures, which may cause
serious injury or death to the person using the gas mixture.
Calibration or use of the Analyzers with a low battery may result in inaccurate readings.
Inaccurate gas analysis can lead to serious personal injury or death.
If the Analyzer has been subjected to a recent change in ambient temperature, allow it
to stabilize for one hour before checking calibration.
Verify calibration on a weekly basis. Breathing gas applications require the use of a
certified CO calibration gas with a 10 ppm concentration and flow rate of 1-3 L/min.
The equipment to produce this flow is available from Nuvair. See Spares and
Accessories section.
To assure the greatest accuracy for other applications, use the calibration gas concentration
closest to the expected concentration in the gas being measured.

Pro CO O2Carbon Monoxide and Oxygen Analyzer
10
www.nuvair.com
To calibrate the CO Analyzer Span:
1. Move to an area with no wind. Wind can affect the analyzer reading and lead to an
incorrect calibration.
2. Power the unit on and allow it to complete its startup.
3. Hold the Prog button down until the Alarm 1 setting is flashing on the screen.
4. Repeatedly press the On/Off button to cycle through the menu until the screen flashes
“CAL”
5. Using the Program and Adjust buttons, set the Cal number to match the exact
measurement of CO PPM in the calibration gas to be used.
6. Use the Power button to cycle to the home screen.
7. Attach the calibration gas and ensure that gas flow is 1 L/min.
8. Once the display has settled, you can either confirm that calibration is correct, or that a
new calibration must be performed.
9. To calibrate the unit, press and hold the Power and Adjust buttons simultaneously until
the display flashes CAL. The unit will now recalibrate to the gas flow based on the
value input in the CAL programming screen.
10. If the reading drifts after a calibration has been performed, allow the unit to sit for
several minutes while powered on before attempting recalibration.
To calibrate the CO Analyzer Zero:
1. Power the unit on and allow it to complete its startup.
2. Attach certified 0 PPM 100% Nitrogen calibration gas and ensure that gas flow is 1
L/min.
3. Press the On/Off and Prog buttons simultaneously and hold until the screen flashes
“Cal”
4. When the display returns to reading 000, the zero has been set.
Nuvair offers CO gas testing kits - see addendum for more information
To calibrate the O2 Analyzer:
1. Check that the 02c value is programmed to 21 if calibrating to ambient air, or to the
Oxygen percentage present in any certified test gas to be used.
2. If calibrating to ambient air, remove the flow adapter cap from the flow inlet. If
calibrating to test gas, leave the flow adapter cap in place and attach the flexible
tubing to the test gas bottle.
3.

Pro CO O2Carbon Monoxide and Oxygen Analyzer
11
www.nuvair.com
4.0 Operation
Prior to each Analyzer use:
1) Remove the Flow Adapter Cap. Ensure that the sensors are exposed to ambient air.
2) Turn each unit on and monitor display for low battery warning. Plug the battery charger
in to the unit if this warning appears.
3) Once fully cycled:
a. the Pro CO screen should read “000”
b. The Pro O2 screen should read “21.0”
4) Check the programmed alarm values and adjust them if needed at this time.
5) Check Calibration of Analyzer using “Calibrated Test Gas”
Do not test cylinders suspected of containing carbon monoxide in a confined space
that does not have good ventilation. Exposure to carbon monoxide can lead to
unconsciousness and death.
Gas, even under moderate pressures, can cause extreme bodily harm. Never allow any
gas stream to be directed at any part of your body.
Never expose the sensor to pressures above atmospheric pressure (0 psi) or you may
cause damage to the sensor and/or receive false readings. Damaged Sensors will not
provide accurate gas analysis. Inaccurate gas analysis can lead to serious personal
injury or death.
Low Battery
Indication
Ready For
Gas Analyzing

Pro CO O2Carbon Monoxide and Oxygen Analyzer
12
www.nuvair.com
Gas is sampled using the Sample Flow Method. The flow rate must equal .5 to 5 L/min at
atmospheric pressure. To produce this flow, a Flow Restrictor and Regulator may be
required. Contact Nuvair if you need assistance.
4.1. Sample Flow Method of Checking Calibration (Preferred)
Nuvair offers CO gas testing kits see addendum for more information
Step 1. Attach
Flexible Tubing
to Gas Sample
Flow of 0.5 to 1
L/min
Step 2. Verify
that Gas is
Flowing Out
Holes in Flow
A
da
p
ter Ca
p
Step 3. Allow 15
Seconds for Display
Reading to Stabilize
Step 4. Record
Reading while Gas is
Flowing
Flow Restrictor/
Regulator
Assembly
10 PPM CO
Calibration Gas
Canister

Pro CO O2Carbon Monoxide and Oxygen Analyzer
13
www.nuvair.com
4.2. Programming Procedures
A) Pro CO
Keep the “Prog” button pressed for more than two seconds and then release the
button. “Pr” should display for two seconds and then the display will change to AL 1
and alternate with the 3 digit set value.
It is possible to program:
o AL 1 First alarm point expressed in ppm of Carbon Monoxide concentration
o AL 2 Second alarm point expressed in ppm of Carbon Monoxide concentration
o FSC Value expressed in ppm of Carbon Monoxide concentration corresponding
to the current output full scale value (20mA). 4mA always correspond to zero
ppm CO concentration.
o nA Conversion value of Carbon Monoxide sensor
o Fct Gain factor
o CAL CO concentration in the calibration test gas to be used
At the end of the programming procedure the display will show “End” and the
instrument will display the Carbon Monoxide content in the gas mix or “000” if not
attached to a CO gas mix.
Below are the actual screen views of each of the modes.
Program First Alarm Second Alarm
Full Scale Value Conversion Value of Sensor Gain Factor

Pro CO O2Carbon Monoxide and Oxygen Analyzer
14
www.nuvair.com
B) Pro O2
Keep the “Prog” button pressed for more than two seconds and then release the
button. “Pr” should display for two seconds and then the display will change to AL 1
and alternate with the 3 digit set value.
It is possible to program:
o AL 1 Minimum alarm point expressed in % of oxygen concentration
o AL 2 Maximum alarm point expressed in % of oxygen concentration
o FSC Value expressed in % of oxygen concentration corresponding to the
current output full scale value (20mA). 20mA always correspond to 100 %
oxygen concentration.
o O2c Oxygen sensor calibration point
At the end of the programming procedure the display will show “End” and the
instrument will display the oxygen content of the gas mix.
Below are the actual screen views of each of the modes.
Program First Alarm Second Alarm
Full Scale Value Oxygen Sensor
Calibration 21% reading

Pro CO O2Carbon Monoxide and Oxygen Analyzer
15
www.nuvair.com
4.3. Alarm Setting (AL 1 & Al 2)
A) Pro CO
1.) Press the Prog button until the display reads “Pr”, then “AL1”. After a second the
display will show the current value of “AL1” CO PPM setting.
2.) The blinking digit shows the cursor position.
3.) Press the Prog button to increase the value (from 0 to 9)
4.) Press the Adjust button to cycle the cursor through the digits.
5.) To complete your entry and save the CO PPM value, press the On/Off button. You
will then move to the “AL 2” programming view.
6.) Repeat steps 3 through 5 to modify and save the “AL 2” CO PPM desired value.
7.) Once programming of “AL 2” is complete, press the On/Off button repeatedly until
the next desired program page is displayed or the end screen appears.
B) Pro O2
8.) Press the Prog button until the display reads “Pr”, then “AL1”. After a second the
display will show the current value of “AL1” O2% setting.
9.) The blinking digit shows the cursor position.
10.) Press the Prog button to increase the value (from 0 to 9)
11.) Press the Adjust button to cycle the cursor through the digits.
12.) To complete your entry and save the O2% value, press the On/Off button. You
will then move to the “AL 2” programming view.
13.) Repeat steps 3 through 5 to modify and save the “AL 2” O2% desired value.
1.) Once programming of “AL 2” is complete, press the On/Off button repeatedly until
the next desired program page is displayed or the end screen appears.

Pro CO O2Carbon Monoxide and Oxygen Analyzer
16
www.nuvair.com
4.4. Full Scale Value Setting (FSC)
A) Pro CO
On the “FSC” page you can change the analog full scale value. It is not necessary to
modify this value unless a new sensor is installed. This is the Carbon Monoxide
concentration corresponding to 20 mA on the analog output. 4mA is the value at 0 ppm of
Carbon Monoxide. When installing a new sensor, input the “Fsc” value displayed on the
new sensor here AND in the “Fct” value.
1.) Press and hold the “Prog” button to access the program pages, then release the
button.
2.) Press the On/Off button to cycle through the settings until you reach the “FSC”
view.
3.) The blinking digit shows the cursor position.
4.) Press the Prog button to increase the value (from 0 to 9)
5.) Press the Adjust button to cycle the cursor through the digits.
6.) To complete your entry and save the FSC value, press the On/Off button
repeatedly until the next desired program page is displayed or the end screen
appears.
7.) This procedure is used ONLY when a new sensor has been ordered from
Nuvair and is ready to be installed.
B) Pro O2
Once the alarms have been set the Pro O2 Alarm Analyzer goes to “FSC” view so that you
can change the analog full scale value. It is not necessary to modify this value which is
factory set at 100. This is the Oxygen concentration corresponding to 20 mA on the
analog output. 4mA is the value at 0% of Oxygen. This value can be changed in the same
manner as the Alarm settings:
1.) Press the “Prog” button for more than two seconds and then release the button.
On the display will appear “Pr” for two seconds, then “AL 1” will appear. Press the
On/Off button to cycle through the Alarm settings until you reach the “FSC” view.
The “FSC” screen and a 3 digit value will alternate for a few seconds and the Pro
O2 Alarm Analyzer will be ready for adjusting the “FSC” Value.
2.) The blinking digit shows the cursor position.
3.) Press the “Prog” button to increase the value (from 0 to 9)
4.) Press the “Adjust” button to move the cursor to the next digit, the “Adjust” button
will be used to cycle through the rest of the digits.
To complete your entry and save the FSC value, press the “On/Off” button. You will
then automatically jump to “O2c” programming view. To continue pass this to the end
press the On/Off button until the “End” screen appears.

Pro CO O2Carbon Monoxide and Oxygen Analyzer
17
www.nuvair.com
4.5. Conversion Value of Carbon Monoxide Sensor (nA)
The “nA” value is the conversion value of the Carbon Monoxide sensor in nano Ampere. It
is not necessary to modify this value except when a new sensor is installed. The new
sensor is provided with the new value to be set on this screen.
1.) Press and hold the “Prog” button to access the program pages, then release the
button.
2.) Press the On/Off button to cycle through the settings until you reach the “nA” view.
3.) The blinking digit shows the cursor position.
4.) Press the Prog button to increase the value (from 0 to 9)
5.) Press the Adjust button to cycle the cursor through the digits.
6.) To complete your entry and save the nA value, press the On/Off button repeatedly
until the next desired program page is displayed or the end screen appears.
7.) This procedure is used ONLY when a new sensor has been ordered from
Nuvair and is ready to be installed.
The conversion value of the Carbon Monoxide sensor is set in factory and must be
changed only when the CO sensor is replaced. The new sensor will come from the
factory with a label showing the new “nA” value to be programmed. A wrong value of
this parameter will give a wrong reading of CO concentration. If it is modified the
conversion value of the Carbon Monoxide sensor, the instrument will be no more
accurate. All the analysis concentration shown on the display will be wrong. Do not
modify this value. It is necessary to modify this value only at the installation of a new
sensor. Wrong Carbon Monoxide analysis may lead to death.

Pro CO O2Carbon Monoxide and Oxygen Analyzer
18
www.nuvair.com
4.6. CO Gain Factor (Fct)
The “Fct” value is the conversion value of gain factor. It is not necessary to modify this
value except when a new sensor is installed. The new sensor is provided with the new
value to be set on this screen. The value is referred to as the “Fsc” number on the sensor.
1.) Press and hold the Prog button to access the program pages, then release the
button.
2.) Press the On/Off button to cycle through the settings until you reach the “FSC”
view.
3.) The blinking digit shows the cursor position.
4.) Press the Prog button to increase the value (from 0 to 9)
5.) Press the Adjust button to cycle the cursor through the digits.
6.) To complete your entry and save the Gain Factor value, press the On/Off button
repeatedly until the next desired program page is displayed or the end screen
appears.
7.) This procedure is used ONLY when a new sensor has been ordered from
Nuvair and is ready to be installed.
Then gain factor is set in factory and must be changed only when the CO sensor is
replaced. The new sensor will come from the factory with a label showing the new ‘Fct’
value to be programmed. A wrong value of this parameter will give a wrong reading of
CO concentration. If it is modified the gain factor instrument will be no more accurate.
All the analysis concentration shown on the display will be wrong. Do not modify this
value. It is necessary to modify this value only at the installation of a new sensor.
Wrong Carbon Monoxide analysis may lead to death.

Pro CO O2Carbon Monoxide and Oxygen Analyzer
19
www.nuvair.com
4.7. Calibration Value
A) Pro CO (CAL)
The “CAL” value corresponds to the CO PPM content of the calibration test gas to be
used for calibration
1.) Press and hold the Prog button to access the program pages, then release the
button.
2.) Press the On/Off button to cycle through the settings until you reach the “FSC”
view.
3.) The blinking digit shows the cursor position.
4.) Press the Prog button to increase the value (from 0 to 9)
5.) Press the Adjust button to cycle the cursor through the digits.
To complete your entry and save the Gain Factor value, press the On/Off button
repeatedly until the next desired program page is displayed or the end screen appears.
B) Pro O2 (O2c)
After the “O2c” is set the Pro O2 Alarm Analyzer goes to “O2c”, this is the current
Oxygen calibration value default is 21%. It is not necessary to modify this value. The
display alternates between “O2c” and the current value (21% default).
Press the “Prog” button for more than two seconds and then release the button.
On the display will appear “Pr” for two seconds, then “AL 1” will appear. Use the
On/Off button to cycle through the various settings until you reach the “O2c” screen.
The 3 digit value will alternate with the “O2c” screen for a few seconds and the Pro
O2 Alarm Analyzer will be ready for adjusting the “O2c” Value.
8.) The blinking digit shows the cursor position.
9.) Press the “Prog” button to increase the value (from 0 to 9)
10.) Press the “Adjust” button to move the cursor to the next digit, the “Adjust” button
will be used to cycle through the rest of the digits.
11.) To complete your entry and save the O2c value, press the “On/Off” button. You
will then automatically jump to the “End” screen.
The oxygen calibration value will be the same value of the calibration set when the
instrument is switched on. During the warm up time if the oxygen percentage of the
gas flowing across the sensor is a different value of calibration set in the instrument, a
failed calibration is obtained and the wrong gas percentage will be displayed. Wrong
oxygen analysis may lead to death.

Pro CO O2Carbon Monoxide and Oxygen Analyzer
20
www.nuvair.com
5.0. Threshold Alarms
C) Pro CO
Should the Carbon Monoxide reading exceed the threshold alarms (AL1 or AL2) the
instrument will go into alarm mode and will activate the internal buzzer. The display will
show the trespassed alarm and the actual measured value. To stop the audible alarm,
press any key. In this event the Pro Co Analyzer will remain in alarm mode until the
analyzed value goes below the alarm.
D) Pro O2
Should the Oxygen reading exceed the threshold alarms (AL1 or AL2) the instrument
will go into alarm mode and will activate the internal buzzer. The display will show the
trespassed alarm and the actual measured value. To stop the audible alarm, press any
key. In this event the Pro O
2 Alarm Analyzer will remain in alarm mode until the
analyzed value goes below the alarm. Alarm 1 (AL 1) is a low value alarm (minimum
O2%) and Alarm 2 (AL 2) is a high value alarm (maximum O2%).
6.0. Powering Off
At the home or gas reading screen, hold down the power
button for a couple of seconds. The Analyzer will display
“OFF” and then go blank.
Table of contents
Popular Carbon Monoxide Alarm manuals by other brands

Ei Electronics
Ei Electronics Carbon Monoxide Alarm Ei220EN instructions

Extech Instruments
Extech Instruments CO30 user guide

First Alert
First Alert SCO1N user manual

First Alert
First Alert First Alert SCO1BN Technical specifications

First Alert
First Alert CO410 user manual

BRK electronic
BRK electronic SC1000B Specifications