OGN CUBE3 Instruction Manual

OGN CUBE3 Installation & User’s Manual
Last update 2020-03-10, work in progress
https://ogn.ibisek.com/
Introduction
Thank you or purchasing our OGN tracking unit CUBE3! We have devoted a lot o e ort and
cra tsmanship so it would serve you well and stay reliable or many years to come. We have also
included some extra unctionality the other trackers do not sport which make this little the box at
your hands pretty well the greatest one on the planet Earth :)
The third generation o OGN CUBE is a superb smart box purposely designed to not only track
location and light route o gliders, ultralights, tow planes and other lying objects but also to record
their utilisation and overal usage. There ore a microSD card and a three-axes accelerometer were
integrated into the unit. The tracker can be interconnected with the other on-board systems via
wired serial line (TTL) or wirelessly using bluetooth. As the usecases may vary or each particular
owner, two variants were developed – denoted as Model A and Model B.
Page 1 o 12
Technical specification
Model A – to be embedded in dashboard
This model has been purposely designed to be tightly integrated into an aircra t to provide
utilisation statistics and analysys in addition to position tracking or happy glider, UL and GA
owners.
•dimensions:
◦enclosure: 70 x 20 x 50mm (width x height x depth)
◦antenna: 50mm
•weight: 50g
•power source: micro USB or RJ-45 socket, 5V – 14V
•current draw ~50mA
•transmitted power ~ 20mW
•communication requency: 868.2 & 868.4 MHz
•data via bluetooth and TTL wired serial (RJ45)
•micro SD card slot or logbook recording
•three-axis accelerometer
OGN CUBE3 Installation and User’s Manual Page 2 o 12

Model B – battery powered & portable
The B as Battery powered version is well suited or pilots who are changing planes requently or
even better or competition organisers. It is conveniently portable, powered by internal battery
which lasts or some 20 hours o lying and can be ully is charged using a common phone micro
USB charger in just below 5 hours.
•dimensions:
◦enclosure: 70 x 25 x 50mm (width x height x depth)
◦antenna: 50mm
•weight: 84g
•power source: micro USB, 5V
•current draw: ~50mA
•transmitted power ~ 20mW
•communication requency: 868.2 & 868.4 MHz
•data via bluetooth
•battery capacity 1020mAh
•on battery li e ~ 20 hours, charging time ~5 hours
•micro SD card slot or logbook recording
•three-axis accelerometer
OGN CUBE3 Installation and User’s Manual Page 3 o 12
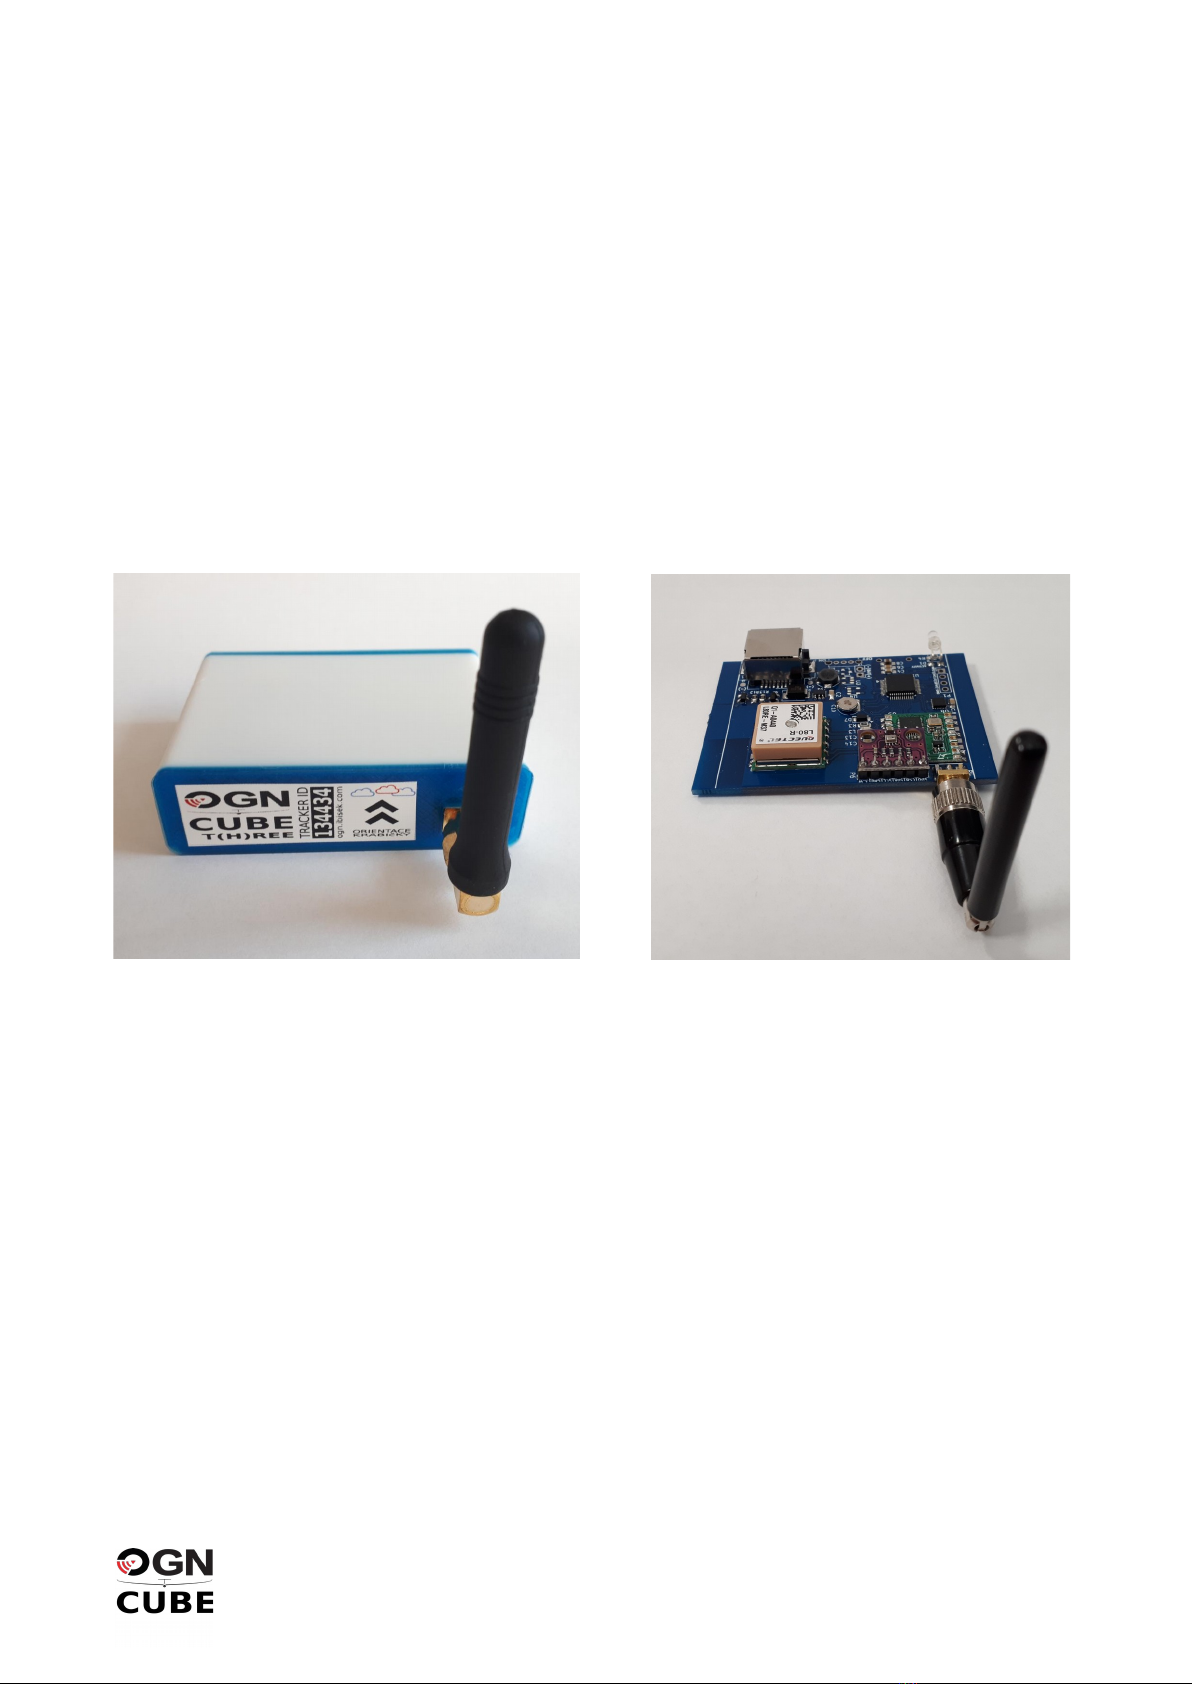
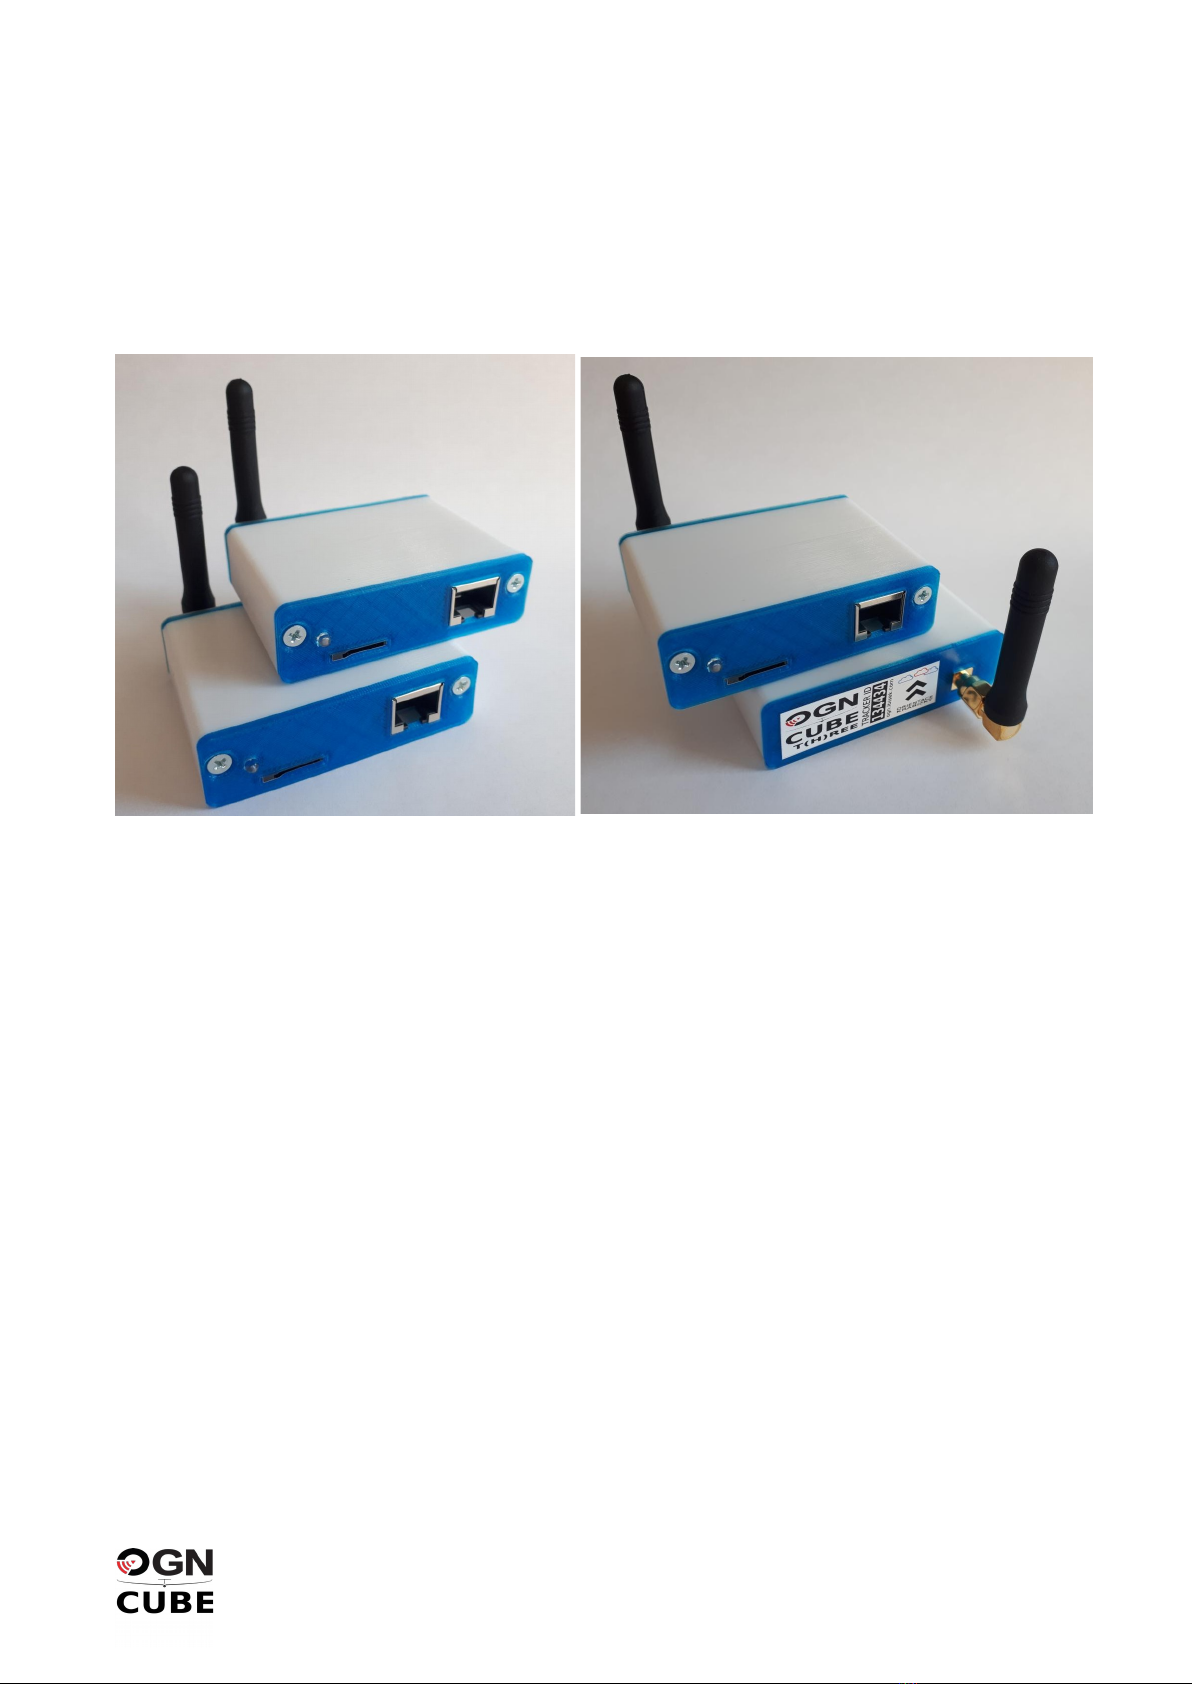
Tracker Placement and Antennas Orientation
Tracker mounting position shall be decided as such it is not shielded by radio signal impenetrable
elements. Covering it by metallic or carbon canopy as well as placing it into centroplane o carbon
or metallic airplanes will result into weak or no data signal at all. Please also consider the distance
rom other sources o electromagnetic noise as magnetos or the entire engine in general when
mounting into powered ships.
The unit orientation is depicted on the sticker at the back o the unit where also the radio antenna is
connected. Under ideal circumstances the box shall be put lat so the integrated GPS antenna could
be acing the sky as much as possible. In case the sticker gets lost you can determine the correct
location without opening the box very easily: place the box lat so the SMA (radio) connector would
be acing the observer and be on the right side o the unit at the same time Then the GPS antenna
aces the sky.
The external radio antenna shall be in vertical orientation, no matter whether up or down. Antenna
tilt (also when circling in thermals) in luences its gain (e iciency) in case when transmitting data to
other planes or ground stations. And again, to avoid shielding by metallic or carbon elements that
prevent radio waves propagation is strongly recommended.
OGN CUBE3 Installation and User’s Manual Page 4 o 12
Illustration 2: Orientation of GPS (white-
brown box on the left) and radio (right)
antennas
Illustration 1: Orientation as depicted on the
label

L D Signalling
A ter powering on the tracker you can observe the ollowing indications in this order:
(1) 0. – 10. s: lashing in 1s interval – bootloader awaits new irmware upload.
(2) 11.-13. s: LED ON or approximately 2 seconds – initialisation o serial lines (bluetooth + GPS),
radio unit, barometric sensor, SD card (i inserted) and system services.
(3) 14.+ s: two medium-short lashes per second – awaiting GPS ix.
(4) very short lashes – radio tra ic– regularly every second (radio TX), or in random intervals
(radio RX).
You can check the boot process on Youtube on this address:
“OGN CUBE3 boot sequence” https://www.youtube.com/watch?v=_XDIrd3SX6g
OGN CUBE3 Installation and User’s Manual Page 5 o 12

Tracker Registration
To be seen online with correct identi ication (or not) either on the web or mobile app you need to
register your tracker on the Glidernet Device Database - http://ddb.glidernet.org/
A ter having creating an account click on “Add device” and then:
(1) select “Device type” as OGN,
(2) “Device ID” is the tracker ID printed on the sticker on the rear side,
(3) choose your “Aircra t type”,
(4) ill-in airplane registration (as on the uselage and bottom o the wing),
(5) ill-in “Competition number” (on the rudder),
(6) and con irm you are owner o this device.
By submitting this orm the tracker in ormation is added to your list o registered tracker and during
the next 15-30 minutes will propagate also into the OGN network.
OGN CUBE3 Installation and User’s Manual Page 6 o 12
Illustration : Tracker registration to OGN device database

Bluetooth connection & LK8000
The CUBE3 trackers can be connected to PDA or phone using bluetooth. When the tracker is on
and the bluetoot is enabled bluetooth beacons can be received. The units announce themselves with
name in orm OGN CUBE xxxxxx” where xx is ID o the tracker. The PIN or bluetooth pairing is
either none or 1234 pin (depends on the master device).
A ter success ul result o the pairing process the the CUBE’s port can be set-up in the LK8000 or
XCSoar con iguration to receive noti ications about the surrounding tra ic in reach o the radio.
To display tra ic in LK8000 you need to enable “Tra ic on map” in system con iguration, page 13.
Similarly, you can pair the tracker with your computer and observe its activity on serial port using
miniterm or putty (baudrate 115200).
OGN CUBE3 Installation and User’s Manual Page 7 o 12

OGN Cube Control
This is an Android application readily available rom the PLAY application repository which should
help you with your CUBE’s:
•irmware updates,
•Logbook maintenance (work in progress),
•light tracking (work not started yet),
•tracker con iguration (planned)
It is available rom the PLAY store on this address:
https://play.google.com/store/apps/details?id=com.ibisek.cube_control
Alternativelly, you can use the ollowing QR code to get it right into your phone:
OGN CUBE3 Installation and User’s Manual Page 8 o 12
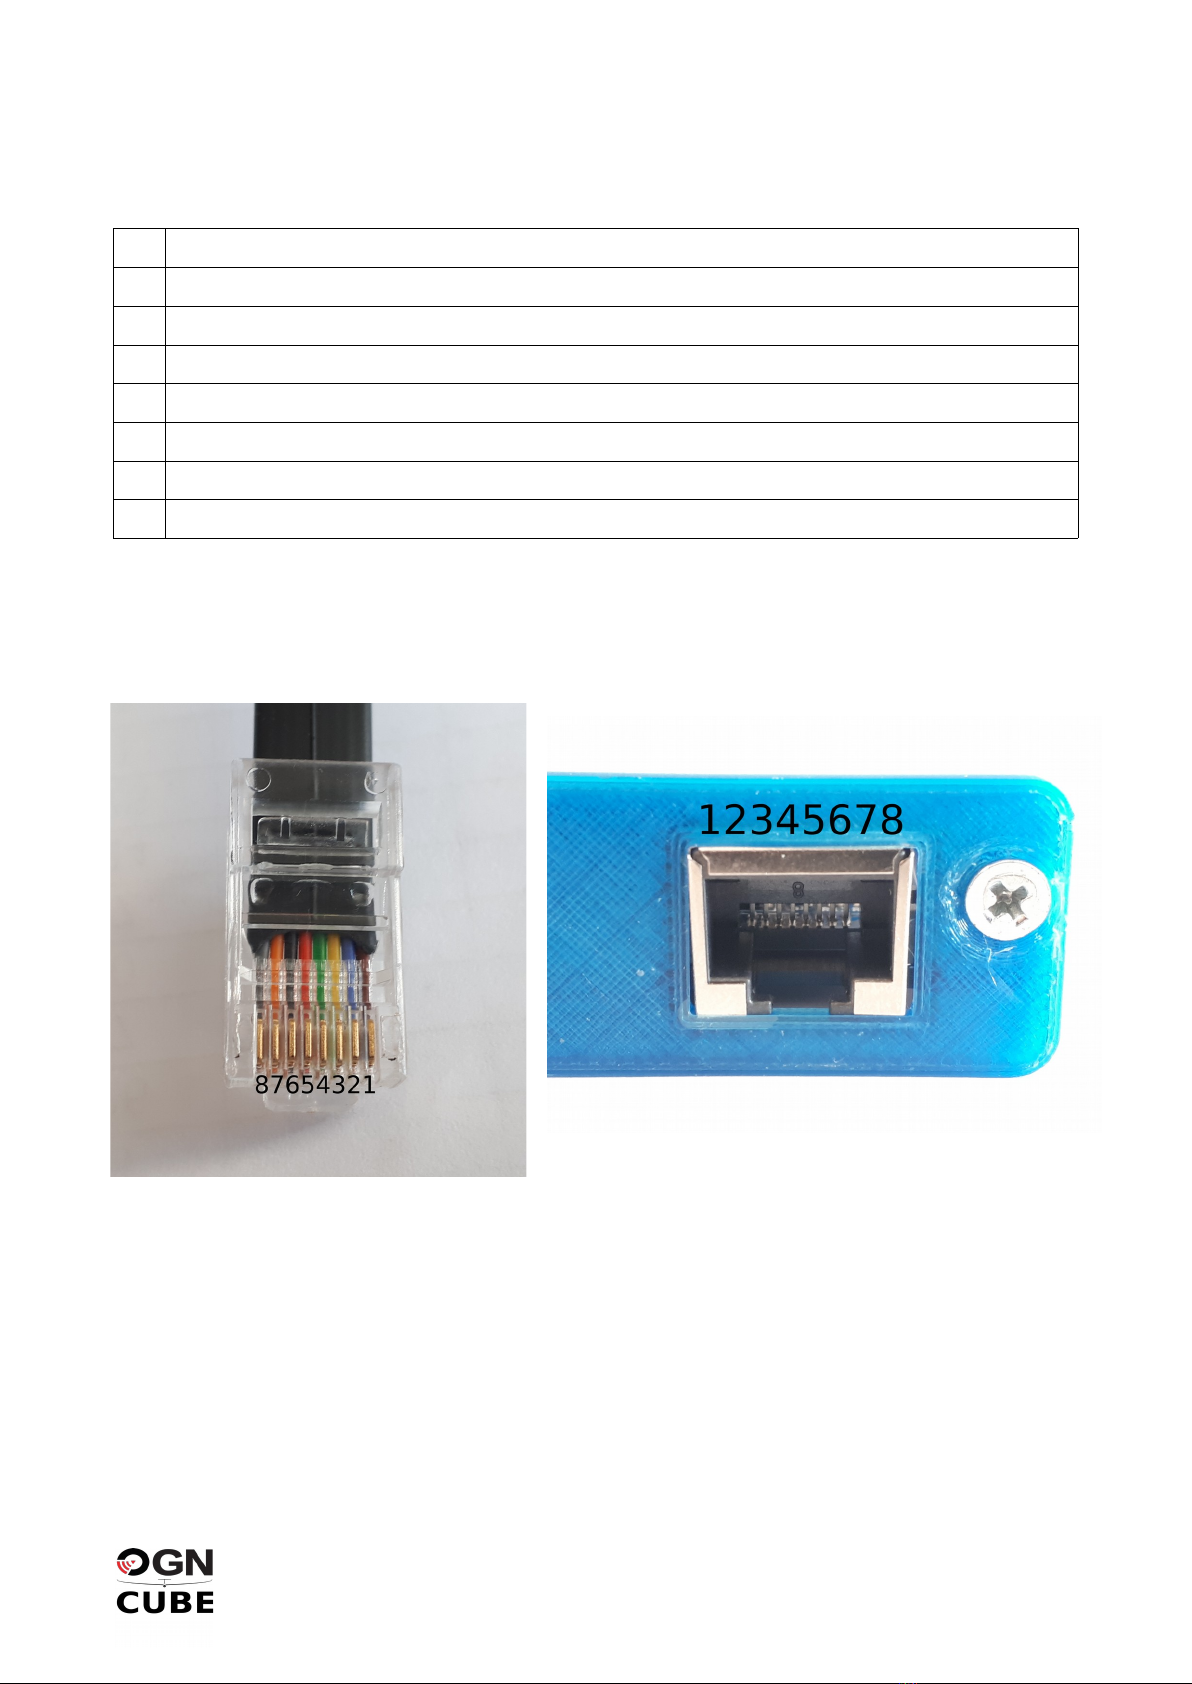
[Model A] RJ45 Connector Pinout
The meaning o the RJ45 pins (model A only) is as ollows:
1GND
2GND
3CUBE RX (TTL at VCC level!)
4CUBE TX (TTL at VCC level!)
5TX OFF
6(not connected)
7VCC (external power input 5-15V)
8VCC (external power input 5-15V)
CAUTION! Relying solely on the cable colours can be misleading as cables sourced rom various
vendors can be marked di erently. Hence it is better to consider the plug by its clip on one side.
Notes regarding the pins #3+4: voltage level o the TTL serial line is determined by the external
power input on pins #7+8. In case the power voltage is 5V you can connect your PDA with 5V TTL
I/O directly. For RS232 connection you need a level converter!
Notes regarding pin #5: this input is designed to turn o radio transmission while maintaining the
reception on. To activate TX OFF you need to connect this pin using a two-way switch to ground
(GND). Otherwise keep it loating (do not connect anywhere).
OGN CUBE3 Installation and User’s Manual Page 9 o 12
Illustration 4: RJ45 pin denotion with the
clip at the bottom side of the plug
Illustration 5: RJ45 pin denotion on the front face of the
unit with the clip at the bottom side
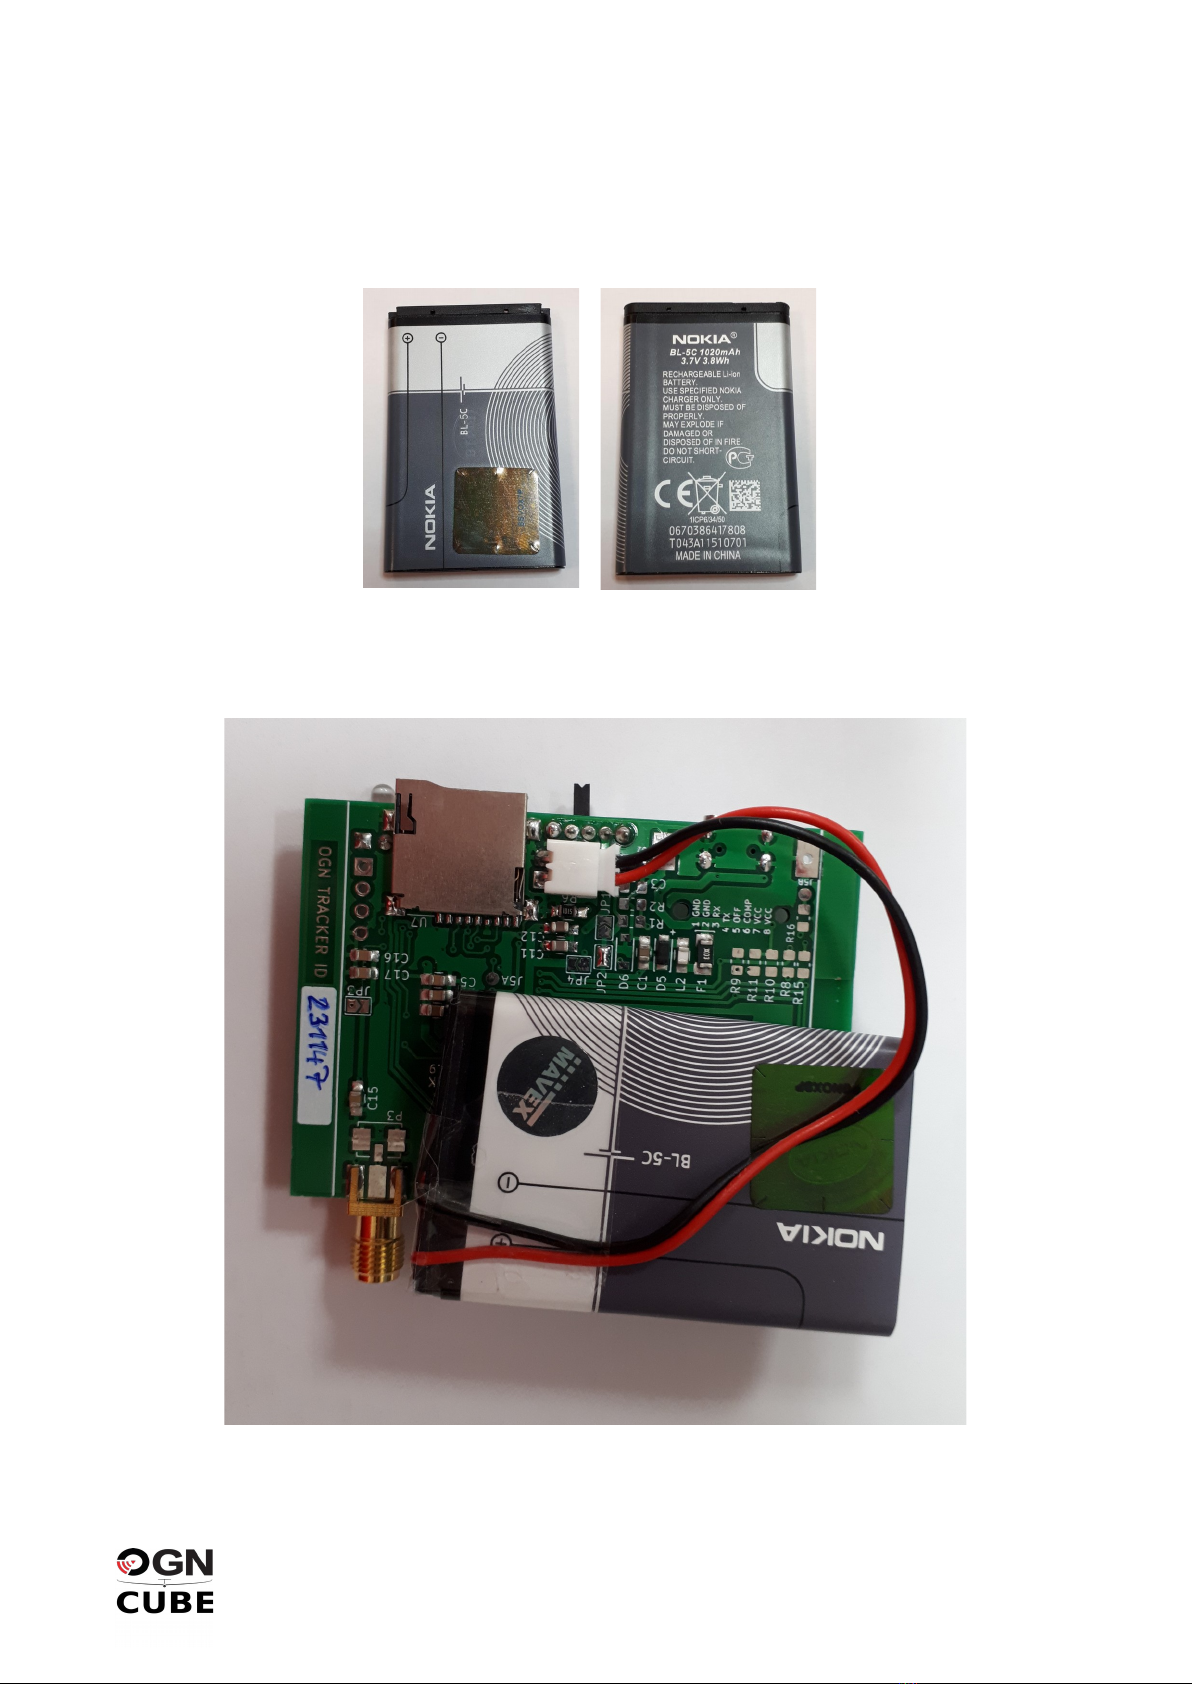
[Model B] Battery Care and Manipulation
The battery-powered Cubes are equipped by the airly standard NOKIA BL-5C 1020mAh Li-ion
battery. The reason or this choice are its compact dimensions and primarily its omnipresence – you
can get a replacement battery almost everywhere or a reasonable price.
Illustration 6: Internal 1020mAh “Nokia” battery
The battery is connected to the board using two-pin JST connector as show in illustration 10 right
below. Installation o the battery inside the enclosure is depicted in no. 8.
OGN CUBE3 Installation and User’s Manual Page 10 o 12
Illustration 7: Battery connected to PCB using a 2.0mm JST connector
Table of contents


