olson OLWM08 User manual

Drum Washer
Model: OLWM08 / OLWM10
Instruction Manual
Before operating this washing machine, please read these instructions carefully and completely.

2
1 Instruction before washing
1.1 Safety notice
1.2 Installation instructions
1.3 Name of parts
1.4 Accessories
2 Operation instruction
2.1 Specication sheet
2.2 Lock and unlock method
2.3 Introduction to detergent box
2.4 Selecting detergent
2.5 Introduction to control panel
2.6 Program introduction
2.7 Various Functions
3 Clean and maintenance
3.1 Clean and maintenance
3.2 Non-failure condition
3.3 Troubleshooting guide
3.4 Product Fiche
3
4
7
6
8
8
9
9
10
11
13
14
15
16
16
CONTENTS

1.1 Safety notice (be sure to observe)
1. INSTRUCTION BEFORE WASHING
3
· To protect the user and other people’s health and property, be sure to observe the following safety notice.
· The precautions stated here are classied as “Warning” and “Attention” according to the damage and the
emergency caused by misoperation, and are described respectively in line with the marks below.
Please read this part of substance carefully for proper
operation before using your machine.

4
1.2 Installation instructions
Transportation
Two people are needed to carry the machine.
One person on one side carries the machine by holding the machine feet.
Location of washer
Washing machine must be installed on the ground
which must be hard, at and skidproof. Please do
not lay the washing machine on the soft blanket or
wooden oor. It is forbiden to lay the washing machine
on the platform or the bracket.

5
Remove the bolt used to x the machine in transportation
To protect the machine in transportation, there are 4 bolts inserted into the inner part of the machine. Remove
these bolts before use (otherwise there will be strong shock, noise, and disfunction in spin process).
1. Unscrew the bolts that are xed before transportation by spanner (4 bolts)
2. Remove the bolts that are xed before
3. Fit the lid into the holes
Adjust the machine horizontally
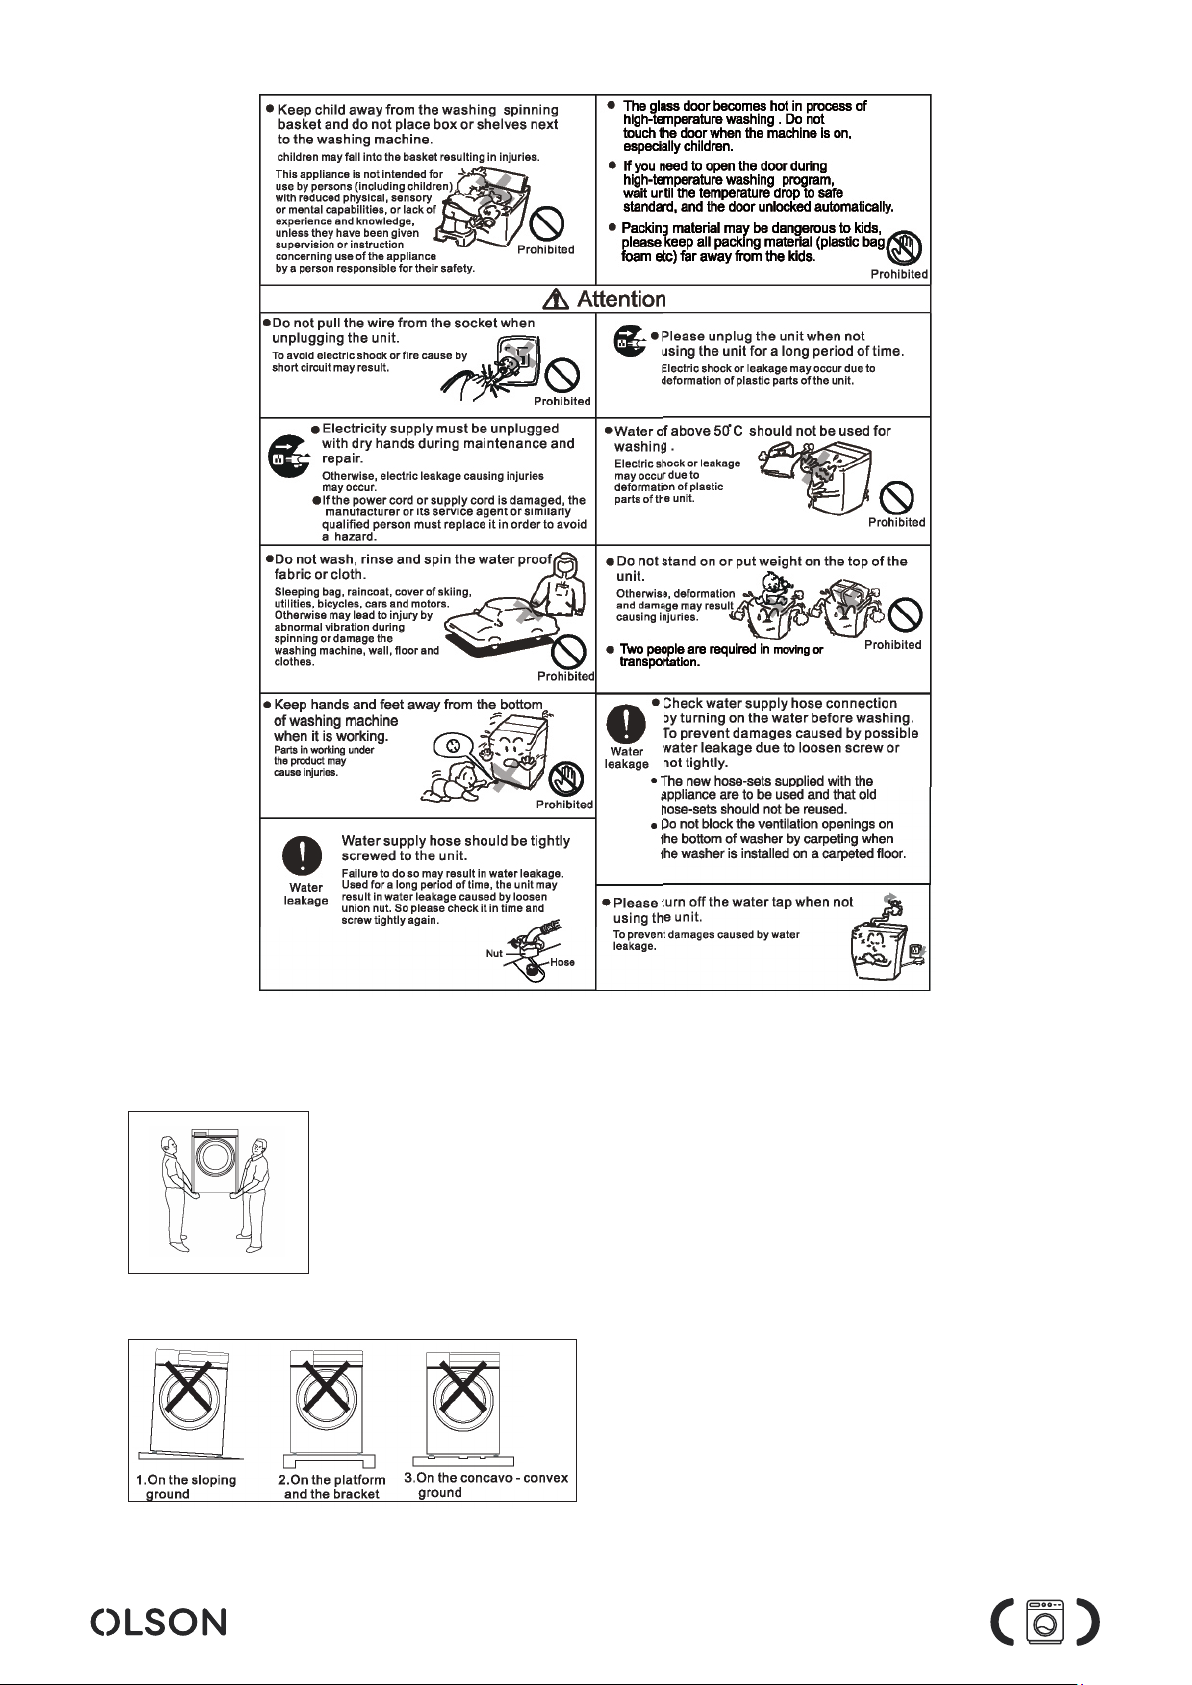
There will be strong shock, noise, and disfunction in operation if the washing machine is not steadily installed.
Please adjust the front adjustable Leg.
Methods are as follows:
1. Check whether the washer is on a level surface using a plumb line as shown in the Beside gure.
The washer is on level ground oor if the Frame line of washer is parallel with the plumb line.
2. Adjust the Adjustable Leg of washer if necessary to make the washer level as shown in the Beside gure.
3. Put your hands on the washer diagonally, press and shake the washer slightly to make sure that the washer
is steady.
- Let the sales force or professional maintenance worker to install the machine.
- Keep the dismounted bolts carefully, you will need them in house moving.
- As the picture shows, please be sure to conrm that the base protection device is not stuck at the bottom of
the washing machine before use, otherwise it will affect the normal use of washing machine.

6
Connecting the Suply Hose
1. Check that sealing washers are rmly seated.
2. Attach the curved end of the hose to the inlet valve of the washing machine, tighten the coupling nuts securely
by hand.
3. Attach straight end of the hose to the tap. Tighten the coupling nuts securely by had.
4. Turn on the taps and check for leaks. Tighten the coupling nuts rmly if there is any leakage. If water pressure is
strong, close the water tap completely then open it slightly.
CAUTIONS:
· Do not use water which is hotter than 50ºC.
· If you faucet is not suitable, please consult your dealer.
Turn the nut clockwise till the nut turned tight while holding the hose.
Turn the nut counterclockwise after turning the faucet off when you want to detach
the water suplly hose.
Installing Water Supply Hose to the Washer

7
Connection of drain hose
1. When washing machine does not work, put drain hose at back of washing machine, (as pic 1 shows).
2. When washing machine works, put drain hose into drainage pond (as pic 2 shows), you can also put the end
of drain hose into sewer, and keep space between end of drain hose and sewer elbow to avoid difcult to drain
water out of washing machine.
3. Clean lter in pump periodically to keep washing machine working normally.
Note: Do not take off drain hose stay, if not, it will lead to drainage problems.
Attention
·We suggest the user to run the tub clean program before the 1st time washing.
·Don’t forget to close the water tap and take down the power plug to avoid any ood and re disaster.
1.3 Name of Parts
1.4 Accessories

2.1 Specication sheet
2. OPERATION INSTRUCTION
8
Attention
· We suggest the user to run the tub clean program before the 1st time washing.
·Don’t forget to close the water tap and take down the power plug to avoid any ood and re disaster.
When the machine is working, the door locks automatically. It can’t be opened.
When the machine is working, the user press the “START/STOP” button.
The door can be unlocked after inner tub stopping spin.
· If take down the power plug directly or power cut when the machine is running, the door can’t be unlocked
automatically.
· If open the door when the machine is working, the forth may exceed and please clean it with towel.
· The user can’t open the door when the machine is running with a high working temperature.
· The user can’t open the door when the water temperature is high.
2.2 Lock and unlock method

9
2.3 Introduction to each compartment of detergent box
· High bubble washer powder or detergents is forbidden.
· Use the detergents in accordance with the instruction by its manufacturer.
· Excessive detergents will cause too much bubble and affect the rinse, also create function faults.
· Choose suitable detergents in accordance with the type and color of clothes, the water temperature and the
stain.
Washing efciency and performance is determined by used deterfent quality.
Use only machine wash approved detergent.
If need use specic detergent, e.g. for synthetic and woolen fabric.
Mind always detergent manufacturer recommendations.
Do not use dry cleaning agents such as trichloroethylene and similar products.
2.4 Selecting detergent

10
The distribution
2.5 Introduction to the control panel
· Start / Stop
- Press the button for a start and pres again for a stop.
· Power knob
- It is for open or close the power.
(When the programs nished, the machine can be closed automatically).

11
· Program choice
- Choose the suitable program according to the clothes rype and dirt lever.
· Display window introduction
- When power on, it will display the spin speed and others.
- When running, it will display the rest time.
- When breakdown, it will display the error code.
· Temperature button
- Set the washing temperature according to the clothes type.
- The temperature setting range is different among programs. Some of them has range limitation.
- Press 3 seconds to set child lock function.
· Spin speed button
- Set the spin speed according tu user’s requirement.
- Some programs have the limitation on setting the spin speed.
· Delay button
- It is for washing reservation function to set time from beginning to nish.
·+ Rinse button
- Press thins key to add times of rinse.
- Some of programs can not shoose + Rins.

12
2.6 Program introduction

13
2.7 Various functions

14
3.1 Clean and maintenance
3. CLEAN AND MAINTENANCE
· Please maintain the machine after long time using. It can enlarge the life time.
· Please take off the power supply when maintenance.

15
3.2 Non-failure condition

16
3.3 Troubleshooting guide
3.4 Product Fiche

17
· That the eco 40 - 60 programme is able to clean normally soiled cotton laundry declared to be washable at
40º or 60º, together in the same cycle, and that this programme is used to assess the compliance with the EU
ecodesign legislation;
· That the most efcient programmes in therms of energy consumption are generally those that perform at lower
temperatures and longer duration;
· That noise and remaining moisture content are inuenced by the spinning speed: the higher the spinning speed
in the spinning phase, the higher the noise and the lower the remaining moisture content;
·The values given for programmes other than the eco 40-60 programme and the wash and dry cycle are
indicative only.

This manual suits for next models
1
Table of contents