Optoma ThemeScene RD65 User manual

RDTV User Manual
RDTV Manuel Utilisateur
RPTV Bedienungsanleitung
www.themescene.tv

1
ENGLISH
Table of Contents
IMPORTANT SAFETY INSTRUCTIONS ........................................................................ 2
ACCESSORIES AND REMOTE CONTROL BATTERY INSTALLATION ....................... 3
DESCRIPTION OF THE REMOTE CONTROL UNIT ..................................................... 4
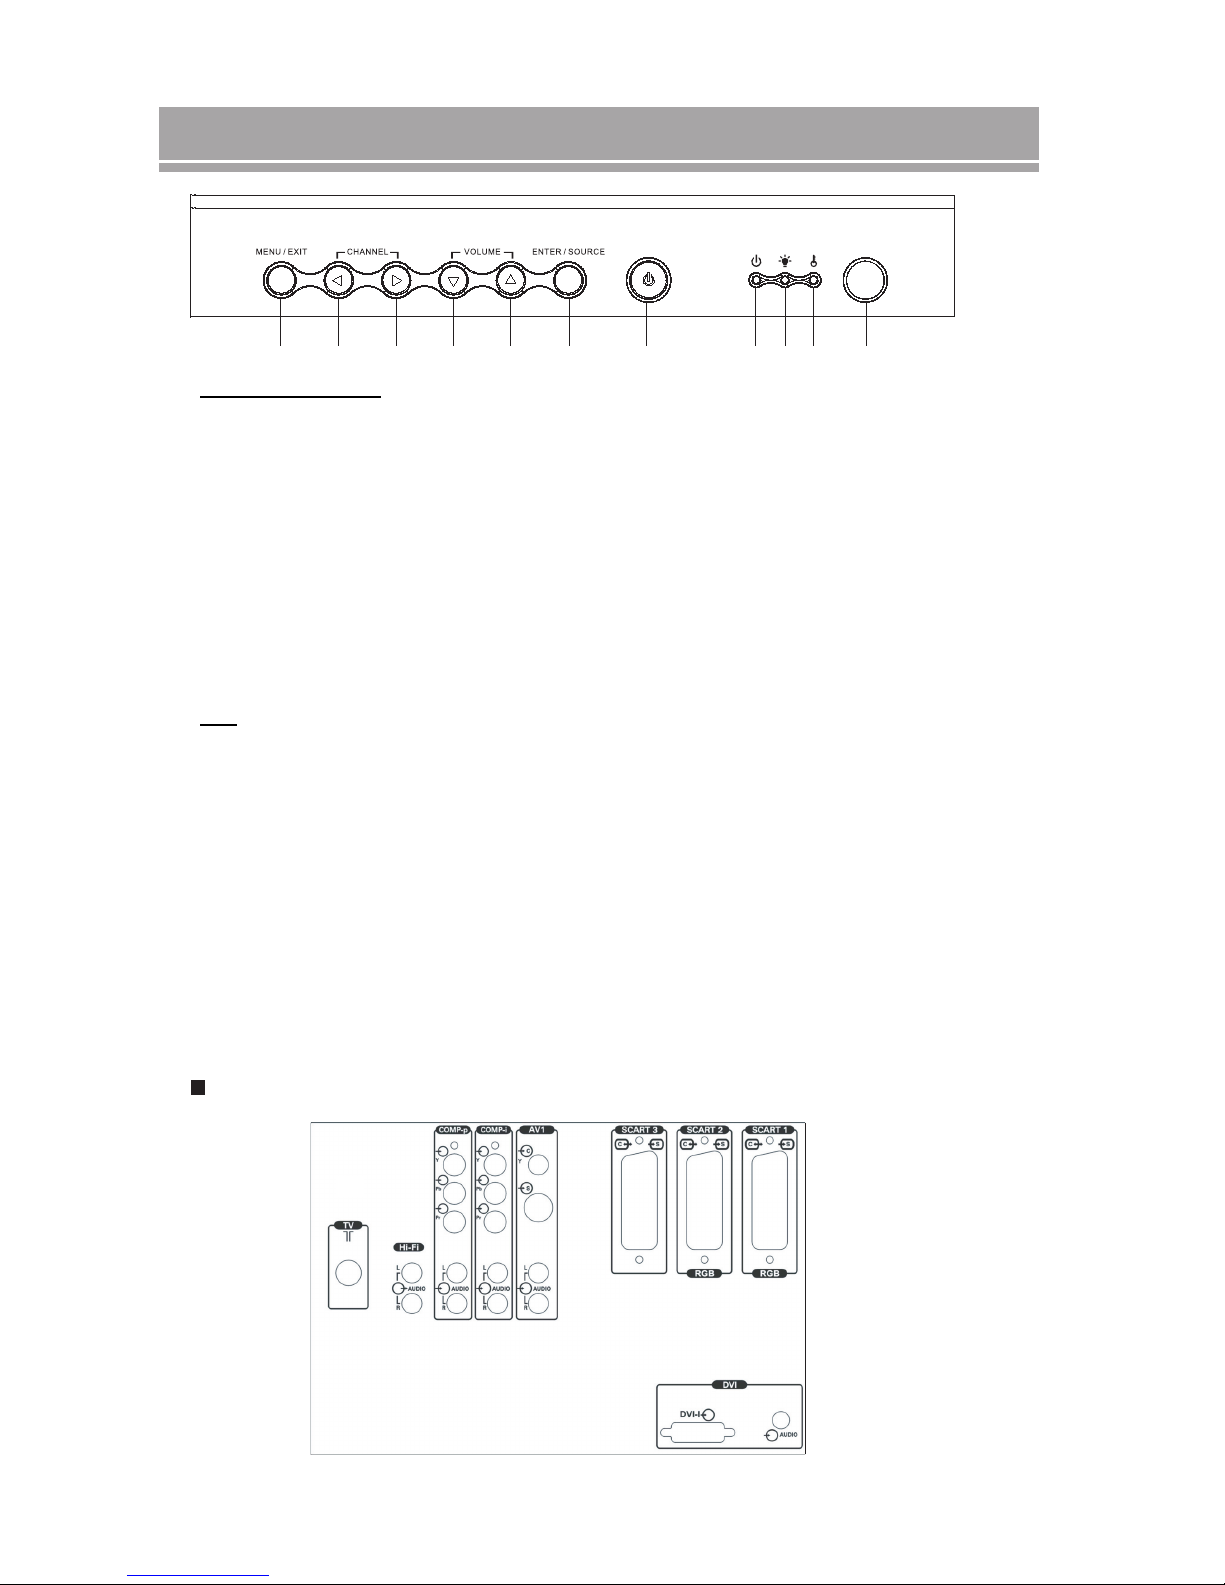
CONTROLS / TERMINALS
Front Panel ................................................................................................................... 5
Rear Panel .................................................................................................................... 6
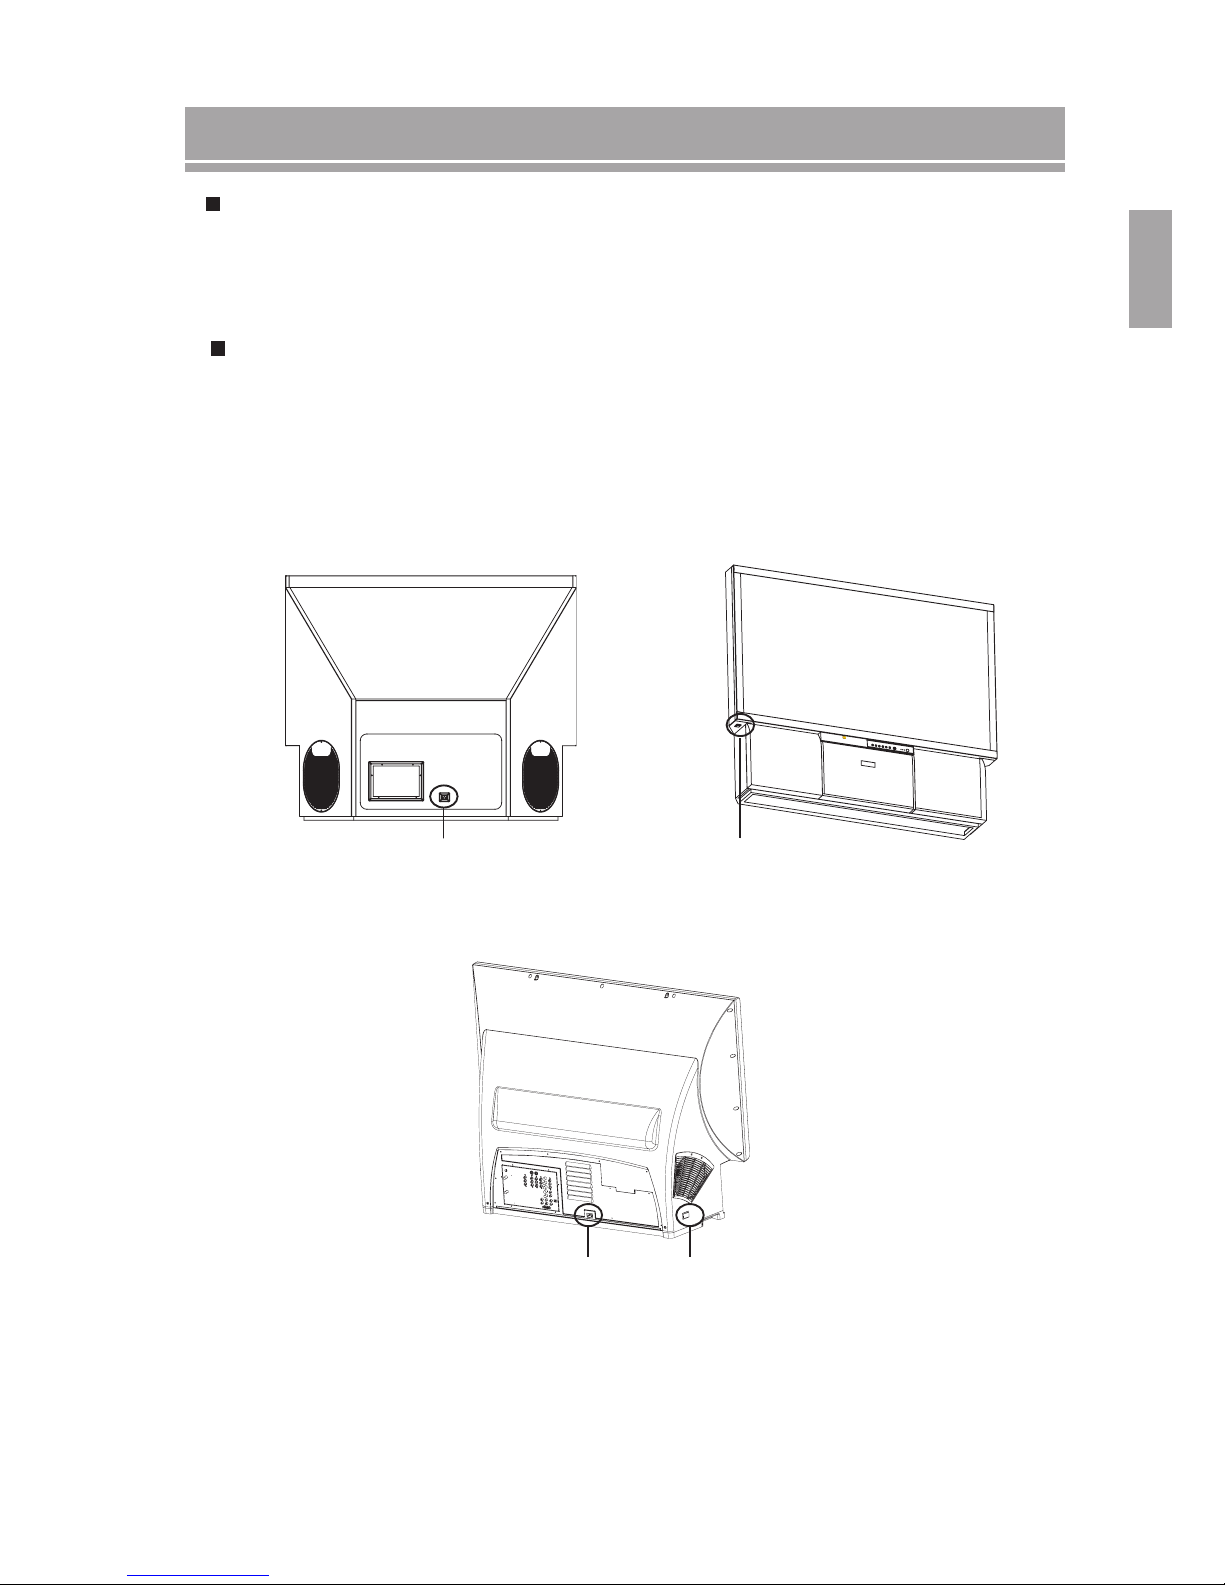
HOW TO POWER ON AND OFF THE DISPLAY ........................................................... 7
CONNECTING EQUIPMENT
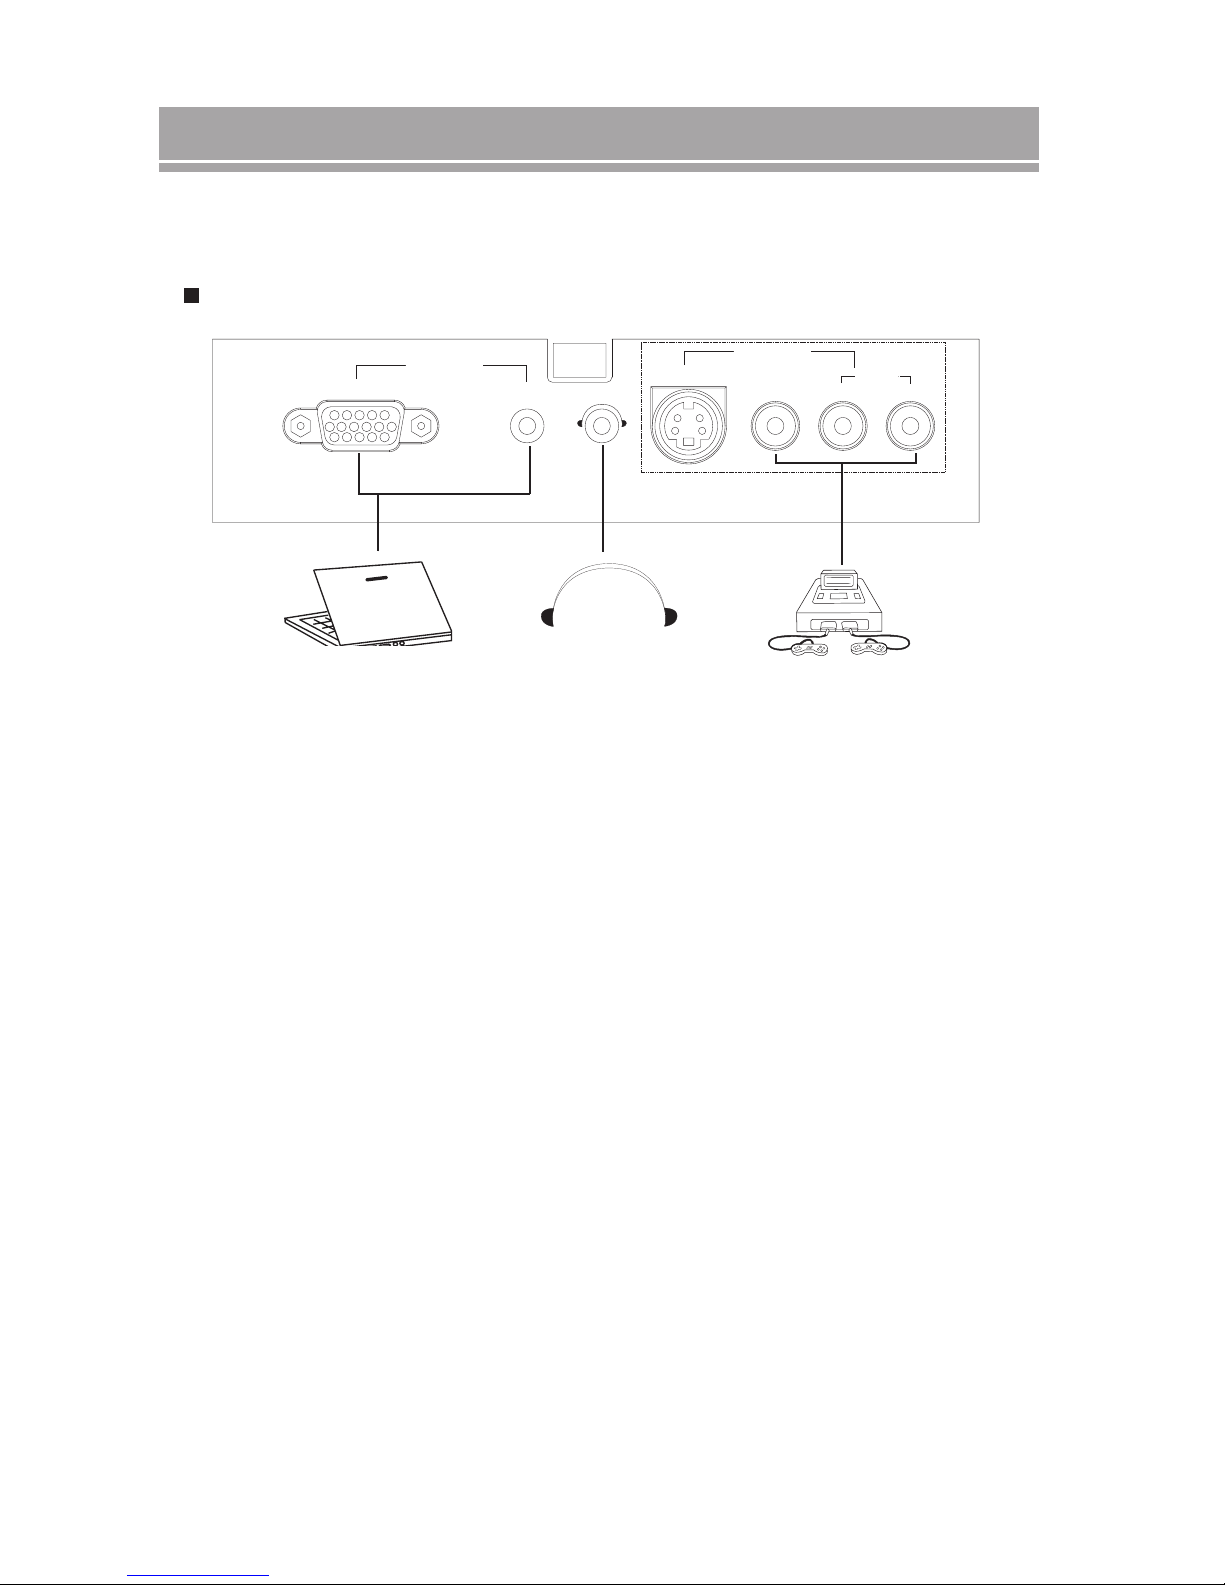
Front Terminals connection ........................................................................................... 8
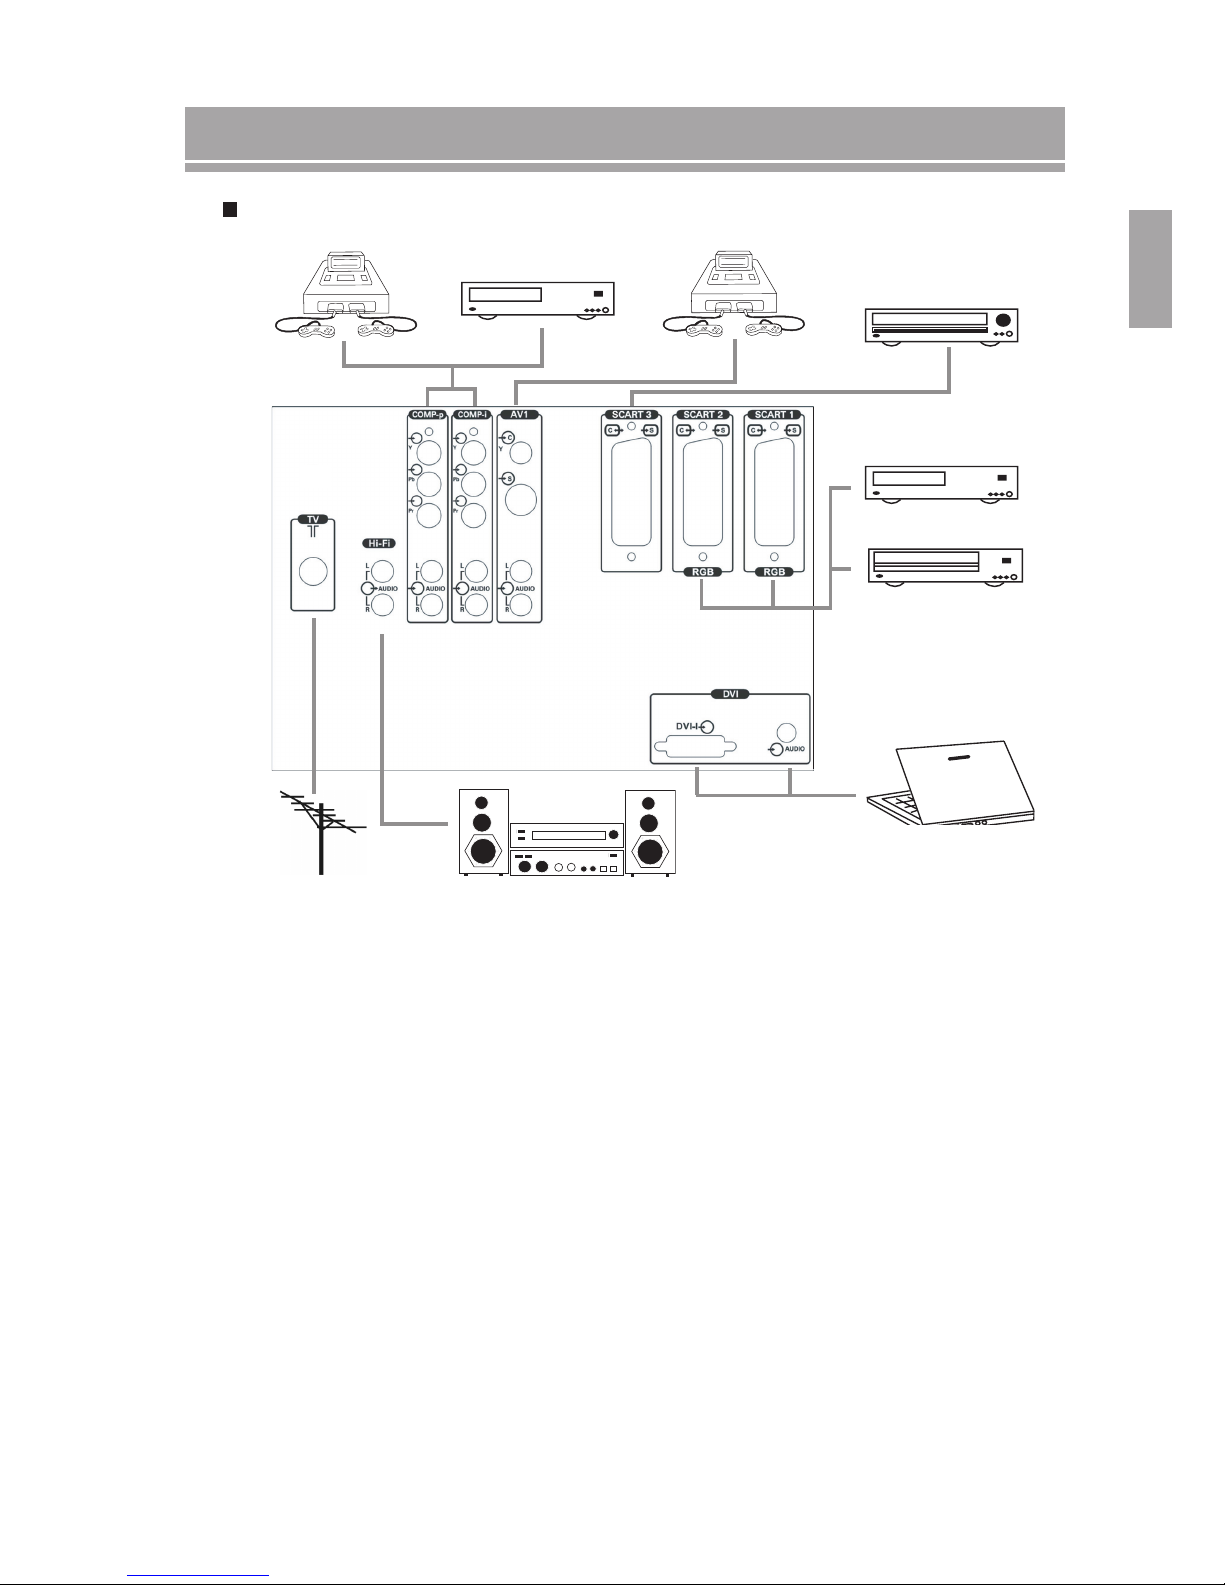
Rear Terminals connection ........................................................................................... 9
ON-SCREEN DISPLAY MENUS
Picture Adjustment ......................................................................................................10
Sound Adjustment ....................................................................................................... 11
Displaying Different Picture Formats
PIP .............................................................................................................................. 12
POP ............................................................................................................................ 13
Selecting The Language ............................................................................................. 14
Setting Country ........................................................................................................... 14
Manual Channel Search ............................................................................................. 14
Channel Auto Scan ..................................................................................................... 15
Setting Your Favorite Channel .................................................................................... 15
EPG Introduction ........................................................................................................16
Setting Sleep Timer .................................................................................................... 16
Changing Password ....................................................................................................16
Reset To Factory Default Value ..................................................................................17
Adjusting Source .........................................................................................................17
Setting Picture ............................................................................................................18
Teletext Introduction .................................................................................................... 19
LAMP CHANGE INSTRUCTIONS- 50 INCHES ........................................................... 20
LAMP CHANGE INSTRUCTIONS- 65 INCHES ........................................................... 21
TROUBLESHOOTING ................................................................................................. 22

2
Important Safety Instructions
Important Safety Instructions For Your Display
1. Read and apply the operating instructions provided with your display.
2. Read all of the instructions given here and retain them for later use.
3. Follow all warning and instructions marked on the display.
4. WARNING: To reduce the risk of fire or electric shock, do not expose this appliance to rain
or moisture.
5. WARNING: Because the temperature of the lamp is high immediately after use, direct
contact with the lamp may cause burns. Do not replace the lamp module until it is cooled down.
7. Unplug this display from the wall outlet before cleaning. Do not use liquid or aerosol cleaners.
Use a dry cloth for cleaning.
8. Vents and openings in the cabinet are provided for ventilation, to insure reliable operation of
the display and to protect it from overheating. These openings must not be blocked or covered.
There should be at least 5 cm of clearance from these openings.
Never block the openings by placing the display on bed, sofa, rug or other similar surface.
Never place this display near or over a radiator, stove or other apparatus that produce heat.
9. Operate only from the type of power source indicated on the marking label. If you are not sure of
the type of power supplied, contact your television dealer or local power company.
10. Do not allow anything to rest on or pinch the power cord. Do not locate this display where the
cord could be stepped on.
11. Do not overload power wall outlets or extension cords as this could result in fire or electric shock.
12. Never insert objects of any kind into this display through cabinet openings. This could result in a
fire or electric shock. Never spill liquid of any kind on the display.
13. For additional safety during a lightning storm, or when it is left unattended and unused for long
periods of time, unplug it from the wall outlet and disconnect the antenna, This will prevent
damage to the receiver due to lightning and power-line surges.
14. Do not attempt to service this display yourself as opening or removing covers may expose you
to dangerous voltages or other hazards. Refer all servicing to qualified service personnel.

3
ENGLISH
Please check you have received the following items:
Accessories and Remote Control Battery Installation
User’s manual
Remote control Two AAA batteries Scart cable
AC power cord
1. Place the remote control face down and remove
the battery cover.
2. Insert two AAA batteries provided - ensuring the
polarity is correct.
3. Replace the battery cover.
NOTE:
1. Batteries should always be replaced as a pair. Always use new batteries
when replacing the old set.
2. Do not combine a used battery with a new one.
3. Do not mix battery types.
4. Do not attempt to charge, short-circuit, disassemble, heat or burn used
batteries.
5. Battery replacement is necessary when the remote control acts sporadi-
cally or stops operating the display.
Remote Control Battery Installation

4
Remote Control
IR Filter
Reveal: Reveal the hidden text
Power: Power on/off
Color Buttons: For use with
Teletext or EPG
Menu: Enter/Exit OSD function
OK: Confirm selection
Active Window: Select the active
window in PIP or POP mode so
that the source can be selected
PIP/POP/Full: Switch viewing
modes
Channel Up/Down: Increase
or decrease preset channel
number
Swap: Swap the position of
PIP/POP main or sub window
Previous Channel or Page:
Return to previous TV channel
or text page
Freeze/Hold: Video freeze
or unfreeze, text page hold
or un-hold
TV/Teletext: Switch between TV
and teletext mode
Index/Page: Go to index page
Audio: Select sound type
EPG: Switch to EPG function
List/F.Text: Select List or
FastText mode
Mute: Mute or un-mute audio
Source Selection: Select
input source
Volume Up/Down: Increase
or decrease the volume level
Number Buttons: Select the
number for TV channels or
text pages

5
ENGLISH
Front View
On the front of display, you will find the control panel and indicator lights as illustrated below.
Front Terminals illustration
50-inch display65-inch display
Controls/ Terminals
VGA PC Audio Headphone
S-Video Video LR
VGA Input
Audio
AV2 Input

6
Controls / Terminals
1
2
3
4
5
6
7
8
9
10
11
Operating the buttons
1. Enter or Exit on-screen menu
2. Channel Down
3. Channel Up
4. Volume Down
5. Volume Up
6. Enter/Source
- When the on-screen menu is on, this key is used to select on-screen menu items.
- Under normal use, this key switches sequentially from one signal source to another.
7. Power
LED
8. Power Indicator
- Red: stand-by
- Flashing red: during system cooling
- Orange (G+R): during warming mode (less than 20 seconds)
- Green: system on
9. Lamp Indicator
- Red: lamp fail
10. Temperature Indicator
- Red: over temperature
11. IR Receiver
- Internal temperature light. Flashes red when temperature is excessive.
Rear Terminals illustration

7
ENGLISH
Power On And Off The Display
Power On
Step 1: Connect the power cord to the display as illustrated below.
Step 2: Switch on the main power switch located at the left side of the display as illustrated below.
Step 3: Press the power button on the front panel or remote control to turn on the display. The display
will turn on after a warm up period of approximately 30 seconds.
Power Off
Press the power button on the front panel or remote control once to turn off the display. For a period of 30
seconds after the power button has been pressed a second keypress will switch the unit back on immediately.
After 30 seconds the unit will begin the cool down process and will not be able to be switched back on for 2
minutes. Except in case of emergency, it is not recommended to use the main power switch to power off the
system. Lamp life may be severely reduced if the system is not allowed to cooled down properly by abruptly
shutting down the system using the main power switch.
NOTE:
1. The main power switch may be left on unless the unit will not be used for an extended period of time
2. The power button toggles between power on and power off. Please refer to the “Discrete IR code” section for user who
need the separate IR power on and power of IR code.
3. During the final phase of the cool down period the system will not respond to any power on or off commands. Wait until
the LED stops blinking to power up the display again.
Power cord Main power switch
RD65 RD65
RD50

8
Connecting Equipment
The flat screen accepts and displays a wide range of video programs and signal sources. It is
important to ensure that your external devices are properly connected to the display and turned off
before connection.
VGA PC Audio Headphone
S-Video Video LR
VGA Input
Audio
AV2 Input
VGA Input - Connect a computer with a VGA type connector.
Headphones - Used for connecting to a 3.5mm stereo headphone jack
AV2 Input - Composite Video connector
Front Terminals Connection
VGA

9
ENGLISH
Connecting Equipment
Rear Terminals Connection
TV TV antenna
Hi-Fi Stereo audio output for connection to external amp and speakers
COMP-p Component video connection for Progressive scan or High Definition sources
COMP-i Component video connection for interlaced scan sources
AV1 Composite video connection
SCART 3 SCART connector
SCART 2 SCART RGB connector
SCART 1 SCART RGB connector
DVI DVI-I connection for analogue and digital sources
DVD
V H S
DVD
Digital receiver
DVI

10
On-screen Display Menus
Picture Adjustment
Adjust the picture to suit the type of program you are watching. There are four preset options, TV,
Cinema, Vivid and User. You can choose to manually adjust the picture settings to suit your personal
preference and then save those settings for future as User
Press MENU of remote control to launch the on-
screen display. Using the button to select
the Picture setting, then press OK. Press again
MENU button to exit setting. (Note: See Table 1
below for an explanation of each of the main picture
components)
Color
Temperature
Explanation Adjustments Value Range
Contrast
Title
Sharpness
Tint
Saturation
Brightness
Adjusts the contrast of the image
Adjusts the brightness of the image
Adjusts the color intensity
Adjusts the balance between red and
green
Adjusts the edge enhancement of objects
in the image
Adjusts the colour temperature of the
image
Lower Higher
Darker Lighter
Weaker Stronger
Lower Higher
Softer Sharper
Lower Higher
0
0
0
0
0
+30
+30
+30
+30
+30
Warm, Normal, Cool
TABLE 1:
NOTE:
1. Adjustments can only be made to the User options.

11
ENGLISH
On-screen Display Menus
Sound Adjustment
Adjust the audio settings to suit a particular program being viewed.
TABLE 2:
Bass
Treble
Balance L/R
Headphone
Volume
Loudspeaker
Mode
Low-frequency audio adjustment
High-frequency audio adjustments
Adjust the audio balance between the left and right speakers
Adjust the headphone volume
Select Stereo\Mono or Left only or Right only for multi language
programmes
Loudspeakers
On
Can be used to turn off the speakers if external amplifier and speakers are
being used
Press MENU on the remote control to launch the
on-screen display. Use the buttons to
select the Audio setting, then press OK. To exit press
Menu (Note: See table 2 below for more information
on audio settings.)

12
On-screen Display Menus
Press MENU of remote control or to launch the on-
screen display. Using the buttons select the
PIP setting, then press OK. Press MENU to exit.
Using the button to choose the corner of
the screen that you would like the smaller pop-up
window to appear. (Refer to table 3 below for the PIP
illustration.)
NOTE:
1. You can also use PIP/POP/Full button of remote control to select the source for the PIP windows.
1. You may also use the SWAP button on the remote control to simultaneously switch the program in the
smaller window to the full screen, and the program on the full screen to the smaller window.
2. The SWAP only switches the PIP main and sub screens it does not exchange left and right screens.
3. The PIP/POP functions are not available when viewing programs signals from the COMP-p, VGA, or DVI inputs
PIP
Picture-In-Picture (PIP) enables the viewer to watch one source Full Screen, and a second source in a
small pop-up window. The position of the small window can be adjusted.
UL (Upper Left) UR (Upper Right)
LL (Lower Left) LL (Lower Right)
TABLE 3: PIP Illustration

13
ENGLISH
On-screen Display Menus
Press MENU of remote control or to launch the on-
screen display. Using the button to select
the POP setting, then press OK. Press again MENU
button to exit setting.
Use the button to choose the desired size of
the new pop-up window. (Refer to Table 4 below for
the POP illustration.)
NOTE:
1. The main program window is on the right side of the screen. The sub window is on the left side
of the screen.
2. You can also use PIP/POP/Full button of remote control to quickly activate or deactivate the split
screen.
3. You can remote control to active sub window and then quickly change the program source for the
pop-up window.
POP
The POP function divides the viewing area into two halves, enabling simultaneous viewing of two
programs in side-by-side windows.
TABLE 4: POP Illustration
1 2
3
4 5
45

14
On-screen Display Menus
To begin watching TV transmissions the unit must be configured and tuned to you local TV
broadcasts. This process will take several minutes but only needs to be performed once.
Use the ‘Source Select’ button to select ‘TV’ as
the input source. Press MENU on the remote
control to launch the on-screen display. Use the
buttons to select the Set Up function, then
press OK. Press MENU button to exit.
Language
Select the desired OSD language on the screen
using the button, press OK to confirm.
Set Up
CH Manager
Country:
Select your location using the buttons, press OK
to confirm. The following countries can be selected.
Country Colour System
UK PAL I
France SECAM L
Deutschland PAL B,G
Portugal PAL B,G
Osterreich PAL B,G
Italia PAL B,G
Espana PAL B,G
Nederland PAL B,G
Denmark PAL B,G
Sverige PAL B,G
Norge PAL B,G
Suomi PAL B
Belgique PAL B,H
Suiss PAL B,G
Manual Search:
It is recommended to use the Auto Tune channel search method
unless you have a specific requirement for Manual tuning.
When using Manual Search channels are searched and saved
manually one at a time
- Go to the Search to start the channel searching using
the button.
- Go to the Program Number and enter the desired program
using the button.
- Go to the Fine Tune and remove the cursor using the
button to obtain a better picture quality.
- Activate all of Manual Search settings with Save button,
press MENU button to exit.

15
ENGLISH
Manual Search:
It is recommended to use the Auto Tune channel search method
unless you have a specific requirement for Manual tuning.
When using Manual Search channels are searched and saved
manually one at a time
- Go to the Search to start the channel searching using
the button.
- Go to the Program Number and enter the desired program
using the button.
- Go to the Fine Tune and remove the cursor using the
button to obtain a better picture quality.
- Activate all of Manual Search settings with Save button,
press MENU button to exit.
On-screen Display Menus
Auto Scan:
Scan channels automatically through all available
channels one-by-one, and will record a list of all channels
that are broadcasting programs.
Press any key on the remote control (except for the
Power button) to stop the automated channel scan cycle.
The whole auto scan process may take a few minutes but
normally only needs to be done once.
When auto scan is selected and a dialog box is displayed.
Auto Channel Scan
Ensure antenna is connected
Press OK to continue
Press ENTER to enter the sub scan selection. Select a
desired scan list below using button, then press OK
to confirm.
Add new channels to existing list
Clear existing channel list
. Channel Edit:
Edit the program list that is a result of your search at any
time.
- Delete a program with RED
Auto scan have feed the list with all channels, you can
delete some programs to conserve only the best ones.
Select the line and press RED key to delete.
- Remove a program with GREEN
User can re-organize the list. Select the line and press
GREED key to select it, move it using the button, then
press GREEN to activate the location.
- Change the program name with YELLOW
Select the line to be modified name and press YELLOW
key to select it. Move through the characters using the
button.
- Lock a program with BLUE
In order to activate the lock on the programs, press BLUE
key to call up lock and press again to unlock. Enable this
function needs to enter 4-digit password with button.
If a list of names is available, it is displayed on left. Move
up and down to choose the right on, press YELLOW again
to apply it. If no list available then “---” will be displayed on
the current line.
User can press the number keys to enter English
Characters similar to cellar phone input. At the end press
YELLOW again.

16
On-screen Display Menus
EPG Search (Electronic Programme Guide)
EPG function only works in Germany, France and Bel-
guim. The EPG uses the NextView system.
EPG data is only broadcast on some TV channels. The
unit needs to search for a TV channel with EPG data
before the EPG can be used.
Use RED, GREEN, YELLOW or BLUE buttons on the
remote control to access services, using but-
ton to move and select program list, then press OK to
confirm. Press MENU button to exit EPG.
To access EPG use the EPG button on the remote
control
EPG Time Offset
If the local time is different from the EPG data this can
be corrected using the EPG offset
Use RED, GREEN, YELLOW or BLUE buttons on the
remote control to select time offset, then press but-
ton to make adjustment. Press MENU button to exit.
Sleep Timer
The timer is used when you would like to have the
display automatically turn itself off and go to standby
mode after a set period of time.
Set the sleep timer with the SLEEP button on remote
control or from MENU. Use button to select the
desired sleep minute sessions, the display will turn off
automatically after the preset time. Disable Sleep Timer
setting, select Off.
Password Change
Allow user to change password of the locked
programmes, user have to enter password to perform
this action. It also allows user to change the password.
If user choose the locked channel by number key, the
screen will show below message.
CHANNEL LOCKED
ENTER PASSWORD NUMBER

17
ENGLISH
On-screen Display Menus
Data
Enables the adjustment of the VGA source. (The
adjustments only apply to PC1).
Horizontal Moves the position of
the screen horizontally.
Vertical Move the position of the screen
image vertically.
Frequency Can be used to reduce
signal interference.
Phase Can be used to synchronize
VGA signals from a computer
Auto Image Automatically adjusts the above
settings.
Reset
Enables TV parameters to be returned to default setting.
Select Reset using button, press OK to activate.
WARNING:
Once the reset done, all of settings will be back to
factory default value except for “PW Change”, “Auto
Scan”, “CH Edit” and “Country”.
Component Explanation

18
The display supports 6 different of picture formats. You can choose the picture format that best suits
your viewing habits and preference.
You can adjust the dimensions of the on-screen image to suit the program being viewed. For example,
if you are viewing a program that contains subtitles, you may wish to select the SUBTITLES picture
format. Or, if you are watching a feature film, you may wish to choose a WIDE format.
4:3
Full
Subtitle
Wide
Zoom
PAN
This format will position 4:3 ratio signals in the center of the screen. Unused
portions of the screen will be left in black.
The picture will take up the entire screen area (1280x720). Suitable for TV, DVD
and High Definition sources.
The picture will take up the entire screen area (1280x720). However, the picture
will be moved up vertically slightly to accommodate the subtitles display area.
This format is used to view feature films, which are normally viewed with a screen
ratio of 2.35x1.
Can be used to create custom zoom levels
Used to move the image horizontally or vertically
On-screen Display Menus
Format
Press MENU on remote control to launch the on-screen
display. Use the buttons to select the Format
setting, then press OK. Press MENU button to exit
setting. (Note: See table 5 below for more information on
audio settings.)
TABLE 5:
NOTE:
1. When viewing Comp-p, VGA or DVI signals, only 4x3 and Full screen formats are available.
2. When in PIP/POP mode, the format function will be disabled.

19
ENGLISH
Teletext functions vary according to TV channel. Teletext is only available if it is broadcast on the
selected TV channel.
On-screen Display Menus
Teletext
Viewing Teletext
Press the TV/TTX button on the remote control to view teletext,
press the button again to return to TV mode.
Go to the index page
Press the Index/Page to go to the Teletext index pages.
List/F. Text mode selection
There are two teletext modes for selection.
- List:
This mode enables 4 Teletext page numbers to be saved and
access quickly at a later time using the RED, GREEN, BLUE
and YELLOW buttons. To store a page press one of the colored
keys, enter then page number and press the same coloured key
to store
- Fast Text:
This mode enables quick navigation using predefined quick
links chosen by the broadcaster. To select these links press the
corresponding color button.
Selecting teletext page
Enter the required page number using the 0~9 buttons on the
remote control.
To scroll thorough stored sub pages use the buttons or
Channel Up/Down.
To return to the previously viewed teletext page, press Pre CH/
Page.
Hold teletext page
Press the Freeze/Hold button to hold a text page. Press again to
return to release hold.
. Display a hidden information
Press the Reveal button to call up and delete hidden information,
such as puzzle solutions and replies to questions.
Other manuals for ThemeScene RD65
2
This manual suits for next models
1
Table of contents
Languages:
Other Optoma Projection TV manuals