Outdoor Theater Systems Recreation Series User manual

Recreation Series
9- or 11-Foot Screen/8” Speakers
Instruction Booklet

1

1. Open the tripod stands by loosening the lower knob and separate the legs until fully
extended. Tighten the lower knob to secure. Repeat this step for the second stand and
position it approximately 10 feet away from the first stand.
2. Insert the eyebolts into the top hole of the stands and tighten them into place with the
twist knobs.
3. From the center of the stand twist one stake into the ground about 3 feet from the front
and the other stake 3 feet from the back. Repeat this step for the other stand.
4. Loosen the height adjustment knob and raise the top tube up to the height of the sixth
hole. Insert the pin into the sixth hole. Tighten the knob to secure the tube. Repeat this step
for the other stand.
5. Hook the first tie down strap into the eyebolt at the top of the stand and connect its
other end to the rear twist stake. Connect the second tie down strap to the hook of the
first strap and connect its other end to the front twist stake. Be sure to leave a little slack in
the straps, you will tighten them fully momentarily. Repeat this step for the other stand.
6. Unfold the black screen. Using the Spring Clips, attach the black screen’s D-Rings,
Velcro side forward, to the eye bolt at the top of the stand. Repeat this step for the other
stand.
7. Take a bungee cord and hook one end onto the lower adjustment knob of the tripod
stand. Wrap the bungee under and around the base of the stand. Attach the other end
of the bungee cord to the bottom corner of the black screen. Repeat this step for the
other stand.
8. Now, tighten down all 4 tie down straps to ensure a secure flat viewing surface. You
may need to move the tripods closer together or further away to achieve this.
9. Take the white screen and with the Velcro facing inward, secure it to the black screen’s
D-Rings using the Spring Clips and Velcro along the top. Then, secure the bottom corners
of the white screen to the bungee cord hooks at the bottom of the screen.
2
Setting Up Your Screen

3
=Twist Stakes
=Tie Down Straps
Setting Up Your Screen
Close-Up View of Bottom Bungee Cord
and Top Eyebolt with Straps Placement

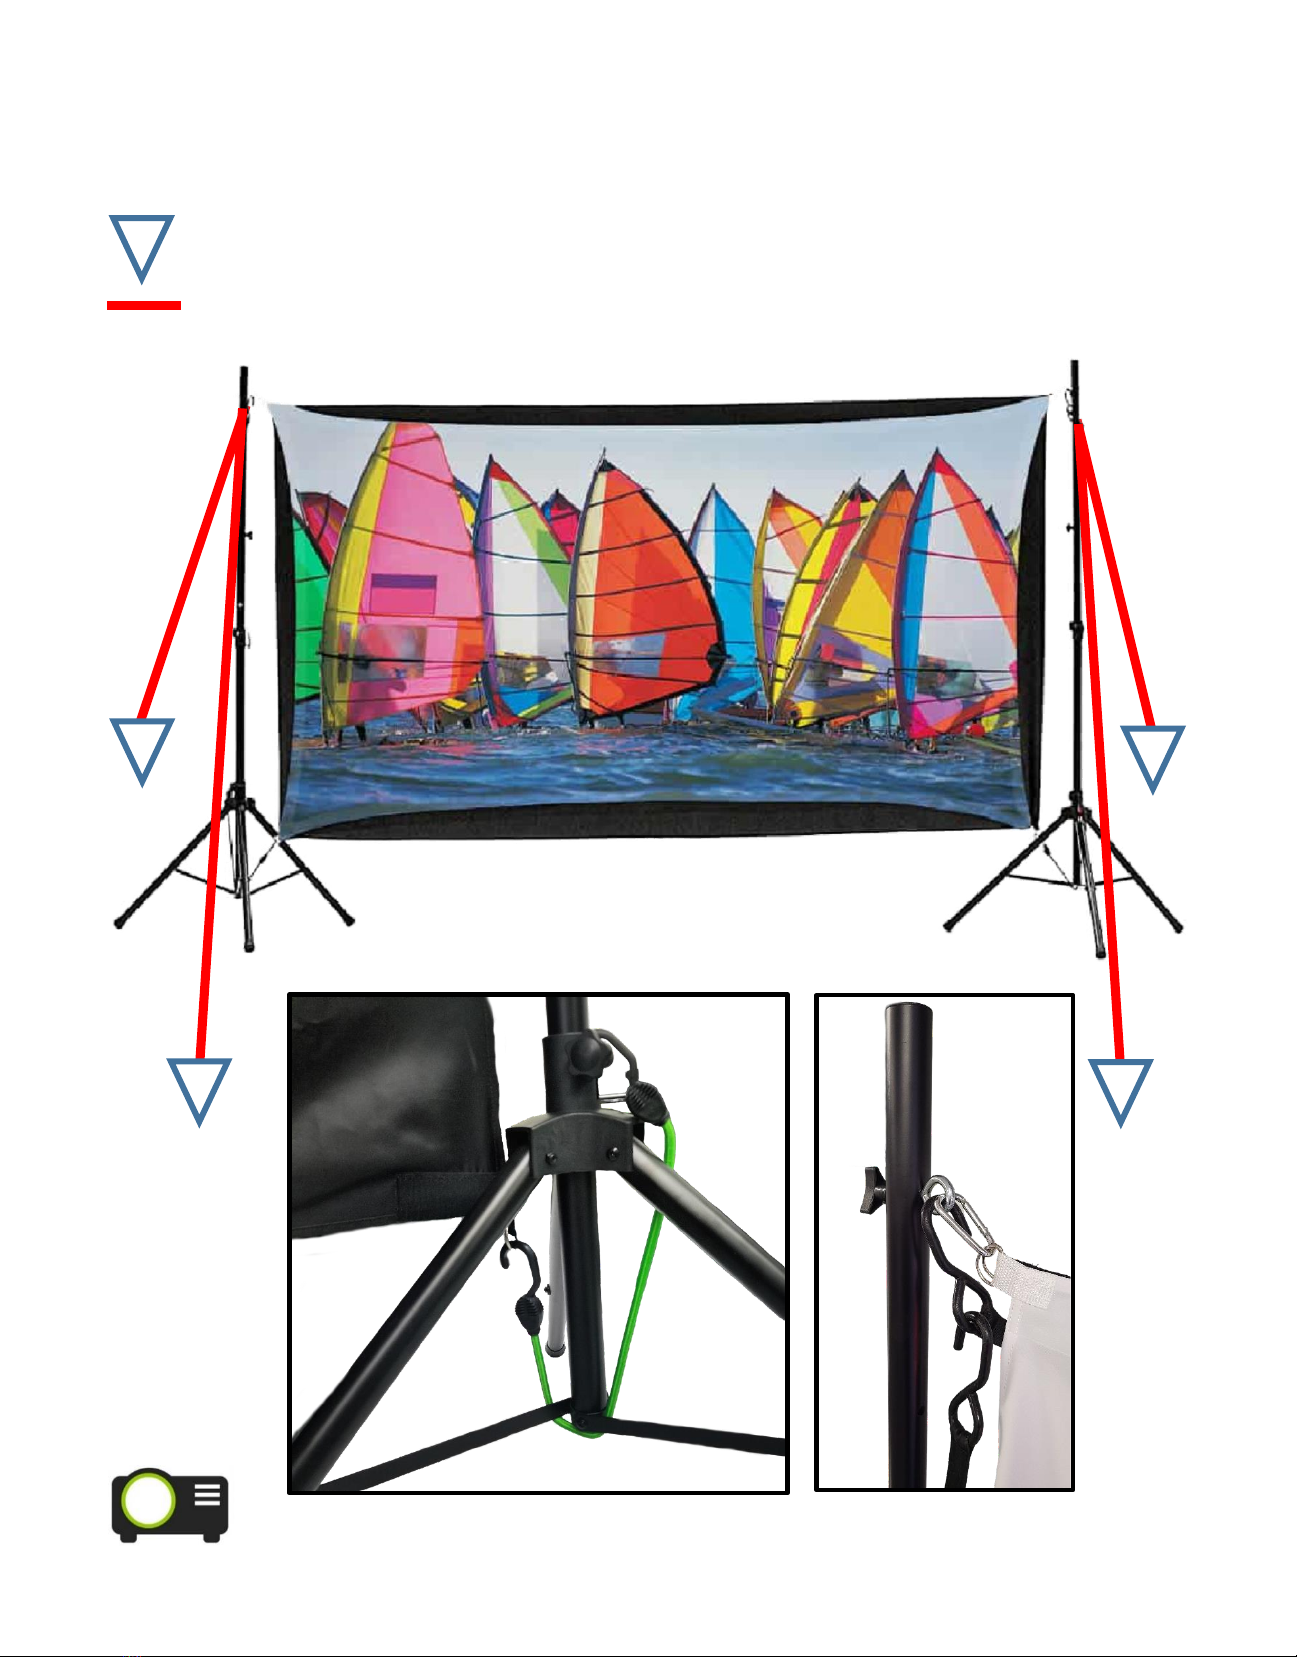
1. Open the 2 tripod stands. Tighten the lower knob to secure the legs in place. Be sure to
spread the tripod legs out wide to ensure they don’t tip! Raise the top pole to the desired
height, insert the pin, and tighten the knob to secure it. Set each stand on level ground at
each side of the screen.
2. Attach the active speaker to a tripod stand. There is a hole in the bottom of each
speaker that will mount on top of the tripod. Secure it in place by tightening the knob on
the back of the speaker. If the speaker does not fit on the tripod stand easily, make sure
the knob is fully loosened. Repeat this for the passive speaker on the same side.
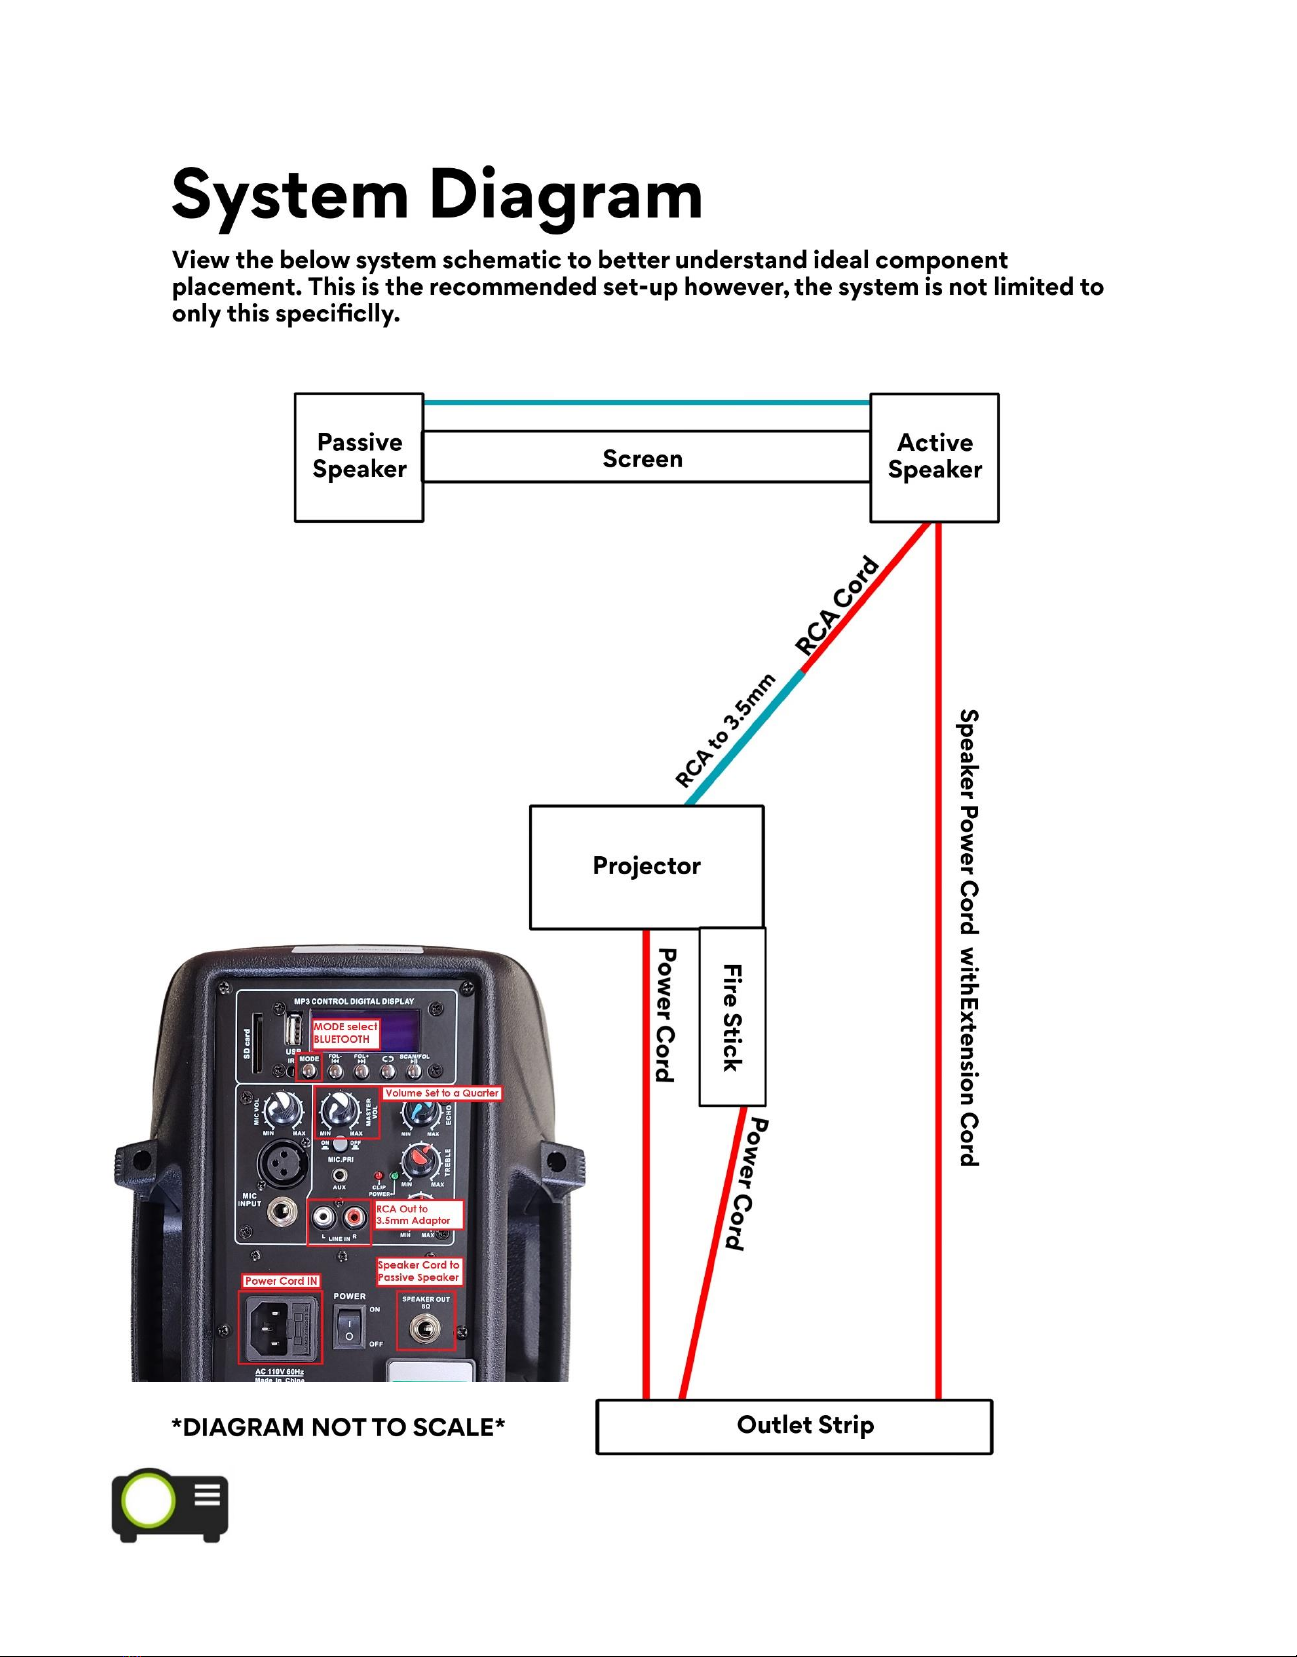
3. Plug the power cord into the back of the active speaker. Plug in a 25’ Extension cord to
the end of the speaker power cord. Now, plug the ¼” metal connector end of the
speaker cable into the output that is labeled “Speaker Out”. Run the other end of the
cable to the passive speaker and push and twist the blue plastic connector to lock into
place in the port labeled “Input”.
4. Take the RCA cord and plug it into the “Line In” port on the back of the active speaker.
5. Run the end of the extension cord back to your projection station along with the RCA
cord about 10-15 feet in the front center of the screen and plug them into the outlet strip.
6. Set a small table for your projection station about 10-20 feet centered in front of the
screen. You may have to adjust the distance slightly depending on the type of media you
are projecting and the screen size you have. You can also use the projector’s zoom, focus,
and keystone controls to fine tune the projection.
7. Place the projector on the case and plug in its power cord. Connect the Amazon Fire
Stick (or other media source) to one of the HDMI Inputs of the back of the projector.
8. Connect the RCA cord
to the 3.5mm adaptor and
plug in the adaptor to the
headphone jack on the
projector.
9. Plug the Projector and
Amazon Fire Stick to the
Multi-Outlet Strip and
power up! Your system is
ready to use!
4
Setting Up Your Speakers and Projection Station

5
Speakon Cord

6
Run Into Trouble?
Read These Super Helpful Hints!
Using Rear Projection
1. Use only the white stretch screen without the black backdrop.
2. Set Up the projector station behind the screen, shooting the image through the white
screen instead of on top of it from the front.
3. You will need to flip the image on the projector so that the picture is not reversed on the
viewing surface. This can be done in the projector menu under projection settings.
Volume Controls
There are 2 ways to control the volume on your system! We’ve found this is the best place
to start!
1. Make sure the volume is all the way up on the projector! The sound leaves the projector
and goes out to the speakers. So, if you don’t have sound, it’s probably down all the way
on the projector.
2. Set your speaker volume to a quarter on the back of the active speaker to start. You
can always adjust it later but it’s best to start there, so you aren’t startled by the sound!
You can always crank it up!
Amazon Fire Stick
We recommend you set Up your Fire Stick beforehand inside on a TV. Log Into all your
apps and connect to your Wi-Fi so it’s ready to go when you want to stream content!
Using Other Media Sources
You can use any media that connects with and HDMI cord! Try out video game systems,
laptops, phones, cable, anything!
Check us out on our website or social media
for more helpful videos and downloads!

952-513-7764
www.outdoortheatersystem.com
info@outdoortheatersystem.com
Table of contents
Other Outdoor Theater Systems Speakers manuals