Ouvis VZ1 User manual

Ouvis VZ1 Camera Installation Manual
Product View
Package Contents
Smart Home Wireless IP Camera VZ1 * 1, Installation Manual * 1,
Bracket * 1, Power Adapter * 1, Screws Package *1, Ethernet Cable * 1,

Environment Requirements
A, WiFi router is mandatory to have,router must support 2.4GHZ WiFi Network(The camera
only support 2.4GHZ WiFi network), and the router already connects to internet;
B, The Smartphone or PC , which you want to use to configure the camera, already connects
to your WiFi router;
C, Router enables DHCP server (most of routers run DHCP server by default);
D,Make sure these is no such restrictions on your WiFI router or in your LAN:
-MAC address access restriction (e.g. MAC address white list or MAC blacklist)
-firewall settings to not allow device in internal network to access internet or similar
settings
If there is such restrictions, you should know how to configure your WiFi router or firewall
to allow the camera get IP address and access the internetIf you are not clear about this,
please refer to your WiFi router manual or support.
Installation
Initial installation with smartphone, goto 1-1;
Initial installation with PC, goto 1-2;
Add installed Camera with smartphone, goto 1-3;
Add installed Camera with PC, goto 1-4;
1-1, Initial installation with smartphone
Step1 Install APP on your smartphone
-If you are using Android smartphone, download “NetCam”App on Google Play and install
the App in your Android smartphone.
-If you are using iPhone or iPad, download “NetCam”App on Apple App Store and install
the App in your iPhone or iPad.
Step2 Find your camera by the wire network
a)connect the camera to your wireless router with the Ethernet cable included in the camera
box;
b)Plug the power cord to the camera, power on the camera with the power adapter included in
the camera box;
c)wait a minute, the camera will run up;
d)Make sure your smartphone connects to same router via WIFI. Open the smartphone App,
Click “Add Device”menu, Then click “Search Device in Lan”(Android)/”LAN search(iOS)”;

e)Click the camera device found by the App (the “Done”button), Then the camera would be
added to device list, you can view the camera‟s living video via wire network now;
Step3 Configure the WiFi network from smartphone
a)Click the camera‟s setting icon button (the icon like gear), go into “WiFi Setting”;
b) Click “WiFi manager”to search WiFi network nearby;
c)Choose the WiFi network of your wireless router, Input your WiFi password. Make sure
you input the correct WiFi password.
d)After you complete the camera WiFi setting, Camera will reboot automatically. Now you
can pull out the Ethernet cable. Wait the camera connects to the router by WiFi,it usually
takes about 1-3mins.
Note: If you find the camera doesn't go online via WIFI, please do the procedure from Step2
to Step3 again. And please pay attention to the WiFi password input in Step3 is correct.
1-2, Initial installation with PC
Step1 Install PC software
You can download the PC software from the two links blow:
http://www.ouvis.online/upload/file/NetCam.exe
http://www.netcam360.com/download/netcam_beta.exe
Install the PC software when download is completed.

Step2 Find your camera in the wire network
a) Connect the camera to your wireless router with Ethernet cable included in the camera box;
b) Plug the power cord to the camera, power on the camera with the power adapter included
in the camera box;
c) wait a minute, the camera will run up;
d)Run the PC software by double click the “NetCam”icon(you should run as
Administrator or PC account with administrator right).Click “+”button on the right-top
menu, then click “Search" button;
e)Double click the camera device you searched, Then edit the camera information, Now the
camera would be added to device list
f)You can see the camera‟s living video via wire network now via drag the camera to the
video window;
Step3 Configure the WiFi network
a) Click the camera‟s setting icon button (the icon like gear), go into “WiFi Setting”;
b) Click “Search”button to search WiFi network nearby;
c) Choose the WiFi network of your wireless router, Input your WiFi password.Make sure
you input the correct WiFi password.

d)After you complete the camera WiFi setting, Camera will reboot automatically. Now you
can pull out the Ethernet cable. Wait the camera connects to router by WiFi,it usually takes
about 1-3mins.
Note: If you find the camera doesn't go online via WIFI, please do the procedure from Step2
to Step3 again. And please pay attention to check you input the correct WiFi password in
Step3.
1-3, Add installed Camera with smartphone
Prepare:
a)Make sure your camera is online;
b)Make sure the smartphone App is installed;
Step1 Open the smartphone App, Click “Add Device”menu, Then click “Search
Device in Lan”;
Step2 Click the camera device you searched(the “Done”button), Then the camera
would be added to device list, you can use the camera now;
1-4, Add installed Camera with PC
Prepare:
a), Make sure your camera is online;
b), Make sure the PC software is installed;
Step1 Double click “NetCam”icon to open the PC software (you should run as
Administrator or PC account with administrator right). Click “+”button on the
right-top menu, Then click “Search button”;
Step2 Double click the camera device you searched, Then edit the camera
information, Now the camera would be added to device list
you can see the camera’s living video via wire network now via drag the
camera to the video window;

Troubleshooting
T-1: If you cannot find the camera after you connect router and camera with the wire Ethernet
cable, check below:
A, Make sure you are using the correct software( NetCam App or Netcam PC Software);
B, Make sure your router allows the camera‟s MAC address or no other relative firewall
limits on the router;
C, Make sure your router runs DHCP server, so the camera can get ip address
automatically;
T-2: If prompted user or password error when trying to configure the camera after searching
the camera successfully (default user is admin, default password is none(needn‟t input any
character)), check below:
A,Make sure you input correct user name and input correct password;
B,Wrong password indeed, there are two possible reasons:
1)You have configured it before and forget the user name or password;
2) All the camera are checked during manufacturing by factory QC. However, in a very
low chance, the camera has not been set back to normal default settings after QC
testing. In this case, you can reset the camera to normal default settings, you can refer
to "ouvis vz1 reset" video in youtube.com--typing "ouvis" to search in youtube. Or use
this link:
https://www.youtube.com/watch?v=4N-mWBld_OE
T-3: If always prompted “timeout” or “offline”, after you setting the camera‟s WiFi
configuration and rebooting the camera, check below:
A, Make sure you have waited one minute to make the camera fully rebooting after you
configure the WiFi setting. You can even unplug the power cord and plug again.
B, Make sure you select the correct WiFi network (SSID) and input the correct WiFi
password. If you select the wrong WiFi Network, camera will fail to join the WiFi network.
C, Make sure your router allows the camera‟s MAC address connecting to internet or no
other relative firewall limits on the router;
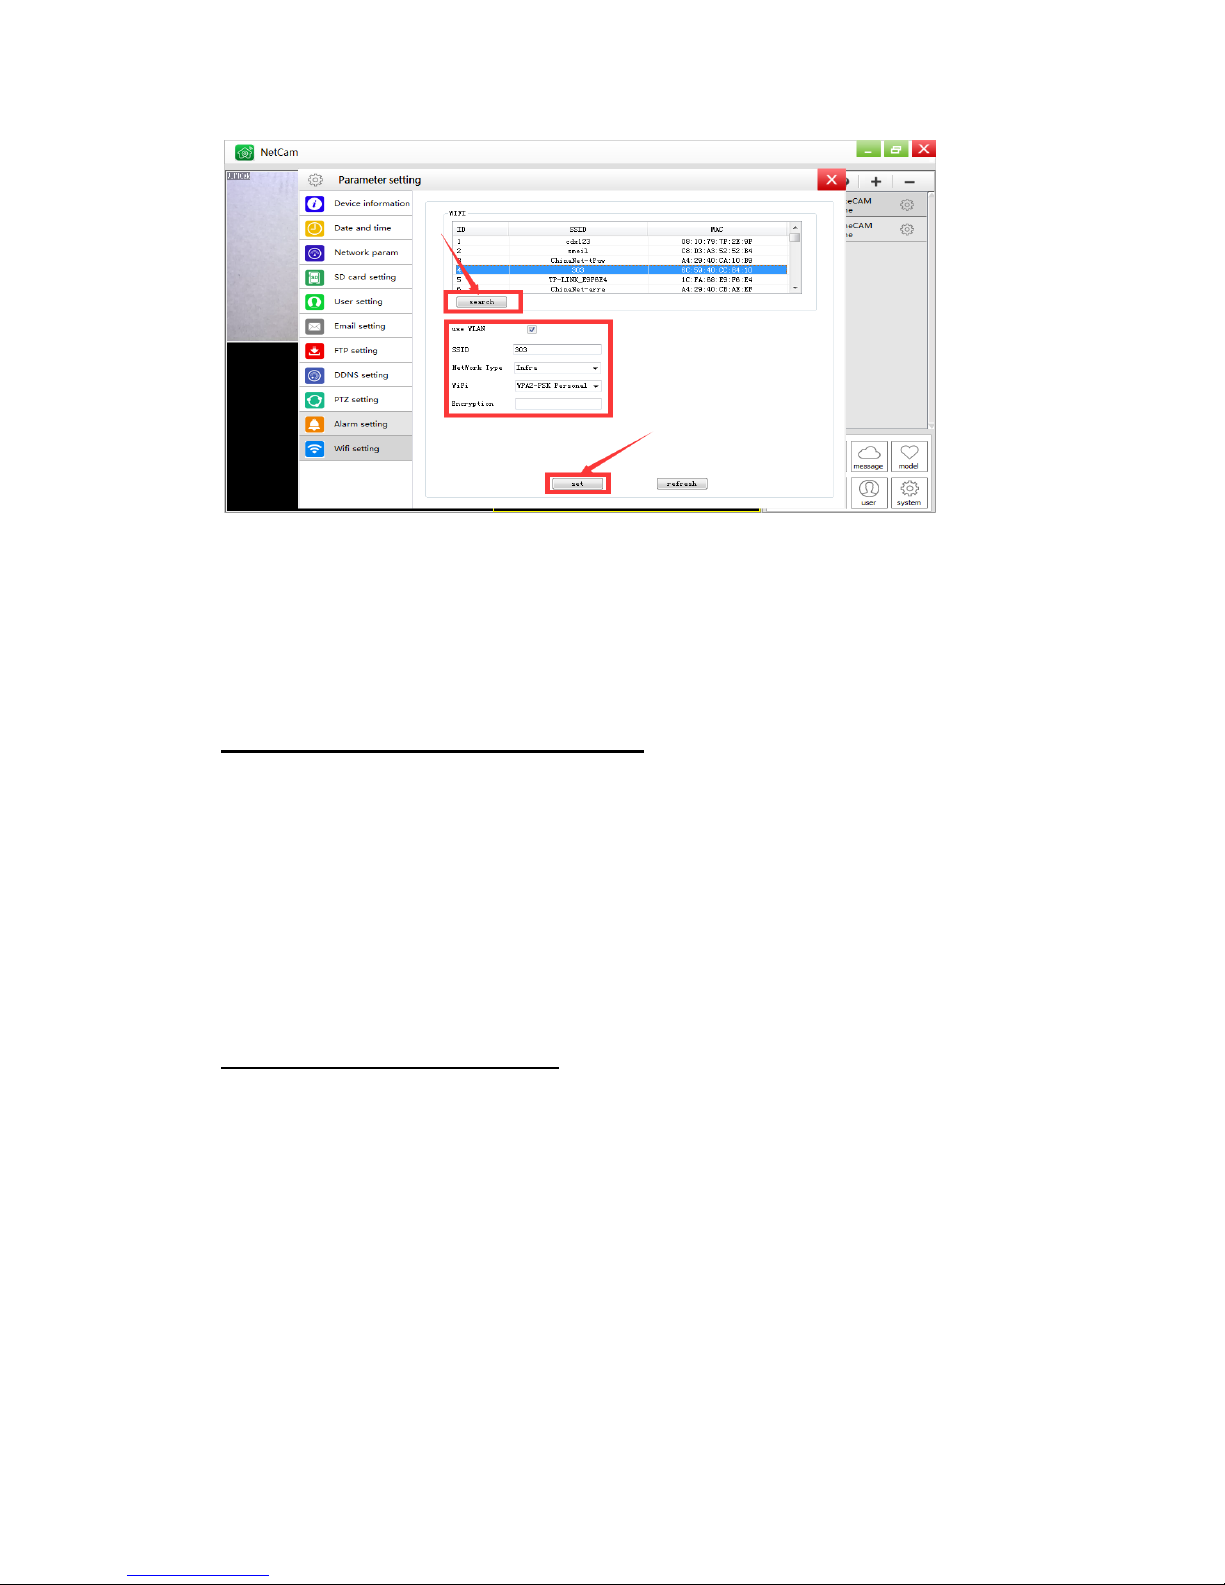
D, Inconsistent of the WiFi encryption protocol negotiation between router and camera.
You can use the PC software to configure the WiFi setting again and verify whether the WiFi
security encryption way is the same as your router, like the picture below:

E, Make sure the WiFi password of your router is consist of normal characters(„a‟~‟z‟,
„A‟~‟Z‟, 0~9,‟-‟).
T-4: Why sometimes it prompted “timeout” or “offline”, when you want to watch the living
video of camera:
A: Smartphone reasons: 3G/4G signal not good sometimes; No enough WiFi network
authority;
B: Signal obstacle between router and camera: different floor; metal baffle, electromagnetic
oven, microwave oven, etc.; Continuously human activity near router;
C: Server high load, need several times to connect;
How to solve:
A: optimize router: raise router power; Make sure SSID to be unique; reduce interference
source;
B: Test the signal performance of camera using smartphone, Test the Dbm signal value using
smartphone nearby camera, if the value is between -35 ~ -65dbm, contact our customer care.
If between -75 ~-90 dbm, please change the camera‟s location to a better location;
C: Try several times

Appendix
Demo video
-Initial Setup Ouvis VZ1 by Mobile APP:
https://www.youtube.com/watch?v=26sU2_t_W1g
-Initial Setup Ousis VZ1 by PC Software
https://www.youtube.com/watch?v=D-J5H6FEeec
https://www.youtube.com/watch?v=d1CSUf0_heA
-Reset Ouvis VZ1 to recover to factory initial configuration:
https://www.youtube.com/watch?v=4N-mWBld_OE
More Functions Manual:
http://www.ouvis.online/fqa.html
About Alert setting: http://www.ouvis.online/showfqa/9.html
About record setting: http://www.ouvis.online/showfqa/10.html
Important Notes:
Our website is www.ouvis.online
Tech support email:
no.1.servicecenter.u[email protected]
Table of contents