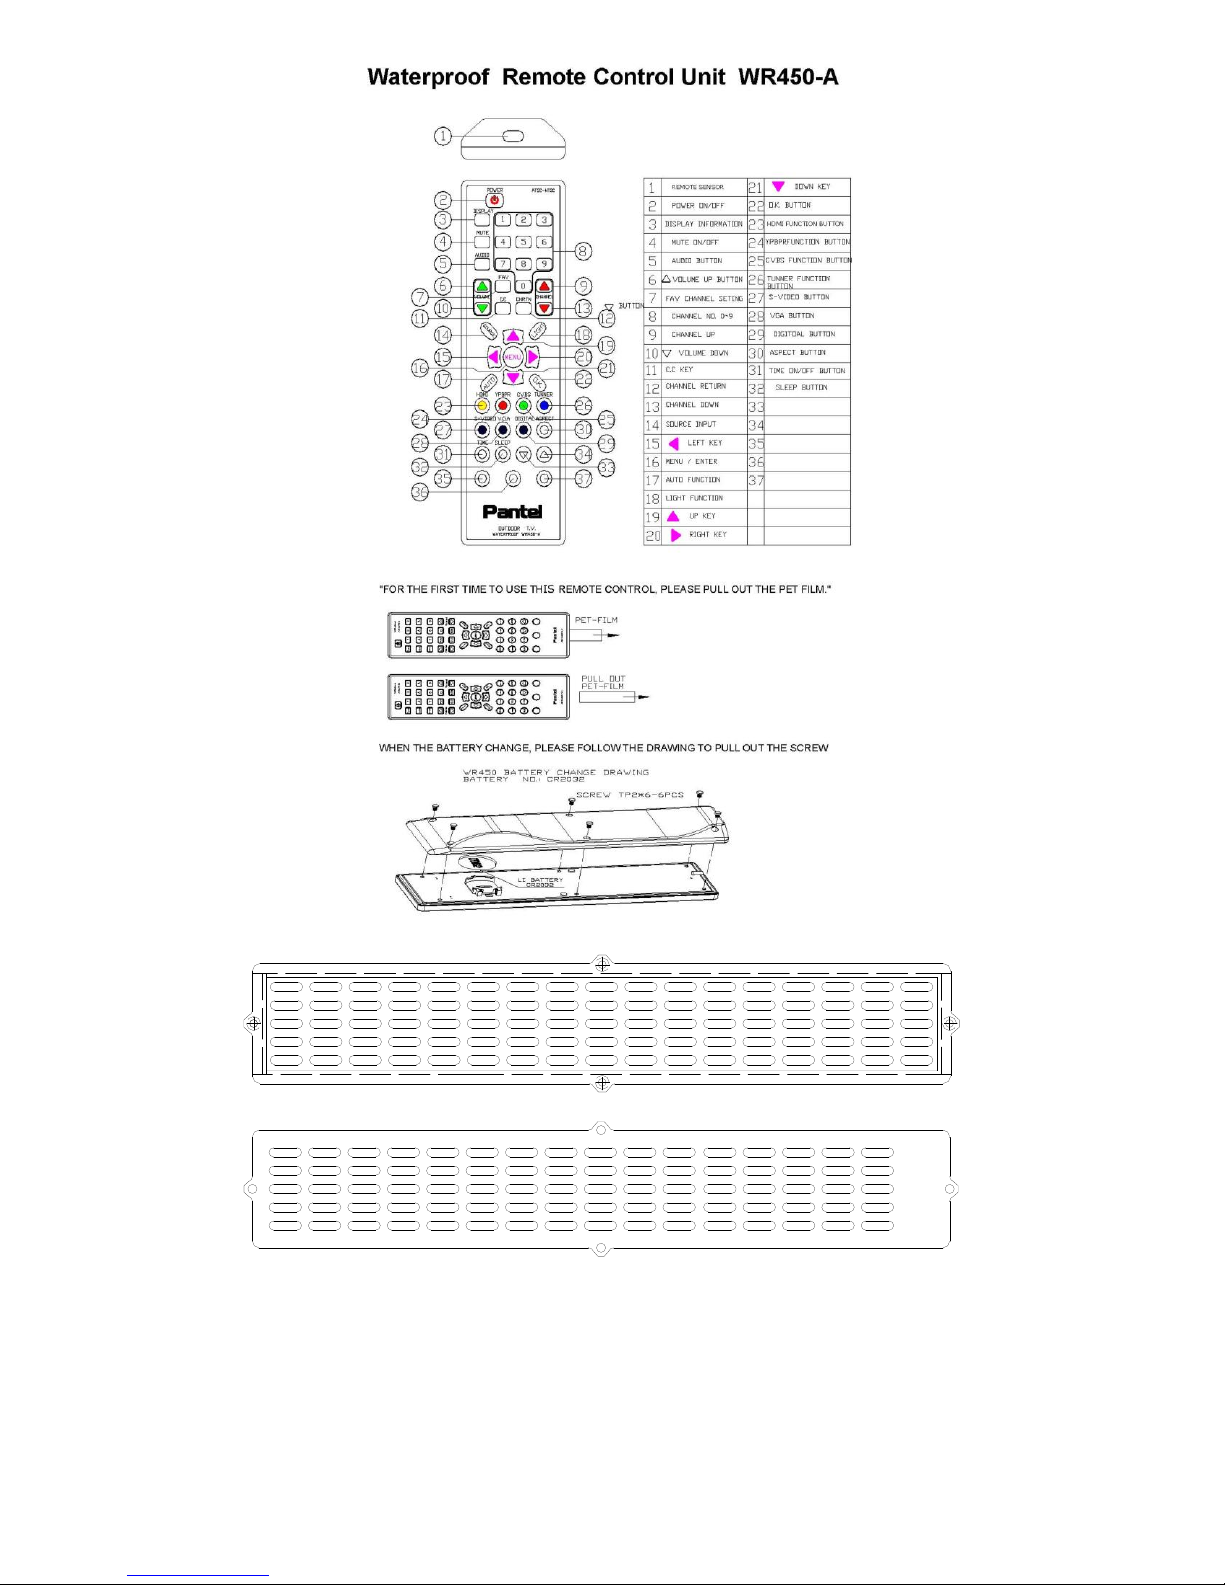
Pantel PAN421 User manual

OUTDOOR HDTV
LCD TV User Manual
PAN201/PAN321/PAN421/PAN521/PAN651
ATSC/NTSC Series Operation Manual
To reduce the risk of fire or electric shock, do not expose this product to severe
heat or submerge underwater. To aid reporting in case of loss or theft, please
record the TV’s model and serial numbers and keep in a safe place.

1
Table of Contents
Important Safety Instructions…………………………………………………………………………………………… 2
Supplied Accessories………………………………………………………………………………………………………… 2-3
Key Features..…………………………………………………………………………………………………………………… 4
Key Functions & Support………………………………………………………………………………………………….. 5
Getting Started (How to Connect)……………………………………………………………………………………. 6-9
On-Screen Display (OSD) Operations……………………………………………………………………………….. 10-18
Optional Accessories………………………………………………………………………………………………………… 19-20
Frequently Asked Questions…………………………………………………………………………………………….. 21-22
Troubleshooting……………………………………………………………………………………………………………….. 23
Basic Care and Maintenance……………………………………………………………………………………………. 24
Pantel Warranty………………………………………………………………………………………………………………. 25-27
Contact Information…………………………………………………………………………………………………………. 28

2
Important Safety Instructions
Electricity is used to perform many helpful functions, but it can also cause personal injuries and
property damage if improperly handled. This product has been engineered and manufactured
with the highest priority on safety. However, improper use can result in electric shock or fire. To
ensure your safety and prevent potential danger, please read the following precautions prior to
using this product.
Read these instructions.
Heed all warnings.
Do not use this TV near any heater.
Do not modify or alter the polarized or grounding-type plug in any way, shape, or form.
Protect the power cord from being walked on or pinched, especially at the plug.
Only use attachments/accessories specified and/or provided by Pantel Corp.
This TV should be operated only from the type of power source indicated on the
manual/marking label.
Never push objects of any kind into this product through openings
Supplied Accessories
Pantel TV
Remote Control
Operation Manual
*NOTE: No stand/mount is included with your Pantel TV. Contact a Pantel Dealer for a
mounting solution.

3
PLEASE CLEAN THE AIR FILTERS EVERY 6 MONTHS. ON THE BOTTOM OF THE HOUSING YOU
WILL FIND THE FILTERS. SIMPLY UNSCREW THE TWO SCREWS AND WASH THE FILTERS WITH
WARM WATER. ALLOW TO DRY BEFORE REPLACEING.
DO NOT USE SOLVENTS OR ANY OTHER CLEANING SOLUTION TO CLEAN THE AIR FILTERS.

4
Pantel Key Features
IP 56 Rating : Guards against dust and
strong jets of water.
Anti-Reflective Glass: Helps reduce glare
and reflection for easy viewing in direct
sunlight as well as protect the LCD from
being damaged by sunlight.
Tempered Glass : For added security.
Sealing Gasket : Additional protection
against water and dust ingression.
Marine Speakers : Can be sprayed
directly without any issue.
Rear IR Sensor: Used for control
systems with IR emitters
Auto Brightness Photocell : Allows for
the television to brighten or dim
depending on the brightness levels in
the surrounding environment.
Touch Button Panel : Secondary way of
changing channels, volume, and
settings.
Powder-coated Aluminum Chassis :
Light-weight, durable, and resistant to
rust.
High-brightness Panel : Allows for
viewing during the day.
Resolution PAN200/320 : 1366 x 768
Resolution PAN420/520/650 : 1920 x
1080.
Ventilation/Cooling System : Helps to
regulate the internal temperature, thus
keeping the viewing conditions in an
optimal state.
Protective Coating on Electrical
Components : This proprietary coating
covers the chip board and thus helps to
protect the internal components of it
against accidental water ingression as
well as extreme cold.
Filter System : Prevents the ingression of
dust as well as water vapor.
Internal Thermostat : Activates the
cooling system at 104 degrees and shuts
down at 86 degrees F as long as the TV
is plugged in (regardless of whether TV
is turned on or off).
VESA Standard Mounting System :
enables the consumer to use any VESA
standard mount that they choose.
Recessed and Covered Inputs :
engineered to keep inputs dry.
Chassis Engineered Specifically to
protect against All-Weather.

5
Pantel Key Functions and Support
AC Power Input: AC 100~240V 50~60Hz 5A max
Standard Definition / High Definition Signal Capabilities
-Composite interface can support 480i
-S-Video interface can support 480i
-Tuner interface can support 480i, 480p, 720p, and 1080i. All ATSC Modes
-Component interfaces can support 480i, 480p, 720p, 1080i, and 1080p
-HDMI interface can support 480i, 480p, 720p, 1080i, 1080p and DVI input resolution
-VGA interface can support VESA standard
VGA DPMS function supported
Preferred digital audio channel selection
Brightness, contrast, color, tint, sharpness, and color temperature control
3D COMB filter support
3:2 Pull Down
Stretch of 4:3 to 16:9 aspect ratio
Internal speaker: 10W @ 8 ohms X 2
Multi-language supported for OSD: English, Spanish, French
Program channel auto scan / manual settings
Automatically detect digital or analog signal without user prompting
Video source selection
Parental control (TV rating and MPAA rating) for USA and Canada
Open V-Chip / Dynamic rating feature supported
Closed-caption support (CEA608B and CEA708B)
Sound output volume control
Analog Audio MTS (BTSC) supported (SAP supported)
Full function remote control
Sleep Timer (up to 240 minutes)
Color Temperature Modes: Cool, Warm and Normal
VGA / DVI Supported Modes (VESA Standard Mode Only):
Resolution fV (Hz)
1024 x 768 60
1280 x 768 60
1280 x 1024 60
1366 x 768 60
1920 x 1080 60
1920 x 1200 60

6
Getting Started
With your New Pantel TV
1. Input and Output Interfaces
2. Side Button Controls
Vol Down, Vol Up, Chan Down, Chan Up, Source, Menu, Power
3. Connecting the TV
- NOTE: The Pantel TV may take up to 10 seconds to start up.
- There are various ways of setting up the Pantel Outdoor weatherproof TV. Make sure that
the TV power is turned off when connecting any cables.
Tuner (Coaxial Cable)
- Connect the coaxial RF cable from your cable box or antenna to the Tuner port in the back
of the TV.
- Turn on the TV.
- Select the Tuner source using either the remote control or the side button controls.
- Using the on-screen display, perform a channel scan.
- NOTE: Using this input source, the TV will receive any standard- or high-definition, over-
the-air channels.
- This input accepts the following formats: NTSC, ATSC-VSB, QAM64 and QAM256.
- A 3D-COMB filter is applied when the TV is detected in NTSC mode.

7
- Brightness, contrast, color, tint, sharpness, and color temperature are controlled in analog
NTSC and digital mode separately.
- The TV will automatically detect NTSC, VSB, QAM64, and QAM256 modes.
Composite (Red, white, & yellow cables)
- Connect the composite (yellow, red, and white) cables from any source with
corresponding outputs to your Pantel TVs composite RCA ports on the rear of the unit.
- Turn on the TV.
- Select the composite source using either the remote control or the side button controls.
- RCA jack (yellow) accepts composite video input format.
- 2 RCA jacks (color-coded: white and red) accept Audio L/R input.
- 3D-COMB filter applied.
- Brightness, Contrast, Color, Tint, Sharpness, and Color Temperature control.
*May utilize either Composite or S-Video inputs, but not both simultaneously
S-Video (S-Video Cable + Red & White cables)
- Connect S-Video cable from any source with a corresponding output to your Pantel TV’s S-
Video port on the rear of the unit.
- Connect the Red and white RCA cables from the source to your Pantel TV’s red and white
audio ports within the S-Video bay.
- Turn on the TV.
- Select the S-Video source using either the remote control or the side button controls.
- S-Video jack accepts Y-C video input format.
- 2 RCA jacks (color-coded: white and red) accept Audio L/R input.
- Brightness, Contrast, Color, Tint, Sharpness, and Color Temperature control.
*May utilize either Composite or S-Video inputs, but not both simultaneously
Component 1/Component 2 (Red, Green, & Blue cables + Red & White cables)
- Connect the component (red, green, and blue) RCA cables from any source with
corresponding outputs to your Pantel TV’s component ports on the rear of the unit.
- Connect the Red and White RCA cables from the source to your Pantel TV’s red and white
audio ports within the Component bay.
- Turn on the TV.
- Select the Component source using either the remote control or the side button controls.
- 3 RCA jacks (color-coded: green, blue, and red) accept 480i, 480p, 720p, and 1080i input
formats.
- 2 RCA jacks (color-coded: white and red) accept Audio L/R input.
- Brightness, Contrast, Color, Tint, Sharpness, and Color Temperature control.
- Automatic black and white level adjustment.
HDMI 1/HDMI 2 (HDMI Cable)
- Connect the HDMI cable from any source with a corresponding output format to your
Pantel TV’s HDMI port on the rear of the unit.
- Turn on the TV.

8
- Select the HDMI source using either the remote control or the side button controls.
- NOTE: If “invalid format” displays on the screen, the source output needs to be changed.
Consult the source manual for instructions on how to change the output format to 1080i
(recommended) or 720p as the maximum output resolution.
- HDMI type-A jack accepts HDMI (480i, 480p, 720p, 1080i, & 1080p input format) input or
DVI (PC mode) input. HDMI input mode will support 480i, 480p, 720p, 1080i, & 1080p
modes at a minimum.
- When in PC mode, Auto-Sync without cropping, all resolutions (depends on VESA standard
and up to 1920 x 1200), all vertical refresh rates (from 56Hz to 75Hz).
- The preferred resolution and timing would be 1360 x 768 @ 60Hz. Other resolutions would
do scaling to fit the whole video onto the whole screen or keep the aspect ratio when in
PC mode.
- PC inputs (both VGA and DVI) should be displayed either 1:1 mode centered on the screen,
scaled to either full height or full width of the screen with aspect ratio preserved, or
scaled to fill the full screen with aspect ratio not preserved. In all cases, there should be
no over-expansion of PC modes.
- Brightness, Contrast, Color, Tint, Sharpness, and Color Temperature control.
VGA (15-pin D-sub VGA cable + red & white RCA cables)
-NOTE: Be sure that both TV and Computer are in off mode when cables are connected.
- Connect a 15-pin D-Sub VGA cable (not provided) to the VGA output port of your PC as
well as to the VGA port on the rear of your Pantel TV.
- Connect the red and white RCA cables to your PC’s audio out ports and to the VGA/audio
ports on the rear of your Pantel TV.
- Turn on your Pantel TV.
- Turn on your PC.
- Using either the remote control or the side button controls, select the VGA source.
- NOTE: If there is no picture, refer to your PC’s settings and use the preferred resolution at
1360 x 768 @ 60Hz.
- 15-pin D-SUB jack accepts VGA signal input or color component (480i, 480p, 720p, 1080i
input format) input.
- OSD can switch to VGA input mode or color component input mode.
- Select VGA signal input, Auto-Sync without cropping, all resolutions (depends on VESA
standard and up to 1280 x 1024), all vertical refresh rates (from 56Hz to 75Hz).
-Auto-Sync functions with DMT, GTF, CV, and CV RB timings.
-The system cannot be table driven.
-The preferred resolution and timing are 1360x768 @ 60Hz. Other resolutions will scale to
fit the whole video onto the whole screen or keep the aspect ratio when in PC mode.
-PC inputs (both VGA and DVI) should be displayed either 1:1 mode centered on the screen,
scaled to either full height or full width of the screen with aspect ratio preserved, or
scaled to fill the full screen with aspect ratio not preserved. In all cases there should be no
over-expansion of PC Modes.
-Brightness, Contrast, Color, Tint, Sharpness and Color Temperature control.

9
RS-232
This is the commercial control COM Port and is only used in commercial applications.
4. Outputs: Audio Only
* There are two outputs to send audio from the Pantel TV to another source
Digital Audio Out –Connect orange RCA cable from the back of the TV to any audio receiver
Speakers Out –Connect speaker wire from speaker jacks on rear of TV to any speakers with
available speaker wire inputs. Pantel TV speaker output is 10 watts x 2.
*NOTE: Sound may be distorted if using high wattage speakers. It is recommended that an
amplifier be used in such cases.

10
On-Screen Display (OSD) Operations
Picture
Option
Description
Picture mode Settings
Adjust the picture setting : Standard/Dynamic/Personal
Contrast Setting
Select the display 0~100.
Brightness Setting
Select the display 0~100.
Color Setting
Select the display 0~100.
Tint Setting
Setting the display -50~+50.
Sharpness Setting
Setting the display 0~100.
Color Mode
Adjust the Color Setting : Normal/Warm/Cool

11
Audio
Option
Description
Sound Mode
Setting the Audio mode: Standard/Music/Movie/Personal
Bass Setting
Select the display 0~100.
Treble Setting
Select the display 0~100.
Balance Setting
Select the display 0~100.
Surround Setting
Setting the display off / on.
AVC Setting
Setting the display off / on.
SPDF Type
Setting the display PCM / RAW

12
Time
Option
Description
Sleep timer
Adjust the display : off / 5min ~240min
Time Zone Setting
Pacific/Alaska/Hawaii/Eastern/Central/Mountain
Daylight Saving Time
Select the display off /on
Clock Setting
Auto

13
Refer to next page for more on Setup

14
Setup
Option
Description
Menu Language
English / French / Spanish
Transparency setting
Select the display off / on
Zoom Mode Setting
Normal/Wide/Zoom/Cinema
Noise Reduction
Off /Weak/Middle /Strong
Closed Caption Setting
CC mode on / off / CC on mute
Misc Setup Setting
XVS on/off.
Restore Default
Reset to default Value form Factory setup

15
Setup for Closed Captioning, select for on or off

16
Set your own password and use this password to lock your TV.

17
Channel
Option
Description
Air / Cable Settings
Select the Air/ Cable
Auto Scan Setting
Select the Cable system Auto/STD/IRC/HRC
Favorite Setting
Select the FAV Channel
Show Hide Setting
Select the display Channel on/off

18
Select the input that you would like to use by pressing the Source key. Use the up/down cursors
to highlight the input source and then press select.

19
Optional Accessories
CL-1360 Ceiling Mount (PAN320/420)
(PAN321/421)
WR-6015 Wall Mount (PAN320/420/520)
(PAN321/421/521)
GS-350
Mobile Floor Stand (PAN320/420/520)
(PAN321/421/521)
This manual suits for next models
1
Table of contents
Other Pantel HDTV manuals