Parrot ZIKMU SOLO User manual

Quickstart guide
Guide d'utilisationrapide

Parrot Zikmu Solo
................................................................. 8English
................................................................. 37Français
................................................................. 64Español
................................................................. 91Deutsch
................................................................. 117Italiano
................................................................. 144Dutch

3

4

5

6

7

8 English
Quick start guide
About this guide
In order to limit our paper consumption and as part of our environmentally friendly
andresponsible approach, Parrot prefers to put user documents online rather than
print them out. This simplified guide to the Parrot Zikmu Solo is therefore limited
to providing you with the main instructions that will make it easy for you to use the
device. More information can be found on the support section of our website,
www.parrot.com: the full manual, FAQs, tutorials, and more.
Contents
Getting started
iPod®
Wi-Fi®
Bluetooth®
Jack
Troubleshooting
General information
p.10
p.13
p.15
p.20
p.23
p.24
p.26

English 9

10 English
Getting started
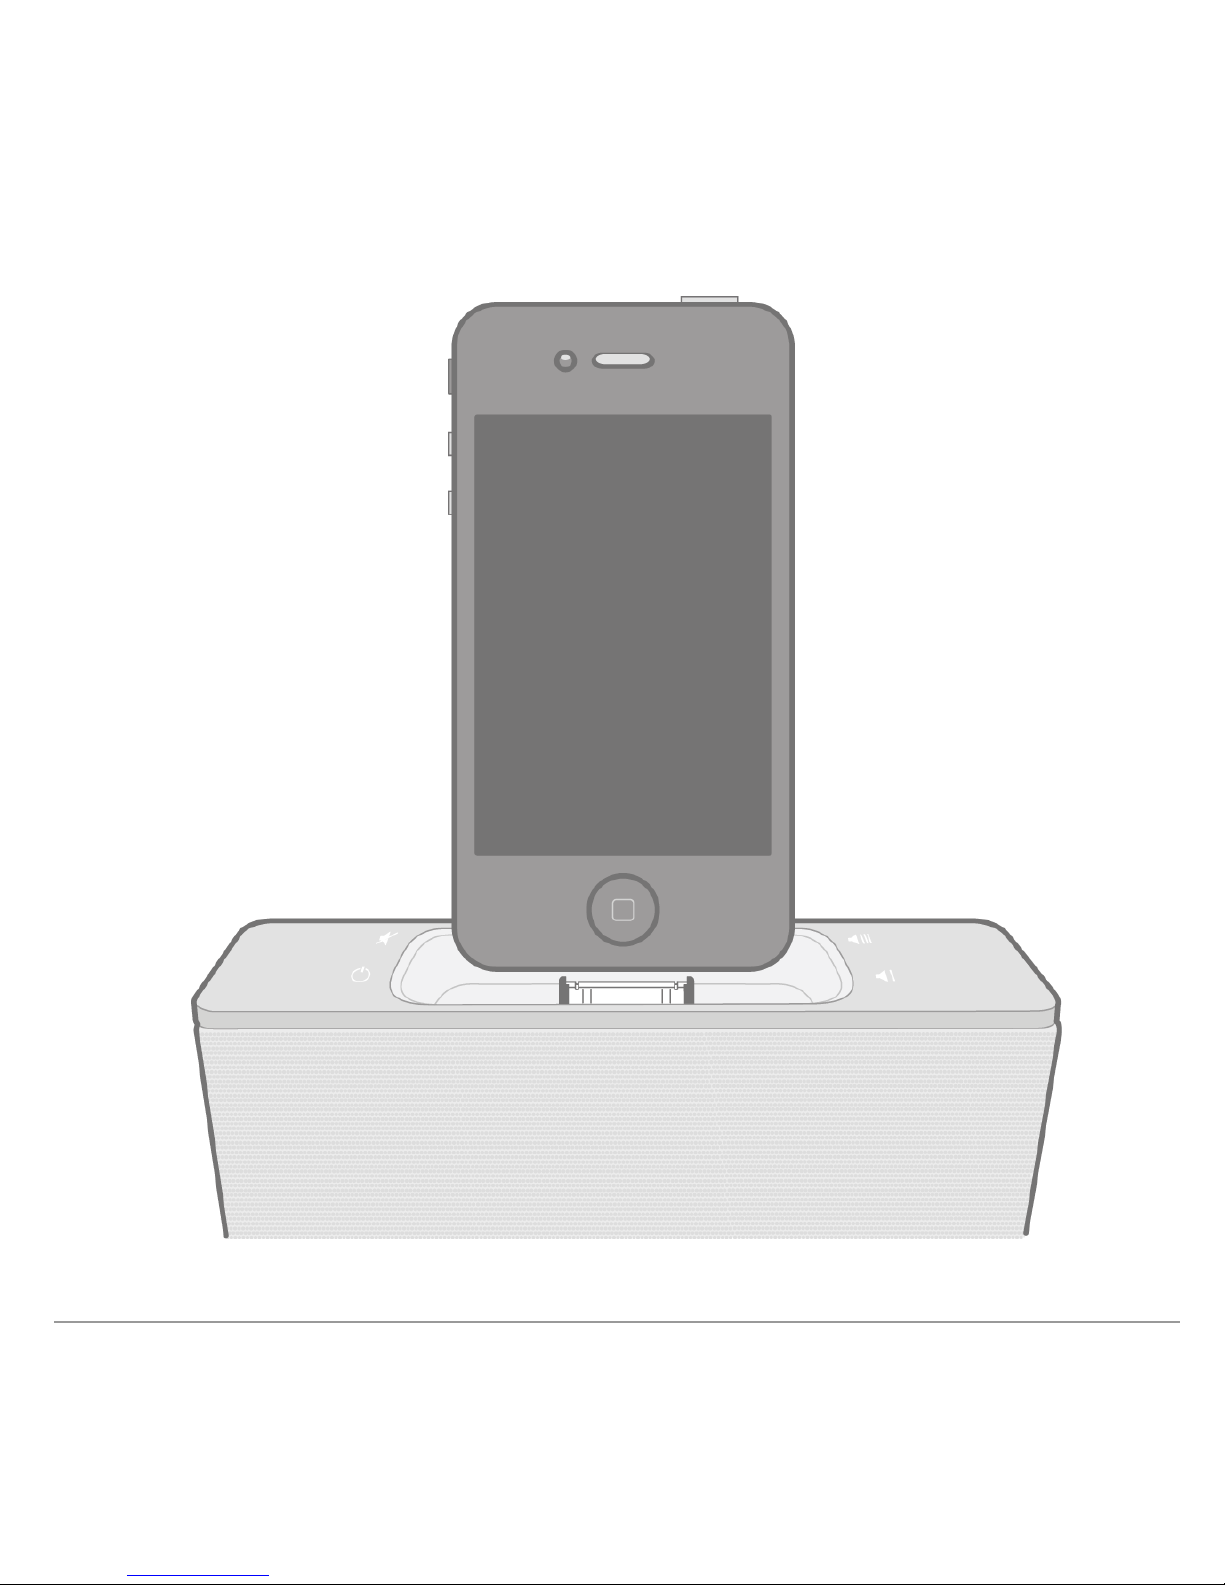
Note : To make this guide easier to read, the iPod touch® and iPhone® (in music
mode) shall be designated by the term "iPod" in this manual. Compatible telephones
or tablet PCs shall be designated by the term "Smartphone".
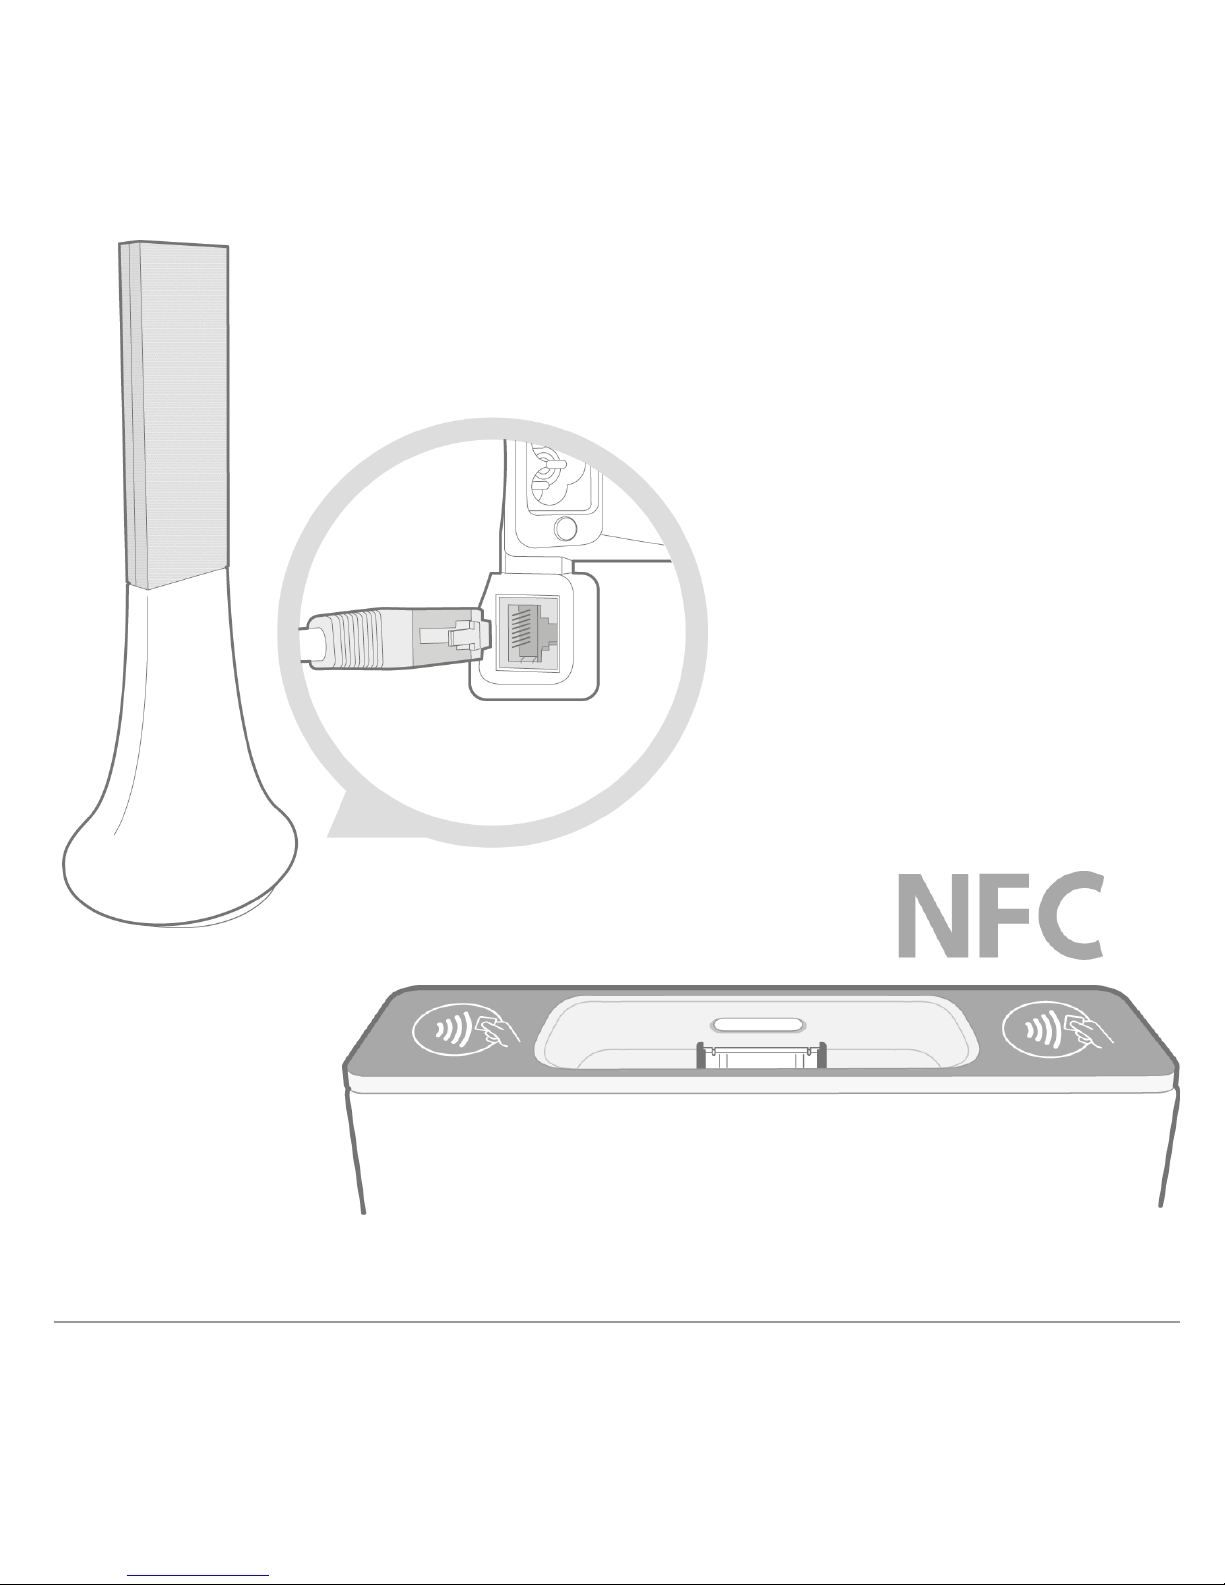
Connectionto mains supply
Plugthe speaker into an electrical outlet using the provided power cable (diagram
p.4).
>The speaker turns on automatically. The icon blinks for a few seconds then
becomes steady.
Remote control
Insert the provided remote control battery into the specific battery compartment
(diagram p.4).
Note: Use only a CR2032 battery.

English 11
Turningthe Parrot Zikmu Solo on/ off
Press the button of the remote control or control panel to turn the speaker on /
off.
Removingthe front grid
The Wi-Fi,
Bluetooth
and Reset buttons are accessible by removing the magnetic
Parrot Zikmu Solo front grid (diagramp.5).

12 English
Button
Function
Short press: Establish Wi-Fi connection with a modem /
router supporting WPS technology (refer to the Wi-Fi >
Connection with WPS section).
Longpress : Reset Wi-Fi and Ethernet parameters.
Short press: Make the Parrot Zikmu Solo visible via
Bluetooth
. Press this button before connecting a
Bluetooth
device to the speaker for the first time (refer to the
Bluetooth > Connection section)
.
Long press : Delete all pairings (except the one of the
currently connected device).
Reset
Longpress: Reboot the speaker.
Note: For a long press, you must keep the button pressed down for at least 5 seconds.
Selecting anaudio source
The Parrot ZikmuSolo allows you to use several types of audio sources: computer
connected via Wi-Fi, computer or Smartphone connected via
Bluetooth
, iPod/
iPhone, analogue audio player, TVor DVD player with an optical audio output.
Press the SOURCE button of the remote control to switch among the active audio

English 13
sources.
If you start playing a music file from a second source, this source is automatically
selected. The music currently played from the first source is automatically
suspended except if the first source is an analogue audio player connected via a
Jackcable.
Controlling the volume
Button
Function
Increase the volume.
Decrease the volume.
Mute the speaker / Stop the source*
*: This function marked with an asterisk is only available if you use the Parrot Zikmu
Solo with controllable sources(iPod, Bluetooth, UPnP, Samba).

14 English
iPod
Note : Refer to the Parrot Zikmu Solo support page for more information about the
compatible iDevice models.
Using the dockadapter
Two dock adapters provided with the Parrot Zikmu Solo allow you to use the
speaker with iPhone 3/3GS/4 & 4S. To use the Parrot Zikmu Solo with another
iDevice, use the dockadaptor supplied with the iDevice.
To insert the dockadapter:
1. Position the adapter above the connector.
2. Insert the front part with the tabs.
3. Lockbypressing the bottom part.
Note: The dock cover dust cap supplied with your Parrot Zikmu Solo protects your
dock from dust. Remove it when you want to connect your device.

English 15
Connectingthe iPod
Once the dockadapter is inserted on the speaker:
1. Unplugthe earphones from your iPod.
2. Connect your iPod to the speaker (diagram p.6).
>The iPodbattery charges until it is fully charged.
>You can now browse for atrack on your iPod.
Using the application
Login to the App StoreSM or Google Play
®
and download the free
Parrot Audio Suite application.
This application will allow you to:
control the playback of your audio files
modifyseveral audio settings
checkwhether anew update is available
connect the speaker to your Wi-Fi networkeasily.
Refer to the Settings section for more information.

16 English
Wi-Fi
Before youbegin
You can stream music via Wi-Fi to the Parrot Zikmu Solo from any computer with
the following operating systems : Windows® XP (SP2 or SP3), Windows Vista®,
Windows®7, Windows 8 and MacOS X 10 (and later versions).
To stream music via Wi-Fi on the Parrot Zikmu Solo while keeping an Internet
connection, you need to have a wireless access point and to connect the Parrot
Zikmu Solo to your Wi-Fi network. If you do not need an Internet connection on the
computer you are using with the Parrot Zikmu Solo, you can simply connect it to the
Wi-Fi network generated bythe Parrot Zikmu Solo: SoloNet-xx.xx.
Note : The performance of the Parrot Zikmu Solo depends highly on the performance
of your modem / router. The sound quality of the Parrot Zikmu Solo may be affected if
there is an obstacle or a wall between the speaker and your modem / router.
Reposition your speakers if necessary.
There are several ways to connect the Parrot Zikmu Solo to your Wi-Fi network.
The detailed connection procedures are available on the Parrot Zikmu Solo
complete user guide on our website www.parrot.com.

English 17
Connectionwith WPS
WPS (Wi-Fi Protected Setup) technology allows you to establish a secured
connection between several Wi-Fi devices simply bypressing abutton.
Connection with an RJ45 cable
Note: The RJ45 cable, also known as a network cable or Ethernet cable, is not supplied
with the Parrot Zikmu Solo.
1. Connect your computer to the Parrot Zikmu Solo using an RJ45 cable (Diagram
P.8).
>The white light blinks when the connection is in progress.
>The white light remains steadywhen the connection is established.
2. On your computer, open your web browser and enter http://zikmu-solo.local/
wifi in the address bar.
>The list of available Wi-Fi networks will be displayed.
3. ClickScan and select your Wi-Fi network.
Enter the WEP/ WPA / WPA2key, if it is not greyed out, andthen clickApply.
>The white light blinks when the connection is in progress.
>The white light remains steadywhen the connection is established.

18 English
Connectionwith aniPhone
If you have an iPodTouch 2G (or later version) or iPhone 3(or later version):
1. Login to the App StoreSM and download the Parrot Audio Suite free
application.
2. Dockyour iPhone on the Parrot Zikmu Solo (diagram p.6) or connect it to the
speaker via
Bluetooth
(refer to the Bluetooth section).
3. Launch the Parrot Audio Suite application and press Wi-Fi.
>The list of available Wi-Fi networks will be displayed.
4. Select your Wi-Fi network.
5. Enter the WEP/ WPA / WPA2key if necessary.
6. Press Join.
>The Parrot Zikmu Solo is now connected to your Wi-Fi network.
>The green light located next to this button blinks when the connection is in
progress.
>The green light remains steadywhen the connection is established.
Manual connection
The Parrot Zikmu Solo creates a Wi-Fi network by default (SoloNet-xx.xx). You
can connect your computer or Smartphone to this network in order to connect the
Parrot ZikmuSolo to your Wi-Fi network.

English 19
Note : Ifthe Parrot Zikmu Solo has already been connected to a Wi-Fi network, it will
not create its own Wi-Fi network. To do so, you first need to reset the Parrot Zikmu
Solo Wi-Fi parameters by holding down the button for 6 seconds.
1. On your computer, scan for available Wi-Fi networks.
2. Join the "SoloNet-xx.xx" Wi-Fi network (as if you were trying to establish a
connection with arouter / modem).
Note : You will temporarily lose your Internet access. You can reconnect your
computer to your Wi-Fi network at the end of this procedure.
3. Launch your web browser on your computer or Smartphone and enter http://
zikmu-solo.local/wifi (or http://[new-name].local/wifi if you changed the
speaker name) in the address bar.
4. Clickon Scan and select your Wi-Fi network.
5. Enter the WEP/ WPA / WPA2if necessary then clickon Apply.
Using the webinterface
The Parrot Zikmu Solo web interface allows you to:
checkwhether anew update is available
control the playback of your audio files
modifyseveral audio settings.

20 English
You can access this interface from your computer, Smartphone or Tablet.
1. Connect the Parrot Zikmu Solo to your Wi-Fi network using one of the
previously described methods.
2. On your computer or Smartphone, launch your web browser.
3. Enter http://zikmu-solo.local in the address bar (or http://[new-name].local if
you changed the speaker name).
Note: Ifyou have an Android Smartphone, you must download the Zeroconf Browser
app from Google Play. This application will search for the connection between the
name assigned to the Parrot Zikmu Solo and the IP address. Enter the resulting URL it
provides in the address bar.
Other manuals for ZIKMU SOLO
5
Table of contents
Languages:
Other Parrot Docking Speakers manuals