Peg-Perego Winx QUAD Installation instructions

6
VOLT
FI001001G150
made in italy
Winx QUAD
cod. IGED1150
USO E MANUTENZIONE
IT
USE AND CARE
UTILISATION ET ENTRETIEN
EN
FR
DE
ES
PT
TR
RU
EL
GEBRAUCH UND WARTUNG
BRUGSANVISNING
KÄYTTÖOHJE
BRUKSANVISNING
DA
FI
NO
SV
BRUKSANVISNING
EMPLEOY MANUTENCION
USO E MANUTENÇÃO
KULLANIM VE BAKIM
ЭКСПЛУАТАЦИЯ И УХОД
MSGQGG
SL
UPORABA IN VZDRŽEVANJE
HBsjO¬HL ‘ Hgw¢hkm
AR
Winx Club ™ © 2003-2010 Rainbow S.p.A.All Rights Reserved www.winxclub.com

1 2
456
7 8
121110
13
A
A
A
B3
A
9
A
15
A
1
1
1
2
2
2
3
14
A

18
16
19 20
17
21
22
2625 27
28 29 30
B
A
24
A
B
23

33
B
A
1
2
31
1
2
32
CC
BB

WINX QUAD cod. IGED1150
1
2
3
4
5
6
7
8
SERIAL NUMBER
9
11
11
12
13
14
15
16
17
18
19
20
21
22
23
25
24
26
27
1SPST9162WI
2SPST8521B
3SPST8246RA
4SPST8500RC
5SPST9102GL
6SPMV8258WJ
7SPST8257WJ
8SPST8259WJ
9IAKB0022
10 SPST9163B
11 SPST0165RA
12 MMEV0737
13 SPST8247B
14 SPST8126R
15 SPST8260B
16 SPST8248XB
17 SPST8368KN
18 SPST0004KGR
19 SAGI9963KKK
20 SARP8253RAWI
21 SOFF0161Z
22 SPST8104JWI
23 SPST8112B
24 SAGI9992
25 SAGI3635K
26 IKCB....
27 SARP8252RAWI
10
10

Leggete attentamente questo manuale istruzioni per
familiarizzare con l’uso del modello e insegnare al
vostro bambino una guida corretta, sicura e divertente.
Conservare poi il manuale per ogni futuro riferimento.
Prima di utilizzare il veicolo per la prima volta,
caricare la batteria per 18 ore. Non osservare questa
procedura potrebbe causare danni irreversibili alla
batteria.
•Anni 2 +
• Veicolo a 1 posto
• 1 Batteria ricaricabile da 6V 3,3 Ah al piombo sigillata
• 1 ruota motrice
• 1 motore da 60 W
• Velocità in 1ª marcia 4 Km/h
Peg Perego si riserva il diritto di apportare in
qualunque momento variazioni a modelli e dati
presenti in questa pubblicazione, per ragioni di natura
tecnica o aziendale.
I nostri giocattoli sono conformi alle Norme di
Sicurezza Europee per i giocattoli (requisiti di
sicurezza previsti dal Consiglio della EEC) e dal “U.S.
Consumer Toy Safety Specification”. Sono approvati
dall’ I.I.S.G. (Istituto Italiano Sicurezza Giocattoli).
Non sono conformi alle disposizioni delle norme di
circolazione su strada e pertanto non possono
circolare su strade pubbliche.
Peg Perego S.p.A. è certificata
ISO 9001.
La certificazione offre ai clienti e ai
consumatori la garanzia di una
trasparenza e fiducia nel modo di
lavorare dell'impresa.
ATTENZIONE! LA SUPERVISIONE DI UN ADULTO
É SEMPRE NECESSARIA.
• Non adatto ai bambini di età inferiore ai 24 mesi
per caratteristiche funzionali.
• Non usare il veicolo su strade pubbliche, dove c’è
traffico e macchine parcheggiate, su pendenze ripide,
vicino a gradini e scale, corsi d’acqua e piscine.
• I bambini devono sempre indossare scarpe durante
l’uso del veicolo.
• Quando il veicolo è operativo fare attenzione
affinché i bambini non mettano mani, piedi o altre
parti del corpo, indumenti o altre cose, vicino alle
parti in movimento.
• Non bagnare mai componenti del veicolo come
motori, impianti, pulsanti, etc.
• Vicino al veicolo non usare benzine o altre
sostanze infiammabili.
• Il veicolo deve essere usato assolutamente da un
solo bambino qualora non rientrasse nella
categoria dei veicoli a due posti.
DIRETTIVA RAEE (solo UE)
• Questo prodotto costituisce alla fine della sua vita
un rifiuto classificato RAEE e pertanto non deve
essere smaltito come rifiuto urbano, bensì deve
essere soggetto a raccolta differenziata;
• Consegnare il rifiuto nelle apposite, preposte isole
ecologiche;
• La presenza di sostanze pericolose contenute nelle
componenti elettriche di questo prodotto
costituiscono fonte di potenziale pericolo per la
salute umana e per l’ ambiente se i prodotti non
vengono correttamente smaltiti;
• Il bidone barrato indica che il prodotto deve essere
assoggettato a raccolta differenziata.
SMALTIMENTO DELLA BATTERIA
• Contribuite alla salvaguardia dell’ambiente.
• La batteria usata, non va buttata tra i rifiuti
domestici.
• Potete depositarla presso un centro di raccolta di
batterie usate o di smaltimento rifiuti speciali;
informatevi presso il vostro comune.
NORME DI SICUREZZA
PEG PEREGO® vi ringrazia per aver preferito
questo prodotto. Da oltre 50 anni PEG PEREGO
porta a spasso i bambini.Appena nati con le
carrozzine, poi con i passeggini e ancora dopo,
con i giocattoli a pedali e a batteria.
Scopri la gamma completa dei prodotti, le novità
e altre informazioni sul mondo Peg Perego sul
nostro sito
www.pegperego.com
DENOMINAZIONE DEL PRODOTTO
WINX QUAD
CODICE IDENTIFICATIVO DEL PRODOTTO
IGED1150
NORMATIVE di RIFERIMENTO (origine)
Direttiva generale Sicurezza dei Giocattoli
88/378/CE
Standard EN71 / 1 -2 -3 -9
Standard EN62115
Direttiva Compatibilità Elettromagnetica
2004/108/CE
Standard EN55022 – EN55014
Direttiva Europea RAEE 2003/108/CE
Direttiva Europea RoHS 2002/95/CE
Direttiva Ftalati 2005/84/CE
Non è conforme alle disposizioni delle norme di
circolazione su strada e pertanto non può
circolare su strade pubbliche.
DICHIARAZIONE di CONFORMITA’
PegPerego S.p.A. dichiara sotto la propria
responsabilità che l’ articolo in oggetto è stato
sottoposto a test di collaudo interni e omologato
secondo le normative vigenti presso laboratori
esterni ed indipendenti.
DATA E LUOGO DEL RILASCIO
Italia - 15.01.2009
Peg Perego S.p.A.
via A. De Gasperi, 50
20043 - Arcore (MI) - ITALIA
ITALIANO
DICHIARAZIONE DI CONFORMITA’
INFORMAZIONI IMPORTANTI
La carica della batteria deve essere effettuata e
supervisionata solo dagli adulti.
Non lasciare che i bambini giochino con la batteria.
CARICA DELLA BATTERIA
• Caricare la batteria seguendo le istruzioni allegate
al caricabatterie e comunque non superare le 24 ore.
• Caricare per tempo la batteria non appena il veicolo
perde velocità, eviterete danni.
• Se lasciate fermo il vostro veicolo per lungo tempo,
ricordatevi di caricare la batteria e di tenerla
scollegata dall'impianto; ripetete l'operazione di
ricarica almeno ogni tre mesi.
• La batteria non deve essere caricata capovolta.
• Non dimenticare la batteria in carica! Controllare
periodicamente.
• Usare solo il caricabatterie in dotazione e la batteria
originali PEG PEREGO.
• La batteria è sigillata e non necessita manutenzione.
ATTENZIONE
• LA BATTERIA CONTIENE SOSTANZE TOSSICHE
CORROSIVE.
NON MANOMETTERLA.
• La batteria contiene elettroliti a base acida.
• Non provocare contatto diretto tra i terminali
della batteria, evitare forti urti: rischio di esplosione
e/o incendio.
• Durante la carica la batteria produce gas. Caricare
la batteria in luogo ben ventilato, lontano da fonti
di calore e materiali infiammabili.
• La batteria esaurita deve essere rimossa dal veicolo.
• È sconsigliato appoggiare la batteria agli indumenti;
si potrebbero danneggiare.
• Utilizzare unicamente batterie o accumulatori del
tipo consigliato o di tipo analogo.
SE VI É UNA PERDITA
Proteggete i vostri occhi; evitare il contatto diretto
con l'elettrolita: proteggete le vostre mani.
Mettere la batteria in una borsa di plastica e seguire
le istruzioni sullo smaltimento batterie.
SE PELLE O OCCHI ENTRANO IN CONTATTO
CON L’ ELETTROLITA
Lavare abbondantemente con acqua corrente la parte
intaccata.
Consultare il medico immediatamente.
SE L’ ELETTROLITA VIENE INGERITO
Sciacquare la bocca e sputare.
Consultare il medico immediatamente.
AVVERTENZE BATTERIA
• Non è consigliabile lasciare il giocattolo in ambienti
con temperature inferiori allo zero. Se venisse
utilizzato senza portarlo ad una temperatura
superiore allo zero si potrebbero causare danni
irreversibili a motori e batterie.
• Controllare regolarmente lo stato del veicolo, in
particolare l’impianto elettrico, i collegamenti delle
spine, i cappucci di protezione ed il caricabatterie.
In caso di difetti accertati, il veicolo elettrico ed il
caricabatterie non devono essere utilizzati.
Per riparazioni usare solo pezzi di ricambio originali
PEG PEREGO.
•PEG PEREGO non si assume nessuna responsabilità
in caso di manomissione dell’impianto elettrico.
• Non lasciare le batterie o il veicolo vicino a fonti di
calore come caloriferi, caminetti, etc.
• Proteggere il veicolo da acqua, pioggia, neve etc.;
usarlo su sabbia o fango potrebbe causare danni a
pulsanti, motori e riduttori.
• Lubrificare periodicamente (con olio leggero) parti
semovibili come cuscinetti, sterzo etc.
• Le superfici del veicolo possono essere pulite con
un panno umido e, se necessario, con prodotti di
uso domestico non abrasivi.
• Le operazioni di pulizia devono essere effettuate
solo da adulti.
• Non smontare mai i meccanismi del veicolo o i
motori, se non autorizzati dalla PEG PEREGO.
MANUTENZIONE E CURA VEICOLO

Per la sicurezza del bambino: prima di azionare il
veicolo, leggere e seguire attentamente le seguenti
istruzioni.
• Insegnate al vostro bambino un uso corretto del
veicolo per una guida sicura e divertente.
• Prima di partire assicurarsi che il percorso sia
sgombro da persone o cose.
• Guidare con le mani sul manubrio/volante e
guardare sempre la strada.
• Frenare per tempo per evitare scontri.
2ª VELOCITÁ (se presente)
Inizialmente si consiglia l’utilizzo della 1ª marcia.
Prima di inserire la 2ª velocità, assicurarsi che il
bambino abbia imparato correttamente l’uso del
manubrio/volante, della 1ª velocità, del freno, e abbia
acquisito dimestichezza con il veicolo.
ATTENZIONE!
• Controllare che tutte le borchie/dadi di fissaggio
delle ruote siano ben salde.
• Se il veicolo agisce in condizioni di sovraccarico,
come su sabbia soffice, fango o terreni molto
sconnessi, l’interruttore di sovraccarico toglierà
immediatamente potenza. L’erogazione di potenza
riprenderà dopo alcuni secondi.
• Solo per veicoli 12 e 24Volt: in prima velocità, il
veicolo é dotato di effetto differenziale come le
vere automobili; su terreni lisci e con un solo
bambino, le due ruote possono avere velocità
diverse con possibilità di slittamento/rallentamento
delle stesse.
DIVERTIMENTO SENZA INTERRUZIONI: tenete
sempre un set-batterie carico di ricambio pronto
all’uso.
IL VEICOLO NON FUNZIONA?
• Verificare che non ci siano cavi scollegati sotto la
piastra dell’ acceleratore.
• Controllare il funzionamento del pulsante
dell’acceleratore ed eventualmente sostituirlo.
• Controllare che la batteria sia attaccata all’ impianto
elettrico.
IL VEICOLO NON HA POTENZA?
• Caricare le batterie. Se dopo la ricarica il problema
persiste far controllare le batterie ed il caricabatterie
da un centro assistenza.
PROBLEMI?
REGOLE PER UNA GUIDA SICURA
PEG PEREGO offre un servizio di assistenza post-
vendita,direttamente o tramite un network di centri di
assistenza autorizzati, per eventuali riparazioni o
sostituzioni e vendita di ricambi originali.
Per contattare i centri assistenza fare riferimento
all’opuscolo “Centri Assistenza” presente nell’imballo.
Per qualsiasi segnalazione,è necessario possedere il
numero seriale corrispondente all’articolo. Per
individuare il numero seriale consultare la pagina
dedicata ai pezzi di ricambio.
Peg Perego è a disposizione dei suoi Consumatori
per soddisfare al meglio ogni loro esigenza.
Per questo, conoscere il parere dei nostri Clienti, è
per noi estremamente importante e prezioso.
Le saremo quindi molto grati se, dopo aver utilizzato
un nostro prodotto, vorrà compilare il QUESTIONARIO
SODDISFAZIONE CONSUMATORE che troverà in Internet
al seguente indirizzo: www.pegperego.com
segnalando eventuali osservazioni o suggerimenti.
SERVIZIO ASSISTENZA
ATTENZIONE
LE OPERAZIONI DI MONTAGGIO DEVONO
ESSERE EFFETTUATE SOLO DA ADULTI.
PRESTARE ATTENZIONE A QUANDO SI ESTRAE
IL VEICOLO DALL'IMBALLO.
TUTTE LE VITI E I PICCOLI PEZZI SI TROVANO IN
UN SACCHETTO ALL'INTERNO DELL'IMBALLO.
LA BATTERIA POTREBBE GIA’ ESSERE INSERITA
NELL’ARTICOLO.
MONTAGGIO
1 • Controllare che l’avantreno sia correttamente
agganciato nei punti A. Eliminare i tappi di
protezione B.
2 • Inserire una rondella di ferro sul perno
dell’avantreno come mostra la figura.
3 • (1)Inserire una delle due ruote anteriori facendo
attenzione di utilizzare la ruota raffigurata nella
figura A. (2)Inserire una rondella di ferro.
4 • Inserire una rondella autobloccante sull'apposito
attrezzo raffigurato in figura.Attenzione, le
linguette della rondella autobloccante devono
essere rivolte verso l'interno dell'attrezzo (vedi
particolare A).
NOTA: nel sacchetto, troverete 8 rondelle
autobloccanti delle quali 4 vanno conservate
nell'eventualita' che se ne rompa una.
5 • Fissare la ruota come in figura spingendo fino a
fondo la rondella autobloccante.
6 • Applicare a scatto il copriborchia. Eseguire le
stesse operazioni da figura 2 per l’altra ruota
anteriore.
7 • Inserire una rondella autobloccante sull'apposito
attrezzo raffigurato in figura.Attenzione, le
linguette della rondella autobloccante devono
essere rivolte verso l'interno dell'attrezzo (vedi
particolare A).
8 • Togliere i tappi grigi di protezione posti sulle
estremità dell’assale posteriore. Infilare l’assale
nell’attrezzo come in figura e martellare.
9 • (1)Inserire una rondella di ferro sull’assale.
(2)Infilare l’assale in una delle due ruote
posteriori facendo attenzione ad utilizzare la
ruota raffigurata nella figura A.
10 •Infilare l’assale con la ruota nel foro del
motoriduttore fino in fondo affinché esca dalla
parte opposta del veicolo.
11 •Ruotare leggermente la ruota per far combaciare
ad incastro i pentagoni del motoriduttore e della
ruota (la figura A mostra l’errato aggancio della
ruota).
12 •Inserire la bussola come mostra la figura dall’altra
parte dell’assale fino ad agganciarla alla scocca.
13 •Inserire una rondella di ferro come mostra la
figura.
14 •Riposizionare l’attrezzo usato in precedenza per
infilare la rondella autobloccante (vedi figura 7),
sull’assale dalla parte della ruota.
Posizionare il veicolo su un lato tenendo la ruota
nella parte sottostante. Fare attenzione che non
si sposti l’attrezzo.
15 •(1)Posizionare la ruota rimasta e inserire una
rondella di ferro. (2)Inserire una rondella
autobloccante sull'apposito attrezzo raffigurato in
figura.Attenzione, le linguette della rondella
autobloccante devono essere rivolte verso
l'interno dell'attrezzo (vedi particolare A).
(3)Fissare la ruota come in figura spingendo fino
a fondo la rondella autobloccante.
16 •Applicare a scatto i restanti copriborchia da
entrambi i lati.
17 •Infilare il manubrio orientandolo come in figura.
18 •Fissare il manubrio con una rondella e una vite.
19 •Inserire a pressione il tappo del manubrio.
20 •Infilare le manopole sul manubrio.
21 •Posizionare le maniglie nella parte posteriore del
veicolo, facendo attenzione al verso corretto di
ogni maniglia: l’estremità più bassa deve essere
rivolta verso il fronte dell’articolo, come
mostrato in figura.
22 •Procedere avvitando le maniglie con le 4 viti in
dotazione.
23 •Ruotare il fermo rosso dietro la sella fino a
portarlo nella posizione indicata nella figura.A: la
sella é bloccata; B: la sella può essere aperta.
Alzare la sella.
24 •Collegare le due spine.
25 •Riposizionare la sella infilando i due perni nei fori
del serbatoio. Girare il fermo rosso posto dietro
la sella per fissarla. Il veicolo é pronto all’uso.
CARATTERISTICHE E USO DEL VEICOLO
26 •LEVA CAMBIO: iI vostro bambino si divertirà a
simulare il cambio delle marce con questa leva
cambio che puo’ essere ruotata in due posizioni.
ISTRUZIONI DI MONTAGGIO 27 •pedale acceleratore/freno elettrico: sollevando il
piede, il freno entrerà in funzione
automaticamente.
SOSTITUZIONE DELLA BATTERIA
ATTENZIONE: I DISEGNI DELLE BATTERIE SONO
SOLO INDICATIVI. LA VOSTRA BATTERIA
POTREBBE DIFFERIRE DAL MODELLO
RAFFIGURATO. CIO’ NON COMPROMETTE LE
SEQUENZE DI SOSTITUZIONE E DI CARICA
ILLUSTRATE.
28 •Ruotare il fermo rosso dietro la sella fino a
portarlo nella posizione indicata nella figura 23
(figura B).Alzare la sella. Scollegare le spine.
Svitare la vite del fermabatteria.Togliere il
fermabatteria.
29 •Sostituire la batteria. Riposizionare e riavvitare il
ferma batteria. Collegare le due spine.
ATTENZIONE: ad operazioni ultimate ricordarsi
sempre di chiudere e fissare la sella.
CARICA DELLA BATTERIA
ATTENZIONE: LA CARICA DELLE BATTERIE E
QUALSIASI INTERVENTO ALL'IMPIANTO
ELETTRICO DEVONO ESSERE EFFETTUATE DA
ADULTI.
LA BATTERIA PUÓ ESSERE CARICATA ANCHE
SENZA RIMUOVERLA DAL GIOCO.
30 •Scollegare la spina A dell' impianto elettrico dalla
spina B della batteria premendo lateralmente.
31 •Inserire la spina del caricabatterie ad una presa
domestica seguendo le sue istruzioni allegate.
Collegare la spina B con la spina C del
caricabatterie.
32 •A carica ultimata staccare il caricabatteria dalla
presa domestica, poi scollegare la spina C dalla
spina B.
33 •Inserire a fondo, fino allo scatto, la spina B nella
spina A.Ad operazioni ultimate ricordarsi sempre
di chiudere e fissare la sella.

PRODUCT NAME
WINX QUAD
PRODUCT IDENTIFICATION CODE
IGED1150
REFERENCE STANDARD (origin)
General Toy Safety Directive 88/378/EEC
Standard EN71 / 1 -2 -3 -9
Standard EN62115
Electromagnetic Compatibility Directive
2004/108/EC
Standard EN55022 – EN55014
European Directive WEEE 2003/108/EC
European Directive RoHS 2002/95/EC
Phthalates Directive 2005/84/EC
The vehicle is not compliant with the requirements
of road transport standards and consequently
cannot travel on public roads.
DECLARATION of CONFORMITY
Peg Perego S.p.A. declares under its own
responsibility that the item in question has been
subjected to internal operational tests and
approved according to the standards in force at
external, independent laboratories.
PLACE AND DATE OF ISSUE
Italy - 15.01.09
Peg Perego S.p.A.
via A. De Gasperi, 50
20043 - Arcore (MI) – ITALIA
DECLARATION OF CONFORMITY
Battery charging must be carried out and supervised
by adults only.
Do not allow children to play with the battery.
CHARGING THE BATTERY
• Charge the battery according to the instructions
enclosed with the battery charger and never for
more than 24 hours.
• To avoid damage, the battery should be charged as
soon as the vehicle starts to lose speed.
• If the vehicle is left unused for a long time,
remember to charge the battery and to keep it
disconnected from the electrical system. Repeat
the recharge procedure at least once every three
months.
• The battery must not be charged upside-down.
• Do not forget about the battery which is being
charged! Check it from time to time.
• Only use the battery charger provided and the
original PEG PEREGO battery.
• The battery is sealed and does not require
maintenance.
WARNING
• THE BATTERY CONTAINS CORROSIVE TOXIC
SUBSTANCES.
DO NOT TAMPER WITH IT.
• The battery contains acid-based electrolytes.
• Do not create direct contact between the battery
terminals, avoid strong impacts: risk of explosion
and/or fire.
• While charging, the battery produces gas. Charge
the battery in a well-ventilated environment, away
from sources of heat and flammable materials.
• The flat battery must be removed from the vehicle.
• It is not advisable to bring the battery into contact
with clothes, as it could damage them.
• Only use the recommended type of battery or an
equivalent type.
IF THERE IS A BATTERY LEAK
Protect your eyes.Avoid direct contact with the
electrolyte. Protect your hands.
Put the battery in a plastic bag and follow the
instructions for battery disposal.
IF SKIN OR EYES COME INTO CONTACT WITH
THE ELECTROLYTE
Thoroughly rinse the area concerned with running
water.
Consult a doctor immediately.
IF THE ELECTROLYTE IS SWALLOWED
Rinse the mouth and spit out the water.
Consult a doctor immediately.
BATTERY WARNINGS
• The toy should not be left anywhere with a
temperature below 0°C. If it were to be used
without being warmed up to a temperature above
0°C, irreversible damage could be caused to the
motors and batteries.
• Check the condition of the vehicle regularly, paying
particular attention to the electrical system, the
plug connections, the terminal protectors and the
battery charger. If defects are identified, the
electrical vehicle and the battery charger must not
be used. For repairs use only original PEG
PEREGO spare parts.
• PEG PEREGO do not accept any responsibility for
cases of tampering with the electrical system.
• Do not leave the batteries or the vehicle close to
sources of heat like radiators, fireplaces, etc.
• Protect the vehicle from water, rain, snow, etc.
Using the vehicle on sand or mud may damage the
buttons, motors and gears.
• Lubricate moving parts like bearings, steering, etc.
periodically with light oil.
• The vehicle surfaces can be cleaned with a damp
cloth and, if necessary, with non-abrasive domestic
cleaning products.
• Cleaning must only be carried out by adults.
• Never dismantle the vehicle mechanisms or
motors, unless authorized by PEG PEREGO.
MAINTENANCE AND VEHICLE CARE
Our toys are compliant with European Safety
Standards for toys (safety requirements stipulated by
the EEC Council) and with the “U.S. Consumer Toy
Safety Specification”.They are approved by the
I.I.S.G. (Italian Toy Safety Institute).They are not
compliant with the requirements of road transport
standards and consequently cannot travel on public
roads.
Peg Perego S.p.A. is ISO 9001
certified.
This certification provides customers
and consumers with a guarantee of
transparency and assurance about the
company’s working procedures.
WARNING! THE SUPERVISION OF AN ADULT IS
ALWAYS NECESSARY.
• Not suitable for children younger than 24 months
of age for functional reasons.
• Do not use the vehicle on public roads, in places
where there is traffic or parked cars, on steep
slopes, near to steps and stairs, watercourses or
swimming pools.
• Children must always wear shoes when using the
vehicle.
• When the vehicle is in operation make sure that
children do not put their hands, feet, other body
parts, clothing, or other objects close to the
moving parts.
• Never wet sensitive vehicle components like the
motors, electrical systems, buttons, etc.
• Do not use petrol or other flammable substances
close to the vehicle.
• The vehicle must be only be used by a single child
unless it is classed as a two-seater vehicle.
WEEE DIRECTIVE (EU only)
• At the end of its useful life, this product is classed
as Waste Electrical and Electronic Equipment
(WEEE) and must therefore not be disposed of as
urban waste but instead taken to a designated
separated waste collection facility.
• Take it to an appropriate collection centre.
• The presence of dangerous substances contained in
the electrical components of this product
represents a potential source of danger to human
health and for the environment if the products are
not disposed of correctly.
• The barred dustbin symbol indicates that the
product must undergo sorted waste collection.
DISPOSAL OF THE BATTERY
• Help protect the environment.
• Used batteries must not be disposed of with
domestic waste.
• They can be left at a used battery or special waste
collection centre. Contact your local authorities
for more information.
SAFETY STANDARDS
Read this instruction manual carefully to learn how
to use the vehicle and teach your child to drive it
properly and safely while enjoying it at the same
time. Keep the manual safe for future reference.
Before using the vehicle for the first time, charge the
battery for 18 hours. Failure to do this could result in
irreparable damage to the battery.
•Ages 2 +
• Single seat vehicle
• One 6V 3,3Ah sealed lead acid rechargeable battery
• One drive wheel
• One 60 W motor
• Speed in 1st gear 4 km/h
Peg Perego reserve the right to make changes to the
models and information in the present publication at
any time, for technical or company reasons.
Thank you for choosing a PEG PEREGO® product.
For over 50 years PEG PEREGO have been with you
as you take your children out - in carriages just
after they are born, then in strollers, and later on in
pedal and battery-powered toys
Discover our complete range of products, news and
other information about the Peg Perego world on
our web site.
www.pegperego.com
ENGLISH
IMPORTANT INFORMATION

REPLACEMENT AND CHARGING PROCEDURES
DESCRIBED.
28 •Rotate the red catch behind the saddle until
bringing it to the position shown on figure 23
(figure B). Lift up the saddle. Unplug the
terminals. Unscrew the battery fastener. Remove
the battery fastener.
29 •Replace the battery. Replace and screw back on
the battery fastener. Connect the two plugs.
CAUTION:When you have finished, remember
to close and fix down the seat.
BATTERY RECHARGE
WARNING: BATTERY CHARGING AND EVERY
OTHER OPERATION ON THE ELECTRICAL
SYSTEM MUST BE CARRIED OUT BY ADULTS
ONLY.
THE BATTERY CAN ALSO BE CHARGED
WITHOUT REMOVING IT FROM THE TOY.
30 •Unplug vehicle wiring terminal A from battery
terminal B, by pressing terminals on side and
pulling apart.
31 •Plug the battery charger terminal to a wall
outlet following the instructions enclosed.
Connect the plug B to the battery charger plug
C.
32 •Once the charge is completed unplug recharger
from wall outlet. Unplug recharger cord terminal
C from battery terminal B.
33 •Plug battery terminal A into vehicle wiring
terminal B. Close saddle.
For the safety of the child, before starting up the
vehicle read and carefully follow the following
instructions.
• Teach the child how to use the vehicle properly for
safe and enjoyable driving.
• Before starting, check that there are no people or
objects obstructing the vehicle’s path.
• Drive with hands on the handlebars/steering wheel
and always watch the road ahead.
• Brake in good time to avoid collisions.
2nd GEAR (if present)
Initially, use in 1st gear is recommended. Before
enabling 2nd gear, check that the child has learned to
use the handlebars/steering wheel, 1st gear and the
brake correctly, and has become familiar with the
vehicle.
WARNING!
• Check that all the wheel fixing studs/nuts are
fastened properly.
• If the vehicle is overloaded, as can happen on soft
sand, mud, or very uneven ground, the overload
switch will immediately disconnect the power.The
power supply will be restored after a few seconds..
• Only for 12 and 24Volt vehicles: in first gear the
vehicle has a differential effect like a real motor
vehicle; on smooth terrain and with just one child
on board, the two wheels can turn at different
speeds and they can slip and slow down.
UNINTERRUPTED FUN: Keep a spare set of charged
batteries ready for use.
THE VEHICLE DOES NOT WORK?
• Check that there are no disconnected cables under
the accelerator plate.
• Check the operation of the accelerator button and
replace it if necessary.
• Check that the battery is connected to the
electrical system.
THE VEHICLE LACKS POWER?
• Charge the batteries. If after charging the problem
persists, have the battery and charger checked by
an assistance centre.
PROBLEMS?
RULES FOR SAFE DRIVING
WARNING
ASSEMBLY MUST ONLY BE CARRIED OUT BY
ADULTS.TAKE CARE WHEN REMOVING THE
VEHICLE FROM ITS PACKAGING.ALL THE
SCREWS AND SMALL PARTS ARE CONTAINED IN
A BAG INSIDE THE PACKAGING.THE BATTERY
MAY ALREADY BE FITTED INSIDE THE ITEM.
ASSEMBLY
1 • Check the forecarriage to be sure it is correctly
fastened at points (A). Remove the protective
caps (B).
2 • Insert an iron washer on the pin of the
forecarriage, as shown in the figure.
3 • (1)Insert one of the two front wheels: make sure
you use the wheel shown in Figure A. (2)Insert
an iron washer.
4 • Insert a self-locking washer on the provided tool
(shown in the figure). Caution: The tabs of the
self-locking washer must face the inside of the
tool (see small picture A). NOTE: the bag
contains 8 self-locking washers. Keep 4 of them
apart as spare washers.
5 • Fasten the wheel as shown in the figure, pushing
the self-locking washer down completely.
6 • Snap on the stud cover. Perform the same
operations as the ones in Figure 2 for the other
front wheel.
7 • Insert a self-locking washer on the provided tool
(shown in the figure). Caution: The tabs of the
self-locking washer must face the inside of the
tool (see small picture A).
8 • Remove the grey protective caps at the ends of
the rear axle. Insert the axle on the tool as
shown in the figure.
9 • (1)Insert an iron washer on the axle. (2)Insert
the axle into one of the two rear wheels: make
sure you use the wheel shown in Figure A.
10 •Insert the axle with the wheel into the hole of
the gearmotor, pressing to be sure it exits from
the opposite side of the vehicle.
11 •Turn the wheel slightly to match up the
gearmotor pentagon with the one on the wheel
(Figure shows incorrect fastening of the wheel).
12 •Insert the bushing as shown in the figure,
working from the other side of the shaft until it
is hooked to the body.
13 •Insert an iron washer as shown in the figure.
14 •Reposition the tool (used previously to insert
the self-locking washer - see Figure 7) on the
axle from the wheel side. Place the vehicle on
one side, keeping the wheel underneath. Make
sure the tool cannot shift.
15 •(1)Position the remaining wheel end insert an
iron washer. (2)Insert a self-locking washer on
the provided tool (shown in the figure). Caution:
The tabs of the self-locking washer must face the
inside of the tool (see small picture A). (3)Fasten
the wheel as shown in the figure, pushing the
self-locking washer down completely.
16 •Snap on the remaining stud covers on both sides.
17 •Slide on the handle, orienting it as shown in the
figure.
18 •Fasten the handle with a washer and screw.
19 •Push the handlebar cap on.
20 •Slide the grips onto the handlebar.
21 •Place the handles on the rear of the vehicle,
ensuring that they are facing the right way: the
lower end must be closer to the front of the
item, as shown in the figure.
22 •Attach the handles with the 4 screws provided.
23 •Rotate the red catch behind the saddle until
bringing it to the position shown on figure.A: the
saddle is locked. B: the saddle can be lifted. Lift
up the saddle.
24 •Connect the two plugs.
25 •Reposition the saddle by sliding the two pins into
the holes on the tank.Turn the red catch behind
the saddle in order to fasten it.The vehicle is
ready to use.
FEATURES AND INSTRUCTIONS FOR USE
26 •GEARSHIFT LEVER:Your child will have fun
pretending to change gears using this gearshift
lever, which can be rotated into two positions.
27 •ACCELERATOR/ELECTRIC BRAKE PEDAL:The
vehicle brakes automatically when your child lift
his/her foot off the pedal.
REPLACING THE BATTERY
PLEASE NOTE:THE PICTURES OF THE BATTERIES
ARE FOR ILLUSTRATIVE PURPOSES ONLY.YOUR
BATTERY MAY BE DIFFERENT FROM THE MODEL
SHOWN.THIS DOES NOT AFFECT THE
ASSEMBLY INSTRUCTIONS
PEG PEREGO offers an after-sales assistance service,
directly or through a network of authorized
assistance centres, for any repairs or replacements
and the sale of original spare parts. To contact the
assistance centres refer to the “Assistance Centres”
booklet included in the packaging.
The item’s serial number must always be quoted.
See the page on spare parts to find out how to
identify the serial number.
Peg Perego always strive to best satisfy their
customers' needs. Knowing the opinions of our
customers is therefore very important and valuable
to us.We would be very grateful if, once you have
used the product, you would fill out the CONSUMER
SATISFACTION QUESTIONNAIRE which you can find on
the internet at: www.pegperego.com, making
any observations or suggestions you might have.
CUSTOMER SERVICE

Nos jouets sont conformes aux normes de sécurité
européennes sur les jouets (conditions essentielles
de sécurité prévues par le Conseil de l’EEC) et par l’
« U.S. Consumer Toy Safety Specification ». Ils ont
été approuvés par l’I.I.S.G. (Institut Italien pour la
Sécurité des Jouets).Ces produits ne sont pas
conformes aux normes de circulation routière et,
par conséquent, ne doivent pas circuler sur les voies
publiques.
La société Peg Perego S.p.A. est
certifiée ISO 9001.
La certification garantit aux clients et
aux consommateurs la transparence et
la fiabilité des méthodes de travail de
l'entreprise.
ATTENTION! LA SURVEILLANCE D’UN ADULTE
EST TOUJOURS NECESSAIRE.
• De par ses caractéristiques fonctionnelles, ne
convient pas aux enfants de moins de 24 mois.
• Ne pas utiliser le véhicule sur les voies publiques,
là où il y a de la circulation et des voitures en
stationnement, sur des pentes raides, à proximité
de marches et d’escaliers, des cours d’eau et des
piscines.
• Les enfants doivent toujours porter des chaussures
lorsqu’ils jouent avec le véhicule.
• Quand le véhicule est en fonction, veillez à ce que
les enfants ne mettent pas les mains, les pieds ou
autres parties du corps, ni des vêtements ou autres
objets près des parties en mouvement.
• Ne jamais mouiller les composants du véhicule tels
que moteurs, circuits, boutons, etc.
• Ne jamais utiliser d’essence ou autres substances
inflammables à proximité du véhicule.
• Si le véhicule n’appartient pas à la catégorie des
véhicules à deux places, il devra impérativement
n’être utilisé que par un seul enfant.
DIRECTIVE RAEE (UE seulement)
• A la fin de sa vie, ce produit constitue un déchet
classé RAEE et, par conséquent, ne doit pas être
éliminé comme déchet urbain mais doit faire l'objet
du tri sélectif des déchets;
• Déposer le déchet dans les conteneurs
écologiques des déchetteries prévus à cet effet;
• Si les produits ne sont pas éliminés comme il se
doit, la présence de substances dangereuses dans
les composants électriques de ce produit en fait
une source potentielle de danger pour la santé et
l’environnement;
• La poubelle barrée indique que le produit doit faire
l’objet du tri sélectif des déchets.
ELIMINATION DE LA BATTERIE
• Contribuez à la sauvegarde de l’environnement.
• Ne pas jeter la batterie usée parmi les ordures
ménagères.
• Vous pouvez la confier à un centre de collecte des
batteries usées ou de traitement des déchets
spéciaux; renseignez-vous auprès de votre mairie.
NORMES DE SECURITE
Lisez attentivement ce manuel d’instructions pour
vous familiariser avec le modèle et apprendre à votre
enfant à le conduire de façon correcte, amusante et
en toute sécurité. Conserver ensuite ce manuel pour
pouvoir vous y référer à l’avenir.
Avant d’utiliser le véhicule pour la première fois,
mettez en charge la batterie pendant 18 heures.
Ne pas appliquer cette règle pourrait être à l’origine
de dommages irréversibles à la batterie.
•Âge 2 +
• Véhicule à 1 place
• 1 Batterie rechargeable de 6V 3,3 Ah scellée au plomb
• 1 roue motrice
• 1 moteur de 60 W
• Vitesse en première 4 km/h
Peg Perego se réserve le droit d’apporter, à tout
moment, des modifications aux modèles et aux
données figurant dans ce livret, pour des raisons de
caractère technique ou de management.
PEG PEREGO® vous remercie d’avoir choisi ce
produit. Depuis plus de 50 ans, PEG PEREGO
accompagne les promenades des enfants. Dès leur
naissance, avec les landaus puis avec les poussettes
et plus tard, avec les jouets à pédales et à batterie.
Découvrez sur notre site la gamme complète des
produits, les nouveautés et d’autres renseignements
sur le monde Peg Perego.
www.pegperego.com
DENOMINATION DU PRODUIT
WINX QUAD
CODE D’IDENTIFICATION DU PRODUIT
IGED1150
REFERENCES NORMATIVES (origine)
Directive générale Sécurité des Jouets 88/378/CE
Standard EN71 / 1 -2 -3 -9
Standard EN62115
Directive Compatibilité électromagnétique (CEM)
2004/108/CE
Standard EN55022 - EN55014
Directive européenne RAEE 2003/108/CE
Directive européenne RoHS 2002/95/CE
Directive Ftalati 2005/84/CE
Ce produit n’est pas conforme aux normes de
circulation routière et, par conséquent, ne doit pas
circuler sur les voies publiques.
DECLARATION DE CONFORMITE
Peg Perego S.p.A. déclare sous son entière
responsabilité que l’article ci-dessus référencé a
été soumis à des essais internes et a été
homologué auprès de laboratoires externes et
indépendants, conformément aux normes en
vigueur.
DATE ET LIEU DE DELIVRANCE
Italie - 15.01.2009
Peg Perego S.p.A.
Via A. De Gasperi, 50
20043 - Arcore (MI) - ITALIA
FRANÇAIS
DECLARATION DE CONFORMITE
RECOMMANDATIONS IMPORTANTES
La mise en charge de la batterie doit être faite et
surveillée exclusivement par un adulte.
Ne pas laisser les enfants jouer avec la batterie.
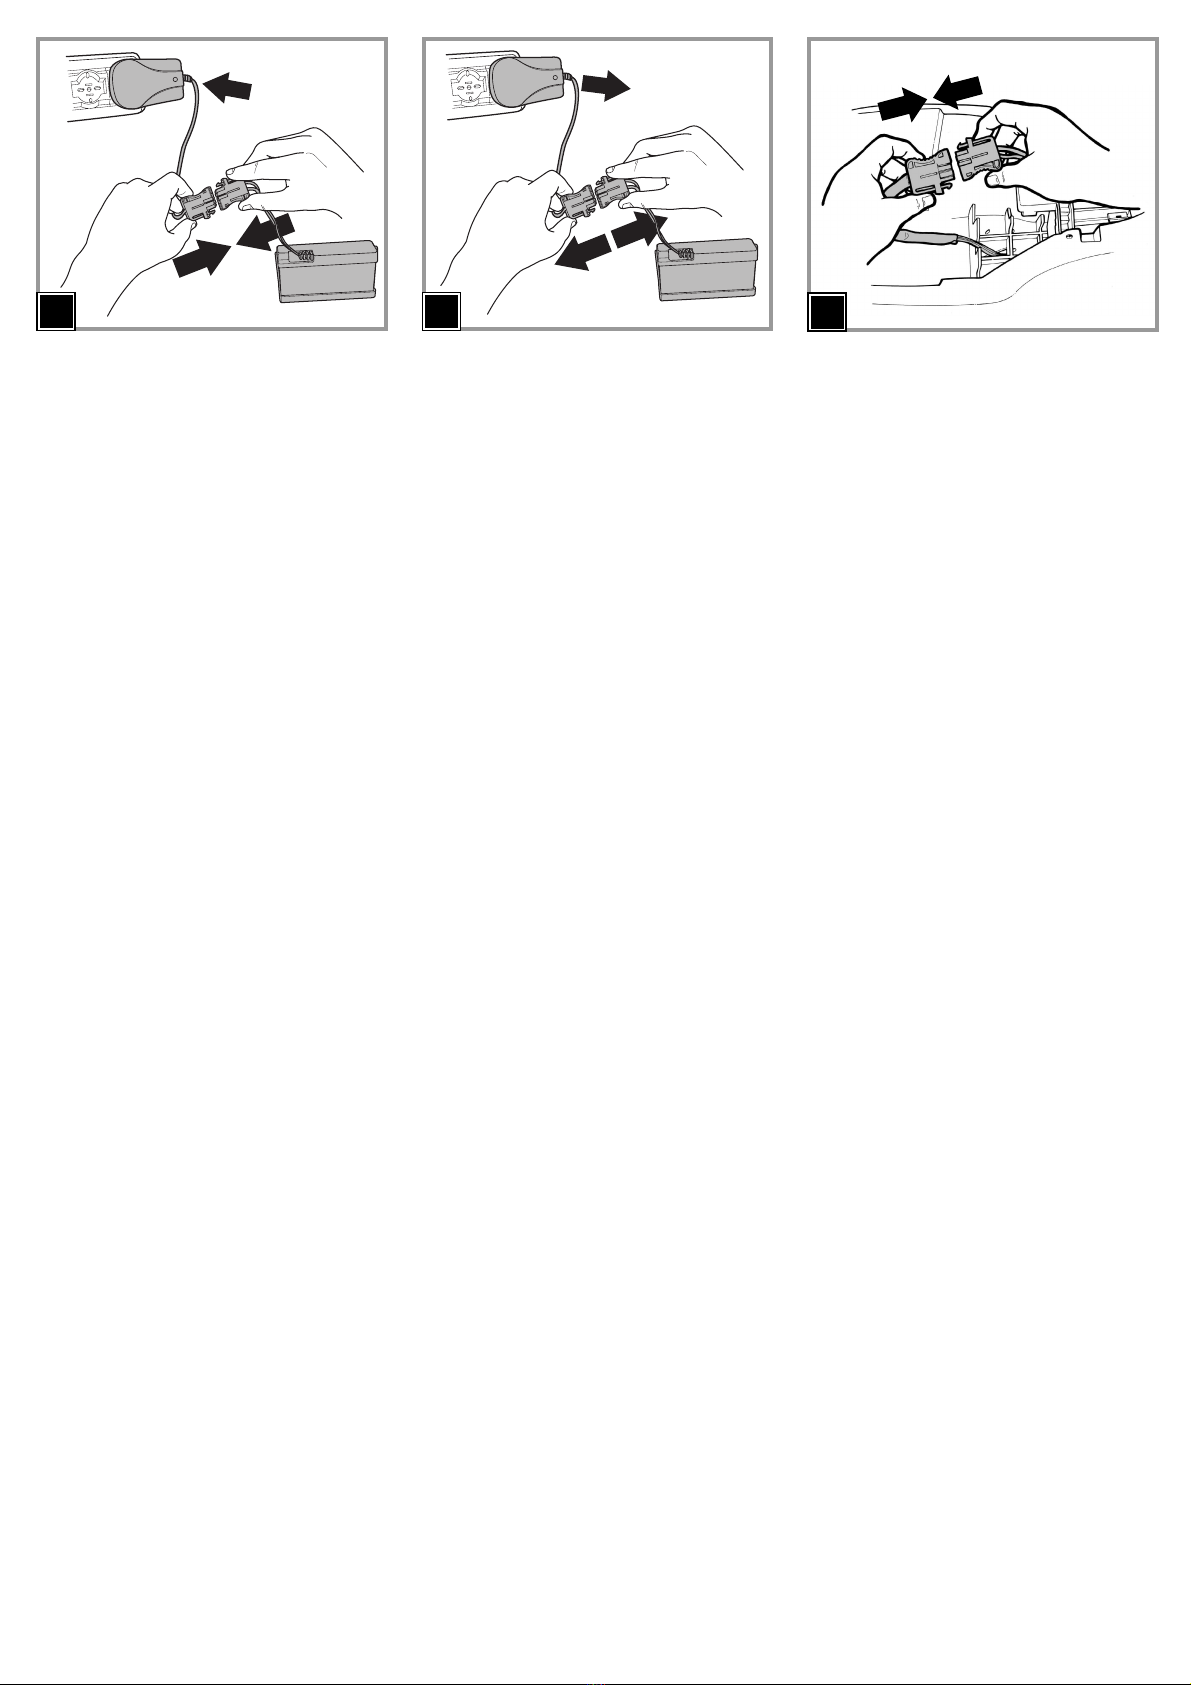
MISE EN CHARGE DE LA BATTERIE
• Charger la batterie en suivant les instructions
jointes au chargeur de batterie et, quoi qu’il en soit,
ne pas dépasser 24 heures de mise en charge.
• Mettre la batterie en charge dès que le véhicule
perd de la vitesse, vous éviterez tout dommage.
• Si le véhicule n’est pas utilisé pendant longtemps,
n’oubliez pas de mettre la batterie en charge puis
de la conserver débranchée du secteur; répéter
cette opération au moins tous les trois mois.
• La batterie ne doit pas être chargée renversée.
• Ne pas oublier la batterie en charge! Contrôlez-la
de temps en temps.
• Utilisez uniquement le chargeur de batterie fourni
et la batterie originale PEG PEREGO.
• La batterie est scellée et ne nécessite aucun
entretien.
ATTENTION!
• LA BATTERIE CONTIENT DES SUBSTANCES
TOXIQUES CORROSIVES.
NE PAS L’OUVRIR NI LA MANIPULER.
• La batterie contient des électrolytes à base acide.
• Evitez tout contact direct entre les cosses de la
batterie, évitez les chocs: risque d’explosion et/ou
d’incendie.
• Pendant son chargement la batterie produit du gaz.
Mettre la batterie en charge dans un endroit bien
aéré, loin de toute source de chaleur et des
matières inflammables.
• Retirer la batterie déchargée du véhicule.
• Il est déconseillé de poser la batterie sur des
vêtements, cela risquerait de les abîmer.
• Utilisez uniquement des batteries ou des
accumulateurs du type recommandé ou de type
analogue.
EN CAS DE FUITE
Protégez vos yeux ; éviter tout contact direct avec
l'électrolyte : protégez vos mains.
Mettre la batterie dans un sac en plastique et suivre
les instructions concernant l’élimination de la batterie.
EN CAS DE CONTACT DE LA PEAU OU DES
YEUX AVEC L’ ELECTROLYTE
Rincer abondamment la partie touchée sous l’eau
courante.
Consulter immédiatement un médecin.
EN CAS D’INGESTION D’ELECTROLYTE
Se rincer la bouche et cracher.
Consulter immédiatement un médecin.
RECOMMANDATIONS
CONCERNANT LA BATTERIE
• Il est déconseillé de laisser le jouet dans des lieux
où la température est inférieure à 0° C. S’il est
utilisé alors que sa température ne dépasse pas 0°
C, les moteurs et les batteries pourraient subir des
dommages irréversibles.
• Contrôler régulièrement l’état du véhicule, en
particulier le circuit électrique, le branchement des
fiches, les cosses de protection et le chargeur de
batterie.Au cas où vous relèveriez des anomalies,
n’utilisez ni le véhicule électrique ni le chargeur de
batterie. Pour les réparations, n’utilisez que des
pièces de rechange originales PEG PEREGO.
•PEG PEREGO décline toute responsabilité en cas
d’intervention technique sur le circuit électrique
par un tiers non agréé.
• Ne pas laisser les batteries ou le véhicule à
proximité de sources de chaleur telles que poêles,
cheminées, etc.
• Protéger le véhicule contre l’eau, la pluie, la neige
etc.; l’utiliser sur du sable ou de la boue pourrait
endommager les boutons, les moteurs et les
réducteurs.
• Graisser périodiquement (avec une huile légère) les
parties mobiles telles que coussinets, volant, etc.
• Les surfaces du véhicule peuvent être nettoyées
avec un chiffon humide et, si nécessaire, avec des
produits d’entretien ordinaires non abrasifs.
• Les opérations de nettoyage doivent être effectuées
uniquement par un adulte.
• Ne jamais démonter les mécanismes ou les moteurs
du véhicule sans l’autorisation de PEG PEREGO.
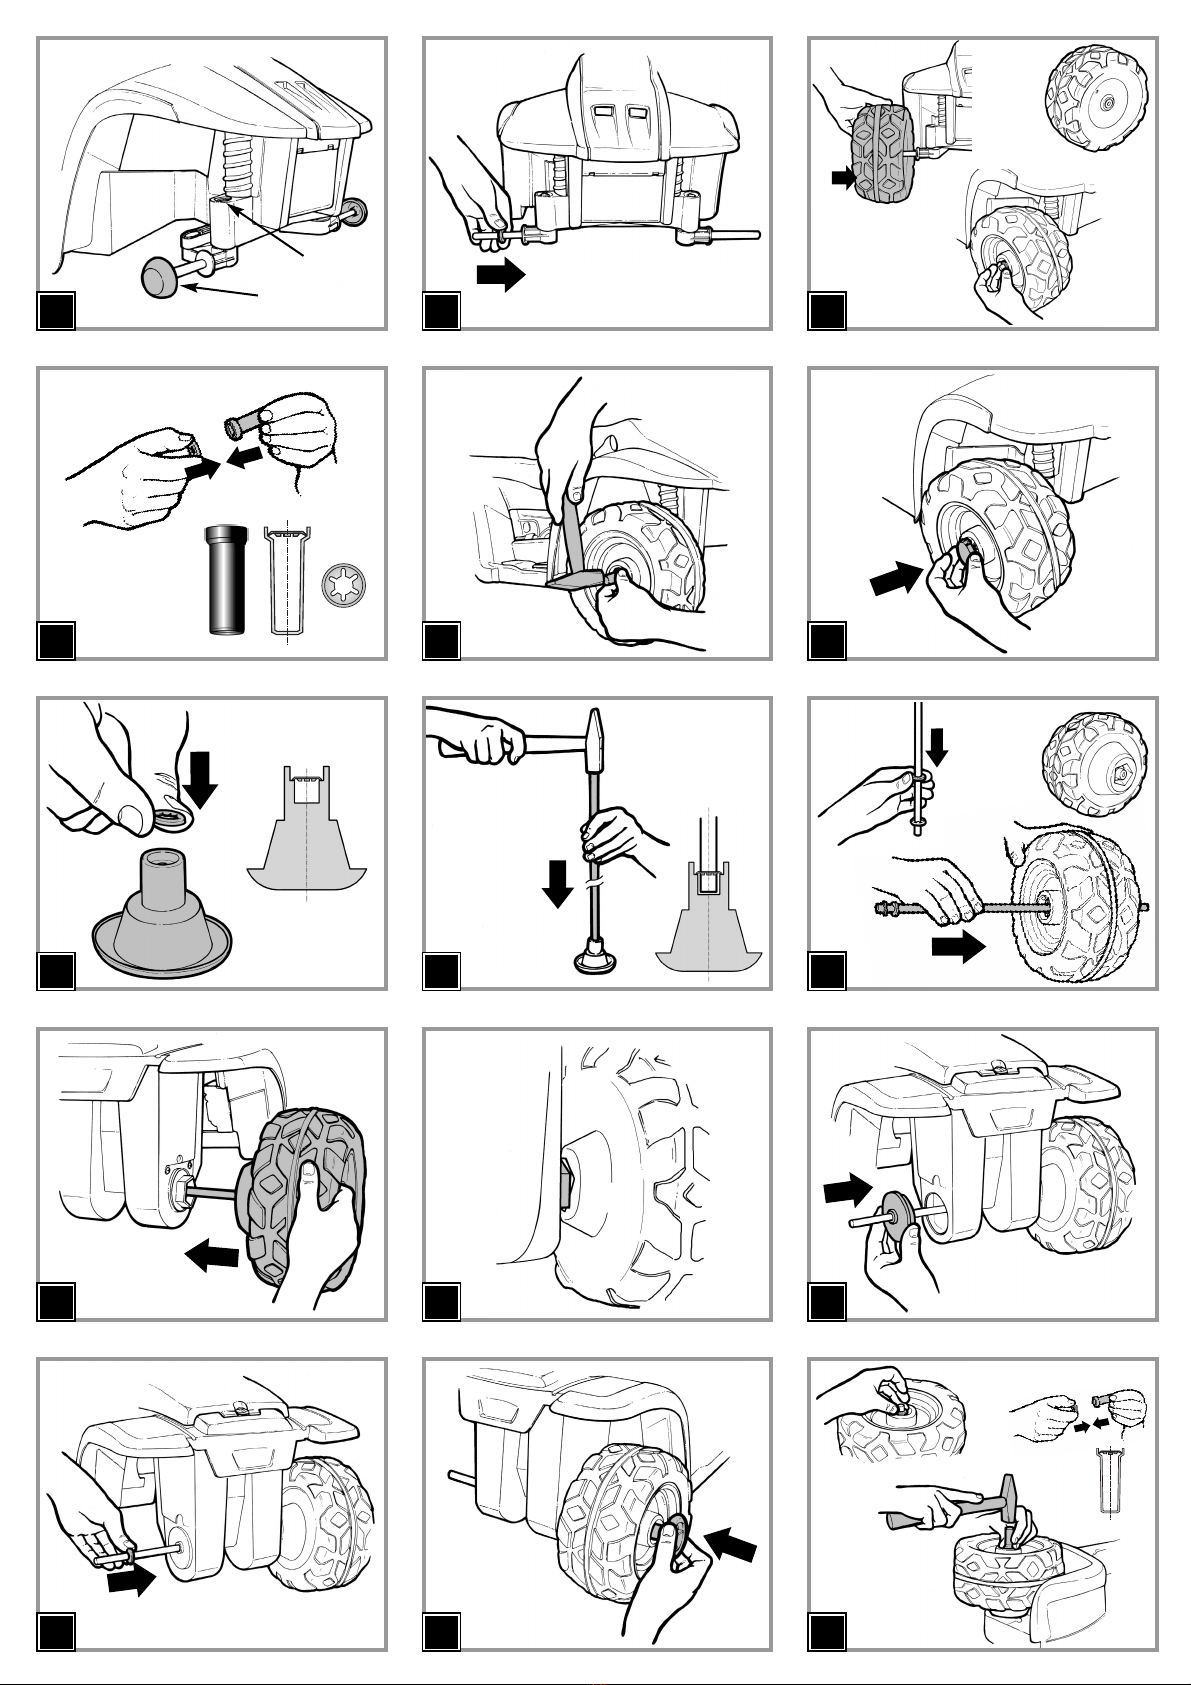
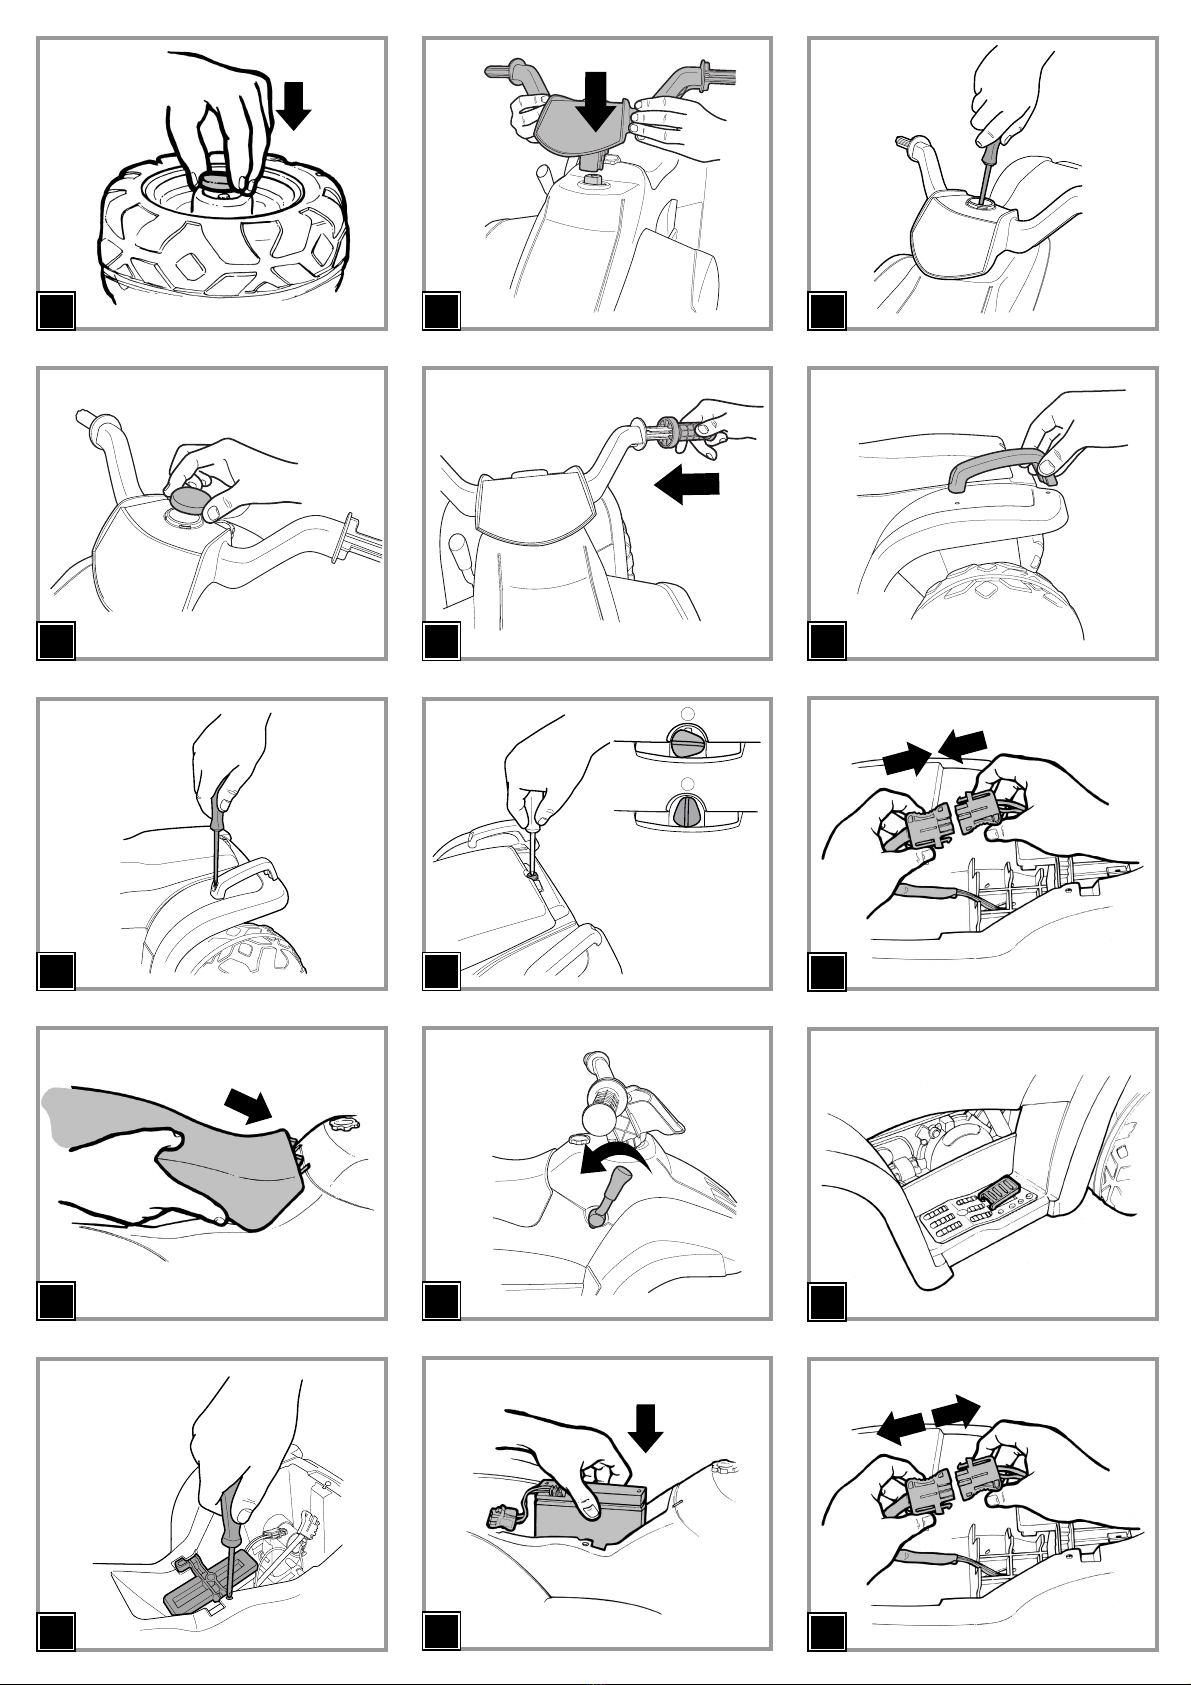
ENTRETIEN ET SOIN DU VEHICULE

ATTENTION!
LE MONTAGE DOIT ETRE EFFECTUE
UNIQUEMENT PAR UN ADULTE.
DEBALLEZ LE VEHICULE AVEC PRECAUTION.
TOUTES LES VIS ET LES PETITES PIECES SONT
DANS UN SACHET DANS L'EMBALLAGE.
IL SE POURRAIT QUE LA BATTERIE SOIT DEJA
MONTEE SUR LE VEHICULE.
MONTAGE
1 • Vérifier que l’avant-train soit bien accroché aux
points (A). Éliminer les bouchons de protection
(B).
2 • Insérer une rondelle en fer sur la cheville de
l’avant-train comme indiqué sur la figure.
3 • (1)Insérer l’une des deux roues avant en prenant
soin d’utiliser la roue représentée sur la figure A.
(2)Insérer une rondelle en fer.
4 • Insérer une rondelle à blocage automatique sur
l'outil fourni représenté sur la figure.Attention:
les languettes de la rondelle à blocage
automatique doivent être tournées vers
l'intérieur de l'outil (voir détail A). NOTE: le
sachet contient 8 rondelles à blocage
automatique ; 4 rondelles doivent être gardées
dans le cas où il est nécessaire de remplacer une
rondelle défectueuse.
5 • Fixer les roues comme indiqué sur la figure en
poussant à fond la rondelle à blocage
automatique.
6 • Enclencher le cache-clous. Exécuter les
opérations indiquées sur la figure 2 pour l’autre
roue avant.
7 • Insérer une rondelle à blocage automatique sur
l'outil fourni représenté sur la figure.Attention:
les languettes de la rondelle à blocage
automatique doivent être tournées vers
l'intérieur de l'outil (voir détail A).
8 • Retirer les bouchons de protection gris situés
aux extrémités de l’essieu arrière. Enfiler l’essieu
dans l’outil comme indiqué sur la figure.
9 • (1)Insérer une rondelle en fer sur l’essieu.
(2)Enfiler l’essieu dans l’une des deux roues
arrière en prenant soin d’utiliser la roue
représentée sur la figure A.
10 •Enfiler complètement l’essieu, la roue dans le
trou du motoréducteur, afin qu’il sorte de l’autre
côté du véhicule.
11 •Faire tourner légèrement la roue pour aligner et
encastrer les pentagones du motoréducteur et
de la roue (la figure représente l’accrochage
erroné de la roue).
12 •Enfiler la douille, comme indiqué sur la figure, de
l’autre côté de l’essieu jusqu’à l’accrocher à la
coque.
13 •Insérer une rondelle en fer comme indiqué sur la
figure.
14 •Replacer l’outil qui a été utilisé pour enfiler la
rondelle à blocage automatique (voir fig. 7) sur
l’essieu, de l’autre côté de la roue. Placer le
véhicule sur un côté en tenant la roue par en
dessous. Prendre soin que l’outil ne se déplace
pas.
15 •(1)Mettre la roue restante en place et insérer
une rondelle en fer. (2)Insérer une rondelle à
blocage automatique sur l'outil fourni représenté
sur la figure.Attention: les languettes de la
rondelle à blocage automatique doivent être
tournées vers l'intérieur de l'outil (voir détail A).
(3)Fixer la roue comme indiqué sur la figure en
poussant à fond la rondelle à blocage
automatique.
16 •Enclencher les autres cache-clous de chaque
côté.
17 •Enfiler le guidon en l’orientant comme indiqué
sur la figure.
18 •Fixer le guidon avec une rondelle et une vis.
19 •Insérer le bouchon du guidon par pression.
20 •Enfiler les poignées sur le guidon.
21 •Monter les poignées à l’arrière du véhicule, en
veillant à les positionner dans le bon sens :
l’extrémité inférieure doit être tournée vers
l’avant de l’article, comme indiqué sur la figure.
22 •Fixer les poignées à l’aide des 4 vis fournies avec
le produit.
23 •Faire tourner le dispositif d'arrêt rouge placé
derrière la selle jusqu'à ce qu'il se trouve dans la
position indiquée sur la figure.A: la selle est
bloquée. B: la selle peut être ouverte. Soulever la
selle.
24 •Brancher les deux prises.
25 •Remettre la selle en place en enfilant les deux
chevilles dans les trous du réservoir. Faire
tourner le dispositif d’arrêt rouge situé derrière
la selle pour la fixer. Le véhicule est prêt à
l’emploi.
CARACTERISTIQUES ET EMPLOI DU
VEHICULE
26 •LEVIER DE VITESSE : votre enfant s’amusera à
faire semblant de changer de vitesse grâce à ce
levier de vitesse à deux positions.
27 •PEDALE D'ACCELERATEUR/FREIN
ELECTRIQUE: le frein entre en fonction
automatiquement quand on lève le pied.
REMPLACEMENT DE LA BATTERIE
ATTENTION : LES DESSINS DES BATTERIES SONT
DONNES PUREMENT A TITRE INDICATIF. LA
BATTERIE EN VOTRE POSSESSION POURRAIT
ETRE DIFFERENTE DU MODELE REPRESENTE LES
SEQUENCES DE REMPLACEMENT ET DE CHARGE
REPRESENTEES N’EN RESTENT PAS MOINS
VALABLES.
28 •Faire tourner le dispositif d'arrêt rouge, placé
derrière la selle, jusqu'à ce qu'il se trouve dans la
position indiquée sur la figure 23 (figure B).
Soulever la selle. Déconnecter les fiches.
Dévisser la vis du porte-batterie. Retirer le
verrou de la batterie.
29 •Remplacer la batterie. Revisser le ferme batterie.
Brancher les deux fiches.ATTENTION: Replacer
et revisser toujours la siège après avoir effectué
les opérations à l'intérieur de le logement de la
batterie.
CHARGE DE LA BATTERIE
ATTENTION: L'OPERATION DE CHARGE DES
BATTERIES ET TOUTES AUTRES INTERVENTIONS
SUR L'EQUIPEMENT ELECTRIQUE DOIVENT ETRE
EFFECTUEES EXCLUSIVEMENT PAR DES ADULTES.
IL EST POSSIBLE DE CHARGER LA BATTERIE
SANS LA DEMONTER DU JOUET.
30 •Débrancher la fiche A de la fiche B en appuyant
sur les côtés.
31 •Insérer la fiche du chargeur de la batterie dans
une prise de courant en suivant les instructions
jointes. Brancher la fiche B et la fiche C du
chargeur de la batterie.
32 •Uen fois la charge terminée, débrancher le
chargeur de batterie C de la prise domestique en
premier lieu et ensuite de la fiche de la batterie
B.
33 •Insérer à fond jusqu'au déclic la fiche A dans la
fiche B. Une fois toutes les opérations terminées,
veiller à bien refermer la selle.
Pour la sécurité de l’enfant: avant de mettre en marche
le véhicule, lire et suivre attentivement les instructions
suivantes:
• apprenez à l’enfant à utiliser correctement le véhicule
pour garantir une conduite amusante en toute
sécurité.
• avant de démarrer, vérifier qu’il n’y ait pas d’obstacle
et que personne ne se trouve sur le parcours.
• conduire avec les mains sur le guidon/volant et
toujours regarder la route.
• freiner à temps pour éviter les chocs.
SECONDE (s’il y a lieu)
Au début, il est conseillé d’utiliser la première vitesse.
Avant de passer la seconde, s’assurer que l’enfant a
bien appris à utiliser le guidon/volant, la première
vitesse, le frein, et qu’il s’est familiarisé avec le véhicule.
ATTENTION!
• Contrôler si toutes les plaques/écrous de fixation
des roues sont bien serrés.
• Si le véhicule fonctionne en surcharge, comme sur
du sable, de la boue ou des terrains très irréguliers,
l’interrupteur de surcharge coupera aussitôt la
puissance. La distribution de puissance reprendra
après quelques secondes.
• Pour les véhicules de 12 et 24Volt uniquement: en
première, le véhicule est doté de différentiel comme
les vraies automobiles; sur des terrains lisses et avec
un seul enfant, les deux roues peuvent avoir des
vitesses différentes et risquent de patiner/ralentir.
DIVERTISSEMENT SANS INTERRUPTION: prévoyez
une batterie de rechange chargée et prête à l’emploi.
LE VEHICULE NE FONCTIONNE PAS?
• Vérifiez si les câbles ne sont pas débranchés sous
la plaque de l’accélérateur.
• Contrôlez le fonctionnement du bouton de
l’accélérateur et, s’il y a lieu, remplacez-le.
• Vérifiez si la batterie est branchée sur le circuit
électrique.
LE VEHICULE MANQUE DE PUISSANCE?
• Chargez les batteries. Si le problème persiste après
le chargement, faire contrôler les batteries et le
chargeur de batterie auprès d'un centre
d'assistance.
DES PROBLEMES?
REGLES POUR UNE CONDUITE EN
TOUTE SECURITE
INSTRUCTIONS POUR LE MONTAGE
Nos véhicules sont garantis pendant une période de
six mois à compter de la date d’achat (le ticket de
caisse faisant foi) contre vice ou défaut de fabrication,
à l’exception de la batterie et du chargeur (se
reporter aux instructions d’utilisation détaillées dans
cette notice).
La garantie s’applique dans le cadre d’une utilisation
normale du véhicule, le fabricant se réservant le droit
d’expertiser les pièces.
Le fabricant ne saurait en aucune manière être tenu
responsable en cas:
• de non respect des recommandations de ce
manuel d’utilisation.
• de mauvaise utilisation du véhicule ou
d’endommagements accidentels.
• de modifications techniques du véhicule qui
pourraient endommager le véhicule et entraîner de
graves dangers pour la sécurité de l’enfant.
• d’usure normale des pièces (exemples: roues).
Conserver cette notice d’utilisation durant
toute la durée de vie du véhicule.
GARANTIE
PEG PEREGO offre un service d’assistance après-vente,
directement ou par le biais de centres d’assistance
agréés, pour toute réparation, remplacement et achat
de pièces de rechange originales.Pour contacter les
centres d’assistance, consultez l’opuscule « Centres
d’Assistance » joint à l’emballage.
Pour toute communication, avoir à disposition le
numéro de série de l’article. Pour trouver le numéro
de série, consulter la page consacrée aux pièces de
rechange.
Peg Perego reste à la disposition de ses Clients pour
satisfaire au mieux leurs exigences. Pour ce faire,
connaître l’opinion de nos Clients, est extrêmement
important et précieux pour nous. Par conséquent
nous vous serions très reconnaissants si, après avoir
utilisé l’un de nos produits,vous vouliez bien remplir
le QUESTIONNAIRE DE SATISFACTION CONSOMMATEUR que
vous trouverez sur Internet à l’adresse suivante :
www.pegperego.com et nous transmettre vos
éventuelles observations ou suggestions.
SERVICE D’ASSISTANCE

Das Laden der Batterie darf nur von Erwachsenen
ausgeführt und überwacht werden. Kinder nicht mit
den Batterien spielen lassen.
LADEN DER BATTERIE
• Die Batterie nicht länger als 24 Stunden laden und
sich dabei an die Anweisungen halten, die dem
Ladegerät beigelegt sind.
• Die Batterie rechtzeitig laden, sobald das Fahrzeug
an Geschwindigkeit verliert.Auf diese Weise
verhindern Sie Schäden.
• Sollte das Fahrzeug längere Zeit unbenutzt bleiben,
vergessen Sie nicht, die Batterie zu laden und sie
aus dem Fahrzeug zu nehmen; das Neuladen
mindestens alle drei Monate wiederholen.
• Die Batterie nicht umgedreht laden.
• Die Batterie nicht im Ladegerät vergessen!
Regelmäßig kontrollieren.
• Nur das mitgelieferte Ladegerät und die Original-
PEG PEREGO-Batterien verwenden.
• Die Batterie ist versiegelt und erfordert keine
Wartung.
ACHTUNG
• DIE BATTERIE ENTHÄLT KORROSIVE UND
GIFTIGE STOFFE.
NICHT BESCHÄDIGEN.
• Die Batterie enthält außerdem Elektrolyte auf
Säurebasis.
• Keinen direkten Kontakt zwischen den Batterieenden
verursachen und starke Stöße vermeiden: Explosions-
und Brandgefahr.
• Während des Ladens erzeugt die Batterie Gas. Das
Laden daher in gut gelüfteten Räumen vornehmen.
Nicht in die Nähe von Wärmequellen und
entflammbaren Materialien bringen.
• Die leere Batterie ist aus dem Fahrzeug zu nehmen.
• Die Batterien sollten mit der Kleidung nicht in
Berührung kommen; sie könnte beschädigt werden.
• Ausschließlich Batterien oder Akkus des
empfohlenen oder eines gleichartigen Typs benutzen.
UNDICHTE BATTERIEN
Schützen Sie Ihre Augen; vermeiden Sie jeden direkten
Kontakt mit dem Elektrolyt: Schützen Sie Ihre Hände.
Geben Sie die Batterie in eine Plastiktüte und
entsorgen Sie die Batterie vorschriftsmäßig.
IM FALLE EINER BERÜHRUNG DER HAUT ODER
DER AUGEN MIT DEM ELEKTROLYT
Die betreffenden Bereiche mit reichlich fließendem
Wasser waschen. Sofort den Arzt aufsuchen.
VERSCHLUCKEN DES ELEKTROLYTS
Den Mund ausspülen und ausspucken. Sofort den Arzt
aufsuchen.
HINWEISE ZUR BATTERIE
• Das Spielzeug sollte nicht bei Temperaturen unter
0º aufbewahrt werden.Vor dem Gebrauch in eine
Umgebungstemperatur von über 0º bringen, sonst
könnten irreversible Schäden an Motoren und
Batterien entstehen.
• Regelmäßig den Zustand des Fahrzeuges prüfen,
vor allem die Elektroanlage, die
Steckerverbindungen, die Schutzhauben und die
Ladegeräte. Bei festgestellten Schäden dürfen das
Elektrofahrzeug und das Ladegerät nicht mehr
benutzt werden. Für Reparaturen nur Original-PEG
PEREGO-Ersatzteile verwenden.
•PEG PEREGO übernimmt keine Haftung, wenn die
elektrische Anlage verändert worden ist.
• Die Batterien oder das Fahrzeug nicht in der Nähe
von Wärmequellen wie Heizkörper, Kamine usw.
abstellen.
• Das Fahrzeug vor Wasser, Regen, Schnee usw.
schützen; sein Einsatz auf Sand oder Schlamm kann
Schäden an den Tasten, dem Motor und dem
Getriebe verursachen.
• Regelmäßig die beweglichen Teile wie Lager,
Lenkrad usw. mit einem leichten Öl schmieren.
• Die Oberflächen des Fahrzeugs können mit einem
feuchten Tuch und, wenn notwendig, mit nicht
scheuernden Wasch- oder Spülmitteln gereinigt
werden.
• Die Reinigung sollte ausschließlich durch
Erwachsene erfolgen.
• Ohne vorherige Genehmigung seitens PEG PEREGO
ist das Abmontieren der Fahrzeugmechanismen
oder der Motoren untersagt.
WARTUNG UND PFLEGE DES
FAHRZEUGS
Bitte lesen Sie aufmerksam die Bedienungsanleitung
durch, um sich mit dem Gebrauch des Modells vertraut
zu machen und um Ihrem Kind den richtigen, sicheren
und unterhaltsamen Umgang damit zeigen zu können.
Bitte bewahren Sie das Handbuch auch für spätere
Hinweise auf.
Vor dem ersten Gebrauch des Fahrzeuges die Batterien
18 Stunden lang laden. Bei Unterlassung dieser
Maßnahme kann die Batterie definitiv beschädigt werden.
•Jahre 2 +
• Fahrzeug mit 1 Sitz
• 1 wiederaufladbare Batterie 6V 3,3Ah mit Siegelplombe
• 1 Antriebsrad
• 1 Motor mit 60 W
• Geschwindigkeit im 1. Gang 4 Km/h
Peg Perego behält sich das Recht vor, zu jedem beliebigen
Zeitpunkt und aus technischen oder betrieblichen
Gründen Abänderungen an den in dieser Ausgabe
aufgeführten Modellen und technischen Daten
vorzunehmen.
PEG PEREGO® bedankt sich für den Kauf dieses
Produktes. Seit über 50 Jahren führt PEG
PEREGO die Kinder spazieren.Als Neugeborene
im Kinderwagen, dann im Kindersportwagen und
später mit den Tret- und Batterie-
Spielfahrzeugen.
Entdecken Sie die komplette Produktreihe, die
Neuheiten und weitere Informationen über die
Welt von Peg Perego auf unserer Webseite
www.pegperego.com
PRODUKTBEZEICHNUNG
WINX QUAD
IDENTIFIKATIONSKODE DES PRODUKTES
IGED1150
HINWEISE AUF GESETZLICHE
BESTIMMUNGEN (Herkunft)
Allgemeine Richtlinie für die Sicherheit von
Spielzeug 88/378/CE
Standard EN71 / 1 -2 -3 -9
Standard EN62115
Richtlinie Elektromagnetische Verträglichkeit
2004/108/CE
Standard EN55022 – EN55014
Europäische Richtlinie RAEE 2003/108/CE
Europäische Richtlinie RoHS 2002/95/CE
Richtlinie Ftalati 2005/84/CE
Das Fahrzeug stimmt nicht mit den Richtlinien der
Straßenverkehrsordnung überein und darf demnach
nicht auf öffentlichen Straßen gefahren werden.
KONFORMITÄTSERKLÄRUNG
PegPerego S.p.A. erklärt auf eigeneVerantwortung,
dass der beschriebene Artikel internen Prüfungen
unterzogen und gemäß der gültigen Bestimmungen
von externen und unabhängigen Labors zugelassen
wurde.
DATUM UND ORT DER AUSSTELLUNG
Italien - 15.01.09
Peg Perego S.p.A.
Via A. De Gasperi, 50
20043 - Arcore (MI) – ITALIA
DEUTSCH
KONFORMITÄTSERKLÄRUNG
WICHTIGE INFORMATIONEN
Unsere Spielwaren entsprechen den vorgesehenen
Sicherheits-Erfordernissen für Spielzeug, die vom Rat
der Europäischen Wirtschaftsgemeinschaft und von
der „U.S. Consumer Toy Safety Specification“
festgelegt wurden. Sie wurden zudem vom I.I.S.G.
(Italienisches Institut für die Sicherheit von Spielzeugen)
zugelassen. Sie stimmen nicht mit den Richtlinien der
Straßenverkehrsordnung überein und dürfen demnach
nicht auf öffentlichen Straßen benutzt werden.
Peg-Pérego S.p.A. besitzt das
Zertifikat ISO 9001.
Die Zertifizierung garantiert den Kunden
und Konsumenten Transparenz und
sichert das Vertrauen in die Arbeitsweise
des Unternehmens.
ACHTUNG! DIE AUFSICHT EINES ERWACHSENEN
IST IMMER ERFORDERLICH.
• Aufgrund der Betriebseigenschaften ist das Produkt
nicht für Kinder unter 24 Monaten geeignet.
• Das Fahrzeug darf nicht auf öffentlichen Straßen und
Parkplätzen und auf Wegen mit starkem Gefälle
benutzt werden.Treppen und die Nähe von
Wasserläufen und Schwimmbecken sind zu meiden.
• Die Kinder müssen während der Benutzung des
Fahrzeugs immer Schuhe tragen.
• Beim Betrieb des Fahrzeuges darauf achten, dass die
Kinder weder Hände, Füße und andere Körperteile,
noch Kleidungsstücke oder andere Gegenstände in
die Nähe der sich bewegenden Teile bringen.
• Fahrzeugteile wie den Motor, die elektrische Anlage,
die Tasten usw. nie mit Wasser in Berührung bringen.
• Benzin oder andere entflammbare Stoffe nicht in der
Nähe des Fahrzeuges benutzen.
• Das Kinderfahrzeug ist nur für die Benutzung durch
ein Kind ausgelegt, sofern es nicht unter die
Kategorie der zweisitzigen Fahrzeuge fällt.
BESTIMMUNGEN RAEE (nur EU)
• Dieses Produkt wird am Ende seiner Lebensdauer
als RAEE - Elektronikschrott - klassifiziert und
muss demnach gemäß der vorgesehenen
Mülltrennungsbestimmungen entsorgt werden;
• Das zu entsorgende Produkt bei den dafür
vorgesehenen Sammelstellen abliefern;
• Die in den elektrischen Komponenten dieses
Produktes enthaltenen gefährlichen Substanzen
stellen eine potenzielle Gefahr für die Gesundheit
des Menschen und die Umwelt dar, sofern diese
Produkte nicht vorschriftsmäßig entsorgt werden;
• Die durchgestrichene Tonne weist darauf hin, dass
das Produkt der Mülltrennung unterliegt.
ENTSORGUNG DER BATTERIE
• Leisten Sie Ihren Beitrag zum Umweltschutz.
• Die gebrauchte Batterie nicht mit dem Hausmüll
entsorgen.
• Sie können dieses Produkt an einem geeigneten
Sammelplatz für gebrauchte Batterien oder für
Problemmüll anliefern, Informieren Sie sich bei
Ihrer Gemeinde.
SICHERHEITSBESTIMMUNGEN

Für die Sicherheit des Kindes: Bitte lesen und befolgen
Sie die nachstehenden Anweisungen, bevor Sie das
Fahrzeug benutzen.
• Zeigen Sie Ihrem Kind den korrekten Umgang mit
dem Fahrzeug für ein sicheres und unterhaltsames
Fahren.
• Sich vor dem Anfahren vergewissern, dass der
Bewegungsradius frei von Personen und
Gegenständen ist.
• Während der Fahrt die Hände auf dem Lenkrad
lassen und immer auf den Fahrweg schauen.
• Rechtzeitig bremsen, um Auffahren zu vermeiden.
2. GANG (sofern vorhanden)
Am Anfang ist es ratsam, nur den 1. Gang zu nutzen.
Den 2. Gang erst einstellen, wenn das Kind die Fahrt
mit dem 1. Gang, den Gebrauch des Lenkrads und der
Bremse sicher erlernt und eine gewisse Fahrsicherheit
erworben hat.
ACHTUNG!
• Überprüfen, ob sämtliche Nieten/Befestigungsschrauben
der Räder richtig festgezogen sind.
• Beim Einsatz des Fahrzeuges unter Überlastbedingungen,
z.B. auf weichem Sand, Schlamm oder in holprigem
Gelände, schaltet der Überlastschalter sofort die
Leistung ab. Die Stromzuführung wird nach einigen
Sekunden wieder aufgenommen.
• Nur bei Fahrzeugen mit 12 und 24 Volt: Im ersten
Gang ist das Fahrzeug wie die echten Autos mit
Differentialeffekt versehen; auf ebenen Flächen und
mit nur einen Kind können die Räder verschiedene
Geschwindigkeiten haben, d.h. sie können auf
unterschiedliche Weise ins Rutschen
geraten/bremsen.
VERGNÜGEN OHNE UNTERBRECHUNG: Halten
Sie immer einen Satz einsatzbereiter Batterien bereit.
DAS FAHRZEUG FUNKTIONIERT NICHT?
• Die korrekteVerbindung der Kabel unter dem
Gaspedal überprüfen.
• Die Funktionstüchtigkeit der Drucktaste des
Gaspedals kontrollieren und diese bei Bedarf
ersetzen.
• Prüfen, ob die Batterie mit der elektrischen Anlage
verbunden ist.
DAS FAHRZEUG LÄUFT LANGSAM?
• Die Batterien laden. Sollte die Schwierigkeit auch
bei aufgeladenen Batterien bestehen, diese und das
Ladegerät von einer Kundendienststelle
kontrollieren lassen.
PROBLEME?
REGELN FÜR EINE SICHERE FAHRT
ACHTUNG:
DIE MONTAGE DARF NUR VON ERWACHSENEN
VORGENOMMEN WERDEN. BEIM AUSPACKEN
DES FAHRZEUGES VORSICHT WALTEN LASSEN.
ALLE SCHRAUBEN UND KLEINEN TEILE
BEFINDEN SICH IN EINEM SÄCKCHEN IN DER
VERPACKUNG.
DIE BATTERIE KÖNNTE BEREITS IN DAS
FAHRZEUG EINGESETZT WORDEN SEIN.
MONTAGE
1 • Sich darüber vergewissern, dass das Vordergestell
sachgemäß an den Stellen (A) eingehängt ist. Die
Schutzstöpsel (B) beseitigen.
2 • Eine Metall-Unterlegscheibe laut Abbildung am
Stift der Vorderachse einsetzen.
3 • (1)Eines der beiden Vorderräder einsetzen und
dabei darauf achten, dass das Rad aus Abb.A
eingesetzt wird. (2)Eine Metall-Unterlegscheibe
einsetzen.
4 • Eine selbstsperrende Unterlegscheibe am
entsprechenden Werkzeug aufstecken (siehe
Abbildung).Achtung! Die Feder der
selbstsperrenden Unterlegscheibe müssen an die
Innenseite des Werkzeugs gerichtet werden
(siehe kleine Abbildung A).ANMERKUNG: Die
Tüte enthält 8 selbstsperrende Unterlegscheiben.
4 davon müssen als Ersatzscheiben aufbewahrt
werden.
5 • Das Rad laut Abbildung fixieren, indem die
Klemm-Unterlegscheibe ganz eingeschoben wird.
6 • Die Radnabenkappe aufsetzen. Die gleichen
Schritte aus Abb. 2 auch für das andere Vorderrad
vornehmen.
7 • Eine selbstsperrende Unterlegscheibe am
entsprechenden Werkzeug aufstecken (siehe
Abbildung).Achtung! Die Feder der
selbstsperrenden Unterlegscheibe müssen an die
Innenseite des Werkzeugs gerichtet werden
(siehe kleine Abbildung A).
8 • Die grauen Schutzabdeckungen von den Enden
der Hinterachse nehmen. Die Achse laut
Abbildung in das Werkzeug einführen.
9 • (1)Eine Metall-Unterlegscheibe einsetzen. (2)Die
Achse durch eines der beiden Hinterräder
führen. Dabei unbedingt das in Abb.A angegebene
Rad verwenden.
10 •Die Achse mit dem Rad in das Loch des
Getriebes einführen, bis sie auf der anderen
Fahrzeugseite wieder austritt.
11 •Das Rad etwas drehen, damit das Fünfeck des
Getriebes mit dem des Rads übereinstimmt (in
Abb. ist das Rad falsch befestigt).
12 •Die Büchse laut Abbildung von der anderen
Achsenseite aus einführen, bis sie am
Fahrzeuggestell einrastet.
13 •Eine Metall-Unterlegscheibe laut Abbildung
einsetzen.
14 •Das zuvor verwendete Werkzeug wieder
anordnen, um die Klemm-Unterlegscheibe (siehe
Abb. 7) am Rad an der Achse einzusetzen. Das
Fahrzeug so auf die Seite legen, dass das Rad zum
Boden hin liegt. Darauf achten, dass das
Werkzeug nicht verrutscht.
15 •(1)Das bleibende Rad positionieren und eine
Metall-Unterlegscheibe einsetzen. (2)Eine
selbstsperrende Unterlegscheibe am
entsprechenden Werkzeug aufstecken (siehe
Abbildung).Achtung! Die Feder der
selbstsperrenden Unterlegscheibe müssen an die
Innenseite des Werkzeugs gerichtet werden
(siehe kleine Abbildung A). (3)Das Rad laut
Abbildung fixieren, indem die Klemm-
Unterlegscheibe ganz eingeschoben wird.
16 •Die übrigen Radnabenkappen auf beiden Seiten
aufsetzen.
17 •Den Lenker entsprechend der Abbildung
einfügen.
18 •Den Lenker mit einer Unterlegscheibe und einer
Schraube befestigen.
19 •Setzen Sie die Abdeckung mit Druck auf den
Lenker.
20 •Stecken Sie die Griffe auf den Lenker.
21 •Bringen Sie die Griffe am hinteren Teil des
Fahrzeugs an.Achten Sie dabei darauf, dass die
Griffe korrekt ausgerichtet sind: Das flache Ende
muss zur Radvorderseite zeigen, wie in der
Abbildung dargestellt.
22 •Befestigen Sie die Griffe anschließend mit den
vier beigefügten Schrauben.
23 •Die rote Verschlußschraube hinter dem Sitz in
die Position entsprechend der Abbildung drehen.
A: der Sitz ist befesting; B: der Sitz kann
abgenommen werde. Den Sitz abnehemen.
24 •Die Stecker einander verbinden.
25 •Den Sattel erneut positionieren, indem man die
MONTAGEANWEISUNGEN
PEG PEREGO bietet Hilfestellung nach dem Verkauf,
direkt oder über das Netz der zugelassenen
Kundendienststellen für etwaige Reparaturen oder
Ersatzleistungen und die Bereitstellung von
Originalersatzteilen an. Zur Kontaktaufnahme mit
den Kundendienststellen konsultieren Sie die der
Verpackung beigelegte Liste der
„Kundendienststellen“.
Bei Mitteilungen an den Händler müssen Sie die
Seriennummer des Artikels angeben. Die
Seriennummer finden Sie auf der Seite mit den
Angaben zu Ersatzteilen.
Peg Perego steht seinen Kunden für jeden Wunsch
immer gerne zur Verfügung. Deshalb halten wir es
für extrem wichtig, über die Meinung unserer
Kunden Bescheid zu wissen.Wir bitten Sie,
nachdem Sie unsere Produkte ausprobiert haben,
das FORMULAR ÜBER DIE
KONSUMENTENZUFRIEDENHEIT auszufüllen.
Das Formular ist unter folgender Internetadresse
abrufbar: www.pegperego.com Wir würden uns
über Anmerkungen und Ratschläge freuen.
KUNDENDIENST
zwei Zapfen in die Löcher des Behälters einfügt.
Den roten Anschlag hinter dem Sattel drehen,
um ihn zu befestigen. Nun ist das Fahrzeug
einsatzbereit.
EIGENSCHAFTEN UND GEBRAUCH DES
FAHRZEUGS
26 •SCHALTHEBEL: Ihr Kind vergnügt sich, den
Gangwechsel mit diesem Hebel nachzuahmen,
der in zwei Positionen gedreht werden kann.
27 •ELEKTRISCHES GAS-BREMSPEDAL: Durch
Anheben des Fußes tritt die Bremse automatisch
in Funktion.
BATTERIEWECHSEL
ACHTUNG: DIE ABBILDUNGEN DER BATTERIEN
SIND NICHT VERBINDLICH. IHRE BATTERIE
KANN VON DEM DARGESTELLTEN MODELL
ABWEICHEN. DIE VORGEHENSWEISE BEIM
WECHSELN UND LADEN DER BATTERIE
ÄNDERT SICH DADURCH NICHT.
28 •Die rote Verschlußschraube hinter dem Sitz in
die Position entsprechend Abbildung drehen (23
B). Den Sitz abnehemen. Die Stecker
herausziehen. Die Schraube des Batteriehalters
herausziehen. Den Batteriehalter abnehmen.
29• Die Batterie auswechseln. Den Batteriedeckel
wieder festschrauben. Die Steckern verbinden.
ACHTUNG: Den Sitz herunterklappen und
durch die Sicherheitsschraube befestigen.
LADEN DER BATTERIE
ACHTUNG: DAS LADEN DER BATTERIE UND
SÄMTLICHE ARBEITEN AN DER ELEKTRISCHEN
ANLAGE DÜRFEN NUR VON ERWACHSENEN
AUSGEFÜHRT WERDEN.
DIE BATTERIE KANN BEIM AUFLADEN AUCH IM
SPIELZEUG GELASSEN WERDEN.
30 •Den Stecker der Batterie B vom Stecker des
Kabelsatzes A trennen, indem gleichzeitig der
Schnappverschluß niedergedrückt wird.
31 •Den Stecker des Batterieladegeräts in eine
Haushaltssteckdose stecken und sich dabei an die
beigelegten Anweisungen halten. Den Stecker B
mit dem Stecker C des Batterieladegeräts
anschließen.
32 •Nach dem Aufladen den Stecker des Ladegerätes
C von der Haushaltssteckdose trennen. Den
Stecker des Ladegerätes C von der
Steckverbindung der Batterie B trennen.
33 •Die Stecker der Batterie B und des Kabelsatzes
A wieder miteinander verbinden. Zuletzt die
Sitze schließen und aus Sicherheitsgründen mit
der Schraube befestigen.

Nuestros juguetes respetan los requisitos de seguridad
previstos por el Consejo de la CEE (cumple con las
normas europeas de seguridad para juguetes), por el
“U.S. Consumer Toy Safety Specification” y están
aprobados por el I.I.S.G. (Istituto Italiano Sicurezza
Giocattoli). No cumplen con las disposiciones de las
normas de circulación por carreteras, por tanto no
pueden circular por vías públicas.
Peg Perego S.p.A. cuenta con la
certificación ISO 9001.
La certificación ofrece tanto a los
clientes como a los consumidores la
garantía de una transparencia y confianza
en lo que respecta al modo de trabajar
de la empresa.
¡ATENCIÓN! LA SUPERVISIÓN DE UN ADULTO
ES SIEMPRE NECESARIA.
• No adecuado para niños con una edad inferior a
los 24 meses por las características funcionales.
• No usar el vehículo en vías públicas, donde hay
tránsito y coches estacionados, en pendientes
pronunciadas, cerca de escaleras, cursos de agua y
piscinas.
• Los niños deben usar siempre zapatos durante el
uso del vehículo.
• Cuando el vehículo está funcionando, prestar
atención para que los niños no metan las manos,
los pies u otras partes del cuerpo cerca de las
partes en movimiento.
• No mojar nunca los componentes eléctricos del
vehículo como motores, cableado, botones…
• No usar gasolina u otras sustancias inflamables
cerca del vehículo.
• El vehículo debe ser usado únicamente por un
niño, siempre que no se incluya en la categoría de
vehículos con 2 plazas.
DIRECTIVA RAEE (sólo UE)
• Este producto representa al final de su vida un
residuo clasificado RAEE y, por tanto, no debe
eliminarse como residuo urbano, pero sí está
sujeto a la recogida diferenciada;
• Entregar el residuo en las correspondientes islas
ecológicas puestas a disposición;
• La presencia de sustancias peligrosas contenidas en
los componentes eléctricos de este producto
constituyen una fuente de peligro potencial para la
salud humana y para el ambiente si los productos
no se eliminan correctamente;
• El contenedor tachado indica que el producto está
sujeto a la recogida diferenciada.
ELIMINACIÓN DE LA BATERÍA
• Contribuya a la protección del medio ambiente
• La batería usada no se elimina con los residuos
domésticos.
• Pueden depositarla en un centro de recogida de
baterías usadas o de eliminación de residuos
especiales. Infórmese en su ayuntamiento.
NORMAS DE SEGURIDAD
La recarga de la batería debe ser efectuada y
supervisionada por personas adultas. No deje que
los niños jueguen con la batería.
RECARGA DE LA BATERÍA
• Recargar la batería siguiendo las instrucciones
incluidas en el cargador y no superar en ningún caso
las 24 horas.
• Recargar la batería a tiempo, apenas el vehículo
pierda velocidad. De este modo se evitarán daños.
• Si el vehículo se queda sin usarlo por largo tiempo,
recordar recargar la batería y mantenerla
desconectada de la instalación. Repetir la operación
de recarga al menos cada tres meses.
• La batería no debe recargarse en posición invertida.
• ¡No olvidar la batería si se está cargando!
Controlarla periódicamente.
• Usar sólo el cargador puesto a disposición y la
batería original PEG PEREGO.
• La batería está sellada y no necesita mantenimiento.
ATENCIÓN
• LA BATERÍA CONTIENE SUSTANCIAS TÓXICAS
CORROSIVAS.
NO DEBE MANIPULARSE.
• La batería contiene electrolitos de base ácida.
• Evitar el contacto directo entre los terminales de
la batería y golpes fuertes: riesgo de explosión o
incendio.
• La batería produce gas cuando se está cargando.
Recargarla en un lugar bien ventilado, lejos de
fuentes de calor y materiales inflamables.
• La batería agotada debe sacarse del vehículo.
• No colocar la batería sobre prendas, pues se
podrían dañar.
• Usar sólo el tipo de baterías o cargadores que se
aconseja o análogos.
SI HAY UNA PÉRDIDA
Protegerse los ojos. Evitar el contacto directo con el
electrolito. Proteger las manos.
Poner la batería en una bolsa de plástico y seguir las
instrucciones para la eliminación de baterías.
SI PIEL Y OJOS ENTRAN EN CONTACTO CON
EL ELECTROLITO
Lavar abundantemente la parte afectada con agua.
Consultar un médico inmediatamente.
SI SE INGIERE ELECTROLITO
Enjuagar la boca y escupir.
Consultar un médico inmediatamente.
ADVERTENCIA BATERÍA
• No es aconsejable dejar el juguete en ambientes
con temperaturas por debajo del cero. Si no se usa
el juguete en un ambiente con una temperatura
por encima del cero, podrán producirse daños
irreversibles en los motores y en las baterías.
• Controlar periódicamente el estado del vehículo,
en especial la instalación eléctrica, las conexiones
de las clavijas, las caperuzas de protección y el
cargador. En caso de defectos comprobados, el
vehículo eléctrico y el cargador no deben
utilizarse. Para las reparaciones, utilizar sólo piezas
de repuesto originales PEG PEREGO.
• PEG PEREGO no se asume ninguna responsabilidad
en caso de uso indebido de la instalación eléctrica.
• No dejar las baterías o el vehículo cerca de fuentes
de calor como radiadores, chimeneas.
• Proteger el vehículo contra el agua, la lluvia, la
nieve. No use el vehículo sobre arena o barro, pues
podría causar daños a los botones, motores y
reductores.
• Lubricar periódicamente (con aceite ligero) las
partes móviles como cojinetes, dirección.
• Las superficies del vehículo deben limpiarse con un
paño húmedo y, si es necesario, con productos no
abrasivos de uso doméstico.
• Las operaciones de limpieza siempre deben
realizarse por personas adultas.
• No desmontar nunca los dispositivos del vehículo
o los motores, sin la autorización de PEG
PEREGO.
MANTENIMIENTOY CUIDADOS DEL
VEHICULO
Lea atentamente este manual de instrucciones para
familiarizarse con el uso del modelo y enseñarle a su
niño un modo de conducir correcto, seguro y
divertido. Conserve después el manual para cualquier
consulta futura.
Antes de utilizar el vehículo por primera vez,
recargar la batería durante 18 horas. No respetar
este procedimiento podría causar daños irreversibles
en la batería.
•Años 2 +
• Vehículo de 1 plaza
• 1 Batería recargable de 6V 3,3Ah de plomo sellada
• 1 rueda motriz
• 1 motor de 60 W
• Velocidad en 1ª marcha 4 Km/h
Peg Perego podrá modificar en cualquier momento
los modelos descritos en este folleto, por razones
técnicas o comerciales.
PEG PEREGO® le agradece que haya elegido este
producto. Hace más de 50 años que PEG PEREGO
lleva a pasear a los niños.Al nacer, con sus
cochecitos, después con los coches de paseo y,
posteriormente, con los juguetes de pedal y
batería.
Descubre la gama completa de los productos, las
novedades y otras informaciones acerca del
mundo Peg Perego en nuestra página Web.
www.pegperego.com
DENOMINACIÓN DEL PRODUCTO
WINX QUAD
CÓDIGO DE IDENTIFICACIÓN DEL
PRODUCTO
IGED1150
NORMATIVAS de REFERENCIA (origen)
Directiva general de Seguridad para Juguetes
88/378/CE
Estándar EN71 / 1 -2 -3 -9
Estándar EN62115
Directiva de Compatibilidad Electromagnética
2004/108/CE
Estándar EN55022 – EN55014
Directiva Europea RAEE 2003/108/CE
Directiva Europea RoHS 2002/95/CE
Directiva Ftalatos 2005/84/CE
No cumple con las disposiciones de las normas de
circulación por carreteras, por tanto no puede
circular por vías públicas.
DECLARACIÓN DE CONFORMIDAD
PegPerego S.p.A. reconoce bajo su propia
responsabilidad que el presente artículo ha sido
sometido a ensayos internos y se ha homologado
conforme a las normas vigentes en laboratorios
externos e independientes.
FECHAY LUGAR DE EXPEDICIÓN
Italia - 15. 01. 2009
Peg Perego S.p.A.
via A. De Gasperi, 50
20043 - Arcore (MI) – ITALIA
ESPAÑOL
DECLARACIÓN DE CONFORMIDAD
INFORMACIONES IMPORTANTES

Para la seguridad del niño: antes de accionar el
vehículo, leer y seguir atentamente las siguientes
instrucciones.
• Enseñar a su niño el uso correcto del vehículo para
una conducción segura y divertida.
• Antes de partir, comprobar que el recorrido esté
libre de personas o cosas.
• Conducir con las manos sobre el volante/manubrio
y mirar siempre el camino.
• Frenar a tiempo para evitar choques.
2ª MARCHA (si presente)
Inicialmente se aconseja utilizar la 1ª marcha.Antes
de pasar a la 2ª marcha, cerciorarse de que el niño
haya aprendido a usar correctamente el
volante/manubrio, la 1ª marcha, el freno y haya
adquirido familiaridad con el vehículo.
¡ATENCIÓN!
• Controlar que todos los remaches/las tuercas de
fijación de las ruedas estén firmes.
• Si el vehículo funciona en condiciones de sobrecarga,
por ejemplo sobre arena blanda, barro o terrenos
muy accidentados, el interruptor de sobrecarga
desconectará inmediatamente la potencia. Después
de algunos segundos, se reanudará el suministro de
corriente.
• Sólo para vehículos de 12 y 24V: en primera marcha,
el vehículo cuenta con efecto diferencial como los
vehículos auténticos. Sobre terrenos lisos y con un
único niño, las dos ruedas pueden tener velocidades
diferentes pudiendo provocar resbalamiento/
deceleración de las mismas.
DIVERTIMIENTO SIN INTERRUPCIÓN: Hay un set
de baterías recargadas de repuesto puesto a
disposición y listo para su uso.
¿EL VEHÍCULO NO FUNCIONA?
• Controlar que la batería esté conectada a la pastilla
del acelerador.
• Controlar el botón del acelerador y, eventualmente,
sustituirlo.
• Controlar que la batería esté conectada a la
instalación eléctrica.
¿EL VEHÍCULO PIERDE POTENCIA?
• Recargar la batería. Si después de haberla recargado
el problema persiste, controlar la batería y el
cargador en un centro de asistencia.
¿PROBLEMAS?
REGLAS PARA UNA CONDUCCIÓN
SEGURA
PEG PEREGO ofrece un servicio de asistencia post-
venta, directa o a través de una red de centros de
asistencia autorizados para eventuales reparaciones
o sustituciones y venta de repuestos originales.
Para contactar los centros de asistencia, sírvase del
folleto “Centros de Asistencia” incluido en el
embalaje.
Para cualquier notificación,es indispensable disponer
del número de serie del artículo. Consultar la página
dedicada a las piezas de repuesto para obtener
información relativa al número de serie.
Peg Perego está a disposición de sus Consumidores
para satisfacer de la mejor manera sus exigencias.
Por este motivo, es para nosotros extremadamente
importante y primordial conocer la opinión de
nuestros Clientes.
Les estaríamos muy agradecidos si después de
utilizar uno de nuestro productos, cumplimentara
el CUESTIONARIO DE SATISFACCIÓN DEL CONSUMIDOR
que encuentra en Internet en la página Web
www.pegperego.com, indicando eventuales
observaciones o sugerencias.
SERVICIO DE ASISTENCIA
ATENCIÓN
LAS OPERACIONES DE MONTAJE DEBEN SER
REALIZADAS ÚNICAMENTE POR PERSONAS
ADULTAS.
PRESTAR ATENCIÓN AL SACARSE EL VEHÍCULO
DEL EMBALAJE.
TODOS LOS TORNILLOS Y LAS PIEZAS
PEQUEÑAS SE ENCUENTRAN EN UNA BOLSA
DENTRO DEL EMBALAJE.
LA BATERÍA PODRÍA ESTAR INTRODUCIDA EN
EL ARTÍCULO.
MONTAJE
1 • Controlar che el avantrén esté correctamente
enganchado en los puntos (A). Eliminar los
tapones de protección (B).
2 • Introducir una arandela de hierro en el pivote
del avantrén como muestra la figura.
3 • (1)Introducir una de las dos ruedas delanteras
fijándose en que se utilice la rueda representada
en la figura A. (2)Introducir una arandela de
hierro.
4 • Introducir una arandela autobloqueante en la
herramienta correspondiente representada en la
figura.Atención: las lengüetas de la arandela
autobloqueante deben dirigirse hacia el interior
de la herramienta (ver detalle A). NOTA: en la
bolsa encontrarán 8 arandelas autobloqueantes,
de las cuales 4 deben conservarse en el caso que
se rompa una.
5 • Fijar la rueda como indica la figura empujando a
fondo la arandela autobloqueante.
6 • Aplicar a presión el cubre-bullón. Efectuar las
mismas operaciones de la figura 2 para la otra
rueda delantera.
7 • Introducir una arandela autobloqueante en la
herramienta correspondiente representada en la
figura.Atención: las lengüetas de la arandela
autobloqueante deben dirigirse hacia el interior
de la herramienta (ver detalle A).
8 • Quitar los tapones grises de protección que hay
en los extremos del eje trasero. Introducir el eje
en la herramienta como indica la figura.
9 • (1)Introducir una arandela de hierro sobre el
eje. (2)Introducir el eje en una de las dos ruedas
traseras fijándose en que se utilice la rueda
representada en la figura A.
10 •Introducir el eje con la rueda en el orificio del
motorreductor hasta el fondo para que salga por
la parte opuesta del vehículo.
11 •Girar ligeramente las ruedas para que coincidan
encajando los pentágonos del motorreductor y
de la rueda (la figura muestra el enganche
incorrecto de la rueda).
12 •Introducir el casquillo como indica la figura por
la otra parte del eje hasta que se enganche a la
carrocería.
13 •Introducir una arandela de hierro como indica la
figura.
14 •Volver a poner la herramienta usada antes para
introducir la arandela autobloqueante (véase la
figura 7), sobre el eje por la parte de la rueda.
Colocar el vehículo de lado manteniendo la
rueda en la parte de abajo. Prestar atención en
que no se desplace la herramienta.
15 •(1)Colocar la última rueda y introducir una
arandela de hierro. (2)Introducir una arandela
autobloqueante en la herramienta
correspondiente representada en la figura.
Atención: las lengüetas de la arandela
autobloqueante deben dirigirse hacia el interior
de la herramienta (ver detalle A). (3)Fijar la
rueda como indica la figura empujando hasta el
fondo la arandela autobloqueante.
16 •Aplicar a presión los otros cubre-bullón por
ambos lados.
17 •Introducir el manubrio orientándolo como indica
la figura.
18 •Fijar el manubrio con una arandela y un tornillo.
19 •Encajar el tapón del manillar.
20 •Introducir los puños en el manillar.
21 •Montar las asas en la parte trasera del vehículo,
prestando atención a que estén colocadas en la
dirección correcta: el extremo más bajo debe
estar situado hacia la parte delantera del artículo
tal y como muestra la imagen.
22 •Atornillar las asas con los 4 tornillos
proporcionados.
23 •Girar la tuerca roja situada detrás del sillín hasta
la posición indicada en la figura.A: el sillín está
bloqueado; B: el sillín puede abrirse. Levantar el
sillín.
24 •Conectar los dos enchufes.
25 •Volver a colocar el sillín introduciendo los dos
pivotes en los orificios del depósito. Girar el
retén rojo que está detrás del sillín para fijarlo. El
INSTRUCCIONES DE MONTAJE vehículo ya está listo para usar.
CARACTERÍSTICASY USO DEL VEHÍCULO
26 •PALANCA DEL CAMBIO: vuestro hijo se
divertirá imitando el movimiento del cambio de
las marchas con esta palanca del cambio que
puede girarse en dos posiciones.
27 •PEDAL ACELERADOR / FRENO ELÉCTRICO:
levantando el pie, el freno se pondrá en
funcionamiento automáticamente.
CAMBIO DE LA BATERÍA
ATENCIÓN: LOS DIBUJOS DE LAS BATERÍAS SON
ÚNICAMENTE INDICATIVOS. SU BATERÍA
PODRÍA SER DIFERENTE CON RESPECTO AL
MODELO REPRESENTADO. NO OBSTANTE,
DEBERÁN SEGUIRSE LAS SECUENCIAS DE
SUSTITUCIÓN Y DE CARGA ILUSTRADAS.
28 •Girar la tuerca roja situada detrás del sillín hasta
la posición indicada en la figura 23 (figura B).
Levantar el sillín. Desconectar las clavijas.
Desenroscar el tornillo sujetabatería. Quitar el
sujetabatería.
29 •Cambie la batería.Vuelva a atornillar el retén de
la batería. Conecte los enchufes.ATENCIÓN:
Una vez terminadas estas operaciones,
recuérdese de cerrar y volver a atornillar el
asiento.
CARGA DE LA BATERÍA
ATENCIÓN: LA OPERACIÓN DE CARGA DE LA
BATERÍA ASÍ COMO CUALQUIER
INTERVENCIÓN ELÉCTRICA, DEBEN SER
REALIZADAS ÚNICAMENTE POR ADULTOS.
LA BATERÍA TAMBIÉN SE PUEDE CARGAR SIN
QUITARLA DEL JUGUETE.
SÓLO PARA EL BRASIL:Tensión del cargador: 127V -
60 Hz. Observación: no utilizar el cargador de la
batería con una tensión de 220V.
30 •Desconectar la clavija-instalación A de la clavija-
bateria B, pulsando de lado.
31 •Introducir la clavija del cargador de baterías en
una toma doméstica siguiendo las instrucciones
incluidas. Conectar el enchufe B con el enchufe
del cargador de baterías C.
32 •Una vez finalizada la carga desconectar el
cargador C de la toma de corriente y después
desconectar la clavija C de la clavija B.
33 •Introducir a fondo hasta el “clic” la clavija A e la
clavija B. Finalizada la operación recuerde
siempre cerrar el sillin.

Nossos brinquedos respeitam as Normas de Segurança
Européias para brinquedos (requisitos de segurança
previstos pelo Conselho da EEC) e pelo “U.S.
Consumer Toy Safety Specification”. São aprovados
pelo I.I.S.G (Instituto Italiano de Segurança para
Brinquedos). Não estão de acordo com as leis de
circulação viária e portanto não podem circular em
vias públicas.
Peg Perego S.p.A. é certificada
ISO 9001.
A certificação oferece aos clientes e aos
consumidores a garantia de transparência
e confiança no que se refere ao modo
com que a empresa trabalha.
ATENÇÃO! A SUPERVISÃO DE UM ADULTO É
SEMPRE NECESSÁRIA.
• Não indicado para crianças com idade inferior a 24
meses devido a características funcionais.
• Não use o veículo em vias públicas, onde exista
tráfego e automóveis estacionados, em rampas
muito inclinadas, perto de degraus e escadas,
cursos de águas e piscinas.
• As crianças devem estar sempre calçadas durante
o uso do veículo.
• Quando o veículo estiver em funcionamento,
preste atenção para que as crianças não coloquem
as mãos, pés ou partes do corpo, roupas ou outros
objetos, perto das peças em movimento.
• Não molhe jamais os componentes do veículo
como motores, instalações, botões, etc.
• Não use gasolina ou outras substâncias inflamáveis
perto do veículo.
• O veículo deve ser usado absolutamente por uma
única criança, já que não se enquadra na categoria
de veículos com dois lugares.
DIRETRIZ RAEE (somente UE)
• Este produto constitui ao fim de sua vida útil como
resíduo classificado RAEE e portanto não deve ser
eliminado como simples resíduo urbano, mas deve
ser sujeito à coleta seletiva;
• Entregue este resíduo nas apropriadas e relativas
ilhas ecológicas;
• A presença de substâncias perigosas contidas nos
componentes elétricos deste produto constitui
fonte de potencial perigo para a saúde humana e
para o meio ambiente, caso tais produtos não
forem corretamente eliminados;
• O desenho presente de um latão de lixo barrado
significa que o produto deve ser sujeito a coleta
seletiva.
DESCARTE DE BATERIAS
• Contribua para proteger o meio ambiente.
• A bateria usada, não pode ser jogada fora com os
resíduos domésticos.
• Podem ser depositadas num centro de coleta de
baterias usadas ou de eliminação de resíduos
especiais, informe-se junto ao setor competente.
NORMAS DE SEGURANÇA
Leia atentamente este manual de instruções para
familiarizar-se com o uso do modelo e ensinar ao seu
filho como dirigir de forma correta, segura e divertida.
Conserve então o manual para consultas futuras.
Antes de utilizar o veículo pela primeira vez, carregue
a bateria por 18 horas. Não observar tal procedimento
pode causar danos irreversíveis à bateria.
•Anos 2 +
• Veículo para 1 lugar
• 1 Bateria recarregável de 6V 3,3Ah em chumbo sigilada
• 1 roda motriz.
• 1 motor de 60 W
• Velocidade em 1ª marcha 4 Km/h
Peg Perego reserva-se o direito de efetuar a qualquer
momento, alterações nos modelos e informações
contidas nesta publicação, por razões técnicas ou
comerciais.
PEG PEREGO® agradece pela escolha deste
produto. Há mais de 50 anos PEG PEREGO leva
crianças a passear. Logo que nascem com seus
carrinhos e depois com as cadeirinhas de passeio, e
ainda depois com os brinquedos a pedais e bateria.
Descubra a linha completa dos produtos, as
novidades e outras informações acerca de Peg
Perego através de nosso site
www.pegperego.com
DENOMINAÇÃO DO PRODUTO
WINX QUAD
CÓDIGO DE IDENTIFICAÇÃO DO
PRODUTO
IGED1150
NORMAS DE REFERÊNCIA (origem)
Diretriz geral de Segurança para Brinquedos
88/378/CE
Standard EN71 / 1 -2 -3 -9
Standard EN62115
Diretriz Compatibilidade Electromagnética
2004/108/CE
Standard EN55022 – EN55014
Diretriz Européia RAEE 2003/108/CE
Diretriz Européia RoHS 2002/95/CE
Diretriz Ftalati 2005/84/CE
Não está de acordo com as leis de circulação
viária e portanto não pode circular em vias
públicas.
DECLARAÇÃO DE CONFORMIDADE
Peg Perego S.p.A. declara sob a própria
responsabilidade que o artigo em objeto foi
submetido a ensaios e testes internos e aprovado
de acordo com as normas técnicas vigentes junto a
laboratórios externos e independentes.
DATA E LOCAL DE EMISSÃO
Itália - 15 01. 2009
Peg Perego S.p.A.
via A. De Gasperi, 50
20043 - Arcore (MI) – ITALIA
PORTUGUÊS
DECLARAÇÃO DE CONFORMIDADE
INFORMAÇÕES IMPORTANTES
A recarga das baterias deve ser efetuada e supervisionada
somente por adultos.
Não deixe que crianças brinquem com as baterias.
CARREGAMENTO DA BATERIA
• Carregue a bateria seguindo as instruções anexas
ao carregador e em todo modo não ultrapasse 24
horas de recarga.
• Recarregue a bateria assim que o veículo perca
velocidade, para evitar danos.
• Caso seu veículo fique parado por muito tempo,
lembre-se de carregar a bateria e conservá-la
desligada da instalação; repita a operação de recarga
ao menos a cada três meses.
• A bateria não deve ser carregada de cabeça para
baixo.
• Não esqueça as baterias a carregar! Controle
periodicamente.
• Use somente o carregador de baterias fornecido e
baterias originais PEG PEREGO.
• A bateria é sigilada e não precisa de manutenção.
ATENÇÃO
• AS BATERIAS CONTÊM SUBSTÂNCIAS
TÓXICAS CORROSIVAS.
NÃO ADULTERÁ-LAS.
• As baterias contêm eletrólitos de base ácida.
• Não provoque contato direto entre os terminais
da bateria, evite golpes fortes: risco de explosão
e/ou incêndio.
• Durante a recarga, a bateria produz gás. Carregue a
bateria num local bem ventilado, longe de fontes de
calor e materiais inflamáveis.
• A bateria gasta deve ser removida do veículo.
• É desaconselhável apoiar a bateria sobre roupas,
poderiam danificar-se.
• Utilize somente baterias ou acumuladores do tipo
recomendado ou similar.
CASO OCORRA VAZAMENTO
Proteja seus olhos, evite contato direto com o
eletrólito: Proteja suas mãos.
Coloque a bateria numa bolsa de plástico e siga as
instruções sobre eliminação de baterias.
CASO A PELE OU ROUPAS ENTREM EM CONTATO
COM O ELETRÓLITO
Lave a parte afetada abundantemente com água corrente.
Consulte um médico imediatamente.
CASO O ELETRÓLITO SEJA INGERIDO
Enxagúe a boca e cuspa.
Consulte um médico imediatamente.
ADVERTÊNCIAS: BATERIA
• Não é aconselhável deixar o brinquedo em
ambientes com temperaturas abaixo de zero. Se
vier a ser utilizado sem levá-lo a uma temperatura
superior a zero, é possível haver danos irreversíveis
ao motor e à bateria.
• Controle regularmente o estado do veículo,
principalmente a instalação elétrica, as ligações das
tomadas, as proteções e o carregador de baterias.
Em caso de defeitos comprovados, o veiculo
elétrico e o carregador de baterias não devem ser
usados. Em caso de reparos, use somente peças
sobressalentes originais PEG PEREGO.
•PEG PEREGO não assume qualquer responsabilidade
em caso de adulteração do sistema elétrico.
• Não deixe as baterias ou o veículo perto de fontes
de calor como aquecedores, lareiras, etc.
• Proteja o veículo da agua, chuva, neve, etc.; usá-la
sobre a areia ou lama pode ocasionar danos nos
botões, motores e redutores.
• Lubrifique regularmente (com óleo leve) partes
móveis, como rolamentos, esterço, etc.
• As superfícies do veículo podem ser limpas com
um pano úmido e, se preciso, com produtos de uso
doméstico não abrasivos.
• As operações de limpeza devem ser efetuadas
somente por adultos.
• Não desmonte os mecanismos do veículo ou os
motores, sem a autorização da PEG PEREGO.
MANUTENÇÃO E CUIDADOS
COM O VEÍCULO

Para a segurança da criança: antes de ligar o veículo,
leia e siga atentamente as seguintes instruções.
• Ensine a criança a usar corretamente o veículo para
dirigi-lo de forma segura e divertida.
• Antes de dar a partida, certifique-se que o percurso
esteja desimpedido de pessoas ou coisas.
• Dirija com as mãos no volante e olhe sempre o
percurso.
• Freie em tempo para evitar colisões.
2ª VELOCIDADE (se existente)
Aconselha-se primeiramente o uso da 1ª marcha.
Antes de colocar a 2ª marcha, certifique-se que a
criança tenha aprendido como usar corretamente o
volante, a 1ª marcha, os freios, e tenha adquirido
familiaridade com o veículo.
ATENÇÃO!
• Controle que todos os tampos de fixação das
rodas estejam bem firmes.
• Se o veículo funcionar em condições de sobrecarga,
como sobre areia, lama ou terrenos muito
irregulares, o interruptor de sobrecarga
interromperá imediatamente a potência.A potência
será retomada depois de alguns segundos.
• Somente para veículos 12 e 24Volts: na primeira
marcha, o veículo possui um efeito diferencial como
nos automóveis verdadeiros, em terrenos lisos e
com uma única criança, as duas rodas podem ter
velocidades diferentes com a possibilidade de
derrapagem/ desaceleração das mesmas.
DIVERTIMENTO SEM INTERRUPÇÃO: conserve
sempre um conjunto de baterias carregadas para a
troca, prontas para serem usadas.
O VEÍCULO NÃO FUNCIONA?
• Verifique se não existem cabos desligados em
baixo da placa do acelerador.
• Controle o funcionamento do botão do acelerador
e eventualmente substitua-o.
• Verifique se a bateria está ligada à rede elétrica.
O VEÍCULO NÃO TEM POTÊNCIA?
• Carregue as baterias. Se após a recarga o problema
permanecer, peça o controle das baterias e do
carregador de baterias junto a um centro de
assistência.
PROBLEMAS?
REGRAS PARA CONDUZIR
COM SEGURANÇA
PEG PEREGO oferece um serviço de assistência pós-
venda,diretamente ou através de uma rede de centros
de assistência autorizados, para eventuais consertos
ou substituição e venda de sobressalentes originais.
Para contatar os centros de assistência, consulte o
folheto "Centros de Assistência" que encontrará na
embalagem.
Para qualquer comunicação, é necessário possuir o
número de série correspondente ao artigo. Para
identificar o número de série consulte a página
dedicada às peças de reposição.
Peg Perego está à disposição dos seus
Consumadores para satisfazer ao máximo suas
exigências. Por isso, conhecer a opinião de nossos
Clientes, é para nós muito importante e precioso.
Ficaremos muito agradecidos se depois de ter
utilizado um nosso produto, quiser preencher o
QUESTIONÁRIO DE SATISFAÇÃO DO CONSUMADOR, o
qual encontrará em Internet no seguinte endereço:
www.pegperego.com, indicando assim eventuais
observações ou sugestões.
SERVIÇO DE ASSISTÊNCIA
ATENÇÃO
AS OPERAÇÕES DE MONTAGEM DEVEM SER
FEITAS SOMENTE POR ADULTOS.
PRESTE ATENÇÃO AO RETIRAR O VEÍCULO DA
EMBALAGEM.
TODOS OS PARAFUSOS E PEQUENAS PEÇAS
ENCONTRAM-SE EM UM SAQUINHO DENTRO
DA EMBALAGEM.
PODE SER QUE A BATERIA TENHA JÁ SIDO
COLOCADA NO VEÍCULO.
MONTAGEM
1 • Controlar que o grupo das rodas esteja
correctamente enganchado nos pontos (A).
Eliminar as tampas de protecção (B).
2 • Inserir uma anilha de ferro sobre o perno do
eixo das rodas anteriores como mostra a figura.
3 • (1)Inserir uma das duas rodas anteriores
prestando atenção de utilizar a roda ilustrada na
figura A. (2)Inserir uma anilha de ferro.
4 • Inserir uma anilha auto-bloqueante sobre a
própria ferramenta como resulta ilustrado na
figura.Atenção, as linguetas da anilha auto-
bloqueante devem ser viradas para o interno da
ferramenta (ver o particular A). NOTA: no
saquinho, se encontra também 8 anilhas auto-
bloqueantes das quais 4 devem ser conservadas
para o caso que se quebre uma daquelas em uso.
5 • Fixar a roda como na figura empurrando até o
fundo a anilha auto-bloqueante.
6 • Aplicar a impulso o cobre-rebite. Efectuar as
mesmas operações da figura 2 para a outra roda
anterior.
7 • Inserir uma anilha auto-bloqueante sobre a
própria ferramenta como resulta ilustrado na
figura.Atenção, as linguetas da anilha auto-
bloqueante devem ser viradas para o interno da
ferramenta (ver o particular A).
8 • Retirar as tampas cinzas de protecção colocadas
na extremidade do eixo posterior. Enfiar o eixo
na ferramenta como indica a figura.
9 • (1)Inserir uma anilha de ferro sobre o eixo.
(2)Enfiar o eixo em uma das duas rodas
posteriores prestando atenção para utilizar a
roda ilustrada na figura A.
10 •Enfiar o eixo com a roda no furo do moto-
redutor até o fundo, em modo que saia da parte
oposta do veículo.
11 •Girar levemente a roda para fazer combinar o
encaixe dos pentagonos do moto-redutor e da
roda (a figura mostra o errado enganche da
roda).
12 •Enfiar a bussola como mostra a figura da outra
parte do eixo até enganchá-la na carcaça.
13 •Inserir uma anilha de ferro como mostra a figura.
14 •Reposicionar a ferramenta usada antes para
enfiar a anilha auto-bloqueante (ver a figura 7),
sobre o eixo da parte da roda. Posicionar o
veículo de lado colocando a roda para baixo.
Prestar atenção para que não se desloque a
ferramenta.
15 •(1)Posicionar a roda restante e inserir uma
anilha de ferro. (2)Inserir uma anilha auto-
bloqueante sobre a própria ferramenta como
está ilustrado na figura.Atenção, as linguetas da
anilha auto-bloqueante devem ser viradas para o
interno da ferramenta (ver o particular A).
(3)Fixar a roda, como na figura, empurrando até
o fundo a anilha auto-bloqueante.
16 •Aplicar a impulso os restantes cobre-rebites de
ambos os lados.
17 •Enfiar o guidão orientando-lo como na figura.
18 •Fixar o guidão com uma anilha e um parafuso.
19 •Introduza a tampa do guiador fazendo pressão.
20 •Introduza os punhos no guiador.
21 •Monte as pegas na parte traseira do veículo,
prestando atenção à direção correta de cada
pega: a extremidade mais baixa deve ficar virada
para a frente do artigo, como ilustrado na figura.
22 •Depois aparafuse as pegas com os 4 parafusos
fornecidos.
23 •Gire a trava vermelha localizada atrás do selim
até a posição indicada na figura.A: o selim está
travado; B: o selim pode ser aberto. Levante o
selim.
24 •Conexar as duas tomadas.
25 •Reposicionar o selim enfiando os dois pinos nos
furos do tanque. Girar o botão vermelho situado
por de trás do selim para fixá-lo. O veículo é
pronto para o uso.
CARACTERÍSTICAS E USO DO VEÍCULO
26 •ALAVANCA DE MUDANÇAS: a sua criança se
divertirá em imitar a passagem das marchas com
esta alavanca que pode ser movida em duas
INSTRUÇÕES DE MONTAGEM posições.
27 •PEDAL ACELERADOR/FREIO ELÉCTRICO:
levantando o pé, o freio entrará em função
automaticamente.
SUBSTITUIÇÃO DA BATERIA
ATENÇÃO: OS DESENHOS DAS BATERIAS SÃO
SOMENTE INDICATIVOS. SUA BATERIA PODE
SER DIFERENTE DO MODELO REPRESENTADO.
ISSO NÃO COMPROMETE AS SEQÜÊNCIAS DE
SUBSTITUIÇÃO E DE CARREGAMENTO
ILUSTRADAS.
28 •Gire a trava vermelha localizada atrás do selim
até a posição indicada na figura 23 (figura B).
Levante o selim. Desconecte os plugues.
Desatarraxe o parafuso do porta-bateria.
Remover o fecho da bateria.
29• Substituir a bateria. Reatarraxar o fecho da
bateria. Conexar as duas tomadas.ATENÇÃO:
Uma vez terminadas as operações lembre-se
sempre de fechar e de atarraxar a cadeira.
CARGA DA BATERIA
ATENÇÃO:A CARGA DA BATERIA E QUALQUER
INTERVENÇÃO NA INSTALAÇÃO ELÉTRICA
DEVEM SER FEITAS SOMENTE POR ADULTOS.
A PILHA TAMBÉM PODE SER CARREGADA SEM
SER RETIRADA DO BRINQUEDO.
TENSÃO DO CARREGADOR: 127V - 60Hz.
OBSERVAÇÃO: NÃO LIGAR O CARREGADOR
DA BATERIA EM TENSÃO DE 220V.
30 •Desconexar a tomada A do sistema eléctrico da
tomada B da bateria pressionando lateralmente.
31 •Inserir a tomada do carregador de baterias em
uma tomada de parede seguindo as instruções
anexadas. Ligar a tomada B com a tomada C do
carregador de baterias.
32 •Uma vez terminada a carga da bateria na tomada
de parede, desconexar a tomada C da tomada B.
33 •Inserir profundamente, até o impulso, a tomada
B na tomada A. Uma vez terminadas as
operações lembre-se sempre de fechar e fixar o
selim.

Skrbno preberite ta priročnik z navodili, da bi vam
bilo laže uporabljati izdelek in naučiti otroka, kako
pravilno in varno voziti ter se ob tem tudi zabavati.
Priročnik shranite, da ga boste lahko še kdaj prebrali.
Preden boste vozilo prvič uporabili, naj se akumulator
polni 18 ur. Če tega postopka ne boste upoštevali, bi
se lahko akumulator nepopravljivo poškodoval.
•Leta 2 +
•Vozilo za 1 osebo
•1 Svinčev akumulator 6V, 3,3Ah, zapečaten
• 1 pogonsko kolo
• 1 motor na 60 W
•Hitrost v prvi prestavi 4 km/h
Peg Perego si pridržuje pravico do sprememb na
modelih in v podatkih v pričujoči publikaciji iz tehničnih
ali podjetniških razlogov v kateremkoli trenutku.
PEG PEREGO® se vam zahvaljuje za nakup tega
izdelka. PEG PEREGO prevaža otroke že več kot
50 let. Čim se rodijo v košarah, nato v športnih
vozičkih in še pozneje na igračah na pedale ali
na akumulatorje.
Popolno paleto izdelkov, novosti in druge
informacije iz sveta Peg Perego odkrijte na
našem spletišču
www.pegperego.com
NAZIV IZDELKA
WINX QUAD
IDENTIFIKACIJSKA KODA IZDELKA
IGED1150
ZAKONSKA PODLAGA (izvor)
Splošna direktiva o varnosti igrač 88/378/ES
Standard EN71 / 1-2 -3 -9
Standard EN62115
Direktiva o elektromagnetni združljivosti
2004/108/ES
Standard EN55022 – EN55014
Evropska direktiva RAEE 2003/108/ES
Evropska direktiva RoHS 2002/95/ES
Direktiva o ftalatih 2005/84/ES
Ne ustreza predpisom za vožnjo po cestah, zato se
z njim otroci ne smejo voziti po javnih cestah.
IZJAVA O SKLADNOSTI
Peg Perego S.p.A. na lastno odgovornost izjavlja, da
je bil izdelek podvržen notranjim kolavdacijskim
preizkusom in da je homologiran v skladu z
veljavnimi predpisi v zunanjih, neodvisnih
laboratorijih.
DATUM IN KRAJ IZDAJE
Italija – 15. 01. 2009
Peg Perego S.p.A.
via A. De Gasperi 50
20043 - Arcore (MI) – ITALIA
SLOVENŠČINA
IZJAVA O SKLADNOSTI
POMEMBNE INFORMACIJE
Naše igrače so izdelane v skladu z evropskimi
varnostnimi predpisi za igrače (varnostni ukrepi, ki jih
predvideva Svet EGS) in s specifikacijo o uporabi
igrač, ki so jo izdale ZDA (U.S. Consumer Toy Safety
Specification). Potrdil jih je organ IISG (Italijanski
inštitut za varnost igrač).
Ne ustrezajo predpisom za vožnjo po cestah, zato se
z njimi otroci ne smejo voziti po javnih cestah.
Peg Perego S.p.A. ima certifikat
ISO 9001.
Certifikat za stranke in uporabnike
pomeni garancijo transparentnosti in
zaupanja v delo podjetja.
POZOR! OTROKE NAJ MED IGRO VEDNO
NADZORUJE ODRASLA OSEBA.
• Zaradi lastnosti delovanja ni primeren za otroke,
mlajše od 24 mesecev.
•Vozila ne uporabljajte na javnih cestah, kjer je tekoč
ali stoječ promet, na strminah, ob stopnicah, vodnih
tokovih ali bazenih.
•Otroci morajo imeti med vožnjo na vozilu vedno
obute čevlje.
•Ko je vozilo v pogonu, pazite, da otroci ne bodo
vtikali rok, nog ali drugih delov telesa, oblačil ali
drugih predmetov med premikajoče se dele.
•Nikoli ne polivajte delov vozila, kot so motor,
naprave, gumbi itd., z vodo.
•Ob vozilu nikoli ne uporabljajte bencina ali drugih
vnetljivih snovi.
•Če vozilo ne sodi v kategorijo vozil, namenjenih za
vožnjo dveh otrok, naj se z njim obvezno vozi le en
otrok.
DIREKTIVA RAEE (samo za EU)
•Ta izdelek je na koncu svoje življenjske dobe
odpadek razreda RAEE, zato ga ne smete zavreči
kot gospodinjski odpadek, ampak je predmet
ločenega zbiranja odpadkov;
•Odpadek odložite na ustreznem vnaprej pripravljenem
ekološkem otoku;
•Prisotnost nevarnih snovi v električnih delih tega
izdelka predstavljajo vir morebitne nevarnosti za
človeško življenje in za okolje, če izdelka ne
zavržete na pravilen način;
•Prekrižan smetnjak je oznaka, ki sporoča, da je
treba izdelek zavreči kot predmet ločenega zbiranja
odpadkov.
VARNO ODLAGANJE AKUMULATORJA
•Prizadevajte si za varovanje okolja.
•Iztrošenega akumulatorja ne zavrzite z gospodinjskimi
odpadki.
•Zavržete ga lahko v centru za zbiranje izrabljenih
baterij in akumulatorjev ali za zbiranje posebnih
odpadkov; pozanimajte se v svoji občini.
VARNOSTNI PREDPISI
Akumulator smejo polniti ali polnjenje nadzorovati
samo odrasle osebe.
Ne dovolite, da bi se z akumulatorjem igrali otroci.
POLNJENJE AKUMULATORJA
•Napolnite akumulatorje, tako da sledite navodilom,
priloženim polnilniku.Akumulator se ne sme polniti
več kot 24 ur.
•Če boste akumulator napolnili, takoj ko začne
vozilo izgubljati hitrost, se boste izognili njegovim
poškodbam.
•Če bo vozilo dlje časa stalo, napolnite akumulator
in ga odklopite iz naprave; napolnite ga vsaj vsake 3
mesece.
•Akumulatorja ne smete polniti, če stoji na glavi.
•Ne puščajte akumulatorja priključenega na
polnilnik! Akumulator redno pregledujte.
•Uporabljajte le priloženi polnilnik in originalne
akumulatorje PEG PEREGO.
•Zapečaten akumulator ne potrebuje vzdrževanja.
POZOR
•V AKUMULATORJU SO STRUPENE IN
KOROZIVNE SNOVI.
NE POSEGAJTE VANJ.
•V akumulatorju so kislinski elektroliti.
•Ne vzpostavljajte direktnega kontakta med končniki
na akumulatorjih in izogibajte se močnim udarcem:
tvegate eksplozijo ali požar.
•Med polnjenjem akumulatorja se sprošča plin.
Akumulator polnite v zračnem okolju, daleč od
virov toplote in gorljivih materialov.
•Iztrošen akumulator morate odstraniti iz vozila.
•Odsvetujemo odlaganje akumulatorja na oblačila;
lahko bi jih poškodovali.
•Uporabljajte le priporočene baterije ali
akumulatorje ali enakega tipa.
ČE AKUMULATOR PUŠČA
Zavarujte si oči; izogibajte se neposrednemu stiku z
elektrolitom: zaščitite si roke.
Akumulator odložite v plastično vrečko in
upoštevajte navodila za varno odlaganje
akumulatorjev.
ČE PRIDE ELEKTROLIT V STIK S KOŽO ALI OČMI
Prizadeto mesto sperite z veliko tekoče vode.
Takoj se posvetujte z zdravnikom.
ČE BI ELEKTROLIT POPILI
Splaknite usta in izpljunite.
Takoj se posvetujte z zdravnikom.
OPOZORILA ZA AKUMULATOR
• Ni priporočljivo puščati igrače v okolju, kjer je
temperatura nižja od nič stopinj. Če bi jo uporabili,
ne da bi jo najprej ogreli na temperaturo, višjo od
nič stopinj, bi se lahko motor in akumulatorji
nepopravljivo pokvarili.
•Redno preverjajte stanje vozila, še posebej
električne dele, povezavo vtičev, zaščitnih
pokrovčkov in polnilnika akumulatorjev. Če opazite
okvare, električnega dela in polnilnika
akumulatorjev ne smete uporabljati. Za popravilo
uporabljajte le originalne nadomestne dele PEG
PEREGO.
•PEG PEREGO ne prevzema odgovornosti za
primer poseganja v električno napravo.
•Ne puščajte akumulatorjev ali vozila ob virih
toplote, na primer radiatorjih, kaminih itd.
•Vozilo zaščitite pred vodo, dežjem, snegom itd.;
uporaba vozila na pesku ali v blatu lahko gumbe,
motor in reduktorje poškoduje.
•Občasno namažite (z lahkim oljem) dele, ki jih je
mogoče odstraniti, kot so ležaji, volan itd.
•Površine vozila lahko očistite z mokro krpo in, če
je to potrebno, blagim detergentom za rabo v
gospodinjstvu.
•Čistijo ga lahko samo odrasli.
•Nikoli ne snemajte mehanskih delov vozila ali
motorja, če vas za to ni pooblastil PEG PEREGO.
VZDRŽEVANJE IN SKRB ZA VOZILO

Za varnost otroka: preden vključite vozilo, preberite
navodila in se jih natančno držite.
•Otroka naučite pravilno uporabljati vozilo, da bo
vozil varno in da se bo ob tem lahko zabaval.
•Preden spelje, se prepričajte, da je pot prosta, da na
njej ni oseb ali stvari.
•Voziti je treba z rokami na volanu/krmilu in vedno
gledati na cesto.
•Vedno je treba pravočasno zavreti, da se ne bi
vozilo zaletelo.
2. PRESTAVA (če je nameščena)
Za začetek vam svetujemo uporabo 1. prestave.
Preden omogočite 2. prestavo, se prepričajte, da zna
otrok pravilno uporabljati volan/krmilo, 1. prestavo,
zavoro in da se je vozila privadil.
POZOR!
•Preverite, da so vse pritrditvene zaponke/matice na
kolesih dobro pritrjene.
•Če vozilo deluje s preobremenitvami, na primer na
mehkem pesku, na blatni ali zelo razdrapani
površini, bo stikalo za preobremenitev izključilo tok.
Delovanje se bo vzpostavilo po nekaj sekundah.
•Samo za vozila na 12 in 24 voltov: prestava vozila je
opremljena z diferencialnim učinkom, tako kot pravi
avtomobili; na gladki površini in v vozilu sedi le en
otrok, se lahko kolesa vrtijo različno hitro, lahko
zdrsnejo ali upočasnijo.
NEPREKINJENA ZABAVA: imejte pripravljen komplet
polnih akumulatorjev.
VOZILO NE DELUJE?
•Preverite, da ni pod ploščico pospeševalnika kateri
od kablov odklopljen.
•Preverite delovanje gumba za pospeševanje in če
ne deluje, ga zamenjajte.
•Preverite, da je akumulator priključen na električno
napeljavo vozila.
VOZILO NIMA MOČI?
•Napolnite akumulatorje. Če po polnjenju akumulatorja
težava še vedno obstaja, odnesite akumulatorje in
polnilnike v center za pomoč uporabnikom.
TEŽAVE?
PRAVILA ZA VARNO VOŽNJO
PEG PEREGO ponuja pomoč uporabnikom, ki so
kupili izdelek, neposredno ali prek svoje mreže
pooblaščenih centrov za pomoč uporabnikom, za
morebitna popravila, zamenjave ali nakup originalnih
rezervnih delov.
Da bi stopili v stik s centrom za pomoč uporabnikom,
glejte v knjižico "CENTRI ZA POMOČ UPORABNIKOM",
ki je v embalaži.
Za vse pripombe morate imeti serijsko številko, ki
ustreza izdelku. Da bi našli serijsko številko, glejte
stran, na kateri so prikazani rezervni deli.
Peg Perego je vedno na voljo svojim strankam, da
v kar največji meri izpolni njihove potrebe. Zato je
za nas zelo pomembno, da poznamo mnenje svojih
strank. Hvaležni vam bomo, če si boste, ko boste
uporabili naš izdelek, vzeli čas in izpolnili
VPRAŠALNIK O ZADOVOLJSTVU STRANK, ki ga boste
našli na naših spletnih straneh, na naslovu:
www.pegperego.com in nam sporočili vaše
pripombe in predloge.
POMOČ UPORABNIKOM
POZOR
IZDELEK SMEJO SESTAVITI IZKLJUČNO ODRASLE
OSEBE.
PAZITE, KO IZDELEK VLEČETE IZ EMBALAŽE.
VSI VIJAKI IN MAJHNI DELCI SO V VREČKI V
EMBALAŽI.
AKUMULATOR JE MORDA ŽE NAMEŠČEN V
VOZILU.
SESTAVLJANJE
1•Preverite, da je prednja prema pravilno
priključena na točkah A. Odstranite zaščitna
pokrovčka B.
2•Vstavite železno podložko na zatič prednje
preme, kot je prikazano na risbi.
3•(1)Nataknite eno od obeh sprednjih koles in
pazite, da boste uporabili kolo, prikazano na sliki
A. (2)Vstavite železno podložko.
4•Samoblokirno podložko nataknite na ustrezno
orodje, prikazano na risbi. Pozor, jezički
samoblokirne podložke morajo biti obrnjeni
proti orodju (glej podrobnost A). OPOMBA: v
vrečki boste našli 8 samoblokirnih podložk. 4
shranite za primer, da se katera od uporabljenih
polomi.
5•Pritrdite kolo, kot prikazuje risba in ga potisnite
do konca samoblokirne podložke.
6•S klikom pritrdite pokrova za zakovice. Enako
kakor je prikazano na risbi 2, naredite še za
drugo sprednje kolo.
7•Samoblokirno podložko nataknite na ustrezno
orodje, prikazano na risbi. Pozor, jezički
samoblokirne podložke morajo biti obrnjeni
proti orodju (glej podrobnost A).
8•Odstranite zaščitna pokrovčka s koncev zadnje
osi.Vstavite os v orodje, kot prikazuje risba in
potolcite s kladivom.
9•(1)Vstavite železno podložko na os. (2)Vstavite
os v eno od obeh zadnjih koles in pazite, da
boste uporabili kolo, prikazano na risbi A.
10 •Os s kolesom vstavite v odprtino na reduktorju
motorja do konca, tako da pride na drugi strani
ven.
11 •Rahlo zavrtite kolo, tako da se ujamejo petkotniki
reduktorja na motorju in kolesa (na risbi A je
prikazan napačen priklop kolesa).
12 •Vstavite nosilec, kot je prikazano na risbi, na
drugo stran osi, dokler se ne zatakne s klikom.
13 •Vstavite železno podložko, kot prikazuje risba.
14 •Orodje, ki ste ga prej uporabili za vstavljanje
samoblokirne podložke (glej risbo 7), nastavite
spet na os na strani kolesa.Vozilo postavite na
eno stranico, pri čemer naj kolo ostane na tleh.
Pazite, da se orodje ne bo premaknilo.
15 •(1) Postavite drugo kolo in vstavite železno
podložko. (2) Samoblokirno podložko nataknite
na ustrezno orodje, prikazano na risbi. Pozor,
jezički samoblokirne podložke morajo biti
obrnjeni proti orodju (glej podrobnost A). (3)
Pritrdite kolo, kot prikazuje risba in ga potisnite
do konca samoblokirne podložke.
16 •S klikom namestite še druga dva pokrova za
zakovice na obeh straneh.
17 •Vstavite krmilo, kot prikazuje risba, in pazite, da
bo gledalo v pravo smer.
18 •Pritrdite krmilo s podložko in vijakom.
19 •S pritiskom vstavite pokrovček krmila.
20 •Nataknite ročice na krmilo.
21 •Postavite ročaje na zadnji del vozila in pri tem
pazite na pravilno smer vsakega ročaja: nižji del
mora biti obrnjen proti sprednjemu koncu
izdelka, kot prikazuje risba.
22 •Nato ročaje privijte s 4 priloženimi vijaki.
23 •Zavrtite rdeči zaustavitveni zatič za sedežem,
tako da ga zavrtite v položaj na sliki.A: sedež je
blokiran; B: sedež je mogoče odpreti. Dvignite
sedež.
24 •Sestavite oba vtiča.
25 •Sedež postavite na njegovo mesto, tako da
zataknete oba zatiča v odprtine na rezervoarju.
Zavrtite rdeči zaustavitveni zatič za sedežem, da
bi ga fiksirali.Vozilo je pripravljeno za rabo.
LASTNOSTI IN UPORABA VOZILA
26 •MENJALNIK: vaš otrok se bo zabaval, ko bo
posnemal pretikanje menjalne ročice, ki jo je
mogoče zavrteti v dva položaja.
27 •PEDAL ZA POSPEŠEVANJE/ELEKTRIČNA
ZAVORA: ko otrok dvigne nogo, se takoj sproži
zavora.
ZAMENJAVA AKUMULATORJA
OPOZORILO: RISBE AKUMULATORJA SO
OKVIRNE.VAŠ AKUMULATOR JE MORDA
NAVODILA ZA SESTAVLJANJE DRUGAČEN MODEL.TO NE VPLIVA NA
NARISANO ZAPOREDJE DEJANJ PRI ZAMENJAVI
IN POLNJENJU.
28 •Zavrtite rdeči zaustavitveni zatič za sedežem,
tako da ga zavrtite v položaj na sliki 23 (slika B).
Dvignite sedež. Iztaknite vtiče. Odvijte vijaka za
pritrditev akumulatorja. Odstranite zaustavljalnik
akumulatorja.
29 •Zamenjava akumulatorja. Postavite ga na njegovo
mesto in spet privijte zaustavljalnik akumulatorja.
Sestavite oba vtiča. POZOR: ko končate, vedno
zaprite in pritrdite sedež.
POLNJENJE AKUMULATORJA
POZOR: POLNJENJE AKUMULATORJA IN VSE
DRUGE POSTOPKE, POVEZANE Z ELEKTRIČNO
NAPELJAVO, SMEJO IZVAJATI LE ODRASLE OSEBE.
AKUMULATOR JE MOGOČE NAPOLNITI, NE DA
BI GA SNELI Z IGRAČE.
30 •Odklopite vtič A električne napeljave z vtiča B
akumulatorja, tako da pritisnete ob strani.
31 •Vtaknite vtič polnilnika za akumulator v vtičnico
domačega električnega omrežja, tako da sledite
priloženim navodilom. Povežite vtič B z vtičem C
polnilnika za akumulator.
32 •Ko končate polnjenje, odklopite polnilnik
akumulatorja iz domačega omrežja in odklopite
vtičnico C z vtičnice B.
33 •Do konca, tako da klikne, vstavite vtičnico B v
vtičnico A. Ko končate, vedno zaprite in pritrdite
sedež.

Opladning af batteriet må kun foretages og overvåges
af voksne.
Lad aldrig dine børn lege med batteriet.
OPLADNING AF BATTERIET
• Oplad batteriet ved at følge anvisningerne vedlagt
batteriopladeren og aldrig i mere end 24 timer.
• Genoplad batteriet, så snart køretøjet begynder at
miste hastighed, for således at undgå at det beskadiges.
• Hvis køretøjet ikke anvendes i længere tid, skal du
huske at genoplade batteriet og at frakoble det fra
anlægget; foretag genopladning mindst hver tredje
måned.
• Batteriet må ikke vendes på hovedet under
genopladningen.
• Glem ikke batteriet under opladning! Kontroller
det regelmæssigt.
• Brug kun den medfølgende batterioplader og det
originale PEG PEREGO batteri.
• Batteriet er forseglet og har ikke behov for
vedligeholdelse.
PAS PÅ!
• BATTERIET INDEHOLDER GIFTIGE OG ÆTSENDE
STOFFER.
FORETAG INGEN INDGREB PÅ DET.
• Batteriet indeholder syrebaserede elektrolytter.
• Foretag ikke nogen direkte sammenkobling af
batteriets terminalpunkter og undgå at det
udsættes for hårde stød: Der er fare for eksplosion
og/eller brand.
• Batterier danner gas under opladningen. Oplad
batteriet på et godt ventileret sted og langt væk fra
varmekilder og brændbare stoffer.
• Når batteriet er opbrugt, skal det fjernes fra
køretøjet.
• Det frarådes at holde batteriet op mod tøj; der
kunne opstå skader.
• Anvend kun batterier eller akkumulatorer af den
anbefalede type eller en tilsvarende type.
HVIS DER FOREKOMMER EN LÆKAGE
Beskyt øjnene; undgå direkte kontakt med
elektrolytten: beskyt hænderne.
Anbring batteriet i en plastikpose og følg
anvisningerne vedrørende bortskaffelse af batterier.
HVIS HUD ELLER ØJNE KOMMER I KONTAKT MED
ELEKTROLYTTEN
Vask det ramte område med rigelige mængder
rindende vand.
Henvend dig straks til en læge.
HVIS ELEKTROLYTTEN KOMMER I MUNDEN
Skyl munden grundigt og spyt ud.
Henvend dig straks til en læge.
BEMÆRKNINGER OM BATTERIET
• Det anbefales ikke at efterlade legetøjet i miljøer
med en temperatur på under frysepunktet. Hvis
det bruges uden først at sørge for, at temperaturen
er over frysepunktet, kan det forårsage ubodelige
skader på motor og batterier.
• Kontroller køretøjets tilstand regelmæssigt, specielt
hvad angår det elektriske anlæg, stikforbindelserne,
beskyttelsesplader og batteriopladeren. Hvis du
finder defekter, må dette elektriske køretøj og
batteriopladeren ikke anvendes.Ved reparationer
må der kun anvendes originale PEG PEREGO
reservedele.
•PEG PEREGO påtager sig intet ansvar i tilfælde af
indgreb på det elektriske anlæg.
• Efterlad ikke batterierne eller køretøjet i nærheden
af varmekilder, som f.eks. varmeapparater, åbne
ildsteder osv.
• Beskyt køretøjet imod vand, regn, sne osv.; hvis det
anvendes på sand eller i mudder kan det forårsage
skader på trykknapper, motorer og reduktionsgear.
• Smør regelmæssigt (med en let olie) de bevægelige
dele som f.eks. lejer, rat osv.
• Køretøjets overflader kan rengøres med en fugtig
klud og - om nødvendigt - med almindelige milde
rengøringsmidler til husholdningen.
• Rengøringen må kun udføres af voksne.
• Demonter aldrig nogen af køretøjets mekaniske
dele eller motoren, med mindre dette er godkendt
af PEG PEREGO.
VEDLIGEHOLDELSE OG
BEHANDLING AF KØRETØJET
Læs denne brugsanvisning omhyggeligt, så du kan lære
denne model at kende og kan lære dit barn, hvordan
den skal køres på korrekt, sikker og fornøjelig måde.
Opbevar denne manual med henblik på anvendelse i
fremtiden.
Før køretøjet anvendes for første gang skal batteriet
oplades fuldstændigt i 18 timer. Hvis denne
fremgangsmåde ikke overholdes, kan det forårsage
uafhjælpelige skader på batteriet.
•År 2 +
• Køretøj med 1 plads
• 1 genopladeligt batteri på 6V 3,3Ah med blyforsegling
• 1 drivende hjul
• 1 motor på 60 W
• Hastighed i 1. gear 4 Km/h
Peg Perego forbeholder sig ret til når som helst at
foretage ændringer på modeller og data angivet i
denne brochure på grund af tekniske eller
erhvervsmæssige årsager.
PEG PEREGO® takker dig for dit valg af dette
produkt. I mere end 50 år har PEG PEREGO taget
ungerne med på tur. Som nyfødte med barnevogne,
herefter med klapvogne og senere endnu med
pedaltrukket eller batteridrevet kørelegetøj.
Kom og se hele vores produktudvalg, nyhederne og
andre nyttige oplysninger fra Peg Perego på vores
website
www.pegperego.com
PRODUKTBETEGNELSE
WINX QUAD
PRODUKTETS IDENTIFIKATIONSKODE
IGED1150
REFERENCENORMER (oprindelse)
Direktiv om sikkerhedskrav til legetøj 88/378/EF
Standard EN71 / 1 -2 -3 -9
Standard EN62115
Direktiv om Elektromagnetisk kompatibilitet
2004/108/EF
Standard EN55022 – EN55014
EU-direktiv WEEE 2003/108/EF
EU-direktiv RoHS 2002/95/EF
Direktiv om indhold af phthalater 2005/84/EF
Køretøjet er ikke konformt med forskrifterne i
færdselsloven og det må derfor ikke anvendes på
offentlig vej.
KONFORMITETSERKLÆRING
Peg-Pérego S.p.A. erklærer under eget ansvar, at
dette produkt har undergået interne tests og er
typegodkendt i henhold til gældende normer af
eksterne og uafhængige afprøvningslaboratorier.
UDSTEDELSESDATO OG -STED
Italien - 15. 01. 2009
Peg Perego S.p.A.
via A. De Gasperi, 50
20043 - Arcore (MI) – ITALIA
DANSK
KONFORMITETSERKLÆRING
VIGTIGE OPLYSNINGER
Vores legetøjsprodukter er fremstillet i
overensstemmelse med de europæiske
sikkerhedsforskrifter for legetøj (sikkerhedskrav
foreskrevet af Europarådet) og med ”U.S. Consumer
Toy Safety Specification”. De er godkendt af I.I.S.G.
(Det Italienske Institut for Legetøjssikkerhed). De er
ikke konforme med forskrifterne i færdselsloven og
de må derfor ikke anvendes på offentlig vej.
Peg Perego S.p.A. er ISO 9001
certificeret.
Certificeringen yder kunder og
forbrugere garanti for gennemskuelighed
og tillid til måden firmaet arbejder på.
PAS PÅ! DET ER ALTID PÅKRÆVET,AT LEGEN
OVERVÅGES AF EN VOKSEN.
• Køretøjet er på grund af dets funktionsegenskaber
ikke egnet til børn under 24 måneder.
• Anvend ikke køretøjet på offentlig vej, hvor der er
trafik og parkerede biler, på stejle skråninger, i
nærheden af trin eller trapper, nær vandløb og
svømmebassiner.
• Børnene skal altid være iført fodtøj, når de bruger
køretøjet.
• Når køretøjet anvendes, bør du passe på, at barnet
ikke stikker hænder, fødder eller andre legemsdele,
beklædningsstykker eller ting ind i de bevægelige
dele.
• Oversprøjt aldrig køretøjets dele som motor,
elanlæg, trykknapper osv. med vand.
• Brug ikke benzin eller andre brandfarlige væsker i
nærheden af køretøjet.
• Køretøjet må kun anvendes af et barn, med mindre
det falder inden for kategorien køretøj med to
pladser.
WEEE-direktivet (kun EU)
• Ved udløbet af dette produkts levetid klassificeres
det som WEEE-affald og må derfor ikke bortskaffes
sammen med almindeligt husholdningsafffald, men
skal indleveres til særligt opsamlingssted.
• Aflever det skrottede produkt på de dertil indrettede
miljøpladser;
• De elektriske dele i dette produkt indeholder
farlige stoffer, der indebærer fare for helbredet og
for miljøet, hvis produkterne ikke skrottes på
korrekt måde;
• Mærkaten med den overstregede skraldespand
angiver, at produktet skal bortskaffes til særlige
opsamlingssteder.
BORTSKAFFELSE AF BATTERIET
• Vær med til at passe på miljøet.
• Et brugt batteri bør aldrig smides væk sammen
med almindeligt husholdningsaffald.
• De kan indleveres til et batteriindsamlingssted eller
til specielle affaldsdepoter; få yderligere oplysninger
hos din kommune.
SIKKERHEDSNORMER
This manual suits for next models
1
Table of contents
Languages:
Other Peg-Perego Offroad Vehicle manuals