manuals.online logo
Brands
  1. Home
  2. •
  3. Brands
  4. •
  5. Philips
  6. •
  7. Projection TV
  8. •
  9. Philips Magnavox 8P6031C101 User manual

Philips Magnavox 8P6031C101 User manual

This manual suits for next models

1

Other Philips Projection TV manuals

Philips 55PP9352 User manual

Philips

Philips 55PP9352 User manual

Philips Magnavox 7P5451C User manual

Philips

Philips Magnavox 7P5451C User manual

Philips 51 IN DIGITAL WIDESCREEN HDTV MONITOR... User manual

Philips

Philips 51 IN DIGITAL WIDESCREEN HDTV MONITOR... User manual

Philips 64P834199 Manual

Philips

Philips 64P834199 Manual

Philips 51PP9303H/17B User manual

Philips

Philips 51PP9303H/17B User manual

Philips matchline 50PP8421 User manual

Philips

Philips matchline 50PP8421 User manual

Philips 60PL9220D User manual

Philips

Philips 60PL9220D User manual

Philips 8P4834C User manual

Philips

Philips 8P4834C User manual

Philips 28PW5408 User manual

Philips

Philips 28PW5408 User manual

Philips 60P 9161 User manual

Philips

Philips 60P 9161 User manual

Philips 64PP 9901 Operating manual

Philips

Philips 64PP 9901 Operating manual

Philips 41CE8741 User manual

Philips

Philips 41CE8741 User manual

Philips 50PP7445 User manual

Philips

Philips 50PP7445 User manual

Philips 64P 9271 User manual

Philips

Philips 64P 9271 User manual

Philips 51PP9200D User manual

Philips

Philips 51PP9200D User manual

Philips 50PL9126D/37E User manual

Philips

Philips 50PL9126D/37E User manual

Philips 55PP9363H User manual

Philips

Philips 55PP9363H User manual

Philips 55P8341 User manual

Philips

Philips 55P8341 User manual

Philips 50P834299 Manual

Philips

Philips 50P834299 Manual

Philips 64PH9905 User manual

Philips

Philips 64PH9905 User manual

Philips Magnavox 8P6031C User manual

Philips

Philips Magnavox 8P6031C User manual

Philips 51PP9363H User manual

Philips

Philips 51PP9363H User manual

Philips 60P834299 Manual

Philips

Philips 60P834299 Manual

Philips 46PP9302 User manual

Philips

Philips 46PP9302 User manual

Popular Projection TV manuals by other brands

Sony KDF-46E3000 - Bravia 3lcd Micro Display High Definition... operating instructions

Sony

Sony KDF-46E3000 - Bravia 3lcd Micro Display High Definition... operating instructions

Samsung ST-43T6P Owner's instructions

Samsung

Samsung ST-43T6P Owner's instructions

Toshiba ColorStream TP50G60 owner's manual

Toshiba

Toshiba ColorStream TP50G60 owner's manual

Mitsubishi Electric WD-65734 Specification sheet

Mitsubishi Electric

Mitsubishi Electric WD-65734 Specification sheet

Optoma EP652A user manual

Optoma

Optoma EP652A user manual

Hitachi 51F510 operating guide

Hitachi

Hitachi 51F510 operating guide

RCA P52950 user guide

RCA

RCA P52950 user guide

JVC I'Art Pro AV-48P776 Brochure & specs

JVC

JVC I'Art Pro AV-48P776 Brochure & specs

Samsung SP43T8HPX/XEC Service manual

Samsung

Samsung SP43T8HPX/XEC Service manual

Sony GRAND WEGA KDF-55XS955 operating instructions

Sony

Sony GRAND WEGA KDF-55XS955 operating instructions

Magnavox 51MP392H - 51" Widescreen Hd Ready Tv owner's manual

Magnavox

Magnavox 51MP392H - 51" Widescreen Hd Ready Tv owner's manual

Sony KP-46WT520 - Wide Screen Projection Tv Service manual

Sony

Sony KP-46WT520 - Wide Screen Projection Tv Service manual

Toshiba 42HM66 - 42" Rear Projection TV owner's manual

Toshiba

Toshiba 42HM66 - 42" Rear Projection TV owner's manual

Sony KP-57WS500 - 57" Hi-scan 1080i™ 16:9 Projection... Dimensions

Sony

Sony KP-57WS500 - 57" Hi-scan 1080i™ 16:9 Projection... Dimensions

Hitachi 51S715 operating guide

Hitachi

Hitachi 51S715 operating guide

Samsung HC-P5256W Owner's instructions

Samsung

Samsung HC-P5256W Owner's instructions

Sony Grand Wega KDF-42E2000 operating instructions

Sony

Sony Grand Wega KDF-42E2000 operating instructions

Sony KP-51DS1U Service manual

Sony

Sony KP-51DS1U Service manual

manuals.online logo
manuals.online logoBrands
  • About & Mission
  • Contact us
  • Privacy Policy
  • Terms and Conditions

Copyright 2025 Manuals.Online. All Rights Reserved.

Instructions for use
MAGNAVOX
81_ 0}5 07392
_Getting Started o
Welcome/Product Registration ................... 2
Safety/Precautions ..................................................... 3
Table of Contents ....................................................... 4
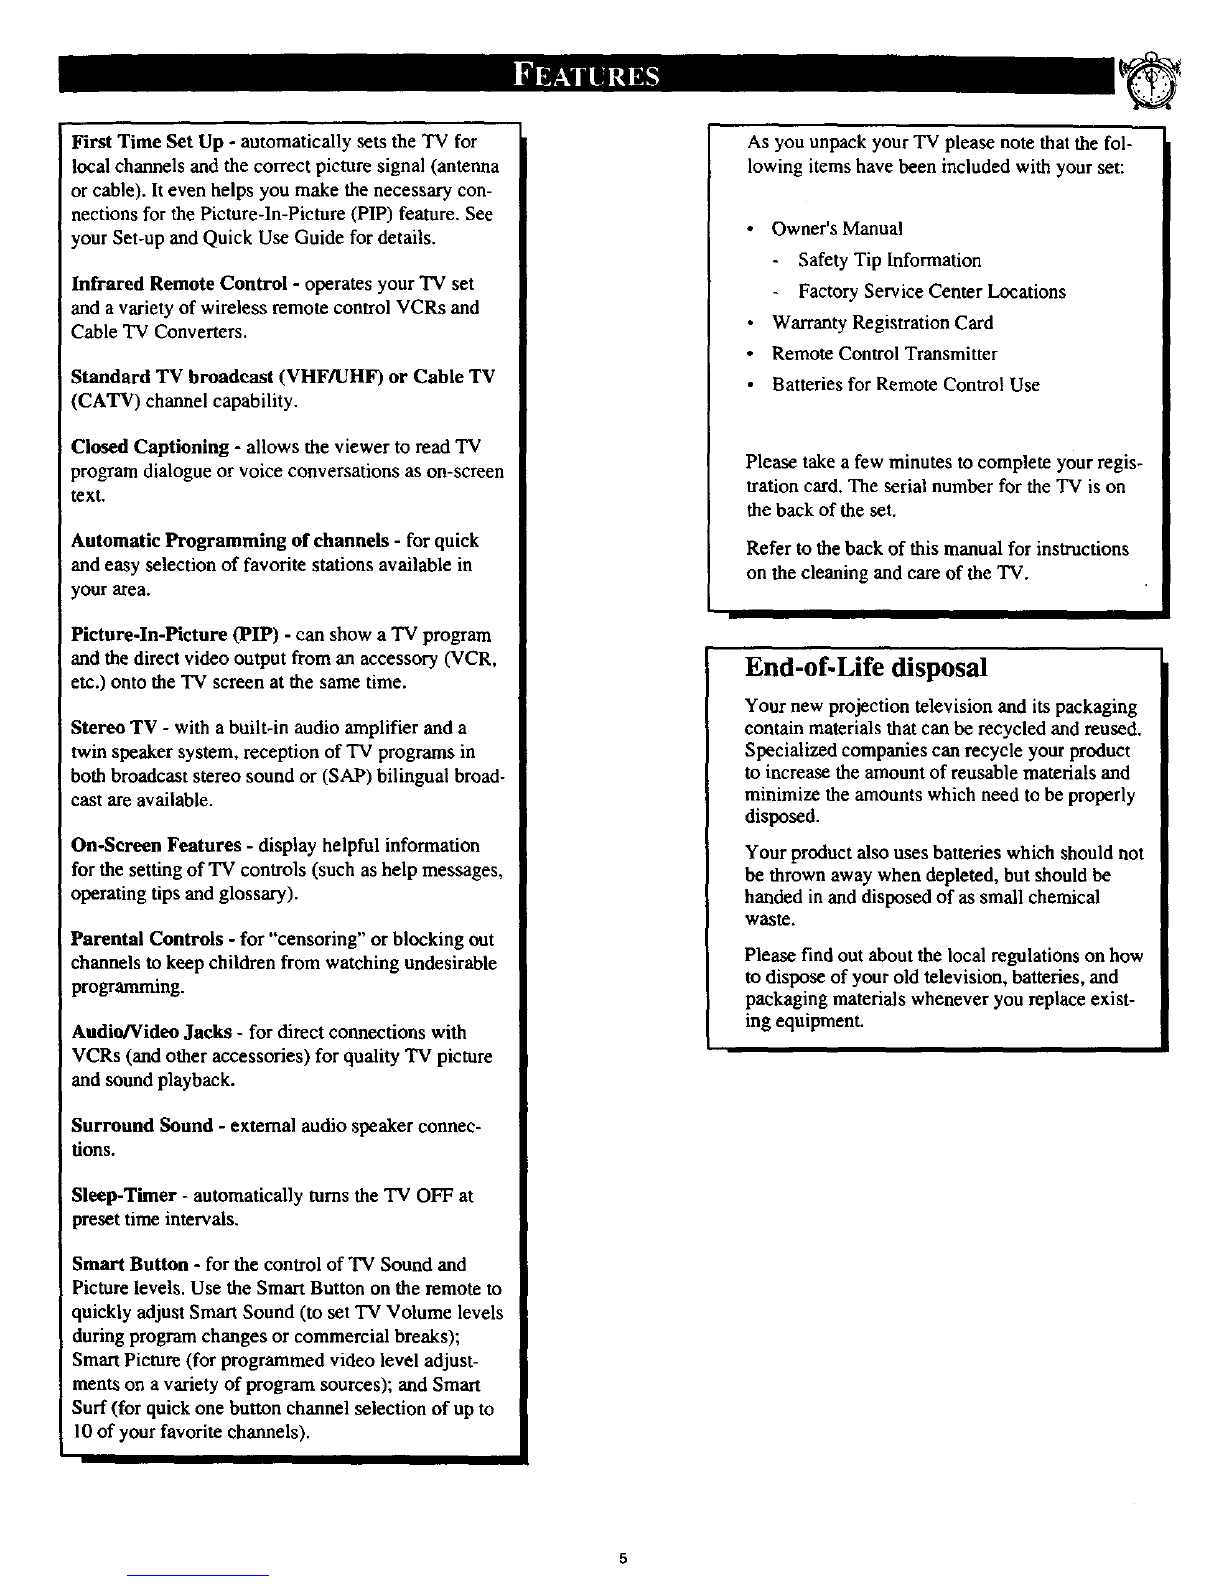
Features and Model Information ................................ 5
_] On-Screen Features
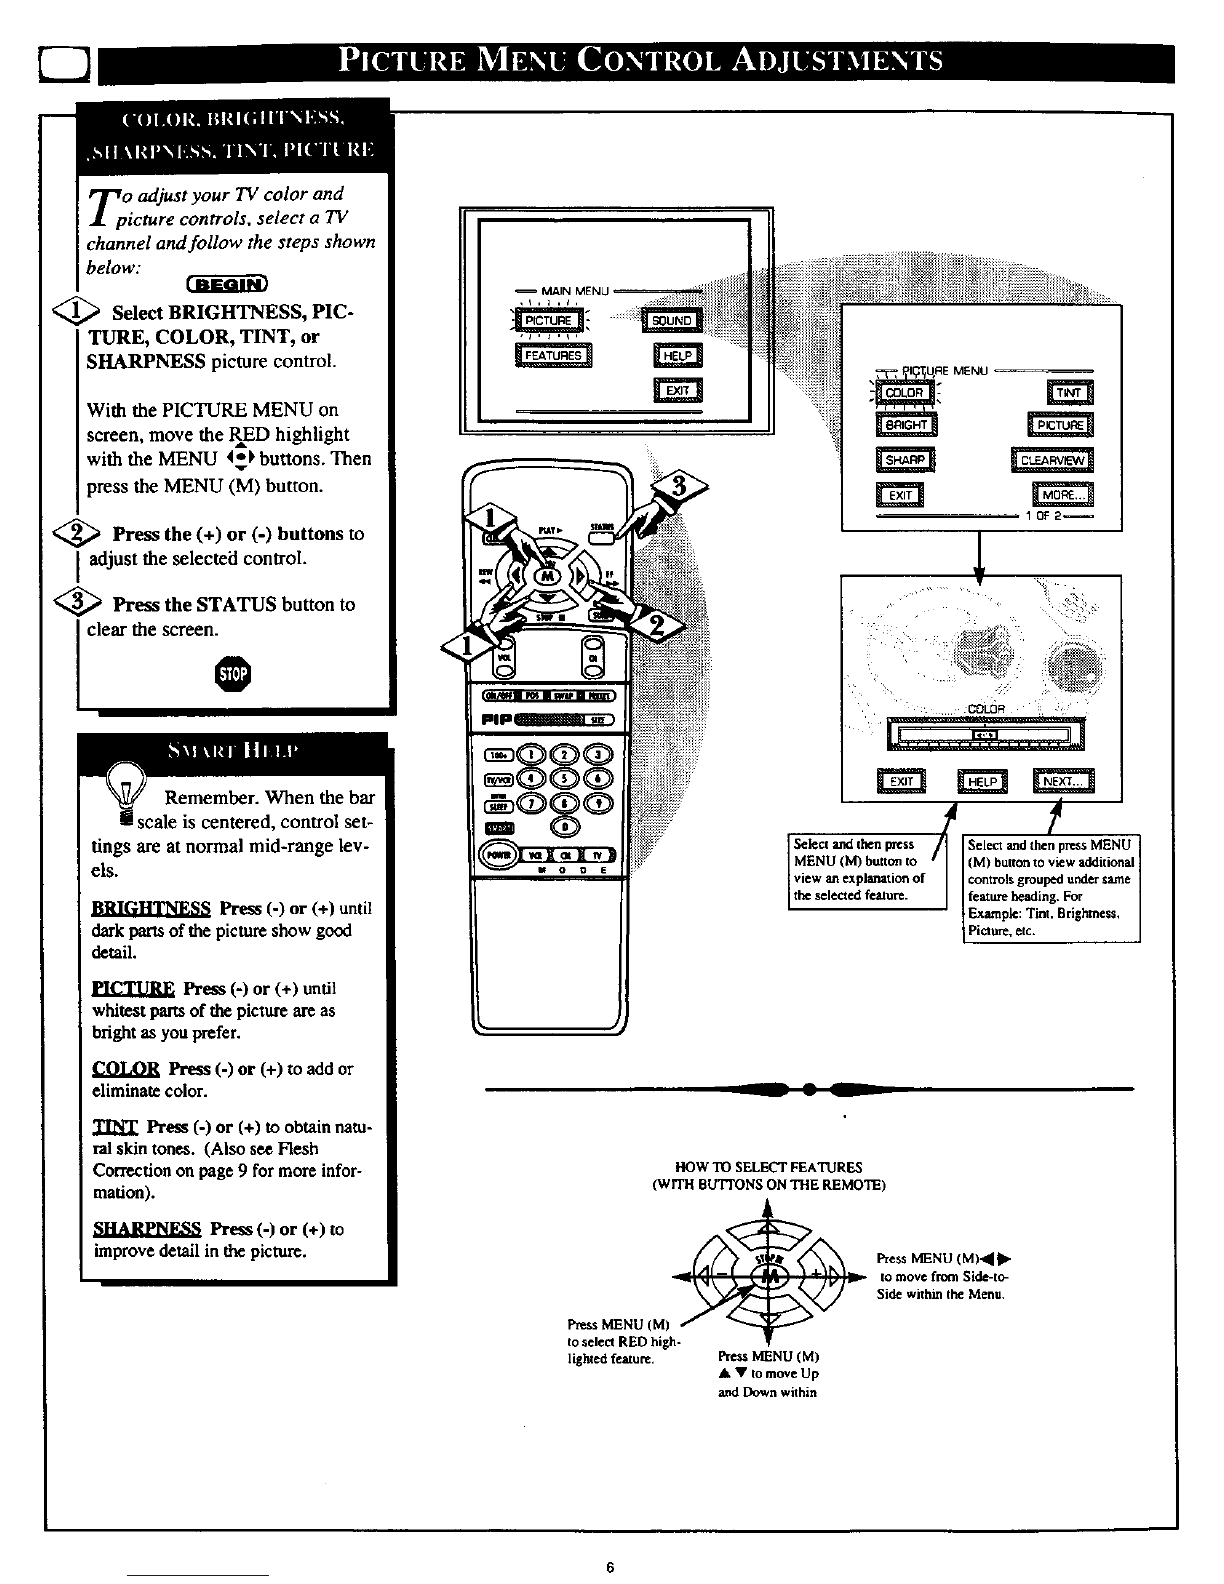
PICTURE MENU
+Adjusting Color, Brightness, Sharpness,
Tint, and Picture Controls ................................... 6
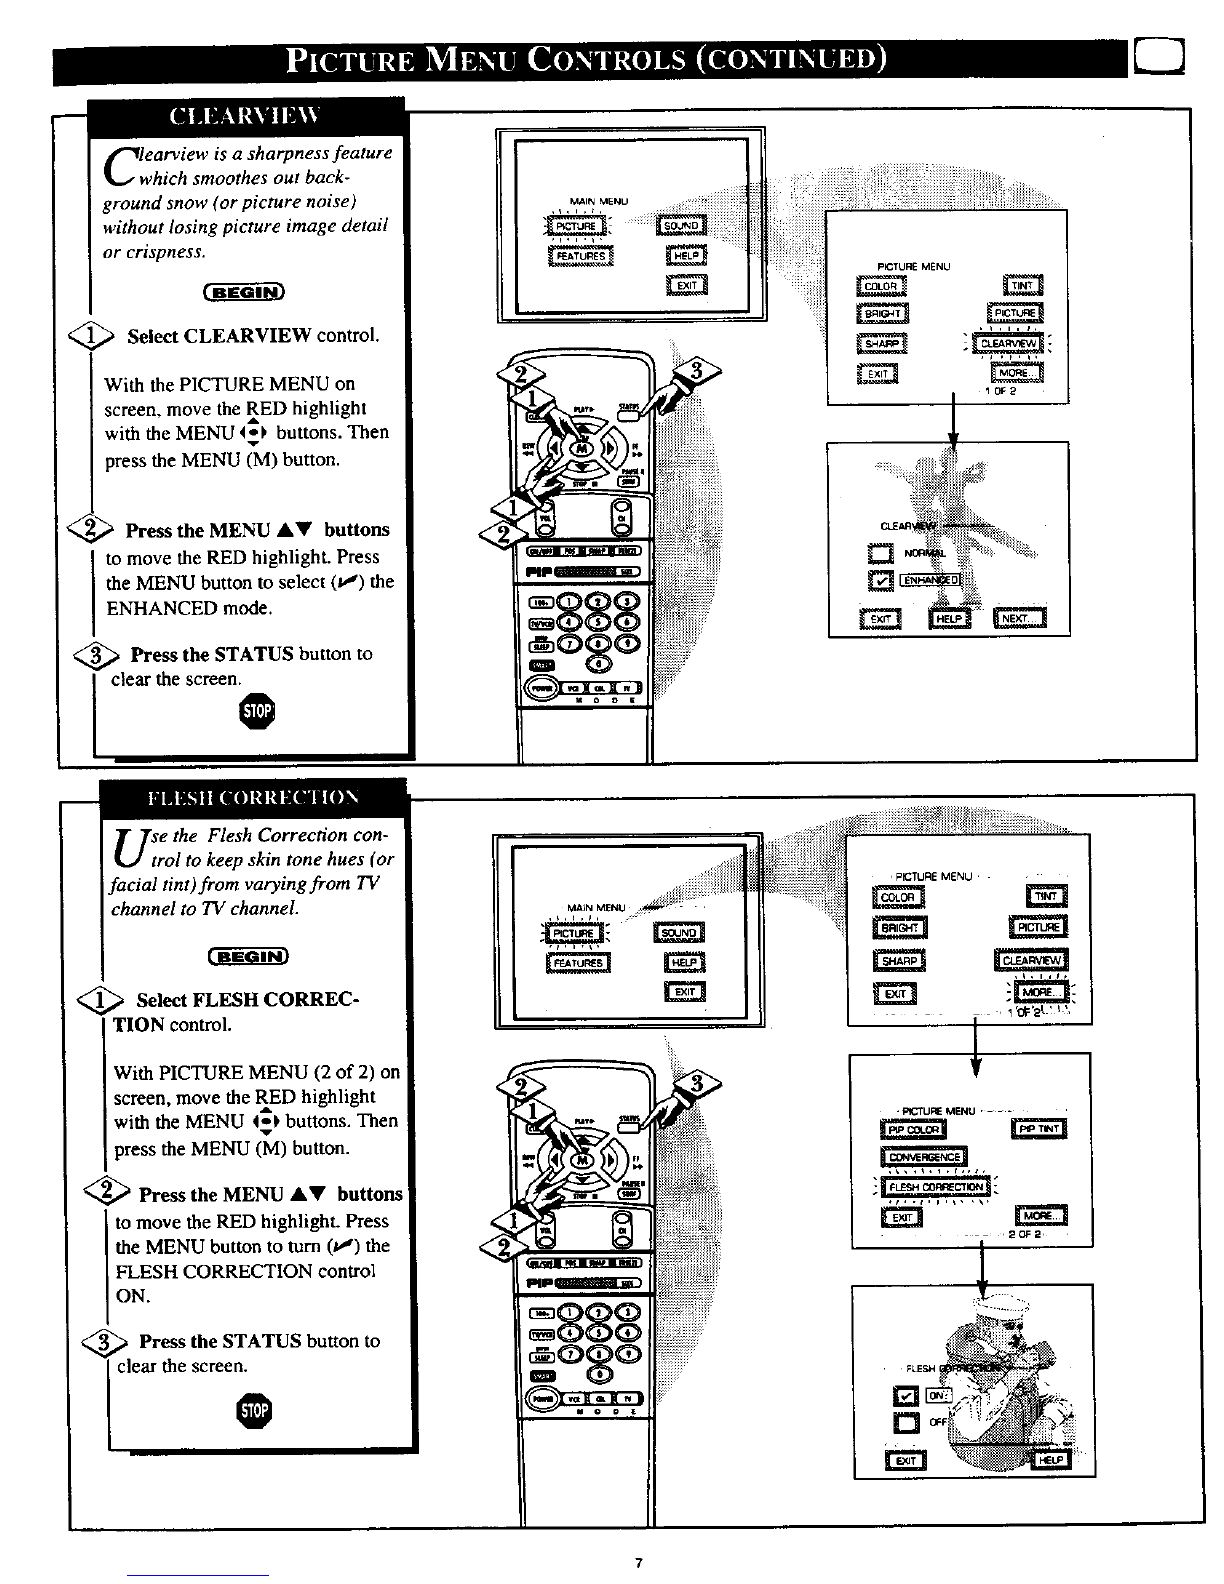
+Using the Clearview Control ............................... 7
+Using the Flesh Correction Control .................... 7
+Adjusting the TV's Convergence Control ........... 8
FEATURES MENU
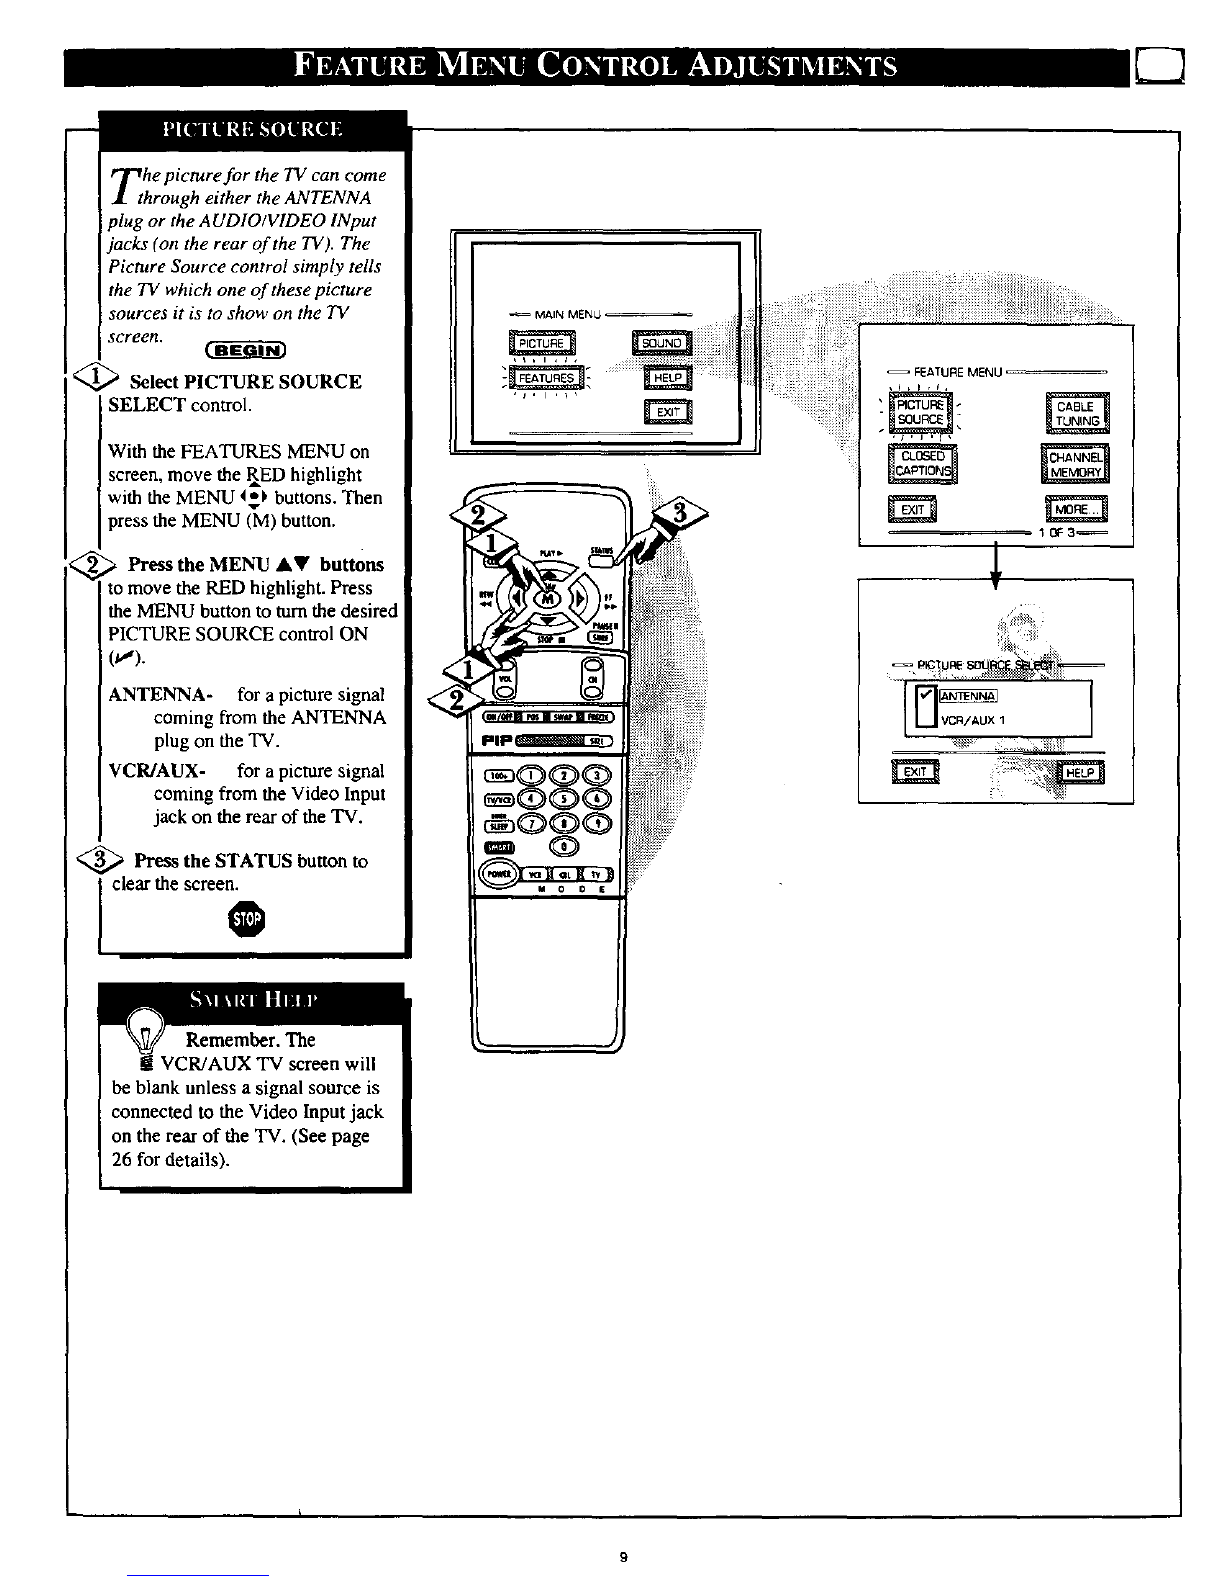
+Selecting a Picture Source .................................. 9
+Setting the TV for Closed Captioning ............... 10
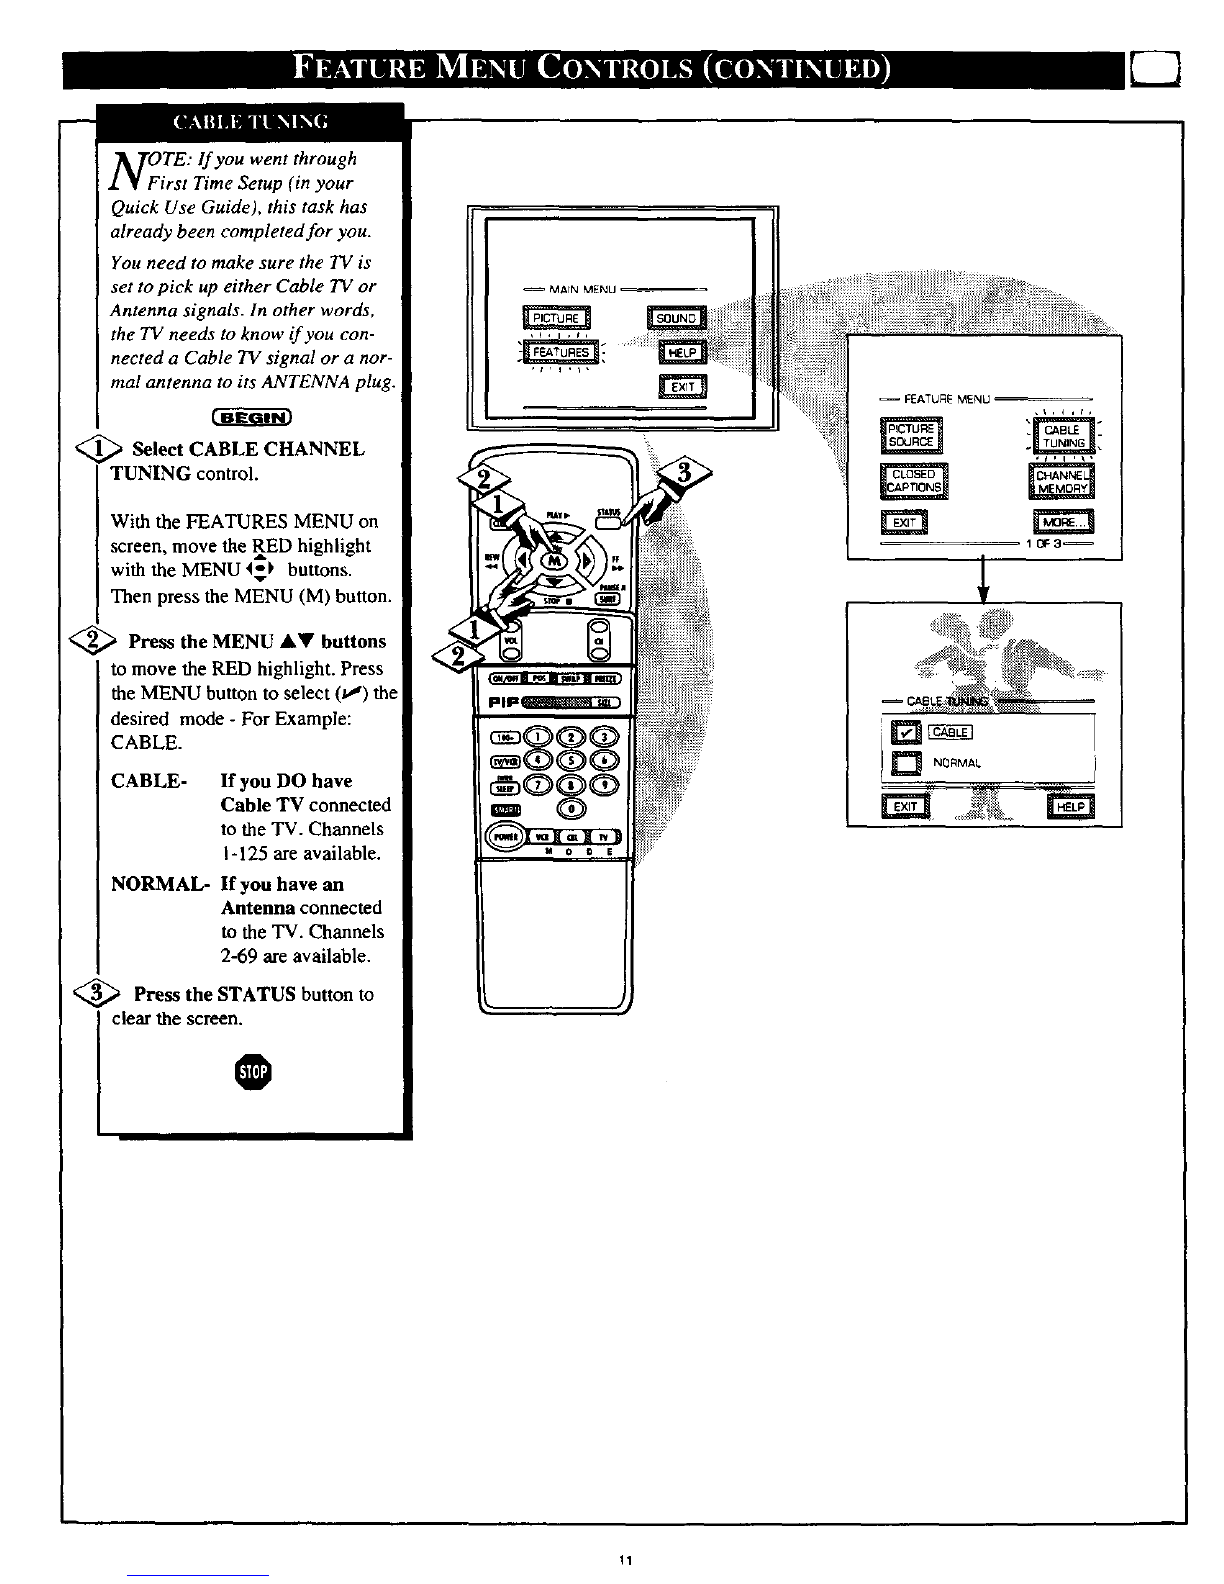
+Setting the TV for Cable or Antenna Signals.... 11
+Adding Channels in Memory (Automatically). 12
+Adding Channels in Memory (Manually) ......... 13
+Setting the TV Clock ......................................... 14
+Turn-On Timer .................................................. 15
+Using the Sleep Timer Control ......................... 15
+Using the Time/Channel Reminder Control...... 16
+Using the Parental Control ........................... 17-18
+Adjusting the Channel Display Control ............ 19
+Using the Language Control ............................. 19
SOUND MENU
+Adjusting Bass, Treble, and Balance Sound
Controls ............................................................. 20
+Setting the Bass Boost Control ........................ 20
+Setting the TV for Stereo and SAP Programs ..21
+Using the Sound Image Control ........................ 22
+Using the Volume Display Control ................... 22
+Using the TV Speaker On/Off Control with
the Audio Output jacks ..................................... 23
+Surround Sound Speaker Connections and
Variable Audio Output Control ........................ 24
+Using the TV's Audio/Video Input and
Output Jacks ............................................... 25-27
Because of continuous product improvements, the informa-
tion mentioned in the documents accompanying your product
am subject to change without notice.
iRemote Control Operation
Using the Smart Picture Control ................. 28
.rsing the Smart Sound Control ............................... 28
Using the Smart Surf Control and the Surf button...29
Setting the Remote to Work VCRs .................... 30-31
Setting the Remote to Work
Cable TV Converters .......................................... 32-33
Setting the Remote to Work VCRs or Cable
Converters - "Search Method". ................................ 34
Using the Remote's VCR buttons ............................ 35
_--_ Picture-ln-Picture (PIP)
How to Use PIP (Connections) ........................... 36-37
How to Use PIP with the TV Remote ...................... 38
Selecting the Picture Source for PIP ........................ 39
Adjusting Picture-in-Picture Color and Tint ............ 40
More PIP Connections (Cable Converter) ............... 41
_1 General Information
Tips if Something Isn't Working ............................. 42
TV Help Menu ......................................................... 43
Glossary of TV Terms ............................................. 44
Index ........................................................................ 45
Factory Service Locations .................................. 46-47
Warranty .................................................................. 48
Use the simple Set-Up Guide (supplied with
your TV information packet) for details on:
• Antenna Hook-ups
• First Time Set-Up
(Automatic Settings)
• Basic TV and Remote
Control Operation
• On-Screen Menu Use
Copyright @1998 Philips Consumer Electronics Company. All rights reserved.
First Time Set Up -automatically sets the TV for
local channels and the correct picture signal (antenna
or cable). It even helps you make the necessary con-
nections for the Picture-In-Picture (PIP) feature. See
€our Set-up and Quick Use Guide for details.
Infrared Remote Control - operates your TV set
and a variety of wireless remote control VCRs and
Cable TV Converters.
Standard TV broadcast (VHF/UHF) or Cable TV
(CA'IV) channel capability.
Closed Captioning - allows the viewer to read TV
3rogram dialogue or voice conversations as on-screen
text,
Automatic Programming of channels - for quick
and easy selection of favorite stations available in
your area.
Picture-In-Picture (PIP) - can show a TV program
and the direct video output from an accessory (VCR,
etc.) onto the TV screen at the same time.
Stereo TV - with abuilt-in audio amplifier and a
twin speaker system, reception of TV programs in
both broadcast stereo sound or (SAP) bilingual broad-
cast are available.
On-Screen Features - display helpful information
for the setting of TV controls (such as help messages,
operating tips and glossary).
Parental Controls - for "censoring" or blocking out
channels to keep children from watching undesirable
programming.
Audio/Video Jacks - for direct connections with
VCRs (and other accessories) for quality TV picture
and sound playback.
Surround Sound -extemal audio speaker connec-
tions.
Sleep-Timer - automatically turns the TV OFF at
preset time intervals.
Smart Button - for the control of "IV Sound and
Picture levels. Use the Smart Button on the remote to
quickly adjust Smart Sound (to set TV Volume levels
during program changes or commercial breaks);
Smart Picture (for programmed video level adjust-
ments on a variety of program sources); and Smart
Surf (for quick one button channel selection of up to
10 of your favorite channels).
As you unpack your TV please note that the fol-
lowing items have been included with your set:
Owner's Manual
Safety Tip Information
Factory Service Center Locations
WarrantyRegistration Card
Remolz Control Transmitter
Batteries for Remote Control Use
Please take a few minutes to complete your regis-
tration card. The serial number for the TV is on
the back of the set.
Refer to the back of this manual for instructions
on the cleaning and care of the "IV.
End-of-Life disposal
Your new projection television and its packaging
contain materials that can be recycled and reused.
Specialized companies can recycle your product
to increase the amount of reusable materials and
minimize the amounts which need to be properly
disposed.
Your product also uses batteries which should not
be thrown away when depleted, but should be
handed in and disposed of as small chemical
waste.
Please find out about the local regulations on how
to dispose of your old television, batteries, and
packaging materials whenever you replace exist-
ing equipment.
s
r TV color and
picture controls, select a TV
channel and follow the steps shown
below:
<_ Select BRIGHTNESS, PIC-
TURE, COLOR, TINT, or
SHARPNESS picture control.
With the PICTURE MENU on
screen, move the RED highlight
with the MENU 4_ buttons. Then
press the MENU (M) button.
<_ Press the (+) or (-) buttons to
adjust the selected control.
_Press the STATUS button to
clear the screen
is centered, control set-
tings are at normal mid-range lev-
els.
BRIGHTNESS Press (-) or (+) until
dark parts of the picture show good
detail.
PICTURE Press (-) or (+) until
whitest parts of the picture are as
bright as you prefer.
COLOR Press (-) or (+) to add or
eliminate color.
TINT Press (-) or (+) to obtain natu-
ralskin tones. (Also see Flesh
Correctiononpage 9 for more infor-
mation).
Press (-) or (+) to
improve detail in the picture.
• -- , -,,
. _ ,
__ • L
HOW TO SELECT FEATURES
(WITH BUTTONS ON THE REMOTE)
P_ss MENU (M)
to select RED high-
lighted feature, Press MENU (M)
• • to move Up
and Down within
Press MENU (M)'_ I_"
to move from Side-to-
Side within the Menu.
6
Clearview is a sharpness feature
which smoothes out back-
ground snow (or picture noise)
without losing picture image detail
or crispness.
<_ Select CLEARVIEW control.
With the PICTURE MENU on
screen• move the RED highlight
with the MENU 4_t buttons. Then
press the MENU (M) button.
<Press the MENU AY buttons
to move the RED highlight. Press
the MENU button to select (u,") the
ENHANCED mode.
<_ Press the STATUS button to
Jcle=thescreen
Use the Flesh Correction con-
trol to keep skin tone hues (or
facial tint)from varying from TV
channel to TV channel.
<_ Select FLESH CORREC-
TION control.
With PICTURE MENU (2 of 2) on
screen, move the RED highlight
with the MENU 4_ buttons. Then
press the MENU (M) button.
<_ Press the MENU AV buttons
Ito move the RED highlight. Press
the MENU button to turn (/,") the
FLESH CORRECTION control
ON.
<_ Press the STATUS button to
Iclear the scree_
pICTUREMENU
1't3fF'2[ ! _!,
MENtJ ,
rm
F_E_,H x
CnnVergence is the correct lin-
g up of the red and blue
light paths on the TV screen.
NOTE: lf no color fringing (see
Smart Help) shows, then no
Convergence adjustments are nec-
essary for your TV.
<_ Select CONVERGENCE con-
trol.
With PICTURE MENU (2 of 2) on
screen, move the RED highlight
with the MENU 4=-_buttons. Then
press the MENU (M) button.
_If there is RED or BLUE color
fringing on the White cross, press
the MENU button to continue.
Press the MENU l_l, buttons
to move the red or blue cross
directly over the white cross on the
TV screen.
The red or blue cross is properly
adjusted when it is completely
merged with the white cross. (No
color appears around the edge of
the white cross).
@Press the STATUS button to
clear the screen when convergence
adjustments are complete.
0
Remember. Convergence
has been set at the factory for
best viewing, but if one or more of
the (red or blue) colors appear
around the edges of objects (color
fringing) follow the steps given in
this section.
PICTURE MENU
1'0_'2
PICTURE MENU
2r_:2_
H
I I
3 .
If thereisREDor BLUE
fringe on theWHITEcress,
usethisadjustment to
improvethe picture.
Press "M"to Continue
- Or -
Press"1."to Return
1
TV can come
through either the ANTENNA
plug or the AUDIO/VIDEO INput
jacks (on the rear of the TV). The
Picture Source control simply tells
the TV which one of these picture
sources it is to show on the TV
screen.
'_ Select PICTURE SOURCE
SELECT control.
With the FEATURES MENU on
screen, move the RED highlight
with the MENU _ buttons. Then
press the MENU (M) button.
qPress the MENU AV buttons
to move the RED highlight. Press
the MENU button to turn the desired
PICTURE SOURCE control ON
(v,').
ANTENNA- for a picture signal
coming from the ANTENNA
plug on the TV.
VCR/AUX- for a picture signal
coming from the Video Input
jack on the rear of the TV.
<_ Press the STATUS button to
I clear the screen€
_MAIN MENU
-- FEATURE MENU
1 0_=3_
?i_/¸ _:
VCRiAUX 1
ClyOSed Captioning (CC) allows
ou to read the voice content of
television programs on the TV
screen. Designed to help the hearing
impaired this feature uses on-screen
"text boxes" to show dialogue and
conversations while the TV program
is in progress.
<_ Select CLOSED CAPTIONING
control.
With the FEATURES MENU on
screen, move the RED highlight
with the MENU t_ buttons. Then
press the MENU (M) button.
<_ Press MENU AV buttons
the
to move the RED highlight. Press
the MENU button to select (v_) the
desired Closed Caption mode - For
Example: "ALWAYS ON" and
"CAPTION 1".
CAPTION 1, 2, 3, 4:
dialogue (and descriptions)
for the action on the captioned
TV program shows on-screen.
(See Important Note on this
page.)
TEXT 1, 2, 3, 4:
often used for channel guide,
schedules, or bulletin board
information for CC programs.
<_;_ After making your Caption mode
selection, press the STATUS button
to clear the TV screen. The selected
Closed Caption mode will be active.
To cancel, set the Closed Captioned
feature to OFF when finished view-
ing. @
Remember. Broadcast
stations will often use
spelling abbreviations, symbols,
dropouts and other grammatical
shortcuts in order to keep pace
with the on-screen action. These
type factors vary upon the source
of the captioned text material and
do not indicate a need for service
on the part of the TV.
NOTE: Not all TV programs and product commercials are made for broadcast
with Closed Caption (CC) information included. Neither areall Closed Caption
modes (CAPTION 1-4; or TEXT 1-4) necessarily being used by a broadcast station
during the transmission of a closed caption program. Usually "CAPTION 1"is the
most used mode to view captioned material. Refer to your area'sTV program list-
ings for the stations and times of Closed Caption shows.
/i:iiii!ii
-- MAINMENU_....'_iiiiii
i iiiiii i]:iiii!!!!iiiiiiiiiiiiiii!iiii!iiiiiiiiiiiiiiiiiiii!!iiiiii iii i i !i! iiii!ii! ii i iii ii! ! i!i!ii!iiiiiiii iiiiiiiiii;iiii i;i i i........
i_iiiiiiiiiiiiii%iiiiii
_iiiiiiiiiiii!iiiiiii!iii
]_ F_A_UREMEN_ =
PIP[
NOTE: The ON DURING
MUTE ONLY control can
be used to set the "rv to
turn the Closed Caption
mod_ _ON" wh_tlevt_r the
MUTE button on the
remote is pressed.
_l ALWAYS ON
ALWAYS OFF
ON DURING MUTE ONLY
rl l-i
Ct_PTION _ "t]_XT
CAPTION 3 TEXT 3
CAPTION 4TEXT d
NN
CAPTION 1mode
Example Screen Display
Closed Caption information will usually appear
in black and white (although some bzoadc_st_rs
or networks may occasionally use color to hi
tight or draw attention to certain areas.)
FULL SCREEN TEXT
will blOCk"IVscreen from viewing
This symbol will appear on channels that con- I [ I
tain Closed Captioning material whenever the _-
statusdisplay isshown, 12:00
10
NOiTE: lf you went through
rst Time Setup (in your
Quick Use Guide), this task has
already been corapleted for you.
You need to make sure the TV is
set to pick up either Cable TV or
Antenna signals. In other words,
the TV needs to know if you con-
nected a Cable TV signal or a nor-
mal antenna to its ANTENNA plug.
_Select CABLE CHANNEL
TUNING control.
With the FEATURES MENU on
screen, move the RED highlight
with the MENU 4-P buttons•
Then press the MENU (M) button.
<_ Press the MENU &V buttons
to move the RED highlight. Press
the MENU button to select (t.J) the
desired mode - For Example:
CABLE.
CABLE- If you DO have
Cable TV connected
to the TV. Channels
1-125 areavailable.
NORMAL- If you have an
Antenna connected
to the TV. Channels
2-69 are available.
<_ Press the STATUS button to
clear the screen.
0
MALN MENU
11
9(in your Quick Use
Guide), this task has already been
completed for you.
Your TV can automatically set itself
for local area (or Cable TV) chan-
nels. This makes it easy for you to
select only the TV stations in your
area when the CHANNEL at Ybut-
tons are pressed.
Select CHANNEL MEMORY
(START AUTO-PROGRAM-
MING) control.
With the FEATURES MENU on
screen, move the RED highlight with
the MENU _) buttons. Then press
the MENU (M) button.
<_ Press the MENU button to turn
AUTO-PROGRAMMING ON.
The TV shows which channel num-
bers are "SAVED" (t_) as they are
added into memory.
"Auto-programming CHANNEL
MEMORY is finished" shows when
the TV is through adding channels.
<_ Press the STATUS or Menu (M)
I button to clear _creen.
. Try it out. Press the
CHANNELAV buttons and
see which channels you can select.
Remember. An Antenna or Cable TV
signal must first be connected to your
"IVso that channels can be saved.
If you want to delete any unwanted
channels from the TV's memory, see
"ADD/DELETE CHANNELS" on
page 14.
MAIN MENU
_" Channel Numbers are S"
Saved in Memc_
_FEATURE MENU
Y
•START
AUTO_ROGRAMMING
CHANNEL MEMORY
1 S*f 3_ 4.,_
5_ 6',f 74" 8_,_
9IF qO 11 12
_3 14 15 16
17 18 19 2O
21 22 23 24
pres 5 "M* t_
Stop Auto_rogram
12