Phonic RoadGear 160 Plus User manual

User’s Manual
Manual del Usuario
使用手册
Road Gear 160
Road Gear 260
Integrated Mobile Sound System
Sistema de Sonido Móvil Integrado
综合移动音响系统
English / Español / 简体中文

Road Gear 160
Road Gear 260
Integrated Mobile Sound System
Sistema de Sonido Móvil Integrado
综合移动音响系统
INTRODUCTION........................4
FEATURES.................................4
ROADGEAR COMPONENTS.....4
DISASSEMBLING......................5
INITIAL SETUP...........................5
THE ROADGEAR MIXER...........6
COMBINATION DOCKING
LOCK..........................................9
THE ROADGEAR SPEAKERS...9
MICROPHONE...........................9
OPTIONAL ACCESSORIES.....10
SPECIFICATIONS....................11
APPLICATION..........................28
BLOCK DIAGRAMS.................29
CONTENTS
INTRODUCCION..............................13
CARACTERISTICAS........................13
COMPONENTES DE ROAD GEAR..13
DESMONTAJE.................................14
CONFIGURACIÓN INICIAL..............14
MEZCLADORA ROADGEAR............15
COMBINACIÓN DE CIERRE DE
ATRACAMIENTO.............................18
ALTAVOCES DE ROADGEAR..........18
MICROFONO...................................18
ACCESORIOS OPCIONALES..........19
ESPECIFICACIONES.......................20
APLICACION....................................28
DIAGRAMAS DE BLOQUE..............29
CONTENIDO 目录
简介...............................22
功能...............................22
RoadGear组件...............22
装卸...............................23
基本设置........................23
RoadGear调音台...........23
对接号码锁.....................25
RoadGear音箱...............26
麦克风............................26
任选配件........................26
规格...............................27
应用...............................28
线路图............................29
Phonic preserves the right to improve or alter any information within this document without prior notice
Phonic se reserva el derecho de mejorar o alterar cualquier información provista dentro de este documento sin previo aviso
PHONIC保留不预先通知即可更新本手册的权利
V1.0 12/05/2008

1. Read these instructions before operating this
apparatus.
2. Keep these instructions for future reference.
3. Heed all warnings to ensure safe operation.
4. Follow all instructions provided in this document.
5. Do not use this apparatus near water or in locations
where condensation may occur.
6. Clean only with dry cloth. Do not use aerosol or liquid
cleaners. Unplug this apparatus before cleaning.
7. Do not block any of the ventilation openings. Install
in accordance with the manufacturer
’
s instructions.
8. Do not install near any heat sources such as radiators,
heat registers, stoves, or other apparatus (including
.
9. Do not defeat the safety purpose of the polarized or
grounding-type plug. A polarized plug has two blades
with one wider than the other. A grounding type plug
has two blades and a third grounding prong. The wide
blade or the third prong is provided for your safety. If
the provided plug does not into your outlet, consult
an electrician for replacement of the obsolete outlet.
10. Protect the power cord from being walked on or
pinched particularly at plug, convenience receptacles,
and the point where they exit from the apparatus.
11. Only use attachments/accessories by the
manufacturer.
12. Use only with a cart, stand, tripod, bracket, or
table by the manufacturer, or sold with
the apparatus. When a cart is used, use caution
when moving the cart/apparatus
combination to avoid injury from tip-
over.
13. Unplug this apparatus during lighting
storms or when unused for long
periods of time.
14. Refer all servicing to service personnel.
Servicing is required when the apparatus has been
damaged in any way, such as power-supply cord or
plug is damaged, liquid has been spilled or objects
have fallen into the apparatus, the apparatus has
been exposed to rain or moisture, does not operate
normally, or has been dropped.
IMPORTANT SAFETY INSTRUCTIONS
CAUTION: TO REDUCE THE RISK OF ELECTRIC SHOCK,
DO NOT REMOVE COVER (OR BACK)
NO USER SERVICEABLE PARTS INSIDE
REFER SERVICING TO QUALIFIED PERSONNEL
The lightning flash with arrowhead symbol, within an
equilateral triangle, is intended to alert the user to the
presence of uninsulated
“
dangerous voltage
”
within the
product
’
magnitude to constitute a risk of electric shock to persons.
The exclamation point within an equilateral triangle is in-
tended to alert the user to the presence of important operat-
ing and maintenance (servicing) instructions in the literature
accompanying the appliance.
WARNING: To reduce the risk of or electric shock, do
not expose this apparatus to rain or moisture.
CAUTION: Use of controls or adjustments or performance
of procedures other than those may result in
hazardous radiation exposure.
The apparatus shall not be exposed to dripping or splashing and that no objects with liquids, such as vases,
shall be placed on the apparatus. The MAINS plug is used as the disconnect device, the disconnect device shall
remain readily operable.
Warning: the user shall not place this apparatus in the area during the operation so that the mains switch
can be easily accessible.
CAUTION
RISK OF ELECTRIC SHOCK
DO NOT OPEN

4Road Gear 160 Plus/Road Gear 260 Plus
Introduction
We at Phonic would like to congratulate you on purchasing
one of the RoadGear Plus mobile audio systems, a set of au-
dio equipment superior in design and versatility. The Phonic
RoadGear sets allow you to take all the equipment you need
to setup an advanced all-in-one integrated sound system any-
where you go, with a minimum of fuss. The fully self-contained
unit includes two full-range speakers, a powered mixer, and
two dynamic microphones, as well as all the needed cables.
RoadGear also gives you the option of using wireless micro-
phones and supplies enough storage space to pack them con-
veniently away.
Setting up the RoadGear couldn’t be easier. Just release the
docking lock, and, after disassembling the mobile kit, simply
position the speakers, and plug them, the microphone, and any
other instruments or devices you wish, into the powered mixer.
After plugging the powered mixer into an appropriate power
supply, your system is ready to use. Not only is it this simple
to set up, however, but using the system is just as simple. Us-
ing the controls of the supplied powered mixer, simply adjust
the levels of the inputs, as well as the high, low, and middle
frequencies of the inputs, and the digital effects processor. All
these features make the RoadGear an easy and convenient
solution to a mobile sound system.
This user’s manual is specically designed to give you ac-
curate information on the function and use of the RoadGear
160 Plus and RoadGear 260 Plus. After thoroughly reading
this manual, it is suggested you store it in an easily accessible
place for future reference.
Features
Common Features
● Integrated mobile sound system with luxury luggage-style
molded cabinet plus wheels
● Operates on AC or DC power
● Speaker system with 1” compression driver and 8” woofer
● 2-band EQ on each input channel
● Two 30 feet speaker cables
● Two receiver slots for optional wireless microphones
● Storage compartment for microphones, cables and acces-
sories
RoadGear 160 Plus additional features
● 160 Watt (80 per channel) stereo
● Four input channel mixer: three mic/line and one stereo
● Echo effect with delay time and repeat controls
● System equalizer with treble/bass control
● One dynamic microphone (with mic clip, cable and carry
pouch)
RoadGear 260 Plus additional features
● 260 Watt (130 per channel) stereo
● Six input channel mixer: four mic/line, two stereo
● High-Denition digital effect processor with 16 programs
and tap-delay
● 3-band system equalizer
● Two dynamic microphones (with clips, cables and individual
pouches)
RoadGear Components
RoadGear 160 Plus
● Two Speakers with specially molded enclosures
● One powered mixer built into a specially molded storage
case
● One Phonic UM 99 microphone with 16 foot (5 meter) cable,
clip and carry pouch
● Two 30 foot (9 meter) speaker cables
● Detatchable power cable
● One transparent dust cover
RoadGear 260 Plus
● Two Speakers with specially molded enclosures
● One powered mixer built into a specially molded storage
case
● Two Phonic UM 99 microphones each with 16 foot (5 meter)
cable, clip and carry pouch
● Two 30 foot (9 meter) speaker cables
● Detatchable power cable
● One transparent dust cover

5Road Gear 160 Plus/Road Gear 260 Plus
Caution
● Use the AC power cable supplied with the RoadGear sets
only
● When buying the RoadGear, the AC power cable will be
specic to the safety and code requirements of the Country
of purchase
● The ground (earth) pin of the AC power cable’s male con-
nector should under no circumstances be removed.
● When taking the RoadGear abroad, check local voltage lev-
els and ensure the appropriate power standard is used, as
selected by the power selection switch on the rear panel.
● When the RoadGear is in use, the storage compartment
door much be kept open for better ventilation
Dissassembling
To follow is the most convenient way to open and close the
RoadGear kits. Following these instructions will ensure trou-
ble-free setup of the RoadGear.
1. You should rst unclip docking locks ①and ②(indicated
below) on the either side of the RoadGear.
2. After unlocking these docking locks you can then open the
top lock ③. This ensure the RoadGear pieces come apart
smoothly.
3. Stand the powered mixer upright.
4. To re-assemble the RoadGear pieces, the same order
should be taken (side locks rst, followed by the top).This
way the pieces will be held securely and rmly together.
5. When using the RoadGear speakers, ensure that the dock-
ing locks on the rear are locked back into place, to ensure
they don’t scratch the surface on which they sit.
Initial Setup
Please ensure you take note of all setup instructions listed in
this manual. The RoadGear 160 and 260 are both used as
normal PA systems and therefore all care should be taken in
ensuring the correct setting up of equipment.
1. Disassembling the mobile RoadGear set and remove the
speakers from the top of the kit. Remove all items you wish
to use in your PA system from the RoadGear’s storage area.
Also, place the mixer and speakers in a suitable place.
2. Contect the two speakers to the Powered Mixer, via the
supplied speaker cable. An optional speaker stand may be
used to increase the height of the speakers.
NB. No devices other than speakers should be connected to
the speaker outputs. Doing so will likely cause damage to
the device. Also, guitar should not be used to connect am-
pliers to speakers.
3. Plug all necessary instruments and equipment into the
device’s various inputs as required. This may include line-
signal devices, as well as microphones and/or guitars, key-
boards, ect.
4. Plug any necessary equipment into the device’s various
outputs. This could include monitors, signal processors,
and/or recording devices.
5. Ensure all input and out levels are set to the leftmost posi-
tion.
6. Plug the supplied AC cable into the AC inlet on the back of
the RoadGear mixer.
NB. Ensure the power cable has no scratches or cuts that may
reveal the wire beneath before plugging into the provided
powered mixer as constant setting up and disassembling of
equipment may cause insulation wear.
7. Plug the supplied AC cable into a power outlet of a suitable
voltage.
8. Turn the mixer power switch to the on position and set all
input and output at appropriate levels to suit your needs.
9. When the RoadGear is in use, the storage compartment
door must be kept open for better ventilation.
1
Push botton in
to release lock

6Road Gear 160 Plus/Road Gear 260 Plus
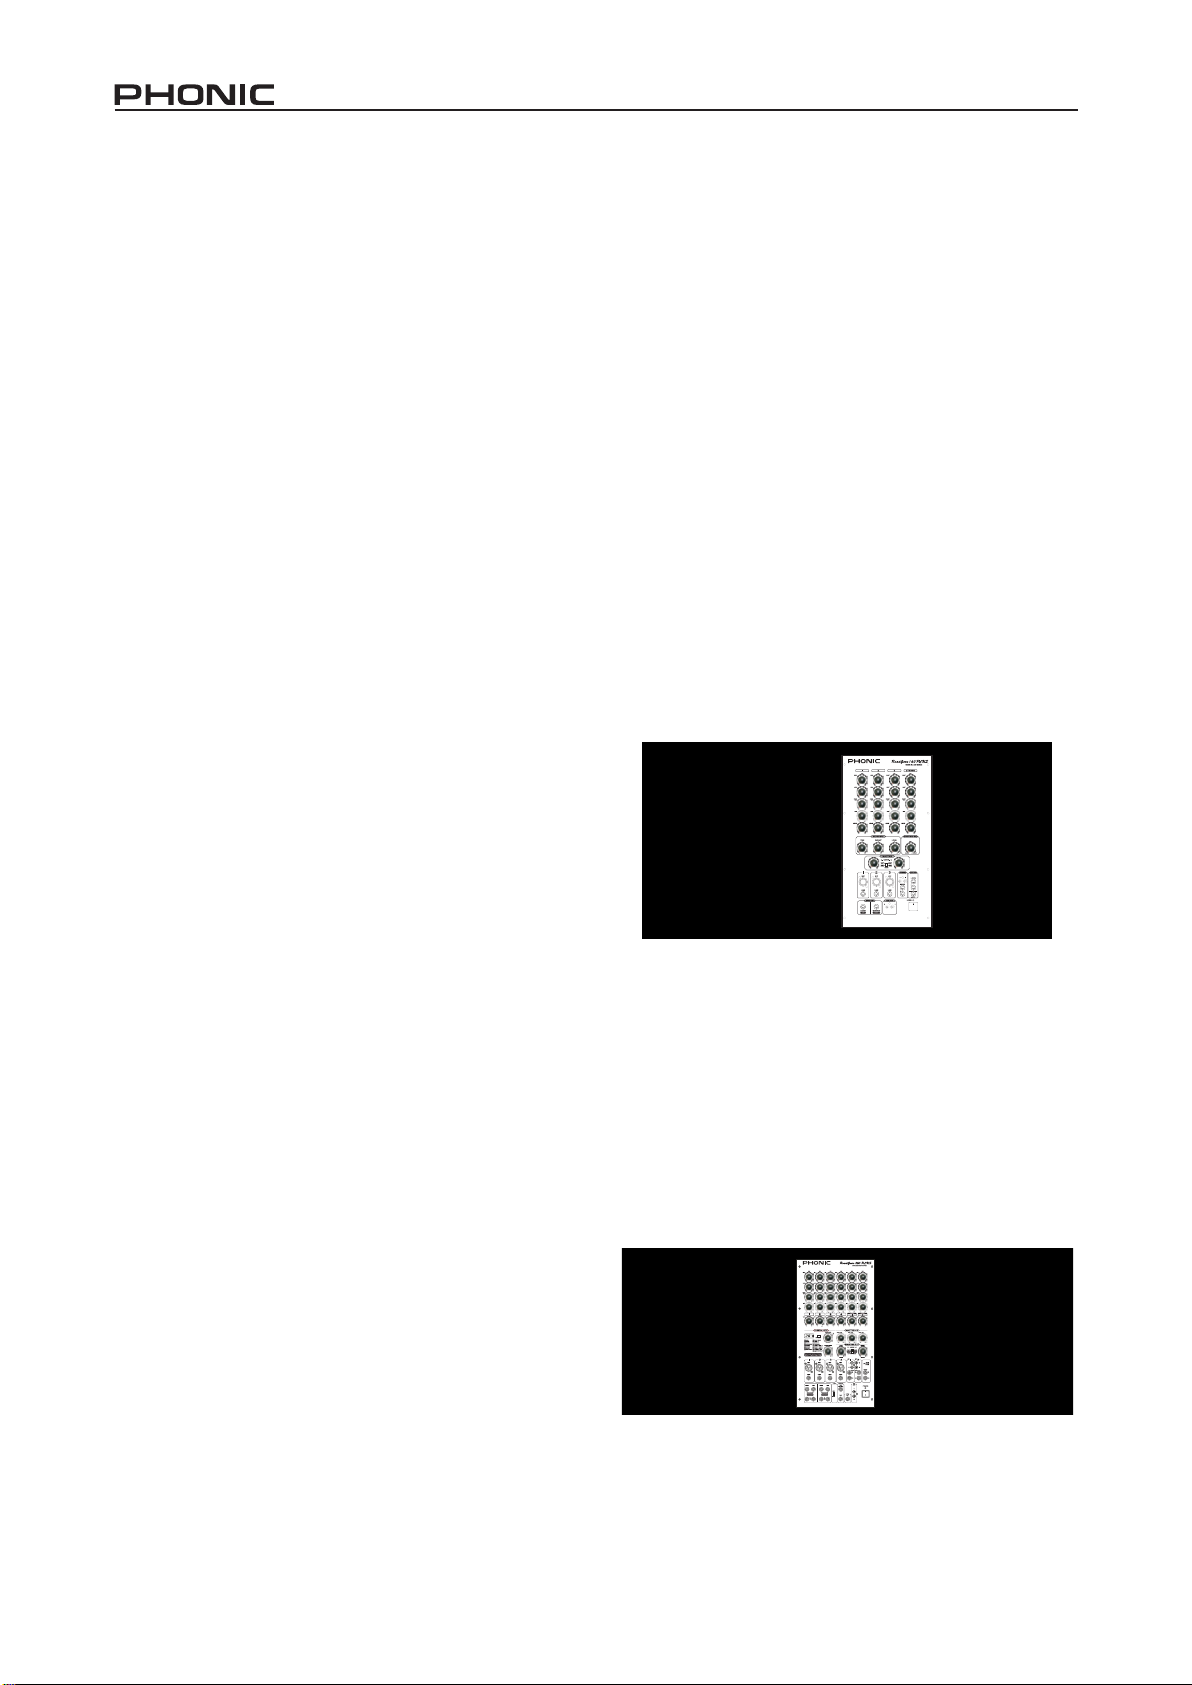
The RoadGear Mixer
The powered mixer provided with the RoadGear 260 Plus is
equipped with 4 mono microphone and line inputs, as well as
2 stereo inputs and a built in effect processor boasting a 32/40-
bit DSP. All this, plus a 3-band built in equalizer, ensures your
audio always sounds great on the road.
The RoadGear 160 Plus’s mixer is equipped with 3 mono mic
and line inputs, a single stereo channel, built-in digital echo
and system bass/treble control.
Making a Connection
1. Microphone Input Jacks
These XLR jacks are for the input of low level signal devices,
most commonly, microphones. For best performance, we sug-
gest using the microphones supplied with the RoadGear set,
however they can be used in conjunction with any professional
condenser, dynamic (RoadGear 260 Plus only) or ribbon mi-
crophones with standard 3-pin XLR male connectors.
2. Line Input Jack
These 1/4” TS phone jacks accept a wide range of input line
level devices, such as guitars and keyboards. It can accept
unbalanced sources, however any microphones plugged into
the microphone input will not work when a line device is at-
tached to this system.
3. Stereo Inputs
The stereo inputs include 2 sets of jacks: standard RCA stereo
jacks, for use with consumer gear like CD and tape players,
etc., and stereo 1/4” TS phone jacks, for use with stereo prod-
ucts such as keyboards and drum machines. The RCA and
TS jacks can both be used simultaneously; however, in some
cases this is unadvisable as the blending of audio may have
undesirable results. The audio fed into these input are fed to
the corresponding stereo input bus.
4. Stereo AUX Return
These TS inputs connect the mixer with parallel external de-
vices, such as sub mixers or external effect processors, receiv-
ing the processed signal from another source and feed it to the
main mixing bus. If you wish to use a signal from a mono de-
vice, simply connect the input to the left jack, and the signal will
be doubled to the right, effectively making it a mono signal.
5. Record Out
These outputs will accommodate RCA cables to be fed to a va-
riety of recording devices, such as tape and digital recorders.
6. Effects (EFX) Out
These 1/4” TS outputs are the nal output from the effects
send mixing bus. This feed may be used to connect to an am-
plier and speakers, or to external digital effect processors.
When using external processors, the feed can be returned to
the Stereo AUX Return ports.
7. Foot Switch (RoadGear 260 Plus only)
This port allows the inclusion of a foot switch for remote al-
teration of digital effect properties (on or off). The upper one
is for turning on and off effect; the lower one is for changing
tap delay.
8. Send and Return (RoadGear 260 Plus)
These connectors allow external signal processors to be in-
corporated with the main mix, just prior to being sent through
the power amplier. Devices that can be used in conjunction
with these jacks include graphic equalizers, digital effect pro-
cessors, feedback silencers, and so forth. It is strongly ad-
vised that these devices are set at low levels to ensure the
RoadGear’s inputs do not overload.
9. Speaker Outputs
These jacks are used to connect to speakers, fed from the in-
ternal power amplier. Both sets of outputs are 1/4” TS jacks,
which can drive 130 Watts of output into 8Ω (or 80 Watts into 8Ω
on the RoadGear 160 Plus) per channel. To use these, simply
insert an appropriate 1/4” TS plug into them. The RoadGear
260 Plus features 2 speaker outputs per channel, whereas the
RoadGear 160 Plus features a single output per channel.
NB. Due to the fact that the output signal of these jacks is active, they
should be used in conjunction with speakers only as to avoid damaging
any other equipment.
34
4
6
RoadGear260 RoadGear160
5
7
6
8
9
9
RoadGear 160 Plus RoadGear260 Plus

7Road Gear 160 Plus/Road Gear 260 Plus
Controls and Settings
10. High Frequency Control
This control alters the degree of high
frequencies – or treble – in the audio
of the corresponding channel. Turn
clockwise to increase the amount
of treble in the sound, and turn
counterclockwise to decrease the
amount. Position the knob for a at
response, if not in use.
11. Low Frequency Control
This control alters the degree of high
frequencies – or bass – in the audio
of the corresponding channel. Turn
clockwise to increase the amount of
bass in the sound, and turn counter-
clockwise to decrease the amount.
Position the knob at “0” if not in use.
12. MONI / EFX Control
This control adjusts the signal level of the corresponding chan-
nel to be sent to the EFX and Monitor mixing bus, for digital
effect processing and monitoring of audio, respectively.
13. PAN / BAL Control
The ‘pan’ control alternates the degree or level of the mono
audio signal that the left and right channels of the main mix
should receive. On stereo channels, the ‘Balance’ attenuates
the left or right signal as required.
14. Level Control
This control alters the signal level of the corresponding chan-
nel to the main mix of the RoadGear. This control should be
set at “0” when the mixer is not in use.
Digital Effects (RoadGear 160 Plus)
15. Time Control
This control adjusts the time of the built-in echo effect.
16. Repeat Control
This control adjusts the frequency of the repeats in the Echo
effect.
17. Level Control
This control adjusts the amount of the audio from the built-in
Echo effect processor that will be sent to the main mix.
Digital Effects Panel (RoadGear 260 Plus)
18. Digital Effects Panel
This 2-digital numeric display shows the program number that
is currently applied to your EFX audio signal. When you rotate
the Program control, you can scroll through different program
numbers; however the display will revert back to the original
program if a new program is not selected within a few sec-
onds.
19. Sig and Clip Indicators
Located within the Digital Effect Display are Clip and Sig LEDs.
The Sig LED will light up when any signal is received by the ef-
fect processor, and the Clip LED will light up shortly before ex-
cessive signals are dynamically clipped. If the Clip LED lights
up too often, it may be advisable to turn down one or all EFX
controls on input channels to ensure the signal level is not too
high.
20. Program Control
This control is used to scroll through the various effects. Turn-
ing the control clockwise will allow users to ascend into higher
program numbers, and turning it counter-clockwise will allow
users to descend into lower program numbers. Pushing this
control will apply the new effect. When a tap-delay effect is
selected, pressing this control will allow users to select the tap-
delay time.
By pushing the button several times, the effect processor in-
terprets the time between last two pushes and remembers this
as the delay time, until the button is pushed again (this is kept,
even after the power is turned off). When the tap delay effect is
selected, a small LED will ash within the digital effect display
window at the selected intervals.
21. EFX Master Control
The EFX master control adjusts the nal level of the processed
signal that is sent to the main mix.
22. Bypass Switch
Pushing this switch will bypass the effect engine. Two small in-
dicators within the Effects display will ash when this is done.
10
11
12
13
14
15 16 17
18 20
21
19 22

8Road Gear 160 Plus/Road Gear 260 Plus
Master Controls
23. System Equalizer
The RoadGear 260 Plus’s built in equalizer provides you with
3 different level controls, for perfect control over the high, mid
and low frequencies of your audio. Changing the level of high
frequencies included in your audio with enhance the treble
sounds, such as guitars, as well as enhancing the crispness
of vocals. Changing the level of low frequencies in your audio
will enhance bass sounds, including drums and bass guitars,
and add to the overall warmth of the sound. Changing middle
frequencies can help add crispness to vocals.
The RoadGear 160 Plus features a single bass / treble control
for adjusting the high and low frequency balance of your mix.
24. L/R Level Controls
These controls are used to adjust the nal volume level of the
MAIN Left and Right signal, sent to the power amplier and
respective outputs (as set by the mode selector switch).
25. Limiter Indicators
There are 2 limiters built-in the stereo power amplier featured
in the RoadGear 160 Plus and 260 Plus. The limiters will kick
into action (and these LEDs illuminate) when the signal levels
become excessive. The limiter system will help prevent any
damage from occurring to any of your equipment, as well as try
to maintain signal clarity. However, if these LEDs are lighting
up, it is advisable to turn the main level controls.
26. Mode Selector
This is used to alternate the use of the power amplier outputs. If
stage monitors are used in your set of speakers, then the switch
can be set to the MAIN / MONI position. On the RoadGear 260
Plus, this will allow you to plug main speakers into the LEFT /
MAIN speaker outputs, and a set of passive monitors (with an
impedance of 8Ω or above) to the RIGHT / MONI outputs. On
the RoadGear 160 Plus, this selection will cause the left speaker
output to send the main signal (in mono); the right speaker out-
put will send the monitor signal. When set to LEFT / RIGHT, the
speaker outputs send the main left and right signals as normal.
27. +48V Switch (RoadGear 260 Plus only)
This switch supplies +48V of phantom power to all input chan-
nels, used for powering condenser microphones.
28. Power Switch
This button is used to turn the device on and off.
Rear Panel
29. DC Power Supply Input
This DC power input is used to connect the RoadGear 12VDC-
to±48VDC converter (12VDC-to±40VDC on RoadGear 160
Plus) (and portable 12V battery) to the RoadGear, enabling
you to use the RoadGear system when an AC power source
is unavailable. The rightmost socket is used for the positive
connection, and the leftmost is used for the negative. The two
middle sockets are used for grounding. The power supply used
should not exceed 51VDC(44VDC on RoadGear 160 Plus) as
to ensure safe operation of the RoadGear.
30. Power Connector and Fuse Holder
This port is used to plug the female end of the included AC
power cable. The other end should be connected to an ap-
propriate power source. Just below this connector is the
RoadGear’s fuse holder. In the event that the fuse blows, users
can open this holder, remove the old fuse and replace it with
another suitable fuse (listed near the power connector).
31. Voltage Selector
The Voltage Select switch is used to adapt the RoadGear to dif-
ferent Countries’ voltage levels. You are able to select between
115V (which you can use in Countries with standard voltage
between 100V and 120V) and 230V (which can be used in
Countries with standard voltage between 220V and 240V).
23
24
25
26
27
28
29
30 31

9Road Gear 160 Plus/Road Gear 260 Plus
32. Wireless Module Slots
Located conveniently within the RoadGear storage compart-
ment, these two slots accept the UM-R11 wireless receiver
module (available with the UM31, UM41 and UM51 wireless
microphone kits). The wireless signal received by the left slot
is sent to channel 2 of the RoadGear mixer, whereas the right
slot is sent to channel 1.
33. Storage Compartment Latch
This small latch keeps the storage compartment
closed when not in use. Flick it up before opening,
and be sure not to force open the storage com-
partment as to avoid damaging this latch.
Combination Docking Lock
The docking locks of the RoadGear are combination locks,
which require the user to enter a pre-set combination to open
them. Please observe the following instructions to opening the
lock.
1) The default code of the lock is 000. Please enter this code
the rst time you use the RoadGear.
2) To change the lock’s code, rst open the latch and nd a
small lever on the underneath of the lock. Pull it towards the
center of the lock, and up, until it sticks into place.
3) Change the number dials to your desired secret code. En-
sure you either remember the code or write it down some-
where, as to not have to attempt to break the RoadGear
apart in a way that would not be favorable to it whatso-
ever.
4) After entering your desired code, replace the small lever
underneath the lock into its original position and voila! Your
new, secret code is set.
This process must be repeated for each lock separately. It’s
advised that you have the same code for each lock, as to avoid
confusion.
The RoadGear Speakers
The specially molded speakers that are included in both sets
provide 8 inch woofers, as well as a 1” compression driver for
high quality sound reproduction. Included with the speakers
are two 30 foot speaker cables. Each speaker has an imped-
ance of 8Ω.
It is important that users do not pick the RoadGear up by the
latches that hold it in place when the kit is assembled. Doing so
can cause damage to the latches, making them useless. Fur-
thermore, when using the speakers, be sure to lock the latches
at the lower-rear end of the speaker back into place. This also
avoids damaging the latch.
Microphone
Included with the RoadGear sets will be a microphone (two
with the RoadGear 260 Plus), more specically the Phonic
UM99 microphone. The Phonic UM99 will no doubt supply you
with a fantastically rened sound for use in public addresses or
even for vocals in live performances.
Polar Pattern: Cardioid (unidirectional)
Frequency Response: 50 Hz – 15 kHz
Impedance: 600Ω ± 30% (at 1000 Hz)
Sensitivity: -72dB ± 3 dB (SPL = 74 dB, 0 dB = 1V/μ bar; at
1000 Hz indicated by open circuit)
Switch: on & off
Dynamic Microphone Cartridge: CUM-112 (copper
voice coil)
Mechanical Spec:
Dimensions: Ø52 x 178 mm
Weight: 232g (without cable)
32
33
UM99

10 Road Gear 160 Plus/Road Gear 260 Plus
Optional Accessories
In addition to all this, the RoadGear sets provide you with the
option of using various added features. Wireless microphones,
with 2 module inputs conveniently placed at the rear of the mix-
er, are a fantastic way to ensure the microphone cord is never
in the way. Dual and single speaker stands compatible with
the RoadGear speakers enable you to position your speak-
ers in a way that best suits your setting, for a greater disper-
sion of audio. These just add to the ease and convenience that
RoadGear provides.
The following is a list of all optional accessories:
TB-RG: RoadGear Travel bag, used to protect the RoadGear
during transportation or in storage.
MK1-RG: RoadGear Speaker wall mount kit.
MK2-RG: RoadGear Dual Speaker Mount, allow you to mount
two RoadGear speakers at one tripod stand.
SK1: Two Speaker Stands, including carry bag.
SK2: Two Mic Stands & two Speaker Stands, including carry
bag.
Wireless Microphone
There are 3 different wireless microphone kits available for
the RoadGear mobile audio systems: the UM31, UM41 and
UM51. Each of these systems provides users with the same
wireless receiver, however includes either a handheld, lava-
liere or headset microphone.
UM31 Handheld System
● Handheld transmitter (HT-100)
● Wireless receiver module (UM-R11)
UM41 Lavaliere System
● Lavaliere microphone (ML-10)
● Bodypack transmitter (BT-200)
● Wireless receiver module (UM-R11)
UM51 Headset System
● Headset microphone (MH-20)
● Bodypack transmitter (BT-200)
● Wireless receiver module (UM-R11)
Battery Pack
The BP-RG Battery Pack and CV-RG 12 volt DC-to-DC con-
verter can be used to power the RoadGear in areas where no
AC power supply is available. The battery pack should provide
up to 4 hours of continuous use, and is rechargeable.
RF Frequency 614 - 870 MHz
Oscillation Type PLL Synthesized Control Oscillation
Channels 16 Channels
Frequency Response 50Hz - 18KHz, +/-3dB
Bandwidth 24MHz
Operation Range 100m
Model Number BP-RG Battery pack
Charge Time 30 hours
Battery Time 4 hours
Lighting Time Up to 25 hours
Dimensions (W x H x D) 226x325x99mm 8.9"x12.8"x3.9"
Weight 7.75 kg (17.1 lbs)
Model Number CV-RG DC to DC converter
Input Voltage 12V nomi
Output Voltage +48VDC and -48VDC
Input Fuse 40 amp
Output Fuse 10 amp
Dimensions (W x H x D) 100x50x166mm 3.9"x2.0"x6.5"
Weight 1.27 kg (2.8 lbs)
2
1
3
4ON
OFF

11Road Gear 160 Plus/Road Gear 260 Plus
Specications
Road Gear 160 Plus Road Gear 260 Plus
Speakers
Drivers Compression tweeter & 8" woofer Compression tweeter & 8" woofer
Stand Adapter 35mm 35mm
Output Power 2x80W @ 8Ω 2x130W@8Ω
Mid/High Crossover Point 2KHz 2KHz
Mixers
Channels 3 mono & 1 stereo CH, 2-band EQ,
Efx send, pan, level
4 mono & 2 stereo CH, 2-band EQ,
Efx send, pan, level
Mono Channel Balanced, XLR & 1/4" TRS Balanced, XLR & 1/4" TRS
Stereo Channel 2x1/4"TS & 2xRCA 2x1/4"TS & 2xRCA
Multi-effect Processor Echo with time and repeat control 16 programs plus tap delay, 40-bit
Foot Switch n/a Momentary, Effect On / Mute and tap
System EQ Treble/Bass 3-band
Minimum Impedance of
Power Amplier 8Ω 4Ω
Amp Mode L & R or MAIN & MONITOR, with limiter indicators L & R or MAIN & MONITOR, with limiter indicators
Speaker Out 1 x 1/4" TS per channel 2 x 1/4" TS per channel with insert
Send and Return
Tape Out One Stereo RCA One Stereo RCA
EFX Out & ST Return Yes, 1/4" TS Yes, 1/4" TS
Phantom Power n/a Yes
Wireless Mic Module
Socket
2 (wireless microphones and receiver
modules are optional)
2 (wireless microphones and receiver
modules are optional)
Miscellaneous
Included Accessories
1 x Phonic UM99 microphone with
clip, 20' cable, and carry pouch
2 x 30' speaker cables
1 x detachable power cable
1 x PVC dust cover
2 x Phonic UM99 microphone with
clip, 20' cable, and carry pouch
2 x 30' speaker cables
1 x detachable power cable
1 x PVC dust cover
Power Requirement Switchable between 115VAC / 60Hz
and 230VAC / 50Hz, or optional
Switchable between 115VAC / 60Hz
and 230VAC / 50Hz, or optional
Dimensions (H x W x D) 818x635x352mm (32.2"x25"x13.9") 818x635x352mm (32.2"x25"x13.9")
Net Weight 27kg (59.5lbs) 28kg(61.7lbs)


13Road Gear 160 Plus/Road Gear 260 Plus
Introducción
En Phonic nos gustaríamos felicitarle por la compra de uno de
los sistemas de audio móvil RoadGear Plus, un set de equipo
de audio superior en el diseño y versatilidad. Los sets de Phonic
RoadGear le permite llevar todo el equipo que usted necesita
para congurar un avanzado sistema de sonido integrado todo-
en-uno a cualquier lugar donde vaya, con un alboroto mínimo.
La unidad completamente autocontenida incluye dos altavoces
de rango completo, una mezcladora de potencia, dos micrófonos
dinámicos y todos los cables necesarios. RoadGear también
le da la opción de usar micrófonos inalámbricos y proporciona
espacio de almacenaje suciente para empaquetarlos
convenientemente.
Congurando el RoadGear no podría ser más fácil. Sólo libere
el cierre de atracamiento y luego de desensamblar el kit móvil,
posicione simplemente los altavoces y enchufarlos, el micrófono
y cualquier otros instrumentos o dispositivos que usted desea
en la mezcladora de potencia. Luego de enchufar la mezcladora
de potencia en un suministro de energía apropiado, su sistema
está listo para utilizar. No solo que la conguración es así de
fácil, sino que la utilización es también así de simple. Usando
los controles de la mezcladora de potencia suministrada,
simplemente ajusta los niveles de las entradas, así como las
frecuencias alta, baja y media de las entradas y el procesador
de efectos digitales. Todas estas características hacen que
RoadGear sea una solución fácil y conveniente para sistema
de sonido móvil.
Este manual del usuario está diseñado especialmente para
darle información exacta de las funciones y uso de RoadGear
160 Plus y RoadGear 260 Plus. Luego de leer este manual, se
le recomienda de guardarlo en un lugar de fácil acceso para
referencia futura.
Características
Características Comunes
●Sistema de sonido móvil integrado con lujoso gabinete
moldeado estilo maleta con ruedas
●Opera con energía AC o DC
●Sistema de altavoz con controlador de compresión de 1” y
woofer de 8”
●EQ de 2 bandas en cada canal de entrada
● Dos cables de altavoz de 30 pies
●Dos ranuras de receptor para micrófonos inalámbricos
opcionales
●Compartimiento de almacenaje para micrófonos, cables y
accesorios
Características adicionales de RoadGear 160 Plus
●Estéreo de 160 Watt (80 por canal)
●Mezcladora de cuatro canales de entrada: tres mic/línea y
un estéreo
●Efecto de eco con tiempo de retardo y controles de repetición
●Ecualizador de sistema con control de agudo/bajo
●Un micrófono dinámico (con mic clip, cable y bolsa para
llevar)
Características adicionales de RoadGear 260 Plus
●Estéreo de 260 Watt (130 por canal)
●Mezcladora de seis canales de entrada: cuatro mic/línea,
dos estéreo
●Procesador de efecto digital de Alta Denición con 16
programas y tap-retardo
●Ecualizador de sistema de 3 bandas
●Dos micrófonos dinámicos (con clips, cables y bolsas
individuales)
Componentes de RoadGear
RoadGear 160 Plus
●Dos Altavoces con estuches moldeados especialmente
●Una mezcladora amplicada construida dentro de un
estuche de almacenaje moldeado especialmente
●Un micrófono Phonic UM 99 con cable de 16 pies (5
metros), clip y bolsa para llevar
●Dos cables de altavoz de 30 pies (9 metros)
●Cable de energía desmontable
●Una cubierta antipolvo transparente
RoadGear 260 Plus
●Dos Altavoces con estuches moldeados especialmente
●Una mezcladora amplicada construida dentro de un
estuche de almacenaje moldeado especialmente
●Dos micrófonos Phonic UM 99, cada uno con cable de 16
pies (5 metros), clip y bolsa para llevar
●Cables de altavoz de 30 pies (9 metros)
●Cable de energía desmontable
●Una cubierta antipolvo transparente

14 Road Gear 160 Plus/Road Gear 260 Plus
Advertencia
Utilice el cable de corriente alterna suministrado con los
sets RoadGear solamente
Cuando compra el RoadGear, el cable de corriente alterna
será especíco a los requerimientos de seguridad y código
de país de la compra.
Elpin a tierradeconector machodecable decorrientealterna
no debería ser removido bajo ninguna circunstancia.
Cuando lleva el RoadGear a otro país, chequée los niveles
de voltaje local y asegúrese de que la energía estándar
apropiada es usada, como seleccionado por el interruptor
de selección de energía en el panel de dorso.
Cuando el RoadGear está en uso, la puerta de
compartimiento de almacenaje debe mantenerse abierta
para una mejor ventilación.
Desmontaje
La siguiente es la manera más conveniente de abrir y cerrar
los kits RoadGear. Siguiendo estas instrucciones asegurará
conguración sin problema de RoadGear.
1. Primero debería desabrochar los cierres de atracamiento
①y ②(indicado abajo) en cualquiera de los dos lados de
RoadGear.
2. Después de desenganchar estos cierres de atracamiento,
usted puede abrir entonces el cierre superior ③. Esto
asegura que las piezas de RoadGear se separan sin
complicaciones.
3. Coloque la mezcladora amplicada verticalmente.
4. Para re-ensamblar las piezas de RoadGear, debería tomar
el mismo orden (primero los cierres laterales, luego el de
arriba). De esta manera las piezas estarán contenidas con
seguridad y rmemente juntas.
5. Cuando se usa los altavoces RoadGear, asegúrese de
que los cierres de atracamiento en la parte trasera están
cerrados correctamente para asegurar que no rayan la
supercie donde se posicionan.
Conguración Inicial
Por favor asegúrese de tomar nota de todas las instrucciones
de conguración listadas en este manual. Ambos RoadGear
160 y 260 son usados como sistemas PA normales y por lo
tanto todos los cuidados deberían ser tomados para asegurar
la conguración correcta de equipo.
1. Desensamble el set RoadGear móvil y remueva los
altavoces de tope de kit. Remueva todos los artículos que
usted desea usar en su sistema PA de área de almacenaje
de RoadGear. También, coloque la mezcladora y los
altavoces en un lugar adecuado.
2. Conecte los dos altavoces a la Mezcladora Amplicada
mediante el cable de altavoz suministrado. Una plataforma
de altavoz opcional puede ser usada para aumentar la
altura de los altavoces.
Nota: Además de los altavoces, ningún otro dispositivo debería
ser conectado a las salidas de altavoz. Haciendo eso, causará
probablemente daño al dispositivo. También, los cables de
guitarra no deberían ser usados para conectar amplicadores
a altavoces.
3. Enchufe todos los instrumentos y equipo necesarios dentro
de las varias entradas de dispositivo como sea necesario.
Esto podría incluir dispositivos de señal de línea, micrófonos
y/o guitarras, teclados, etc.
4. Enchufe cualquier equipo necesario en las varias salidas
de dispositivo. Esto podría incluir monitores, procesadores
de señal y/o dispositivos de grabación.
5. Asegúrese de que todos los niveles de entrada y salida
están seteados a la posición más izquierda.
6. Enchufe el cable suministrado de corriente alterna en
la entrada de corriente alterna en la parte trasera de la
mezcladora RoadGear.
Nota: Asegúrese de que el cable de electricidad no tenga
rayaduras o cortes que podrían haber por debajo de cable
antes de enchufar en la mezcladora amplicada proporcionada
ya que el constante montaje y desmontaje de equipo podría
causar aislamiento a desgaste.
7. Enchufe el cable de corriente alterna suministrado en la
salida de energía de un voltaje compatible.
8. Gire el interruptor de energía de mezcladora a la posición
de encendido y setée todas las entradas y salidas en
niveles apropiados para ajustar a sus necesidades.
9. Cuando el RoadGear está en uso, la puerta de
compartimento de almacenaje debería mantenerse abierta
para mejor ventilación.
1
Push botton in
to release lock
Presione el botón para
liberar el cierre

15Road Gear 160 Plus/Road Gear 260 Plus
Mezcladora RoadGear
La mezcladora amplicada proporcionada con RoadGear 260
Plus está equipada con 4 micrófonos mono y entradas de línea,
2 entradas de estéreo y un procesador de efecto incorporado
ostentando un 32/40 bits DSP. Todo esto, más un ecualizador
incorporado de 3 bandas, asegura que su audio suena siempre
magníco en la ruta.
La mezcladora de RoadGear 160 Plus está equipada con 3
mic mono y entradas de línea, un simple canal de estéreo, eco
digital incorporado y control de grave/agudo de sistema.
Haciendo Conexión
1. Jacks de Entrada de Micrófono
Estos jacks XLR son para entrada de dispositivos de señal
de nivel bajo, lo más común, micrófonos. Para el mejor
rendimiento, sugerimos usar los micrófonos suministrados
con el set RoadGear, sin embargo, pueden ser usado junto
con cualquier condensador profesional (RoadGear 260 Plus
solamente) o micrófonos de cinta con conectores macho XLR
estándares de 3 pines.
2. Jack de Entrada de Línea
Estos jacks de auricular TS 1/4” aceptan un amplio rango de
dispositivos de nivel de línea de entrada, tales como guitarras y
teclados. Puede aceptar fuentes no balanceadas, sin embargo,
cualquier micrófono enchufado en la entrada de micrófono no
trabajará cuando un dispositivo de línea está unida a este
sistema.
3. Entradas de Estéreo
Las entradas de estéreo incluyen 2 juegos de jacks: jacks
estándar RCA estéreo, para usar con equipo de consumidor
como CD y tape players, etc., y jacks de auricular TS 1/4”
estéreo, para usar con productos de estéreo tales como teclados
y máquinas de tambor. Ambos jacks RCA y TS pueden ser
usados simultáneamente; sin embargo, en algunos casos no es
aconsejable ya que combinando audio podría tener resultados
no deseables. El audio alimentado dentro de estas entradas
son alimentadas a bus de entrada de estéreo correspondiente.
4. Retorno Aux de Estéreo
Estas entradas TS conecta la mezcladora con dispositivos
externos paralelos, tales como sub mezcladoras o procesadores
de efecto externos, recibiendo la señal procesada de otra fuente
y alimentarla a bus de mezcla principal. Si usted desea usar
una señal desde un dispositivo mono, simplemente conecte la
entrada a jack izquierdo y la señal será doblada a la derecha,
haciendola una señal mono ecientemente.
5. Salida de Grabación
Estas salidas acomodarán a los cables RCA para ser
alimentadas a una variedad de dispositivos de grabación,
tales como tape y grabadoras digitales.
6. Salida de Efectos (EFX)
Estas salidas TS 1/4” son salidas nales desde el bus de mezcla
de envío de efectos. Esta alimentación podría ser usada para
conectar a un amplicador y altavoces o a procesadores de
efecto digital externos. Cuando se usa procesadores externos,
la alimentación puede ser retornada a los puertos de Estéreo
AUX Retorno.
7. Interruptor de Pedal (RoadGear 260 Plus solamente)
Este puerto permite la inclusión de un interruptor de pedal
para alteración remota de las propiedades de efecto digital
(encendido o apagado). El de arriba es para encender o
apgargar el efecto; el de abajo es para cambiar tap retardo.
8. Envío y Retorno (RoadGear 260 Plus)
Estos conectores permiten a procesadores de señal externa
ser incorporados con la mezcla principal, justo antes de ser
enviado por el amplicador de potencia. Los dispositivos que
pueden ser usados junto con estos jacks incluyen ecualizadores
grácos, procesadores de efecto digital, silenciadores de
retroalimentación, etc. Se advierte fuertemente que estos
dispositivos están seteados en niveles bajos para asegurar
que las entradas de RoadGear no se sobrecargan.
9. Salidas de Altavoz
Estos jacks son usados para conectar a los altavoces,
alimentado desde el amplicador de potencia interno. Ambos
juegos de salidas son jacks TS de 1/4”, que pueden conducir
130 Watts de salida en 8Ω (o 80 Watts en 8Ω en RoadGear
160 Plus) por canal. Para usar ésto, simplemente inserte un
enchufe apropiado TS 1/4” en ello. El RoadGear 260 Plus
presenta 2 salidas de altavoz por canal, en tanto el RoadGear
160 Plus presenta una salida simple por canal.
Nota: Debido a que la señal de salida de estos jacks está activa, ellos
deberían ser usados junto con los altavoces solamente como para
evitar daño a cualquier otro equipo.
5
7
6
8
9
9
RoadGear 160 Plus RoadGear260 Plus
34
4
6
RoadGear260 RoadGear160

16 Road Gear 160 Plus/Road Gear 260 Plus
Controles y Conguraciones
10. Control de Frecuencia Alta
Este control altera el grado de las
frecuencias altas –o agudo- en el
audio de canal correspondiente. Gire
en el sentido de reloj para aumentar la
cantidad de agudo en el sonido, y gire
en sentido contrario para disminuir la
cantidad. Posicione el botón para una
respuesta plana, si no está en uso.
11. Control de Frecuencia Baja
Este control altera el grado de las
frecuencias bajas –o bass- en el
audio de canal correspondiente. Gire
en sentido de reloj para aumentar la
cantidad de bass en el sonido, y gire
en sentido contrario para disminuir la
cantidad. Posicione la perilla en “0” si
no está en uso.
12. Control MONI / EFX
Este control ajusta el nivel de la señal de canal correspondiente
para ser enviado a EFX y bus de mezcla de Monitor, para
procesamiento de efecto digital y monitoreo de audio,
respectivamente.
13. Control PAN / BAL
El control ‘pan’ alterna el grado o nivel de señal de audio mono
que los canales izquierdo y derecho de la mezcla principal
deberíanrecibir.Enlos canales deestéreo,‘Balance’(Equilibrio)
atenua la señal izquierda o derecha como es requerida.
14. Control de Nivel
Este control alterna el nivel de la señal de canal correspondiente
a la mezcla principal de RoadGear. Este control debería estar
seteado en “0” cuando la mezcladora no está en uso.
Efectos Digitales (RoadGear 160 Plus)
15. Control de Tiempo
Este control ajusta el tiempo de efecto eco incorporado.
16. Control de Repetición
Este control ajusta la frecuencia de repeticiones en efecto
Eco
17. Control de Nivel
Este control ajusta la cantidad de audio de procesador de
efecto Eco que será enviado a la mezcla principal.
Panel de Efectos Digitales (RoadGear 260 Plus)
18. Panel de Efectos Digitales
Este display numérico de 2 digitales muestra el número de
programa que es actualmente aplicado a su señal de audio
EFX. Cuando usted gira el Control de Programa, puede
desplazarse por los diferentes números de programa; sin
embargo, el display volverá a programa original si el nuevo
programa no está seleccionado dentro de pocos segundos.
19. Indicadores Sig y Clip
Los LEDs de Clip y Sig están ubicados dentro de Display
de Efecto Digital. El LED Sig se iluminará cuando cualquier
señal es recibida por el procesador de efecto, y el LED Clip
se encenderá brevemente antes de que las señales excesivas
son cortadas dinámicamente. Si el LED Clip se ilumina
demasiado frecuente, sería aconsejable bajar uno o todos los
controles EFX en los canales de entrada para asegurar que el
nivel de la señal no está demasiado alto.
20. Control de Programa
Este control es usado para desplazarse por varios efectos.
Girando el control en el sentido de reloj permitirá a los usuarios
ascender a números más altos de programa, y girando en
sentido contrario permitirá a usuarios a descender a programa
de números más bajos. Pulsando este control se aplicará el
nuevo el efecto nuevo. Cuando un efecto de tap-retardo es
seleccionado, presionando este control permitirá a los usuarios
a seleccionar el tiempo de tap-retardo.
Pulsando el botón varias veces, el procesador de efecto
interpreta el tiempo entre las dos últimas pulsadas y lo toma
como el tiempo de retardo hasta que el botón es pulsado
nuevamente (ésto se guarda aún después de apagar
la electricidad). Cuando el efecto de retardo de tap es
seleccionado, un pequeño LED se brillará dentro de la ventana
de display de efecto digital en los intervalos sleccionados.
21. Control Maestro EFX
El control maestro EFX ajusta el nivel nal de la señal
procesada que es enviada a la mezcla principal.
22. Interruptor de Bypass
Pulsando este interruptor bypass el motor de efecto. Dos
indicadores pequeños dentro de display de efectos se brillarán
cuando está hecho.
10
11
12
13
14
15 16 17
18 20
21
19 22

17Road Gear 160 Plus/Road Gear 260 Plus
Controles Maestro
23. Ecualizador de Sistema
El ecualizador incorporado de RoadGear 260 Plus le provee
con 3 controles de nivel diferentes, para el control perfecto
sobre las frecuencias altas, medias y bajas de su audio.
Cambiando el nivel de frecuencias altas incluidas en su audio
con aumento de sonidos agudos, tales como guitarras, y
aumentando la claridad de las vocales. Cambiando el nivel
de las frecuencias bajas en su audio aumentará los sonidos
de bass, incluyendo tambores y guitarras bajo, y añade en
general calidez de sonido. Cambiando frecuencias medias
puede ayudar a agregar claridad a las vocales.
El RoadGear 160 Plus presenta un simple control de grave /
agudo para ajustar el equilibrio de frecuencia alta y baja de
su mezcla.
24. Controles de Nivel Izquierdo/Derecho
Estos controles son usados para ajustar el nivel de volumen
nal de señal PRINCIPAL Izquierda y Derecha, enviada a
amplicador de potencia y salidas respectivas (según seteado
por el interruptor de selector de modo).
25. Indicadores de Limitador
Hay 2 limitadores incorporados en amplicador de potencia
de estéreo presentados en RoadGear 160 Plus y 260 Plus.
Los limitadores entrarán en acción (y estos LEDs se iluminan)
cuando los niveles de la señal llegan a ser excesivos. El
sistema de limitador ayudará a prevenir cualquier daño a
su equipo y tratar de mantener la claridad de la señal. Sin
embargo, si estos LEDs se iluminan, es aconsejable bajar los
controles de nivel principal.
26. Selector de Modo
Es utilizado para alternar el uso de las salidas de amplicador
de potencia. Si los monitores de escenario son usados en su
juego de altavoces, entonces el interruptor puede ser seteado
a posición PRINCIPAL / MONI. En RoadGear 260 Plus, ésto
le permitirá enchufar los altavoces principales en salidas de
altavoz IZQUIERDO / PRINCIPAL, y un juego de monitores
pasivos (con una impedancia de 8Ω o más) a salidas
DERECHA / MONI. En RoadGear 160 Plus, esta selección
causará la salida de altavoz izquierdo a enviar la señal
principal (en mono); la salida de altavoz derecho enviará la
señal de monitor. Cuando setea a IZQUIERDO / DERECHO,
las salidas de altavoz envían las señales de principal izquierdo
y derecho como normal.
27. Interruptor +48V (RoadGear 260 Plus solamente)
Este interruptor suministra +48V de fuente fantasma a todos los
canales de entrada, usado para proveer energía a micrófonos
de condensador.
28. Interruptor de Energía
Este botón es usado para encender y apagar el dispositivo.
Panel de Dorso
29. Entrada de Suministro de Energía DC
Esta entrada de energía DC es usada para conectar el
convertidor de RoadGear 12VDC-a±48VDC (12VDC-a±40VDC
en RoadGear 160 Plus ) (y batería portable 12V) a RoadGear,
permitiendole a usted usar el sistema RoadGear cuando la
fuente de corriente alterna no está disponible. El enchufe más
a derecho es usado para conexión positiva, y el más izquierdo
es usado para la negativa. Los dos enchufes de medio son
usados para conexión a tierra. El suministro de energía usado
no debería exceder 51VDC (44VDC en RoadGear 160 Plus)
como para asegurar la seguridad de operación de RoadGear.
30. Conector de Energía y Portafusible
Este puerto es usado para enchufar el extremo hembra de
incluido cable de corriente alterna. El otro extremo debería
conectar a una fuente de energía apropiada. Justo debajo de
este conector está el portafusible de RoadGear. En el caso
de que el fusible se quema, los usuarios pueden abrir este
portafusible, remueva el viejo fusible y reemplacelo con otro
fusible compatible (listado cerca de conector de energía).
31. Selector de Voltaje
El interruptor de Selección de Voltaje es usado para adaptar
el RoadGear a los niveles de de voltaje de diferentes países.
Usted es capaz de seleccionar entre 115V (que puede usar en
países con voltaje estándar entre 100V y 120V) y 230V(que
puede ser usado en países con voltaje estádar entre 220V y
240V).
23 24
25
26
29
30 31
27
28

18 Road Gear 160 Plus/Road Gear 260 Plus
32. Ranuras de Módulo Inalámbrico
Ubicado convenientemente dentro de compartimiento
de almacenaje de RoadGear, estas dos ranuras aceptan
módulo de receptor inalámbrico UM-R11 (disponible con kits
de micrófono inalámbrico UM31, UM41 y UM51). La señal
inalámbrica recibida por la ranura izquierda es enviada a canal
2 de la mezcladora RoadGear, en tanto que la ranura derecha
es enviada a canal 1.
33. Pestillo de Compartimiento de Almacenaje
El pequeño pestillo mantiene el compartimiento
de almacenaje cerrado cuando no está en uso.
Levantelo antes de abrir, y asegure de no abrir con
fuerza el comparimiento de almacenaje para evitar
que se dañe este pestillo.
Combinación de Cierre de Atracamiento
Los cierres de atracamiento de RoadGear son cierres de
combinación, que requiere que el usuario ingrese una
combinación preseteada para abrirlos. Por favor vea las
siguientes instrucciones para abrir el cierre.
1) El código de cierre por defecto es 000. Por favor ingrese
este código la primera vez que utilice RoadGear.
2) Para cambiar el código de cierre, primero abra el pestillo
y encuentre la pequeña palanca debajo de cierre. Tirela
hacia el centro de cierre y arriba hasta que se clava en el
lugar.
3) Cambie los diales de número a su código secreto deseado.
Asegúrese de acordar el código o escribalo en algún lugar,
para que no tenga que intentar a romper el RoadGear, que
no sería una manera favorable en absuluto.
4) Luego de ingresar su código deseado, coloque la pequeña
palanca debajo de cierre en su posición original y listo! Su
nuevo, secreto código está seteado.
Este preoceso debe ser repetido para cada cierre
separadamente. Es aconsejado que tenga el mismo código
para cada cierre para evitar confusión.
Altavoces de RoadGear
Los altavoces moldeados especialmente que están incluidos
en ambos sets proveen woofers de 8 pulgadas, un driver de
compresión 1” para reproducción de sonido de alta calidad.
Con los altavoces incluyen dos cables de altavoz de 30 pies.
Cada altavoz tiene una impedancia de 8Ω.
Es importante que los usuarios no levanten el RoadGear por
los pestillos que lo sujeta en el lugar cuando el kit está armado.
Haciendo eso, puede causar daño a los pestillos, haciendolos
inútiles. En adelante, cuando usa los altavoces, asegúrese
de cerrar los pestillos en el extremo bajo reverso de altavoz
trasero en el lugar. Esto también evita dañar el pestillo.
Micrófono
Con los sets RoadGear incluirán un micrófono (dos con
RoadGear 260 Plus), más especicamente micrófono Phonic
UM99. Phonic UM99 sin duda le suministrará un sonido
increíblemente renado para usar en lugares públicos o aún
para voces en actuaciones en vivo.
Patrón Polar: Cardioide (unidireccional)
Respuesta de Frecuencia: 50Hz – 15kHz
Impedancia: 600Ω ± 30% (en 1000 Hz)
Sensibilidad: -72dB ± 3 dB (SPL = 74dB, 0dB=1V/µ bar; en
1000 Hz indicado por circuirto abierto)
Interruptor: encendido & apagado
Cartucho de Micrófono Dinámico: CUM-112 (bobina
de cobre)
Especicación Mecánica:
Dimensiones: Ø52 x 178 mm
Peso: 232g (sin cable)
32
33
Parte Inferior de Cierre de Combinación de RoadGear
UM99

19Road Gear 160 Plus/Road Gear 260 Plus
Accesorios Opcionales
Además de todo ésto, los sets RoadGear le proveen la
opción de usar varias características añadidas. Micrófonos
inalámbricos con 2 entradas de módulo convenientemente
colocados en la parte trasera de la mezcladora, son maneras
estupendas para asegurar que el cable de micrófono no
está nunca en el camino. Soportes de altavoz dual y simple
compatibles con altavoces RoadGear le permite posicionar sus
altavoces en la manera que ajusta mejor a su conguración,
para mayor dispersión de audio. Los paquetes de batería
opcionales proveen energía a sets RoadGear cuando no hay
otra fuente de energía cerca. Estos solo agregan a la facilidad
y conveniencia que RoadGear provee.
La siguiente es una lista completa de todos los accesorios
opcionales:
TB-RG: RoadGear bolsa de viaje, usado para proteger
RoadGear durante la transportación o en almacenamiento.
MK1-RG: RoadGear kit de montaje a pared de altavoz.
MK2-RG: RoadGear Montaje de Altavoz Dual, le permite
montar dos altavoces RoadGear en un soporte de trípode.
SK1: Dos Soportes de Altavoz, incluyendo bolsa para llevar.
SK2: Dos Soportes de Mic & dos Soportes de Altavoz,
incluyendo bolsa para llevar.
Micrófono Inalámbrico
Hay 3 kits de micrófonos inalámbricos diferentes disponibles
para sistemas de audio móvil RoadGear: UM31, UM41 y
UM51. Cada uno de estos sistemas provee a usuarios con
el mismo receptor inalámbrico e incluye un micrófono portátil,
lavaliere o auricular con micrófono integrado.
Sistema Portátil UM 31
●Transmisor portátil (HT-100)
●Módulo de receptor inalámbrico (UM-R11)
Sistema Lavaliere UM41
●Micrófono lavaliere (ML-10)
●Transmisor bodypack (BT-200)
●Módulo de receptor inalámbrico (UM-R11)
Sistema Auriculares UM51
●Micrófono auriculares (MH-20)
●Transmisor bodypack (BT-200)
●Módulo de receptor inalámbrico (UM-R11)
Paquete de Batería
El Paquete de Batería BP-RG y convertidor CV-RG 12 voltios
DC-a-DC puede ser usado para dar energía a RoadGear en
áreas donde no hay suministro de corriente alterna. El paquete
de batería debería proveer hasta 4 horas de uso continuo, y
es recargable.
Frecuencia RF 614-870 MHz
Tipo de Oscilación Oscilación de Control Sintetizado PLL
Canales 16 Canales
Respuesta Frecuencia 50 Hz – 18 kHz, +/-3dB
Ancho de Banda 24 MHz
Rango de Operación 100m
Número de Modelo BP-RG Paquete de Batería
Tiempo de Carga 30 horas
Tiempo de Batería 4 horas
Tiempo de Iluminación Hasta 25 horas
Dimensiones(An xAl x P) 226x325x99mm 8.9”x12.8”x3.9”
Peso 7.75 kg (17.1 lbs)
Número de Modelo CV-RG DC a DC convertidor
Voltaje de Entrada 12V nominal
Voltaje de Salida +48VDC y -48VDC
Fusible de Entrada 40 amp
Fusible de Salida 10 amp
Dimensiones(An xAl x P) 100x50x166mm 3.9”x2.0”x6.5”
Peso 1.27 kg (2.8 lbs)
2
1
3
4ON
OFF

20 Road Gear 160 Plus/Road Gear 260 Plus
Especicaciones
RoadGear 160 Plus RoadGear 260 Plus
Altavoces
Drivers Compresión tweeter & 8” woofer Compresión tweeter & 8” woofer
Adaptador de Soporte 35mm 35mm
Energía de Salida 2 x 80W @ 8 ohms 2 x 130W @ 8 ohms
Punto de Crossover Medio/Alto 2 kHz 2 kHz
Mezcladora
Canales Canales 3 mono & 1estéreo, EQ 2 bandas,
envío Efx, pan, nivel
Canales 4 mono & 2estéreo, EQ 2 bandas,
envío Efx, pan, nivel
Canal Mono Balanceado, XLR & 1/4” TRS Balanceado, XLR & 1/4” TRS
Canal Estéreo 2 x 1/4” TS & 2 x RCA 2 x 1/4” TS & 2 x RCA
Procesador Multi-efecto Eco con control de tiempo y repetición 16 programas más retardo tap, 40 bits
Interruptor de Pedal No Momentáneo, Efecto Encendido/Mute y tap
Sistema EQ Agudo / Grave 3 bandas
Impedancia Mínima de
Amplicador de Potencia 8 ohms 4 ohms
Modo Amp I & D o PRINCIPAL & MONITOR, con
indicadores de limitador
I & D o PRINCIPAL & MONITOR, con
indicadores de limitador
Salida de Altavoz 1 x 1/4” TS por canal 2 x 1/4” TS por canal con inserción de Envío y
Retorno
Salida de Tape Un Estéreo RCA Un Estéreo RCA
Salida EFX & Retorno ST Sí, 1/4” TS Sí, 1/4” TS
Fuente Fantasma No Sí
Socket de Módulo Mic
Inalámbrico
2 (micrófonos inalámbricos y módulos de
receptor son opcionales)
2 (micrófonos inalámbricos y módulos de
receptor son opcionales)
Varios
Accesorios Incluidos
1 x micrófono Phonic UM99 con clip, cable de
20’ y bolsa para llevar
2 x micrófono Phonic UM99 con clip, cable de
20’ y bolsa para llevar
2 x cables de altavoz 30’ 2 x cables de altavoz 30’
1 x cable de electricidad desmontable 1 x cable de electricidad desmontable
1 x cubierta antipolvo PVC 1 x cubierta antipolvo PVC
Requerimiento de Energía Intercambiable entre 115VAC / 60Hz y
230VAC / 50Hz, u opcional
Intercambiable entre 115VAC / 60Hz y
230VAC / 50Hz, u opcional
Dimensiones
(Alto x Ancho x Profundidad)
818 x 635 x 352 mm 818 x 635 x 352 mm
(32.2” x 25” x 13.9”) (32.2” x 25” x 13.9”)
Peso Neto 27 Kg (59.4 lbs) 28 Kg (61.7 lbs)
This manual suits for next models
1
Table of contents
Languages:
Other Phonic Speakers System manuals