PINE64 Pinebook Pro User manual

User Guide
The Pinebook Pro is a Linux and *BSD ARM laptop from PIN 64
It is built to be a compelling alternative to mid-ranged Chromebooks that people convert
into Linux laptops. It features an IPS 1080p 14″ LCD panel, a premium magnesium alloy
shell, high capacity eMMC storage, a 10,000 mAh capacity battery, and the modularity
that only an open source project can deliver.
Key features include: the RK3399 SOC; USB-C for data, video-out and power-in (3A 5V);
privacy switches for the microphone, BT/WiFi module, and camera; and expandable
storage via NVMe (PCIe 4x) with an optional adapter.
The Pinebook Pro is equipped with 4GB LPDDR4 system memory, high capacity eMMC
flash storage, and 128Mb SPI boot Flash. The I/O includes: 1x micro SD card reader
(bootable), 1x USB 2.0, 1x USB 3.0, 1x USB type C Host with DP 1.2 and power-in, PCIe
4x for an NVMe SSD drive (requires an optional adapter), and UART (via the headphone
jack by setting an internal switch).
The keyboard and trackpad both use the USB 2.0 protocol. The LCD panel uses eDP
MiPi display protocol.
Many different Operating Systems (OS) are freely available from the open source
community and partner projects. These include various flavors of Linux (Ubuntu, Debian,
Manjaro, etc.) and *BSD.
Using the optional NVMe adapter
The optional NVMe adapter allows the use of M.2 cards that support the NVMe standard,
(but not SATA standard).
Installing the adapter
The v2.1 SSD adapter that is shipped with the initial Pinebook Pro batches had
significant issues. A repair kit will be shipped to address those issues.
(If necessary, they can be modified to work. There is an unofficial tutorial on the
forums describing these modifications.)
Using as data drive
As long as the kernel in use has both the PCIe and NVMe drivers, you should be able to
use a NVMe drive as a data drive. It can automatically mount when booting from either
the eMMC or an SD card. This applies to both Linux and FreeBSD, using the normal
partitioning and file system creation tools. Android and Chromium OS require testing.
Using as OS root drive
It is not possible to boot directly off an NVMe drive. The SoC does not include the NVMe
boot code, so the NVMe is not in the SoC's boot order.

However, it is possible to initially boot off an eMMC or SD card, then transfer to a root file
system on the NVMe. Currently, it is necessary to have the U-Boot code on an eMMC or
SD card. (A forum member posted here about using a modified version of U-Boot with
NVMe drivers, that uses
/boot
and
/
off the NVMe drive. So this may change in the
future.)
Please see Bootable Storage.
Caring for the PineBook Pro
Bypass Cables
The mainboard features two (disconnected by default) bypass cables that are only to be
used with the battery disconnected. The female (10) male (6) ends of the bypass cables
can be connected to provide power to the mainboard if you need to run the laptop without
a battery. Please refer to this engineering notice.
WARNING: Do not connect the bypass cables with the battery connected. Using the
bypass cables with the battery connected can permanently damage the computer.
Pinebook Service Step-by-Step Guides
Placeholder for Pinebook Pro specific guides
Under 'Service Guides for Pinebook' you can find instructions guides concerning
disassembly of:
Note: he installation process on Pinebook Pro similar to 14" Pinebook
Note: he installation process is the reverse order of removal guide
•
14″ Pinebook Lithium Battery Pack Removal Guide
•
14″ Pinebook LCD Panel Screen Removal Guide
•
14″ Pinebook eMMC Module Removal Guide
Power Supply
•
Input Power: 5V DC @ 3A
•
Mechanical: 3.5mm OD / 1.35mm ID, Barrel jack
•
USB-C 15W PD quickcharge
•
Only use one power input at a time, barrel jack OR USB-C
FAQ
What cool software works out of the box? Pinebook Pro OTB xperience
roubleshooting guide
Tips, tricks and other information for troubleshooting your Pinebook Pro

New from the factory - Pinebook Pro won't boot / power on
•
Some Pinebook Pros came from the factory with the eMMC switch in the disabled
position. It should be switched towards the back / hinge to enable the eMMC.
•
The eMMC may have come loose during shipment. Open the back and verify that the
eMMC is firmly seated.
•
You may want to try unplugging the SD card daughterboard ribbon cable and see if it
powers on (remove the battery and peel off a bit of the tape before unplugging it to
avoid damage). If it does, try reseating it on both sides. It might have come loose
during shipping.
•
It's possible that your eMMC is empty from the factory. Simply create a bootable SD
card and see if your Pinebook Pro boots. If so, you can then write an OS image to
the eMMC.
Pinebook Pro won't boot when using UAR console cable
•
If you're using the UART cable sold on the Pine Store, you may want to see if it boots
after you disconnect it. Some users report that custom-made cables based on FTDI
UART adapters do not cause this issue.
Pinebook Pro will not power on after toggling the eMMC
enable/disable switch
•
This may happen if you meant to toggle the UART/Headphone switch (9) towards
touchpad for headphone use and instead you toggled the eMMC enable/disable
switch (24).
•
After reenabling eMMC by toggling switch (24) towards hinge, if Pinebook Pro does
not turn on then press the R S T button (28). It is clearly marked 'reset' on the PCB
board.
Keys not registering / missing keys when typing
This issue occurs when your thumb or edge of the palm makes contact with left or right
tip of the trackpad when you type. This is due to the palm rejection firmware being too
forceful. Instead of only disabling the trackpad, so your cursor does not move all over the
screen, it disables both the trackpad and the keyboard.
Using Fn+F7 to disable the touchpad will keep it from also disabling the keyboard.
A firmware update has been released to address this.
WiFi issues
•
First, check the privacy switches to make sure your WiFi is enabled. They are
persistant. See Privacy Switches
•
Next, you may have to modify the file "/etc/NetworkManager/NetworkManager.conf"
as user "root", and replace "managed=false" with "managed=true". Then reboot.
•
For connections that drop and resume too often, it might be due to WiFi power
management from earlier OS releases. Later OS releases either removed WiFi
power management, or default to full power. (Power management can be turned off
via command line with
iw dev wlan0 set power_save
off
or
iwconfig wlan0 power off
, although it is not persistent through re-
boot.)
•
If WiFi is un-usable or often crashes when using an alternate OS, then it might
because its WiFi firmware is not appropriate for the WiFi chip in the Pinebook Pro.
Try the latest firmware patch from;

https://gitlab.manjaro.org/tsys/pinebook-firmware/tree/master/brcm
Bluetooth issues
•
If attempting to use Bluetooth attached speakers or headset, you will need to have
the pulseaudio-module-bluetooth package installed. If not installed, you can do so
with;
sudo apt-get install pulseaudio-module-bluetooth
Sound issues
•
Many reports of no sound are due to the OS, incorrect settings, or other software
problems (eg. PulseAudio). So first test to see if it is a software or hardware problem,
by trying another OS via SD card. (For example, if Debian is installed on the eMMC,
try Ubuntu on SD.)
•
If you cannot get sound from the headphone jack, but can get sound from the
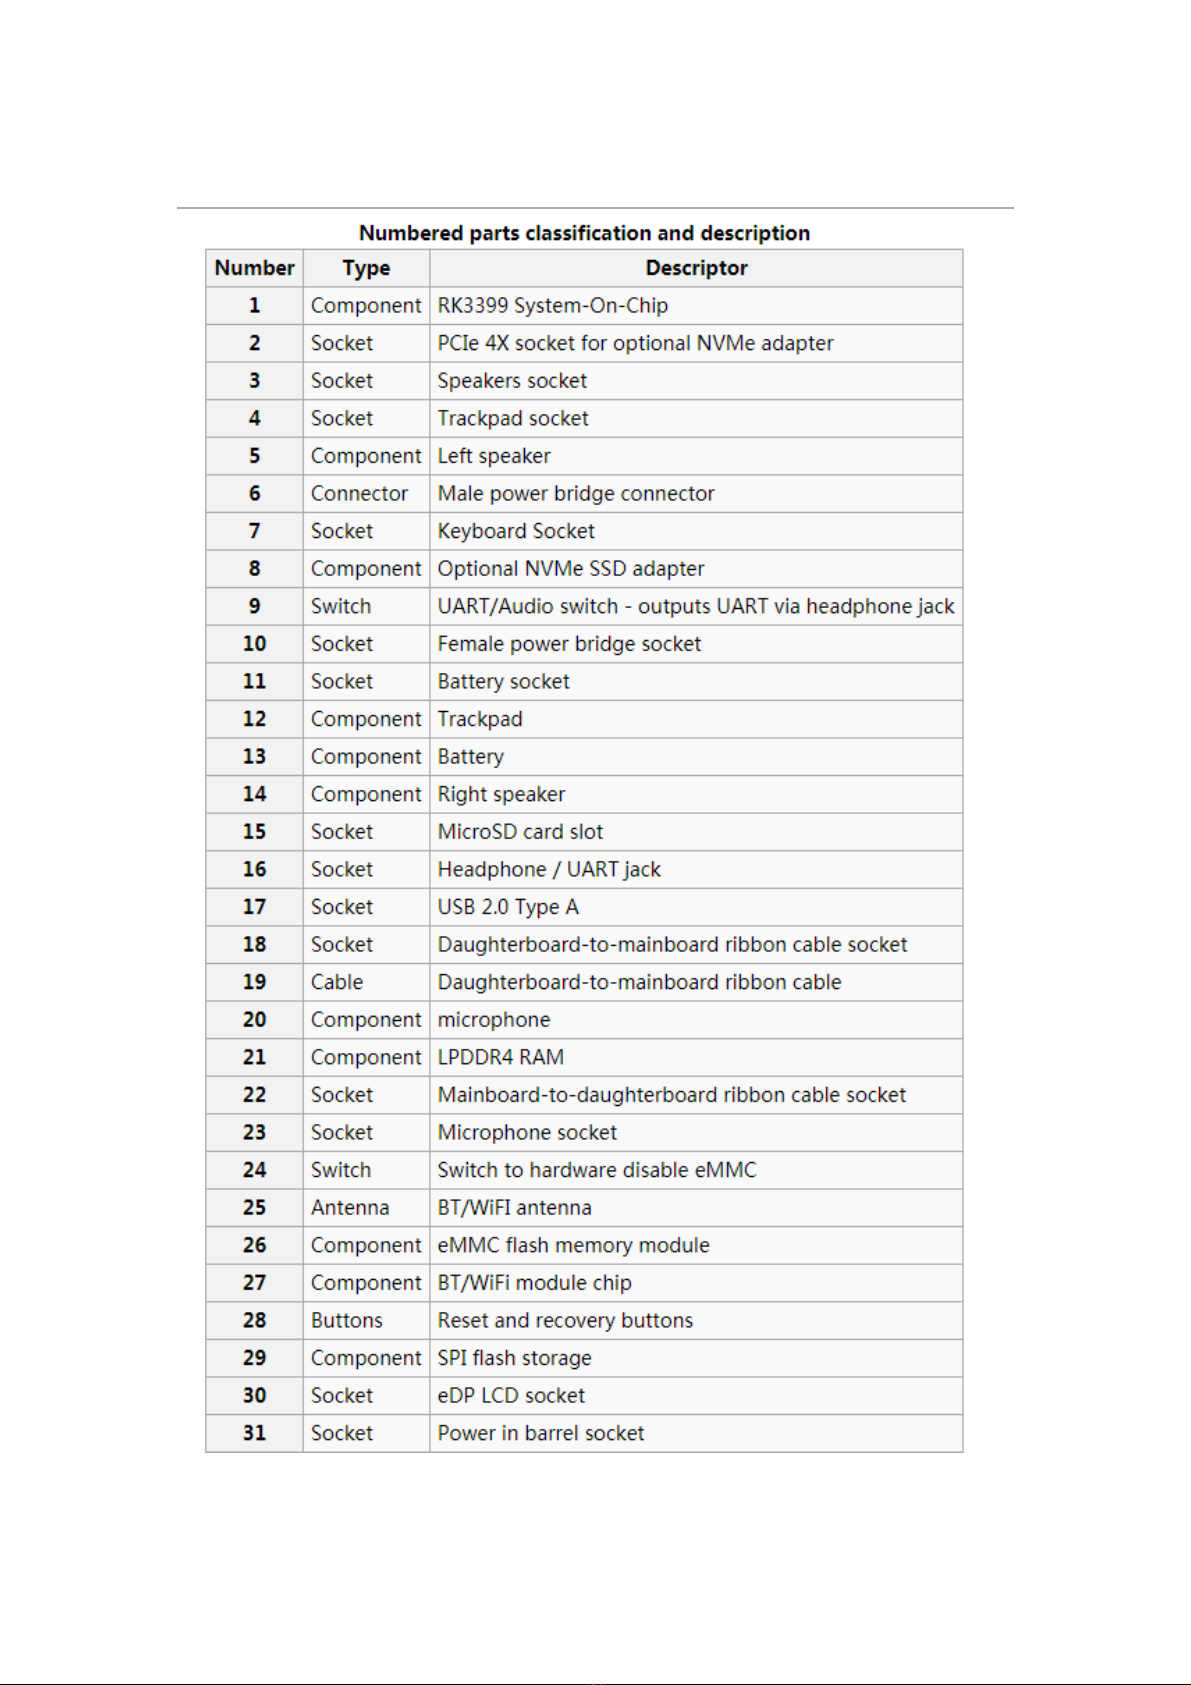
speakers, then the headphone / UART console switch may be set to the UART mode.
You can open the back and check the position of the switch. If set to UART mode,
switch it to headphone mode. See the parts layout for the location and correct
position of the switch.
•
When using the USB C alternate DisplayPort mode, it is possible that the audio has
been re-directed through this path. If your monitor has speakers, then see if they
work.
USB docks & USB C alternate mode video
The Pinebook Pro uses the RK3399 SoC, (System on a Chip). It supports a video pass
through mode on the USB C port called alternate mode, using DisplayPort. This
DisplayPort would come from the same GPU as the builtin LCD is displaying. Here are
some selection criteria for successfully using the USB C alternate mode for video:
•
The device must use USB C alternate mode DisplayPort. Not USB C alternate mode
HDMI, or other.
•
The device can have a HDMI, (or VGA) connector, if it uses an active translater from
DisplayPort to HDMI, (or VGA)
•
If USB 3 is also desired for a USB dock, the maximum resolution, frame rate and
pixel depth is reduced to half the bandwidth. For example, 4K @ 30hz instead of
60hz.
•
USB docks that also use USB C alternate mode DisplayPort always have USB 2
available, (480Mbps, half-duplex).
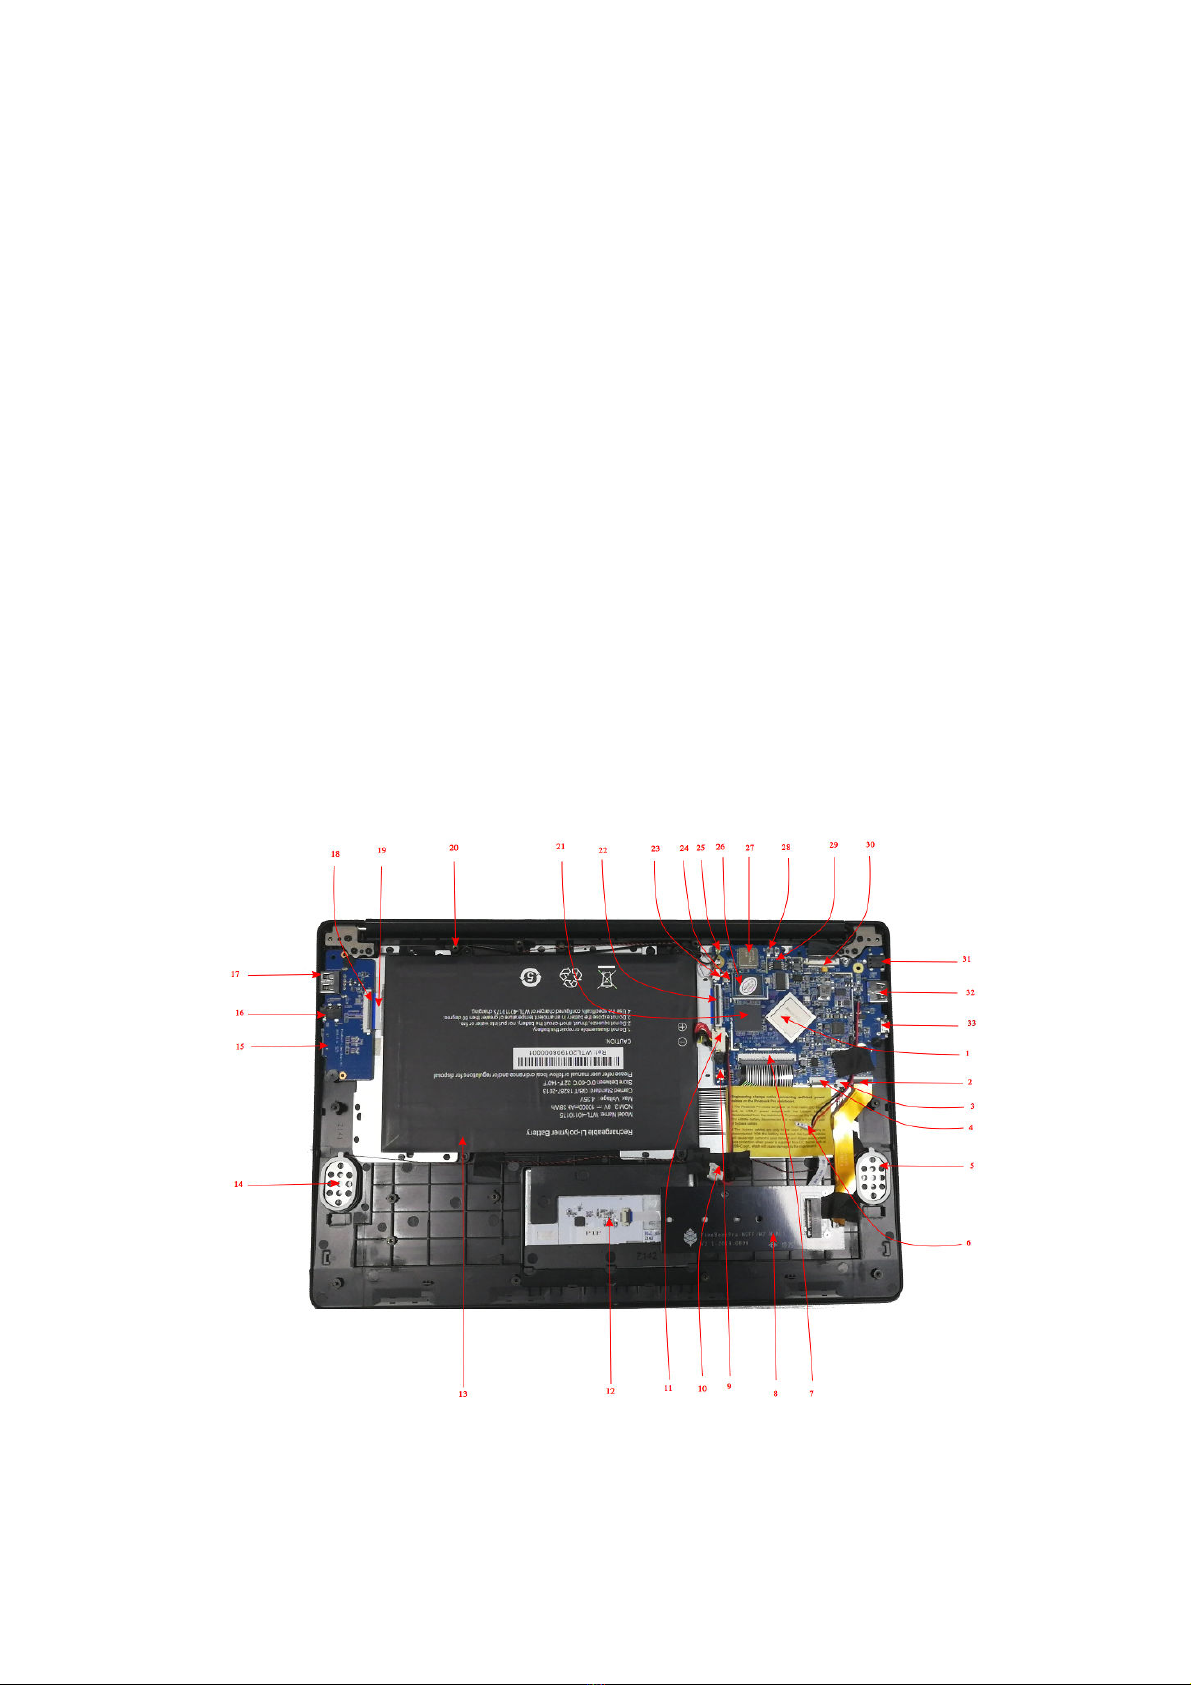
WARNING: Do not open the laptop by lifting the lid while the Pinebook Pro bottom cover
is removed - this can cause structural damage to the hinges and/or other plastic
components of the chassis such as the IO port cut-outs.
WARNING: When removing the back cover plate, use care if sliding fingertips between
back cover plate and palm rest assembly. The back cover plate edges are sharp.
When disassembling the laptop make sure that it is powered off and folded closed. To
remove the bottom cover of the Pinebook Pro, first remove the ten (10) Phillips head
screws that hold the bottom section of the laptop in place. Remove the cover from the
back where the hinges are situated by lifting it up and away from the rest of the chassis.
During reassembly, make sure that the back-screw standoffs are in place and seated
correctly. To reassemble the Pinebook Pro, slide the bottom section into place so it
meets the front lip of the keyboard section. Secure the front section (where the trackpad

is located) in place using the short screws in the front left and right corners. Then
proceed to pop in the bottom panel into place. Secure the bottom section (where hinges
are located) by screwing in the left and right corners. Then screw in the remaining screws
and run your finger though the rim on the chassis to make sure its fitted correctly. Note
that the front uses the remaining 2 short screws.
NOT : The screws are small and should only be finger tight. Too much force will strip the
threads. If after installing screws the back cover plate has not seated properly on one
side, open the display and hold the base on either side of the keyboard and gently flex
the base with both hands in opposing directions. Once the side pops further in, then
recheck the screws on that side. If it does not pop back in, just let it be.
Main chips
•
RK3399 system-on-chip (1)
•
LPDDR4 SDRAM (21)
•
SPI NOR flash memory (29)
•
eMMC flash memory (26)
•
WiFi/BT module (27)
Mainboard Switches and Buttons
There are two switches on the main board: disabling the eMMC (24), and enabling UART
(9) via headphone jack.
The Reset and Recovery buttons (28): the reset button performs an immediate reset of
the laptop. The Recovery button is used to place the device in maskrom mode; this mode
allows flashing eMMC using Rockchip tools (e.g. rkflashtools)


Bootable Storage
The Pinebook Pro is capable of booting from eMMC, USB 2.0, USB 3.0, or an SD card. It
cannot boot from USB-C. The boot order of the hard-coded ROM of its RK3399 SoC is:
SPI NOR, eMMC, SD, USB OTG.
At this time, the Pinebook Pro ships with a Debian + MAT build with uboot on the eMMC.
Its boot order is: SD, then eMMC. Booting off USB storage is not currently available, but
will be in the future.
(An update has been pushed for the default Debian + MAT build that improves
compatibility with booting other OSs from an SD card. In order to update, fully charge the
battery, establish an internet connection, click the update icon in the toolbar, and then
reboot your Pinebook Pro. Please see this log for details.)
Please note that PCIe, the interface used for NVMe SSD on the Pinebook Pro, is not
bootable on the RK3399 and therefore is not a part of the boot hierarchy. It is possible to
run the desired OS from NVMe by pointing extlinux on the eMMC to rootfs on the SSD.
This requires uboot, the Kernel image, DTB, and extlinux.conf in a /boot partition on the
eMMC.
eMMC information
The eMMC storage will show up as multiple block devices:
•
mmcblk1boot0 - eMMC standard boot0 partition, may be 4MB
•
mmcblk1boot1 - eMMC standard boot1 partition, may be 4MB
•
mmcblk1rpmb - eMMC standard secure data partition, may be 16MB
•
mmcblk1 - This block contains the user areas
Only the last is usable as regular storage device in the Pinebook Pro. The device number
of "1" shown above may vary, depending on kernel.
Boot sequence details
The RK3399's mask 32KB ROM boot code looks for the next stage of code at byte off-set
32768, (sector 64 if using 512 byte sectors). This is where U-Boot code would reside on
any media that is bootable.
Pinebook Pro Dimensions
•
Dimensions: 329mm x 220mm x 12mm (WxDxH)
•
Weight: 1.26Kg
•
Based on Rockchip RK3399
CPU Architecture
•
big.LITTL architecture: Dual Cortex-A72 + Quad Cortex-A53, 64-bit CPU
•
Full implementation of the ARM architecture v8-A instruction set (both AArch64
and AArch32)

•
ARM Neon Advanced SIMD (single instruction, multiple data) support for
accelerated media and signal processing computation
•
ARMv8 Cryptography xtensions
•
VFPv4 floating point unit supporting single and double-precision operations
•
Hardware virtualization support
•
TrustZone technology support
•
Full CoreSight debug solution
•
One isolated voltage domain to support DVFS
•
Cortex-A72 (big cluster):
•
Dual-core Cortex-A72 up to 2.0GHz CPU
•
Superscalar, variable-length, out-of-order pipeline
•
L1 cache 48KB Icache and 32KB Dcache for each A72
•
L2 cache 1024KB for big cluster
•
Cortex-A53 (little cluster):
•
Quad-core Cortex-A53 up to 1.5GHz CPU
•
In-order pipeline with symmetric dual-issue of most instructions
•
L1 cache 32KB Icache and 32KB Dcache for each A53
•
L2 cache 512KB for little cluster
•
Cortex-M0 (control processors):
•
Cortex-M0 CPU
•
Two Cortex-M0 cooperate with the central processors
•
Architecture: Armv6-M
•
Thumb/Thumb2 instruction set
•
32 bit only
GPU Architecture
•
ARM Mali-T860MP4 Quad-core GPU
•
The highest performance GPUs built on Arm Mali’s famous Midgard architecture, the
Mali-T860 GPU is designed for complex graphics use cases and provide stunning
visuals for UHD content.
•
Frequency 650MHz
•
Throughput 1300Mtri/s, 10.4Gpix/s
•
OpenGL® S 1.1, 1.2, 2.0, 3.1, 3.2., Vulkan 1.0*., OpenCL™ 1.1, 1.2., DirectX® 11
FL11_1., RenderScript™.
System Memory
•
RAM Memory:
•
LPDDR4
•
Dual memory channels on the CPU, each 32 bits wide
•
Quad memory channels on the RAM chip, each 16 bits wide, 2 bonded together
for each CPU channel
•
4GB as a single 366 pin mobile RAM chip
•
Storage Memory:
•
64GB eMMC module, can be upgraded to a 128GB eMMC module. (The initial
PIN 64 community build version shipped with a 128GB eMMC.)
•
eMMC version 5.1, HS400, 8 bit on RK3399 side
Battery
•
Lithium Polymer Battery (10,000 mAH)
Display

•
14.1" 1920x1080 IPS LCD panel
Video out
•
USB-C Alt mode DP
•
Up to 3840x2160 p60, dependant on adapter, (2 lanes verses 4 lanes)
Audio
•
3.5mm stereo earphone/microphone plug
•
Build in stereo speakers
Network
•
WiFi:
•
802.11 b/g/n/ac
•
Dual band: 2.4Ghz & 5Ghz
•
Single antenna
•
Bluetooth 5.0
Expansion Ports
•
MicroSD card:
•
Bootable
•
Supports SD, SDHC and SDXC cards, up to 512GB
•
Version SD3.0, (MMC 4.5), up to 50MB/s
•
USB ports:
•
1 x USB 2.0 Type-A Host Port, bootable
•
1 x USB 3.0 Type-A Host Port, 5Gbps, is not bootable
•
1 x USB 3.0 Type-C OTG Port, 5Gbps, (includes laptop charging function), is not
bootable
•
Headphone jack switchable to UART console mux circuit
•
Optional NVMe adapter:
•
PCIe 2.x, 5GT/s per lane
•
4 PCIe lanes, can not be bifurcated, (however, can be used with 1 or 2 lane
NVMe cards)
•
Maximum length for M.2 card is 80mm (M.2 2280)
•
Power: 2.5W continuous, 8.25W peak momentary
•
Does not support SATA M.2 cards
•
Does not support USB M.2 cards
FCC Caution: Any changes or modifications not expressly approved by the party
responsible for compliance could void the user's authority to operate this equipment.
This device complies with Part 15 of the FCC Rules. Operation is subject to the
following two conditions:
(1) This device may not cause harmful interference, and
(2) this device must accept any interference received, including interference that may
cause undesired operation.

This Product meets the government's requirements for exposure to radio waves. The
guidelines are based on standards that were developed by independent scientific
organizations through periodic and thorough evaluation of scientific studies.The
standards include a substantial safety margin designed to assure the safety of all
persons regardless of age or health.
FCC RF xposure Information and Statement the SAR limit of USA (FCC) is1.6 W/
kg averaged over one gram of this Device 14″ PINEBOOK Pro LINUX LAPTOP
(FCC ID: 2ANV3-PIN BOOKPRO) has been tested against this SAR limit. SAR
information on this can be viewed on-line at http://www.fcc.gov/oet/ea/fccid/. Please
use the device FCC ID number for search. This device was tested for typical
operations 0mm from the body. To maintain compliance with FCC RF exposure
requirements, 0mm separation distance should. maintained to the user's bodies
NOT :
This equipment has been tested and found to comply with the limits for a
Class B digital
device, pursuant to Part 15 of the FCC Rules.
These limits are
designed to provide reasonable protection against harmful interference
in a residential installation. This equipment generates, uses and can radiate radio
frequency energy and, if not installed and used in accordance with the instructions,
may cause harmful interference to radio communications.
However,
there is no guarantee that interference will not occur in a particular installation.
If this equipment does cause harmful interference to radio or television reception,
which can be determined by turning the equipment off and on, the user is
encouraged to
try to correct the interference by one or more of the followingmeasures:
-- Reorient or relocate the receiving antenna.
-- Increase the separation between the equipment and receiver.
-- Connect the equipment into an outlet on a circuit different from that to which the
receiver is connected.
-- Consult the dealer or an experienced radio/TV technician for help.
FCC ID: 2ANV3-PIN BOOKPRO
Table of contents