Planar PR3010 User manual


User’s Manual
— ii —
Copyright
This publication, including all photographs, illustrations and software, is protected under international
copyright laws, with all rights reserved. Neither this manual, nor any of the material contained herein, may
be reproduced without written consent of the author.
© Copyright June, 2006
Disclaimer
The information in this document is subject to change without notice. The manufacturer makes no
representations or warranties with respect to the contents hereof and specifically disclaims any implied
warranties of merchantability or fitness for any particular purpose. The manufacturer reserves the right to
revise this publication and to make changes from time to time in the content hereof without obligation of
the manufacturer to notify any person of such revision or changes.
Trademark Recognition
Kensington is a U.S. registered trademark of ACCO Brand Corporation with issued registrations and
pending applications in other countries throughout the world.
All other product names used in this manual are the properties of their respective owners and are
acknowledged.
—i —

Preface
–iii –
Important Safety Information
Congratulations on purchasing the Planar DLP® projector!
Important:
It is strongly recommended that you read this section carefully before using the projector. These
safety and usage instructions will ensure that you enjoy many years of safe use of the projector.
Keep this manual for future reference.
Symbols Used
Warning symbols are used on the unit and in this manual to alert you of hazardous situations.
The following styles are used in this manual to alert you to important information.
Note:
Provides additional information on the topic at hand.
Important:
Provides additional information that should not be overlooked.
Caution:
Alerts you to situations that may damage the unit.
Warning:
Alerts you to situations that may damage the unit, create a hazardous environment, or cause
personal injury.
Throughout this manual, component parts and items in the OSD menus are denoted in bold font as in this
example:
“Push the Menu button on the remote control to open the Main menu.”
Remote Control
Some remote controls have a laser for pointing out items on a screen.
DANGER: Do not point the laser in the eyes. Doing so can damage the eyes permanently.
General Safety Information
¾Do not open the unit case. Aside from the projection lamp, there are no user-serviceable parts in
the unit. For servicing, contact qualified service personnel.
¾Follow all warnings and cautions in this manual and on the unit case.
¾The projection lamp is extremely bright by design. To avoid damage to eyes, do not look into the
lens when the lamp is on.
¾Do not place the unit on an unstable surface, cart, or stand.
¾Avoid using the system near water, in direct sunlight, or near a heating device.
¾Do not place heavy objects such as books or bags on the unit.
—ii —

User’s Manual
— iv —
Power Safety
¾Only use the supplied power cord.
¾Do not place anything on the power cord. Place the power cord where it will not be in the way of
foot traffic.
¾Remove the batteries from the remote control when storing or not in use for a prolonged period.
Replacing the Lamp
Replacing the lamp can be hazardous if done incorrectly. Refer to “Replacing the Projection Lamp” on
page 33 for clear and safe instructions for this procedure. Before replacing the lamp:
¾Unplug the power cord.
¾Allow the lamp to cool for about one hour.
Important Recycle Instructions:
Lamp(s) inside this product contain mercury. This product may contain other electronic waste that
can be hazardous if not disposed of properly. Recycle or dispose in accordance with local, state, or federal
Laws. For more information, contact the Electronic Industries Alliance at WWW.EIAE.ORG. For lamp
specific disposal information check WWW.LAMPRECYCLE.ORG.
Cleaning the Projector
¾Unplug the power cord before cleaning. Refer to “Cleaning the Projector” on page 36.
¾Allow the lamp to cool for about one hour.
Regulatory Warnings
Before installing and using the projector, read the regulatory notices in the “Regulatory Compliance”
section on page 46.
Symbol Explanations
DISPOSAL: Do not use household or municipal waste collection services for
disposal of electrical and electronic equipment. EU countries require the use
of seperate recycling collection services.
—iii —

Preface
–v –
Main Features
•Lightweight unit, easy to pack away and transport
•Compatible with all major video standards including NTSC, PAL, and SECAM
•A high brightness rating allows for presentations in daylight or in lit rooms
•Supports resolutions up to SXGA+ at 16.7 million colors to deliver crisp, clear images
•Flexible setup allows for front , rear & ceiling mounted projections
•Line-of-vision projections remain square, with advanced keystone correction for angled
projections
•Input source automatically detected
Register Your Planar Products Today
Thank you for choosing Planar. To assure you receive all the benefits of your Planar product and services,
registeryour Planar product today. Visit our website to register your product at
http://www.planar.com/support/product_registration.html
Cables, Replacement Lamps and Accessories
To find cables, replacement lamps and accessories for your Planar projector, LCD monitor, touchscreen or
other Planar products visit our online store at www.PlanarOnline.com or find other stores who carry Planar
products at http://www.planar.com/howtobuy
About this manual
This manual is intended for end users and describes how to install and operate the DLP® projector.
Wherever possible, relevant information—such as an illustration and its description—has been kept on
one page. This printer-friendly format is both for your convenience and to help save paper, thereby
protecting the environment. It is suggested that you only print sections that are relevant to your needs.
—iv —

User’s Manual
— vi —
Table of contents
GETTING STARTED.......................................................................................................................................................... 1
PACKING CHECKLIST........................................................................................................................................................... 1
VIEWS OF PROJECTOR PARTS............................................................................................................................................... 2
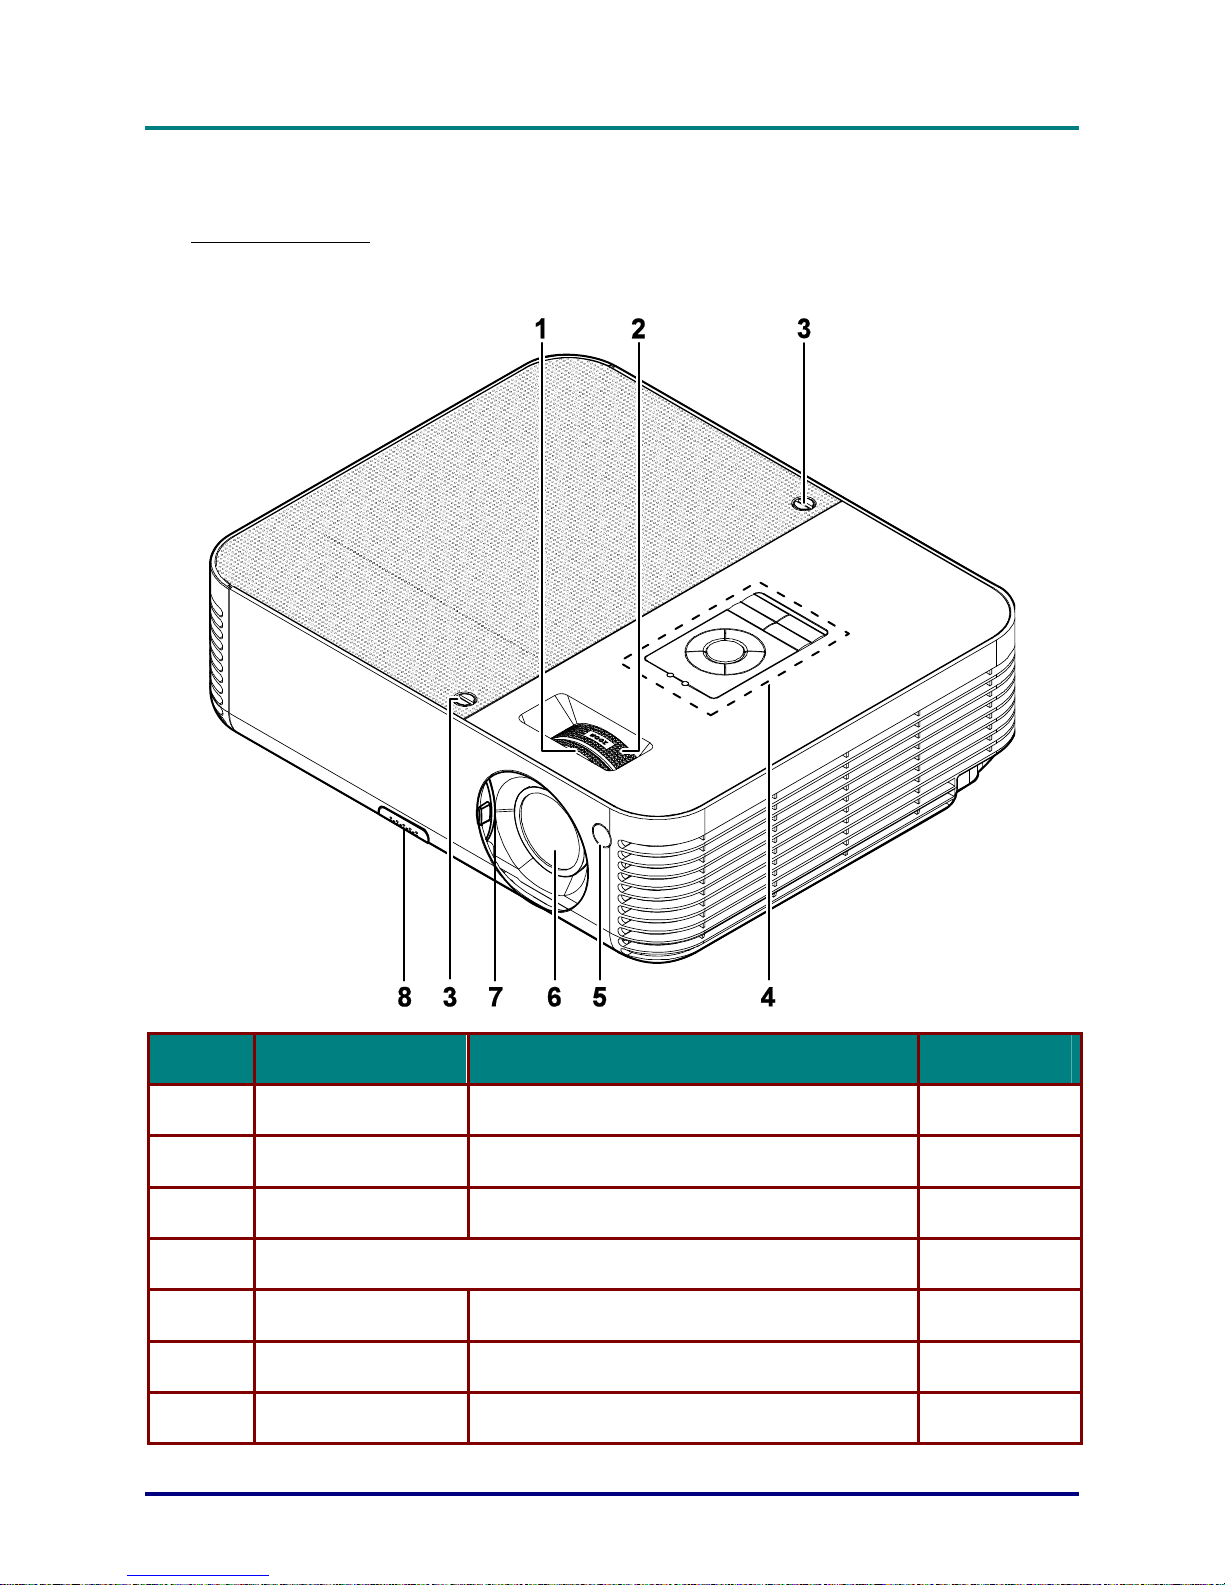
Front-right View ............................................................................................................................................................. 2
Top view—On-screen Display (OSD) buttons and LEDs ............................................................................................... 3
Rear view ........................................................................................................................................................................ 5
Bottom view..................................................................................................................................................................... 6
REMOTE CONTROL PARTS ................................................................................................................................................... 7
REMOTE CONTROL OPERATING RANGE............................................................................................................................... 9
PROJECTOR AND REMOTE CONTROL BUTTONS.................................................................................................................... 9
SETUP AND OPERATION............................................................................................................................................... 10
INSERTING THE REMOTE CONTROL BATTERIES ................................................................................................................. 10
CONNECTING INPUT DEVICES............................................................................................................................................ 11
STARTING AND SHUTTING DOWN THE PROJECTOR............................................................................................................. 13
SETTING AN ACCESS PASSWORD (SECURITY LOCK).......................................................................................................... 15
ADJUSTING THE PROJECTOR LEVEL................................................................................................................................... 16
ADJUSTING THE ZOOM,FOCUS AND KEYSTONE ................................................................................................................ 17
ADJUSTING THE VOLUME .................................................................................................................................................. 17
ON-SCREEN DISPLAY (OSD) MENU SETTINGS....................................................................................................... 19
OSD MENU CONTROLS ..................................................................................................................................................... 19
Navigating the OSD...................................................................................................................................................... 19
SETTING THE OSD LANGUAGE.......................................................................................................................................... 20
MAIN MENU ...................................................................................................................................................................... 22
Main Menu Functions Available for Connected Source............................................................................................... 23
SETUP MENU ..................................................................................................................................................................... 24
Setup Menu Functions Available for Connected Source............................................................................................... 24
Advance Feature........................................................................................................................................................... 25
User Color .................................................................................................................................................................... 27
CONFIG MENU ................................................................................................................................................................... 28
UTILITY MENU .................................................................................................................................................................. 29
Utility Menu Functions Available for Connected Source ............................................................................................. 30
TOOL MENU ...................................................................................................................................................................... 31
STATUS MENU................................................................................................................................................................... 32
MAINTENANCE AND SECURITY................................................................................................................................. 33
REPLACING THE PROJECTION LAMP................................................................................................................................... 33
Resetting the Lamp........................................................................................................................................................ 36
CLEANING THE PROJECTOR................................................................................................................................................ 36
Cleaning the Lens ......................................................................................................................................................... 37
Cleaning the Case......................................................................................................................................................... 37
USING THE KENSINGTON®LOCK ...................................................................................................................................... 37
TROUBLESHOOTING..................................................................................................................................................... 38
COMMON PROBLEMS AND SOLUTIONS ............................................................................................................................... 38
TIPS FOR TROUBLESHOOTING ............................................................................................................................................ 38
LED ERROR MESSAGES..................................................................................................................................................... 39
IMAGE PROBLEMS.............................................................................................................................................................. 39
LAMP PROBLEMS............................................................................................................................................................... 40
REMOTE CONTROL PROBLEMS .......................................................................................................................................... 40
AUDIO PROBLEMS ............................................................................................................................................................. 40
SPECIFICATIONS............................................................................................................................................................. 41
Input/output connectors ................................................................................................................................................ 41
PROJECTION DISTANCE V.S. PROJECTION SIZE.................................................................................................................. 42
PR3020 and PR3010 Projection distance and size table.............................................................................................. 42
PR5020 Projection distance and size table................................................................................................................... 43
TIMING MODE TABLE........................................................................................................................................................ 44
— v —

Preface
–vii –
REGULATORY COMPLIANCE..................................................................................................................................... 46
FCC WARNING.................................................................................................................................................................. 46
CANADA ............................................................................................................................................................................ 46
SAFETY CERTIFICATIONS................................................................................................................................................... 46
FCC CLASS B, UL, C-UL, CE, CB, TUV-GS, CCC ,ICES-003(CLASS B)....................................................................... 46
EN 55022 WARNING ......................................................................................................................................................... 46
— vi —


–1 –
G
ETTING
S
TARTED
Packing Checklist
Carefully unpack the projector and check that the following items are included:
DLP® PROJECTOR REMOTE CONTROL
(WITH TWO AAABATTERIES)
POWER CORD USB CABLE
(USB TYPE A-TO-BUSB) COMPOSITE VIDEO CABLE
(RCA3-TO-RCA3) COMPUTER CABLE
(VGA-VGA)
.
AUDIO CABLE
(MINI JACK-TO-MINI JACK) CD-ROM (THIS USER’S
MANUAL) USERS GUIDE CARRYING CASE
Contact your dealer immediately if any items are missing, appear damaged, or if the unit does not work.
Caution:
Avoid using the projector in dusty environments.

User’s Manual
– 2 –
Views of Projector Parts
Front-right View
ITEM LABEL DESCRIPTION SEE PAGE:
1. Focus Focuses the projected image 17
2. Lens zoom Enlarges the projected image 17
3. Screws Holds lamp to projector
4. See “Top view—OSD buttons and LEDs” 3
5. Front IR receiver Receiver for IR signal from remote control 7
6. Lens Slide lens cap before use.
7. Lens cover Slide across to protect lens when not in use

DLP® Projector – User’s Manual
–3 –
8. Height-adjuster button Push to release height adjuster 16
Important:
Ventilation openings on the projector allow for good air circulation, which keeps the projector lamp
cool. Do not obstruct any of the ventilation openings.
Top view—On-screen Display (OSD) buttons and LEDs
ITEM LABEL DESCRIPTION SEE PAGE:
1. Keystone/
Down cursor Corrects image-trapezoid (wider bottom) effect
Navigates and changes settings in the OSD 19
2. VOL-/
Left cursor Decreases volume
Navigates and changes settings in the OSD 19
Orange Lamp ready—you can safely turn on or off the projector
3. Ready LED
Flashing Lamp not ready—do not press the power button
4. Keystone/
UP cursor Corrects image-trapezoid (wider top) effect
Navigates and changes settings in the OSD 19
Green Unit is powered on and working correctly
Off Unit is powered off
5. Power LED
Flashing Operational error code
(refer to “LED Error Messages” on page 39)
6. Enter Changes settings in the OSD 19

User’s Manual
– 4 –
7. VOL+/
Right cursor Increases volume
Navigates and changes settings in the OSD 19
8. Auto Optimizes image size, position, and resolution
Navigates and changes settings in the OSD
9. Menu Opens and exits the OSD
10. Source Detects the input device
11. Power Turns the projector on or off
13

DLP® Projector – User’s Manual
–5 –
Rear view
ITEM LABEL DESCRIPTION SEE
PAGE:
1. Rear IR receiver Receiver for IR signal from remote control 7
2. DVI-D
(For PR5020 only) Connect a DVI-D cable (not supplied) from a computer
3. VGA IN Connect a VGA cable (supplied) from a computer
4. VGA OUT Connect to a monitor (not supplied)
5. S-video Connect the S-video cable (not supplied) from a video device
6. Video Connect a composite video cable (supplied) from a video
device.
7. Audio in-R Connect the audio cable (supplied) from an audio input device.
8. Audio in-L Connect the audio cable (supplied) from an audio input device.
9. Audio-in Connect an audio cable(supplied) from the computer’s audio-out
connector.
10. Audio-out Audio loop-thru
11. USB Connect the USB cable (supplied) from a computer
12. RS-232
(For PR5020 only) Installation control
11
13. Power Connect the power cord (supplied) 13

User’s Manual
– 6 –
14. Security Lock Secure to permanent object with a Kensington® Lock
system 37
Note:
If your video equipment has both S-video and RCA jacks (composite video) connect to the S-video
connector.
S-video provides a better quality signal.
Bottom view
ITEM LABEL DESCRIPTION SEE PAGE:
1. Ceiling support holes Contact your dealer for information on mounting
the projector on a ceiling.
2. Height adjuster button Push to release height adjuster
3. Height adjuster Adjuster drops down when adjuster button is
pushed
4. Tilt adjuster Adjust angle of the picture
16

DLP® Projector – User’s Manual
–7 –
Remote Control Parts
Important:
1. Avoid using the projector with bright fluorescent lighting turned on. Certain high-frequency
fluorescent lights can disrupt remote control operation.
2. Be sure nothing obstructs the path between the remote control and the projector. If the path
between the remote control and the projector is obstructed, you can bounce the signal off certain
reflective surfaces such as projector screens.
3. The buttons and keys on the projector have the same functions as the corresponding buttons on
the remote control. This user’s manual describes the functions based on the remote control.
ITEM LABEL DESCRIPTION SEE PAGE:
1. IR transmitter Transmits signals to projector
2. Status LED Lights when the remote control is used
3. Laser Press to operate the on-screen pointer
4. Up Up arrow when connected through USB to a PC
5. Right Right arrow when connected through USB to a PC
6. Down Down arrow when connected through USB to a PC

User’s Manual
– 8 –
ITEM LABEL DESCRIPTION SEE PAGE:
7. Page Down Page down when connected through USB to a PC
8. Up cursor
9. Right cursor
10. Down cursor
Navigates and changes settings in the OSD 19
11. Volume +/- Adjusts volume 17
12. Mute Mutes the built-in speaker
13. Zoom+ Zoom in
14. Zoom- Zoom out
15. Freeze Freeze/unfreezes the on-screen picture
16. Blank Makes the screen blank
17. Source Detects the input device
18. Auto Auto adjustment for phase, tracking, size, position
19. Menu Opens the OSD 19
20. Status Opens the OSD Status menu (the menu only opens
when an input device is detected) 32
21. Keystone
top/bottom Corrects image-trapezoid (wider top/bottom) effect 17
22. Left cursor Navigates and changes settings in the OSD
23. Enter Changes settings in the OSD 19
24. Page Up Page up when connected through USB to a PC
25. Left Left arrow when connected through USB to a PC
26. Enter Enter key when connected through USB to a PC
27. Power Turns the projector on or off 13
28. Laser Use as on-screen pointer. DO NOT POINT IN EYES.
Note:
The remote control can only interface with a computer when connected to the computer through a
USB cable connection. The computer cable connects a computer to the projector for display
purposes only.

DLP® Projector – User’s Manual
–9 –
Remote Control Operating Range
The remote control uses infrared transmission to control the projector. It is not necessary to point the
remote directly at the projector. Provided you are not holding the remote perpendicular to the sides or
the rear of the projector, the remote will function well within a radius of about 10 meters (33 feet) and
30 degrees above or below the projector level. If the projector does not respond to the remote control,
move a little closer.
Projector and Remote Control Buttons
The projector can be operated using the remote control or the buttons on the top of the projector. All
operations can be carried out with the remote control; however the buttons on the projector are
limited in use. The following illustration shows the corresponding buttons on the remote control and
on the projector.
Some buttons on the projector have two functions. For example, item 10/13 on the projector functions
both keystone button and as the up cursor key in OSD menus.

–10 –
S
ETUP AND
O
PERATION
Inserting the Remote Control Batteries
1.
Remove the battery compartment cover
by sliding the cover in the direction of
the arrow.
2.
Insert the supplied batteries taking note
of the polarity (+/-) as shown here.
3.
Replace the cover.
Caution:
1. Only use AAA alkaline batteries.
2. Dispose of used batteries according to local ordinance regulations.
3. Remove the batteries when not using the projector for prolonged periods.

DLP® Projector – User’s Manual
–11 –
Connecting Input Devices
A PC or notebook computer as well as video devices can be connected to the projector at the same
time. Video devices include DVD, VCD, and VHS players, as well as movie camcorders and digital
still cameras. Check the user manual of the connecting device to confirm it has the appropriate output
connector.
ITEM LABEL DESCRIPTION
A
Rear IR Receiver for IR signal from remote control.
B
DVI-D
(For PR5020 only) Connect DVI-D cable (not supplied) from a computer.
C
VGA in Connect a VGA cable (supplied) from a computer.
D
VGA out Connect a VGA cable (not supplied) to a monitor.
E
S-video Connect S-video cable (not supplied) from a video device.
F
Video Connect a composite video cable (supplied) from a video device.
G
Audio in-R Connect the audio cable (supplied) from an audio input device.
H
Audio in-L Connect the audio cable (supplied) from an audio input device.
I
Audio-in Connect an audio cable (supplied) from the computer’s audio-out
connector.
Audio-out Audio loop-thru
USB Connect the supplied USB cable (supplied) from a computer for USB
mouse function and firmware upgrades.
RS-232
(For PR5020 only) Reserved for installation control.

User’s Manual
– 12 –
Warning:
As a safety precaution, disconnect all power to the projector and connecting devices before making
connections.
Other manuals for PR3010
4
This manual suits for next models
2
Table of contents
Other Planar Projector manuals

Planar
Planar PR5021 User manual

Planar
Planar PR5022 User manual

Planar
Planar PD8130 User manual

Planar
Planar PR5020 User manual

Planar
Planar PD7010 User manual

Planar
Planar PR5021 User manual

Planar
Planar DLP PD7130 User manual

Planar
Planar PR3010 User manual

Planar
Planar PR5020 Operating instructions

Planar
Planar PR5022 User manual

Planar
Planar PR3020 Owner's manual

Planar
Planar PR3010 User manual

Planar
Planar DLP PD7150 User manual

Planar
Planar PD7170 User manual

Planar
Planar PD7060 User manual

Planar
Planar PR5030 User manual

Planar
Planar PR2010 User manual

Planar
Planar PD8130 User manual

Planar
Planar PR9030 User manual

Planar
Planar 8949H User manual