Plasma Screenland User manual

De
En
Fr
Es
It
Plasma SCREENLAND
Bedienungsanleitung
Instruction manual
Notice d’utilisation
Instrucciones para el manejo
Istruzioni per l’uso
Vor Inbetriebnahme lesen Sie bitte die Bedienungsanleitung aufmerksam durch und bewahren Sie diese sorgfältig auf.
Before first use, read the instruction manual carefully and keep them for future reference.
Antes de utilizarla por primera vez, lea detenidamente las instrucciones para el manejo y guárdelas para futuras consultas.
Lisez soigneusement toutes les notice d’utilisation indiquées avant votre première utilisation, et conservez ce manuel pour vous y référer ultérieurement.
Prima di usare leggete attentamente le istruzioni per l’uso e conservatele per il futuro.

Contents
2 04/07 Plasma Screenland
Risk of burning-in ..................................3
Specifications ........................................................4
General, Safety.......................................5
Safety and set-up location ....................................5
Set-up location – Safe operation .................................5
Instructions for waste disposal.....................................5
Installation .............................................6
Setup, installation ................................................. 6
Fitting the base ............................................................6
Attaching the speakers................................................6
Connection..............................................7
Connections ......................................................... 7
Connection elements on the rear of the unit...............7
Connecting to the SCINEMA BOX II ............................7
Speaker connection .....................................................8
Mains connection ........................................................8
Operating elements...............................9
Controls................................................................ 9
Front of the unit ..........................................................9
Setting the remote control...........................................9
Notes on the remote control .......................................9
Operating the plasma display using the remote control10
Inserting the batteries................................................10
Operating in TV mode .........................11
Operation ...........................................................11
General notes ............................................................11
Switching on/off ........................................................11
Selecting the signal source.........................................11
Operating without the remote control ......................11
Menu navigation.................................................11
Settings...............................................................12
IMAGE picture settings ..............................................12
Operating in YCbCr/VGA/DVI mode ...13
Settings...............................................................13
Menu overview ......................................................... 13
Navigating within the menu...................................... 13
Menu picture settings ............................................... 13
Menu system settings ............................................... 13
Adjustment menu (only available in VGA mode) ...... 14
PIP menu (picture-in-picture) (only available in VGA
and DVI mode).......................................................... 14
External connections ...........................15
External connections ...........................................15
PC connection (VGA, DVI)......................................... 15
Signal configuration of the VGA interface ................ 15
Connection for a DVD component signal (YCbCr).... 15
Appendix ..............................................16
Care and maintenance........................................16
Maintenance............................................................. 16
Cleaning.................................................................... 16
Troubleshooting ........................................................ 16
Menu overview ...................................................17
Index ...................................................................20

Overview
Plasma Screenland 04/07 3
En
RS-232C VGA IN DVI IN DVD COMPONENT IN SPECIAL SIGNAL IN AC POWER IN
230 V ~ 50 Hz
Cr Cb Y
12 3
6 7 8 109 11
45
SOURCE STANDBY
37
36
35*
12
14*13
15
17
19*
21
16*
18*
20
22
34
30* 29*
27*
25
23
28
26*
24
33
32*
31
Caution, risk of burning-in!
Reproducing a still image for longer periods has a nega-
tive effect on the picture quality. Burn-in images and
permanent effects on the screen can be avoided by im-
plementing a series of basic precautionary measures. Ob-
serving the following recommendations will ensure that
the display delivers satisfactory results in the long term:
Avoid frequent playback of the same image and moving
images with static areas (e.g. fixed fade-ins in the image or
video games with areas that do not move).
Avoid operating the plasma display in 4:3 picture format
for longer periods.
Do not view the same teletext page for long periods.
Avoid playing back on-screen fade-ins from a decoder,
DVD player, video recorder or other equipment for long
periods.
When you use the freeze-frame function on a television,
video recorder, DVD player or other equipment, do not
leave the picture on freeze-frame or pause for long peri-
ods.
* Note:
The buttons with the star sign are used to control the tuner
box.These have no function in PC mode.

General
4 04/07 Plasma Screenland
Specifications
Model
Dimensions with base 126 x 73.5 x 30 cm
Dimensions without base 126 x 66.5 x 8 cm
Weight 28 kg
Display
Typ e Active Matrix Plasma Display
Screen diagonals 107 cm / 42 Inch
Picture format 16:9
Resolution 852 x 480 pixels
Pixel Pitch 0.36 x 1.08 mm
Viewing angle 160 degree
Brightness 1000 cd/m2
Colours 16.7 million (True Colour)
Contrast ratio 1000 : 1
Reaction time 20 µs
Sockets:
RS-232C Control input for external devices
VGA-IN (15 Pin D-Sub, PC connection) VGA/SVGA/XGA
DVI-I IN (29-pin) digital VGA/SVGA/XGA
DVD COMPONENT IN (YCbCr) 525i/625i
SPECIAL SIGNAL IN (SCINEMA-BOX II) 525i/625i
PC (MS WindowsTM) compatible "
MAC compatible "
Electrical specifications
Power supply 220 – 240 V / 50-60 Hz
Maximum power consumption 300 W
Power consumption in standby 2.5 W
Loudspeaker
Impedance 8 Ω
Removable "
Operation conditions
Temperature 0 °C – 40 °C
Humidity 20 % – 80 %

General, Safety
Plasma Screenland 04/07 5
En
General,Safety
Safety and set-up location
Set-up location – Safe operation
Caution!
The unit is only suitable for use in modest climate
and should not be exposed to drip or splash water.
Protect the unit against humidity and rain.The TV
set should not be operated in rooms with high moi-
sture levels. Do not place receptacles containing
water on the unit, e.g. vases, flower pots.
The combination of electrical current and water
can cause fatal electric shocks.
Make sure that no objects can fall through the ven-
tilation slits into the interior of the unit as they may
touch live parts. Do not touch the connection con-
tacts at the rear of the unit with your fingers or
metal objects.This could cause a short-circuit.
Should any liquids or foreign objects fall into the
interior of the unit, disconnect the unit from the
power supply immediately. Have the unit checked
by a specialist before using it again.
Caution!
If the mains plug on the units power cable is faulty
or if the unit shows other signs of damage, it should
not be used.
Note:
If the unit is moved from a cold to a warm place,
condensation may develop inside the unit. Leave
the unit switched off for a few hours.
Caution!
Make sure that the unit
(
most importantly th
e
screen) does not come into contact with hard ob-
jects, especially during transportation!
The place of installation should provide a stable, horizontal, vi-
bration-free surface to ensure that the unit stands safely and is
not exposed to any vibrations. This could damage the sensitive
electronics.
Any warmth generated when the unit is operated must be al-
lowed to escape freely.Avoid direct thermal effects from radia-
tors or sunlight. If in doubt, consult a specialist dealer. Heat
build-up may cause electronic components to fail!
500 mm
The ventilation slits must always be kept free. Do not cover the
ventilation openings with curtains, cloths or newspapers.
Do not place sources of naked flames such as burning candles
on the receiver.
Make sure that all connections have been made correctly.
Loose connections can cause malfunctions.
Position the unit in such a way that bright light or sunshine
cannot fall onto the screen. Light sources of this kind will re-
flect off the screen and interfere with the brilliance of the pic-
ture.
Do not install the unit near equipment generating strong
magnetic fields (e.g. motors, loudspeakers, transformers, etc.) as
these may cause colour changes on the screen.
Caution!
Viewers should maintain a distance of 4 metres (4
times the diagonal of the screen
)
from the screen to
protect their eyes while watching television.
Instructions for waste disposal
Packaging and packaging aids can and always should be recy-
cled.
Caution!
Packaging materials, such as e.g. foil bags, must be
kept away from children (Danger of suffocation!).
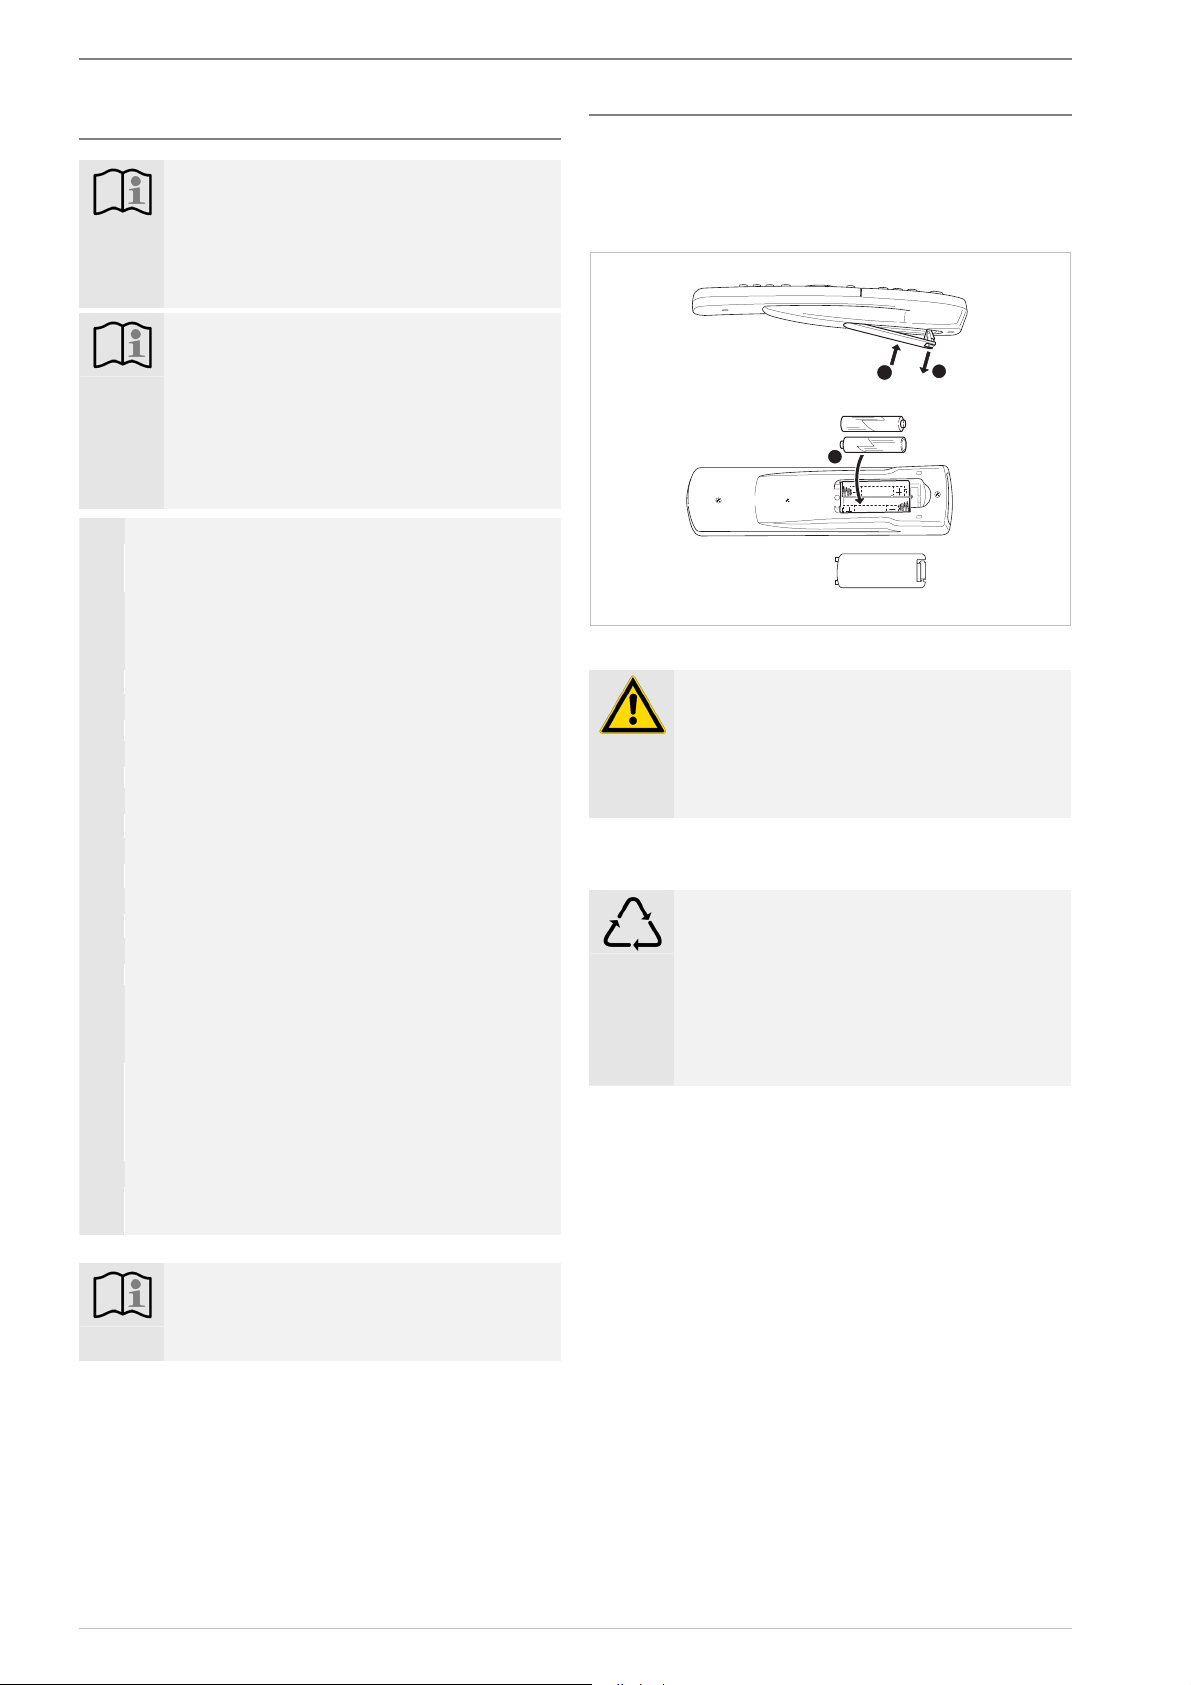
Note:
Before disposing of the unit, please remove any
batteries! The unit and batteries can be handed in
at a collection point for hazardous waste or at your
local recycling centre, for example. Please consult
your local authority!
Make your own contribution to protecting the environment!
Note:
Flat batteries and storage batteries should not be
disposed of together with standard household wa-
ste.They can be deposited at the collection point
for used batteries and hazardous waste. Please con-
sult your local authority!
It may also be possible to return discharged batter-
ies to a specialist dealer or retailer.

Installation
6 04/07 Plasma Screenland
Installation
Setup, installation
To set up the unit, please proceed as follows:
Fitting the base
Fit the base to the housing using the fine-thread screws (x 4)
supplied. Check that the screws are seated correctly.
Attaching the speakers
Fix the speakers supplied to the housing using the screws pro-
vided (6 for each speaker).
Note:
Make sure that the retaining plates are screwed on
with the spacer lobes facing towards the speakers.
The screwsA (x 2) are intended for the speaker si-
de and the screws B (x 1) for the housing side.
B
A

Connection
Plasma Screenland 04/07 7
En
Connection
Connections
Connection elements on the rear of the unit
RS-232C VGA IN DVI IN DVD COMPONENT IN SPECIAL SIGNAL IN AC POWER IN
230 V ~ 50 Hz
Cr Cb Y
6 7 8 109 11
6 RS-232C
External control connection for D-Sub 9-pin serial inter-
face cable connecting the plasma display to a PC or a
tuner box
7 VGA IN
Connection socket, D-Sub 15-pin, for VGA connection,
e.g. for PC
8 DVI-I IN
Connection sockets 29-pin, Digital Visual Interface for
feeding digital picture signal, e.g. PC
Note:
The display can process the following signals:
Horizontal
sampling frequency max: 15.7 kHz
(TV)
69 kHz (PC)
Vertical
sampling frequency: 60 Hz (TV)
85 Hz (PC).
Display resolution: see page 15.
9 DVD COMPONENT IN
Component input signal via RCA video cable (YCbCr)
10 SPECIAL SIGNAL IN
Socket for connecting to SCINEMA-BOX II with ac-
companying cable*
11 AC POWER IN
Mains connection socket
220 – 240 V / 50–60 Hz
Note:
If the system is connected to the power voltage,
parts of the machine are in operation due to the
stand-by function. In order to switch off the system
completely, disconnect it from the mains.
Connecting to the SCINEMA BOX II
The plasma display is designed for operation with the SCI-
NEMA-BOX II.
Connect the plasma display (top of illustration) to the SCI-
NEMA-BOX II (bottom of illustration) using the 15-pin
VGA connecting cable supplied.
* Note:
Connect the Plasma monitor to the SCINEMA-
BOX II using only the VGA 15 PIN service cable
included with the SCINEMA-BOX II.
The VGA cable included with the Plasma monitor
is suitable only for PC applications!

Connection
8 04/07 Plasma Screenland
Speaker connection
To play back sound, connect the speakers for the plasma display
(top of illustration) to the speaker jacks on the SCINEMA-
BOX II (bottom of illustration) using the speaker cables.
The left speaker should be connected to the Lterminals and
the right speaker to the Rterminals. Press down the terminal
levers to plug in the speaker cables.
Note:
Only plug in the stripped end of the speaker cable!
Use the speaker cables supplied and make sure that they are
connected as specified in the following connection overview.
Connection overview
Terminal Plasma
display
Cable Scinema Box II
L (+) Red Left wire 1 Red
L (−) black Left wire 2 black
R (+) Red Right wire 1 Red
R (−) black Right wire 2 black
Mains connection
Only use the cable included in the scope of delivery to connect
to the power supply. Only connect the unit to a grounded
mains socket! The socket should be as close to the unit as pos-
sible.
For mains connection, insert the mains plug into the mains
socket completely.
Caution!
The unit should only be connected to a
power supply voltage of 220 - 240 V / 50-60 Hz.
Caution!
The unit should only be connected to the mains
supply once all other connections have been made.
If the mains plug on the units power cable is fault
y
or if the unit shows other signs of damage, it shoul
d
not be used.
Remove the mains cable from the socket by pull-
ing out at the plug – do not pull on the cable.
Caution!
Use an appropriate, easily accessible power suppl
y
and avoid using multiple socket outlets!
Disconnect the power supply plug during thunder-
storms or if the unit is not used for longer periods.
Do not touch power supply plugs with wet hands -
risk of electric shocks!
Caution!
If the unit is faulty or smoke and odours are emit-
ted from the housing, pull the power supply plug
from the socket immediately!

Operating elements
Plasma Screenland 04/07 9
En
Operating element s
Controls
Front of the unit
12 345
SOURCE STANDBY
1 POWER
Power switch: Switch the TV on and off
2 Indicator light showing TV switched on (green)
Standby indicator (red)
Remote control receiver
3 SOURCE
Select the input signal by pressing the 4 ∆/ ∇buttons
TV-BOX,YCbCr (DVD component signal),VGA or
DVI (PC socket)
4 ∆/ ∇for SOURCE selection
5 Standby
Switches off the unit temporarily (ready for operation);
the red standby indicator 2 lights up.To switch the unit
back on, press the button again or press the POWER 12
button on the remote control, indicator lights up green.
Setting the remote control
If the equipment is operated with the remote control, observe
the following:
The RC 902 remote control can control up to five different
devices:
• TV,
• DVR,
• SAT,
• DVD and so-called
• PC mode;To operate the plasma display, press the Mode
37 button until the TV and DVD LEDs light up simulta-
neously
Note:
The blue button lettering on the remote control
usually comes as standard!
PC
PC
To operate the Scinema_Box II, press the Mode 37 button un-
til the TV LED lights up.
Notes on the remote control
In general:
• Point the remote control (transmitter) at remote control
receiver 2 on the unit.
• An optical connection must be established between the
transmitter and the receiver.
• If the range of the remote control decreases, replace the
batteries.

Operating elements
10 04/07 Plasma Screenland
Operating the plasma display using the re-
mote control
Note:
Switch the remote control to PC mode by pressing
the Mode 37 button (TV and DVD LEDs light up
simultaneously).
The blue button lettering on the remote control
usually comes as standard!
Note:
The menus disappear again after approx. 7 seconds.
Modified settings are accepted and saved auto-
matically.
PiP:
The buttons 21, 22, 23 on the remote control only
function once the PiP function has been activated
by pressing button 24.
12 POWER: Switch the unit on and off when the power
switch 1 is activated. Indicator 2 lights up green when the
unit is ready to use or red when in STANDBY.
13 Display button i: displays the input signal source
15 Arrow buttons for the menu guide: Menu selection
17 Blue VT/VGA Auto button: automatic geometric ad-
justment in VGA mode
21 F4/Moving button: Position of the faded-in PiP sub-
image can be selected in VGA/DVI mode.
22 F3/Position button: The position of the PiP in
VGA/DVI mode can be selected.
23 F2/Zoom button:The size of the PiP in VGA/DVI mode
can be selected.
24 F1/PiP: switches PiP function (picture in picture) on and
off in VGA/DVI mode
25 Jump/Source button: Signal source of the faded-in PiP
sub-image in VGA/DVI mode can be selected.
31 Arrow buttons for menu guide:
Change the settings, + increase, - decrease the set values
33 ?/Picture button: Select the picture mode IMAGE
34 List/Menu button: Open the main menu
36 Numerical buttons:
0 : Select the input signal TV box, DVD component sig-
nal (YCbCr),VGA, DVI
Confirm with button 31
1-9:Time input in system menu
37 Mode button: For selecting different devices (TV, DVR,
SAT receiver, DVD player and PC mode (plasma dis-
play)
Note:
The buttons with the star sign (see page 3
)
are used
to control the tuner box.These have no function in
PC mode.
Inserting the batteries
The batteries should be removed if the remote control is not
used for long periods. Otherwise, the batteries may leak and
damage the remote control. The remote control is fitted with
two AAA type 1.5 V R03 Micro batteries (included in scope of
delivery).
R03AAA
R03AAA
2
31
Caution!
The batteries for the remote control should be kept
out of the reach of children. Swallowing batteries
can seriously damage your health.
Batteries must not be charged, heated or thrown
into an open fire (danger of explosion!).
Make your own contribution to protecting the environment!
Note:
Flat batteries and storage batteries should not be
disposed of together with standard household wa-
ste.They can be deposited at the collection point
for used batteries and hazardous waste. Please con-
sult your local authority!
Flat batteries can be returned to your specialist
dealer, specialist stores or sales outlets.

Operating in TV mode
Plasma Screenland 04/07 11
En
Operating in TV mode
Operation
General notes
The SCREENLAND plasma display is intended for use with
the SCINEMA-BOX II control unit. Most settings that influ-
ence the picture, sound, channel slots, child lock, etc., are ad-
justed on the SCINEMA-BOX II (in "TV" remote control
mode, see Setting the remote control, page 9).
Please read the relevant instruction manual.
If the plasma display is e.g. connected to a PC, you can adjust
the settings using the remote control in "PC" mode.
Switching on/off
Switch the unit on by pressing the POWER 1 power switch.
The indicator lights up 2 red.
Note:
Switch the remote control to PC mode by pressing
the Mode 37 button (TV and DVD LEDs light up
simultaneously).
Press the standby button 5 on the unit or the POWER 12 but-
ton on the remote control to switch the active unit to standby.
The green standby indicator 2 illuminates to show this.
Switch off the unit, first switch to standby and then press the
POWER 1 power switch.
Note:
Protect the environment and save energy!
The TV should always be switched off via the
POWER 1 power switch if it is to remain unused
for a long period, e.g. overnight or when you are on
holiday.This will help to protect the environment
and reduce electricity costs.
Caution!
To avoid damage caused by thunderstorms, pull
out the mains socket during the storm.11
Selecting the signal source
1. Press the numerical button 0 on the remote control.
2. Select the input signal from the list by pressing the
arrow button 15. If you are operating the plasma
display with the tuner box, set the input signal to TV
BOX.
3. Confirm your selection by pressing the arrow but-
ton 31.
Operating without the remote control
If the remote control does not function because the batteries
are flat, for example, it is still possible to select the signal source
on the plasma display.
• To do this, open the menu by pressing the SOURCE 3
button.
• Select the signal source TV BOX,YCbCr,VGA or DVI
by pressing the ∆/ ∇buttons 4 and
• accept the setting by pressing the SOURCE 3 button.
Menu navigation
Note:
Signal-specific menus appear in graphic form de-
pending on the signal source setting TV BOX,
YCbCr,VGA, DVI.
The graphic menu guide makes the unit easier to use in the
respective operating modes, see page 13.

Operating in TV mode
12 04/07 Plasma Screenland
Settings
Note:
To access the settings, first switch the remote con-
trol to PC mode by pressing the Mode 37 button
(TV and DVD LEDs light up simultaneously).
The following settings can be adjusted via the remote control
in TV mode:
13 Display button i: displays the input signal source
15 Arrow buttons for menu selection:
Picture, system
31 Arrow buttons for menu settings:
Change the settings,
+ increase,- decrease the set values
33 ?/Picture button: Select the picture mode IMAGE:
standard, bright, mild
34 List/Menu button: Open the main menu
36 Numerical buttons:
0 : Select the input signal TV-Box,YCbCr,VGA, DVI,
confirm with arrow button 31
1-9:Time input in system menu
IMAGE picture settings
Press Picture button 33. Select one of the following settings by
pressing the button several times:
standard Preset values for balanced picture repro-
duction.
bright Preset values for bright picture reproduc-
tion.
mild Preset values for soft picture reproduction.

Operating in YCbCr/VGA/DVI mode
Plasma Screenland 04/07 13
En
Operating in YCbCr/VGA/ DVI mode
Settings
Note:
To open the menu, first switch the remote control
to PC mode by pressing the Mode 37 button (TV
and DVD LEDs light up simultaneously).
Menu overview
1. Pressing the menu button 34 opens the picture set-
tings menu.
2. Pressing the menu button 34 repeatedly displays the
different menus available.
9300
BRIGHT 40
A
B
C
D
Menu
A Picture settings
B System settings
C Adjustment (only available in VGA mode)
D PIP (only available in VGA and DVI mode)
3. Pressing the menu button 34 again closes the menu.
Navigating within the menu
You can select the individual menu items by pressing the ar-
row buttons 15 on the remote control.
You can modify individual values by pressing the arrow but-
tons 31 on the remote control.
See menu structure in the appendix on page 17
Menu picture settings
9300
BRIGHT 40
1 2 3 4 5 6
Menu Settings
1 Brightness
2 Contrast
3 Colour
4 Tone
5 Hue
6 Temperature:Warm/cold colour setting to match
colour reproduction
Modify values by pressing the arrow buttons 31 on the remote
control. Press the menu button 34 to exit the menu and save
your settings.
Menu system settings
RGB
OFF
COLOR SYS
NO USE
1 2 3 4 5 6
Menu Settings
1 Standard: Country-specific standard TV settings
AUTO, PAL, NTSC 3.58, NTSC 4.43, SECAM
2 Sound mode: currently no function
3 Language: OSD language setting
4 Clock: Set the system time via the numerical buttons
36 on the remote control,
Format:--:-- (hh:mm)
5 Time ON: Set the automatic switch-on time via the
numerical buttons 36 on the remote control, format: -
-:-- (hh:mm)
The unit automatically switches on after the entere
d
time.
6 Time OFF: Set the automatic switch-off time via the
numerical buttons 36 on the remote control, format: -
-:-- (hh:mm)
The unit automatically switches off after the entered
time.
Modify the values in menus 1-3 by pressing the arrow buttons
31 on the remote control. Press the menu button 34 to exit the
menu and save your settings.

Operating in YCbCr/VGA/DVI mode
14 04/07 Plasma Screenland
Adjustment menu (only available in VGA mode)
H-CENTER
AUTO
1 2 3 4 5
Menu Settings
1 H-CENTER: Setting for the horizontal picture posi-
tion
2 V-CENTER: Setting for the vertical picture position
3 H-SIZE: Setting for the horizontal picture size
4 PHASE: Setting for the phase position
5 AUTO:Automatic setting for the picture position and
phase
Modify the values in the menus by pressing the arrow buttons 31
on the remote control. Press the menu button 34 to exit the menu
and save your settings.
PIP menu (picture-in-picture) (only available
in VGA and DVI mode)
PIP
OFF
1 2 3 4 5 6
Note:
PiP function is only available when a VGA or
DVI signal is available at the same time as the
tuner signal orYCbCr signal.
Note:
PiP function:
The buttons 21, 22, 23 on the remote control only
function once the PiP function has been activated
by pressing button 24.
Menu Settings
1 PiP:Activation/Deactivation of the PiP function
The PiP function can also be activated directly via
the F1/PiP button 24 on the remote control.
2 Source: Set the source of the sub-picture (TV-BOX
or YCbCr)
3 Size: Define the size of the sub-picture.
The zoom function can also be activated directly
via the F2/Zoom button 23 on the remote control.
4 Picture position: Setting for the position of the sub-
picture
The position function can also be activated directly
via the F3/Position button 22 on the remote con-
trol.
5 Currently disabled
6 Move: Switch the position function for the sub-
picture on or off
The move function can also be activated directly
via the F2/Move button 21 on the remote control.
Modify the values in the menus by pressing the arrow but-
tons 31 on the remote control. Press the menu button 34 to
exit the menu and save your settings.

External connections
Plasma Screenland 04/07 15
En
External connec tions
External connections
PC connection (VGA, DVI)
You can use the VGA or DVI connection on the plasma dis-
play to connect a personal computer. The cable required for
this is available at specialised dealers. Set the signal source on
the plasma display to VGA or DVI, see page 11.
RS-232C VGA IN DVI IN DVD COMPONENT IN SPECIAL SIGNAL IN
Cr Cb Y
Resolution in VGA mode:
Pixels Frequency
640x480 60 Hz
800x600 60 Hz
1024x768 60 Hz
1280x768 60 Hz
1280x960 60 Hz
1280x1024 60 Hz
Resolution in DVI mode:
Pixels Frequency
640x480 60 Hz
800x600 60 Hz
1024x768 60 Hz
1280x768 available at 56 HZ
Some resolutions may not be supported, depend-
ing on the graphics card being used.
Signal configuration of the VGA interface
15 14 13 12
9
11
10
876
54 3 21
(Front)
1 R 9 + 5 V
2 G 10 GND (ground)
3 B 11 No assignment
4 No assignment 12 SDA
5 No assignment 13 HD
6 GND (ground) 14 VD
7 GND (ground) 15 SCL
8 GND (ground)
Connection for a DVD component signal
(YCbCr)
You can use the component connection on the plasma display
to connect e.g. a DVD player or a video camera with a com-
ponent output signal. You will require an RCA cable for this,
which is available at specialist dealers. Set the signal source on
the plasma display to YCbCr, see page 11.
RS-232C VGA IN DVI IN DVD COMPONENT IN SPECIAL SIGNAL IN
Cr Cb Y
All rights reserved for technical modifications.

Appendix
16 04/07 Plasma Screenland
Appendix
Care and maintenance
Maintenance
Electronic components are subject to a natural ageing pro-
cess. In the event of malfunction, consult a service repair
shop. Only use the original packaging for transporting the
unit.
Caution!
The unit is operated at dangerous voltages.The uni
t
may only be opened by an authorised specialist.All
maintenance and servicing work must be carried
out by an authorised company. Repairs that are
carried out incorrectly could result in fatal injuries
to the user.
Unauthorised tampering with the inside of the unit invalidates
the warranty.
Note:
To make it easier to identify your unit when han-
ded over to customer services, state the identifica-
tion number printed on the type plate on the rear
of the unit.
The manufacturer shall not warrant for any damage caused by
improper maintenance and repair work by third parties.
Cleaning
Caution!
Disconnect the mains plug before cleaning.
General:
• Do not expose the surface of the screen to temperatures
above + 80 °C and below – 40 °C!
Protect the unit against extreme humidity.
• Do not write on the surface of the screen with a biro or
felt-tip pen!
• Only use a cotton cloth to clean the screen.
• If necessary, use a cotton cloth and small quantities of di-
luted,non-alkaline soapy solution that is water-based or al-
cohol-based.
• Do not use any of the following substances:
Salt water, insecticide, chlorine or acidic solvents (am-
monium chloride), scouring powder.
• Gently clean the surface with the cotton cloth until it is
dry.
Caution!
Never
• wipe the screen using window cleaner
• treat with foam products
• clean by polishing or scouring.
Troubleshooting
Before you contact our service personnel, you should check
the following typical fault sources:
Problem Cause Solution
Mains plug not connected
correctly
Connect correctly to the mains
Plasma display and SCI-
NEMA BOX not con-
nected correctly
Check connection and correct if
necessary, see page 7
Incorrect signal source set-
ting
Set signal source correctly, see
page 11
No sound, no picture
Cable connection damaged Notify specialist
Display is in standby mode Press the POWER 12
button
Brightness and contrast set-
ting incorrect
Select the correct picture set-
tings
PC signal incompatible Select the correct PC signal,see
page 4
No picture but sound
produced
Problem with channel se-
lected
Select another channel
Volume set to minimum Increase volume
MUTE button pressed Press mute button again
Headphones connected to
the SCINEMA BOX
Unplug headphones
No sound but picture
available
Possible problems from the
broadcasting company
-
no signal or signal
weak Check cable connection to LNB
Cable connection damaged
or connector inserted incor-
rectly
Check connector, repair or re-
place
cable
Scart connector inserted
into device at
an angle
Plug in correctly
Satellite dish covered
Remove objects or obstructions,
choose a different mounting lo-
cation if necessary
No sound,
poor picture,
picture freezes,
No picture
Satellite dish
too small Use a larger satellite dish
Batteries not inserted cor-
rectly, polarity incorrect
Insert batteries
correctly, make sure polarity is
correct, see page 9
Batteries flat Insert new
batteries
Remote control is not di-
rected at radio 2 or receiver
2 is obstructed by objects
Direct remote control at re-
ceiver 2 or remove objects
Remote control
does not work
TV not switched on Switch on the TV by pressing
the POWER button 1
Adjust colour system See page 13
Colour settings at minimum Adjust colour,see page 13
Picture only
black/white Broadcast in black and whi-
te
-

Appendix
Plasma Screenland 04/07 17
En
Menu overview
Note:
The menus disappear again after approx. 7 seconds. Modified settings are accepted and saved automatically. Pressin
g
the menu button 34 repeatedly displays the different menus available.
Note:
Pressing the "0" button from the numerical buttons 36 always opens the selection menu for the signal source. Set the
TV Box,YCbCr,VGA or DVI signal source here.
TV mode
Button Menu Parameter Va lu e Description
13 Display of the signal source
33 Image mild/standard/bright Preset picture settings
34 Picture Brightness - No function
Contrast - No function
Colour - No function
Tone - No function
Sharpness - No function
Temperature Warm/cold Adjust with button 31 (Vol-/Vol+)
34 System Standard Auto/PAL/NTSC3.58/NTSC4.43/SECAM Country-specific standard TV setting
Sound mode - No function
Language - OSD language setting
Clock "--:--" Time in "hh:mm" format
Time on "--:--" Switch-on time
Time off "--:--" Time off
YCbCr mode
Button Menu Parameter Va lu e Description
13 Status display top right:
VGA resolution; horizontal freq.;
vertical freq.
33 Image mild/standard/bright/personal Preset picture settings
34 Picture Brightness Adjust with button 31 (Vol-/Vol+)
Contrast Adjust with button 31 (Vol-/Vol+)
Colour Adjust with button 31 (Vol-/Vol+)
Tone - No function
Sharpness Adjust with button 31 (Vol-/Vol+)
Temperature Warm/cold Adjust with button 31 (Vol-/Vol+)
34 System Standard - No function
Sound mode - No function
Language
Clock "--:--" Time in "hh:mm" format
Time on "--:--" Switch-on time
Time off "--:--" Time off
28 Format 4:3/Zoom/Decoder/16:9 Setting for the picture format

Appendix
18 04/07 Plasma Screenland
VGA mode
Button Menu Parameter Va lu e Description
13 Status display top right:
VGA resolution; horizontal freq.;
vertical freq.
33 Image mild/standard/bright/personal Preset picture settings
34 Picture Brightness Adjust with button 31 (Vol-/Vol+)
Contrast Adjust with button 31 (Vol-/Vol+)
Colour - No function
Tone - No function
Sharpness - No function
Temperature Warm/cold Adjust with button 31 (Vol-/Vol+)
34 System Standard - No function
Sound mode - No function
Language OSD language setting
Clock "--:--" Time in "hh:mm" format
Time on "--:--" Switch-on time
Time off "--:--" Time off
34 Adjustment H-Center Adjust with button 31 (Vol-/Vol+)
V-Center Adjust with button 31 (Vol-/Vol+)
H-size: Adjust with button 31 (Vol-/Vol+)
Phase Adjust with button 31 (Vol-/Vol+)
Auto Automatic picture adjustment
with button 31 (Vol-/Vol+)
34 PiP On/Off
Source TV/YCbCr PiP source selection
Size 1/2/3/4 Size setting
Picture position 1/2/3/4/5 Picture position setting:
Top left / top right
Bottom right / bottom left
central
Move On/Off On:Move the PiP picture anywhere
on the screen
Off: Remains in the current position
when the button is pressed
17 Auto adjustment
Caution: without OSD fade-in!
28 Format 4:3/Decoder Setting for the picture format
24 PiP On/Off Switches the PiP function on and off
23 PiP Size 1/2/3/4 Size setting
22 PiP Pos 1/2/3/4/5 PiP position setting:
21 PiP MOVE On/Off On: Move the PiP picture anywhere
on the screen
Off: Remains in the current position
when the button is pressed

Appendix
Plasma Screenland 04/07 19
En
DVI mode
Button Menu Parameter Va lu e Description
13 Status display top right:
VGA resolution; horizontal freq.;
vertical freq.
33 Image mild/standard/bright/personal Preset picture settings
34 Picture Brightness Adjust with button 31 (Vol-/Vol+)
Contrast Adjust with button 31 (Vol-/Vol+)
Colour - No function
Tone - No function
Sharpness - No function
Temperature - No function
34 System Standard - No function
Sound mode - No function
Language OSD language setting
Clock "--:--" Time in "hh:mm" format
Time on "--:--" Switch-on time
Time off "--:--" Time off
34 PiP On/Off
Source TV/YCbCr PiP source selection
Size 1/2/3/4 Size setting
Picture position 1/2/3/4/5 Picture position setting:
Top left / top right
Bottom right / bottom left
central
Move On/Off On: Move the PiP picture anywhere
on the screen
Off: Remains in the current position
when the button is pressed
28 Format 4:3/Decoder Setting for the picture format
24 PiP On/Off Switches the PiP function on and off
23 PiP Size 1/2/3/4 Size setting:
1 = small; 4 = 40% of the screen
22 PiP Pos 1/2/3/4/5 PiP position setting:
21 PiP MOVE On/Off On: Move the PiP picture anywhere
on the screen
Off: Remains in the current position
when the button is pressed

Appendix
20 04/07 Plasma Screenland
Index
"PC" mode 9
Automatic switch-off
time 13
Automatic switch-on
time 13
Base
fitting 6
Batteries 10
Type 10
Burn-in images 3
Cleaning 16
Component signal 15
Condensation 5
Connection overview
Loudspeaker 8
Connections 7
Connection elements on
the rear of the unit 7
Mains connection 8
SCINEMA BOX II 7
Speaker connection 8
Speakers to SCINEMA BOX II
8
Control unit 11
SCINEMA BOX 11
Display resolution 7
DVD COMPONENT IN 7
DVI IN 7
Environment
protection 5
Faults 8
Freeze-frame 3
Geometry settings
menu 14
Horizontal sampling
frequency 7
Identification number
16
IMAGE picture settings
12
Installation 6
Instructions for waste
disposal 5
Loudspeaker
attaching 6
Mains connection 8
Mains plug 8
faulty 8
Maintenance 16
Menu
Picture settings 13
Menu navigation 11
Opening the plasma
display menu 11
Menu overview 17
DVI mode 19
TV mode 17
VGA mode 18
YCbCr mode 17
Menu picture settings
13
Menu system settings
13
menus 13
Navigation 13
Overview 13
Navigation 13
Odours 8
Operating 11
Switching on/off 11
without the remote
control 11
Operating elements 9
Front of the unit 9
Remote control 9
Remote control, PC mode
10
PC connection 15
PC mode 13
Picture format 3
Picture quality 3
Picture settings 13
PiP menu 14
Place of installation 5
Climate 5
Plasma display 13
Settings 13
Power switch 11
RCA cable 15
RCA video cable 7
Risk of burning-in 3
RS-232C 7
Safety 5
Settings 12
in TV mode 12
Set-up 6
Signal configuration
15
Signal source 11, 15
Selecting 11
Smoke 8
SOURCE 9
Standby function 7
Storms 8
Switching on 11
System time 13
Thunderstorm 11
Transportation 5
Troubleshooting 16
Tuner box 7, 10
TV standard 13
Country-specific 13
Vertical sampling
frequency 7
VGA IN 7
VGA interface 15
∆/ ∇9
Ident.No. 0112693
Table of contents