Polyend Play User manual

Polyend Play
Play
Version: 1.0.1
Sample and MIDI-Based Groovebox
Index:
First Steps
Quick Guide
Basics
Enhanced Playability
Tips & Tricks
Introduction
Interface
User Interface
Back Panel Connectors
Audio Port Specifications
Project Management
Project Naming
Sample Pool
Sample Pack
Audio Sequencer
The Grid
View Controller
Variations
Step Edit
Quick Copy
Knobs
Live Recording
Master FX
Fill Tool
Pattern Mode

Perform Mode
MIDI Sequencer
Main Menu
File
Samples
Scales
MIDI
Settings
Firmware
Firmware Updates
In case of trouble
Warranty & Safety
EU regulations
Appendix
Audio Architecture
Predefined MIDI Chords List
Musical Scales List
Randomize Types
What's In The Box?
Device Dimensions
Polyend Play Battery Powering
Credits
Polyend Play Licences
First Steps
Quick Guide
Play is a pattern and performance-based Audio and MIDI groovebox, capable of great
complexity while remaining easy to operate. Play offers an inspiring workflow for both

seasoned and novice musicians. It allows music makers to create and interact with musical
patterns in a number of exciting and creative ways. Once patterns are created, they can be
chained together for playback or triggered on the fly. Additionally, each pattern’s tracks can
have its own variations, and each of those tracks may have its own length, playback speed,
and more.
If this sounds like a lot to take in, rest assured that Polyend has made Play’s interface so
user-friendly that you’ll be up and running with barely a glance at this manual. However, we
suggest that you take a look at the following First Steps section to get started, and then
come back when you’re ready to dig a little deeper.
https://www.youtube.com/embed/3s2Lq-sAMNI?feature=oembed
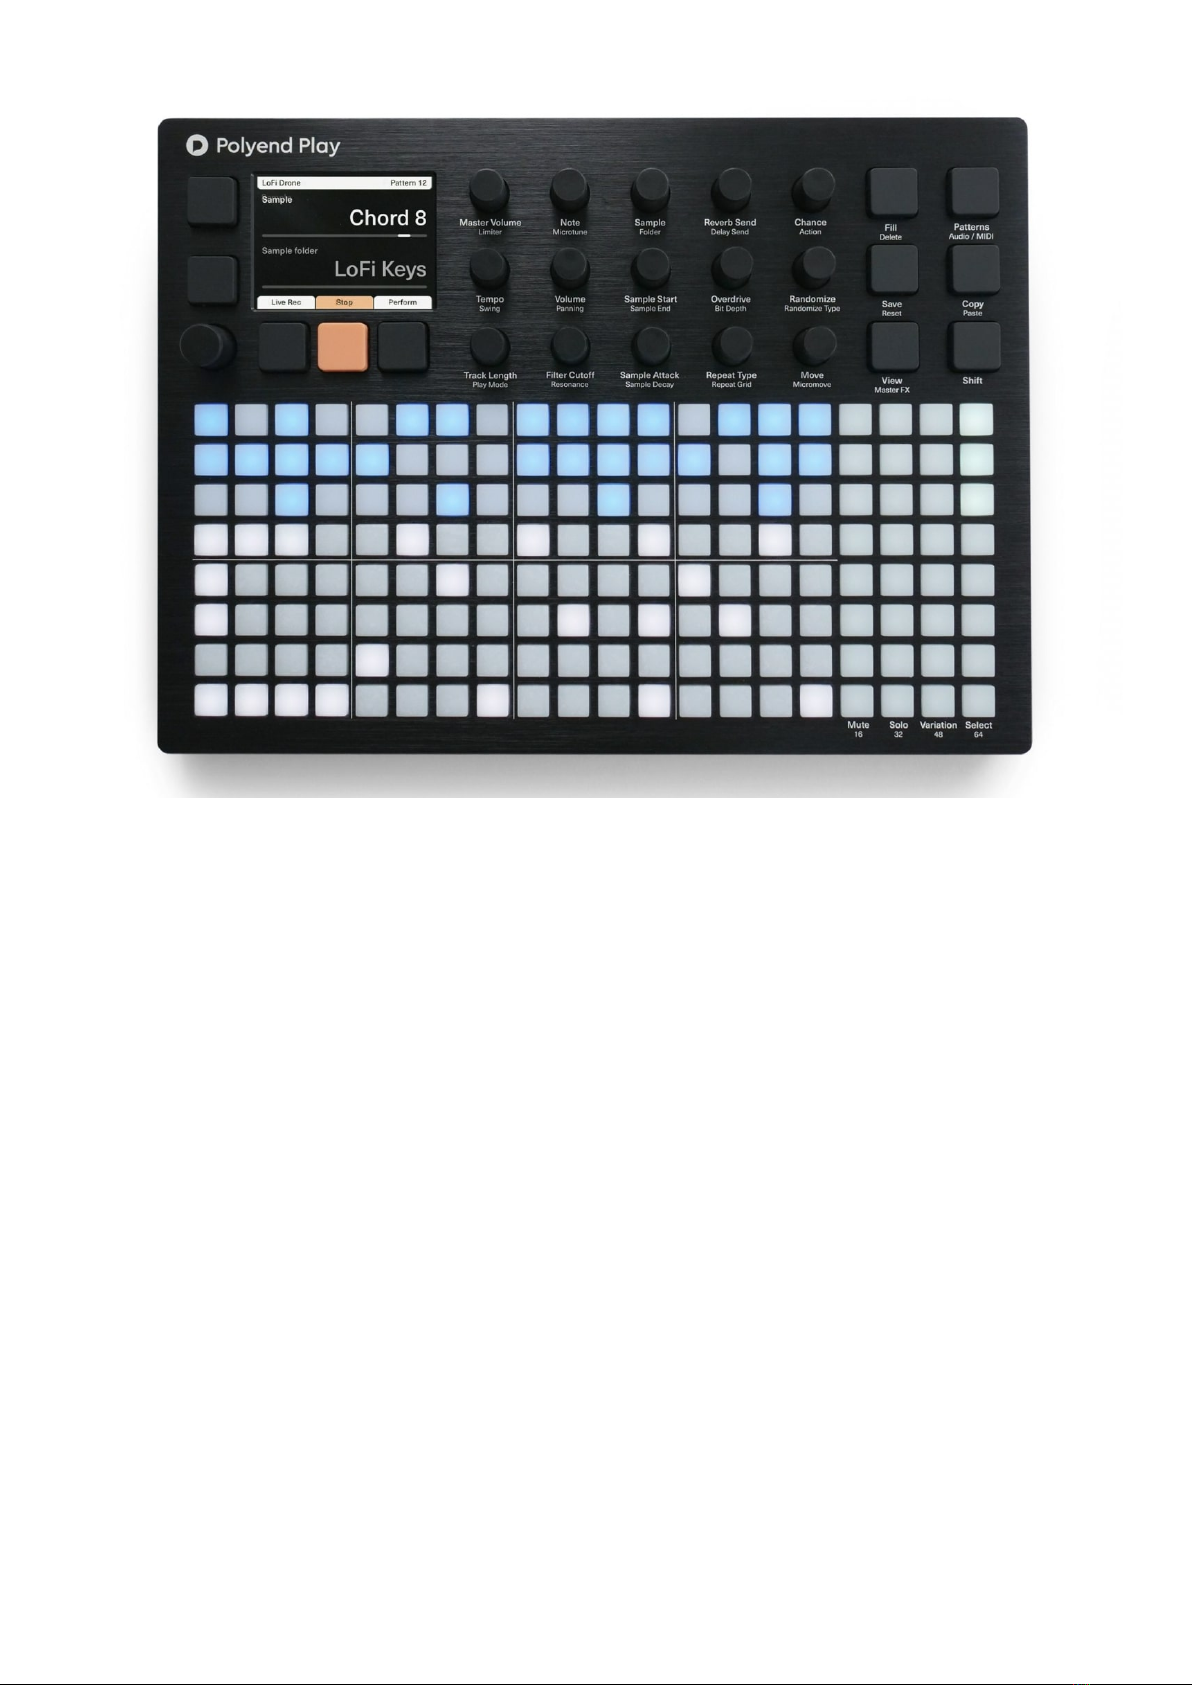
PickandPlace – First, use the knobs to pick the ‘work step’ parameter values, their sample,
note, volume, filter type, send Fx, MIDI properties, etc. When ready, start pressing the grid
pads to place steps on the sequencer tracks.
SelectandAdjust–Select a step by pressing and holding the grid pad, and use the knobs to
modify its parameters. You can select:
One or more steps by pressing and holding the grid pads.
A group of multiple steps by pressing the grid pads while holding the Shift button.
A whole track by pressing the Select pad on the right side of the grid.
A rectangular block of multiple steps across multiple tracks by holding the Shift key and
then pressing pads on opposite diagonal points of a rectangular block of the steps you
wish to include.
Press and quickly release the Shift key to clear any type of selection.
When no track or step is currently selected/held for editing, then by turning the
knobs you will pick/modify the so-called ‘work step’ values. It applies the same way
to both audio and MIDI sequencing modes.
Deselect all the steps and tracks to get back to ‘work step’ editing.
When multiple steps are selected, the parameter change is applied to all of them. When the
parameter values of selected steps are different, then a tilde ~sign together with a number
and +/- is displayed while changing them. Double–clicking a screen button corresponding to
the selected knob parameter (and/or its automation) will restore its default value.
Playback – Polyend Play offers various types of playback:

Press the Play screen button to start and stop playing the current pattern. When the
sequencer is active, it will turn orange.
Use Shift + Play while playing a pattern in a loop to continue playing arranged patterns
sequentially.
Use Shift + Play while stopped to start playing arranged patterns sequentially.
Use Shift + Play while playing arranged patterns sequentially to switch to playing the
current pattern in a loop.
Basics
Audio and MIDI sequencer – Use Play as the centerpiece of your studio, controlling external
devices with up to 8 polyphonic MIDI tracks, or use it on the go, making use of its 8 internal
audio tracks. Play is small and lightweight – an entire studio that can rest comfortably on
your lap.
Knobs – Turn the knob to control its active parameter. Each knob has two parameter values.
The operational parameter is highlighted. Toggle between them by double-tapping the knob
or using the two function screen buttons located on the left side of the screen. The currently
selected knob parameter can also be controlled by the screen encoder.
Entering Notes – You can choose a note by holding a step and turning the Note knob.
Alternatively, you can use the View controller function, or even by sending note data from
external MIDI gear.
Live Rec – Press the Live Rec screen button to use it (it will turn red when active). When the
sequencer is running it will register all the knob automation for existing steps. It will also
record notes inserted from both the View mode and MIDI controllers on the pattern tracks.
Entering the Live Rec mode disables the Perform mode and vice versa.
Perform – Press the Perform screen button to enter this mode. Select one or more tracks
with the Select pads on the right side of the grid, and start pressing the Perform pads. Only
the selected tracks will be affected. Each of the Perform pads holds a punch-in effect that
will influence the sound. Hold the pad for a momentary punch-in effect, press it and let go
immediately to latch the effect. In this mode, you can also use the knob modulators. All the
knob value changes will get back to the initial values after leaving the Perform more. Punch-
in effects will be immediately toggled off when you quit the Perform mode, and toggle back
on when you’ll get back to it again.

Pattern chaining /Song mode – Press the Patterns function button to enter the pattern view.
You can store up to 128 patterns in a single project. Place the patterns in a row and use the
Shift + Play keys combo to chain them together for sequential playback. Using this method
makes it possible to create an entire song. Leave at least one blank pattern pad between
pattern chains to create a set of pattern chains. Press grid pads with patterns or pattern
chains to jump between the parts of your composition. Quick Copy patterns by holding a grid
pad with an existing pattern while pressing a blank pad to paste it.
Config Menu – Click down the Encoder to enter the Main menu section.
Enhanced Playability
Sample Packs – Play comes with many sample packs created by top-notch sound designers.
You can load your own too, but the bundled packs are more than enough to create high-
quality music right out of the box. Play’s workflow relies on sample packs that have been
prepared in a specific way, with samples categorized in folders. Some of the instrument’s
algorithms are based on these packs. Most significantly, the Fill and Randomizing tool ideas
rely on them. Of course, you are not obligated to follow this formula, you can do things your
own way, but it helps to make the audio outcome very musical.
Quick Copy – Press and hold a grid pad for about half a second. The pad will be highlighted
in purple and its parameter values will now be copied to the clipboard. While still holding the
source pad, indicate the target pad where it will be copied. This works for steps, step pages,
patterns, and variations. The Quick Copy of an existing step copies its values to a ‘work step’
state.
Work Step – Select audio/MIDI parameters using the knobs before you place the steps on
the grid manually or with the use of the Fill tool.
Fill tool – This can be used to automatically fill the selected area with the fill type of your
choice. You can select a Random placement of steps, euclidean spread, or even an entire
drum beat.
Variation – This tool allows you to create alternative versions of your tracks. These variations
can be manually switched during playback. Press one or more of the Variation function pads
to make quick changes to the entire track. Each track has its own corresponding Variation
pad. The pads representing track variations are illuminated in pink.
Other manuals for Play
1
Table of contents