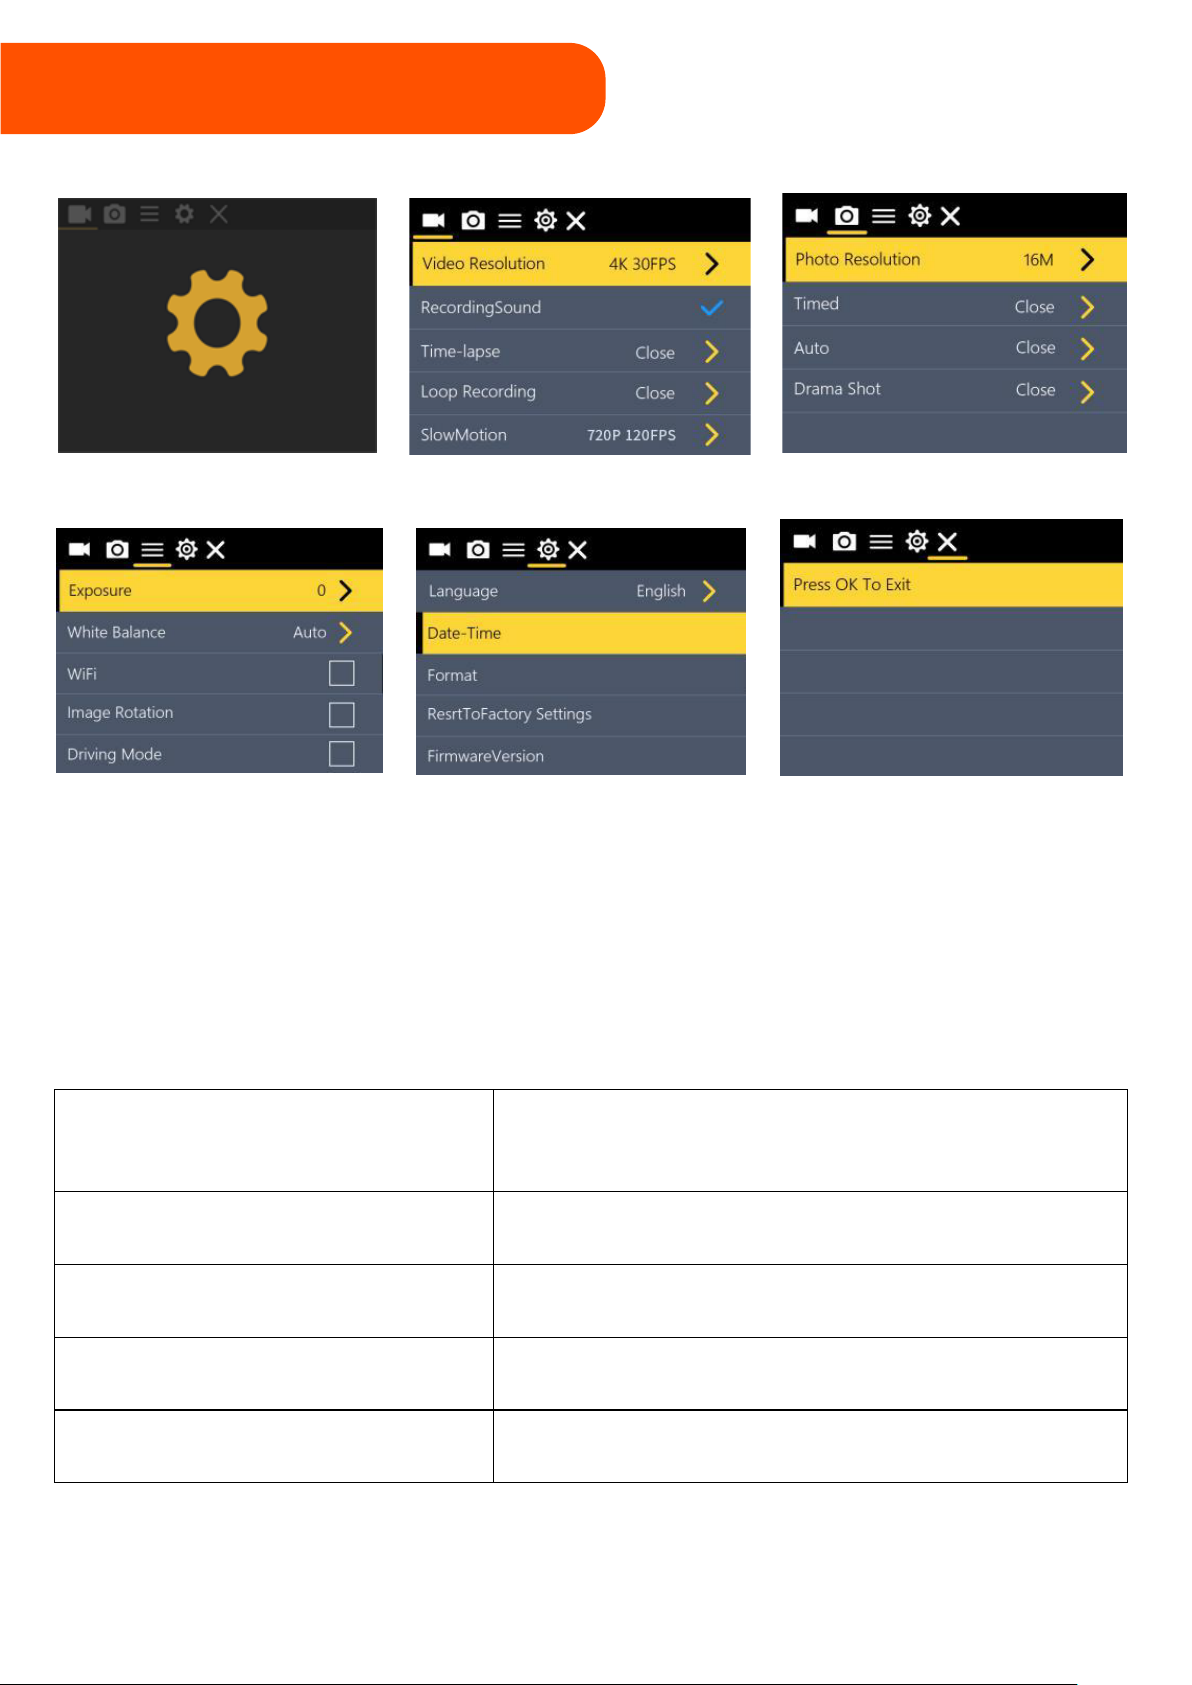
PORODO LIFESTYLE PD-4KACAM-BK User manual

Waterproof 4K
Action Camera
SKU:PD-4KACAM-BK

Warning
1. Protect the device from falls and impacts.
2. Maintain a distance from strong magnetic fields, like those produced
by electrical machines, to prevent interference that could damage the
product or degrade audio and visual quality.
3. Avoid exposing the product to extreme temperatures and direct
sunlight.
4. Use a high-quality Micro SD Card to achieve the best results.
5. Keep your Micro SD Card away from magnetic fields to prevent data
corruption.
6. If the device overheats, emits smoke, or smells unusual, disconnect
it immediately from the power source to prevent the risk of fire.
7. Ensure the safety of children by keeping the device out of their
reach when charging.
8. Store the device in a cool, dry, and dust-free environment.
Product Features
*Equipped with a waterproof casing, allowing filming up to 30 meters
underwater.
*Features a 2.0” IPS + 1.3” IPS screen for convenient video playback
and image review.
*Comes with a detachable battery for easy replacement and to enhance
the product's lifespan.
*Capable of recording videos while charging.
*Boasts an HD 16 Megapixel wide-angle lens.
*Supports HDMI output.
*Functions as a PC camera.
*Compatible with SD cards up to 64GB for extensive storage.
*Supports various video recording formats: 4K/2.7K/1080P/720P.
*Capable of recording in the MP4 format.
*Offers multiple photo shooting modes, including single shot, timed,
auto, and drama shot.

Product Diagram
USB-C Port
Micro SD Card Slot
Micro HDMI Port
Microphone
Screen
Working Indicator Light
Charging Indicator Light
OK/Shutter Button
Up Button
Down Button
Speaker
Power/Mode Button
Lens
Battery Door

Power/Mode Button
Waterproof Housing
OK/Shutter Button
Latch
Up Button
Down Button
Warning:
Ensure the waterproof housing is securely locked before immersing it in
water to prevent leaks that could damage or destroy your camera.
Exposure to water can damage both the camera and the battery, leading
to the risk of an explosion or fire. The warranty does not cover water
damage resulting from user error.

Diagram of Accessories
Waterproof Case Bicycle Bracket Pedestal Back Clip
Commutator Switch Support Helmet Mount Bandage
3M Adhesives USB Cable Battery User Manual

Mounting Your Camera
+
+
+
++
+
+
+
+
+
+
+
+
+
+
=
=
=
=
=
=
=
=

Getting Started
To power on:
Press and hold the Power/Mode Button.
To power off:
Press and hold the Power/Mode Button.
Overview
To activate the camera, press the Power/Mode Button repeatedly to
cycle through the various camera modes and settings. The modes will
display in the following sequence:
Video
Photo
Slow motion
Playback
Settings
Record video footage.
Capture a single photo.
Record video in slow motion.
Review video and photo content.
Modify camera settings.

Setting
To access the settings menu, press the OK Button. Cycle through options
by pressing the Power/Mode Button, then select the desired option using
the Up/Down Buttons.
Video Settings
Video Resolution
4K@30FPS, 2.7K@30FPS, 1080P@30/60FPS,
720P@30/60/120FPS
Recording Sound On/Off
Time-lapse Off, 0.5s. 1s, 2s, 5s, 10s, 60 ,30s
Loop Recording Off or can be set to 3 ,2, or 5 minutes
Slow Motion 1080P@60FPS or 720P@120FPS

Photo Settings
Photo Resolution 16M, 12M, 8M, 5M, 2M
Timed Off, 3s, 5s, 10s, 20s
Auto Off, 3s, 10s, 15s, 20s, 30s
Drama Shot
Off or take a burst of photos at 5 ,3, or 1
pictures per second
Options
Exposure Options range from -3to +3
White Balance Auto, Sunny, Cloudy, Incandescent light,
Fluorescent light
Wi-Fi On/Off
Image Rotation On/Off
Driving Mode On/Off
Light Source Frequency Auto, 50Hz, 60Hz
LED Indicator Light On/Off
Auto Screensaver Off, 10s, 20s, 30s
Auto Shutdown Off, 1 minute, 3 minutes, 5 minutes
Time Watermark On/Off
Language
English, Japanese, Korean, Russian, German,
French, Italian, Spanish, Polish, Dutch, Portuguese,
Thai, Simplified Chinese, Traditional Chinese
Date-time
Set date and time, e.g., 12:00:00 01/01/2020
Format Confirm or cancel formatting
Reset To Factory Settings Confirm or cancel reset
Firmware Version Display current version/Updated

Usage Guidelines
Video Mode
1. To start recording, ensure the camera is in Video mode.
2. If the Video icon is displayed on the screen, press the OK Button
to begin recording. A blue light will flash to indicate recording is in
progress.
3. Press the OK Button again to stop recording; the blue light will stop
flashing.
Picture Mode
1. To take a photo, ensure the camera is in Picture mode.
2. If the Picture icon is visible, press the OK Button to capture the
image.
Slow Motion
1. To record in slow motion, switch to Slow Motion mode.
2. When the Slow-Motion icon appears, press the OK Button to start
recording. The blue light will flash. Press the OK Button again to stop; the
blue light will cease flashing.
Time-Lapse
1. Access Time-Lapse through the settings menu, then return to Video
mode to begin.
2. Press the OK Button to start and stop time-lapse recording as indicated
by the flashing blue light.
Back & Front Screen Switching
Long press the Down Button to switch between the back and front
screens in video and photo modes. The back screen turns off upon
switching to the front screen and vice versa.

Playback
1. To review content, ensure the camera is in Playback mode.
2. Use the Up/Down Buttons to navigate files and press the OK Button to
play videos or photos.
Battery Installation,Removal and Charging
1. To install: Slide the battery cover as indicated by the arrow to open.
Insert the battery according to the plus/minus orientation and ensure it's
securely in place.
2. To remove: Push the battery cover to release and remove the battery.
3. To charge the device, you can:
-Connect it to a computer or a power adapter.
-Plug it directly into a car charger.
-Charge while using the video function (requires driving mode to be
activated).
Indicator Lights
1. Working Indicator: Blue light signals operation.
2. Charging Indicator: Red light flashes during charging and remains
solid when fully charged.
Connecting to HDMI
Connect the camera to an HDMI-TV using an HDMI cable to display all
operations on a high-definition screen.
Connecting to a PC
When connected to a PC, turn on the camera to display three modes:
1. USB Mode: Press OK to enter for video and photo playback.
2. PC Camera: Press OK to use the camera function.
3. Charging Mode: Press OK to charge the device.

Wi-Fi Application Installation and Usage
To use Wi-Fi, install the "X-Sport Pro" app on your smartphone.
1. Scan the QR code or search for "X-Sport Pro" in the app store to download.
2. Android users can find it on Google Play; iOS users can find it in the
App Store.
Wi-Fi Connection Process:
1. After powering on, long-press the Up button to display the Wi-Fi
connection message.
2. Access the "X-Sport Pro" app to view the live feed, manage files, and
adjust settings.
Note: App requires Android 4.1+/iOS 7+.
Product Specifications
Display 1.3 + ”2.0” IPS Screen
Lens 160-degree wide-angle
Languages
English, Japanese, Korean, Russian, German, French, Italian,
Spanish, Polish, Dutch, Portuguese, Thai, Simplified Chinese,
and Traditional Chinese
Video Resolution 4K@30FPS, 2.7K@30FPS, 1080P@30/60FPS, 720P@30/60/120FPS
Video Format MP4 with H.264 compression
Photo Resolutions
16M/12M/8M/5M/2M
Storage Micro SD card support up to 64GB
Modes Normal, Time-lapse, Loop Recording, Slow Motion
Wi-Fi Supported
Light Source Frequency Auto/50Hz/60Hz
Connectivity USB 2.0
Power Input 5V/1A
Battery 900mAh
Recording Time Approximately 90mins
Charge Time Approximately 3 hours
System Compatibility Windows XP/Vista/7 or above, Mac OS
Dimensions 44*32*61mm

*Products that you buy directly from our Porodo website or shop
come with a24-monthwarranty.
*When you buy Porodo products from any of our approved sellers, you
only get a12-monthwarranty. If you want to extend this warranty, go
to our website at https://porodo.net/warranty and fill out the form
with your information. Don't forget to upload a picture of the product
too. After we've checked and accepted your request, we'll send you an
email to confirm that your product's warranty has been extended.
Exclusion
-Porodo doesn't cover any damage caused by the normal use of the
product over time during the warranty period.
-The Porodo warranty doesn't include coverage for improper use,
deliberate damage, accidents, theft, carelessness, or any repairs
done by unauthorized service centers.
-The power needs for each product are clearly stated on their
packages. Please check these requirements against those of your
country before buying. Porodo won't be responsible for any problems
related to this.
For more info, please check:
porodo.net/warranty
Contact Us
If you have any questions about this Privacy Policy, please contact us
at: info@porodo.net
Website: porodo.net
Service Support: [email protected]et
Instagram: porodo
Warranty
Table of contents