Portland 64497 User manual

!"#$%&'(&)*&+,-./01
2"3$45&#$647'(&7#&)*$6737$%&"(%&
#9':;%&('4&69"(<$=&$>6$84&?9$@$&('4$%A&&
B%%747'(";&?"@(7(<#&6"(&C$&"%%$%&4'&
D9"7(&2"?&2"3$45&E"@(7(<#&'(&8"<$&
.&"34$@&)*&@$F:7@$%&?"@(7(<#&G8@'%:64&
#8$67376&?"@(7(<#&'(&8"#4$C'"@%HA
I7#74&':@&?$C#74$&"4J&9448JKK???A9"@C'@3@$7<94A6'L
ML"7;&':@&4$69(76";&#:88'@4&"4J&8@'%:64#:88'@4N9"@C'@3@$7<94A6'L
Owner’s Manual & Safety Instructions
Save This Manual Keep this manual for the safety warnings and precautions, assembly,
operating, inspection, maintenance and cleaning procedures. Write the product’s serial number in the
back of the manual near the assembly diagram (or month and year of purchase if product has no number).
Keep this manual and the receipt in a safe and dry place for future reference. 20i
When unpacking, make sure that the product is intact
and undamaged. If any parts are missing or broken,
please call 1-888-866-5797 as soon as possible.
Copyright© 2020 by Harbor Freight Tools®. All rights reserved.
No portion of this manual or any artwork contained herein may be reproduced in
any shape or form without the express written consent of Harbor Freight Tools.
Diagrams within this manual may not be drawn proportionally. Due to continuing
improvements, actual product may differ slightly from the product described herein.
Tools required for assembly a nd service may not be i ncluded.
Read this material before using this product.
Failure to do so can result in serious injury.
SAVE THIS MANUAL.

Page 2 O'@&4$69(76";&F:$#47'(#=&8;$"#$&6";;&10PPP0P++0/-Q-A Item 64497
2BOMRS TUMVBRWTX YBWXRMXBXDM2MR)U
R"C;$&'3&D'(4$(4#
Safety ......................................................... 2
Specifications ............................................. 8
Setup .......................................................... 8
Operation ................................................... 11
Maintenance .............................................. 16
Parts List and Diagram .............................. 18
Warranty .................................................... 20
EBVXWXZ&2SY!T*2&BX[&[MOWXWRWTX2
This is the safety alert symbol. It is used to alert you to potential
personal injury hazards. Obey all safety messages that
follow this symbol to avoid possible injury or death.
Indicates a hazardous situation which, if not avoided,
will result in death or serious injury.
Indicates a hazardous situation which, if not avoided,
could result in death or serious injury.
Indicates a hazardous situation which, if not avoided,
could result in minor or moderate injury.
Addresses practices not related to personal injury.
WYUTVRBXR&2BOMRS&WXOTVYBRWTX
Z$($@";&U'?$@&R'';&2"3$45&E"@(7(<#
V$"%&";;&#"3$45&?"@(7(<#&"(%&";;&7(#4@:647'(#A&&
Failure to follow the warnings and instructions may result in electric shock, fire and/or serious injury.
2"\$&";;&?"@(7(<#&"(%&7(#4@:647'(#&3'@&3:4:@$&@$3$@$(6$A
The term ″power tool″ in the warnings refers to your mains-operated (corded) power tool.
E'@]&B@$"&2"3$45
1. ^$$8&?'@]&"@$"&6;$"(&"(%&?$;;&;74A&&
Cluttered or dark areas invite accidents.
2. ['&('4&'8$@"4$&8'?$@&4'';#&7(&$>8;'#7\$&
"4L'#89$@$#=&#:69&"#&7(&49$&8@$#$(6$&'3&
3;"LL"C;$&;7F:7%#=&<"#$#&'@&%:#4A Power tools
create sparks which may ignite the dust or fumes.
3. ^$$8&697;%@$(&"(%&C5#4"(%$@#&
"?"5&?97;$&'8$@"47(<&"&8'?$@&4'';A
Distractions can cause you to lose control.

Page 3O'@&4$69(76";&F:$#47'(#=&8;$"#$&6";;&10PPP0P++0/-Q-AItem 64497
2BOMRSTUMVBRWTXYBWXRMXBXDM 2MR)U
M;$64@76";&2"3$45
1. U'?$@&4'';&8;:<#&L:#4&L"469&49$&':4;$4A&&
X$\$@&L'%735&49$&8;:<&7(&"(5&?"5A&&
['&('4&:#$&"(5&"%"84$@&8;:<#&?749&<@':(%$%&
8'?$@&4'';#A Unmodified plugs and matching
outlets will reduce risk of electric shock.
2. B\'7%&C'%5&6'(4"64&?749&<@':(%$%&#:@3"6$#&
#:69&"#&878$#=&@"%7"4'@#=&@"(<$#&"(%&
@$3@7<$@"4'@#A& There is an increased risk of
electric shock if your body is grounded.
3. ['&('4&$>8'#$&8'?$@&4'';#&4'&@"7(&'@&?$4&
6'(%747'(#A Water entering a power tool
will increase the risk of electric shock.
4. ['&('4&"C:#$&49$&6'@%A&&X$\$@&:#$&49$&6'@%&
3'@&6"@@57(<=&8:;;7(<&'@&:(8;:<<7(<&49$&
8'?$@&4'';A&&^$$8&6'@%&"?"5&3@'L&9$"4=&'7;=&
#9"@8&$%<$#&'@&L'\7(<&8"@4#A&&Damaged or
entangled cords increase the risk of electric shock.
5. E9$(&'8$@"47(<&"&8'?$@&4'';&':4%''@#=&
:#$&"(&$>4$(#7'(&6'@%&#:74"C;$&3'@&
':4%''@&:#$A Use of a cord suitable for outdoor
use reduces the risk of electric shock.
6. W3&'8$@"47(<&"&8'?$@&4'';&7(&"&%"L8&;'6"47'(&
7#&:("\'7%"C;$=&:#$&"&Z@':(%&O":;4&D7@6:74&
W(4$@@:84$@&GZODWH&8@'4$64$%&#:88;5A
Use of a GFCI reduces the risk of electric shock.
U$@#'(";&2"3$45
1. 24"5&";$@4=&?"469&?9"4&5':&"@$&%'7(<&
"(%&:#$&6'LL'(&#$(#$&?9$(&'8$@"47(<&
"&8'?$@&4'';A&&['&('4&:#$&"&8'?$@&
4'';&?97;$&5':&"@$&47@$%&'@&:(%$@&49$&
7(3;:$(6$&'3&%@:<#=&";6'9';&'@&L$%76"47'(A
A moment of inattention while operating power
tools may result in serious personal injury.
2. )#$&8$@#'(";&8@'4$647\$&$F:78L$(4A&&
B;?"5#&?$"@&$5$&8@'4$647'(A Protective
equipment such as dust mask, non-skid safety
shoes, hard hat, or hearing protection used for
appropriate conditions will reduce personal injuries.
3. U@$\$(4&:(7(4$(47'(";"@47(<A&
M(#:@$&49$&R@7<<$@&7#&7(&49$&'3308'#747'(&C$3'@$&
6'(($647(<&4'&8'?$@&#':@6$=&876]7(<&:8&'@&
6"@@57(<&49$&4'';A
Carrying power tools with your finger on
the Trigger or energizing power tools that
have the Trigger on invites accidents.
4. ['&('4&'\$@@$"69A&&^$$8&8@'8$@&3''47(<&"(%&
C";"(6$&"4&";;&47L$#A This enables better control
of the power tool in unexpected situations.
5. [@$##&8@'8$@;5A&&['&('4&?$"@&;''#$&6;'497(<&'@&
_$?$;@5A&&^$$8&5':@&9"7@=&6;'497(<&"(%&<;'\$#&
"?"5&3@'L&L'\7(<&8"@4#A Loose clothes, jewelry
or long hair can be caught in moving parts.
6. W3&%$\76$#&"@$&8@'\7%$%&3'@&49$&6'(($647'(&'3&
%:#4&$>4@"647'(&"(%&6';;$647'(&3"67;747$#=&$(#:@$&
49$#$&"@$&6'(($64$%&"(%&8@'8$@;5&:#$%A Use of
dust collection can reduce dust-related hazards.
7. T(;5&:#$&#"3$45&$F:78L$(4&49"4&9"#&C$$(&
"88@'\$%&C5&"(&"88@'8@7"4$"(%"@%#&"<$(65A
Unapproved safety equipment may not provide
adequate protection. Eye protection must be
ANSI-approved and breathing protection
must be NIOSH-approved for the
specific hazards in the work area.
U'?$@&R'';&)#$&"(%&D"@$
1. ['&('4&3'@6$&49$&8'?$@&4'';A&&)#$&49$&
6'@@$64&8'?$@&4'';&3'@&5':@&"88;76"47'(A
The correct power tool will do the job better and
safer at the rate for which it was designed.
2. ['&('4&:#$&49$&8'?$@&4'';&73&49$&R@7<<$@&&
%'$#&('4&4:@(&74&'(&"(%&'33A
Any power tool that cannot be controlled with the
Trigger is dangerous and must be repaired.
3. [7#6'(($64&49$&8;:<&3@'L&49$&8'?$@&#':@6$&
C$3'@$&L"]7(<&"(5&"%_:#4L$(4#=&69"(<7(<&
"66$##'@7$#=&'@'@7(<&8'?$@&4'';#A
Such preventive safety measures reduce the
risk of starting the power tool accidentally.
4. 24'@$&7%;$&8'?$@&4'';#&':4&'3&49$&@$"69&'3&
697;%@$(&"(%&%'&('4&";;'?&8$@#'(#&:(3"L7;7"@&
?749&49$&8'?$@&4'';&'@&49$#$&7(#4@:647'(#&
4'&'8$@"4$&49$&8'?$@&4'';A Power tools are
dangerous in the hands of untrained users.
5. Y"7(4"7(&8'?$@&4'';#A&&D9$6]&3'@&L7#";7<(L$(4&
'@&C7(%7(<&'3&L'\7(<&8"@4#=&C@$"]"<$&'3&8"@4#&
"(%&"(5&'49$@&6'(%747'(&49"4&L"5&"33$64&49$&
8'?$@&4'';`#&'8$@"47'(A&&W3&%"L"<$%=&9"\$&49$&
8'?$@&4'';&@$8"7@$%&C$3'@$&:#$A Many accidents
are caused by poorly maintained power tools.

Page 4 O'@&4$69(76";&F:$#47'(#=&8;$"#$&6";;&10PPP0P++0/-Q-A Item 64497
2BOMRS TUMVBRWTX YBWXRMXBXDM2MR)U
6. ^$$8&6:447(<&4'';#	"@8&"(%&6;$"(A Properly
maintained cutting tools with sharp cutting edges
are less likely to bind and are easier to control.
7. )#$&49$&8'?$@&4'';=&"66$##'@7$#&"(%&4'';&C74#&
$46A&7(&"66'@%"(6$&?749&49$#$&7(#4@:647'(#=&
4"]7(<&7(4'&"66':(4&49$&?'@]7(<&6'(%747'(#&
"(%&49$&?'@]&4'&C$&8$@3'@L$%A Use of the
power tool for operations different from those
intended could result in a hazardous situation.
2$@\76$
a"\$&5':@&8'?$@&4'';&#$@\76$%&C5&"&F:";737$%&@$8"7@&8$@#'(&:#7(<&'(;5&7%$(476";&@$8;"6$L$(4&8"@4#A&
This will ensure that the safety of the power tool is maintained.
D9"7(&2"?&2"3$45&E"@(7(<#
1. ^$$8&";;&8"@4#&'3&49$&C'%5&"?"5&3@'L&49$&
#"?&69"7(&?9$(&49$&69"7(&#"?&7#&'8$@"47(<A&&
!$3'@$&5':"@4&49$&69"7(&#"?=&L"]$&#:@$&
49$&#"?&69"7(&7#&('4&6'(4"647(<&"(5497(<A
A moment of inattention while operating
chain saws may cause entanglement of your
clothing or body with the saw chain.
2. B;?"5#&9';%&49$&69"7(&#"?&?749&5':@&@7<94&
9"(%&'(&49$&@$"@&9"(%;$&"(%&5':@&;$34&9"(%&'(&
49$&3@'(4&9"(%;$A Holding the chain saw with a
reversed hand configuration increases the risk
of personal injury and should never be done.
3. a';%&49$&8'?$@&4'';&C5&7(#:;"4$%&<@7887(<&
#:@3"6$#&'(;5=&C$6":#$&49$&#"?&69"7(&L"5&
6'(4"64&97%%$(&?7@7(<&'@&74#&'?(&6'@%A
Saw chains contacting a “live” wire may make
exposed metal parts of the power tool “live” and
could give the operator an electric shock.
4. E$"@&#"3$45&<;"##$#&"(%&9$"@7(<&8@'4$647'(A&
O:@49$@&8@'4$647\$&$F:78L$(4&3'@&9$"%=&
9"(%#=&;$<#&"(%&3$$4&7#&@$6'LL$(%$%A
Adequate protective clothing will reduce
personal injury by flying debris or
accidental contact with the saw chain.
5. ['&('4&'8$@"4$&"&69"7(&#"?&7(&"&4@$$A
Operation of a chain saw while up in a
tree may result in personal injury.
6. B;?"5#&]$$8&8@'8$@&3''47(<&"(%&'8$@"4$&
49$&69"7(&#"?&'(;5&?9$("(%7(<&'(&37>$%=&
#$6:@$&"(%&;$\$;&#:@3"6$A Slippery or unstable
surfaces such as ladders may cause a loss
of balance or control of the chain saw.
7. E9$(&6:447(<&"&;7LC&49"4&7#&:(%$@&4$(#7'(&
C$&";$@4&3'@@7(<&C"6]A When the tension
in the wood fibres is released the spring
loaded limb may strike the operator and/
or throw the chain saw out of control.
8. )#$&$>4@$L$&6":47'(&?9$(&6:447(<&
C@:#9&"(%&#"8;7(<#A The slender material
may catch the saw chain and be whipped
toward you or pull you off balance.
9. D"@@5&49$&69"7(&#"?&C5&49$&3@'(4&9"(%;$&?749&
49$&69"7(&#"?&#?7469$%&'33&"(%&"?"5&3@'L&5':@&
C'%5A&E9$(&4@"(#8'@47(<&'@'@7(<&49$&69"7(&
#"?&";?"5#&374&49$&<:7%$&C"@&6'\$@A Proper
handling of the chain saw will reduce the likelihood
of accidental contact with the moving saw chain.
10. O';;'?&7(#4@:647'(#&3'@&;:C@76"47(<=&69"7(&
4$(#7'(7(<&"(%&69"(<7(<&"66$##'@7$#A
Improperly tensioned or lubricated chain may
either break or increase the chance for kickback.
11. ^$$8&9"(%;$#&%@5=&6;$"(=&"(%&3@$$&3@'L&
'7;&"(%&<@$"#$A Greasy, oily handles
are slippery causing loss of control.
12. D:4&?''%&'(;5A&['&('4&:#$&69"7(&#"?&3'@&
8:@8'#$#&('4&7(4$(%$%A&&
O'@&$>"L8;$J&%'&('4&:#$&69"7(&#"?&3'@&6:447(<&
8;"#476=&L"#'(@5&'@&('(0?''%&C:7;%7(<&L"4$@7";#A
Use of the chain saw for operations different than
intended could result in a hazardous situation.
13. D":#$#&"(%&'8$@"4'@&8@$\$(47'(&'3&]76]C"6]J
Kickback may occur when the nose or tip of the
guide bar touches an object, or when the wood
closes in and pinches the saw chain in the cut.
Tip contact in some cases may cause
a sudden reverse reaction, kicking the
guide bar up and back towards the operator.
Pinching the saw chain along the
top of the guide bar may push the guide
bar rapidly back towards the operator.

Page 5O'@&4$69(76";&F:$#47'(#=&8;$"#$&6";;&10PPP0P++0/-Q-AItem 64497
2BOMRSTUMVBRWTXYBWXRMXBXDM 2MR)U
Either of these reactions may cause you to lose
control of the saw which could result in serious
personal injury. Do not rely exclusively upon the
safety devices built into your saw. As a chain saw
user, you should take several steps to keep
your cutting jobs free from accident or injury.
Kickback is the result of tool misuse and/
or incorrect operating procedures or
conditions and can be avoided by taking
proper precautions as given below:
a. Y"7(4"7(&"&37@L&<@78=&?749&49:LC#&"(%&
37(<$@#&$(67@6;7(<&49$&69"7(&#"?&9"(%;$#=&
?749&C'49&9"(%#&'(&49$&#"?&"(%&8'#747'(&
5':@&C'%5&"(%&"@L&4'&";;'?&5':&4'&@$#7#4&
]76]C"6]&3'@6$#A Kickback forces can be
controlled by the operator, if proper precautions
are taken. Do not let go of the chain saw.
)#$&497#&<@78&
49:LC&C$;'?&
9"(%;$
O7<:@$&BJ&&a';%7(<&49$&D9"7(&2"?
b. ['&('4&'\$@@$"69&"(%&%'&('4&6:4&"C'\$&
#9':;%$@&9$7<94A This helps prevent
unintended tip contact and enables better control
of the chain saw in unexpected situations.
c. T(;5&:#$&@$8;"6$L$(4&C"@#&"(%&
69"7(#$6737$%&C5&49$&L"(:3"64:@$@A
Incorrect replacement bars and chains may
cause chain breakage and/or kickback.
d. O';;'?&49$&L"(:3"64:@$@`#	"@8$(7(<&"(%&
L"7(4$("(6$&7(#4@:647'(#&3'@&49$&#"?&69"7(A
Decreasing the depth gauge height
can lead to increased kickback.
14. Maintain labels and nameplates on the tool.
These carry important safety information.
If unreadable or missing, contact
Harbor Freight Tools for a replacement.
15. Avoid unintentional starting.
Prepare to begin work before turning on the tool.
16. Do not leave the tool unattended when it is plugged
into an electrical outlet. Turn off the tool, and
unplug it from its electrical outlet before leaving.
17. This product is not a toy.
Keep it out of reach of children.
18. People with pacemakers should consult their
physician(s) before use. Electromagnetic fields in
close proximity to heart pacemaker could cause
pacemaker interference or pacemaker failure.
In addition, people with pacemakers should:
• Avoid operating alone.
• Do not use with Trigger locked on.
• Properly maintain and inspect to avoid
electrical shock.
• Properly ground power cord. Ground Fault Circuit
Interrupter (GFCI) should also be implemented
– it prevents sustained electrical shock.
19. The warnings, precautions, and instructions
discussed in this instruction manual cannot cover all
possible conditions and situations that may occur.
It must be understood by the operator that
common sense and caution are factors
which cannot be built into this product,
but must be supplied by the operator.
&2BIM&RaM2M&WX2RV)DRWTX2A

Page 6 O'@&4$69(76";&F:$#47'(#=&8;$"#$&6";;&10PPP0P++0/-Q-A Item 64497
2BOMRS TUMVBRWTX YBWXRMXBXDM2MR)U
Z@':(%7(<
RT&UVMIMXR&M*MDRVWD&2aTD^&BX[&[MBRa&OVTY&
WXDTVVMDR&ZVT)X[WXZ&EWVM&DTXXMDRWTXJ&
D9$6]&?749&"&F:";737$%&$;$64@767"(&73&5':&"@$&7(&%':C4&"#&4'&?9$49$@&49$&':4;$4&7#&8@'8$@;5&
<@':(%$%A&&['&('4&L'%735&49$&8'?$@&6'@%&8;:<&8@'\7%$%&?749&49$&4'';A&&X$\$@&@$L'\$&49$&
<@':(%7(<&8@'(<&3@'L&49$&8;:<A&&['&('4&:#$&49$&4'';&73&49$&8'?$@&6'@%&'@&8;:<&7#&%"L"<$%A&&W3&%"L"<$%=&9"\$&
74&@$8"7@$%&C5&"&#$@\76$&3"67;745&C$3'@$&:#$A&&W3&49$&8;:<&?7;;&('4&374&49$&':4;$4=&9"\$&"&8@'8$@&':4;$4&7(#4";;$%&C5&
"&F:";737$%&$;$64@767"(A
Z@':(%$%&R'';#J&R'';#&?749&R9@$$&U@'(<&U;:<#
b0U@'(<&U;:<&"(%&T:4;$4
1. Tools marked with “Grounding Required” have
a three wire cord and three prong grounding
plug. The plug must be connected to a properly
grounded outlet. If the tool should electrically
malfunction or break down, grounding provides
a low resistance path to carry electricity away
from the user, reducing the risk of electric shock.
G2$$&b0U@'(<&U;:<&"(%&T:4;$4AH
2. The grounding prong in the plug is connected
through the green wire inside the cord to the
grounding system in the tool. The green wire
in the cord must be the only wire connected to
the tool’s grounding system and must never
be attached to an electrically “live” terminal.
G2$$&b0U@'(<&U;:<&"(%&T:4;$4AH
3. The tool must be plugged into an appropriate outlet,
properly installed and grounded in accordance
with all codes and ordinances. The plug and outlet
should look like those in the preceding illustration.
G2$$&b0U@'(<&U;:<&"(%&T:4;$4AH
[':C;$&W(#:;"4$%&R'';#J&R'';#&?749&R?'&U@'(<&U;:<#
T:4;$4#&3'@&c0U@'(<&U;:<
1. Tools marked “Double Insulated” do not
require grounding. They have a special
double insulation system which satisfies
OSHA requirements and complies with
the applicable standards of Underwriters
Laboratories, Inc., the Canadian Standard
Association, and the National Electrical Code.
2. Double insulated tools may be used in either of the
120 volt outlets shown in the preceding illustration.&&&
G2$$&T:4;$4#&3'@&c0U@'(<&U;:<AH
Page 7O'@&4$69(76";&F:$#47'(#=&8;$"#$&6";;&10PPP0P++0/-Q-AItem 64497
2BOMRSTUMVBRWTXYBWXRMXBXDM 2MR)U
M>4$(#7'(&D'@%#
1. Grounded tools require a three wire extension cord.
Double Insulated tools can use either
a two or three wire extension cord.
2. As the distance from the supply outlet increases,
you must use a heavier gauge extension cord.
Using extension cords with inadequately sized wire
causes a serious drop in voltage, resulting in loss of
power and possible tool damage. G2$$&R"C;$&BAH
3. The smaller the gauge number of the wire, the
greater the capacity of the cord. For example,
a 14 gauge cord can carry a higher current
than a 16 gauge cord. G2$$&R"C;$&BAH
4. When using more than one extension cord
to make up the total length, make sure
each cord contains at least the minimum
wire size required. G2$$&R"C;$&BAH
5. If you are using one extension cord for more
than one tool, add the nameplate&eres
and use the sum to determine the required
minimum cord size. G2$$&R"C;$&BAH
6. If you are using an extension cord outdoors, make
sure it is marked with the suffix “W-A” (“W” in
Canada) to indicate it is acceptable for outdoor use.
7. Make sure the extension cord is properly wired
and in good electrical condition. Always replace
a damaged extension cord or have it repaired
by a qualified electrician before using it.
8. Protect the extension cords from sharp objects,
excessive heat, and damp or wet areas.
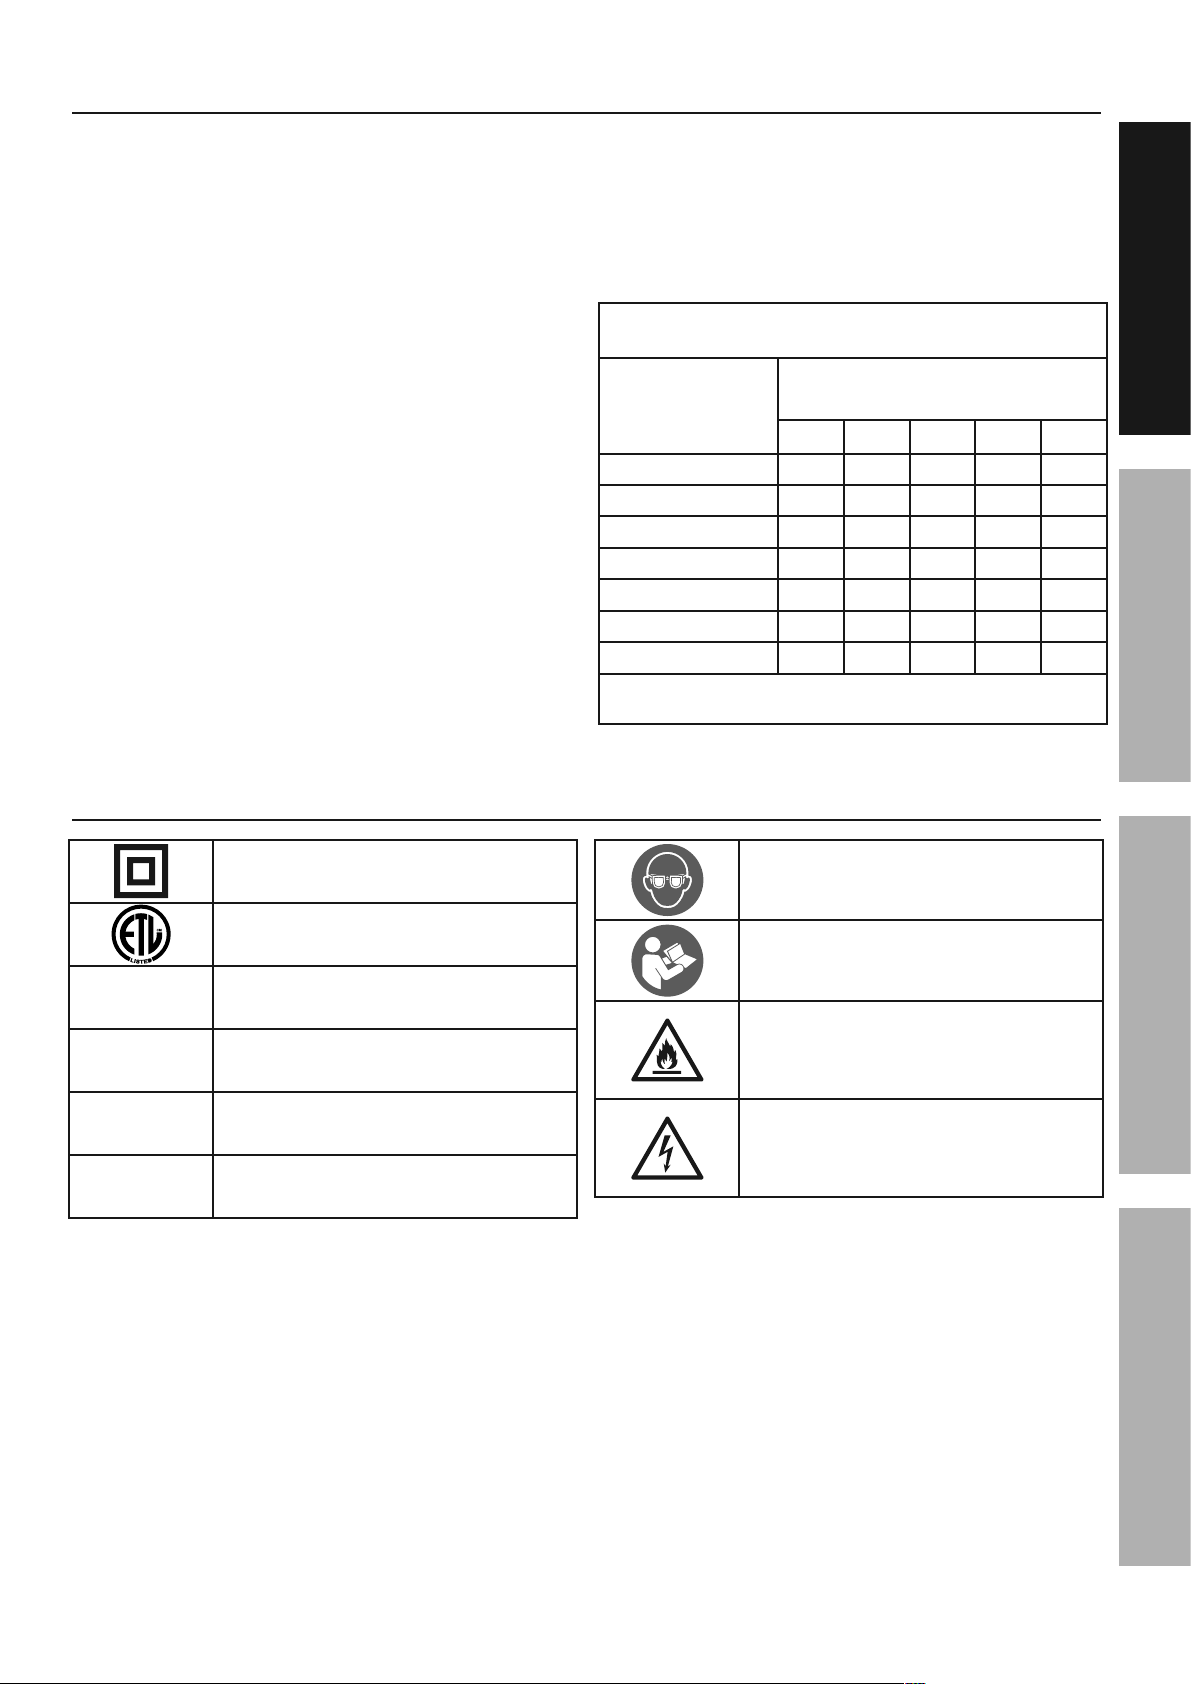
RB!*M&BJ&&VMDTYYMX[M[&YWXWY)Y&EWVM&
ZB)ZM&OTV&MdRMX2WTX&DTV[2e&G1c,Kc.,&IT*RH
XBYMU*BRM
BYUMVM2
G"4&3:;;&;'"%H
MdRMX2WTX&DTV[&
*MXZRa
c/f /,f -/f 1,,f 1/,f
0 – 2.0 18 18 18 18 16
2.1 – 3.4 18 18 18 16 14
3.5 – 5.0 18 18 16 14 12
5.1 – 7.0 18 16 14 12 12
7.1 – 12.0 18 14 12 10 -
12.1 – 16.0 14 12 10 - -
16.1 – 20.0 12 10 - - -
e&!"#$%&'(&;7L747(<&49$&;7($&\';4"<$&%@'8&4'&37\$&\';4#&"4&
1/,g&'3&49$&@"4$%&"L8$@$#A
25LC';'<5
Double Insulated
Intertek Testing Services NA, Inc.
IVolts
hAlternating Current
BAmperes
n0 xxxx/min. No Load Revolutions per Minute (RPM)
WARNING marking concerning Risk
of Eye Injury. Wear ANSI-approved
safety goggles with side shields.
Read the manual before
set-up and/or use.
WARNING marking
concerning Risk of Fire.
Do not cover ventilation ducts.
Keep flammable objects away.
WARNING marking concerning
Risk of Electric Shock.
Properly connect power cord
to appropriate outlet.
Page 8 O'@&4$69(76";&F:$#47'(#=&8;$"#$&6";;&10PPP0P++0/-Q-A Item 64497
2BOMRS TUMVBRWTX YBWXRMXBXDM2MR)U
28$67376"47'(#
Electrical Rating 120 VAC / 60 Hz / 9 A
Motor Speed 5,600 RPM (No Load)
Chain Oil Type
SAE #30 motor oil –
Below 30° F use SAE #10 oil
Above 75° F use SAE #40 oil
Capacity 3.4 oz (100 ml)
Cutting
Attachment
14" Sprocket Nose Chain Guide Bar
Low-Kickback Full Skip Chain
Pitch: 3/8"
Gauge: 0.050"
# of links: 52
X'4$J This electric chain saw is for cutting small logs and for lighter weight trimming jobs.
A more powerful chain saw may be needed for heavy duty use.
2$4:8&0&!$3'@$&)#$J
&V$"%&49$&MXRWVM&WYUTVRBXR&2BOMRS&WXOTVYBRWTX&#$647'(&"4&49$&C$<7((7(<&'3&497#&
L"(:";&7(6;:%7(<&";;&4$>4&:(%$@&#:C9$"%7(<#&49$@$7(&C$3'@$&#$4&:8&'@&:#$&'3&497#&8@'%:64A
X'4$J For additional information regarding the parts listed in the
following pages, refer to Parts List and Diagram on page 18.
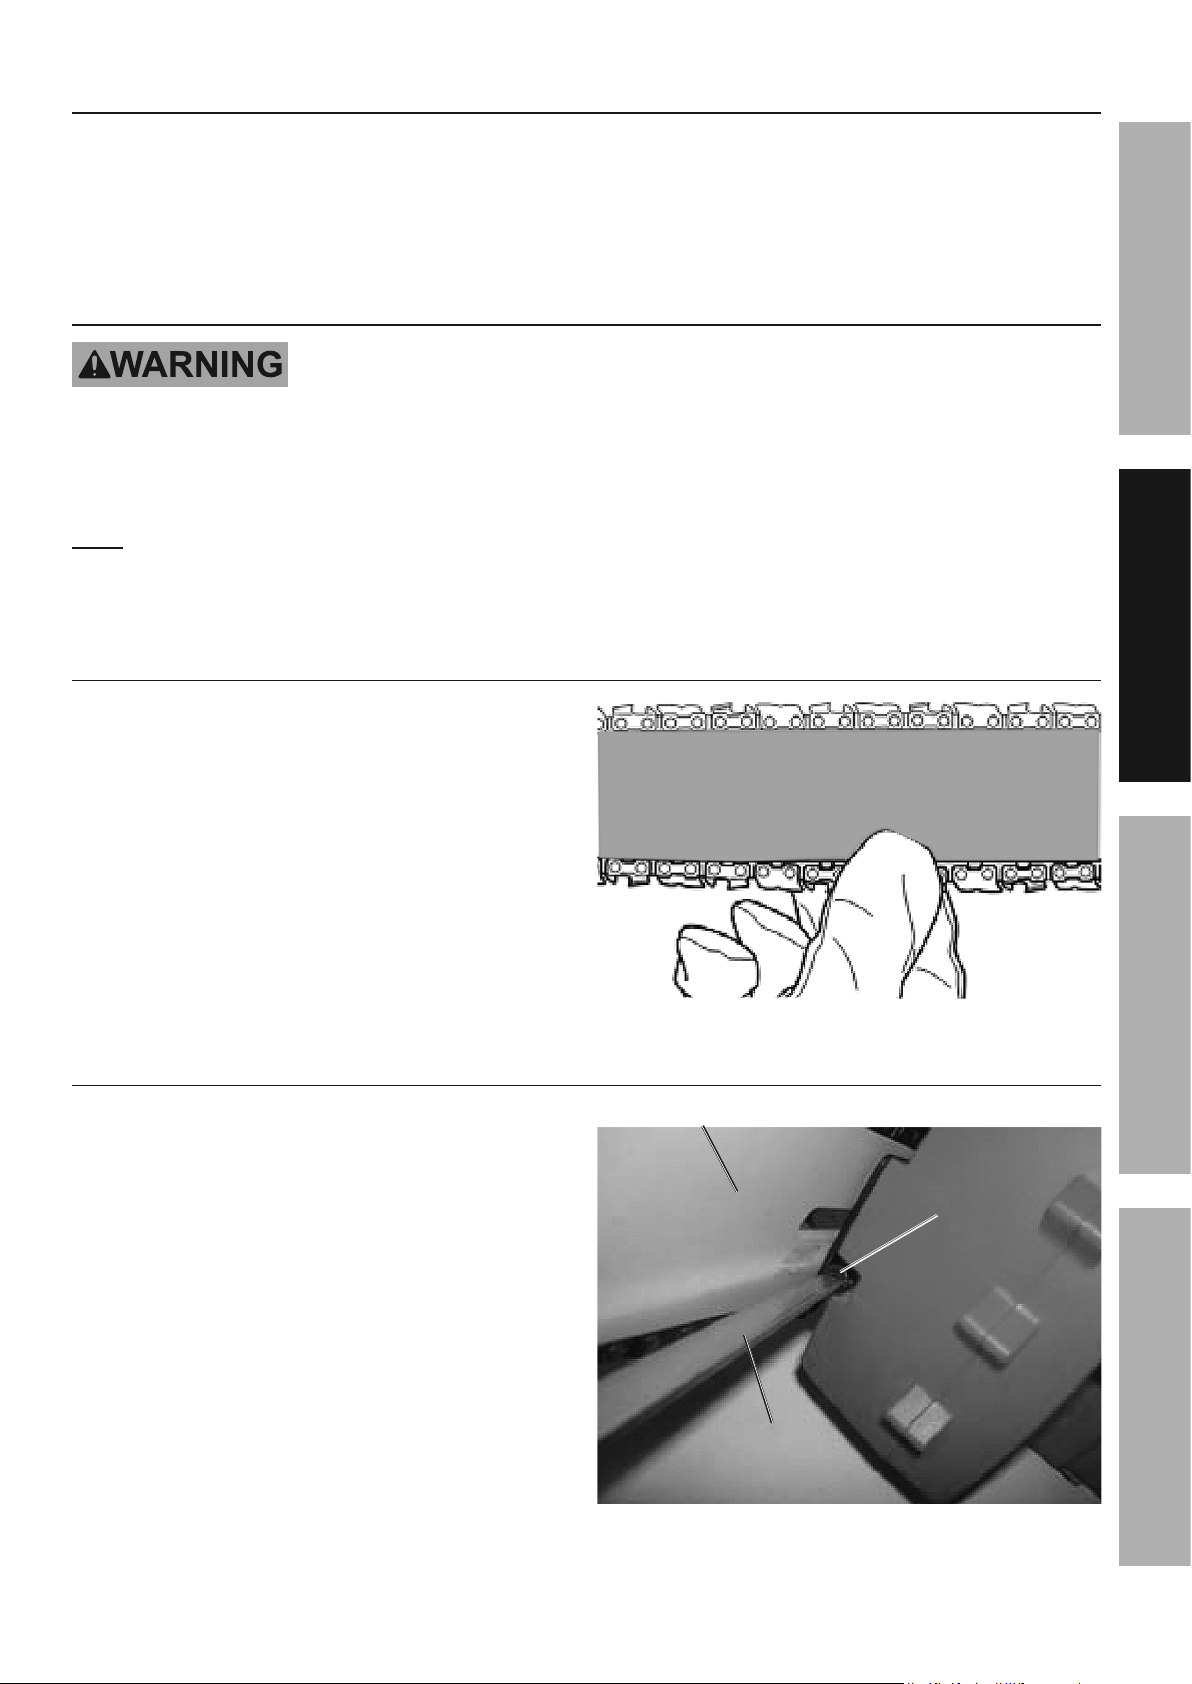
O:(647'(#
D9"7(&Z:7%$&
!"@&29$"49
2?7469&*'6]':4
R@7<<$@
U'?$@&D'@%
U'?$@&
D'@%&D;78
T7;&R"(]&D"8
Z:7%$&!"@&
X'#$
D9"7(&Z:7%$&!"@
287]$%&!:L8$@
2"?&D9"7(
O@'(4&a"(%;$&
Z:"@%
O@'(4&a"(%;$
V$"@&
a"(%;$
[@7\$&
D'\$@
X:4&
D'\$@
Page 9O'@&4$69(76";&F:$#47'(#=&8;$"#$&6";;&10PPP0P++0/-Q-AItem 64497
2BOMRSTUMVBRWTXYBWXRMXBXDM 2MR)U
2"3$45&[$\76$&M>8;"("47'(
1. Front Handle Guard – A guard that protects your
hand on the Front Handle from the Saw Chain.
2. Switch Lockout – A movable stop that
prevents the unintentional operation of
the Trigger until manually activated.
3. Low-Kickback Chain – A Chain that complies
with the kickback performance requirements
of ANSI B175.1-1991 when tested on a
representative sample of chain saws.
Z:7%$&!"@&"(%&2"?&D9"7(&W(#4";;"47'(&"(%&B%_:#4L$(4
RT&UVMIMXR&2MVWT)2&WXi)VS&OVTY&BDDW[MXRB*&TUMVBRWTXJ&
Y"]$&#:@$&49"4&49$&R@7<<$@&7#&7(&49$&'3308'#747'(&"(%&:(8;:<&49$&4'';&3@'L&74#&
$;$64@76";&':4;$4&C$3'@$&8$@3'@L7(<&"(5&8@'6$%:@$&7(&497#&#$647'(A
The Chain Saw is supplied with the Chain Guide Bar and Saw Chain pre-installed and no assembly
is required. Before first use and before each use thereafter, check the Saw Chain tension.
X'4$J New Saw Chains often need to be tensioned several times during first use.
Check a new Saw Chain’s tension often when first using.
Follow the directions in the following sections for checking and adjusting Saw
Chain tension and for replacing the Saw Chain when necessary.
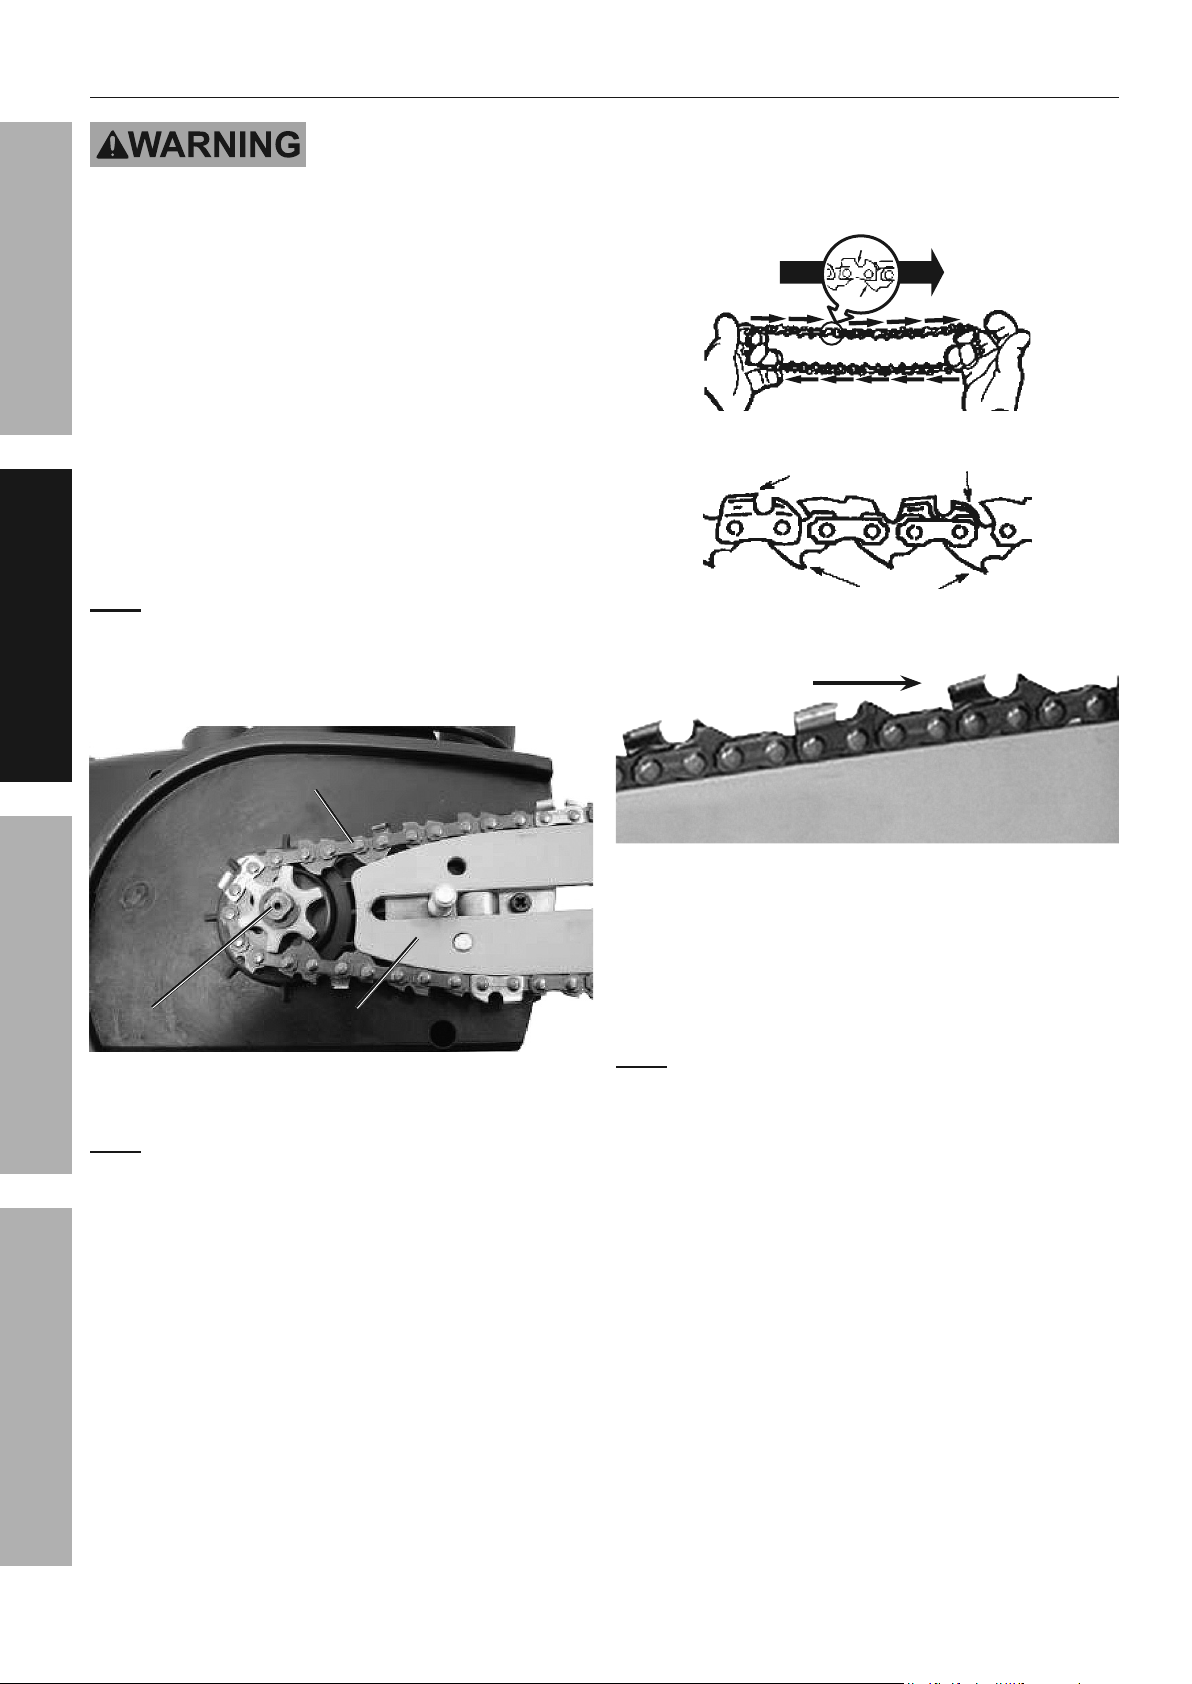
D9$6]7(<&2"?&D9"7(&R$(#7'(
1. Before using, check the Saw Chain tension.
2. While wearing heavy-duty gloves, use your index
finger and thumb to carefully grab the Saw Chain
in the middle section under the Chain Guide Bar.
3. Pull the Saw Chain away from the Guide Bar.
4. The Saw Chain should snap back against
the Guide Bar. The Chain should fit snugly
in the groove of the Chain Guide Bar, yet
you should still be able to slide the chain
along the Chain Guide Bar by hand.
5. There should be no sagging between the Guide Bar
and Saw Chain on the underside of the Guide Bar. O7<:@$&!J&&D9$6]7(<&2"?&D9"7(&R$(#7'(
B%_:#47(<&2"?&D9"7(&R$(#7'(
1. Remove the Nut Cover (46) and loosen
the Nut (28) on the Drive Cover (26).
2. Pull up on the Guide Bar Nose and hold it
up while making the tension adjustment.
3. Turn the Tension Screw (31) clockwise,
until the Saw Chain makes contact along
the bottom of the Chain Guide Bar.
Turn the Tension Screw 1/4 turn more.
4. Continue to hold the Guide Bar Nose
up while tightening the Nut.
5. Check the Saw Chain tension again following
steps 2 through 5 under Checking Saw Chain
Tension above. If needed, repeat the adjusting
steps to achieve the correct tension.
6. When adjustment is complete replace the Nut Cover.
R$(#7'(&
26@$?&Gb1H
D9"7(&Z:7%$&!"@&GcQH
26@$?%@7\$@
O7<:@$&DJ&&B%_:#47(<&2"?&D9"7(&R$(#7'(
Page 10 O'@&4$69(76";&F:$#47'(#=&8;$"#$&6";;&10PPP0P++0/-Q-A Item 64497
2BOMRS TUMVBRWTX YBWXRMXBXDM2MR)U
V$8;"67(<&49$&2"?&D9"7(
['&('4&7(#4";;&"&2"?&D9"7(&'@&D9"7(&Z:7%$&!"@&'49$@&49"(&49$j$&"(%&458$&
8@'\7%$%&"(%&;7#4$%&7(&49$&28$67376"47'(#&D9"@4&'(&8"<$&PA
1. Soak the new Saw Chain overnight in
Bar and Chain Oil (sold separately).
2. Remove the Nut Cover (46) and loosen the
Nut (28) on the Drive Cover (26), then loosen
the Tension Screw (31) counter-clockwise
until the Saw Chain (30) is loose.
3. Unthread the Nut and remove the Drive Cover.
4. Push the Chain Guide Bar (29) towards the
Sprocket (37) to further loosen the Saw Chain.
5. Remove the Saw Chain from
the Sprocket, then the Guide Bar.
X'4$J&Check the condition of the Sprocket when
replacing the chain. The Sprocket should be
replaced if it shows signs of wear or is damaged.
If needed, have the Sprocket replaced and the
bearings greased by a qualified technician.
28@'6]$4 Z:7%$&!"@
D9"7(
O7<:@$&[J&&28@'6]$4&;'6"47'(&?749&Z:7%$&
!"@&"(%&2"?&D9"7(&7(&8;"6$
X'4$J Check the condition of the Chain Guide Bar
when replacing the chain. Refer to Chain Guide Bar
Care on page 16.
6. Flip the Chain Guide Bar over before mounting
the new Saw Chain. This will ensure that the
Chain Guide Bar wears evenly over time.
D)RRMV2&Y)2R&OBDM&WX&
[WVMDRWTX&TO&VTRBRWTX
R78&'3&
!"@
D:44$@
[@7\$;7(]
D:44$@# [$849&Z":<$
[@7\$&*7(]#
[7@$647'(&'3&2"?&
D9"7(&D:44$@#
2"?
Z:7%$&!"@&
X'#$
7. Place the new Saw Chain around the Sprocket
and over the Guide Bar. Make sure the Cutters
of the Saw Chain are facing away from the Chain
Saw along the top edge of the Guide Bar. Fit
the Chain in the groove around the Guide Bar.
8. Replace the Drive Cover.
X'4$J For proper placement the pin on the bottom
of the Drive Cover must fit into its hole on the Right
Housing (22) prior to securing the Nut. Do not force.
9. Finger tighten the Nut, then tension the
Saw Chain following the steps in Adjusting
Saw Chain Tension on page 9.
Other manuals for 64497
1
Table of contents
Other Portland Chainsaw manuals


