PowerPac PPW920 User manual

2in1 TWIN-TUB MINI WASHING MACHINE
PPW920

Parts & Description s
○
1 Cover
○
6 Wash Tub
○
2 Water Inlet
○
7 Spin Tub
○
3 Wash Timer Knob
○
8 Base
○
4 Drain Selector Knob (OFF/Drain)
○
9 Water Outlet Pipe
○
5 Spin Timer Knob
○
9 Water Outlet Pipe
○
6 Wash Tub
○
7 Spin Tub
○
8 Base
○
2 Water Inlet
○
3 Wash Timer Knob
○
1 Cover
○
4 Drain Selector Knob
○
5 Spin Timer Knob

Terminology: Items placed in the ○
6 Wash Tub & ○
7 Spin Tub may include clothes, cloth
of various materials, rags, towels, stuffed toys, small blankets, small pillows, etc.
Henceforth throughout this Instructional Manual, these items will be collectively grouped as
“clothes”.
Warnings s
ATTENTION :
Read this booklet carefully as it contains important instructions for a safe installation, use
and maintenance.
Important instructions to be kept for future reference.
The following basic precautions should always be followed when using electrical
appliances:
1. Read all instructions before using the appliance.
The Appliance
2. This appliance must be used only for the purpose it was expressly designed; any use
NOT complying with the instructions contained in the manual is considered
inappropriate and dangerous. The manufacturer is NOT responsible for possible
damages caused by the inappropriate and/or unreasonable use.
3. The installation/assembly of the appliance will be made in accordance with the
indications of the manufacturer. A wrong procedure may cause damages to persons,
animals or objects, for which the manufacturer cannot be considered responsible.
4. Before use, check the integrity of the appliance and power cable. DO NOT operate the
appliance when its housing is damaged. In case you are not sure, contact a qualified
person. If the power cable is damaged, it must be replaced by the manufacturer or its
service agent or a qualified technician in order to avoid a shock hazard.
5. Before powering the appliance make sure the rating (voltage and frequency)
corresponding to the grid and the socket is suitable for the plug of the appliance, and
that the wall socket is properly grounded. This appliance is fitted with an earth wire for
extra safety.
6. Avoid the use of adapters and/or extension cables; if their use is absolutely necessary,
use only materials in compliance with the current safety regulations and according to
the electrical parameters of the adapters.
7. The appliance must NOT be switched on using external timers and/or other remote
control appliances which are not specified in this manual.

8. Only use original components & accessories provided by the manufacturer. Any
non-original components & accessories NOT recommended by the manufacturer may
cause injuries to persons or damage to the appliance. Doing so will void the warranty
and may cause serious injury.
9. The packing materials (plastic bags, expanded polystyrene, etc.) must be kept out of
the reach of children or disabled persons since they represent potential sources of
danger.
Location
10. This appliance is NOT suitable to be used or stored near heat sources (open flame,
ovens, heaters, stoves, etc.) and/or in an explosive environment (in the presence of
flammable substances such as gas, vapour, mist or dust, in atmospheric conditions
when, after ignition, the combustion is spread in the air). Items containing these
substances should never be placed in the appliance, and never be used to clean the
appliance in order to avert the risk of fire or explosion.
11. The appliance should NOT be placed on a surface, or in the vicinity of, objects which
can be damaged by heat, such as carpets or plastics. DO NOT locate multiple portable
socket outlets or power supplies at the bottom or rear of the appliance.
12. DO NOT touch the outside and bottom of the appliance while it is operating to prevent
scalding. The bottom of the appliance becomes hot as the appliance operates.
13. Place the appliance at a proper distance from objects or surrounding walls making sure
that its functioning will not cause accidental damages. There should be at least 10 cm
of free space from the back, left & right sides and at least 30 cm from the top of the
appliance to allow adequate air circulation to cool the compressor. Never put things on
top of the appliance.
14. Avoid placing the power cable on abrasive or sharp surfaces or in positions where it
can be damaged easily. Avoid placing heavy objects on the cable. The cable must NOT
be placed under carpets, or covered with throw rugs, runners or similar. Arrange the
cable away from the high traffic area, and where it will NOT be tripped over. DO NOT
pull or carry the appliance by the cable.
15. DO NOT use or store the appliance outdoors. Store and use the appliance only indoors,
or in any case, protected from weathering such as rain, direct radiation of the sun and
dust.

Operation
16. Remove loose items like coins, sweets, wrappers, tissue, paper, clumps of hair or fabric,
etc. which may clog the mechanism inside the Wash Tub & Spin Tub and cause the
motor to overheat and fail. If this happens, please switch the appliance off, unplug the
power cable from the electric mains and remove the items.
17. If you are using the appliance for the first time, you should:
a. Clean the inside of the appliance with water.
b. Ensure that the external parts of the appliance are completely dry before use and
that the appliance is standing at an upright position. Damage to the appliance may
occur if it is placed on an incline or decline.
c. Switch off the appliance and unplug the socket from the electric mains before lifting
up the Cover to put in or remove clothes from the appliance, cleaning or performing
any maintenance operation. Make sure that the appliance has cooled down before
performing any maintenance work.
d. Make sure to remove any label or protective sheet which may prevent its proper
functioning.
DO NOT:
cover the appliance during functioning;
insert objects or body parts inside the protection cover of the appliance;
turn the Drain Selector Knob (OFF/ Drain) in the midst of the Wash or Spin cycles;
turn the Drain Selector Knob (OFF/ Drain) from “OFF” to “Drain” without first turning
the Wash Timer Knob to “0”;
turn the Drain Selector Knob (OFF/ Drain) from “Drain” to “OFF” without first turning
the Spin Timer Knob to “0”;
use electrical devices (e.g. hairdryers, heaters, radiators, fans, etc.) near the
appliance while the Cover is open, and the Wash Tub & Spin Tub containing water
or damp clothes are exposed. Electrical devices may accidentally fall into the
appliance and cause an electric shock to persons or animals nearby;
place or use any electrical appliances (e.g. electric blankets, etc.) inside the
appliance unless recommended by the manufacturer;
put heavy or hot objects on the appliance to prevent the plastic materials of the
appliance from deforming;
use hot water above 55C in the Wash Tub or Spin Tub to prevent the plastic
materials of the appliance from deforming;
store or use the appliance in a bathroom where water can enter the internal
machinery or outdoors unsheltered from the rain;
touch the clothes placed inside the Wash Tub or Spin Tub before the tubs have
completely stopped spinning to prevent injury to your body or damage to the

appliance;
put clothes which have been cleaned by volatile organic solvents like petrol,
kerosene, thinner, ethers, alcohols, vinegar, etc. inside the Wash Tub or Spin Tub;
use the appliance for more than 45 minutes without turning it off for at least 15
minutes for a total usage of 2 hours in a single day – failure to heed this warning
may result in motor failure;
move the appliance by the Cover;
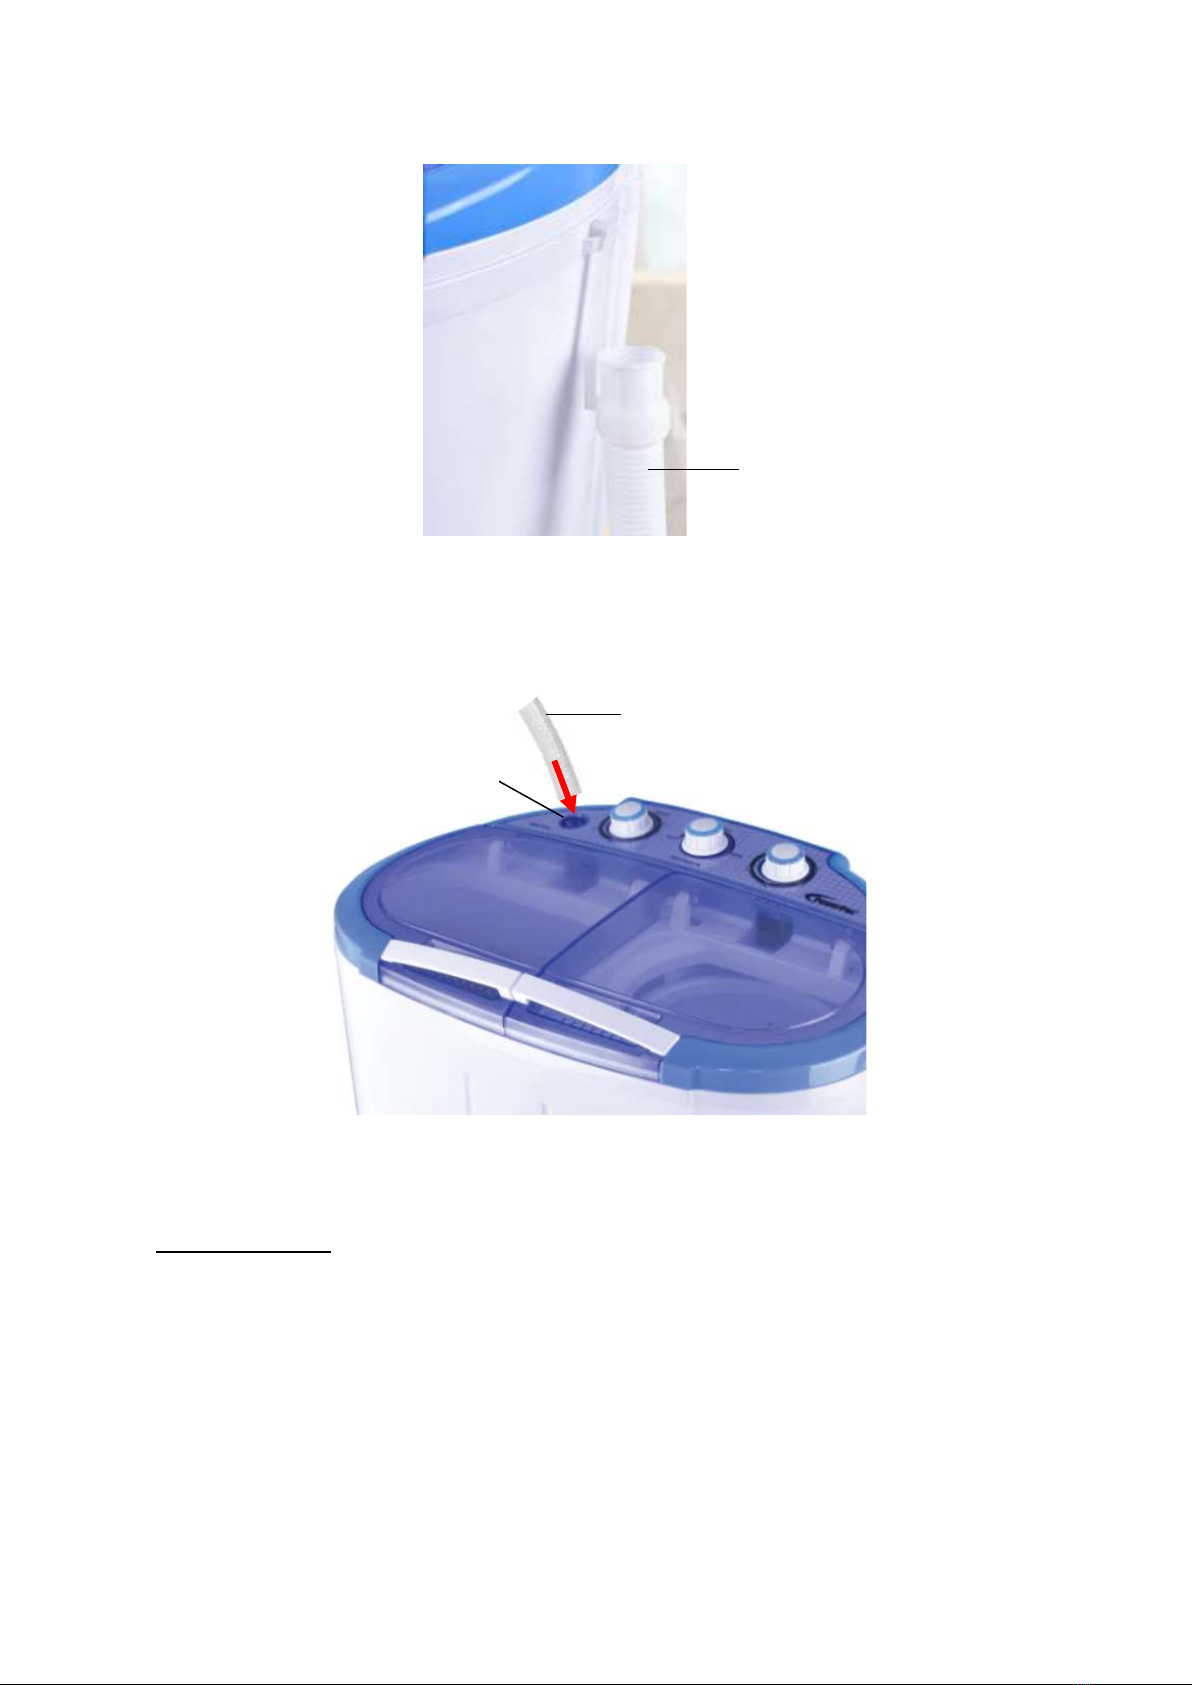
bend, stamp and drag the Water Outlet Pipe;
use the Wash Tub & Spin Tub for other purposes, like storing clothes;
leave the appliance unsupervised during operation.
18. During operation, DO NOT touch the appliance with wet body parts, and it is
recommended to have between you and the standing surface, an isolating element (for
example, wearing shoes with rubber soles).
19. The water level must never be above the maximum level. Excess water in the Wash
Tub will cause shaking and vibration. If this occurs, the vibrations are your warning that
the Tub is overfilled.
20. DO NOT soak the appliance in water or other liquids, wash it under the tap, or let any
liquid flow into the internal casing of the appliance to prevent electric shock.
21. Turn both the Wash Timer Knob & Spin Timer Knob to “0” and switch the appliance
OFF before unplugging the appliance. Plug and unplug the power cable firmly holding it
with dry hands. Always unplug the power cable to avoid overheating and if it is NOT
used for a long period, before storing, assembling & disassembling, cleaning or
performing any maintenance operation. Before storing, cleaning or performing any
maintenance operation, leave to cool for at least 30 minutes.
22. In case of malfunction or anomaly during the functioning, switch the appliance off
immediately, turn off the power and check the cause of the anomaly, if possible, with the
support of a qualified person.
23. If smoke is observed coming out of the appliance, unplug the power cable immediately.
24. This appliance is NOT intended for commercial use but to be used in households and
similar applications, such as:
Staff kitchen areas in shops, offices and other working environments;
By clients in dormitories; hotels, motels and other residential environments;
Bed and breakfast type environments.
25. This appliance can be used by children aged from 8 years and above and persons with
reduced physical, sensory or mental capabilities or lack of experience and knowledge if
they have been given supervision or instruction concerning use of the appliance in a
safe way and understand the hazards involved. Children shall NOT play with the
appliance. Cleaning and user maintenance shall NOT be made by children unless they
are older than 8 and supervised. Keep the appliance and its cable out of reach of
children less than 8 years old.
26. Save these instructions.

How to use s
○
9 Water Outlet Pipe
○
2 Water Inlet
○
3 Wash Timer Knob
○
1 Cover
○
6 Wash Tub
○
4 Drain Selector Knob
○
5 Spin Timer Knob
○
7 Spin Tub
○
8 Base

1. Ensure that the ○
9 Water Outlet Pipe is upright so that water is unable to flow out of
the appliance.
2. Insert a water hose connected to an external water tap into the ○
2 Water Inlet of the
appliance.
The Wash Cycle
3. Turn the ○
4 Drain Selector Knob to “OFF”.
4. Turn on the external water tap to fill water into the ○
6 Wash Tub (up to 1/3 of the level
desired) and turn off the tap.
5. Lift up the ○
1 Cover and put washing powder directly into the water in the ○
6 Wash
Tub. Close the ○
1 Cover.
6. Plug the power cable into the electric mains holding it firmly with dry hands and switch it
on. Turn the ○
3 Wash Timer Knob to “1 minute” to dissolve the detergent thoroughly in
the water prior to putting clothes into the tub.
○
9 Water Outlet Pipe
water hose
○
2 Water Inlet

7. (Remember to remove loose items like coins, sweets, wrappers, tissue, paper, etc.
which may be found in shirt or trouser pockets prior to putting the clothes into the ○
6
Wash Tub. To prevent damage to the tub, tie up loose ends of skirts, shawls, overalls,
aprons, etc. and pull up all zippers of jeans, jackets, skirts, pants, etc. prior to putting
them into the tub. Heavily soiled clothes may require immersing in detergent and
leaving to soak in a pail prior to washing.)
Lift up the ○
1 Cover and put the clothes into the ○
6 Wash Tub. As clothes begin to fill
the tub, the water level may decrease. Put in more water if necessary, the amount of
which would commensurate with the amount of clothes to be washed. Ensure that the
clothes are evenly distributed (as far as possible) within the ○
6 Wash Tub. DO NOT
overfill water in the appliance. Close the ○
1 Cover.
○
1 Cover
○
6 Wash Tub ○
7 Spin Tub

8. Turn the ○
3 Wash Timer Knob to select the duration of washing (up to 15 minutes)
based on the type and amount of clothes to be washed. The duration of washing is
affected by the softness or hardness of water of that particular region.
Hard water contains a high concentration of minerals - typically calcium,
magnesium, manganese and iron - in water. The greater the concentrations of
these minerals, the harder the water. Soft water contains a lower concentration of
these minerals, and instead contains some sodium and potassium salts.
Hard water hinders the laundry process by preventing water from mixing with
detergent. As a result, soap is unable to lather effectively and soap scum is left
behind on your clothes as a streaky, chalky substance. Not only does this
residue look unsightly, it can also cause clothes to feel stiff and unclean, all while
attracting and holding more dirt than before. This same mineral coating can
reduce the absorption of bath towels and cause skin irritation in the form of
chafing and dryness, especially for those who suffer from sensitive skin or other
skin conditions. Additionally, hard water can cause the premature fading of dark
fabrics, leave reddish brown streaks on clothing due to the presence of iron and,
in the case of very hard water or mineral build up, even weaken and tear fabrics
made from natural fibres, leading to costly clothes repairs or replacements. Hard
water requires slightly longer wash duration compared to soft water. In addition, it
might be helpful to substitute powdered (solid) detergent with liquid detergent if
your tap water is hard.
Water Inlet WASH OFF / DRAIN SPIN
5 6 9 12 15 Drain Selector 1 2 3 4 5

Washing Load
(kg)
Water
Type
Water Level
Material
Duration
(mins)
3
Hard
Based on
amount of
clothes
Artificial fibre
6 – 8
Kapok, Hemp
7 – 10
Soiled clothes
10 – 13
Bedsheets
11 – 15
3
Standard
(between
hard &
soft)
Based on
amount of
clothes
Artificial fibre
5 – 7
Kapok, Hemp
6 – 9
Soiled clothes
8 – 12
Bedsheets
9 – 13
3
Soft
Based on
amount of
clothes
Artificial fibre
4 – 6
Kapok, Hemp
5 – 8
Soiled clothes
6 – 10
Bedsheets
8 – 11
DO NOT wash pure woolen fabrics in this appliance. DO NOT wash
electric blankets or put in any electrical device in this appliance.
9. The appliance starts operating. When the Wash Cycle concludes (○
3 Wash Timer Knob
reaches “0”), the appliance stops operating.
10. Lay down the ○
9 Water Outlet Pipe on the ground and make sure water can flow out
horizontally or downwards out of the ○
6 Wash Tub.
11. Turn the ○
4 Drain Selector Knob (OFF/Drain) to “Drain”.
12. When water has completely drained from the ○
9 Water Outlet Pipe, if you wish to
remove the clothes from the appliance without undergoing the Rinse or Spin cycles,
switch off and unplug the power cable from the electric mains holding it firmly with dry
hands. Remove the water hose from the ○
2 Water Inlet before lifting up the ○
1 Cover
and removing the clothes from the ○
6 Wash Tub. Otherwise, proceed to step 13.

The Rinse Cycle
13. When water has completely drained from the ○
9 Water Outlet Pipe, lift up the ○
1
Cover, remove the clothes from the ○
6 Wash Tub and transfer them to the ○
7 Spin
Tub. Ensure that the clothes are evenly distributed (as far as possible) within the ○
7
Spin Tub in order to minimise vibrations which may emanate from the appliance if the
○
7 Spin Tub is spinning with clothes unevenly distributed. Press the clothes down firmly
and place the Safety Cap on top of them. Close the ○
1 Cover.
(DO NOT be alarmed when you notice these vibrations. As clothes can never be
completely evenly distributed, vibrations can never be fully eliminated as when an
object spins about its axis of rotation, if that object is unevenly distributed in terms of
mass, its center of mass would move around, resulting in wobbles. In addition, as water
is removed from the clothes due to the spinning action, the movement of water within
the appliance itself would cause the center of mass to move around, resulting in further
wobbles.)
14. Turn the ○
5 Spin Timer Knob to select the duration of the spin cycle (up to 5 minutes)
based on the type and amount of clothes.
15. The Spin Cycle commences. When this is operating, water is automatically discharged
through the ○
9 Water Outlet Pipe. When the Spin Cycle concludes (○
5 Spin Timer
Knob reaches “0”), the appliance stops operating.
16. Turn the ○
4 Drain Selector Knob (OFF/Drain) to “OFF”.
17. Put the ○
9 Water Outlet Pipe upright again.
18. Turn on the external water tap to fill water into the ○
6 Wash Tub up to the level desired
and turn off the tap. DO NOT overfill water in the appliance.
19. Lift up the ○
1 Cover. Remove the clothes from the ○
7 Spin Tub and transfer them to
the ○
6 Wash Tub. As clothes begin to fill the tub, the water level may decrease. Put in
more water if necessary, the amount of which would commensurate with the amount of
clothes to be washed. Ensure that the clothes are evenly distributed (as far as possible)
within the ○
6 Wash Tub. DO NOT overfill water in the appliance. Remove the water
hose from the ○
2 Water Inlet. Close the ○
1 Cover.
20. Turn the ○
3 Wash Timer Knob to select the duration of rinsing (up to 15 minutes)
based on the type and amount of clothes to be rinsed.
21. The appliance starts operating. When the Rinse Cycle concludes (○
3 Wash Timer
Knob reaches “0”), the appliance stops operating.
22. Lay down the ○
9 Water Outlet Pipe on the ground and make sure water can flow out
horizontally or downwards out of the ○
6 Wash Tub.
23. Turn the ○
4 Drain Selector Knob (OFF/Drain) to “Drain”.
24. When water has completely drained from the ○
9 Water Outlet Pipe, if you wish to
remove the clothes from the appliance without undergoing the Spin Cycle, switch off
and unplug the power cable from the electric mains holding it firmly with dry hands.
Lift up the ○
1 Cover and remove the clothes from the ○
6 Wash Tub. Otherwise,
proceed to step 25.

The Spin Cycle
25. If a Spin Cycle is required, lift up the ○
1 Cover, remove the clothes from the ○
6 Wash
Tub and transfer them to the ○
7 Spin Tub. Ensure that the clothes are evenly
distributed (as far as possible) within the ○
7 Spin Tub in order to minimise vibrations
which may emanate from the appliance if the ○
7 Spin Tub is spinning with clothes
unevenly distributed. Press the clothes down firmly and place the Safety Cap on top of
them. Close the ○
1 Cover.
(DO NOT be alarmed when you notice these vibrations. As clothes can never be
completely evenly distributed, vibrations can never be fully eliminated as when an
object spins about its axis of rotation, if that object is unevenly distributed in terms of
mass, its center of mass would move around, resulting in wobbles. In addition, as water
is removed from the clothes due to the spinning action, the movement of water within
the appliance itself would cause the center of mass to move around, resulting in further
wobbles.)
26. Turn the ○
5 Spin Timer Knob to select the duration of the spin cycle (up to 5 minutes)
based on the type and amount of clothes.
27. The Spin Cycle commences. When this is operating, water is automatically discharged
through the ○
9 Water Outlet Pipe. When the Spin Cycle concludes (○
5 Spin Timer
Knob reaches “0”), the appliance stops operating.
28. Switch off and unplug the power cable from the electric mains holding it firmly with dry
hands before lifting up the ○
1 Cover and removing the clothes from the ○
7 Spin Tub.
29. Always remember to unplug the power cable of the appliance if it is NOT used for a
long period, before storing, cleaning or performing any maintenance operation.

How to clean s
1. Turn the ○
4 Drain Selector Knob (OFF/Drain) to “OFF”.
2. Ensure that the ○
9 Water Outlet Pipe is upright so that water is unable to flow out of
the appliance.
3. Insert a water hose connected to an external water tap into the ○
2 Water Inlet of the
appliance.
4. Turn on the external water tap to fill water into the ○
6 Wash Tub just below the
maximum level and turn off the tap.
5. Plug the power cable into the electric mains holding it firmly with dry hands and switch it
on.
6. Lift up the ○
1 Cover and put four cups of white vinegar directly into the water in the ○
6
Wash Tub. Close the ○
1 Cover.
7. Set the ○
3 Wash Timer Knob to “1 minute” to mix the vinegar and the water thoroughly.
Let the mixture sit in the ○
6 Wash Tub for about an hour.
8. Turn the ○
3 Wash Timer Knob to select “15 minutes”.
9. The appliance starts operating. While you wait, you can tackle the rest of the
appliance’s surfaces. Spritz vinegar onto a microfiber cloth and rub along every square
inch of your appliance. When the Wash Cycle concludes (○
3 Wash Timer Knob
reaches “0”), the appliance stops operating.
10. Lay down the ○
9 Water Outlet Pipe on the ground and make sure water can flow out
horizontally or downwards out of the ○
6 Wash Tub.
11. Turn the ○
4 Drain Selector Knob (OFF/Drain) to “Drain”.
12. When water has completely drained from the ○
9 Water Outlet Pipe, turn the ○
4 Drain
Selector Knob (OFF/Drain) to “OFF”.
13. Put the Water Outlet Pipe upright again so that water is unable to flow out of the
appliance.
14. Turn on the external water tap to fill water into the ○
6 Wash Tub just below the
maximum level and turn off the tap.
15. Lift up the ○
1 Cover and pour in a cup of baking soda into the water in the ○
6 Wash
Tub.
16. Turn the ○
3 Wash Timer Knob to select “15 minutes”.
17. The appliance starts operating. When the Wash Cycle concludes, the appliance stops
operating.
18. Lay down the ○
9 Water Outlet Pipe on the ground and make sure water can flow out
horizontally or downwards out of the ○
6 Wash Tub.
19. Turn the ○
4 Drain Selector Knob (OFF/Drain) to “DRAIN”.
20. Switch off and unplug the power cable from the electric mains holding it firmly with dry
hands.

21. Remove the water hose from the ○
2 Water Inlet.

PROBLEM SOLVING s
Problem
Possible Causes
How to Solve
The appliance
fails to work.
The appliance is
NOT plugged in.
Plug the appliance into the electric mains
and switch it on.
Household power
circuit has blown.
Check the household circuit breaker for any
tripped wires. Call for a qualified electrician.
Fuse on appliance
is blown.
Send the appliance to the service centre for
checks.
Water levels in
the Wash Tub
remain low
Bellows in the
Overflow Filter is
misaligned or
mis-installed.
Reinstall the Bellows in the Overflow Filter.
If unable to do so, send the appliance to the
service centre for checks.
Water is NOT
able to be
drained out of
the appliance
The Water Outlet
Pipe is NOT
lowered.
Lay down the Water Outlet Pipe on the
ground and make sure water can flow out
horizontally or downwards out of the Wash
Tub or the Spin Tub, depending on where
the water originated.
Water flows
out very
slowly
The Drain Selector
Knob (OFF/Drain)
is at “OFF”.
Turn the Drain Selector Knob (OFF/Drain) to
“Drain”.
The Water Outlet
Pipe has NOT been
fixed properly.
Check the connection of the Water Outlet
Pipe to the base of the appliance.
The Water Outlet
Pipe has blockages
along the inside of
the pipe.
Detach the Water Outlet Pipe from the base
of the appliance and remove any blockage
before re-attaching the pipe
Abnormal
sounds
emitting from
the appliance
while
operating
Items like coins that
were NOT removed
from clothes
became dislodged.
Loose ends of
clothes or zippers
made these sounds
as they move
around the Wash
Tub or Spin Tub.
Remove loose items like coins, sweets,
wrappers, tissue, paper, etc. which may be
found in shirt or trouser pockets prior to
putting the clothes into the Wash Tub or
Spin Tub.
Tie up loose ends of skirts, shawls, overalls,
aprons, etc. and pull up all zippers of jeans,
jackets, skirts, pants, etc. prior to putting
them into the tubs.

Sounds &
vibration while
spinning
Abnormal sounds &
violent vibration
emitting from the
Spin Tub.
Place the machine on flat and solid ground.
Ensure that the clothes are evenly
distributed within the Spin Tub. Press the
clothes down firmly and place the Safety
Cap on top of them.

ENVIRONMENTAL TIP s
This appliance, along with all other electronic appliances, should, when it is no longer
capable of functioning, be disposed with the least possible environmental damage
according to the local regulations in your area. In most cases you can discard the appliance
at your local recycling center.
DISPOSAL: Do not dispose this appliance as unsorted municipal waste. Collection of such
waste separately for special treatment is necessary.
Risk of child or animal entrapment
Before you discard this appliance, please remove the cover so that children or animals may
not easily get trapped inside.
SPECIFICATION s
MODEL
PPW920
VALID CAPACITY
3 kg
PRODUCT DIMENSION
580 x 360 x 580 mm
WASH TUB
235 x 185 x 345 mm
SPIN TUB
195 x 165 x 260 mm
WEIGHT
10 kg
RATED VOLTAGE
220 – 240 V ~50 – 60 Hz
POWER
200 W

WARRANTY s
Warranty Conditions
1. This warranty provides against defective materials and manufacturing faults throughout
for two years from the date of purchase of the appliance. The warranty on the
Compressor is 10 years subject to the same conditions as above.
2. This warranty also does not cover normal wear and tear, replacement of consumable
materials and accessories, and the cost of maintenance of the appliance.
3. This warranty does not cover the repair or replacement of part/s damaged by misuse,
accidents, negligence, alterations, or modifications in any way, or repairs done by any
repair organisation without the prior consent of PowerPac Electrical Pte Ltd.
4. Repair and service are to be performed at: 5 Changi South Lane #03-01 Singapore
486045. A transport fee will be charged for personal doorstep service.
5. The original purchaser of the appliance must furnish proof of purchase to our Service
Centre with the email or number as registered during submission of warranty when this
appliance is sent for repair/service. Failure to do so may delay the receipt of said
repair/service by the customer.
6. Under no circumstances whatsoever shall the serial number be erased, defaced or
altered by the customer and/or his representatives, or the dealer and/or his agents.
Failure to ensure this shall invalidate the warranty.
7. This warranty is deemed to be void if the defect is cause by the attack of household
pests, fire, lightning, natural disasters, pollution, abnormal voltage or the usage of
generators.
8. This warranty is valid in Singapore only.
9. This warranty will be honoured subject to the customer’s registration of the warranty
inclusive of original invoice or valid purchase receipt. Failure to present these
documents will result in denial of service. However, if the customer still requests that
the defective appliance be repaired, PowerPac Electrical Pte Ltd may, at its discretion,
repair the appliance but impose a labour charge, as well as the costs of the
replacement parts, to be borne solely by the customer.
10. Please refer to the attached picture for the location of
one of our appliance’s serial number, as an example.

Please complete the on-line registration warranty form available on our website. There is
no further requirement to send us any hard copy as part of our efforts to save the
environment.
In accordance with the terms and conditions of this limited warranty as stated above,
PowerPac Electrical Pte Ltd, at its expense shall provide free services for the appliance
within the warranty period from its date of purchase from our Authorised dealers.
Table of contents
Other PowerPac Washer manuals