PowerTap Joule GPS User manual

PowerTap Joule™GPS
User Guide
Joule GPS is compatible with any ANT+TM
power meter, speed sensor, cadence
sensor, or heart rate sensor.
WATTS
451 160
21 96
1:06:45
HR
MPH CAD
170 894
AV WATTS MX WATTS
RIDE TIME KJ
9:34
A
71º
380
INT
Supporting FW 19.087

Joule GPS User Guide page 2
© 2012 Saris Cycling Group, Inc.
5253 Verona Road
Madison, WI 53711
All rights reserved. No part of this publication may be copied, photographed, reproduced, translated,
transmitted electronically or placed on digital media without the prior written consent of Saris Cycling
Group, Inc.
Trademarks
Saris Cycling Group, Inc., PowerTap, and PowerTap logo, are all registered trademarks of Saris Cycling Group,
Inc. All other product, brand, or trade names used in this manual may be trademarks or registered trademarks
of their respective owners.
Modifications
Saris Cycling Group, Inc. reserves the right to make improvements and/or updates to the products
described herein at any time without notice.
This device complies with part 15 of FCC Rules and Rss-210 of IC Rules. Operation is subjected to the following two conditions:
(1) This device may not cause harmful interference, and (2) This device must accept any interference received, including
interference that may cause undesired operation. The manufacturer is not responsible for any radio or tv interference caused
by unauthorized modifications to this equipment. Such modifications could void the user authority to operate the equipment.

CHAPTER
7. Training ___________________ 36
Workouts
Auto Lap
Countdown
8. DEVICE____________________ 41
Date & Time
Display
Record Control
Memory
Altimeter
About
9. DATA & DOWNLOADS________ 48
Download
PowerAgent
10. FAQ & TROUBLESHOOTING __ 48
11. PRECAUTIONS ______________ 49
12. FEATURES LIST _____________ 50
TECHNICAL SPECIFICATIONS____ 51
13. WARRANTY ________________ 52
Appendix A, History Reports_______ 53
Appendix B, Error messages ______ 59
Appendix C, Metrics ____________ 62
Appendix D, GPS Signals _________ 64
Appendix E, Short cuts, quick links__ 67
TABLE OF CONTENTS
Joule GPS User Guide page 3
CHAPTER
1. STARTING OUT _____________ 4
Unpacking
Compatibility
Installation
Charging
2. OVERVIEW & SETUP _________ 6
Dashboards
Buttons and Screen
Main Menu
User
Sensor and Pairing
3. DASHBOARDS ______________ 11
Dashboard 1,2,3: Metrics
Dashboard 4: Intervals
Dashboard 5: GPS Map
4. SENSORS __________________ 17
Sensors Overview
Dene a Bike
Associating Sensors
Sensor Details
Calibration
5. NAVIGATION _______________ 23
Navigation Overview
Routes
Waypoints
GPS Status
Compass
6. HISTORY REPORTS __________ 32
Overview
Reports

Joule GPS User Guide page 4
Thank you for purchasing the PowerTap Joule GPS. This user guide is just one of the resources to help
you understand all the features the Joule GPS has to offer.
Please visit www.PowerTap.com to:
• Learn more about the Joule GPS and the PowerTap system of products
• Register all PowerTap products and activate warranty
• View instructional videos
• Sign up for the PowerTap newsletter-your source for the latest news and technical updates from
PowerTap
PACKAGE CONTENTS:
PART QTY
Joule GPS computer 1
Heart rate strap (select models) 1
Stem/Handlebar mount 1
Out-Front mount 1
Mount o-rings (2 sm, 2 lg) 4
Micro USB cable 1
CHAPTER 1: STARTING OUT
UNPACKING JOULE GPS
Joule GPS is compatible with any ANT+TM
power meter, heart rate sensor, cadence
sensor, speed sensor, or combination
speed/cadence sensor.
COMPATIBILITY

CHARGING
The Joule GPS is powered by a high-capacity rechargeable
battery. To charge the battery, plug into a computer or AC wall
adapter (#7060 not included). Typical battery charge lasts
approximately 20 hours of operation.
Should the battery become completely discharged (no partial
charge remaining), plug the Joule GPS into a computer or AC wall
adapter, press the reset button on the back panel of the Joule
GPS, and the charging process will begin.
Joule GPS User Guide page 5
Micro-USB
USB
INT
INSTALLATION
Installing the PowerTap Joule GPS
OUT-FRONT MOUNT
INT
INT
O-Rings: Crisscross under
stem/handlebar, latch on hooks OR Zip tie around stem,
through slots
STEM/HANDLEBAR MOUNT
INT
INT
CHAPTER 1: STARTING OUT
INT

Main Menu
Ride
History
Sensors
Training
Navigation
User
Device
Back to Dashboard
9:34A71º
[ENTER]
Press & Hold 3 sec.
CHAPTER 2: JOULE GPS OVERVIEW & SETUP
DASHBOARDS and BUTTONS
Press any button on the Joule GPS to turn the unit on. The display will briefly show the date, time, some
user totals and the firmware version, then begin acquiring the GPS fix on your current location. One of 5
Dashboard screens will be displayed at this time. By default, there are 3 dashboards displaying various
Metrics, 1 dashboard displaying completed intervals, and 1 dashboard displaying the GPS map. Pressing
the ENTER button will advance the display to the next of the 5 Dashboard screens. Dashboard 1, by default,
is initially set to display 6 metric windows in the configurable area. Other screens can appear between the
Metric Dashboards and the Navigation dashboard, depending on which features you are using (e.g. Screens
related to Training and Workouts, Navigating to a Waypoint, Following a Route, etc.).
• To view the Main Menu from any Dashboard, press and hold the ENTER button for 3 seconds.
• To return to the Dashboard from any Menu press and hold the ENTER button for 3 seconds.
Press any of the 4 buttons to turn the unit on
WATTS
--- ---
--- ---
0:00:00
HR
MPH CAD
0.0 0.0
AV WATTS MX WATTS
RIDE TIME KJ
9:34
A
71º
0
INT
Displays the Main Menu
Joule GPS User Guide page 6

WATTS
451 160
21 96
1:06:45
HR
MPH CAD
170 894
AV WATTS MX WATTS
RIDE TIME KJ
9:34
A
71º
380
INT
Joule GPS User Guide page 7
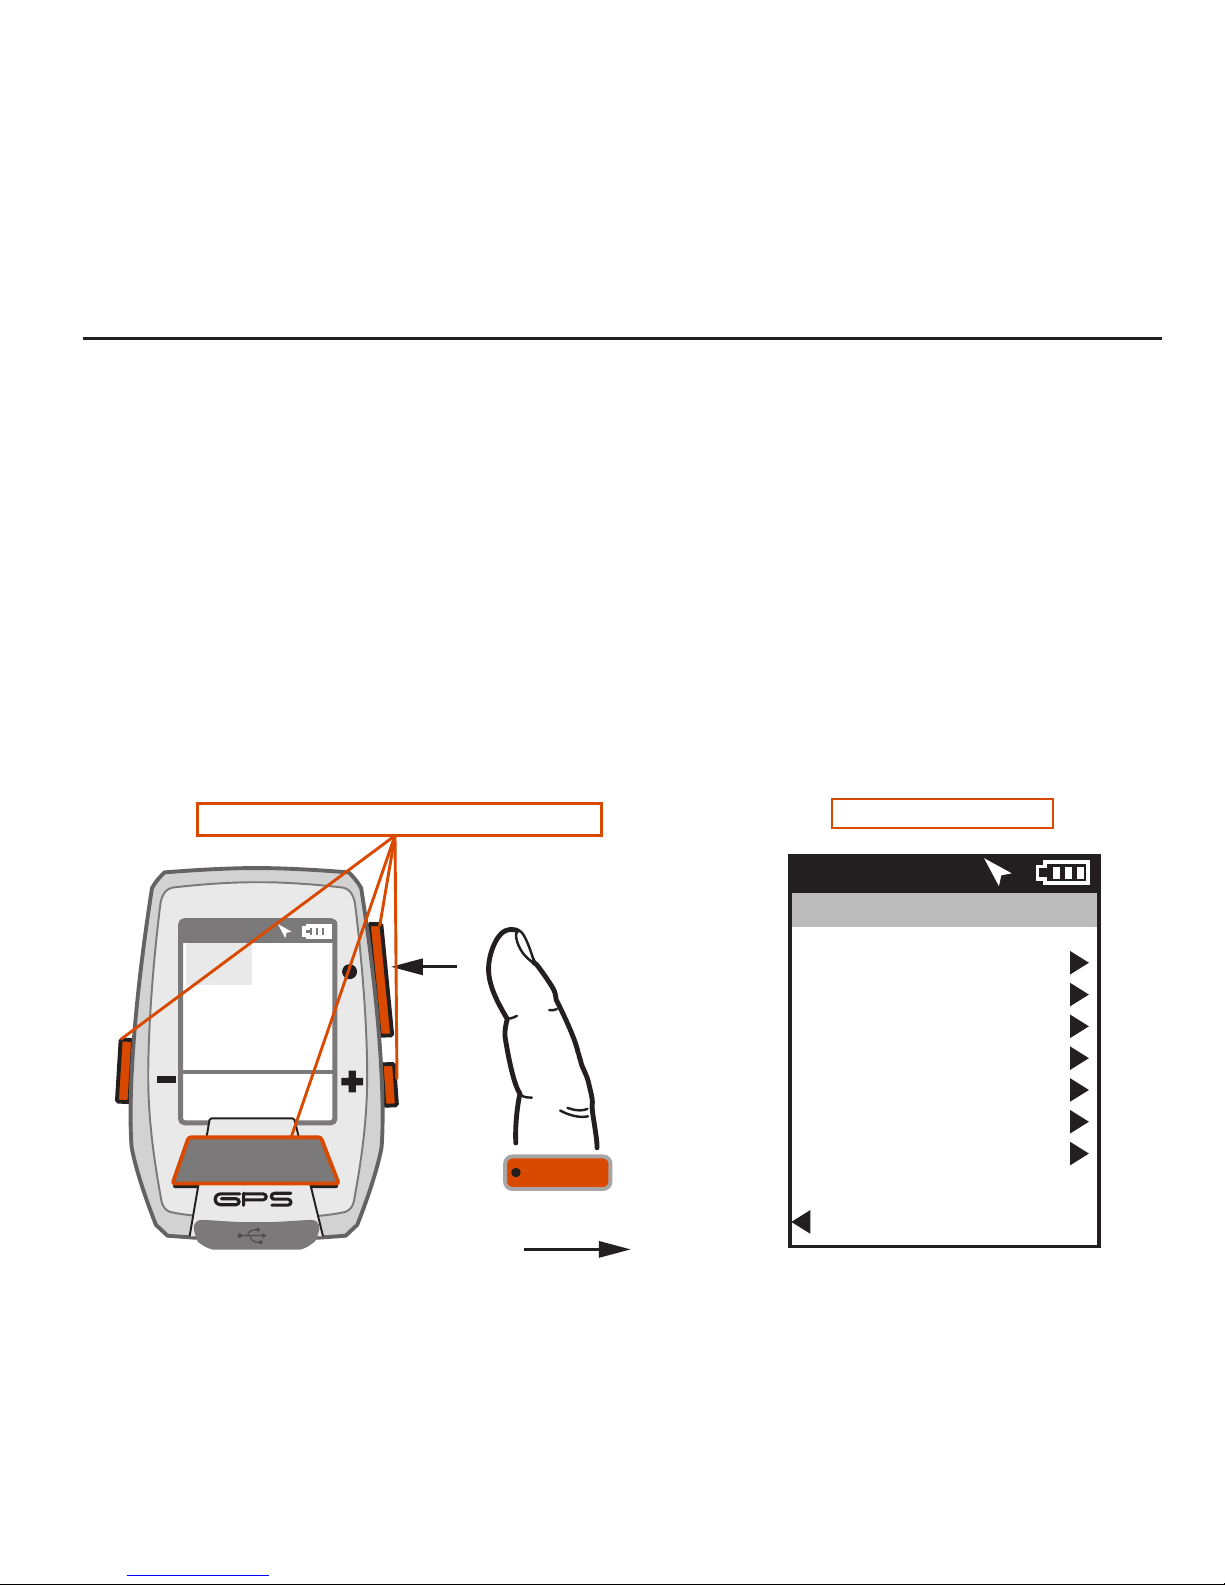
more BUTTON and DASHBOARD DETAIL
There are three buttons on the sides of the Joule GPS and one large button below the screen. The
screen is divided into 3 display areas. The Title Bar, displays time, temperature, compass, and battery
level. The large middle section displays user-selected metrics and can be configured to show 3 to 6
windows. The lower section shows complimentary metrics associated with the highlighted metric.
CHAPTER 2: JOULE GPS OVERVIEW & SETUP
Highlighted
Metric
Complimentary
Metrics
Micro-USB port
Ride Time or Clock
Temperature
North Arrow and GPS Signal Lock Indicator
Battery Level
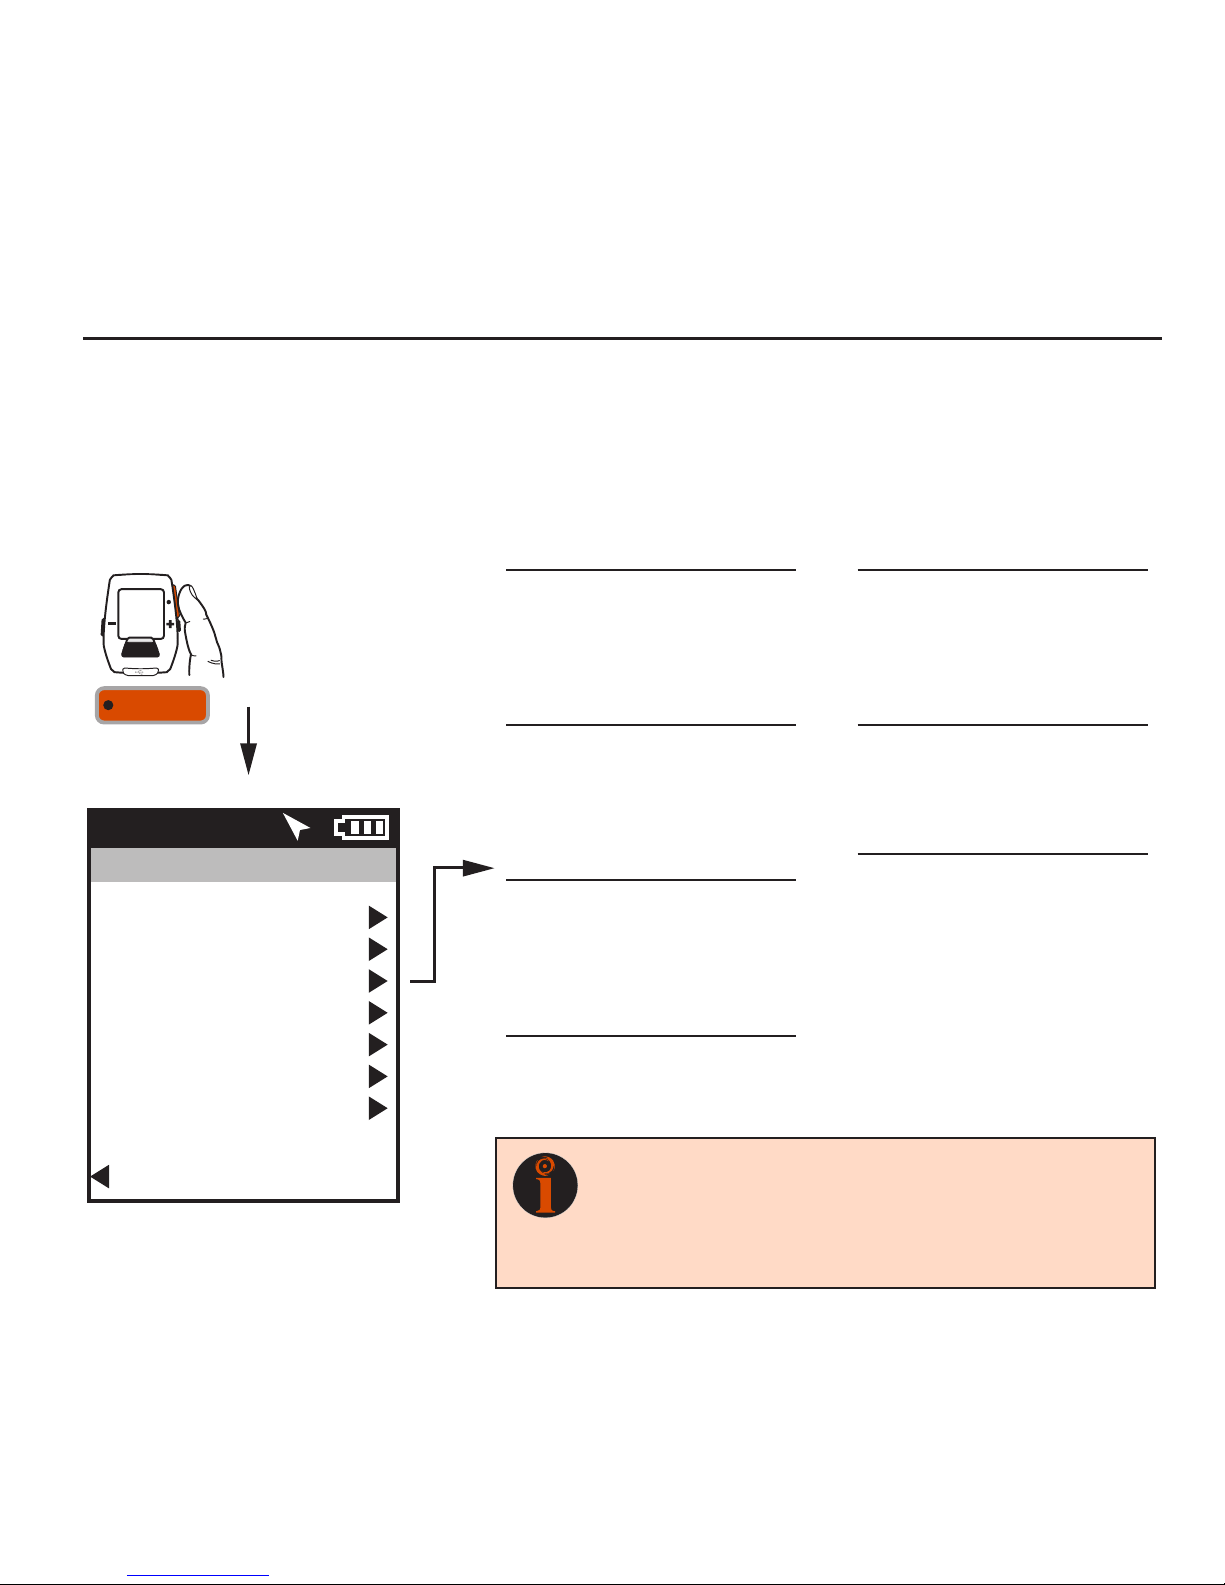
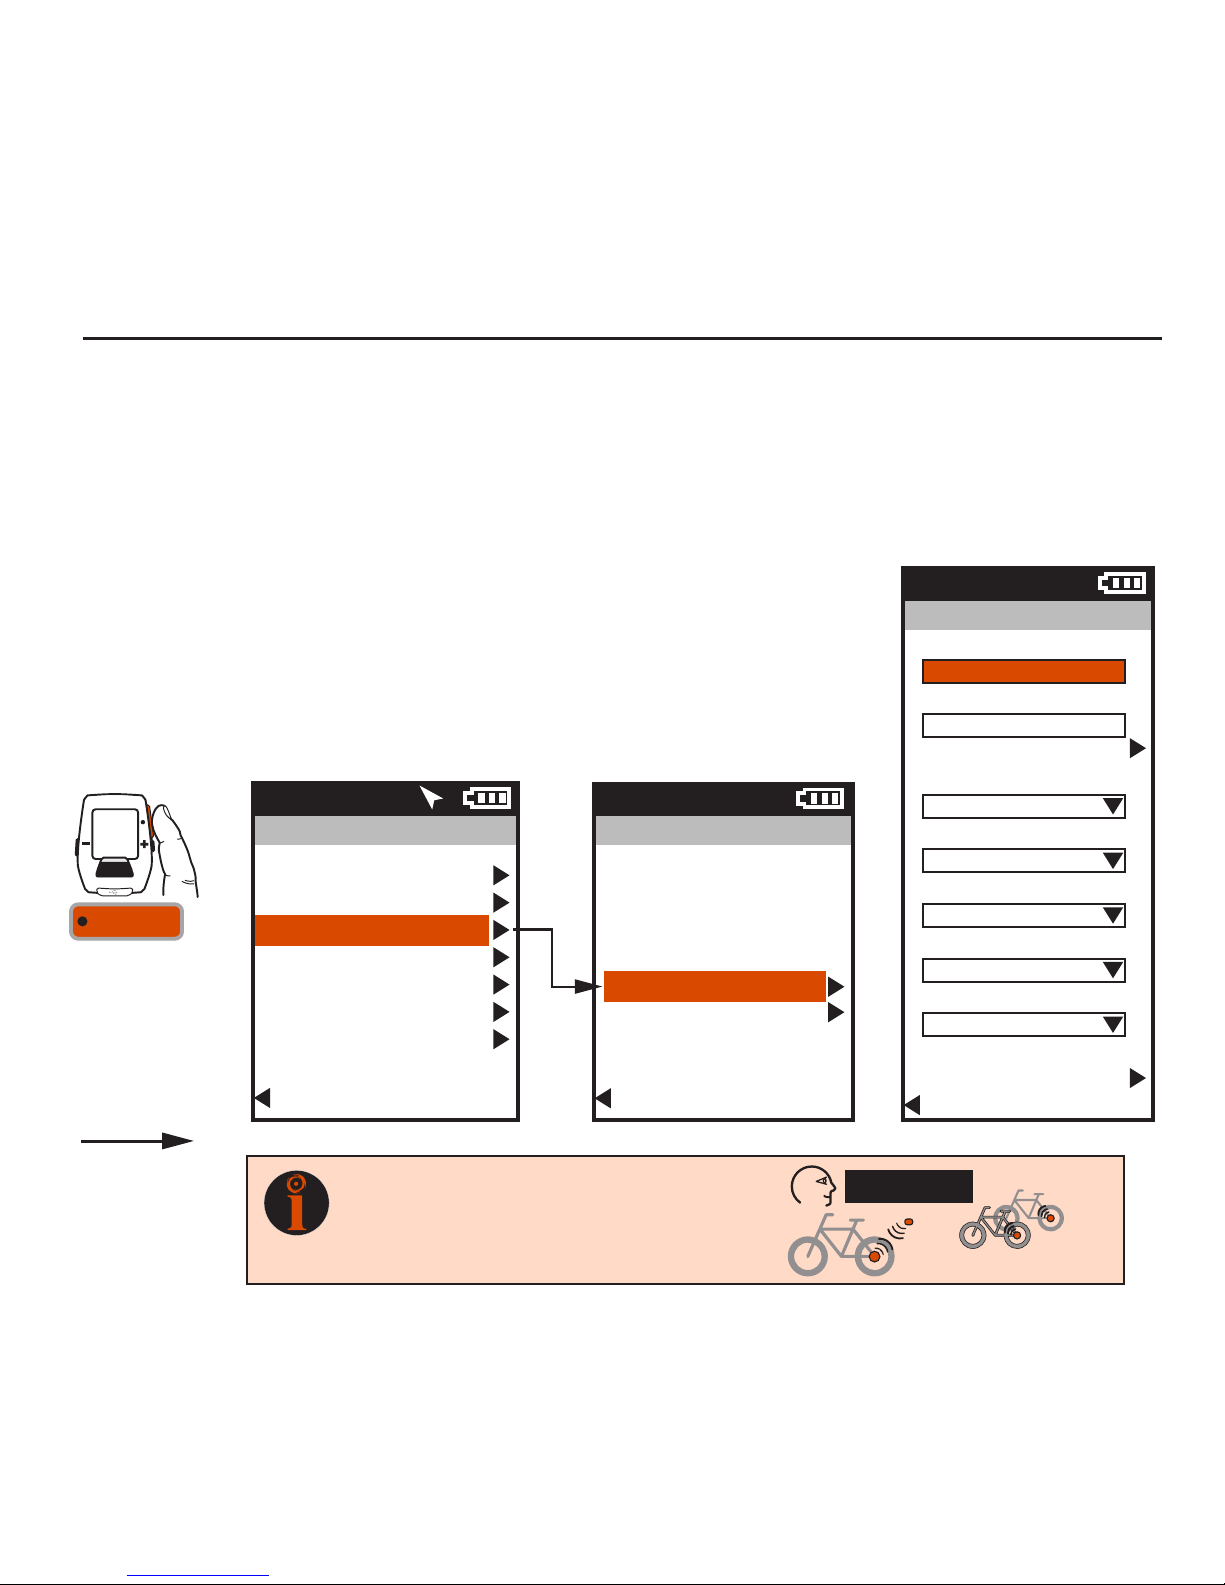
[ENTER] button * Press once to advance through Dashboards
* Hold for 2 seconds - Go to Main Menu
* In Menus, press once to select menu item
* In Menus, hold 2 seconds to return to Dashboard
* Shifts selected metric or “highlight box”
to the right and down
* Hold for 3 seconds to begin metric rotation
* Shifts selected metric or “highlight box”
to the left and up
* Press to mark intervals
* Hold for 2 seconds to display Interval view
* Hold for 2 seconds to display Ride view
* In Menus, press once to return to previous screen
* Press together and hold for 3 seconds to put the
Joule GPS to sleep
* Press together and hold for 2 seconds to “find”
sensors that may have been lost or were not
awake when the Joule powered up.
[PLUS] button
[MINUS] button
[PLUS] button
[MINUS] button
[INTERVAL] button
[INTERVAL] button
BUTTONS FUNCTION
TIP
: See Appendix E for all button
combinations, short cuts and quick
links.
[PLUS] button

CHAPTER 2: JOULE GPS OVERVIEW & SETUP
MAIN MENU
The Main Menu is your home base. Enter the Main Menu to stop and save rides; review ride history;
create, edit, select, and pair Sensors; activate Training features; define individual Users; and configure the
Device. Access to the Main Menu can be gained while viewing any Dashboard by pressing and holding the
ENTER button. Use the (+) and (-) buttons to advance through the options to your selection.
Joule GPS User Guide page 8
Main Menu
Ride
History
Sensors
Training
Navigation
User
Device
Back to Dashboard
9:34A71º
INT
[ENTER]
Press
& Hold 2 sec.
FROM DASHBOARD
TIP: Once you have entered the Menu system (by holding ENTER button
down for 2 seconds) the INTERVAL button will act as the “back” button. Each
button press will return to the previous screen. Additionally, there is a “Back
to...” choice at the bottom of every Menu screen, which will also return the
display to the previous screen.
RIDE
Resume Ride
Stop and Save
Stop and Delete
Reset Pacer
HISTORY
Last Ride
Select a Ride
Report - Max
Report - Totals
SENSOR
Select a Bike
NEW BIKE
Add a Bike
Manual Zero
TRAINING
Workouts
Auto Lap
Countdown
NAVIGATION
Routes
Waypoints
GPS Status
Compass
USER
Select a User
NEW USER
Add a User
DEVICE
Date and Time
Display
Record Control
Memory
Averages
Altimeter
About Joule

USER Multiple users can be stored
on each Joule GPS. (e.g. Jim, Bob,
Rachel can all share same device with
unique information). To add another user,
select Add a User, enter the name,
weight, height and date of birth for the
new user. If the training data is known
for this particular user it can be entered
now or enter it later, after a few rides.
CHAPTER 2: JOULE GPS OVERVIEW & SETUP
USER
Because the Joule GPS is multi-user compatible, it's easy to share the device among several riders (e.g.
Rachel, Jim, Bob). Each user can have multiple bikes (e.g. TT bike, Road bike, MTB); each bike can have
multiple sensors associated with it (e.g. PowerTap, Cadence, HR strap, Speed). A default User is already
defined within the Joule GPS. You can either edit the settings associated with that User or create a new user
by selecting Add a User.
Main Menu
Ride
History
Sensors
Training
Navigation
User
Device
Back to Dashboard
9:34A71º
User
Select a User
USER
Add a User
Back to Main Menu
9:34A
INT
FROM MAIN MENU
[ENTER]
Press
to scroll to User.
Press Name
Weight, lb
Height, in
Date of Birth
Gender
FTP
Power Zones
Heart Rate Zones
Joule GPS User Guide page 9
TIP: When editing within a data field, the ENTER button allows you to enter, then
move forward in the field; the INTERVAL button allows you to move backward;
the PLUS/MINUS buttons allow you to pick a letter or number. Moving to the end
of the field and pressing ENTER twice exits the field.

CHAPTER 2: JOULE GPS OVERVIEW & SETUP
SENSORS & PAIRING
Pairing is a term used to describe the association of your Joule GPS with a particular sensor that is broadcasting an
ANT+TM signal (e.g. a PowerTap hub, a Heart Rate strap, a remote cadence sensor, a remote speed sensor, etc.).
Sensors can be shared between bikes (e.g. a heart rate strap). Each User can define multiple bikes. Each bike may
have one or more sensors associated with it. Use unique names when creating additional bikes. For example: Jim’s
Racing Bike, Jim’s MTB, My TT Bike, etc.
To add another bike:
· Select “Add a Bike,” enter a unique name and the weight of the bike.
· Associate the sensors with the bike. Make sure all the sensors are awake and
broadcasting (briefly spin PowerTap wheel, wear HR strap).
· Select “Pair All” to pair all awake sensors in broadcast range (PowerTap hub, Heart
Rate strap). Sensors can also be paired individually by selecting it within the
Sensors menu.
Joule GPS User Guide page 10
TIP: The Joule GPS pairs to the sensor(s) closest to the
device first. Hold the Joule within 12” of PowerTap hub
when pairing in the presence of other sensors.
For more information on Sensors, see chapter 4
12” or 30cm
other sensors
INT
[ENTER]
Press & Hold
2 sec. to enter
Menus. Scroll
to Sensors;
Press •[ENTER];
Select “Add a Bike,”
Press •[ENTER] ;
FROM DASHBOARD
Main Menu
Ride
History
Sensors
Training
Navigation
User
Device
Back to Dashboard
9:34A71º
Sensors
Select a Bike
Jims RB
Add a Bike
Manual Zero
Back to Main Menu
9:34A
NewBike2
Name
NewBike2
Weight
0.0
Pair All
Power Sensor
None
Cadence Sensor
None
Speed/Combo
None
Heart Rate Sensor
None
RU Sensor
None
Delete Bike
Back to Sensors
9:34A

Joule GPS User Guide page 11
CHAPTER 3: DASHBOARDS
DASHBOARD 1
METRIC 1
METRIC 1
METRIC 2 METRIC 3
METRIC 2 METRIC 3
WATTS WATTS
451 160
21 96
1:06:45
HR
HR
MPH
MPH
CAD
CAD
170 894
AV WATTS MX WATTS
AV WATTS MX WATTS
AV HR MX HR
RIDE TIME
RIDE TIME
KJ
KJ
9:34A71º
Selected metric is
highlighted in gray Selected Metric
Detail View:
2 Complimentary Metrics
Detail Views
AA
B
B
AV MPH MX MPH
AV CAD MX CAD
MILES Kilojoules
KJ/HR TSS
C
C
D
D
E
E
F
F
380
Press • [ENTER] to
advance through
Dashboards
INT
[ENTER]
TIP
: Dashboards are fully customizable. 3 to 6 of the 23 available
metrics can be displayed in each dashboard. See Chapter 8 for
display options and Appendix C for a full list of metrics.
DASHBOARD 1
The Dashboards display various metrics, summaries and navigation information that can be easily customized.
When a new metric is highlighted, the detailed view changes to show the related complimentary metrics.

Joule GPS User Guide page 12
DASHBOARD 2
Dashboards can be customized to display from 3 to 6 metric windows. The example on previous page
displayed 6. The example below, Dashboard 2, displays 4 metric windows. Each window can display any of
23 metrics, plus related/complimentary metrics. See Appendix C for a full list of metrics.
CHAPTER 3: DASHBOARDS
METRIC 2 METRIC 3
Detail View:
2 Complimentary Metrics
DASHBOARD 2
1:06:45
RIDE TIME
21
MPH
WATTS
132 185
AV HR MX HR
9:34A71º
A
CD
451 160
HR
B
METRIC 1
METRIC 1 METRIC 2 METRIC 3
WATTS
HR
MPH
AV WATTS MX WATTS
AV HR MX HR
RIDE TIME
Selected Metric Detail Views
A
B
AV MPH MX MPH
Total Miles Kilojoules
C
D
Press • [ENTER] to
advance through
Dashboards
INT
[ENTER]
Selected metric is
highlighted in gray

Joule GPS User Guide page 13
DASHBOARD 3
Dashboard 3 is configured to display 3 metric windows (default configuration). Press the PLUS (+) or MINUS
(-) button to highlight a different metric. See Appendix C for a full list of metrics.
CHAPTER 3: DASHBOARDS
Detail View:
2 Complimentary Metrics
1:06:45
RIDE TIME
25
SPD GRADE
9:34A71º
A
B C
26.00 380
MILES KJ
DASHBOARD 3
METRIC 1
METRIC 1 METRIC 2 METRIC 3
SPEED
GRADE
MILES KJ
AV MPH MX WATTS
RIDE TIME
Selected Metric Detail Views
A
B
AV GRADE FT GAIN
C
Press • [ENTER] to
advance through
Dashboards
INT
[ENTER]
METRIC 2 METRIC 3
5%
TIP
: By holding down the + [PLUS] button for 3
seconds, any of the three related metrics can be
rotated into the primary dashboard metric position.
For example: To see total distance traveled as the
main metric, instead of Ride Time, press the [PLUS]
button until the highlighted metric is Ride Time.
Next, hold the [PLUS] button down for 3 seconds,
continue holding the button down while the metrics
are rotating. Release the button when the desired
metric is the primary or highlighted metric.
Selected metric is
highlighted in gray

Joule GPS User Guide page 14
CHAPTER 3: DASHBOARDS
Press • [ENTER] to
advance to the Intervals
Dashboard.
INT
[ENTER]
INTERVALS DASHBOARD
Intervals are useful for viewing ride data specific to a section of a ride, such as a hill or other period of high intensity
riding. The Interval Summary dashboard contains a summary of each interval completed up to that point in the ride.
To initiate or stop an interval press the large [INTERVAL] button on the front of the Joule.
When viewing dashboard metrics, the Joule GPS allows 2 types of views: Ride View and Interval View. Ride View
displays metric values related to the entire ride from the start to the current point in time. Interval View displays metric
values related to the current interval. Holding the [INTERVAL] button down for 2 seconds toggles between the 2 views.
Intervals
2321w0:04:58
113kj 2.25mi
9:34A71º
Interval number
Current interval at top
Interval time
Interval distance 1285w0:05:02
101kj 2.65mi
0192w0:12:32
221kj 2.65mi
Average Power
Total kilojoules
If power data is not available,
Speed and HR are displayed:
Average Heart Rate
Average Speed
10:12:32
2.65mi146
15.2mph
[INTERVAL]
INT
[INTERVAL]
INT
Press & Hold
2 sec. to go to
Interval View
Press & Hold
2 sec. to go
back to Ride
View
AV WATTS
321 0:04:58
RIDE TIME
9:34AINT 2
Interval marker
(replaces Temperature)
INTERVAL VIEW
Metrics displayed are for current interval
INTERVAL 2
INTERVAL 1
UP TO 99 INTERVALS
AV WATTS
176 1:24:06
RIDE TIME
9:34A71º
RIDE VIEW
ENTIRE RIDE
Metrics displayed are for overall ride

Joule GPS User Guide page 15
CHAPTER 3: DASHBOARDS
INTERVALS continued
When using intervals, the Joule GPS can operate in one of two modes: Lap Mode or Interval Mode. These modes refer
to the action taken when the [INTERVAL] button is pressed. The default is Lap Mode. The mode can be changed in the
Record Control section of the Device menu (see chapter 8).
• Lap Mode refers to the traditional way the interval button has operated on all computers from PowerTap: Pressing
the [INTERVAL] button completes one interval (or Lap) and begins the next interval (Lap). Interval 0 (zero), or Lap 0,
is the time recorded from the start of the ride to the first [INTERVAL] button press. The next button press completes
Lap 1 and begins Lap 2. The next button press completes Lap 2 and begins Lap 3, and so on...
• Interval Mode refers to tracking a rider’s intervals as opposed to laps. When the Joule GPS is set to record in
Interval Mode, the first press of the [INTERVAL] button begins interval 1. The next press of the button ends interval
one. The next press of the button begins interval 2. The next press of the button ends interval 2, and so on... The
period between intervals is referred to as the “rest” period in the Joule title bar but the rest/recovery period is not
listed on the Interval dashboard. Only intervals are listed on the Interval dashboard.
Below, the represents when the [INTERVAL] button is pushed.
INTERVAL MODE
Interval 1
Interval 2
LAP MODE
Start Ride
Lap 0
Lap 1
Lap 2 Lap 3
Lap 4
Start Ride

Joule GPS User Guide page 16
CHAPTER 3: DASHBOARDS
NAVIGATION DASHBOARD
The Navigation dashboard displays the path ridden from the start of the ride to your current position.
Additionally, the screen displays two configurable metric windows, interval markers (), waypoints (), and a
pacing icon (), depending upon which navigation feature is being used. This Dashboard is also used when
navigating to a Waypoint or following a route.
• Zoom the map in/out by pressing the PLUS (+) and MINUS (-) buttons.
• Zoom levels range from 75 meters to 80 kilometers (250 ft to 50 miles).
• When following a route, information related to total route distance or distance to the next turn appears
above the metrics. The route name will appear briefly in this area.
Press • [ENTER] to
advance through
Dashboards to the
Map screen.
INT
[ENTER]
Navigation Dashboard
9:34A71º
WATTS
184 96
CAD
01
2
Ofce
Home
5 mi
North arrow
(compass)
Waypoints
Zoom level
Zoom in
Zoom out
Position indicator
Intervals
Start
2 configurable metrics Satellite Reception Indicator.
The status bars appear while the
Joule GPS is working to get a full
fix or lock on your current position.
Each solid bar represents one
Satellite signal lock. A full position
fix occurs once the device has
locked on 4 or 5 satellites.
TIP: The GPS signal locking process can take anywhere from less than a
minute to several minutes, depending on weather, environmental
conditions and/or when the last time the device was powered up.
See Appendix D for detailed information on GPS signals.

CHAPTER 4: SENSORS
SENSOR OVERVIEW
The Sensor section of the Main Menu is the gateway to all bicycle and sensor associations. In this area you can:
• Define and pair various sensors (e.g. power meter, heart rate strap, speed, cadence, PowerCal, PowerBeam, etc.).
• Create a “bike” description by associating a specific group of sensors.
• Or, if you have already created a bike or two, you can select which bike description you are about to ride or “use,”
or which bike description to “edit.”
• Here, you can also access utilities related to calibration, such as calibrating the torque of a particular power meter
or calibrating the Resistance Unit (RU) of a PowerBeam indoor trainer.
Joule GPS User Guide page 17
INT
[ENTER]
Press & Hold
2 sec. to enter
Menus. Scroll
to Sensors;
Press •[ENTER];
Select a bike
Press •[ENTER];
Press +[PLUS] for
Use, -[MINUS] for Edit.
FROM DASHBOARD
Main Menu
Ride
History
Sensors
Training
Navigation
User
Device
Back to Dashboard
9:34A71º
Sensors
Select a Bike
Bike1
Bike2
Add a Bike
Manual Zero
Back to Main Menu
9:34A
Sensors
Select a Bike
Bike1
Bike2
Add a Bike
Manual Zero
Back to Main Menu
9:34A
Bike1
selected
Edit Use

Bike1
Name
Bike1
Weight
17.0
Pair All
Power Sensor
Power1
Cadence Sensor
None
Speed/Combo
None
Heart Rate Sensor
HeartRate1
RU Sensor
None
Delete Bike
Back to Sensors
9:34A
INT
[ENTER]
Press & Hold
3 sec. to enter
Menus. Scroll
to Sensors;
Press •[ENTER];
Scroll to either an
existing bike to edit
or to “Add a Bike” to
create a new bike.
Press •[ENTER]
FROM DASHBOARD
Main Menu
Ride
History
Sensors
Training
Navigation
User
Device
Back to Dashboard
9:34A71º
CHAPTER 4: SENSORS
Joule GPS User Guide page 18
Sensors
9:34A
Select a Bike
Bike1
Bike2
Add a Bike
Manual Zero
Back to Main Menu
Sensors
9:34A
Select a Bike
Bike1
Bike2
Add a Bike
Manual Zero
Back to Main Menu
DEFINING A BIKE
Display the bike definition screen by selecting an existing bike to “edit” or by adding a “new Bike.” The definition contains
the bike name, weight of the bike, and links to any associated sensors. Also, the bike definition can be deleted here.
Bike1
selected
Edit Use
Define a New Bike
Activate Existing Bike
Edit an Existing Bike
Manual Zero
Return to Dashboard
ACTION OPTION
Select “Add a Bike.” Edit the default name and weight of " NEW BIKE1." Pair the sensors individually or
by selecting "Pair All."
Select the bike name, choose Use (press the +[PLUS] button), and the bike will be activated (checkmark
appears near bike name).
Select the bike name, choose Edit (press the -[MINUS] button), and the bike defintion screen will appear.
A shortcut for power meter calibration. See information later in this chapter.
Return to dashboard by holding the [ENTER] button down for 2 seconds. You can also back out of the
menus to the dashboard by pressing the [INTERVAL] button.

Bike1
Name
Bike1
Weight
17.0
Pair All
Power Sensor
Power1
Cadence Sensor
None
Speed/Combo
None
Heart Rate Sensor
HeartRate1
RU Sensor
None
Delete Bike
Back to Sensors
9:34A
Power Sensor
Activate Sensor
Start Pairing
Name
g3CarbonC45
Sensor ID
11484
Circumference, mm
2096
Auto Zero
Yes
Delete Sensor
Manual Zero
Back to Bike
9:34A
Bike1
Name
Bike1
Weight
17.0
Pair All
Power Sensor
Power1
Cadence Sensor
None
Speed/Combo
None
Heart Rate Sensor
HeartRate1
RU Sensor
None
Delete Bike
Back to Sensors
9:34A
CHAPTER 4: SENSORS
Joule GPS User Guide page 19
ASSOCIATING SENSORS
For sensor association, there are two options: Pair All or Pair Individually.
PAIRING
Pair All
Pair Individually
Link Named Sensor
OPTION DESCRIPTION
Select “Pair All” to scan for all sensors awake and in broadcast range. The Joule GPS will display the ID of each
sensor found. Selecting Yes, when a sensor's ID is displayed, will link the sensor to the new bike definition (by
pressing the +[PLUS] button). Selecting No will instruct the Joule GPS to continue to scan for additional sensors of
the same type before searching for sensors of another type (by pressing the -[MINUS] button).
To pair sensors individually, scroll to and select the sensor. A menu of sensor names will appear. Select
“<new sensor>” to scan for an awake and present sensor. When a sensor of same type is found, the ID is displayed.
Selecting Yes will link the sensor with the defined bike. Selecting No wil instruct the Joule will continue to scan for
another sensor of the same type. The name “<none>” indicates no sensor has been linked to the defined bike.
Scroll to and select the sensor name. A menu of sensor names will appear. Scroll to the preferred predefined
sensor; select it. You will be asked to Use it or Edit it. Selecting “Use” will link the sensor to the bike definition.
PAIR INDIVIDUALLYPAIR ALL
g2MTB29
g3CarbonC45
<None>
<New Sensor>

Power Sensor
Activate Sensor
Start Pairing
Name
Power2
Sensor ID
2484
Circumference, mm
2096
Auto Zero
Yes
Delete Sensor
Manual Zero
Back to Bike
9:34A
Heart Rate Sensor
Activate Sensor
Start Pairing
Name
HeartRate1
Sensor ID
38742
PowerCal
Yes/No
Delete Sensor
Back to Bike
9:34A
Speed/Combo
Activate Sensor
Start Pairing
Name
Speed1
Sensor ID
4848
Type
Combo
Circumference, mm
2096
Delete Sensor
Back to Bike
9:34A
Cadence Sensor
Activate Sensor
Start Pairing
Name
Cadence1
Sensor ID
5624
Delete Sensor
Back to Bike
9:34A
RU Sensor
Activate Sensor
Start Pairing
Name
RU1
Sensor ID
130
Delete Sensor
Calibrate
Back to Bike
9:34A
CHAPTER 4: SENSORS
Joule GPS User Guide page 20
SENSOR TYPE DETAILS
For each type of sensor the detail screen displays items common to all sensors, including activation and pairing functions, an
editable name and an editiable ID. The “Start Pairing” option will automatically fill in the ID when pairing completes. If you know
the ID of a particular sensor you can manually enter it into the field.
Power
Heart Rate
Speed/Combo
Cadence
RU
SENSOR ADDITIONAL OPTIONS DESCRIBED
If your power meter is a hub-based power meter, like a PowerTap, the wheel circumference can be entered here. The
default wheel size of 2096mm represents a 700x23 wheel. Ignore circumference if your power meter is not hub-based.
Auto Zero and Manual Zero options refer to calibration and are discussed in the following pages.
The PowerCal option is set automatically, during the paring process, when the Joule GPS determines that the present
HR strap is a Powercal.
The type of speed sensor is determined automatically during the pairing process (either a combination speed and
cadence or a speed-only sensor). Enter the circumference of your wheel. The default wheel size is 2096 mm (700x23).
No additional options.
Resistance Unit or RU is associated with CycleOps PowerBeam trainers and indoor cycles.
Other manuals for Joule GPS
3
This manual suits for next models
1
Table of contents
Other PowerTap GPS manuals
Popular GPS manuals by other brands

Garmin
Garmin Personal Navigator GPS 40 Owner's manual & reference

Icar
Icar IK207 user manual

Magellan
Magellan RoadMate 3000T - Automotive GPS Receiver installation instructions

Scientech Technologies
Scientech Technologies ST2276 operating manual

Garmin
Garmin GPSMAP 162 Sounder Specifications

Xirgo
Xirgo XT6350 user guide