PROEL PLBR24 User manual

REGIA LIGHT 24/48
LIGHT MIXER 24/48
PLBR24

43
Double Preset
1. Press Mode Select Button to enter A Double Preset Mode.
2. In this mode, Channel Sliders 1-24 and channel sliders 25-48 both control Channel 1-24
3. Master A controls channel Slider 1-24 while Master B controls Channel Sliders 25-48.
4. In this Mode, no scene could be recorded.
Example
1. Enter the Double Preset Mode.
2. Push Channel Sliders 1 to 6 to the top and move Channel Sliders 19 to 24 to the maximum.
3. Move Master A and B to the same level and push them to the same direction, you will get a
scene.
TECHNICAL SPECIFICATIONS
Power Input . . . . . . . . . . . . . . . . . . . . . . . . . . . . . . . . . . . . . . . . . . . . . . . . . . . . . . . . . . . . . . . . . . . . . . . . . . DC 12~20V, 500 mA min.
DMX Output . . . . . . . . . . . . . . . . . . . . . . . . . . . . . . . . . . . . . . . . . . . . . . . . . . . . . . . . . . . . . . . . . . . . . . . . . . . . . . . . . . . 3 pin female XLR
MIDI Signal . . . . . . . . . . . . . . . . . . . . . . . . . . . . . . . . . . . . . . . . . . . . . . . . . . . . . . . . . . . . . . . . . . . . . . . . . . 5 pin standard interface
Audio Input . . . . . . . . . . . . . . . . . . . . . . . . . . . . . . . . . . . . . . . . . . . . . . . . . . . . . . . . . . . . . . . . . . . . . . . . . . . . . . . . . . . . . . . . . 100 mV~1Vpp
Fuse(internal) . . . . . . . . . . . . . . . . . . . . . . . . . . . . . . . . . . . . . . . . . . . . . . . . . . . . . . . . . . . . . . . . . . . . . . . . . . . . . . F0.5A 250V 5x20mm
Dimensions . . . . . . . . . . . . . . . . . . . . . . . . . . . . . . . . . . . . . . . . . . . . . . . . . . . . . . . . . . . . . . . . . . . . . . . . . . . . . . . . . . . . . . . 711x264x85mm
Weight(appro.) . . . . . . . . . . . . . . . . . . . . . . . . . . . . . . . . . . . . . . . . . . . . . . . . . . . . . . . . . . . . . . . . . . . . . . . . . . . . . . . . . . . . . . . . . . . . . . . 7.2 kg
Attention!
1.Toretainyourprogramsfromloss,thisunitmustbepowerednotlessthantwohoureverymonth.
2. The Segment Display shows "LOP" if the voltage is too low.

42
e Mode
programs will run in sequential order starting in the order of program number.
e Segment Display will read the running program number.
programs will be controlled by the same Speed Slider .
ss the MODE SELECT BUTTON and select " CHNS SCENES".
ss the PARK BUTTON to select SINGLE CHASE MODE. A red LED will indicate this selection.
Mode
l run all programs synchronously.
programs can be controlled by the same SLIDER SPEED, or each programs speed may be
olled individually. (See Speed Setting ).
ss the MODE SELECT BUTTON and select "CHNS SCENES".
ss the PARK BUTTON to select MIX CHASE MODE. A yellow LED will indicate this selection.
er Display
e 3-Digit Segment Display is used to display intensity percentage or absolute DMX value.
change between percentage and absolute value:
and hold the Shift Button. While holding down the Shift button press the % or 0-255 Button
itch between percentage and absolute values.
he Segment Display reads, for example, "076", it means a percentage value 76%.
Segment Display reads "076.", it means the DMX value 76.
and Home
nd function takes channels temporally out from a chase, when the chase is running, and gi-
ou manual control over the channel.
ss and hold the Blind Button and tap the relative Flash Button you want to temporarily take
the chase.
return to normal chase again press and hold the Home Button and push the Flash Button
want to return to normal chase.
CHNSSCENESMode,press down the buttonyoucanchangethechasingmode of programs
een Single Mode and Mix Mode.
ouble Preset Mode, pressing down this button is equal to pushing Master Slider B to the top.
ingle Preset Mode, this button could temporally record current output, with Master Slider
adjust.
and Kill
ADD/KILL Button changes the mode of the flash buttons. Normally the flash buttons are in
mode, whereas pressing any flash button will not kill other scenes, allowing multiple scenes
on at a time.
ill mode is activated by pressing the Add/Kill button and illuminating the LED above it. Pres-
any flash button will kill other active SCENE or Program.
Mode, the killed program does not stop running but can not output.
3
INDICE
Caratteristiche……………………………………………………………………………………………………………………………… 5
Istruzioni Generali ……………………………………………………………………………………………………………………… 5
1. Presentazione ………………………………………………………………………………………………………………………… 7
1.1 Pannello frontale …………………………………………………………………………………………………………… 7
1.2 Pannello posteriore
………………………………………………………………………………………………………… 9
2. Guida al funzionamento ………………………………………………………………………………………………………… 10
2.1 Inizio programmazione
…………………………………………………………………………………………………… 10
2.1.1 Attivazione di record ……………………………………………………………………………………………… 10
2.1.2 Sicurezza dei programmi ……………………………………………………………………………………… 10
2.1.3 Programmazione scene ………………………………………………………………………………………… 11
2.2 Editing
……………………………………………………………………………………………………………………………… 12
2.2.1 Attivazione di edit …………………………………………………………………………………………………… 12
2.2.2 Cancellazione di un programma …………………………………………………………………………… 13
2.2.3 Cancellazione di tutti i programmi ………………………………………………………………………… 13
2.2.4 Annullamento di una scena o di più scene…………………………………………………………… 13
2.2.5 Cancellazione di un passo o di più passi ……………………………………………………………… 13
2.2.6 Inserimento di un passo o di più passi ………………………………………………………………… 14
2.2.7 Modifica di un passo o di più passi ……………………………………………………………………… 15
2.3 Funzionamento ……………………………………………………………………………………………………………… 15
2.3.1 Funzionamento di programmi chase …………………………………………………………………… 15
2.3.2 Funzionamento di un programma in Audio ………………………………………………………… 16
2.3.3 Funzionamento di un programma con lo slider SPEED………………………………………… 17
2.3.4 Funzionamento di un programma beat standard ………………………………………………… 17
2.4 Cambiamento della modalità SPEED tra 5 minuti e 10 minuti ……………………………………… 18
3. Funzionamento MIDI ……………………………………………………………………………………………………………… 18
3.1 Impostazione MIDI IN …………………………………………………………………………………………………… 18
3.2 Impostazione MIDI OUT ………………………………………………………………………………………………… 19
3.3 Uscita dall’impostazione MIDI ……………………………………………………………………………………… 19
3.4 Ricezione del dump del file MIDI ………………………………………………………………………………… 19
3.5 Invio del dump del file MIDI …………………………………………………………………………………………… 20
3.6 Installazione …………………………………………………………………………………………………………………… 20
Sommario delle Funzioni Principali ………………………………………………………………………………………… 21
Caratteristiche Tecniche …………………………………………………………………………………………………………… 23

41
4. BRIEF OF MAIN FUNCTIONS
Tap Sync Button:
1. Reverse the direction of all the scenes:
Press the ALL REV Button, all the scenes should change their directions.
2. Reverse the chasing direction of all the programs with speed control.
Press the Chase Rev Button.
3. Reverse the chasing direction of all the programs with standard beat:
Press the Beat Rev Button.
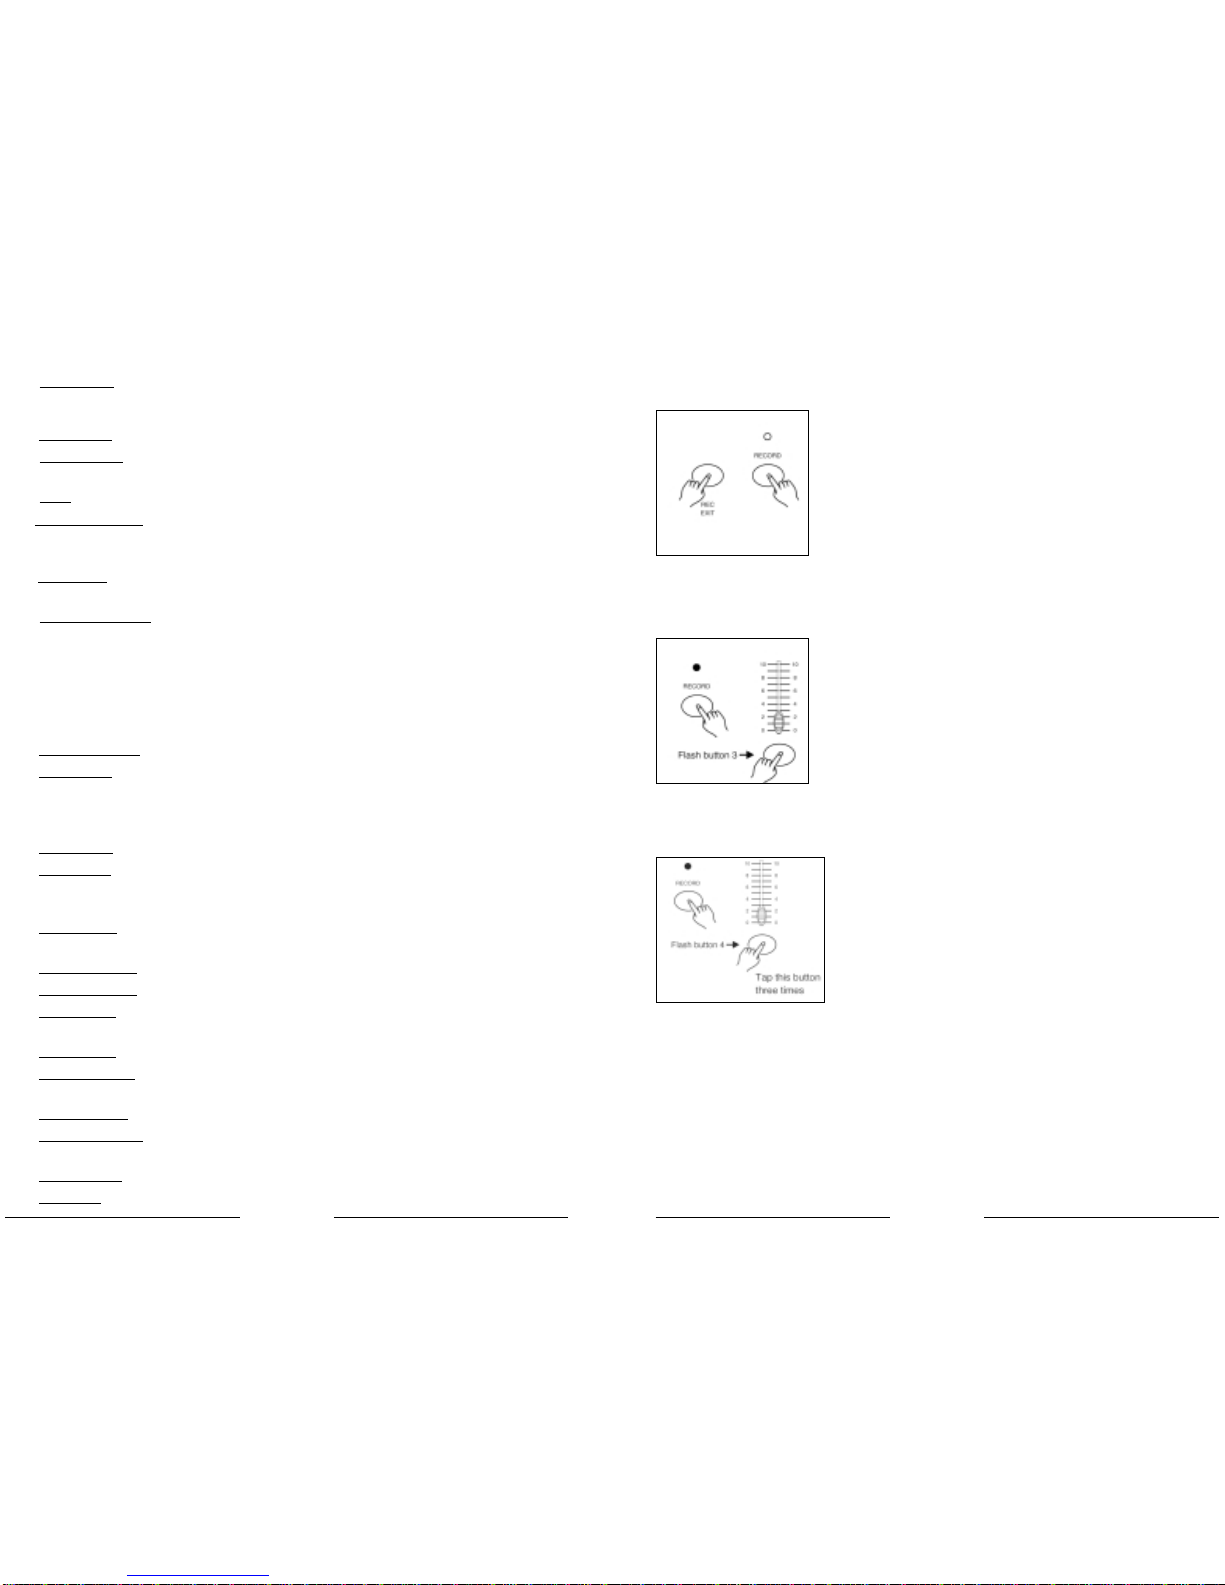
4. Revers chasing direction of any program:
Press and hold down the Rec One Button, then press down the Flash Button corresponding to
your desired program and release together.
Fade Time
1. The amount of time it will take for the dimmer to go from zero output to maximum
output, a nd vice verse.
2. Fade time is adjusted through the Fade Time Slider, which varies from instant to
10 minutes.
Tap Sync button
1. The Tap Sync button is used to set and synchronize the chase rate (the rate at which
all scenes will sequence) by taping the button several times. The chase rate will synchronize
to the time of the last two taps. The LED above the Step Button will flash at the new chase
rate. The chase rate may be set anytime whether or not a program is running.
2. Tap Sync will override any previous setting of the speed slider control until the slider is
moved again.
3. Use of Tap Sync in setting a standard beat is the same with speed control slider.
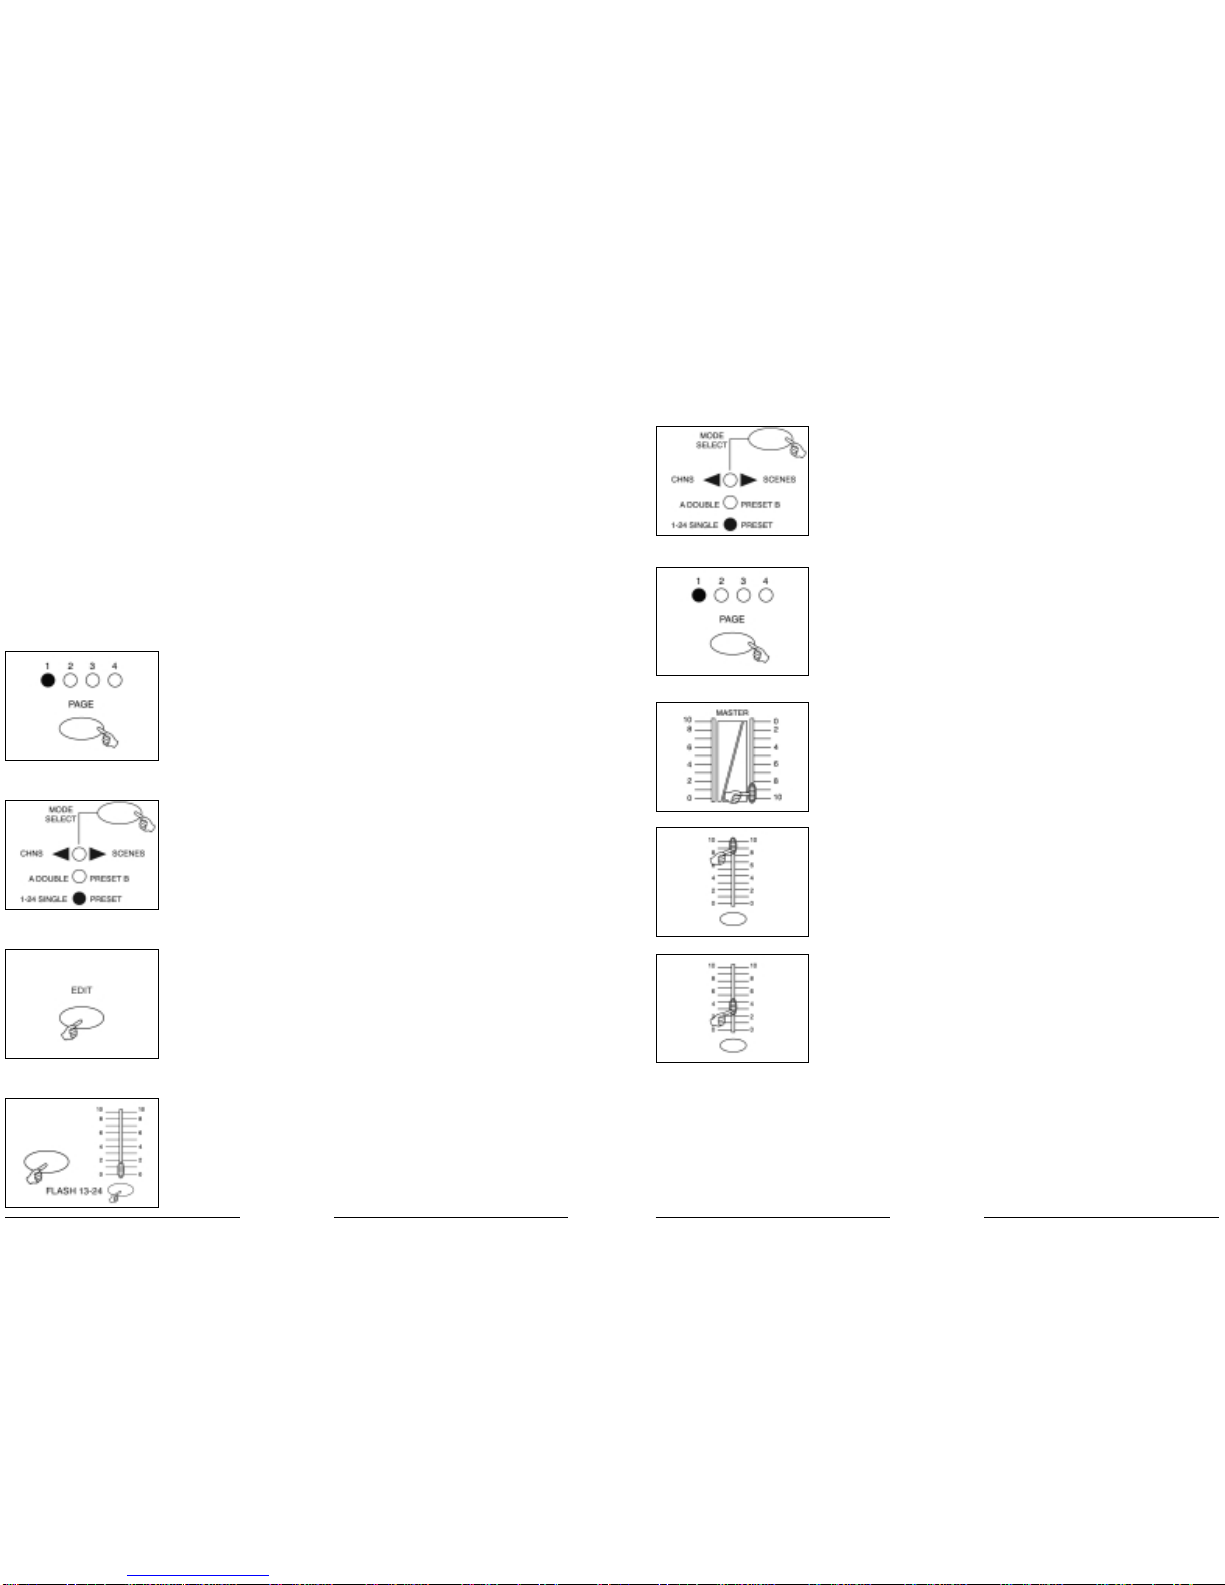
Master Slider
Master Slider control provides proportional level control over all channels and scenes
with the exception of the Flash Buttons. For example:
Whenever the Master slider control is at minimum all stage outputs will be at zero except
for any resulting from a Flash Button or FULL ON Button.
If the Master is at 50%, all outputs will be at only 50% of the setting of current channel
or scenes except for any resulting from a Flash Button or FULL ON Button.
If the Master is at full all outputs will follow the unit setting.
MasterA alwayscontrols outputs ofchannels. Master Bcontrols the programor a sceneexcept
in Double Preset Mode.
ATTERISTICHE
e per l’acquisto. Questo prodotto ha le seguenti caratteristiche:
anali DMX in output
sibilità di creare scene tramite l’uso manuale di 48 fader
gine di programmi, ognuna capace di contenere fino a 12 programmi
programma consiste di max 4600 passi (i passi compongono le scene registrate)
ogrammi possono essere attivati da AUDIO / SPEED SLIDER / STANDARD BEAT, ecc.
zionare uno o più programmi per volta
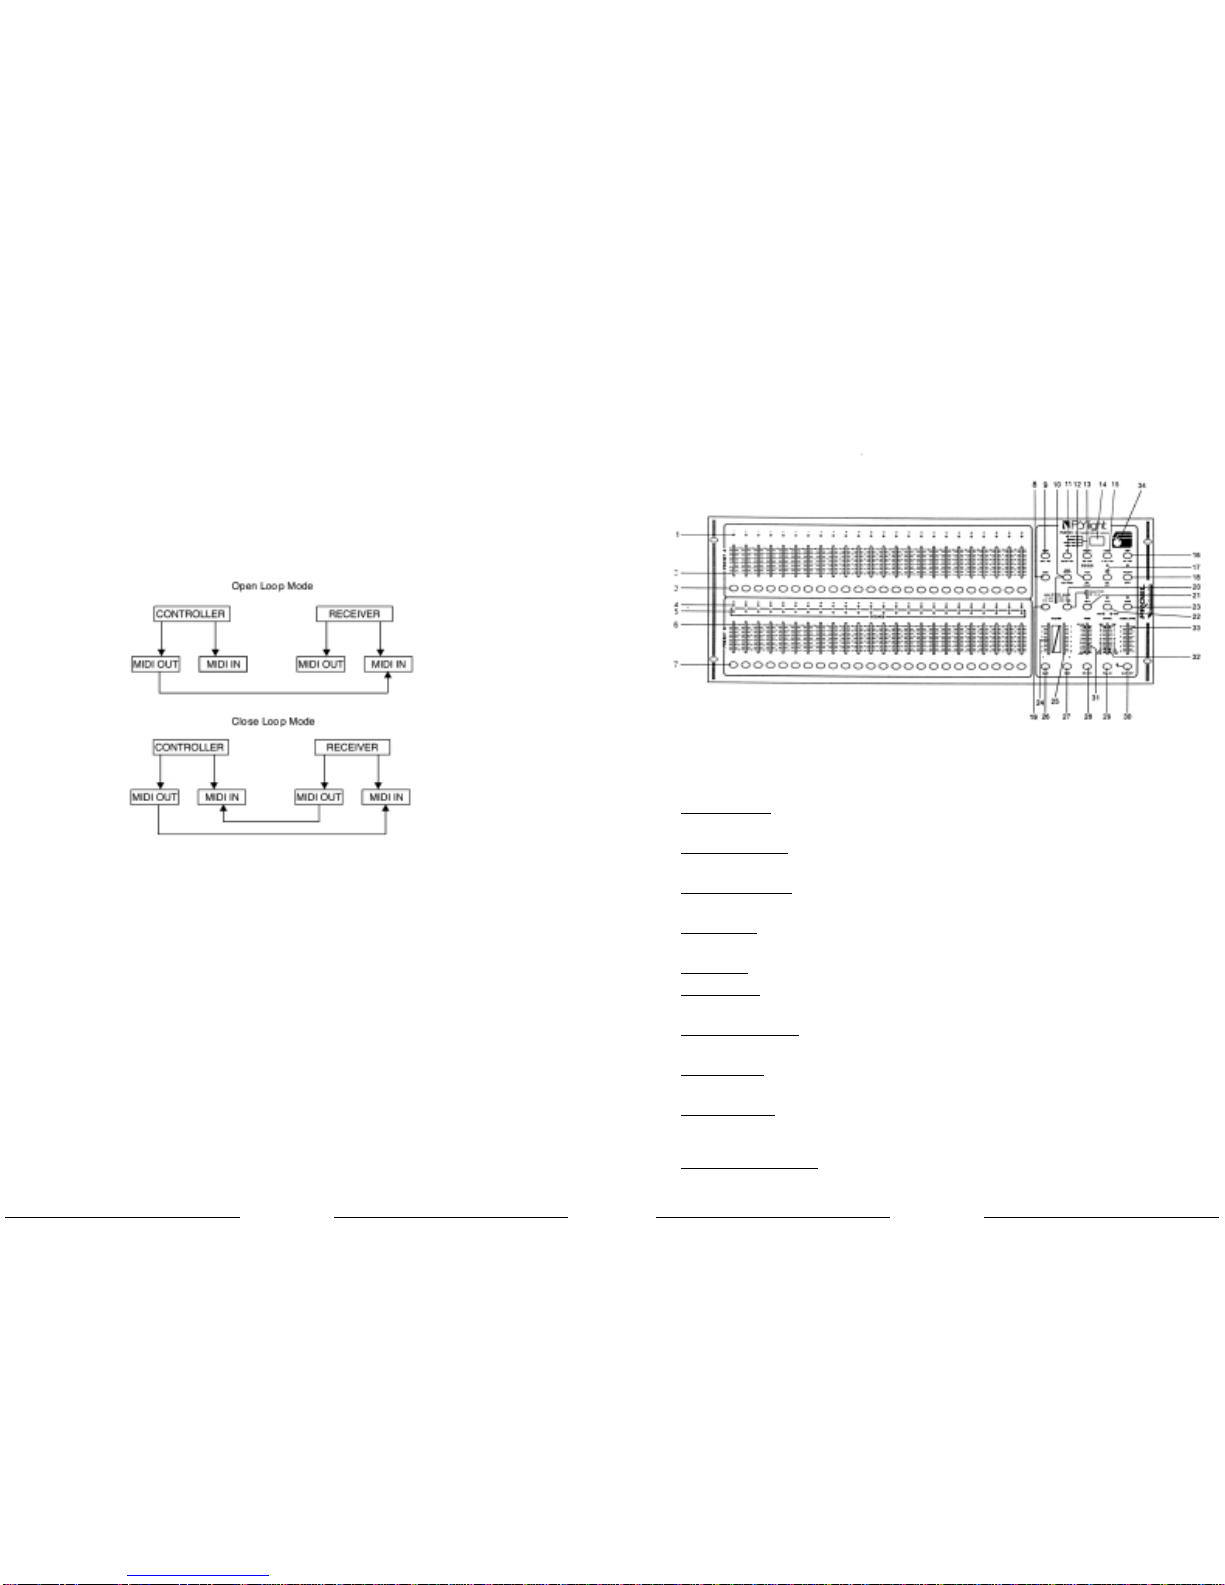
o dump del file MIDI e ricezione del dump del file MIDI
kout master
dice di registrazione permette di proteggere il programma da atti intenzionali
rità DMX selezionabile per il cavo DMX
trollo MIDI su 48 canali, 48 programmi, FULL ON, BLACKOUT, ecc.
moria in caso di mancanza di alimentazione
: È richiesta la conoscenza di MIDI e DMX per utilizzare al meglio questa unità.
UZIONI GENERALI
ere attentamente le istruzioni contenute nel presente manuale in quanto forniscono infor-
ni importanti relative alla sicurezza durante l’utilizzo e la manutenzione. Conservare il pre-
manuale insieme all’unità allo scopo di poterlo consultare in futuro.
nità viene venduta o ceduta ad un altro operatore, accertarsi che includa sempre il relativo
ale affinché il nuovo proprietario possa leggerne il funzionamento e le relative istruzioni.
NZIONE
are che nell’apparecchio penetrino liquidi infiammabili, acqua o oggetti metallici.
aso di penetrazione di liquido nell’apparecchio, staccare immediatamente la presa di ali-
tazione.
aso di problemi di funzionamento di una certa entità, cessare immediatamente l’utilizzo e ri-
ersi al proprio rivenditore per un controllo oppure contattare direttamente PROEL. La mano-
sione del prodotto prevede la decadenza immediata della garanzia.
aprire l’apparecchio. Nessun componente può essere riparato dall’utente.
are di eseguirne la riparazione. Eventuali interventi da parte di personale non qualificato ne
ocherebbe danni o il funzionamento difettoso. Contattare il rivenditore più vicino.
RTENZE
parecchio non è stato ideato per uso domestico.
curarsi che l’apparecchio sia intatto, dopo aver tolto l’imballo. In caso di dubbio, evitare di
zzare lo stesso e rivolgersi ad un rivenditore autorizzato.
re i materiali per l’imballaggio (plastica, schiumogeni, chiodi etc.) fuori dalla portata dei bambini.
lasciare l’apparecchio incustodito; evitare che i bambini giochino o manomettano lo stesso.
utilizzare l’apparecchio nei seguenti casi:
uoghi soggetti ad eccessiva umidità.
uoghi soggetti a vibrazioni o a possibili urti.
uoghi dove la temperatura sia superiore a 45°C/113°F o inferiore a 2° C/35.6°F.
eggere l’apparecchio da condizioni di eccessiva umidità o aridità (le condizioni ideali sono
35% e 80%).
smontare e apportare modifiche all’apparecchio.
4

mplementation
ing receiving and sending MIDI data, all MIDI scenes and channels being run will automa-
y paused if there is no response within 10 minutes.
ngreceiving andsendingfile dump,thecontroller willautomaticallysearch fororsend De-
D of 55H(85), a file named DC2448 with an extension of "BIN(SPACE)".
dump allows this controller to send its MIDI data to next unit or other MIDI devices.
ere are two types of file dump mode described as below:
e controller will send and receive Note On and Note Off data via the Flash buttons.
NO. Velocity Functions
9 Program master Select or deselect of program 1-48
7 Channel intensity activate Channel 1-48
FULL -ON
DARK
HOLD
AUDIO enable or disable
CHNS SCENES
DOUBLE PRESET Mode
SINGLE PRESET Mode
Step
BLACK OUT
40 5
1. PRESENTAZIONE
1.1 Pannello Frontale
1. LED
IN PRESET A Mostrano l’intensità luminosa del canale attinente numerato da 1
a 24.
2. SLIDERS CANALI 1-12 Questi 24 sliders vengono utilizzati per controllare e/o programma-
re l’intensità dei canali 1-24.
3. PULSANTI FLASH 1-12 Questi 24 pulsanti vengono utilizzati per portare un singolo canale
alla massima intensità.
4. LED PRESET B Mostrano l’intensità luminosa del canale attinente numerato da 25
a 48.
5. LED SCENE Si accendono quando le scene attinenti sono attive.
6. SLIDERS CANALI Questi 24 sliders vengono utilizzati per controllare e/o programma-
re l’intensità dei canali 25-48.
7. PULSANTI FLASH 13-24 Questi 12 pulsanti vengono utilizzati per portare un singolo canale
alla massima intensità. Vengono anche utilizzati per programmare.
8. PULSANTE DARK Questo pulsante viene utilizzato per interrompere momentanea-
mente l’output generale.
9. DOWN / BEATREV DOWNserveamodificareunascenanellamodalitàEDIT.BEATREV
viene utilizzato per invertire la direzione del chasing di un pro-
gramma con pulsazione regolare.
10. MODE SELECT / REC SPEED Ognipressioneattiveràlamodalitàdifunzionamentonelseguenteor-
dine: CHNS/SCENES, DOUBLE PRESET E SINGLE PRESET. REC SPEED: impo-
sta la velocità di qualunque gioco programmato nella modalità Mix.

3.3 Exit MIDI Setting
PressandholddowntheRecordbutton.WhileholdingdowntheRe-
cord button tap the Rec Exit button to exit MIDI setting.
3.4 Receiving MIDI File Dump
Tap the Flash button 3 three times while holding down the Record
button, the Segment Display reads "IN" indicating the controller is
ready to receive MIDI file dump.
3.5 Sending MIDI File Dump
Tapthe Flashbutton 4 threetimes whileholding downthe Record
button, the Segment Display reads "OUT" indicating the control-
ler is ready to send a file.
NOTE:
1. During file dump, all other operations will not function. Functions will automatically
return when the file dump is completed.
2. File dump will be interrupted and stop if errors occur or power failure.
396
P/ CHASE REV Up viene utilizzato per modificare una scena nella modalità EDIT.
CHASE REV serve a invertire la direzione del chasing di una scena
sotto il controllo slider SPEED.
ULSANTE PAGE Premere per selezionare le pagine delle scene da Pagina 1 a 4.
ELETE / REV ONE Cancella un qualunque passo di una scena oppure inverte la dire-
zione del chasing di un qualunque programma.
ISPLAYMostra l’attività corrente o lo stato di programmazione.
NSERT / % OR 0-255 Insert serve ad aggiungere un passo o più passi in una scena.
% OR 0-255 viene utilizzato per cambiare il valore del ciclo sul di-
splay da % a 0-255.
DIT / ALL REV EDIT viene utilizzato per attivare la modalità EDIT.ALL REV serve ad
invertire la direzione del chasing di tutti i programmi.
DD OR KILL / REC EXIT In modalità ADD,scene multiple opulsantiFLASH saranno accesial-
lo stesso tempo. Nella modalità KILL, premendo qualsiasi pulsante
FLASH verrà neutralizzata qualunque altra scena o programma. REC
EXIT viene utilizzato per uscire da PROGRAM o EDIT.
ECORD / SHIFT RECORD viene utilizzato per attivare la modalità RECORD o per pro-
grammare un passo. Le funzioni Shift vengono utilizzate solo con
altri pulsanti.
ULSANTE MASTER A Porta i canali 1-12 al massimo dell’impostazione attuale.
ULSANTE PARK Serve a selezionare SINGLE / MIX CHASE, porta i canali 13-24 al mas-
simo dell’impostazione attuale, oppure programma momentanea-
mente una scena nello slider MASTER B, a seconda della modalità
corrente.
ULSANTE HOLD Questo pulsante viene utilizzato per mantenere la scena corrente.
ULSANTE STEP Questo pulsante viene utilizzato per andare al successivo passo
quando lo slider SPEED viene regolato completamente verso il bas-
so o in modalità EDIT.
ULSANTE AUDIO Attivalasincronizzazioneaudiodichasee glieffettidiintensitàmu-
sicale.
LIDER A DI MASTER Questo slider controlla l’output globale di tutti i canali.
LIDER B DI MASTER Questo slider controlla il chase di tutti i programmi.
ULSANTE BLIND Questa funzione porta il canale fuori dal chase di un programma in
modalità CHNS / SCENE.
ULSANTE HOME Questo pulsante serve a disattivare il BLIND.
ULSANTE TAP SYNC Premendoripetutamentequestopulsantesistabiliscelavelocitàdi
chase.
ULSANTE FULL ONQuesta funzione porta l’output totale alla massima intensità.
ULSANTE BLACK OUT Questo pulsante serve a neutralizzare tutto l’output ad eccezione
di quello risultante da FLASH e FULL ON.
LIDER FADE TIME Serve a regolare il tempo di FADE.
LIDER SPEED Serve a regolare la velocità di chase.

DI OPERATION
etting MIDI IN 1. Tap the Flash button 1 three times while holding down the Re-
cord button, the Segment Display reads "CHI" indicating MIDI IN
channel setup is available.
2. Tap the Flash button numbered from 1-16 to assign MIDI IN
channel 1-16, the relevant channel LED lights indicating MIDI IN
channel is set.
etting MIDI OUT
1. Tap the Flash button 2 three times while holding down the Record
button,theSegmentDisplayreads "CHO" indicating MIDI OUTchan-
nel setup is available.
2.TaptheFlashbuttonnumberedfrom1-16toassignMIDIOUTchan-
nel 1-16, the relevant channel LED lights indicating MIDI OUT
channel is set.
38 7
33. SLIDER AUDIO LEVEL Questo slider controlla la sensibilità dell’input Audio.
34. PULSANTE FOG MACHINE Serve ad attivare a distanza macchine del fumo che abbiano input
DMX.
1.2 Pannello posteriore
35. INTERRUTTORE POWER Questointerruttorecontrolla l’accensioneo lo spegnimentodell’a-
limentazione.
36. DC INPUT DC 12-20V, 500 mA Min.
37. MIDI THRU/OUT/INPorta MIDI per la connessione ad un sequenziale o ad un disposi-
tivo MIDI.
38. DMX OUT Questo connettore manda il valore DMX all’apparecchio DMX o al
DMX pack.
39. DMX POLARITÀ SELECT Serve a selezionare la polarità DMX.
40. INPUT AUDIO Questo jack accetta un segnale del livello audio in input che va da
100mV a 1Vpp.
41. INPUT REMOTE BLACK OUT e FULL ONpossono essere controllati tramite un teleco-
mando utilizzando un jack stereo standard da 1/4".
42. CONNETTORE FOG MACHINE Questo connettore prevede l’input del comando DMX della mac-
china del fumo.

37
2.3.4 Running a Program With the Standard Beat
1. Be sure the Audio is disengaged. Tap the Mode Select button to
select CHNS SCENE mode.
2. Tap the Park button to select Mix Chase mode, the LED lights in-
dicating this selection.
3. Select your program as described above.
4. Move the Speed slider until the Segment Display reads your de-
sired value.
You may tapthe Tap Sync button twice to define your beat time.
5. While pressing and holding down the Rec Speed button, tap the
Flash button(25-48) that stores the program.
6. The program will then run with the set time or beat when enga-
ged.
7. Repeat steps 4 and 5 to set a new beat time.
2.4 Change the Speed Mode between 5 Minutes and 10 Minutes
1. Press and hold the Record button.
2. Tap the Flash button 5 or 10 three times while holding down the
Record button.
3. The 5MIN or 10MIN should light up indicating the Speed slider is
set to run in the 5 or 10 minute mode.
8
UIDA AL FUNZIONAMENTO
izio Programmazione
Attivazione di Record
mere e mantenere premuto il pulsante RECORD.
ntenendo premuto il pulsante RECORD, premere i pulsanti FLASH 1, 6, 6 e 8 in sequenza.
ciare il pulsante Record, il LED RECORD si accende e a questo punto si può iniziare la pro-
mmazione dei modelli chase.
: La prima volta che l’unità viene accesa, l’impostazione di default del RECORD CODE è data
dai pulsanti Flash 1, 6, 6 e 8.
sibile cambiare il Record Code per proteggere i propri programmi.
Sicurezza dei programmi
roteggere i propri programmi da input dati da altre persone, è possibile cambiare il Record
erire l’attuale Record Code (Pulsanti FLASH 1, 6, 6 e 8).
mere e mantenere premuti i pulsanti RECORD ed EDIT allo stesso tempo.
ntenendo premuti i pulsanti RECORD ed EDIT, premere il pulsante FLASH desiderato ed inseri-
un nuovo Record Code. Il Record Code consiste in 4 pulsanti FLASH (lo stesso pulsante o pul-
nti diversi). Assicurarsi che il nuovo Record Code consista in 4 pulsanti FLASH.
erire il nuovo Record Code una seconda volta, tutti i LED canali e i LED scene lampegge-
no 3 volte. A questo punto il Record Code è cambiato.
cita dalla modalità Record. Premere il pulsante REC EXIT premendo e mantenendo premuto il
sante RECORD, lasciare i 2 pulsanti simultaneamente. A questo punto la modalità Record è
attivata.
RTANTE:Ricordare sempre diabbandonare lamodalità Record quandonon siintende con-
e la programmazione, altrimenti non si potrà entrare in modalità Record a causa del cam-
el Record Code.
: Se la seconda volta che viene inserito il nuovo Record Code, differente da quello inserito
la prima volta, i LED non lampeggeranno, significa che il tentativo di cambiare il Record
Code non è andato a buon fine.
do si inserisce un nuovo Record Code per la prima volta e poi si desidera cancellare il nuo-
cord Code si può premere e mantenere premuti i pulsanti RECORD ed EXIT simultaneamente
scire.

36
Running a Program To Audio
1.Usebuilt-inmicrophoneorplugtheaudiosource into the RCA Au-
dio jack.
2. Select your program as described above.
3. Tap the Audio button until its LED lights, indicating Audio mode is
active.
4. Use the Audio Level slider to adjust the music sensitivity.
5.Toreturntonormalmode,taptheAudiobuttonasecondtimecau-
sing its LED goes out, the Audio mode is disengaged.
Running a Program With the Speed Slider
1.BesuretheAudiomodeisdisengaged,thatis,theAudioLEDgoes
out.
2. Select your program as described above.
3. Move the Speed slider to the SHOW MODE position(the bottom),
then tap the Flash button (25-48) while pressing and holding down
the Rec Speed button, the corresponding program will not run with
the Standard beat any longer.
4.NowyoumaymovetheSpeedSlidertoselectyourdesiredspeed.
NOTE: The step 3 is not necessary if the selected program is not re-
corded with the Standard Beat.
AUDIOAUDIO
C SPIN
2.1.3 Programmazione scene
1. Attivare Record.
2. Selezionare lamodalità 1-48Single premendoilpulsanteModeSe-
lect.Questo garantirà ilcontrollodi tutti i48 canalidurantela pro-
grammazione. Assicurarsi che Master A e B siano entrambi im-
postati al massimo (Master A è al massimo quando posizionato
completamenteinalto,mentreMasterBèalmassimoquandopo-
sizionato completamente in basso).
3. Creazione di una scena desiderata utilizzando gli slider canale 1-
48.Allo0%oaDMX0,questisliderdovrebberoessereinposizione
0, e al 100% o a DMX 255, questi slider dovrebbero essere in po-
sizione 10.
4. Una voltache lascena sia soddisfacente,premere ilpulsanteRe-
cord per programmare la scena come un passo nella memoria.
5. Ripetere il passo 3 e il passo 4 fino a che tutti i passi desiderati
non siano stati programmati nella memoria. Si possono program-
mare fino a 1000 passi nella memoria.
6. Selezionare unchase banko scenemaster perarchiviare ipropri
programmi. Premere il pulsante Page per selezionare una pagina
(Page 1-4) per memorizzare le scene.
7. Premere il pulsante Flash tra 13-24 mantenendo premuto il pul-
sante Record. Tutti i LED lampeggeranno indicando che le scene
sono state programmate nella memoria.
8. Si può continuare a programmare oppure uscire. Per uscire dal-
lamodalitàProgram,premereilpulsanteExitmantenendopremuto
il pulsante Record. Il LED Record dovrebbe spegnersi.
9

2.3 Running
2.3.1 Running Chase Programs
1. Tap the Mode Select button to select CHNS SCENE mode indica-
ted by the red LED.
2. Tap the Page button to select the correct page the program you
wish to run is located.
3. Push Master Slider B to its maximum position(fully down).
4. Move the desired Channel slider (25-48) to its maximum position
totrigger the program,andthe program willfadein dependingupon
current fade time.
Youmay press and hold down the relevant Flash button (25-48) to trig-
ger the program.
5. Move the Channel slider to adjust the output of the current pro-
gram.
35
MPIO: Programmazione di un chase a 16 passi con i canali 1-32 al completo in sequenza nel
nte Flash 25 della Pagina 1.
Attivare RECORD.
Portare Master A e B nella posizione massima e lo slider FADE verso l’alto.
Premere il pulsante MODE SELECT per selezionare la modalità 1-48 Single.
Portare lo slider del canale 1 in alto, il suo LED si accende alla massima intensità.
Premere il pulsante RECORD per programmare questo passo nella memoria.
Ripetere i passi 4 e 5 fino a che gli slider canali 1-16 non saranno stati programmati.
Premere il pulsante PAGE in modo che si accenda il LED PAGE 1.
Premere il pulsante FLASH25 mantenendo premuto il pulsante RECORD. Tutti i LED lampegge-
ranno indicando che il chase è stato programmato nella memoria.
diting
Attivazione di Edit
1. Attivare RECORD.
2. Utilizzare il pulsante PAGE per selezionare la pagina del program-
ma che si desidera editare.
3. Premere il pulsante MODE SELECT per selezionare CHNS / SCENES.
4. Premere e mantenere premuto il pulsante EDIT.
5. Mantenendo premuto il pulsante EDIT, premere il pulsante FLASH
che corrisponde al programma che si desidera editare.
6. LasciareilpulsanteEDIT,ilLEDdellascenaattinentedovrebbeac-
cendersi indicando che la modalità Edit è attivata.
EDIT
10

4. Tap the Insert button to insert the step you've created before, all
LEDs will flash, indicating the step is inserted.
5. Exit Edit mode.
EXAMPLE: Insert a step with channels 1-12 fully on at a time between step
step 5 of program 35.
cord enable.
sh Channel sliders 1-12 to the top and record the scene as a step.
the Mode Select button to select CHNS SCENE mode.
the Page button until Page 2 LED lights.
the Flash button 35 while holding down the Edit button, the corresponding scene LED lights.
the Step button to scroll to the step 4.
the Insert button to insert the scene you've created before .
Modify a Step or Steps
1. Enter Edit mode.
2. Tap the Step button to scroll to the step you wish to modify.
3. Press and hold the Up button if you want to raise the intensity.
If you want to lower the intensity, press and hold down the Down
button.
4. While holding down the Up or Down button, tap the Flash button
corresponding to the DMX channel of the scene you wish to modify
untilyoureachthedesiredintensityvaluereadfromtheSegmentDi-
splay.ThenyoumaytaptheFlashbuttonsuntilyouaresatisfiedwith
the new scene.
5. Repeat steps 2, 3 and 4 until all the steps have been modified.
6. Exit Edit mode.
INSERT
UP
STEP
UP
34
2.2.2 Cancellazione di un programma
1. Attivare RECORD.
2. Usare il pulsante PAGE per selezionare la pagina del programma
che si desidera cancellare.
3. Mantenendo premuto il pulsante EDIT, premere il pulsante FLASH
(25-48) due volte.
4. Lasciare i due pulsanti, tutti i LED lampeggeranno indicando che
il programma è stato cancellato.
2.2.3 Cancellazione di tutti i programmi
1. Premere e mantenere premuto il pulsante RECORD.
2. Premere in sequenza i pulsanti FLASH 1, 4, 2 e 3 mantenendo premuto il pulsante RECORD. Tutti i
LED lampeggeranno indicando che tutti i programmi memorizzati sono stati cancellati.
2.2.4 Annullamento di una scena o di più scene
1. Attivare RECORD.
2. Registrare una scena o più scene.
3. Se non si è soddisfatti della scena o delle scene, è possibile pre-
mereilpulsanteREC CLEAR mantenendopremuto il pulsante RECORD,
tutti i LED lampeggeranno indicando che le scene sono state an-
nullate.
2.2.5 Cancellazione di uno o più passi
1. Entrare in modalità EDIT.
2. PremereilpulsanteSTEP perscorrerefinoalpassochesidesidera
cancellare.
EDIT
tap this button twice
11
REC
CLEAR
STEP

2.2.5 Delete a Step or Steps 1. Enter the Edit mode.
2. Tap the Step button to scroll to the step you wish to delete.
3. Tap the Delete button when you reach to the step you wish to de-
lete, all LEDs will flash briefly indicating the deletion of the step.
4.Continue steps2and 3 untilall the unwantedsteps have beende-
leted.
5. Tap the Rec Exit button while pressing and holding down the Re-
cord button, the Scene LED goes out, indicating the exit of Edit mo-
de.
EXAMPLE: Delete the third step of the program on Flash button 25 on Page 2
1. Record enable.
2. Tap the Mode Select button to select CHNS SCENE mode.
3. Tap the Page button until Page 2 LED lights.
4. Tap the Flash button 25 while pressing and holding down the Edit button, the Scene LED lights.
5. Tap the Step button to scroll to the third step.
6. Tap the Delete button to delete the step.
7. Tap the Rec Exit button while pressing and holding down the Record button to exit Edit mode..
2.2.6 Insert a Step or Steps
1. Record a scene or scenes you wish to insert.
2. Be sure you're in CHNS SCENE and Enter the Edit mode.
3. Tap the Step button to scroll to the step which you wish to insert
before. You may read the step from the Segment Display.
DELETE
STEP
STEP
3312
3. Premere il pulsante DELETE quando viene raggiunto il passo che
si desidera cancellare, tutti i LED lampeggeranno brevemente in-
dicando la cancellazione del passo.
4. Continuare allo stesso modo con il passo 2 e 3 fino a quando tut-
ti i passi indesiderati non saranno stati cancellati.
5. Premere il pulsante REC EXIT premendo e mantenendo premuto il
pulsanteRECORD,ilLEDSCENE sispegneindicandol’uscitadallamo-
dalità EDIT.
MPIO: Cancellazione del terzo passo del programma sul pulsante FLASH 25 della Page 2.
Attivare RECORD
Premere il pulsante MODE SELECT per selezionare la modalità CHNS tu SCENE.
Premere il pulsante PAGE fino a quando il LED di Page 2 non lampeggerà.
Premere il pulsante FLASH 25premendo e mantenendo premuto il pulsante EDIT, il LED Sce-
ne si accenderà.
Premere il pulsante STEP per scorrere fino al terzo passo.
Premere il pulsante Delete per cancellare il passo.
Premereil pulsante RecExit premendoemantenendo premuto ilpulsante Recordperusci-
re dalla modalità Edit.
nserimento di uno o più passi
1. Registrare la scena (o più scene) che si desidera inserire.
2.AssicurarsidiessereinCHNS/SCENEedentrareinmodalitàEDIT.
3. PremereilpulsanteSTEP perscorrerefinoalpassochesidesidera
inserire prima. È possibile leggere il passo dal Display.
4. Premere il pulsante INSERT per inserire il passo creato preceden-
temente, tutti i LED lampeggeranno indicando che il passo è sta-
to inserito.
5. Uscire dalla modalità EDIT.
MPIO: Inserimento di un passo con i canali 1-12 totalmente attivi allo stesso tempo tra il pas-
e il passo 5 del programma 35.
Attivare RECORD.
Portare gli slider CANALI 1-12 completamente in alto e registrare la scena come un passo.
Premere il pulsante MODE SELECT per selezionare la modalità CHNS / SCENE.
Premere il pulsante PAGE fino a quando il LED Page 2 non si accenderà.
DELETE
INSERT
STEP

32
Erase a Program
1. Record enable.
2. Use the Page button to select the page the program you wish to
erase is on.
3. While holding down the Edit button, tap the Flash button(25-48)
twice.
4. Release the two buttons ,all LEDs flash, indicating the program is
erased.
Erase All Programs
ss and hold the Record button.
the Flash buttons 1, 4, 2 and 3 in sequence while holding the Record button. All LEDs will
indicating all programs stored in memory have been erased
Clear a Scene or Scenes
1. Record enable.
2. Record a scene or scenes.
3. If you are not satisfied with the scene or scenes, you may tap the
Rec Clear button while pressing and holding the Record button, all
LEDs will flash, indicating the scenes have been cleared.
EDIT
ap this button twice
5. Premere il pulsante FLASH 35 mantenendo premuto il pulsante EDIT, il LED della scena cor-
rispondente si accenderà.
6. Premere il pulsante STEP per scorrere fino al passo 4.
7. Premere il pulsante Insert per inserire la scena creata precedentemente.
2.2.7 Modifica di uno o più passi
1. Entrare in modalità EDIT.
2. PremereilpulsanteSTEP perscorrerefinoalpassochesidesidera
modificare.
3. Premere e mantenere premuto il pulsante UPse si desidera ele-
vare l’intensità. Se si desidera abbassare l’intensità, premere e
mantenere premuto il pulsante DOWN.
4. Mantenendo premuto il pulsante UPo il pulsante DOWN, premere
il pulsante FLASH corrispondente al canale DMX della scena che
si desidera modificare fino a raggiungere il valore d’intensità de-
sideratoleggibiledalDISPLAY.Quindi,èpossibilepremereipulsanti
FLASH fino a che non si è soddisfatti della nuova scena.
5. Ripetereipassi2,3,e4finoaquandotuttiipassinonsarannosta-
ti modificati.
6. Uscire dalla modalità EDIT.
2.3 Funzionamento
2.3.1 Funzionamento di programmi chase
1. PremereilpulsanteMODE SELECT perselezionarelamodalitàCHNS
/ SCENE indicata dal LED rosso.
2. Premere il pulsante PAGE per selezionare la giusta pagina dove si
trova il programma che si desidera far funzionare.
UP
STEP
UP
13

EXAMPLE: Program a 16 steps chase with channel 1-32 at full in sequence into Flash button 25
of Page 1.
1. Record enable.
2. Push Master A & B to maximum position and Fade slider to top.
3. Tap the Mode Select button to select 1-48 Single mode.
4. Push Channel slider 1 to the top position, its LED light at full intensity.
5. Tap the Record button to program this step into memory.
6. Repeat steps 4 and 5 until you've programmed Channel sliders 1-16.
7. Tap the Page button causing Page 1 LED lights.
8. Tap the Flash button 25 while holding down the Record button, all LEDs will flash indicating
you've programmed the chase into memory.
2.2 Editing
2.2.1 Edit Enable
1. Record enable.
2. Use the Page button to select the page the program you wish to
edit is on.
3. Tap the Mode Select button to select CHNS SCENES.
4. Press and hold down the Edit button.
5. While holding down the Edit button, tap the Flash button that cor-
responds to the program you wish to edit.
6. Release the Edit button, the relevant scene LED should light indi-
cating you are in the Edit mode.
EDIT
3114
3. PortareilMASTER SLIDER Balmassimo(completamenteversoilbas-
so).
4. Portare lo slider del canale desiderato (25-48) al massimo per av-
viare il programma, e il programma dissolverà in base all’attuale
tempo di dissolvenza. È possibile premere e mantenere premuto
il pulsante FLASH (25-48) attinente per dare l’avvio al programma.
5. Manovrare lo slider del canale per regolarne l’output del pro-
gramma corrente.
Funzionamento di un programma in Audio
1. UtilizzareilmicrofonointernoocollegarelafonteaudioaljackAU-
DIO RCA.
2. Selezionare il proprio programma come descritto sopra.
3. Premere il pulsante AUDIO fino a quando il relativo LED non si ac-
cenderà, indicando che la modalità Audio è attiva.
4. Utilizzare lo slider AUDIO LEVEL per regolare la sensibilità della mu-
sica.
5. Per tornare alla modalità normale, premere il pulsante AUDIO una
seconda volta in modo che il relativo LED si spenga e la modalità
AUDIO venga disattivata.
AUDIOAUDIO

Program Scenes 1. Record Enable.
2. Select the 1-48 Single mode by tapping the the Mode Select but-
ton. This will give you control of all 48 channels as you program.
Be sure that Master A & B are both set at maximum.
(Master A is at its maximum in the fully up position , while Master B
is at its maximum in the fully down position.)
3.Create adesired scene usingChannel Sliders1-48.At 0%or DMX
0,theseslidersshouldbeat0position,andat100%orDMX255,the-
se sliders should be at 10 position.
4. Once the scene is satisfactory, tap the Record button to program
the scene as a step into the memory.
5. Repeat step 3 and step 4 until all desired steps have been pro-
grammed into memory.
You may program up to 1000 steps into memory.
6. Select a chase bank or scene master to store your program. Tap
the Page button to select a page(Page 1-4) to store your scenes.
7. Press a Flash button between 25-48 while holding down the Re-
cord button. All LED will flash indicating the scenes have been
programmed into memory.
8. You can continue programming or exit.
ToexitProgrammode,taptheExitbuttonwhileholdingdowntheRe-
cord button, the Record LED should go out.
30 15
2.3.3 Funzionamento di un programma con lo slider Speed
1. AssicurarsichelamodalitàAUDIO siadisattivata,ovvero,cheilLED
AUDIO sia spento.
2. Selezionare il proprio programma come descritto sopra.
3. Posizionare lo slider SPEED su SHOW MODE (completamente ver-
so il basso), quindi premere il pulsante FLASH (25-48) premendo e
mantenendo premuto il pulsante REC SPEED, il programma corri-
spondente non funzionerà più al beat STANDARD.
4. A questo punto è possibile muovere lo slider SPEED per seleziona-
re la velocità desiderata.
NOTA: il passo 3 non è necessario se il programma selezionato non
è registrato al beat STANDARD.
2.3.4 Funzionamento di un programma al beat standard
1. AssicurarsicheAUDIO siadisattivato.PremereilpulsanteMODE SE-
LECT per selezionare la modalità CHNS / SCENE.
2. Premere il pulsante PARK per selezionare la modalità MIX CHASE, il
LED si accende indicando questa selezione.
3. Selezionare il proprio programma come descritto sopra.
4. RegolarelosliderSPEED finoacheilDISPLAY nonleggailvalore de-
siderato.ÈpossibilepremereilpulsanteTAP SYNC duevolteperde-
finire il tempo di pulsazione.
5. Premendo e mantenendo premuto il pulsante REC SPEED, premere
il pulsante FLASH (25-48) che memorizza il programma.
6. Il programma funzionerà dunque al tempo o alla pulsazione impo-
stata quando attivato.
7. Ripetere i passi 4 e 5 per impostare un nuovo tempo di pulsazio-
ne.
REC SPIN

29
2. OPERAION GUIDE
2.1 Begin Programming
2.1.1 Record Enable
1. Press and hold down the Record button.
2. While holding down the Record button, tap the Flash buttons 1, 6, 6 and 8
in sequence.
3. Release the Record button, the Record LED lights up, now you can begin
programming your chase patterns.
NOTE:
The first time you turn on your unit, the default setting of the Record Code is
Flash buttons 1, 6, 6 and 8.
You may change the Record Code to protect your programs.
2.1.2 Security for Your Programs
To protect your programs from any editing by others, you may change the
Record Code.
1. Enter current Record Code(Flash buttons 1, 6, 6 and 8).
2. Press and hold down the Record and Edit buttons at a time.
3. While holding the Record and Edit buttons, tap the desired Flash button to
enter a new Record Code
The Record Code consists of 4 Flash buttons(the same button or different buttons),
be sure your new Record Code consists of 4 Flash buttons.
4. Enter your new Record Code a second time, all channel LEDs and scene LEDs
will flash three times, now the Record Code is changed.
5. Exit Record mode. Tap the Rec Exit button while pressing and holding down the
Record button, release the two buttons at a time, the Record mode is disengaged.
IMPORTANT!!!
Always remember to exit Record mode when you won't continue
your programming, otherwise you may lose control of your unit.
NOTE:
The second time you enter your new Record Code different from that of the
first time, the LEDs will not flash, which means you've failed to change the
Record Code.
When you've entered a new Record Code the first time, and now you want to
cancel the new Record Code, you may press and hold down the Record and
Exit buttons at a time to exit.
16
ambiamento della modalità SPEED tra 5 minuti e 10 minuti
1. Premere e mantenere premuto il pulsante RECORD.
2. Premere il pulsante 5 o 10 per 3 volte mantenendo premuto
il pulsante RECORD.
3. Il5MINo il10MINdovrebbe accendersiindicando chelosli-
derSPEED èimpostatoperfunzionarenellamodalità5o10mi-
nuti.
NZIONAMENTO MIDI
mpostazione MIDI IN
1. Premere il pulsante FLASH 1 per 3 volte mantenendo premuto
ilpulsanteRECORD,ildisplayleggerà“CHI”indicandochel’im-
postazione del canale MIDI IN è disponibile.
2. Premere il pulsante FLASH numerato da 1 a 16 per assegnare i ca-
nali MIDI IN 1-16, il LED del canale attinente si accende indican-
do che il canale MIDI IN è impostato.

ome Button This button is used to deactivate the Blind.
p Sync Button Repeatedly tapping this button establish the chase speed.
ll On Button This function bring overall output to full intensity.
ack Out Button This button is used to kill all output with exception for that
resulting from Flash and Full On.
de Time Slider Used to adjust the Fade Time.
peed Slider Used to adjust the chase speed.
udio Level Slider This slider controls the sensitivity of the Audio input.
g Machine button
ower Switch This switch controls turning on or off of the power.
C Input DC 12-20V, 500 mAMin.
IDI Thru/Out/In MIDI ports for connection to a sequencer or MIDI device.
MX Out This connector sends your DMX value to the DMX fixture
or DMX pack.
MX Polarity Select Used to select DMX polarity.
udio Input This jack accepts a line level audio input signal ranged
from 100mV to 1Vpp.
emote Input Black Out and Full On may be controlled by a remote
control using a standard 1/4"stereo jack.
g Machine Connector
ear View
28 17
3.2 Impostazione MIDI OUT 1. Premere il pulsante FLASH 2 per 3 volte mantenendo premuto
il pulsante RECORD, il display legge “CHO” indicando che l’im-
postazione del canale MIDI OUT è disponibile.
2. Premere il pulsante FLASH numerato da 1 a 16 per assegnare i ca-
nali 1-16 MIDI OUT, il LED del canale attinente si accende indican-
do che il canale MIDI OUT è impostato.
3.3 Uscita dall’impostazione MIDI
Premeree mantenerepremuto il pulsanteRECORD. Mantenendo pre-
muto il pulsante RECORD, premere il pulsante REC EXIT per uscire dal-
l’impostazione MIDI.
3.4 Ricezione del dump del file MIDI
Premere il pulsante FLASH 3 per 3 volte mantenendo premuto il
pulsante RECORD. Il display legge “IN” indicando che questa
centralina sta ricevendo il dump del file MIDI.

27
in Mix mode.
11. Up/Chase Rev Up is used to modify a scene in Edit mode.
Chase Rev is to reverse the chasing direction of a scene
under Speed Slider control.
12. Page Button Tap to select pages of scenes from Page 1-4.
13. Delete/ Rev One Delete any step of a scene or reverse the chasing direction
of any program.
14. Segment Display Shows the current activity or programming state.
15. Insert / % or 0-255 Insert is to add one step or steps into a scene.
% or 0-255 is used to change display value cycle between
% and 0-255.
16. Edit / All Rev Edit is used to activate Edit mode.
All Rev is to reverse the chasing direction of all programs.
17. Add or Kill/ Rec Exit
In Add mode, multiple scenes or Flash buttons will be onat a time.
In Kill mode, pressing any Flash button will kill any other
scenes or programs.
Rec Exit is used to exit from Program or Edit mode.
18. Record/ Shift Record is used to activate Record mode or program a step.
Shift functions only used with other buttons.
19. Master AButton Brings channel 1-12 to full of current setting.
20. Park Button Used to select Single/Mix Chase, bring Channel 13-24 to
full of current setting, or momentarily program a scene into
Master B slider, depending on the current mode.
21. Hold Button This button is used to maintain current scene.
22. Step Button This button is used to go to next step when the Speed Slider
is pushed to the bottom or in Edit mode.
23. Audio Button Activates audio sync of chase and audio intensity effects.
24. Master Slider A This slider controls overall output of all channels.
25. Master Slider B This slider controlsthe chase of all programs.
26. Blind Button This function takes the channel out of the chase of a program
resulting from Flash and Full On.
18
vio del dump del file MIDI Premere il pulsante FLASH 4 per 3 volte mantenendo premuto il
pulsante RECORD, il display legge “OUT” indicando che questa
centralina sta inviando il dump del file MIDI.
Suggerimento: nel corso dell’invio o della ricezione, ogni altra
operazionenonfunzionafinoaquandol’invioolaricezionenon
sia stata completata.
stallazione
ntre si ricevono o si inviano dati MIDI, tutte le scene MIDI e i canali installati saranno ter-
nati automaticamente se non vi sono risposte entro 10 minuti.
ntre si ricevono e si inviano dump di file, la centralina cercherà automaticamente o invierà
spositivo ID di 55H(85), un file chiamato DC2448 con un’estensione di “BIN(SPACE)”.
ump del file permette a questa centralina di inviare i suoi dati MIDI all’unità successiva o
altri dispositivi MIDI.
sono due tipi di modalità di dump di file, descritti qui di seguito:
centralina invierà e riceverà dati NOTE ONe NOTE OFF tramite i pulsanti FLASH.
ota N. Velocità Funzioni
22-69 Programma Master Selezione o deselezione di programmi 1-48
0-117 Intensità canale Attivazione canale 1-48
118 FULL-ON
119 DARK
120 HOLD
121 Attivazione o disattivazione AUDIO
122 CHNS / SCENES
123 Modalità DOUBLE PRESET
124 Modalità SINGLE PRESET
125 Step
126 BLACK OUT

26
VIEW
ont View
set A LEDs
Show the current intensity of the relevant channel numberedfrom 1 to 24
annel Sliders 1-12 These24 slidersareused tocontroland /orprogram theintensities
of channels 1-24.
sh Buttons 1-12
These 24 buttons are used to bring an individual channel to full intensity.
set B LEDs
Show the current intensity of the relevant channel numberedfrom 25-48.
ENE LEDs Light when relevant scenes are active.
annel Sliders 13-24 These24sliders areused tocontrol and/or programthe intensities
of channels 25-48.
sh Buttons 13-24 These 12 buttons are used to bring an individual channel,
to full intensity. They also are used for programming.
rk Button This button is used to momentarily black out overall output.
wn/Beat Rev DOWN functions to modify a scene in Edit mode;BEAT REV is used
to reverse the chasing direction of aprogram with regular beat.
ode Select/Rec Speed Each tap will activate the operating mode in the order:
CHNS /SCENES, Double Preset and Single Preset.
Rec Speed: Set the speed of any of the programs chasing 19
4. SOMMARIO DELLE FUNZIONI PRINCIPALI
• Inversione della direzione della scena
1. Inversione della direzione di tutte le scene: Premere il pulsante ALL REV, tutte le scene do-
vrebbero cambiare direzione.
2. Inversione della direzione del chasing di tutti i programmi con controllo della velocità. Pre-
mere il pulsante Chase Rev.
3. Inversione della direzione del chasing di tutti i programmi con pulsazione standard: Preme-
re il pulsante Beat Rev.
4. Inversione della direzione del chasing di qualunque programma: Premere e mantenere pre-
muto il pulsante Rec One, quindi premere il pulsante Flash corrispondente al programma de-
siderato e lasciarli insieme.
• Tempo di dissolvenza
1. La quantità di tempo che il dimmer impiegherà per passare da un output zero all’output mas-
simo, e viceversa.
2. Il tempo di dissolvenza viene regolato tramite lo slider Fade Time, che varia da un istante a
10 minuti.
•Pulsante Tap Sync
1. Il pulsante Tap Sync viene utilizzato per impostare e sincronizzare l’indice di chase (l’indice
a cui tutte le scene si sistemeranno in sequenza) premendo il pulsante diverse volte. L’indice
di chase si sincronizzerà al tempo delle ultime due pressioni. Il LED che si trova sopra il pul-
sante Step lampeggerà al nuovo indice di chase. L’indice di chase può essere impostato in
qualunque momento sia che un programma stia funzionando, sia che non stia funzionando.
2. Tap Syncnon terràconto diqualunque impostazioneprecedente delcontrollo sliderdella ve-
locità fino a che lo slider non venga mosso di nuovo.
3. Utilizzare Tap Sync nell’impostazione di un beat standard è lo stesso con il controllo slider
della velocità.
• Slider Master
- Il controlloslider Masterfornisce il controllodel livelloproporzionale sututti i canalie lesce-
ne ad eccezione di pulsanti Flash. Ad esempio:
- Ogni volta che lo slider Master è al minimo, gli output a tutti gli stadi saranno a zero ad ecce-
zione di ogni risultante da un pulsante Flash o dal pulsante FULL ON.
- Se il Master è al 50%, tutti gli output saranno solo al 50% dell’impostazione dell’attuale cana-
leodelleattualisceneadeccezionediognirisultantedaunpulsanteFlashodalpulsanteFULL
ON.
- SeilMasterèalmassimo,tuttiglioutputseguirannol’impostazionedell’unità.IlMasterAcon-
trolla sempre gli output del canale. Il Master B controlla il programma o la scena eccetto in
modalità Double Preset.

25
GENERAL INSTRUCTIONS
Read the instruction in this manual carefully and thoroughly, as they give important
information regarding safety during use and maintenance. Keep this manual with
the unit, in order to consult it in the future. If the unit is sold or given to another
operator, make certain that it always has its manual, to enable the new owner to
read about its operation and re lative instructions.
Warnings
DO NOT make any inflammable liquids, water or metal objects enter the unit.
Should any liquid be spilled on the unit, DISCONNECT the power supply to the unit
immediately.
STOP using the unit immediately In the event of serious operation problems and
either contact your local dealer for a check or contact us directly.
DO NOT open the unit--there are no user serviceable parts inside.
NEVER try to repair the unit yourself. Repairs by unqualified people could cause
damage or faulty operation. Contact your nearest dealer.
Cautions
This unit is NOT intended for home use.
After having removed the packaging check that the unit is NOT damaged in any way.
If in doubt, DON'T use it and contact an authorized dealer.
Packaging material (plastic bags, polystyrene foam, nails, etc.) MUST NOT be left
within children's reach, as it can be dangerous.
This unit must only be operated by adults. DO NOT allow children to tamper or play
with it.
NEVER use the unit under the following conditions:
In places subject to excessive humidity.
In places subject to vibrations or bumps.
In places with a temperature of over 45 C or less than 2 C/35.6 F.
Protect the unit from excessive dryness or humidity (ideal conditions are between
35% and 80%).
DO NOT dismantle or modify the unit.
20
gle Mode
uttiiprogrammifunzionerannoinordinesequenzialepartendonell’ordinedelnumerodelpro-
ramma.
Display leggerà il numero del programma avviato.
utti i programmi saranno controllati dallo stesso Slider Speed.
remere il pulsante MODE SELECT e selezionare “CHNS tu SCENES”.
remereilpulsantePARKperselezionarelamodalitàSINGLECHASE.UnLEDrossoindicherà
ale selezione.
Mode
vvierà tutti i programmi in modo sincronico.
utti i programmi possono essere controllati dallo stesso SLIDER SPEED, o la velocità di ogni
rogramma può essere controllata individualmente (Vedere Impostazione Velocità).
remere il pulsante MODE SELECT e selezionare “CHNS tu SCENES”.
remere il pulsante PARK per selezionare la modalità MIX CHASE. Un LED giallo indicherà
ale selezione.
play Dimmer
Displaya 3 cifreviene utilizzatopermostrare la percentualedi intensitàoil valore DMXas-
oluto.
er cambiare tra percentuale e valore assoluto: premere e mantenere premuto il pulsante
hift.MantenendopremutoilpulsanteShift,premereilpulsante%oilpulsante0-255perpas-
are dalla percentuale ai valori assoluti.
e il Display legge, ad esempio, “076”, significa un valore in percentuale del 76%. Se il Di-
play legge “076.”, significa che il valore DMX è 76.
d e Home
afunzioneBlindtira fuori temporaneamente deicanali da unchase, mentre il chasesta fun-
onando, e conferisce il controllo manuale sul canale.
remere e mantenere premuto il pulsante Blind e premere il relativo pulsante Flash che si
esidera tirare fuori temporaneamente dal chase.
ertornaredinuovoalchasenormale,premereemantenerepremutoilpulsanteHomeepre-
mere il pulsante Flash che si desidera far tornare al chase normale.
k
ella modalità CHNS tu SCENES, premere il pulsante per cambiare la modalità chasing dei
rogrammi tra Single Mode e Mix Mode.
ellamodalitàDoublePreset,premendoquestopulsanteequivaleaportareloSliderdel Ma-
ter B completamente in alto.
ellamodalitàSinglePreset, questo pulsante potrebberegistrare temporaneamente l’output
ttuale, con lo Slider del Master B da regolare.
Table of contents