Proficient MT2 User manual

MT2
Tabletop TV Sound System
Owner's Manual
PROFICIENT MaxTV

2 3
SAFETY INSTRUCTIONS
The lightning ash with arrowhead symbol, within
an equilateral triangle, is intended to alert you to the
presence of non-insulated “dangerous voltage” within
the product’s enclosure that may be of sucient
magnitude to constitute a risk of electric shock to
persons.
The exclamation point within an equilateral triangle
is intended to alert you to the presence of important
operating and maintenance (servicing) instructions in
the literature accompanying the product.
APPLICABLE FOR USA, CANADA OR
WHERE APPROVED FOR USAGE
CAUTION: TO PREVENT ELECTRIC SHOCK,
MATCH WIDE BLADE PLUG TO WIDE SLOT,
INSERT FULLY.
ATTENTION: POUR EVITER LES CHOCS
ELECTRIQUES, INTRODUIRE LA LAME LA
PLUS LARGE DE LA FICHE DANS LA BORNE
CORRESPONDANTE DE LA PRISE ET POUSSER
JUSQU AU FOND.
1. Read these instructions.
2. Keep these instructions.
3. Heed all warnings.
4. Follow all instructions.
5. Do not use this apparatus near water.
6. Clean only with a damp cloth.
7. Do not block any ventilation openings. Install in accordance with the
manufacturer’s instructions.
8. Do not install near any heat sources such as radiators, heat registers, stoves, or
other apparatus (including ampliers) that produce heat.
9. Do not defeat the safety purpose of the polarized or grounding-type plug. A
polarized plug has two blades with one wider than the other. A grounding-type
plug has two blades and a third grounding prong. The wide blade or the third
prong are provided for your safety. If the provided plug does not t into your
outlet, consult an electrician for replacement of the obsolete outlet.
10. Protect the power cord from being walked on or pinched particularly at plugs,
convenience receptacles, and the point where they exit from the apparatus.
11. Only use attachments/accessories specied by the manufacturer.
12. Use only with the cart, stand, tripod, bracket, or table specied by the
manufacturer, or sold with the apparatus. When a cart is used, use caution
when moving the cart/apparatus combination to avoid injury from tip-over.
13. Unplug this apparatus during lightning storms or when unused for long periods
of time.
14. Refer all servicing to qualied service personnel. Servicing is required when the
apparatus has been damaged in any way, such as power-supply cord or plug is
damaged, liquid has been spilled or objects have fallen into the apparatus, the
apparatus has been exposed to rain or moisture, does not operate normally, or
has been dropped.
15. The apparatus shall not be exposed to dripping or splashing and that no
objects lled with liquids, such as vases, shall be placed on the apparatus.
16. CAUTION: Servicing instructions are for use by qualied service personnel only.
To reduce the risk of electric shock, do not perform any servicing other than
that contained in the operating instructions unless you are qualied to do so.
17. WARNING: To reduce the risk of re or electric shock, do not expose this
apparatus to rain or moisture.
18. Where the MAIN plug or an appliance coupler is used as the disconnect device,
the disconnect device shall remain readily operable.
19. This equipment is a Class II or double insulated electrical appliance. It has
been designed in such a way that it does not require a safety connection to
electrical earth.
20. CAUTION: Danger of explosion if remote control battery is incorrectly replaced.
Replace only with the same or equivalent type (CR2025). WARNING: Do not
expose batteries to excessive heat such as direct sunlight, fire or the like.
Dispose of dead batteries in accordance with local regulations.
PORTABLE CART WARNING
TABLE OF CONTENTS
SAFETY INSTRUCTIONS .............................................................................................................................................................. 2
TABLE OF CONTENTS ................................................................................................................................................................... 3
WHAT’S INCLUDED......................................................................................................................................................................... 4
INTRODUCTION ............................................................................................................................................................................. 5
MT2 FEATURES................................................................................................................................................................................ 6
MT2 FRONT PANEL.................................................................................................................................................................. 6
MT2 REAR PANEL..................................................................................................................................................................... 6
MT2 CONNECTION PANEL.................................................................................................................................................... 7
MT2 BOTTOM PANEL.............................................................................................................................................................. 8
MT2 IR REMOTE CONTROL................................................................................................................................................... 9
INSTALLATION ..............................................................................................................................................................................10
CONNECTIONS .............................................................................................................................................................................11
OPTICAL DIGITAL AUDIO ....................................................................................................................................................11
COAXIAL DIGITAL AUDIO....................................................................................................................................................11
L&R AUDIO...............................................................................................................................................................................11
AC POWER CORD...................................................................................................................................................................11
OPERATING THE MT2 .................................................................................................................................................................12
POWER ON/OFF.....................................................................................................................................................................12
VOLUME/MUTE ......................................................................................................................................................................12
TONE CONTROLS...................................................................................................................................................................12
EQ RESET ..................................................................................................................................................................................12
SIMULATED SURROUND .....................................................................................................................................................12
SELECT INPUT .........................................................................................................................................................................13
PAIRING AND SELECTING A BLUETOOTH SOURCE ...........................................................................................................13
LIMITED TWO-YEAR WARRANTY .............................................................................................................................................15
TO REDUCE THE RISK OF ELEC TRIC SHOCK, DO
NOT REMOV E COVER ( OR BACK ). NO USER SERVICEABLE PART S
INSIDE. REFER SERVICING TO QUALIFIED SERVICE PERSONNEL.
POUR RÉDUIRE LE RISQUE DE CHOC
ÉLECTR IQUE, NE PAS ENLEVER LE COUVERCLE ( NI LE DOS).
AUCUNE PIÈCE À L'INTÉRIEUR. EN TRETIEN DE PERSONNEL
QUALIFIE.
Explanation of Graphical Symbols
Z096
N27917
03X-MT2

4 5
WHAT’S INCLUDED
1 - Max TV MT2 Table Top TV Sound System
1 - MaxTV MT2 IR Remote Control
1 - Lithium Battery
1 - AC Power Cord
1 - Stereo RCA Patch Cable
1 - Digital Optical Patch Cable
1 - MaxTV MT2 Owners Manual
MT2 FEATURES
Basic Description
Table Top TV Sound System
Amplifier
Bi-amp design; independent amp channels for each subwoofer and
each set of midrange drivers and tweeter
20W Continuous x 4 Channels into 4Ω for 80 Watts Total Amplification
35Hz - 20kHz; <1% THD
Audio Inputs
1 Digital Coaxial Audio Input
1 Digital Optical Audio Input
1 Stereo Analog Line Level Audio Input
1 Bluetooth Input
Speaker Configuration
Stereo
Four Front-Facing 2½" Midrange Drivers with two 1" Dome Tweeters
Two Down-Firing 5¼" Subwoofers
Ported Enclosure
Control
IR Remote Control
ON/Standby
Volume/Mute
Input Select
Treble/Bass
Pre-Programmed DSP Options
Simulated Surround Sound
Bluetooth devices can control volume/mute
MT2 FEATURES INTRODUCTION
Congratulations and thank you for purchasing the MaxTV MT2 by Proficient Audio.
The MaxTV MT2 is a tabletop, under TV amplified speaker system designed to deliver high-quality audio for
a flat panel TV. Flat panel TV audio is exactly that...flat. There isn’t a whole lot of room for speakers and
amplifiers in a flat panel TV and as a result the quality of the sound suffers.
The MaxTV MT2 is the result of years of successful research and design by Proficient Audio, one of the premier
manufacturers of speakers, amplifiers, subwoofers, multi-room and wireless audio systems. The experience of
developing such a wide range of products has all been put together in creating the MaxTV MT2.
The MT2 typically sits on an audio/video equipment cabinet or table top with a flat panel TV sitting on top of the
MT2. The MT2 takes up little more space than the TV itself. This is where the years of audio design experience
pay off. Big sound requires big speakers, right? Big speakers require big amplifiers. And doesn’t home theater
require having speakers all over the room? Not necessarily.
The MT2 is a single cabinet that provides full stereo audio that can be enhanced with advanced Digital Signal
Processing (DSP) to create simulated surround sound that spreads the soundstage coming from the speakers
so ambient sounds of TV and movie soundtracks appear to come from all over the room and not just from the
speakers. The left and right channels each have dual 2½" treated paper midrange drivers on either side of a 1"
silk dome tweeter. This midrange-tweeter-midrange arrangement provides focused channel separation and
clarity. For solid bass, the subwoofers, two 5¼" cone speakers, one each for the left and right channels, are hid-
den underneath the cabinet. This down-firing configuration, combined with scientifically tuned bass ports are
what create such a big sound from such a small, low profile cabinet. The bass ports are actually components to
the subwoofer enclosure so that when the subwoofers are driving low frequencies, the ports are designed to
accentuate low frequency sounds without the need for big speakers, amps or cabinets.
The TV audio output (digital or analog) gets connected to one of the MT2 audio inputs. The TV speakers get
turned off and audio is played through the MT2.
The MT2 comes with a full-function IR remote control. The remote controls power, volume, mute, input select,
tone controls and simulated surround sound. There is an IR sensor behind the front panel grille that ‘sees’ the
commands from the remote allowing arm-chair control of the MT2.
But MaxTV isn’t just for TV. With three hardwired source inputs (optical digital, coaxial digital and L&R line
level audio) MaxTV can also be used as a music system as well! Music sources such as CD players, portable
music players, computers, internet radio...any audio source with an optical, coaxial or line level audio output
can be connected to MaxTV. But that’s still not the whole story...
MaxTV is also Bluetooth compatible. This wireless connection can sync to almost any Bluetooth compatible
audio device, so when friends or family come over, a ‘guest’ music player can get connected in just seconds,
to really get the party started. Want to switch to something on TV or another music device and then come
back to the Bluetooth device? No problem. The Bluetooth device will stay ‘connected’ until it is turned off, the
device moves out of range or the connection is removed.
MaxTV MT2. Small box. Big sound. Big features. Big fun.
Please read and follow the instructions in this manual to assist in proper connection and use of the MaxTV MT2.

6 7
MT2 FEATURES MT2 FEATURES
1 2
MT2 FRONT PANEL
1. STATUS LED - (Behind front panel lens.) One multi-color LED. This LED will illuminate red/blue and flash in different modes to
indicate changes in MT2 operational status.
SOLID RED - OFF (Standby). Power cord is connected and AC switch is turned ON, but the MT2 is OFF.
SOLID BLUE - ON. MT2 is ON.
SINGLE BLUE FLASH - Confirms receiving an IR command from the MT2 Remote for changes to Treble/Bass, EQ Reset,
Simulated Surround (SR), single Volume UP/DOWN command, initiating output of the Bluetooth Connection Code.
RAPID BLUE FLASH - Confirms receiving a continuous IR stream from the MT2 Remote for ramping volume UP/DOWN.
Rapid blue flash also indicates the MT2 is in Bluetooth pairing mode.
SLOW BLUE FLASH - Audio Mute. Audio signal to the speakers is turned OFF.
TWO BLUE FLASHES; DELAY - Bluetooth signal has been interrupted while Bluetooth Input is selected.
2. IR SENSOR - (Behind front panel lens.) The IR Sensor ‘sees’ the IR control commands output from the MT2 IR Remote Control
when buttons are pressed on the remote for armchair control of the MT2. This sensor must be kept clear for direct line-of-
sight to the remote, or the remote will not be able to control the MT2.
OPTICAL
INPUT
COAXIAL
INPUT
AUDIO
INPUT L
Rproficientaudio.com
Riversi de, CA USA
Made in China
M axT V
MT2
PROFICIENT
POWER
100 24 0V~
50 -60 Hz 100W
Z096
N27917
TO RED UCE THE RI SK OF ELE CTRIC S HOCK, DO
NOT RE MOVE COV ER (OR B ACK). N O USER SE RVICE ABLE PA RTS
INSIDE. REFER SERVICING TO QUALIFIED SERVICE PERSONNEL.
POUR R ÉDUIR E LE RISQU E DE CHOC
ÉLEC TRIQU E, NE PAS EN LEVER L E COUV ERCLE ( NI LE DOS ).
AUCUNE PIÈCE À L'INTÉRIEUR. ENTRETIEN DE PERSONNEL
QUALIFIE.
03X-MT2
4005723
5
6
7 8
9
MT2 CONNECTION PANEL
5. DIGITAL COAXIAL INPUT - One RCA jack. Connect to the Digital Coaxial OUT on a TV or other source. This input is selected
by pressing the COAX button on the MT2 IR Remote.
NOTE: The audio output of a TV, Blu-ray Disc player or DVD player connected to the MT2 via Coaxial Digital, must be set to
PCM in the source’s setup. Please see the device Owner’s Manual for details.
6. DIGITAL OPTICAL INPUT - One TOSLINK connector. Connect to the Digital Optical OUT on a TV or other source. This input is
selected by pressing the OPT button on the MT2 IR Remote.
NOTE: The audio output of a TV, Blu-ray Disc player or DVD player connected to the MT2 via Optical Digital, must be set to
PCM in the source’s setup. Please see the device Owner’s Manual for details.
7. AUDIO INPUT - Two RCA jacks. Connect to the L & R Line Level Audio OUT on a TV or other source. This input is selected by
pressing the AUX button on the MT2 IR Remote.
8. POWER - Turns the power to the MT2 ON/OFF. Always turn the power OFF when making connections to the MT2. The Front
Panel LED will illuminate red to indicate Standby (power switch ON, MT2 turned OFF with IR Remote) or blue to indicate that
the MT2 is ON.
9. AC INPUT - Universal power connector. Automatically selects AC voltage for a given region. Connect to the included
2-conductor AC Power Cord. After all connections have been made and confirmed, plug the power cord into an unswitched
AC Outlet to power the MT2. Contact Proficient Audio Systems for a proper replacement should the AC Power Cord be damaged
or misplaced.
3
4
OPTICAL
INPUT
COAXIAL
INPUT
AUDIO
INPUT L
Rproficientaudio.com
Riverside, CA USA
Madein China
Ma xTV
MT2
PROFICIENT
POWER
100240 V~
50-60Hz100W
Z096
N27917
TO REDUCE T HE RISK O F ELECT RIC SHOC K, DO
NOTREM OVE COVE R (OR BA CK). NO U SER SER VICEA BLE PAR TS
INSIDE.REFERSERVICING TO QUALIFIED SERVICE PERSONNEL.
POURRÉ DUIRE L E RISQU E DE CHOC
ÉLECTRIQUE , NE PAS ENL EVER L E COUVE RCLE ( NI LE DOS ).
AUCUNEPIÈCEÀ L'INTÉRIEUR.ENT RETIEN DE PERSONNEL
QUALIFIE.
03X-MT2
4005723
MT2 REAR PANEL
3. REAR PANEL BASS PORTS - Two tuned openings in the MT2 cabinet allow air to ‘release’ from the cabinet and enhance low
frequency audio. Allow at least 3 inches of clearance to a back wall to allow air to move freely from the ports for full bass
extension.
4. CONNECTION PANEL - See enlarged detail, next page.

8 9
MT2 FEATURES MT2 FEATURES
1
2
3
4
5
6
7
8
4
9
MT2 IR REMOTE CONTROL
1. POWER - Press this button to turn the MT2 ON/OFF. (Power switch on the
MT2 rear panel must be in the ON position.)
2. INPUT - Press to select a connected source. The MT2 Front Panel Status
LED will flash once to indicate a change in input selection.
COAX - Press to select the Digital Coaxial Input.
OPT - Press to select the Digital Optical Input.
AUX - Press to select the L&R Line Level Audio Input.
- Press to select a paired Bluetooth device. A Bluetooth device
must be paired to the MT2 for audio output. A paired Bluetooth
device will remain ‘connected’ after changing inputs as long as
the Bluetooth device has not moved out of range, turned off or
otherwise disconnected.
3. - Press this button to initiate Bluetooth pairing mode. The Front Panel
Status LED will rapid flash blue. The MT2 will output a pairing code that
will be picked up by any active Bluetooth device that is within range of the
MT2. See section: Pairing A Bluetooth Device for additional information.
4. VOLUME ± - Press VOL - to reduce volume. Press VOL + to increase volume.
5. BASS ± - Press BASS - to reduce low frequency output. Press BASS + to
increase low frequency output.
5. TREBLE ± - Press TREBLE - to reduce high frequency output. Press TREBLE +
to increase high frequency output.
7. MUTE - Press this button once to mute the MT2, (no audio output from
the speakers). Press this button again to un-mute the MT2, (audio output
from the speakers).
8. SURR - Press this button to activate the simulated surround audio mode.
Press again to turn Surround Mode OFF.
9. EQ RESET - Press this button to cancel any changes to the Treble & Bass
controls.
Remote Control Battery Replacement CAUTION:
WHEN REPLACING THE LITHIUM BATTERY IN THE REMOTE, MAKE SURE THAT THE REPLACEMENT BATTERY IS INSERTED
IN CORRECT POLARITY. PLACE THE BATTERY SO THAT ITS POSITIVE + SIDE FACES UP WITH THE TRAY HELD SO THAT THE
SURFACE WITH THE DOT AND + IS FACING UP.
CAUTION: DANGER OF EXPLOSION IF BATTERY IS INCORRECTLY REPLACED.
REPLACE ONLY WITH THE SAME OR EQUIVALENT TYPE CR2025.
WARNING: DO NOT EXPOSE BATTERIES TO EXCESSIVE HEAT SUCH AS DIRECT SUNLIGHT, FIRE OR THE LIKE.
DISPOSE OF DEAD BATTERIES IN ACCORDANCE WITH LOCAL REGULATIONS.
Remote Control Battery Installation
Push small tab toward
battery slot.
Pull battery drawer out. Insert battery with “+”side up,
and slide drawer back into remote.
10
MT2 BOTTOM PANEL
10. DOWN FIRING SUBWOOFERS - The MT2 bottom panel features two 5-¼" subwoofers, one for left channel bass one for right
channel bass. This down-firing configuration, combined with the front and rear panel bass ports is what allows the MT2 to
achieve such outstanding bass performance in such a small cabinet.
When handling the MT2, be careful not to grab or hold the cabinet on the bottom where the subwoofers are located to
prevent damaging the subwoofers. Also take care to not set the cabinet down on anything that can damage the subwoofers.
When placing the MT2 on a shelf or stand, be sure there are no objects under the cabinet that will block the subwoofers and
check to make sure there are no objects on the sides of the cabinet that will block the space under the MT2. Blocking this
space will reduce overall bass performance.

10 11
INSTALLATION CONNECTIONS
Flat Screen
TV
MaxTV
A/V Sources
TABLE TOP INSTALLATION
The MaxTV MT2 is ideally designed for table top installation. In this application the MT2 is placed on a cabinet top and becomes a
pedestal for the TV. Very little space beyond that already used by the TV is required.
DOWN-FIRING SUBWOOFERS/REAR PORTS
The MT2 has two down-firing subwoofers. The MT2 should always be placed on a solid surface, maintaining the clearance on the
bottom of the unit required for low-frequency sound to freely radiate into the room. Do not place objects next to the MT2 that
will block this space...on any side...as this can also adversely affect low-frequency performance. The MT2 has two rear bass ports
that enhance low frequency sounds. These ports should remain unobstructed with a clearance of at least three inches to a back
wall to assure proper performance.
Cabinet Depth
17" minimum
TV pedestal should not
be larger than the top of the MT2
(W 28" x D 16")
TV Pedestal MaxTV
CABINET DEPTH
The cabinet top should be at least seventeen inches deep to properly support the MT2. The MT2 is sixteen and a half inches deep
(with grille attached) and extra space will be required between the MT2 and a wall behind the cabinet for cables connecting the
MT2 to the TV or other A/V sources (3 inches minimum).
PEDESTAL DIMENSIONS
The TV pedestal should not be larger than the top of the MT2 (W 28" x D 16"). A TV with a pedestal larger than the MT2 top will not
be properly supported. Place a TV with a pedestal larger than 28" x 16" directly on the cabinet and locate the MT2 on a shelf below
the T V.
OPTICAL
INPUT
COAXIAL
INPUT
COAXIAL
OUTPUT
OPTICAL
OUTPUT AUDIO
OUTPUT
TV/Source Audio Outputs
MaxTV Audio Inputs
Digital Coaxial Audio Cable
TV/Source
Coaxial OUTPUT
MaxTV
Coaxial INPUT
4005723
OPTICAL
INPUT
COAXIAL
INPUT
COAXIAL
OUTPUT
OPTICAL
OUTPUT AUDIO
OUTPUT
TV/Source Audio Outputs
MaxTV Audio Inputs
Digital Optical Audio Cable
TV/Source
Optical OUTPUT
MaxTV
Optical INPUT
4005723
OPTICAL
INPUT
COAXIAL
INPUT
COAXIAL
OUTPUT
OPTICAL
OUTPUT AUDIO
OUTPUT
TV/Source Audio Outputs
MaxTV Audio Inputs
Stereo RCA Patch Cable
TV/Source
L&R Audio OUTPUTS
MaxTV
L&R Audio INPUTS
4005723
HARDWIRED AUDIO CONNECTIONS
MaxTV MT2 has three hardwired Audio Input connections on the rear panel that can be used for TV audio or connection to other
sources such as CD player, a portable music player (that does not have bluetooth), a computer or any audio source with one of the
following output connections. For Bluetooth connection, see section: Pairing and Selecting a Bluetooth Source.
COAXIAL DIGITAL AUDIO
Connect the Coaxial Digital Audio OUT on a TV or other
source to the MT2 Coaxial Input using a Coaxial Optical
Audio Cable as shown. This Input is selected by pressing
the ‘COAX’ button on the included IR Remote.
NOTE: The audio output of a TV, Blu-ray Disc player or
DVD player connected to the MT2 via Coaxial Digital,
must be set to PCM in the source’s setup. Please see the
device Owner’s Manual for details. Digital connection to
a CD player does not require a special setting.
L&R AUDIO
Connect the L&R Audio OUT on a TV or other source to
the MT2 L&R Audio Input using a Stereo RCA-RCA Patch
Cable as shown. This Input is selected by pressing the
‘AUX’ button on the included IR Remote.
OPTICAL DIGITAL AUDIO
Connect the Optical Digital Audio OUT on a TV or other
source to the MT2 Optical Input using a Digital Optical
Audio Cable as shown. This Input is selected by pressing
the ‘OPT’ button on the included IR Remote.
NOTE: The audio output of a TV, Blu-ray Disc player or
DVD player connected to the MT2 via Optical Digital,
must be set to PCM in the source’s setup. Please see the
device Owner’s Manual for details. Digital connection to
a CD player does not require a special setting.
AC POWER CORD
After all audio connections have been made and con-
firmed, connect the female end of the included power
cord to the AC Input on the MT2 rear panel, and then
plug the AC power cord into an unswitched AC outlet.
The AC connection is a universal power connection that
will automatically switch AC voltage from 100-240VAC.
Turn the Power switch ON.
FRONT VIEW
TOP VIEW

12 13
OPERATING THE MT2 OPERATING THE MT2
With everything connected and powered up, the MT2 is ready to play!
POWER ON/OFF
ON
Before turning the MT2 ON, turn ON the TV or other sources to be played through Max TV. Turning a source ON with its input
selected and the volume turned up on the MT2 can potentially damage the speakers or amplifier.
1. Press the Power button on the MT2 IR Remote to turn the unit ON. (Power switch on the MT2 rear panel must be in the ON
position.)
OFF
Turn the MT2 OFF before turning OFF the TV or other sources. Turning a source OFF with its input selected and the volume turned
up on the MT2 can potentially damage the speakers or amplifier.
1. Press the Power button on the MT2 IR Remote to turn the unit OFF.
VOLUME/MUTE
VOLUME
1. Press the VOL+ button on the MT2 IR Remote to increase volume. The front panel Status LED will rapid flash blue while in-
creasing volume. Flash will stop at max volume.
2. Press the VOL- button on the MT2 IR Remote to decrease volume. The front panel Status LED will rapid flash blue while de-
creasing volume. Flash will stop at min volume.
MUTE
1. Press the MUTE button on the MT2 IR Remote to cut amplifier output to the speakers. (There will be no sound coming from
the speakers.) The Status LED on the front panel will slowly flash. Press the MUTE button again to un-mute the speakers.
TONE CONTROLS
BASS
1. Press the BASS+ button on the MT2 IR Remote to increase bass (low frequencies). The front panel Status LED will flash once for
each step of additional bass. Flash will stop at max bass.
2. Press the BASS- button on the MT2 IR Remote to decrease bass (low frequencies). The front panel Status LED will flash once for
each step of reduced bass. Flash will stop at min bass.
TREBLE
1. Press the TREBLE+ button on the MT2 IR Remote to increase treble (high frequencies). The front panel Status LED will flash
once for each step of additional treble. Flash will stop at max treble.
2. Press the TREBLE- button on the MT2 IR Remote to decrease treble (high frequencies). The front panel Status LED will flash
once for each step of reduced treble. Flash will stop at min treble.
EQ RESET
1. Press the EQ RESET button on the MT2 IR Remote to cancel any changes to the Treble and Bass controls and return to a ‘flat’
setting. The front panel Status LED will flash once to indicate EQ Reset.
SIMULATED SURROUND
The MT2 utilizes advanced Digital Signal Processing (DSP) to create simulated surround sound from a stereo speaker configura-
tion. The simulated surround effect will ‘spread’the soundstage coming from the speakers so ambient sounds of TV and movie
soundtracks appear to come from all over the room and not just from the speakers. The MT2 simulated surround can also be used
for music listening, but some music might sound better with the DSP turned OFF...this is purely a matter of preference to the
listener.
1. Press the SURR button on the MT2 IR Remote to turn the simulated surround ON. Front panel Status LED will flash once.
2. Press the SURR button on the MT2 IR Remote to turn the simulated surround OFF. Front panel Status LED will flash once.
SELECT INPUT
The MT2 has three hardwired source inputs and a Bluetooth interface allowing TV, music and other sources to be played through
the MT2. For Bluetooth connection, see section: Pairing and Selecting a Bucktooth Source. To select one of the hardwired
inputs, press the COAX, OPT or AUX button on the MT2 IR Remote. When changing sources, the Status LED on the front panel will
flash once to indicate an input change.
1. Press COAX to select the Digital Coaxial Input.
2. Press OPT to select the Digital Optical Input.
3. Press AUX to select the L&R Line Level Audio Input.
PAIRING AND SELECTING A BLUETOOTH SOURCE
The MT2 will pair without the need to enter a code, if the device implements Bluetooth v2.1 or later.
Legacy pairing is the only method available for Bluetooth v2.0 and older. Each device must enter an PIN code: ‘0000’ to complete
pairing. To ensure that your device is compatible, look for the Bluetooth Music Icon on the device documentation or packaging, or
go to: www.gadgetguide.bluetooth.com to check compatibility.
Many portable music players, smartphones, tablets, and computers feature Bluetooth, a wireless connection used for exchang-
ing data over short distances. The MT2 is Bluetooth compatible. This wireless connection will allow any Bluetooth device to play
through the MT2, be it your smartphone or one that belongs to a visiting friend or family member. A Bluetooth device must be
‘paired’with the MT2...but that is a simple process that only takes a few seconds...and then any music on the‘paired’device can be
played through the MT2!
NOTE: Only one Bluetooth device can be paired to the MT2 at a time.
PAIRING A BLUETOOTH DEVICE
1. Turn the MT2 and the Bluetooth device ON.
2. Press the button on the MT2 IR Remote to select the Bluetooth Input. The front panel Status LED flash twice, delay then repeat.
2. Turn Bluetooth ON, on the device to be paired to the MT2. The Bluetooth controls are typically found in the device’s ‘Settings’
or ‘Connections’menu. If the Bluetooth device has previously been paired with the MT2, and the MT2 has not been removed
from the list of discovered devices, the bluetooth device should automatically sync with the MT2. (Front panel Status LED solid
blue.)
3. For a Bluetooth device that has not been paired with the MT2, or has been removed from the list of discovered devices, press
the button on the MT2 IR Remote. The MT2 will output a sync code that will be received by the Bluetooth device. The front
panel Status LED will flash rapidly until the Bluetooth device accepts the BT Code and pairs to the MT2.
4. ‘MaxTV ’ will appear as a device in the Bluetooth setup screen on the device being paired.
5. Select MaxTV. The device should sync to the MT2. The front panel Status LED will stop flashing and illuminate solid blue.
6. Navigate to music on the Bluetooth device, select, play, turn up the volume!
7. The Bluetooth device’s volume and mute controls can be used to control volume and mute the same way as when listening
through headphones. Doing so will change the output volume/mute on the Bluetooth device and is not controlling MT2
volume/mute.
SWITCHING BETWEEN BLUETOOTH AND WIRED DEVICES/BLUETOOTH DEVICE TURNED OFF
If switching between hardwired sources and a paired Bluetooth device, the Bluetooth device will remain‘connected’as long as
the device has not been turned OFF or moved out of Bluetooth range. (Bluetooth range will vary given the paired devices and
local environment.) If the Bluetooth device has been turned OFF, simply turn it ON, navigate to the device’s Bluetooth setup, select
MaxTV, and the device should sync to the MT2 in a few seconds. If the device has moved out of range, Bluetooth will disconnect,
and depending upon device, reconnect when brought back within range. If the Bluetooth device does not automatically recon-
nect, navigate to the device’s Bluetooth setup, select MaxTV, and the device should sync to the MT2 in a few seconds.

14 15
LIMITED TWO-YEAR WARRANTY
Proficient Audio, Inc. warrants to the original retail purchaser only (“you”) that this product will be free from defects in materials
and workmanship for a period of two years (the“Warranty Period”), subject to the limitations and exclusions set out in this Limited
Warranty. This warranty is not transferable to subsequent owners of the product. If you discover a defect in material or work-
manship within the Warranty Period, you can obtain warranty service by contacting Proficient Audio during the Warranty Period
at 877.888.9004 or [email protected] or by sending the product to Proficient Audio at 940 Columbia Avenue,
Riverside, CA 92507 or to the dealer from whom you purchased the product. Defective products must be shipped, prepaid and
insured, together with proof of purchase. Warranty service requests made without proof of date of purchase will be denied. Freight
collect shipments will be refused. It is preferable to ship this product in the original shipping container to lessen the chance of
transit damage. In any case, the risk of loss or damage in transit is to be borne by the purchaser.
If, upon examination by Proficient Audio it is determined that the unit is in fact defective, Proficient Audio will, at its option:
• Repairorreplacetheproductatnoadditionalcharge;or
• Ifthemodelisnolongeravailableandcannotberepairedeffectively,replacetheunitwithacurrentmodelofequalorgreater
value. In some cases where a new model is substituted, a modification to the mounting surface may be required. If mounting
surface modification is required, Proficient Audio assumes no responsibility or liability for such modification. Proficient Audio will
bear the cost of returning the repaired or replaced product to you, freight prepaid. All replaced parts and product become the
property of Proficient Audio. The foregoing is your sole and exclusive remedy for breach of warranty. If the product is not found
to be defective, Proficient Audio will contact you to arrange for return of the product to you, at your expense.
EXCLUSIONS:
• ThisWarrantydoesnotincludeserviceorpartstorepairdamagecausedbyaccident,disaster,misuse,abuse,negligence,inad-
equate packing or shipping procedures, commercial use, voltage inputs in excess of the rated maximum of the unit, or service,
repair or modification of the product by unauthorized dealers.This Warranty also excludes normal cosmetic deterioration caused
by environmental conditions.
• ThisWarrantywillbevoidif:
• TheSerialNumberontheproducthasbeenremoved,tamperedwithordefaced.
• Theproductwasnotpurchasedfromanauthorizeddealer.
The foregoing warranties are exclusive and in lieu of all other expressed and Implied warranties. Proficient Audio expressly
disclaims all such other warranties, Including but not limited to implied warranties of merchantability, fitness for A par-
ticular purpose and non-infringement. In no event will Proficient Audio be liable for any incidental or consequential damages
arising out of the use or inability to use the product, even if Proficient Audio has been advised of the possibility of such damages,
or for any claim by any other party. Notwithstanding the above, if you qualify as a“consumer” under the Magnuson-Moss Warranty
Act, then you may be entitled to any implied warranties allowed by law for the Warranty Period. Further, some states do not allow
limitations on how long an implied Limited Warranty lasts or allow the exclusion or limitation of consequential damages, so such
limitations may not apply to you.
ATTENTION TO OUR VALUED CONSUMERS:
To insure that consumers obtain quality pre-sale and after-sale support and service, Proficient Audio products are sold exclusively
through authorized dealers. Proficient Audio products are not sold online by Proficient Audio or its authorized dealers, and this
warranty is VOID if the products have been purchased from any internet reseller. To determine if your Proficient Audio reseller is
authorized, please call Proficient Audio at 877.888.9004 or go to proficientaudio.com.
Limited Two-Year Warranty
Should you have any questions regarding this, or any other Proficient Audio product, please call our service hotline at 877.888.9004
We are available to assist you every weekday, except holidays, between the hours of 7:00 a.m. and 5:00 p.m. PST.
SPECIFICATIONS
Audio Sections
Power Output 20W Continuous x 4 Channels into 4Ω for 80 Watts Total Amplification; 35Hz to 20kHz
THD (at rated power) <1.00%
Damping Factor > 15
Input Sensitivity (For rated power @ max VC, analog L&R Inputs) 335 mV
Input Impedance (analog L&R Inputs) 20 K Ohms
Input Overload (analog L&R Inputs) 2.0Vrms
Frequency Response 35 Hz to 20 kHz
Channel Separation > 50 dB @ 10 kHz
Cross Talk Between Sources > 60 dB @ 10 kHz
S/N Ratio (A-Wtd, db below 1 Watt) -78 dB
Bass Control Range ± 8 dB @ 100 Hz
Treble Control Range ± 6 dB/-10dB @ 10 kHz
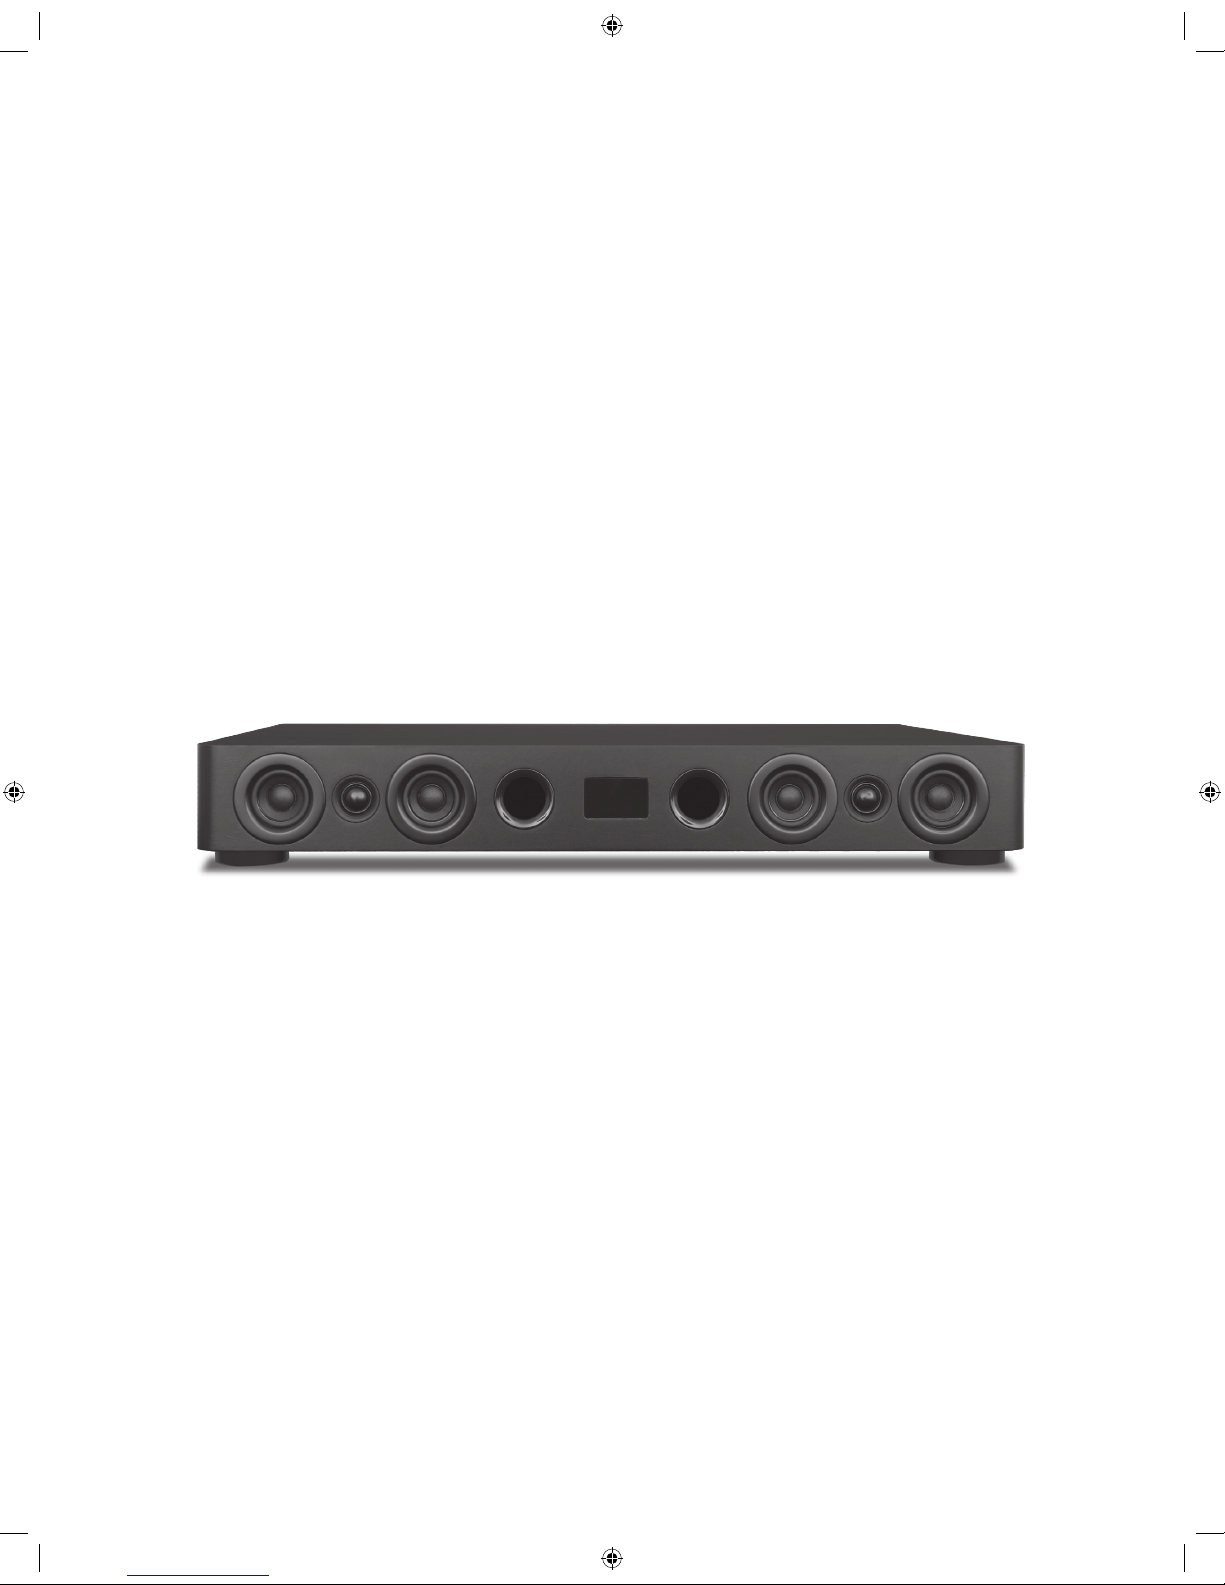
Speakers
Down-firing Subwoofers Two x 5¼" Treated Paper Cone
Mid Range Drivers Four x 2½" Treated Paper Cone
Tweeters Two x 1" Silk Dome
Power Consumption 120V Version
Standby <0.5 Watts
No signal (idle) 14 Watts
At 1/8 of Rated Power (2.5 Watts/Channel, 4Ω) 40 Watts
Rear Panel marked Line Ratings 100-240V~ 50-60Hz 100W
Dimensions
W 28" (711mm) x H 4" (102mm) x D 16½" (419mm)* * D 16" (406mm) with grille removed
Weight
25 lbs (11kg)
The Bluetooth® word mark and logos are registered trademarks owned by Bluetooth SIG, Inc. and any use of such marks by
Proficient Audio Systems is under license. Other trademarks and trade names are those of their respective owners.
FCC Warning
•ThisdevicecomplieswithPart15oftheFCCRules.Operationissubject
to the following two conditions:
•(1)Thisdevicemaynotcauseharmfulinterference,and
•(2)Thisdevicemustacceptanyinterferencereceived,includinginter-
ference that may cause undesired operation.
•Changesormodificationsnotexpresslyapprovedbytheparty
responsible for compliance could void the user's authority to operate
the equipment.
•NOTE:Thisequipmenthasbeentestedandfoundtocomplywiththe
limits for a Class B digital device, pursuant to Part 15 of the FCC Rules.
These limits are designed to provide reasonable protection against
harmful interference in a residential installation. This equipment gener-
ates, uses and can radiate radio frequency energy and, if not installed
and used in accordance with the instructions, may cause harmful
interference to radio communications. However, there is no guarantee
that interference will not occur in a particular installation. If this equip-
ment does cause harmful interference to radio or television reception,
which can be determined by turning the equipment off and on, the
user is encouraged to try to correct the interference by one or more of
the following measures:
•--Reorientorrelocatethereceivingantenna.
•--Increasetheseparationbetweentheequipmentandreceiver.
•--Connecttheequipmentintoanoutletonacircuitdifferentfromthat
to which the receiver is connected.
•--Consultthedealeroranexperiencedradio/TVtechnicianforhelp.
Z096
N27917
03X-MT2

PROFICIENT ©2012 Proficient Audio Systems
940ColumbiaAvenue•Riverside,CA92507•877.888.9004•Fax951.750.6304•proficientaudio.com
Z096
N27917
03X-MT2
1300-62015
Table of contents