Cetacea Sound CVS-II User manual


CAUTION:
1) TO PREVENT THE RISK OF ELECTRIC SHOCK, DO NOT REMOVE COVER OR BACK.
2) NO USER SERVICEABLE PARTS INSIDE.
3) REFER SERVICING TO QUALIFIED SERVICE PERSONNEL.
SAFETY INSTRUCTIONS
Read Instructions - All the safety and operating instructions should be read
before the appliance is operated.
Retain Instructions - The operating instructions should be retained for future
reference.
Heed Warning - All warnings on the CVS and in the operating instructions
should be adhered to.
Follow Instructions - All operating and use instructions should be followed.
Water and Moisture - The CVS should not be used near water - for example,
near a bathtub, washbowl, kitchen sink, laundry tub, in a wet basement, or near a
swimming pool, etc.
Outdoor Use - Warning: To reduce the risk of fire or electric shock, do not
expose this CVS to rain or moisture. Not intended for outdoor use.
Location - The CVS should be used in a stable location.
Ventilation - The CVS should be situated so that its location or position does
not interfere with its proper ventilation. For example, the CVS should not be
situated on a bed, sofa, rug or similar surface that may block the ventilation
openings; or placed in a built-in installation, such as a closed bookcase or
cabinet that may impede the flow of air through the ventilation openings.
Heat - The CVS should be situated away from heat sources such as radiators,
heat registers, stoves, or other appliances (including amplifiers) that produce
heat.
Power Sources - Both the transmitter and receiver of the CVS use a single nine
volt alkaline battery (9V). The PAS speakers should only be connected to a
Mediaphile AV approved power supply such as the one included with the PAS/
CVS system.
Power-Cord Protection -Power-supply cords should be routed so that they are
not likely to be walked on or pinched by items placed upon or against them. Pay
particular attention to cords at plugs, convenience receptacles, and the point where
they exit from the PAS.
Grounding or Polarization - Precautions should be taken so that the grounding
or polarization means of the PAS is not defeated.
Cleaning -The CVS/PAS should only be cleaned with a polishing cloth or a soft
dry cloth. Never clean with furniture wax, benzene, or other volatile liquids since
they may melt the plastic or destroy the finish.
Non-Use Periods - The power cord of the PAS should be unplugged from the
outlet when left unused for a long period of time. The CVS should be turned off.
Object and Liquid Entry - Care should be taken so that objects do not fall and
liquids are not spilled into any enclosures through openings.
Damage Requiring Service - The CVS/PAS should be serviced by qualified
service personnel when:
•The power-supply cord or the plug has been damaged.
•Objects have fallen, or liquid has been spilled into the CVS/PAS.
•The CVS/PAS has been exposed to rain.
•The CVS/PAS does not appear to operate normally or exhibits a marked change
in performance.
•The CVS/PAS has been dropped or the enclosure damaged.
Servicing - The user should not attempt to service the CVS/PAS. Servicing
should be referred to qualified service personnel or returned to the dealer or call
the service line for assistance.
Page 2

CVS/PAS Product Description
THE CVS- This Clear Voice (CVS) wireless microphone system
features a high performance audio system and a matching wireless
microphone in a very compact lightweight package. The system
weighs less than 2 lbs. and easily fits inside a briefcase.
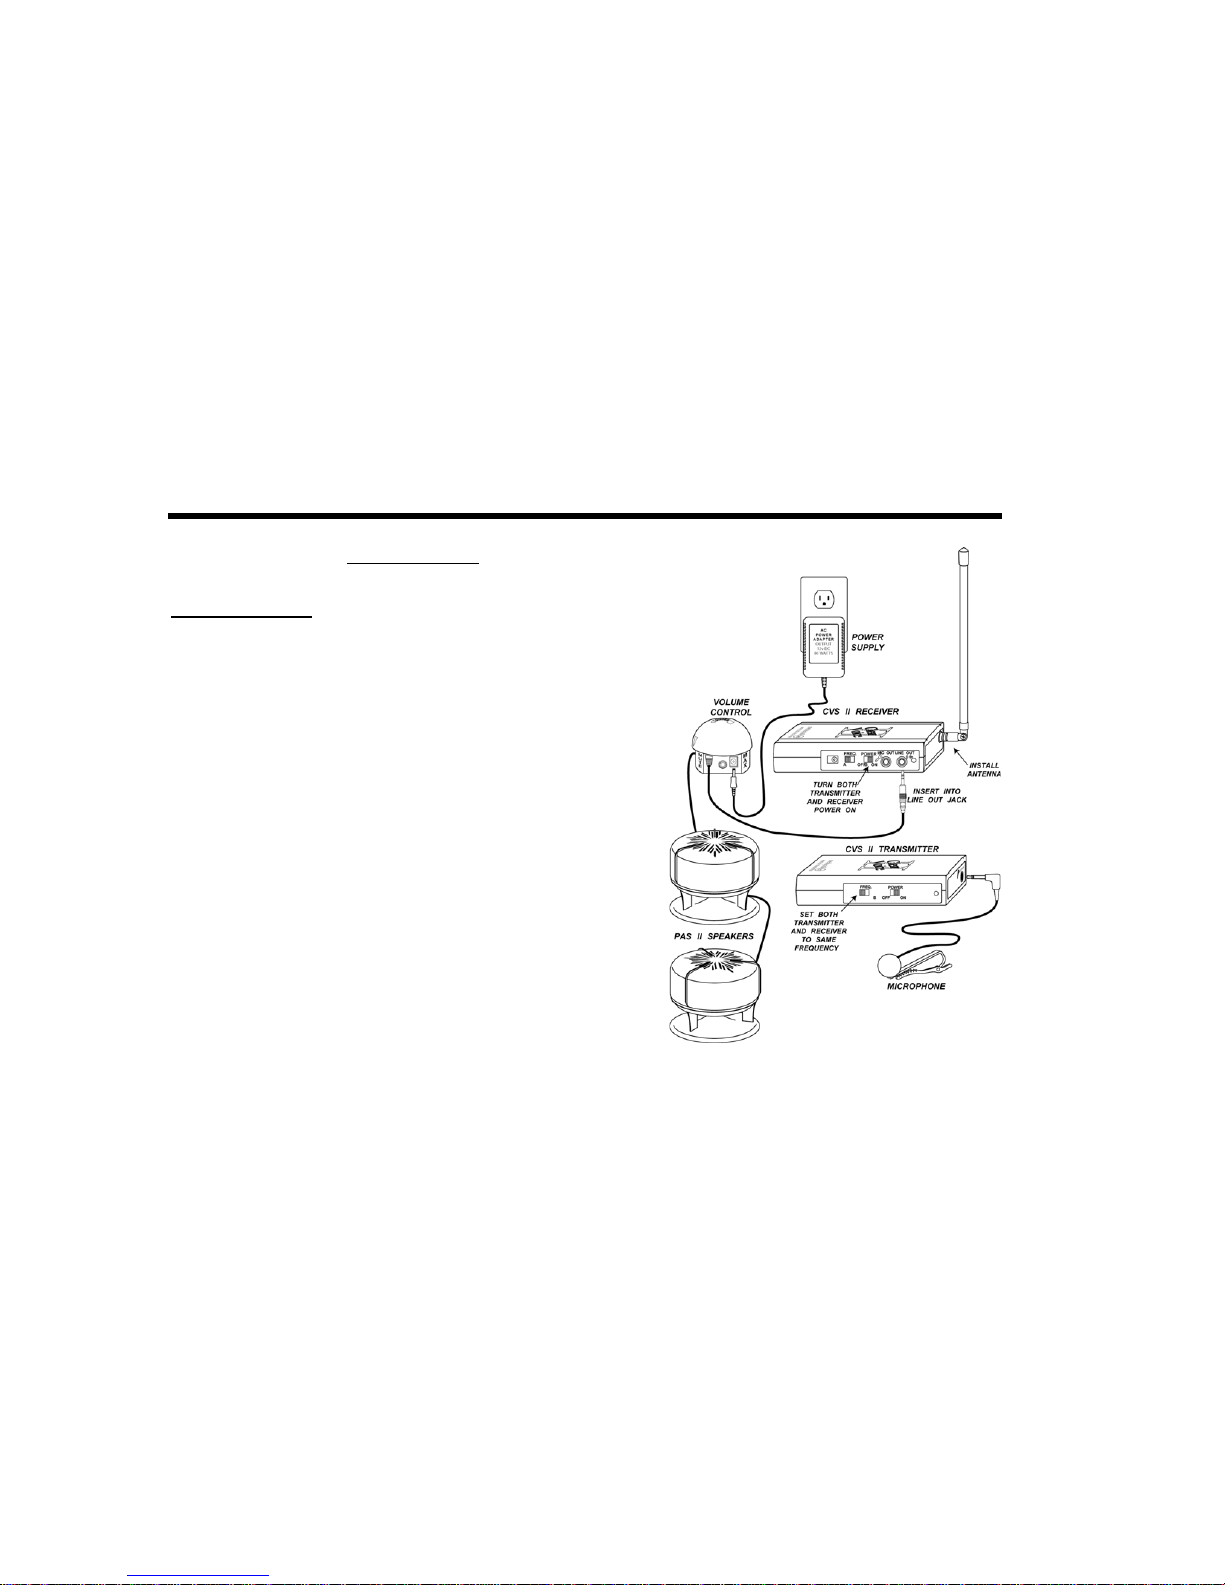
The CVS features voltages for both “high output” line level
and “microphone level” connections. A special “tie clip” uni-
directional electret condenser microphone is used for clearest speech
and to minimize feedback and clothing movement noise. Two
switch-selectable operating frequencies are provided so that two
systems can be used in the same room. The Clear Voice uses
sophisticated noise reduction techniques including a 2:1 compandor
and pre-emphasis/de-emphasis. The CVS receiver has an auto-
sensing line output jack for either mono or stereo connections. This
makes it easy to connect Mediaphile’s award winning PAS audio
system. In addition, it is also easy to make a mono connection to an
external mixer.
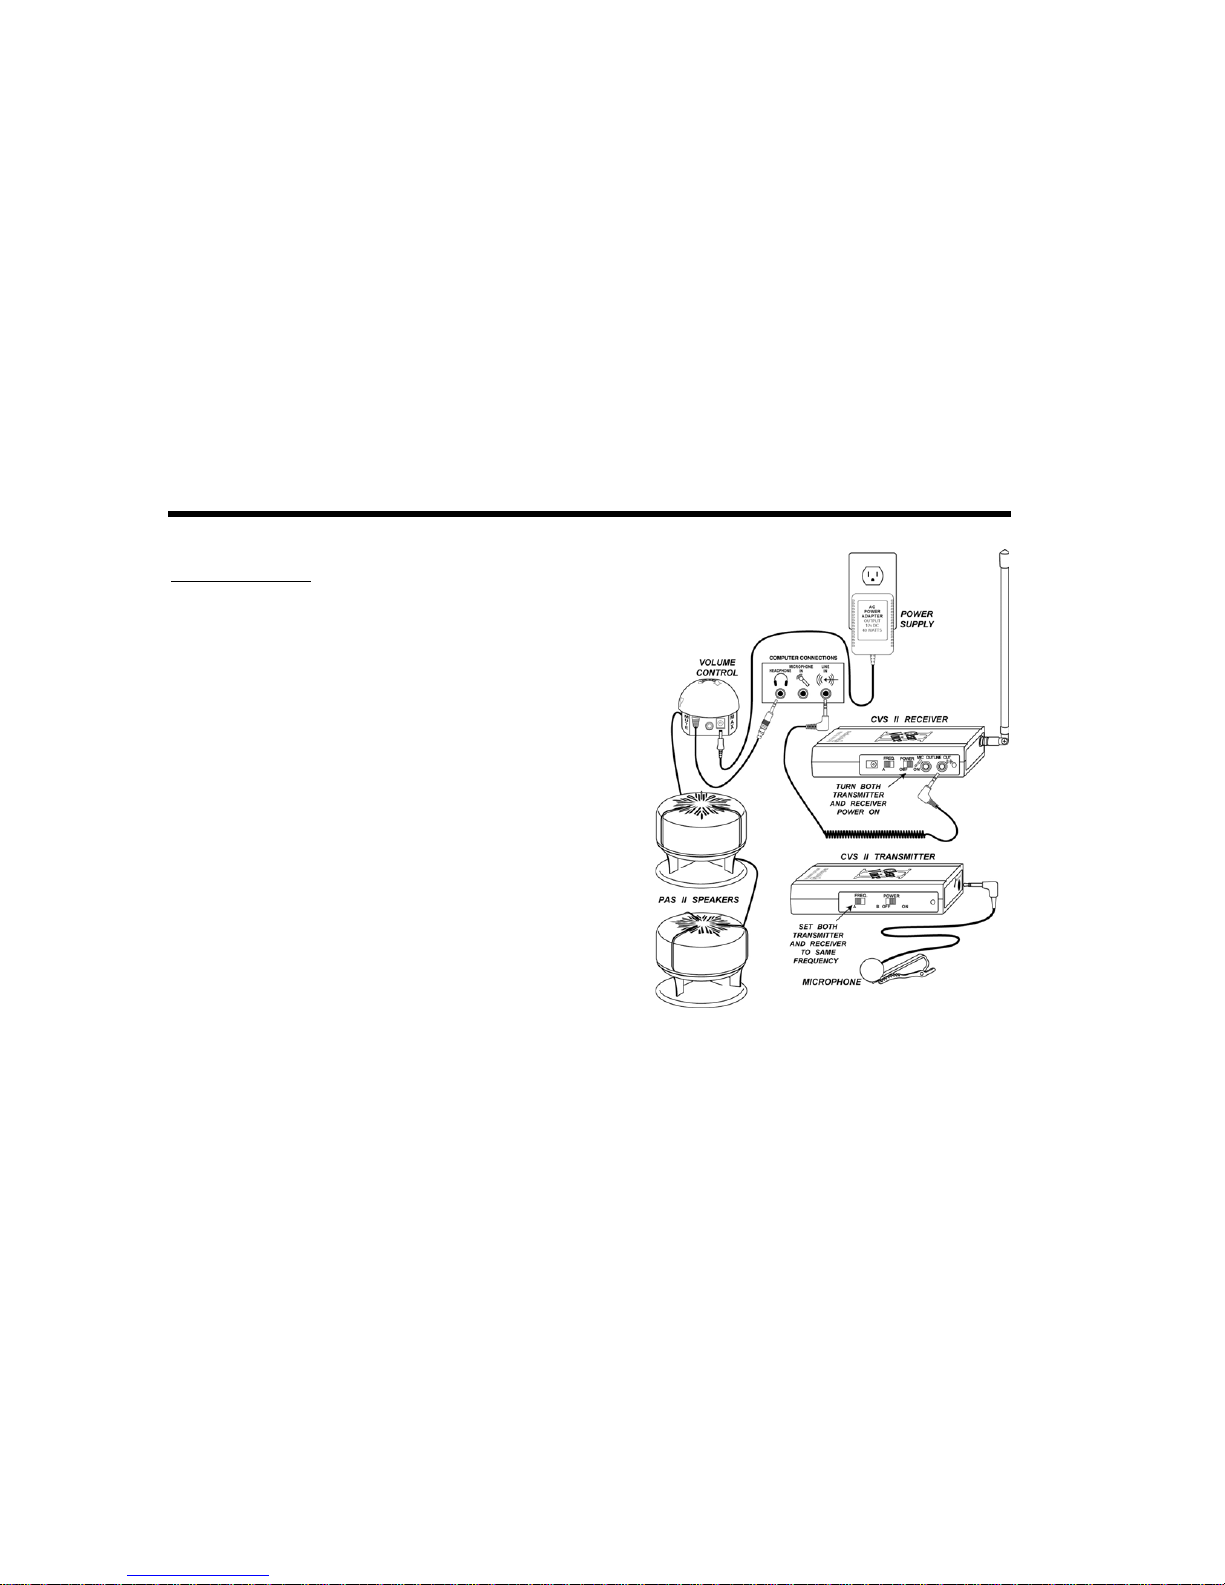
The CVS receiver also contains a microphone level 3.5
mm jack. This allows a single presenter to use a notebook computer
with a SoundBlaster compatible sound card/mixer to simultaneously
broadcast live voice and pre-recorded multimedia sound from the
notebook peripherals. Multimedia content from the notebook CD-
ROM, DVD-ROM, or HDD can be mixed with the voice by
connecting both the CVS receiver and the PAS speakers to the
notebook computer.
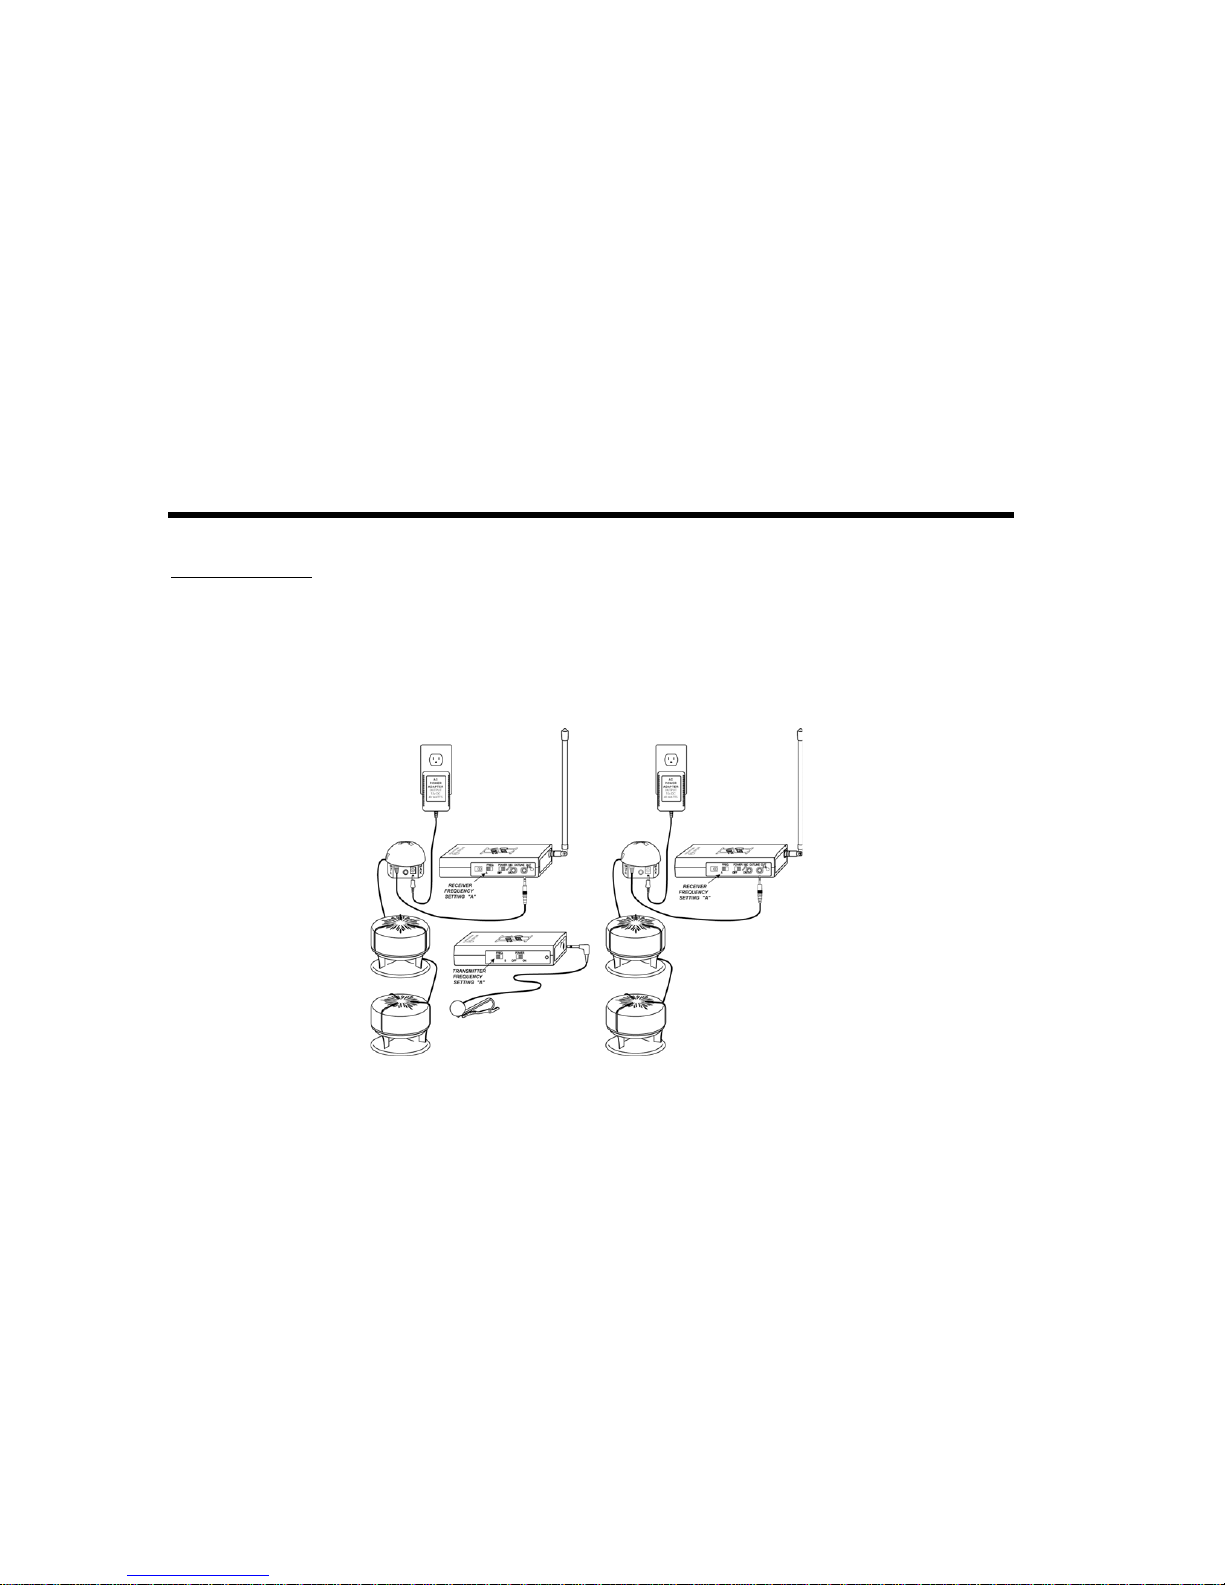
In addition, the CVS receiver also contains a line level
output jack. Connections can be made directly to an external mixer
or a notebook computer with dual input capabilities. This allows the
use of two microphone receivers in the same room so that two live
presenters can speak simultaneously with pre-recorded multimedia
Page 3
This Product is a Voice and Multimedia Support Solution for Mobile Presenters and other Professionals who
make Presentations in Mid-Size Conference Rooms.
sound from the notebook CD-ROM, DVD-ROM, or HDD during the
presentation. Finally, in lieu of two presenters, one live presenter and a
separate external sound source like a VCR or tape deck can be used
simultaneously with pre-recorded multimedia sound from the notebook CD-
ROM, DVD-ROM, or HDD during the presentation.
THE PAS- The Presentation Audio System (PAS) is a new audio technology
that facilitates high speech intelligibility in a mid-size room. This high-
technology device is designed and engineered to make business meetings
more effective.
Based on “Group Listening Technology”, the PAS creates a wall to
wall sound space regardless of seating position. It outperforms other speaker
systems many times its size and weight. The PAS satellite system plays as
loud as a 30-watt system and with the optional subwoofer plays as loud as a
60-watt system. The system plays loud enough for a 1,000 square foot room
and audiences of up to 100 people.
Because each listener’s seating position relative to a conventional
speaker can drastically alter intelligibility of speech, the PAS was invented to
eliminate this problem.
This is the first miniature stereo system that allows listeners
freedom of position within the room without loss of sound quality.
Mediaphile has filed for a patent on the implementing technology.

Welcome to Group Listening TechnologyTM
Designed like no other speaker system in the world, this proprietary PAS audio system (patent pending) allows your
audience to hear your presentation like never before. This new Group Listening Technology (GLT) creates wall to wall
quality sound space that improves the clarity of sound for everyone in the room. GLT also allows the speakers to be placed
close together for the clearest voice presentation while still maintaining a large stereo image.
Page 4
Introduction

1. Voice Support with PAS Speakers Only.
Insert the PAS signal plug directly into the line output
jack of the CVS receiver for a voice only presentation.
(See Figure 1, page 6)
2. Simultaneous Single Voice and Multimedia Support Using
a Notebook Computer SoundBlaster Sound Card/Mixer.
Insert the PAS signal plug directly into a line out or
headphone jack on a notebook computer and the CVS line out
into the computer line input jack for a simultaneous voice and
multimedia sound presentation.
(See Figure 2, page 7)
3. Simultaneous Dual Voice and Multimedia Support Using
a Notebook Computer SoundBlaster Compatible Card. (Also
applies to an electronic mixer)
Insert the PAS signal plug directly into a line out or
headphone jack on a notebook computer and two CVS receivers
into the notebook. One CVS receiver will connect between the
microphone output jack of the receiver to the microphone input
jack of the notebook and the other will connect between the line
output jack of the receiver to the line input jack of the notebook
with the supplied coiled patch cables.
(See Figure 3, page 8)
Page 5
Introduction
In lieu of a second “voice”, the second CVS system can
transmit audio content from an external sound source like a VCR,
VCD, DVD, or tape deck. (You may need one or more optional
accessories listed on the last page of this manual.)
4. Multiple Wireless Speaker Option, Using Multiple Receivers:
This option allows you to place several wireless PAS
speakers throughout a room. For large or problem rooms multiple
PAS systems are helpful to get a more even sound coverage and to
increase loudness. You will use one transmitter to broadcast to all
receivers. There is no limit to the number of receivers, or PAS units,
that can be run from one transmitter. (See Figure 4, page 9)
Welcome to the Clear Voice System.
The CVS allows the presenter(s) to do four things:

Page 6
CVS - Use of Controls and Connections
Depending on your choice from the previous section, choose
ONE of the following four Connection Options for the Clear
Voice System:
Connection Option A: (See Figure 1)
Connecting the receiver to the PAS speaker system:
The Clear Voice receiver features high voltage “line
level” audio output so that you can connect it directly to the PAS
speakers.
1) Plug the input wire of the PAS speaker into the line output
jack of the CVS receiver.
1) You will get lowest radio
interference noise if you maintain
Fig. 1 (Continued on page 7)

CVS - Use of Controls and Connections (cont.)
Connection Option B: (See Figure 2)
Connecting the receiver to a computer using the “line” input:
1) The Clear Voice receiver has a line level output jack.
2) Plug one end of the coiled patch cable into the line level
output jack of the CVS receiver and the other end into the line
input jack of your computer.
3) Plug the input wire of the PAS speaker into the headphone or
line output jack of your computer.
4) Adjust your computer sound card mixer to use this option.
See the computer owner’s manual for further details.
Fig. 2
(Continued on page 8)
(Continued from page 6)
Page 7

Page 8
CVS - Use of Controls and Connections (cont.)
Connection Option C: (See Figure 3)
Connecting dual receivers to a computer using both the “line” and “mic” input jacks:
1) A coiled male-to-male 3.5mm patch cable is included with the Clear Voice System.
2) Insert one end of the first patch cable into the line output of one receiver.
3) Insert the other end of this cable into the line input of your computer.
4) Insert one end of the second patch cable into the mic output of the second receiver.
5) Insert the other end of the second patch cable into the mic input of your computer.
6) Plug the input wire of the PAS speaker into the “headphone” or “line output” jack of your computer.
7) Adjust your computer sound card mixer to use this option. See the computer owner’s manual.
Fig. 3
(Continued on page 9)
(Continued from page 7)

Page 9
CVS - Use of Controls and Connections (cont.)
Connection Option D: (See Figure 4)
Connecting multiple wireless PAS units to multiple receivers:
1) Connect each PAS to its own receiver as described in Connection Option A, page 6.
2) You can only use one transmitter with this option.
3) Set the transmitter to F1 or F2. Set both receivers to the same frequency, F1 or F2, depending on which you selected for the
transmitter.
(Continued on page 10)
Fig. 4
(Continued from page 8)

Page 10
CVS - Use of Controls and Connections (cont.)
Placement of receivers to minimize radio interference noise.
2) You will get lowest radio interference noise if you maintain a
clear line of sight between the presenter and the receiver.
3) Do not place the receiver behind the notebook computer
screen, computer monitor, television monitor, video projector
or other audio/video equipment. These all contain metal and
will cause radio interference noise.
4) The receiver and transmitter need to be kept away from
vertical metal objects and surfaces. Do not place the receiver
inside metal Audio/Video carts, stands or podiums. Also, be
aware of large metal objects like trade show displays,
automobiles, building support columns, office dividers and
room dividers.
5) Moving the transmitter or receiver as little as 6 inches may
get rid of a radio interference problem.
6) Before your presentation, it is best to walk around the room
with the Clear Voice System turned on to discover places in
the room that have radio interference problems, then you will
know to avoid these places during your presentation.
Turning ON the Clear Voice and selecting operating
frequency.
1) The receiver antenna must be installed and pulled up to a vertical
position.
2) Two frequencies “F1” and “F2” are provided so that you can
select the one that has the lowest noise. Potential radio noise
sources may come from other wireless microphones, radio and
television stations, cordless phones, communications radios,
fluorescent lights and light dimmers.
3) Sliding the switch from “OFF” to either “F1” or “F2” turns on
the Clear Voice transmitter and receiver.
4) The transmitter and receiver must be set to the same frequency,
either “F1” or “F2”.
5) The receiver and transmitter LED lights will stay on when the
devices are switched on.
6) If the receiver or transmitter LED lights do not turn on, then
install fresh batteries.
(Continued on page 11)
(Continued from page 9)

Page 11
ion
(Continued from page 10)
Battery Instructions: (See Figure 5)
The Clear Voice receiver and transmitter each use one 9-volt
alkaline battery. Typical battery life is 6 to 8 hours. You should
always keep extra fresh batteries readily available. If the Clear
Voice does not function properly such as LED lights not turning on
or you hear noise or audio distortion the first thing to do is install
fresh batteries.
1) On both the receiver and transmitter the battery compartment
cover is on the back side of the case and is marked with an
“OPEN” arrow and thumb traction rib.
2) Gently push down on the ribs and slide the cover in the direction
of the arrow and it will open.
3) Inside the battery compartment you will see a 9-volt battery
connector with snaps. Orient the battery correctly to fit the
snaps and push firmly until the connection is tight. Insert the
battery into the case keeping the nylon strap oriented for easy
removal.
4 Push down on the cover and slide it back to its locked position.
During storage or transportation, the batteries should be
removed to prevent weak or dead batteries from leaking
chemicals that may damage the Clear Voice.
CVS - Use of Controls and Connections (cont.)
(Continued on page 12)
Fig. 5

Page 12
ion
CVS - Use of Controls and Connections (cont.)
Fig. 6
(Continued from page 11)
Microphone Instructions: (See Figure 6)
The Clear Voice features a special electret condenser unidirectional microphone. This type of microphone only “hears”sound from the
front. This feature reduces feedback problems, room noises and clothing movement noises.
1) Insert the Microphone plug into the Clear Voice transmitter jack labeled “MIC”.
2) The transmitter can be placed in any convenient clothing pocket. The transmitter also has a belt clip.
3) The microphone works best when placed on your collar, or as high up on your clothes as possible. The front of the microphone is the surface
of the foam ball that is exactly opposite of the wire. The front of the microphone MUST face towards your mouth. If the microphone is
pointed in some other direction it will not “hear” your voice clearly and feedback problems will be increased.
4) To place the microphone on your clothes squeeze the end of the alligator clip in the “ribbed area”.
5) You can also hold the microphone by hand. You should hold the microphone between 4 and 6 inches from your mouth. If the microphone is
held too close to your mouth, audio distortion and breathing sounds will be heard.
6) The microphone wire is used as the antenna. The microphone wire must be allowed to droop freely from the microphone to the Clear Voice
transmitter. The Clear Voice transmitter will not function correctly if the microphone wire is rolled up in a coil or compacted in any way.

PAS Power Supply Connection. (See Figure 7)
1. Insert the AC connector into a wall power outlet.
2. Insert the circular plug into the base of volume control knob.
PAS Power On/Off. If power to the PAS is turned on/off by a main
power switch on the source (CD, DVD, or computer), some “pop” or
static sounds may be heard through the speakers. To avoid this
disturbance it is recommended to turn the volume down on the PAS
before using a main power switch. This is common to all powered
speakers.
Do not put the AC power plug into the wall outlet before the volume
is adjusted down.
Page 13
PAS - Use of Controls and Connections
Caution: To prevent electric shock do not use this
(polarized) plug with an extension cord, receptacle or other
outlet unless the blades can be fully inserted to prevent blade
exposure.
Figure 7
WARNING: TO REDUCE THE RISK OF FIRE OR
ELECTRIC SHOCK, DO NOT EXPOSE ANY PART OF
THIS POWER SUPPLY OR VOLUME CONTROL KNOB
TO RAIN OR MOISTURE. (Continued on page 14)

13
PAS - Use of Controls and Connections
(Continued from page 13)
Volume Up/Down. Volume is controlled by the use of a knob located on the top of the smallest satellite. Use the small
arrow to estimate the loudness by aligning it with the numbers on the base of the knob. (See Figure 8)
Page 14
PAS - Use of Controls and Connections (cont.)
(Continued on page 15)
Figure 8

Page 15 Figure 9
Optional Subwoofer:
Volume Control (Bass Level). With the subwoofer in
the desired location, the volume control is used to mix
the level of the subwoofer with the satellite speakers.
Mixing is usually done by playing a wide variety of
music and speech and adjusting the control until a
natural sound is obtained. The subwoofer volume
control is typically set between 11 and 12 o’clock. (See
Figure 9)
Do not put the AC power plug into the wall outlet before
the volume is adjusted down.
Note: When using the subwoofer, the wall
pack power adapter is plugged into the
subwoofer front, not the base of the volume
control knob. The supplied 2 meter subwoofer
interconnect cord is also plugged into the
subwoofer front and then into the base of the
volume control knob.
(Continued from page 14)
PAS - Use of Controls and Connections (cont.)

The “mobile power presenter” makes
presentations in many different conference room and
seating arrangements. Typical “shoebox style” speakers
in these conference rooms suffer from so much
distortion as to render them useless. Without
convenient amplified sound, the presenter must speak
in a loud or unnatural voice. The PAS makes all these
situations easy to deal with in one lightweight portable
package that weighs less than 2 lbs. Now the presenter
can have total confidence that his or her natural voice
will be heard and understood. This reduces listener
fatigue and improves speech intelligibility and
information retention. These desirable effects can be
accomplished by merely placing the PAS speakers on a
flat table surface and making connections as instructed
in this manual.
Sound effects and music will be heard as
never before making the presentation delightful to hear.
Well recorded music will sound like the live
performance.
The satellite speakers and optional subwoofer
are magnetically shielded and can be placed close to
the video displays without distorting the video image.
Speakers do not need to be placed far apart for
stereo effects because the PAS produces near perfect
surround sound.
The subwoofer does not necessarily have to be
placed in any particular relationship to the satellites.
However, placing the subwoofer on the floor close to a wall
or corner of a room provides maximum bass efficiency. The
subwoofer is magnetically shielded and can also be placed
near video displays.
CAUTION: All speakers used in voice
presentations are susceptible to microphone
feedback. In order to minimize microphone
feedback and distortion, the speakers should be
placed as close as possible to the audience and the
microphone should be placed as far away from the
speakers as possible. Please see the following
suggested room set-up drawings on page 21 and 22.
It may be helpful to have an assistant adjust the
speaker volume while the presenter is talking.
Page 16
PAS - Placement of Speakers

The CVS/PAS system works best when used as described
in this manual. The PAS can also be connected to standard “line
level” home computer and portable stereo equipment. Be careful
when using a headphone jack provided in these devices because
most have very high distortion when the headphone volume
control is set above 3/4 turn. If it is desired to use the headphone
jack, the best method to adjust for highest quality sound is to turn
the PAS volume control all the way up and then turn the
headphone volume up until distortion is heard. Then reduce the
volume slightly until distortion goes away. Then use the PAS
volume control to adjust for best listening as required. Standard
and portable CD players can be used as long as the bass boost is
turned off and the distortion is removed as described. Some of
these portable players, as well as notebook computers, have
distortion that can be minimized by following these methods.
Be especially careful of notebook computer soundcard
software and the mixer settings. Set all software controls for
volume, bass, and treble to their midpoints and use the PAS
volume control knob to adjust for total system volume.
The PAS desktop speakers are designed to have the best
frequency response when placed on a large table or desk top. For
best results, this table top should measure at least 0.75 meter by 2
meters. If two smaller tables are used each should be at least 0.5
meter by 0.5 meter.
The desk top speakers have a 360 degree sound radiation
pattern. For best results, place them at least 1 meter away from any
vertical wall or surface.
The optional subwoofer should be placed on the floor near an
intersecting wall directly below and in-between the desk top
speakers. Because each room sounds different, the bass volume
control on the subwoofer may need to be adjusted to the listener's
preference. In small rooms of under 500 square feet, the bass control
is usually set between 9 o'clock and noon.
Adjusting CVS/PAS Volume Settings for lowest noise and
feedback.
1) If you are not using a computer please skip ahead to step 8.
2) If your computer has a “thumb wheel” headphone volume
control located next to the headphone jack, set it to maximum.
3) If your computer has “push button” headphone volume control
set it to middle level. These push buttons actually control the
master volume of the sound card.
4) Your computer’s internal sound card has software control of
volume levels for each source of sound input and output. To
find these volume controls enter your computer’s Help Topics
and do a key word search on “volume”. Open “Accessories:
Using Volume Control to vary sound”. This “Volume Control”
window may also be called a “Mixer” or “Audio Rack”. Set the
volume of “Line”, “Microphone” and “Master Volume Control”
to their middle level by clicking and dragging the knob. If you
do not see a control for the sound source that you need then
click on “Options” then “Properties” and check the box of the
sound source that you need. Any sound source that will not be
used should be set to “Mute” to minimize noise.
5) Begin by setting all volume controls to a middle level. Later the
volume settings of each sound source can be set to different
levels to get the correct loudness balance or “mix” among
(Continued on page 18)
CVS/PAS - Set Up Instructions
Page 17

microphone, line, CD audio, wave, etc.
6) If you need louder volume and do not get feedback or
distortion then increase the volume settings in the computer
software as described in step 4 above. You will have lowest
noise with the PAS volume set at maximum and the
computer sound card software controls set at the
beginning of feedback or distortion. You will need to
experiment to find the correct settings for loudest volume with
lowest noise, distortion and no feedback.
7) For best speech clarity we recommend that you turn off your
3D sound processor like Spatializer, SRS, or QSound. You
will find this option in the “Volume Control” window by
clicking “Options” then “Advanced Controls”.
8) Overall system volume is adjusted with the PAS volume
control. Begin with a low volume level then SLOWLY
increase the volume until you begin to hear echo as you speak.
This echo is the beginning of feedback. Now reduce the
volume until the echo goes away, this is the optimum volume
setting for giving a presentation.
9) Feedback can be reduced by increasing the distance
between the microphone and the PAS speakers. You will
get the best sound if you place the PAS speakers in the
middle of your audience in the middle of a table. This will
give you less feedback than having the speakers at the front of
the room close to the presenter. Placing the speakers closer to the
audience also means that the speakers do not need to be turned up as
loud for people to hear, this reduces feedback and distortion. Feed
back is also reduced as the room size increases and the room shape
becomes more irregular.
10) Keep the distance between the PAS speaker and the farthest listener
less than 20 feet. If this is not possible then you will need to use the
Multiple Wireless Speaker Option that is described on page 9 and
19. This is to insure that each listener has adequate loudness and
limited reverberation and echo.
11) Before your presentation, it is best to walk around the room with
the Clear Voice system turned on to discover places in the room that
have feedback problems, then you will know to avoid these places
during your presentation.
It is possible to use more than one Clear Voice System with the
following two setup options.
Multiple Presenter Option, using two Clear Voice systems
simultaneously: (See Figure 10) (Continued on page 19)
CVS/PAS - Set Up Instructions (cont.)
Page 18
(Continued from page 17)

You may use this option when you need two wireless
presenters. In lieu of two wireless presenters, one wireless
presenter and one wireless audio source is possible using a
special adapter.
1) Set one transmitter and receiver to “F1”
2) Set the second transmitter and receiver to “F2”.
3) Plug one receiver into the computer “line input” as described
above in “Connection Option B”.
4) Plug the second receiver into the computer “microphone
input” as described above in “Connection Option C”.
5) A MINIMUM distance of TWO FEET must separate all
receivers to prevent radio interference noise.
6) You can NOT use two transmitters with one receiver.
7) You can NOT use more than one Clear Voice system on the
same frequency.
8) It is possible to use several Clear Voice Systems
simultaneously. Each system MUST have different operating
frequencies that are available by special order. You will also
need a multi channel Microphone Mixer that has one input for
every ClearVoice System that you will be using.
Contact Mediaphile for more information.
CVS/PAS - Set Up Instructions (cont.)
Page 19
(Continued on page 20)
(Continued from page 18)
Fig. 10

Single Presenter, or source, Option, using ONE single
transmitter to multiple receivers simultaneously: (See Figure
4, page 9 or page 20)
This option allows you to place several wireless PAS speakers
throughout a room. For large or problem rooms multiple PAS
systems are helpful to get a more even sound coverage and
increased loudness. You will use ONE transmitter to broadcast to
ALL receivers. There is no limit to the number of receivers, or
PAS units, that can be run from ONE transmitter.
a) Set the transmitter frequency to either “F1” or “F2”.
b) All receivers MUST be set to this same frequency.
c) Connect the receiver to the PAS as described in “Connection
Option A”. (See page 6).
d) For long rooms the best speaker placement is on tables down
the center isle with all the speakers placed in a single row.
This type of placement makes volume levels most even and
minimizes echoes and feedback.
e) In rooms that have acoustic echo problems, placing several
speakers very close to the audience reduces echo problems by
reducing the average distance between the speaker and
listener.
f) Keep the distance between the PAS speaker and the farthest
listener less than 20 feet. This is to insure that the listener has
adequate loudness and limited reverberation and echo.
g) A minimum distance of two feet must separate all receivers to
prevent radio interference noise.
CVS/PAS - Set Up Instructions (cont.)
Page 20
(Continued from page 19)
Fig. 4
Other manuals for CVS-II
2
Table of contents
Other Cetacea Sound Stereo System manuals