Prossimo PDW6-SL User manual

USER MANUAL FOR YOUR PROSSIMO
PDW6-SL/W 60 cm Full Height
Freestanding Dishwasher
NOTE: This User Instruction Manual contains important
information, including safety & installation points, which will
enable you to get the most out of your appliance. Please keep it
in a safe place so that it is easily available for future reference; for
you or any person not familiar with the operation of the appliance.
JW 07/01/13

2
Contents
Environmental note 3
Important safety information 4 – 6
Specifications 7 – 10
Product and aperture dimensions 7
Product specifications 7 - 8
Electricaldetails 8
Description of the appliance 9
Controlpanel 10
Usingyourdishwasher 10 - 21
Before first use 10
Fillingwithrinseaid 11
Settingtherinseaidlevel 12
Filling with dishwasher detergent 12 - 13
Loading the upper basket 14
Adjusting the upper basket 14
Loadingthelowerbasket 15
The cutlery basket 16
Loading dishes and cutlery 16 - 17
Program table 18
Settingawashprogram 19
Changingawashprogram 19
At the end of a wash program 20
Adding an item to the wash cycle 20
Delaystart 20
Rinse aid and salt indicator neons 20
Saving energy using your dishwasher 21 - 22
Cleaning and maintenance 22 - 24
The filter system 22
Cleaning the filters 22 - 23
Cleaningthesprayarms 23
Cleaning the control panel 23
Cleaningthedoor 24
Error code failure system 24 - 28
General troubleshooting 26 - 28
Installation 28 - 32
Connecting to the mains water supply 28
Connecting to the water outlet 29
Connecting to the power supply 30
Applying the condensation strip 30 - 31
Levelling the appliance 31
Before first use 31
Contact details 32
ENVIRONMENTAL NOTE
Note
: Before discarding an old appliance, switch off and
disconnect it from the power supply. Cut off and render any plug
useless. Cut the cable off directly behind the appliance to prevent
misuse. This should be undertaken by a competent person. Disable
the door lock to make sure that children cannot get stuck inside
the appliance.
oThe packaging materials that Prossimo uses are environmentally
friendly and can be recycled.
oPlease discard all packaging material with due regard for the
environment.
3

IMPORTANT SAFETY INFORMATION
Your safety is of the utmost importance to Prossimo.
Please make sure that you read this instruction booklet
before attempting to install or use the appliance. If you
are unsure of any of the information contained in this
booklet, please contact the retailer where you purchased
your unit.
General Safety
oRepairs to your appliance must only be carried out by authorised
service agents. Any attempt by an inexperienced person to
repair the appliance, could result in injury or damage to your
dishwasher.
oIf you notice that the mains cable is damaged. The appliance
must not be used. The same applies if you notice that the
worktop, control panel or base area is damaged. As this could
allow access to the internal components of the machine.
oThe appliance should be turned off and isolated from the mains
supply, before either cleaning or maintenance work is attempted.
oThe mains cable must not be used to pull the plug out of the
electrical socket.
oThe machine should not be sprayed with water.
oThe external surface of the appliance may become hot whilst
your dishwasher is in use.
oIt is possible for small animals to chew either mains cables or
water hoses, which could cause an electric shock hazard.
Installation
oThe installation instructions contained within this user manual
should be followed.
oIt is obligatory for the completed installation to comply with all
relevant building regulations and local water authority
requirements.
oBefore the first use of the appliance, you should follow the
steps listed in the “Before first use” section on page 11
and page 31 of this manual.
4

5
oCare should be taken not to trap the power supply cable
underneath the appliance whilst installing it.
oNo attempt should be made to alter or modify the specifications
of this appliance.
In daily use
oThis appliance is only designed to wash normal domestic
washloads. If you use your dishwasher in any other way or it is
incorrectly used, then the manufacturer accepts no liability for
any damage that might be caused and any guarantee will be
void.
oIt is recommended that the appliance is unplugged and the
water supply is turned off after the machine is used.
oThe detergents and rinse aid that you place in this appliance
should be suitable for automatic dishwashers. With regards to
dosage levels, the detergent manufacturer’s recommendations
should be followed.
oSharp knifes or ones with long blades are a potential safety
hazard when placed in an upright position in the cutlery basket.
We would recommend that these items are placed horizontally in
the upper basket.
oYou should not wash any items that have come into contact
with corrosive, acidic or alkaline chemicals, paint, petrol, iron or
steel debris.
oYou should not open the door whilst the appliance is set on a
wash program. Depending on which stage that the wash
program is at, hot water could escape the machine.
oYou should not leave the door of the appliance open, unless
you are loading or unloading the dishwasher.
oYou should not stand or sit on the door when it is open.

6
Child Safety
oYour dishwasher should only be used by adults. You should not
allow children in the area of the machine unsupervised. You
should not let them touch the controls or play with the appliance.
oIt could be possible for a child or pet to gain access to the
dishwasher if the door is left open. Therefore please check the
inside of the appliance before setting it on a wash cycle.
oAny packaging that is removed from the machine should be kept
away from children.
oAll detergents should be kept out of children’s reach in a safe
place.
oSome water will remain inside the dishwasher when it has
completed a wash cycle. This water is not suitable for drinking
and may contain residues from the detergents that are used in
the appliance.
Declaration of conformity
oThis appliance complies with the standards currently in force.
Specifications
Product dimensions
Height: 850 - 875 mm
Width: 600 mm
Depth: 600 mm
Product specifications
o12 Place settings
o3 functions: Normal
Intensive
Rapid
o5 temperatures: 40°C, 45°C, 49°C, 55°C, 65°C
oNoise level: 52 dB
oDelay start
oAnti-leak device
oAnti-flood device
oConcealed heating element
oCollapsible plate racks
oHeight adjustable upper basket
oAdjustable feet
oResidual drying
Energy efficiency details
Energy efficiency class: 3 Star
7

8
Electrical details
Rated voltage: 220-240 Vac 50 Hz
Supply connection: 10 A
For future reference please record the following information which can
be found on the rating plate and the date of purchase which can be
found on your sales invoice. The rating plate of your dishwasher is
located on the right hand side of the drop down door.
Model Number ……………………………….
Serial Number ……………………………….
Date of Purchase ……………………………….

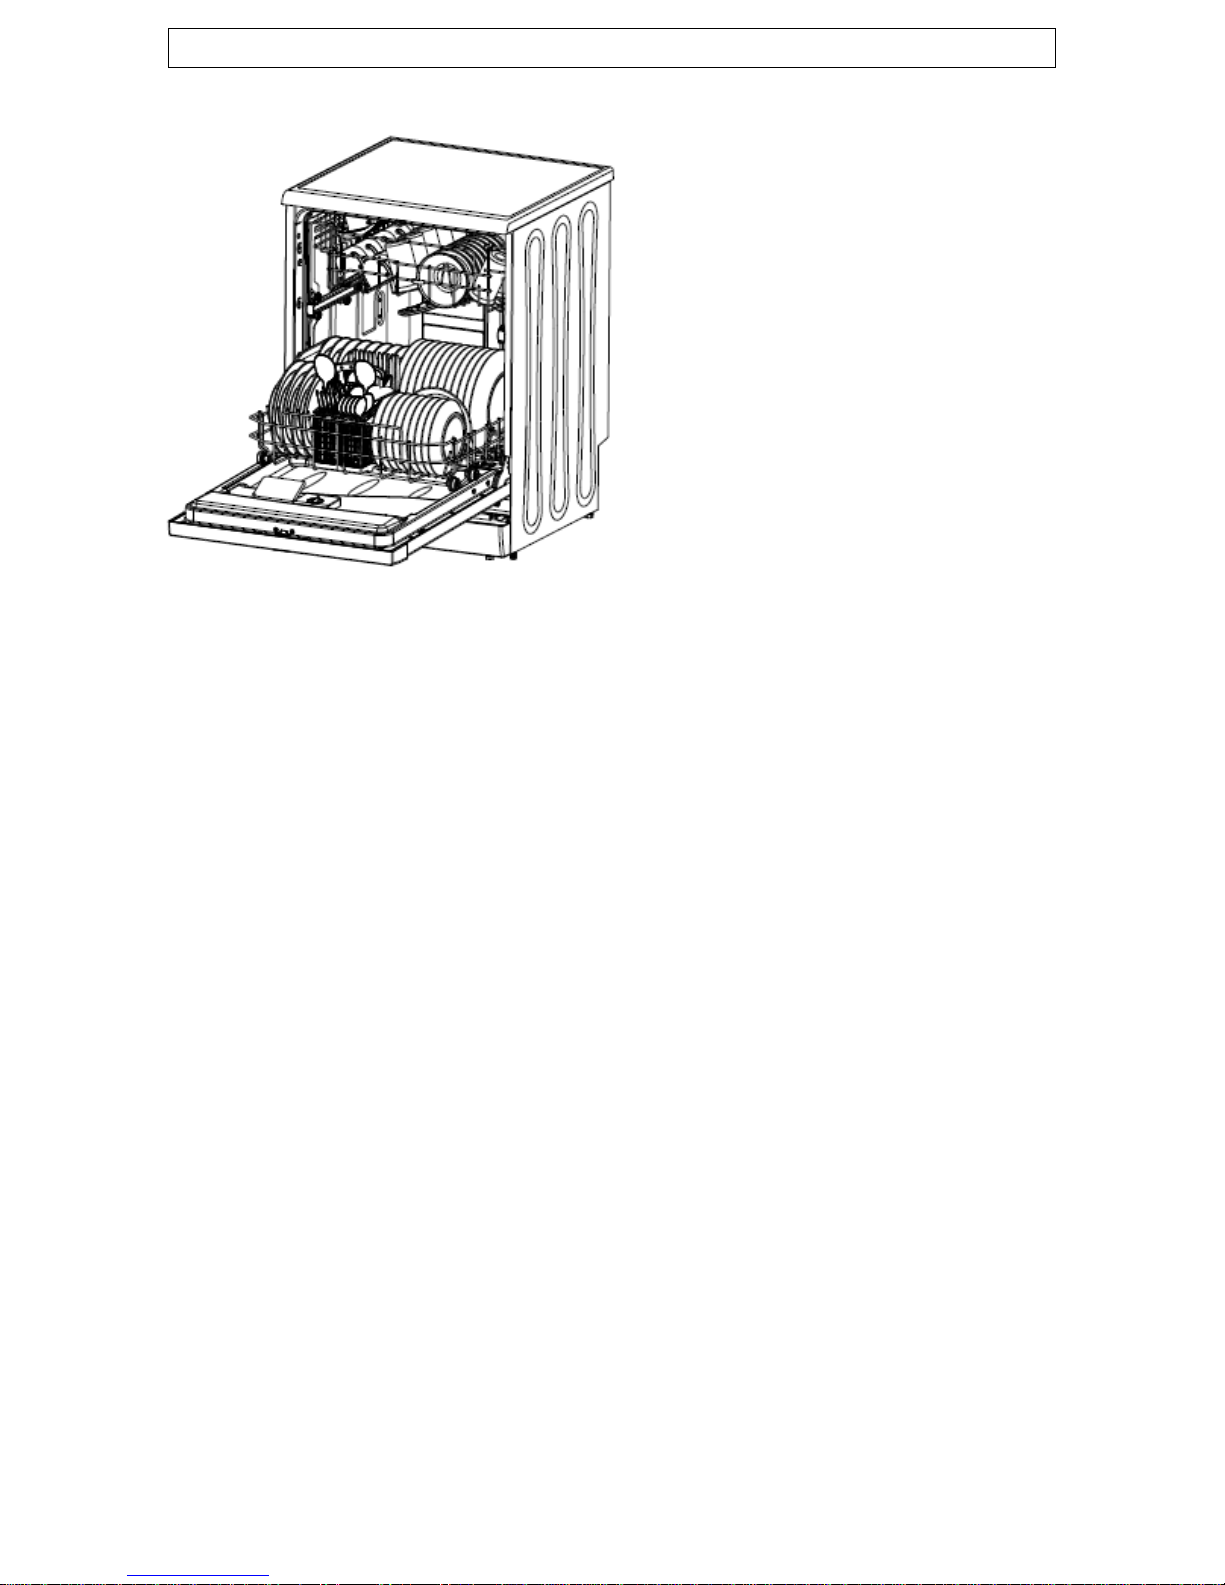
Description of the appliance
1) Upper basket
2) Spray arms
3) Lower basket
4) Filters
5) Detergent dispenser
6) Rinse Aid dispenser
7) Cutlery basket
8) Cup holder
9
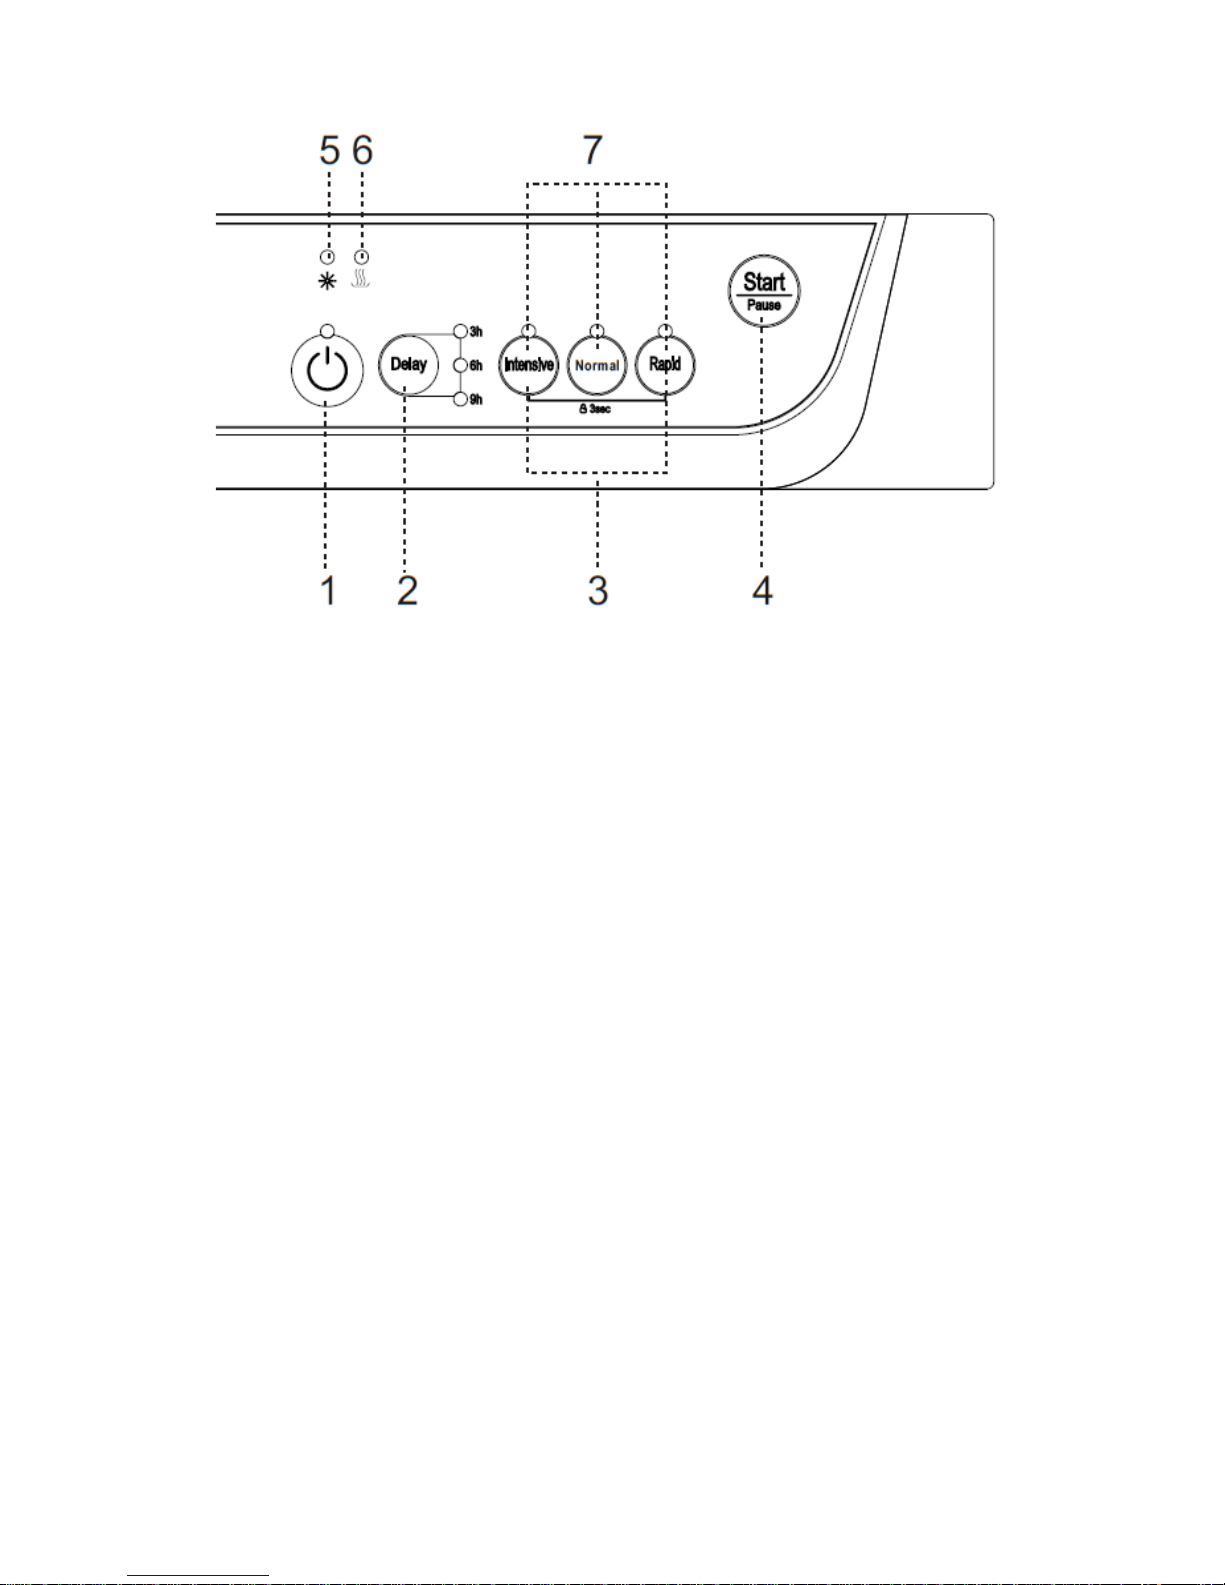
Control panel
1) ON/OFF button
2) Delay start button
3) Child lock buttons
4) Start/Pause button
5) Rinse aid indicator
6) Drying indicator
7) Program selection buttons
10

Using your dishwasher
Before first use
Filling with rinse aid
The rinse aid is released during the final rinse and it helps
to prevent water from forming droplets on your dishes.
These droplets will lead to spots and streaks being left on
items after the wash program has completed.
oYour dishwasher is designed to utilise liquid rinse aid.
oThe rinse aid dispenser is located inside the drop down door,
next to the detergent dispenser.
oTo access the rinse aid dispenser, you should turn the cap
anticlockwise and it will pop out of the hole. Then slowly pour in
liquid rinse aid, the rinse aid dispenser will hold approximately
140 ml of rinse aid.
oYou should continue to fill with rinse aid, until the level indicator
turns completely black.
oBe careful not to overfill the dispenser, as this could cause
oversudsing when a wash program is selected. Wipe away any
rinse aid excess or spillages with a damp cloth.
oReplace the cap and turn it clockwise until it locks into position.
oYou should refill the rinse aid dispenser when the rinse aid
indicator lights on the control panel (5).
oIMPORTANT: If you are using 3 in 1 dishwasher tablets then
you should still fill the rinse aid dispenser.
11

Setting the rinse aid level
The amount of rinse aid that the dishwasher requires also depends on
the hardness of your water. You should experiment with the rinse aid
setting, until you find a level that gives the best results.
oOn the first wash cycle, we would
recommend that the rinse aid level is
set to number 4.
oIf you get water spots and poor drying
performance, then you should turn the
arrow anticlockwise and increase the
setting to the next number.
oYou should continue to adjust the rinse aid level upwards until
you get no water spots.
oIf you get cloudiness or streaking on your dishes, the rinse aid
level is set too high and it is causing foaming during the wash
cycle. Turn the arrow clockwise and lower the setting to the next
number.
Filling with dishwasher detergent
The detergent dispenser must be refilled at the start of each wash
cycle (apart from the Rinse wash program).
oOpen the lid that closes over the detergent dispenser and place
the detergent inside the dispenser.
12
oThe section marked 1 in the diagram
is for the main wash cycle detergent.
Only one detergent tablet should be
placed in the dispenser at any one
time. If you are using detergent
powder or liquid, you should follow
the detergent manufacturer’s
recommendations.

13
oThe section marked 2 in the diagram can have separate
detergent placed in it for any wash cycle that has a pre-wash
element to it, however this is optional. This must be a liquid or
powder detergent, not another detergent tablet.
oShut the detergent dispenser lid so that it clicks shut securely.
oAt the beginning of a wash cycle the clip will open and the
tablet/powder/liquid will enter the dishwasher.
Concentrated detergent
oThe use of the NORMAL program with concentrated detergents
reduces pollution and is good for your dishes.
oThis wash program is specifically suited to the dirt-dissolving
properties of the enzymes of concentrated detergent. For this
reason, the NORMAL program, in which concentrated detergent
is used, can achieve the same results achieved in the INTENSIVE
program.
Detergent tablets
oDifferent brands of detergent tablets dissolve at different speeds.
For this reason, some detergent tablets cannot dissolve and
develop their full cleaning power during short programs.
oIt is recommended that you use longer programs when using
detergent tablets to ensure the complete removal of detergent
residues.
oIf you are using 3 in 1 detergent tablets you should check that
the water hardness in your supply is compatible with the use of
these products, as per the detergent manufacturer’s instructions.
o3 in 1 detergent tablets contain detergent, rinse aid and salt,
and as such it may be beneficial to select the lowest setting for
water hardness. See ‘setting the rinse aid’ section for details.

Loading the upper basket
The upper basket is most suited to washing delicate and light
dishware, such as glasses, coffee & tea cups, saucers, plates, bowls
and shallow pans (that are not heavily soiled).
14
e.
A. Cups
B. Glasses
C. Saucers
oYou should position the dishes
and cookware in such a way that
they are not moved by the spray
of water during the wash cycl
oUse the diagram above as a guide to the most appropriate way
to load the upper basket.
Adjusting the upper basket
Your dishwasher has an adjustable upper basket which you can alter to
the most suitable position for the items you are going to wash in the
upper and lower baskets.
oThe height of the upper basket can be adjusted by placing the
wheels on a different height of the rails. Long items such as
cutlery, salad servers and knives should be placed on the shelf
so they do not obstruct the rotation of the spray arms.
oIMPORTANT: The upper basket must be empty when you are
removing it from the guide supports.
oNOTE: For easier stacking of pots and pans the cup shelf spikes
can be folded down.
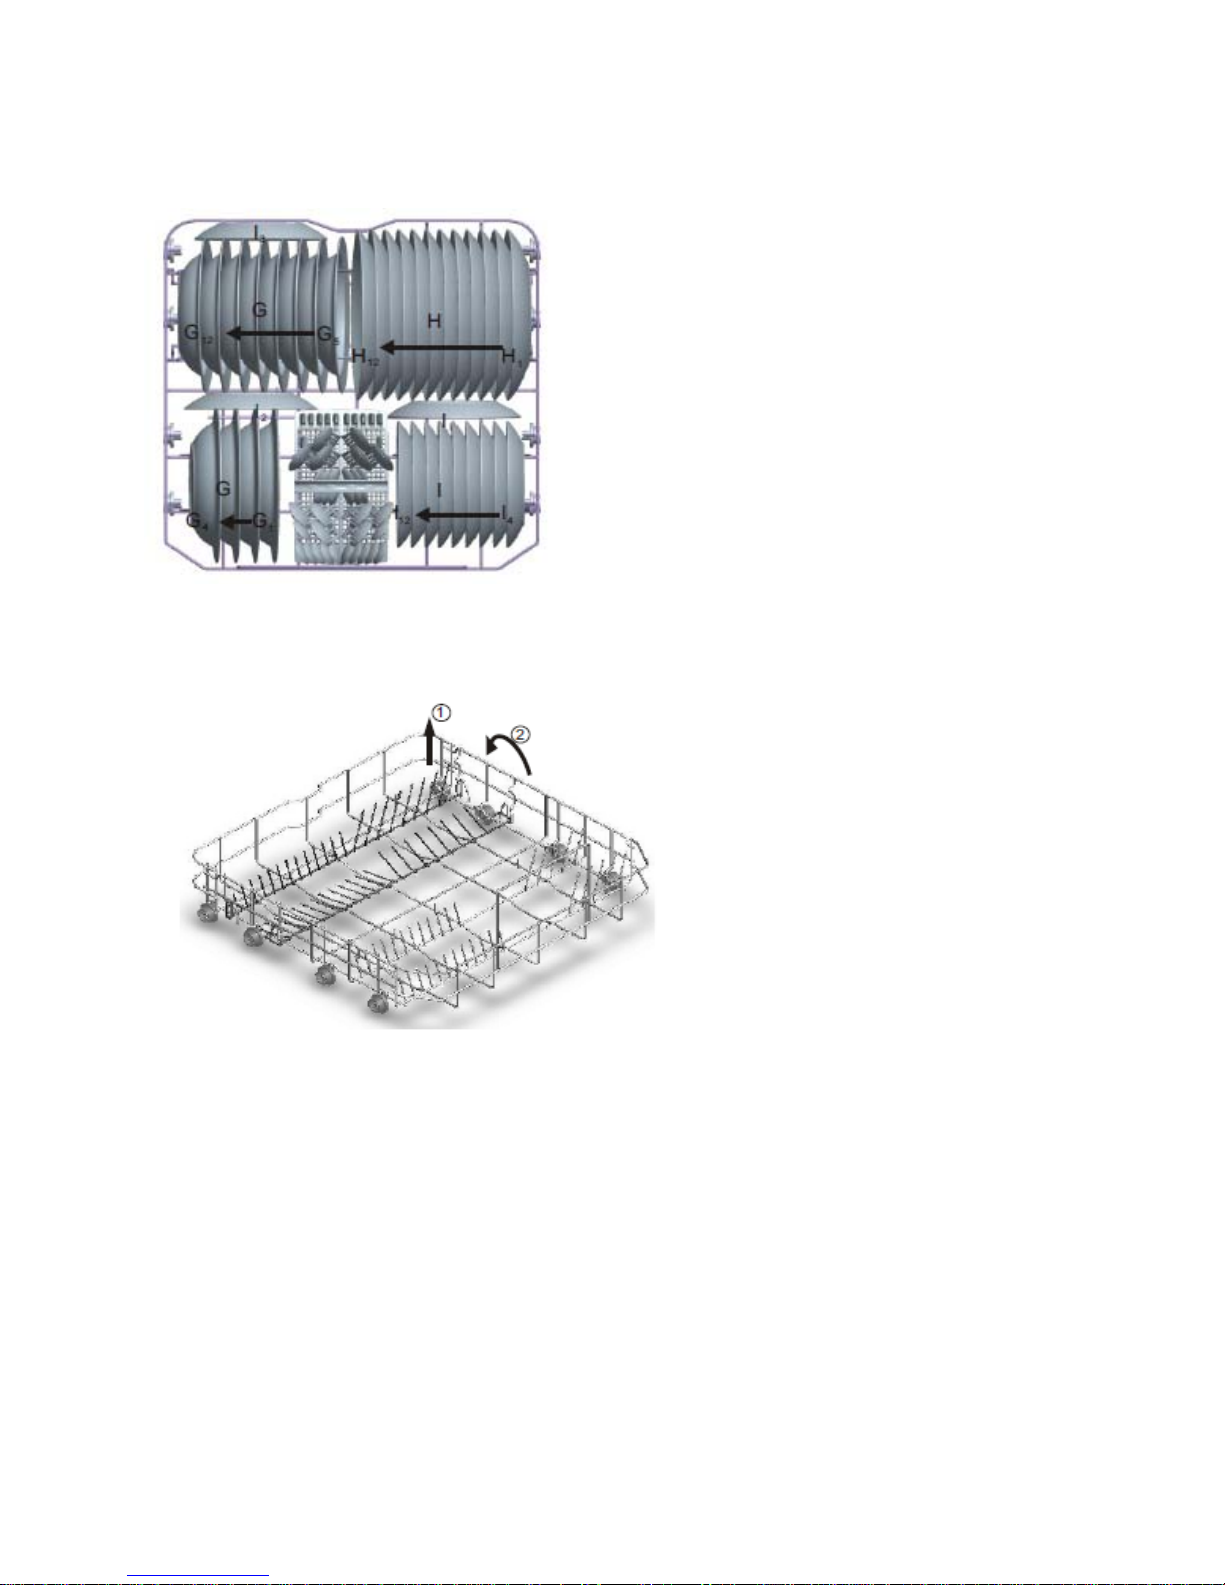
Loading the lower basket
The lower basket is most suited to washing larger and more heavily
soiled items, such as saucepans, saucepan lids and serving dishes. You
can also load bowls and a variety of plates into the lower basket.
G. Dessert dishes
H. Dinner plates
I. Side plates
oSaucepans and serving bowls must
always be placed with their bases
upwards.
oDeep saucepans should be slanted,
to allow water to run off.
Folding spikes of lower basket
oThe bottom rack has
prongs that can be folded
downwards, to allow for
easier loading of larger
saucepans and serving
bowls.
15
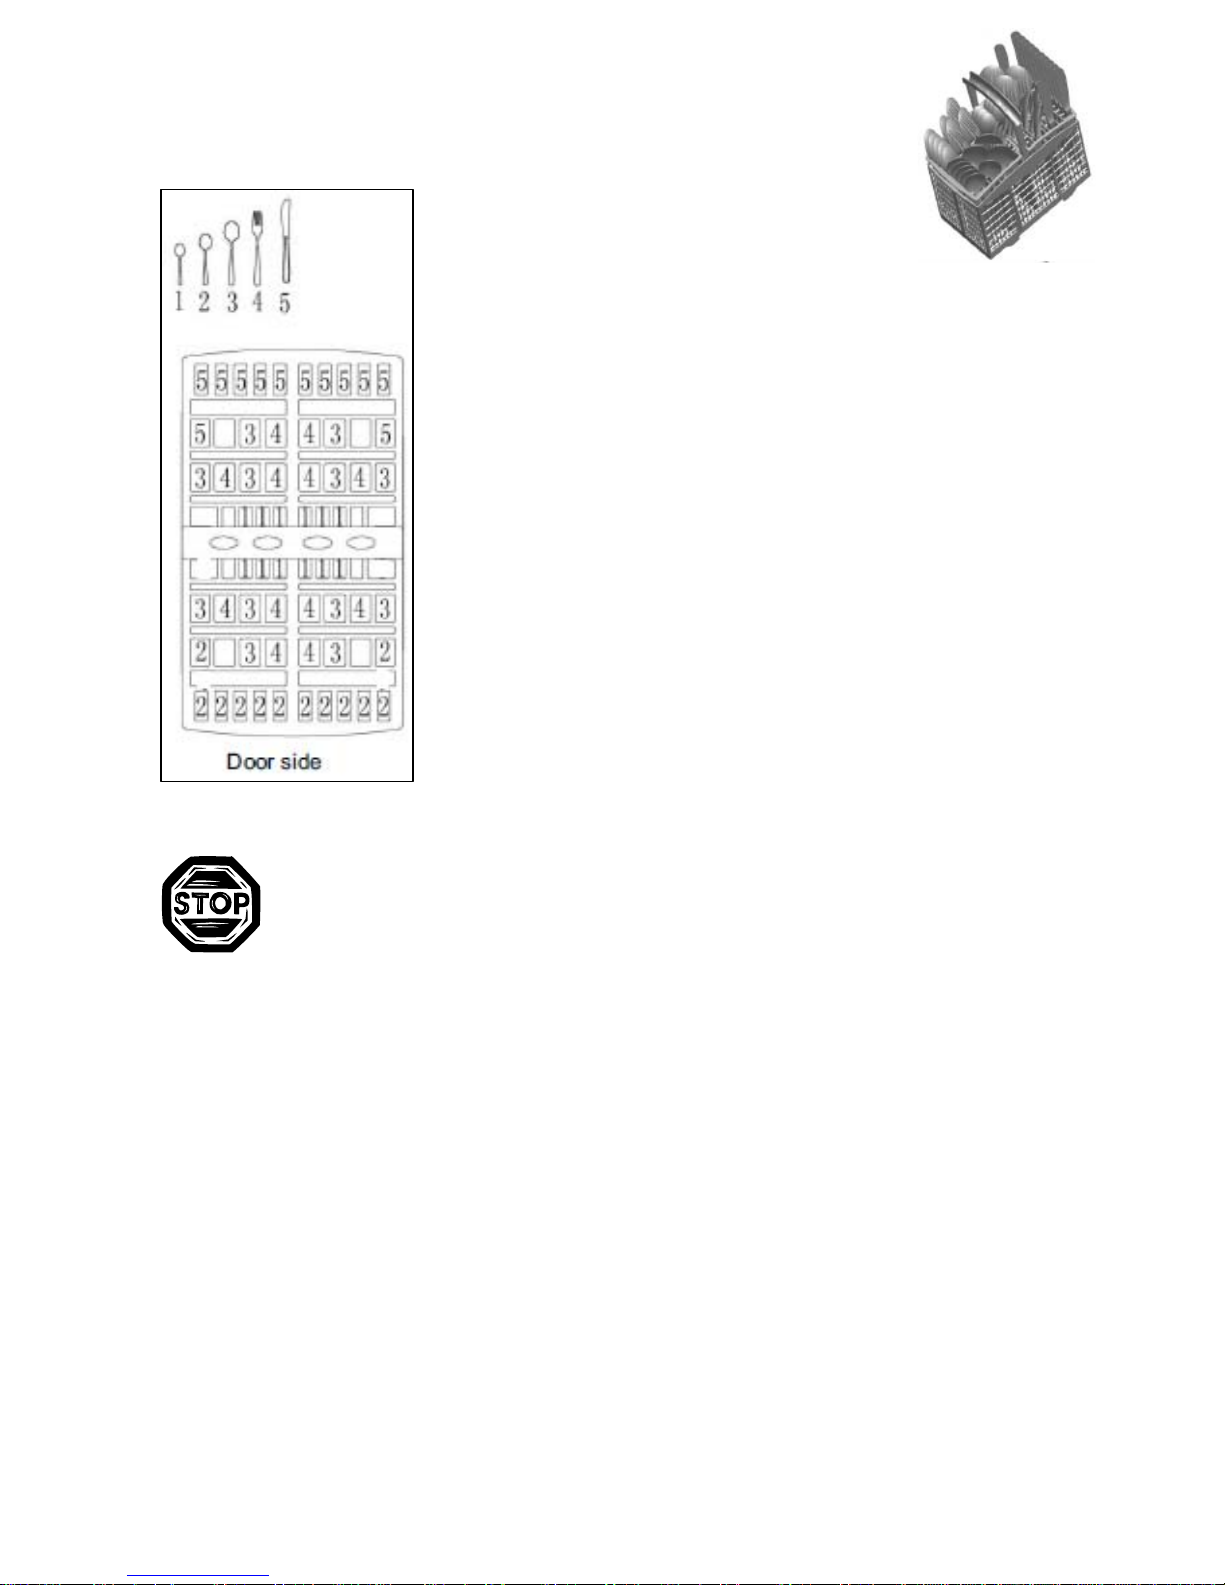
The cutlery basket
16
Cutlery should be placed inside of the cutlery basket. The
cutlery basket should then be placed in the appropriate
position in the lower basket.
1. Teaspoons
2. Dessert spoons
3. Soup spoons
4. Forks
5. Knives
oFor the best washing performance, cutlery
should be placed through the slots in the
top of the cutlery basket.
IMPORTANT: Do not allow items of cutlery to fall
through the bottom of the cutlery basket, as this
may cause damage to the spray arm and/or the
cutlery. If the bottom of the basket begins to
deteriorate and allows items to fall through, you
should replace the cutlery basket.
Loading dishes and cutlery
Household cloths, sponges or any other object that may
absorb water SHOULD NOT be washed in a dishwasher.
oRemove leftovers and soften the remnants of burnt food in pans,
prior to loading dishes in the appliance.
oOnce the dishwasher has been loaded, check that the spray arms
can move freely. If the spray arm comes into contact with any
item, then you should rearrange the wash load.
oCups, glasses, pans etc should all be loaded with their bases
upwards, so that water does not collect inside of them.
oCutlery and dishes should not cover each other; otherwise you
may get poor wash results.
oDo not allow glasses to touch inside the dishwasher, otherwise
damage may occur.
oSmall objects can be placed inside of the cutlery basket.

The following items are NOT suitable for washing
inside a dishwasher:-
oCutlery with a handle of mother-of-pearl, wood, horn or china.
oPlastic items that are not resistant to heat.
oCutlery that consists of glued parts that are not resistant to heat.
oCutlery items or crockery that are bonded.
oCopper or pewter items.
oLead crystal glass.
oWooden platters.
oSynthetic fibre items.
The following items are not always suitable for
washing inside a dishwasher:-
oStoneware should only be washed if the manufacturer of the
item has marked it as dishwasher safe.
oPlastic items (such as lunchboxes) should only be washed if the
manufacturer has marked it as dishwasher safe.
oGlazed crockery may fade with repeated washing inside of a
dishwasher.
oItems made of silverware or aluminium can discolour when
washed inside a dishwasher.
oAny food residue should be removed from silver items
immediately, as this can also result in discolouration.
oCertain types of glass may become dull or cloudy after a large
number of washes.
17
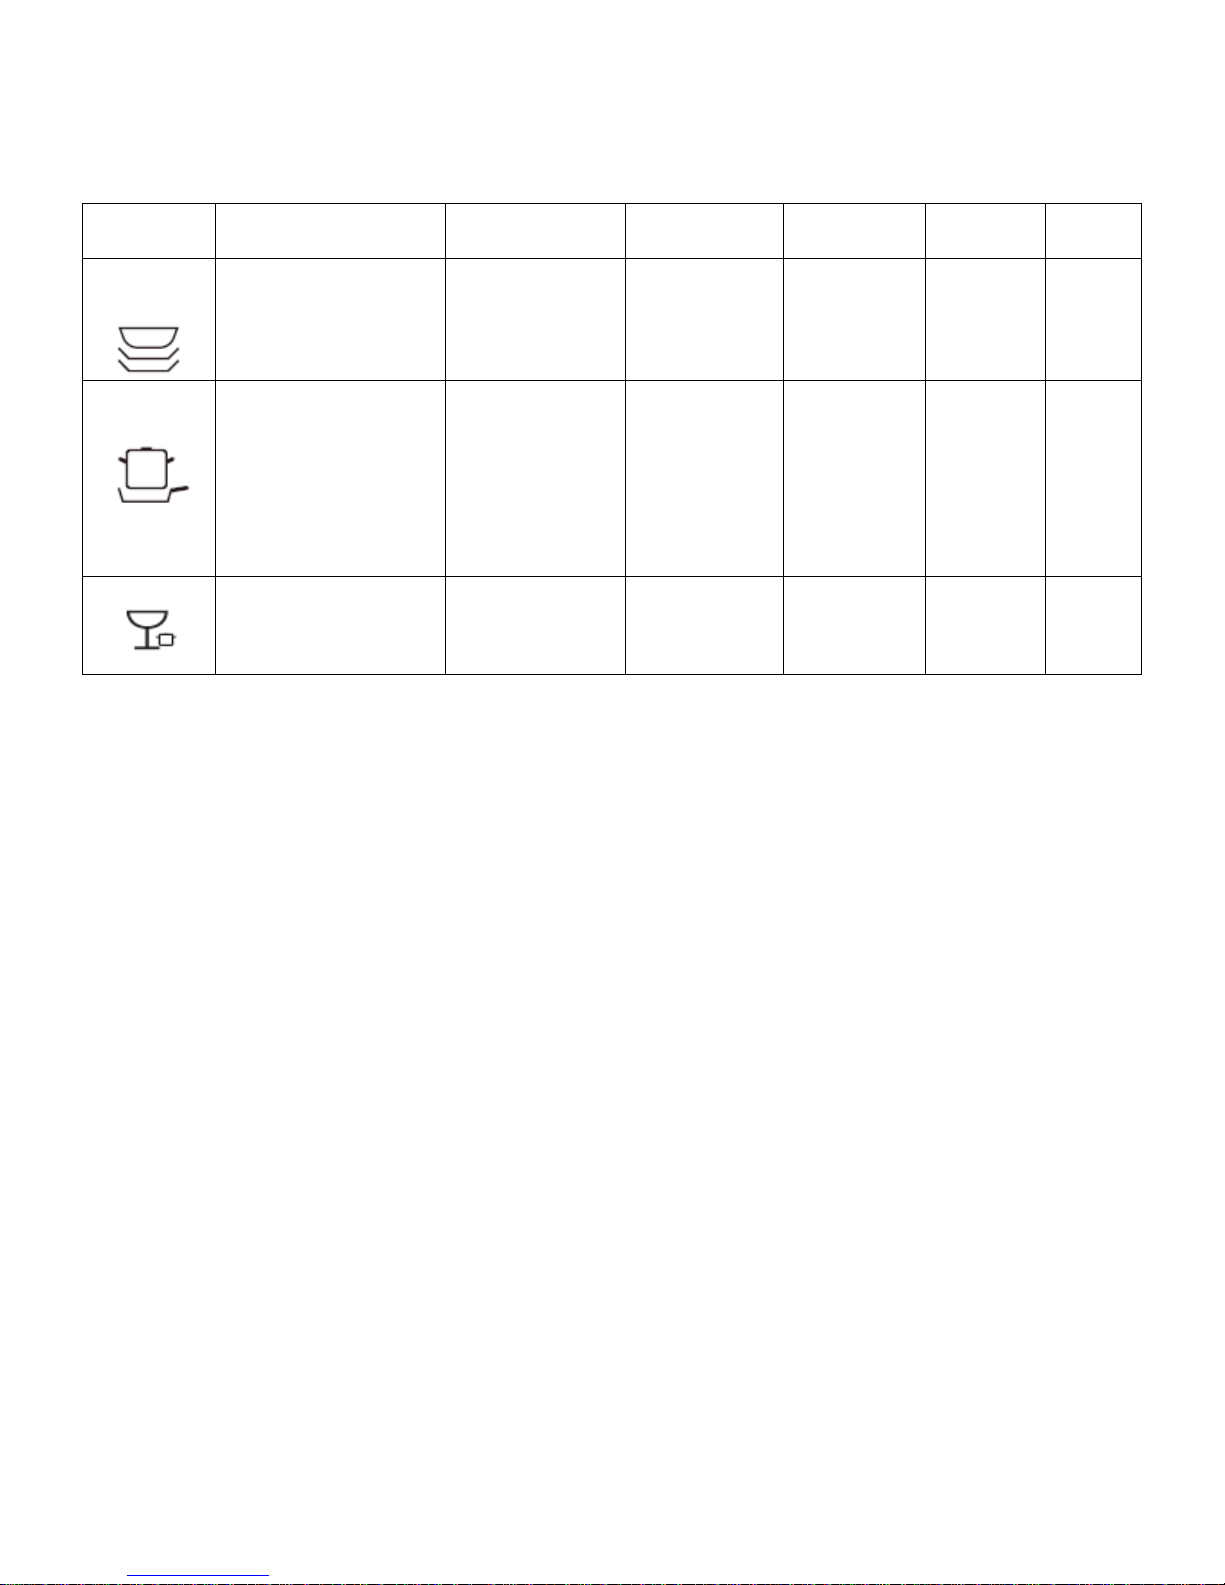
Program table
oThe ECONOMY program is suitable for cleaning a typical load of
dirty dishes and is the most efficient in terms of its combined
energy and water consumption.
Program Program
information Description
of cycle Detergent
pre/main Program
times* Energy
(kWh) Water
(L)
Normal
**
For normally soiled
loads, such as pots,
plates, glasses and
lightly soiled pans.
Wash (45°C)
Rinse
Hot rinse
(49°C)
Drying
5 grams
(pre-rinse)
25 grams
(main wash)
Or 3 in 1
112
Minutes
0.73 11.8
Intensive
For the heaviest
soiled loads, such as
pots, pans,
casserole dishes and
dishes that have
been sitting with
dried food on them
for awhile.
Pre-wash
(40°C)
Wash (55°C)
Rinse
Hot rinse
(65°C)
Drying
5 grams
(pre-rinse)
25 grams
(main wash)
Or 3 in 1
145
Minutes
1.20 15.5
Rapid
A shorter wash for
lightly soiled loads
that do not need
drying.
Wash (40°C)
Hot rinse
(49°C)
15 grams
(main wash) 50
Minutes
0.50 7.5
*The wash program times that are quoted are intended as a guide
only. Please note that factors external to the machine, e.g. the
temperature of your water supply, your water pressure etc. can affect
the time it takes for the wash program to complete.
** NORMAL is the testing program for AS/NZS.2007.1
18

Setting a wash program
Make sure that the before first use section has been
followed.
oCheck whether the appliance needs rinse aid adding to it.
oPull out the top and bottom baskets, then load them in
accordance with the loading instructions.
oPush the top and bottom baskets fully back into position.
oAdd detergent.
oClose the dispenser before starting the dishwasher
oClose the door firmly, so that you hear the door lock click shut.
oTurn the appliance on by using the ON/OFF button.
oIMPORTANT: Wait for 5 seconds before pressing the
program selection button, otherwise the appliance may
not function correctly.
oPress the program selection button to choose an appropriate
wash program for the load that you are washing. Where
applicable, the relevant program indicator will light to show
which program you have selected.
oAfter a few seconds, you will hear the appliance begin to fill with
water and the wash program will have started.
Changing the wash program
IMPORTANT: This should only be attempted when the cycle has
only just started, otherwise the detergent tablet may have
already released or you could have hot water escaping.
oTurn off the appliance using the on/off button and wait for a
minute.
oTurn the appliance back on using the on/off button.
oSelect your new wash program.
oAfter about 10 seconds you will hear the appliance begin to fill
with water and the wash program will have started.
19

At the end of a wash program
oWhen the wash program is finished a buzzer will sound.
oOpen the door of the appliance.
oUse the ON/OFF button to switch the dishwasher off.
oWait a few minutes before unloading the dishwasher to avoid
handling the dishes and utensils while they are still not and more
susceptible to breakages. They will also dry better.
Adding an item to a wash cycle
IMPORTANT: This should only be attempted when the cycle has
only just started, otherwise the detergent tablet may have
already released or you could have hot water escaping.
oSlightly open the door of the appliance and wait for a minute before
fully opening the door to avoid scalding by the hot water.
oThe cycle will pause. The machine will emit a beep and the
“Intensive” and “Normal” LED’s will flash. This is an error signal
caused by opening the door.
oAdd the item and then close the door. The cycle will resume after
approximately 10 seconds.
Delay start
oSet your desired wash program as outlined on page 18.
oPress the delay start button to delay the start of the wash.
oKeep pressing the delay start button until your desired amount of
delay is displayed (in hours):
Off – 3 hours – 6 hours – 9 hours – Off.
oThe maximum amount of delay is 9 hours.
Rinse aid indicator
oThe rinse aid indicator on the control panel will let you know when
the appliance needs rinse aid adding to it.
oThe light indicates that you need to add rinse aid to the
appliance. You should follow the procedure outlined on pages 11.
20
This manual suits for next models
1
Table of contents


