PRTC Digital TV User manual

1
The Future of Television
Entertainment has Arrived –
PRTC Digital TV
Your Guide to PRTC’s Digi tal T V &Whole Home DVR Service
P O W E R E D B Y M I C R O S O F T M E D I A R O O M TM
P A L M E T T O R U R A L T E L E P H O N E C O O P E R A T I V E
Y O U R O N L Y L O C A L T O T A L C O M M U N I C A T I O N S P R O V I D E R

2
Watch what the PRTC DigitalVideo service
can do for your home entertainment.
Welcome to PRTC Digital TV, powered by Microsoft Mediaroom.
TM With the easy-to-read
programming guide and easy-to-use menu and navigation screens, watching
TV just got, well, easier. Every PRTC Digital Receiver is High Definition ready so you
can enjoy the clearest picture and the brightest colors with your HD television.
And with Whole Home DVR you can pause, rewind and play live TV from any receiver
in your house. You can even record all your favorite shows and watch them
when you want, where you want. The Whole Home DVR gives you the freedom to
access your recordings from any TV in your house with a PRTC Digital Receiver.
PRTC Digital TV Service Technical Support (843) 538-5481 www.PRTC.coop PRTC Digital TV Service2 3
KEYS TO CONTROLLING YOUR PRTC DIGITAL TV VIDEO SERVICETABLE OF CONTENTS
KEYS TO CONT ROLLING YOUR PRTC VIDEO SERVICE 3
GET TO KNOW YOUR PRTC HD AND HD/DVR RECEIVER 4
Front Panel Cisco ISB7000 4
Rear Panel Cisco ISB7000 5
Front Panel Cisco CIS430 6
Rear Panel Cisco CIS430 7
CONTROL UP TO FOUR DEVICES WITH YOUR REMOTE
Assign Devices To The Mode Buttons 8
Control The Volume 8
Control Channel Selection 9
Control Power On Other Devices 9
START WITH THE BASIC S
Turn Your TV On Or Off 10
Change The Channel 10
Browse With Picture-In-Picture (PIP) 10
Access And Navigate The Onscreen Menus 10
The Menu Button 11
The Info Button 12
CUSTOMIZE YOUR TV SCREEN FOR HD
Change Your Screen Aspect Ratio For Wide Screen Or HDTV 12
Use Zoom To Adjust The Aspect Ratio 13
FIND WHAT YOU WAN T TO WATCH AND CHOOSE FAVORITES
Use The Interactive Program Guide 14
Set Up Your Favorites List For The First Time 14
Edit Your Favorites List 15
Find Programs Using Search 15
Narrow Your Search 16
CONTROL THE KEYS TO PA RENTAL LOCKS
Lock Specific Channels 16
Lock Programs Based On Ratings 17
Lock Video On Demand Rentals 17
Turn Off Locks Temporarily 17
Reset All Your Parental Locks And Pin 18
Hide Channels In The Guide 18
PAUSE , PLAY, REPLAY AND RECORD LIVE TV
Pause Or Restart A Program 18
Replay Part Or All Of A Program 19
Fast Forward Or Return To The Program 19
Record The Program You’re Watching 19
Add Extra Recording Time To The End Of The Program 20
DISCOVER, PREVIEW AND ENJ OY YOUR CHOICES WITH VIDEO ON DEMAND
Rent Movies From Video On Demand 20
Play Your Current Video Rentals 21
Order Pay Per View Events 22
Paying For On Demand Rentals And Pay Per View Events 22
YOUR PRTC WHOLE HOME DVR HAS IT ALL
Schedule Programs For Recording 22
Schedule A Series Recording From The Program Info Screen 23
Solve Conflicts In Recording Schedules 24
Manage Your Recordings For Browsing, Playing And Replaying 26
SPECIAL FEATURES & APPLICATIONS
Remote DVR (RDVR) 28
Caller ID 30
ANSWERS TO THE MOST-ASKED QUESTIONS ABOUTPRTC VIDEO 31
TROUBLE-SHOOTING TIPS 32
Version 25FEB12
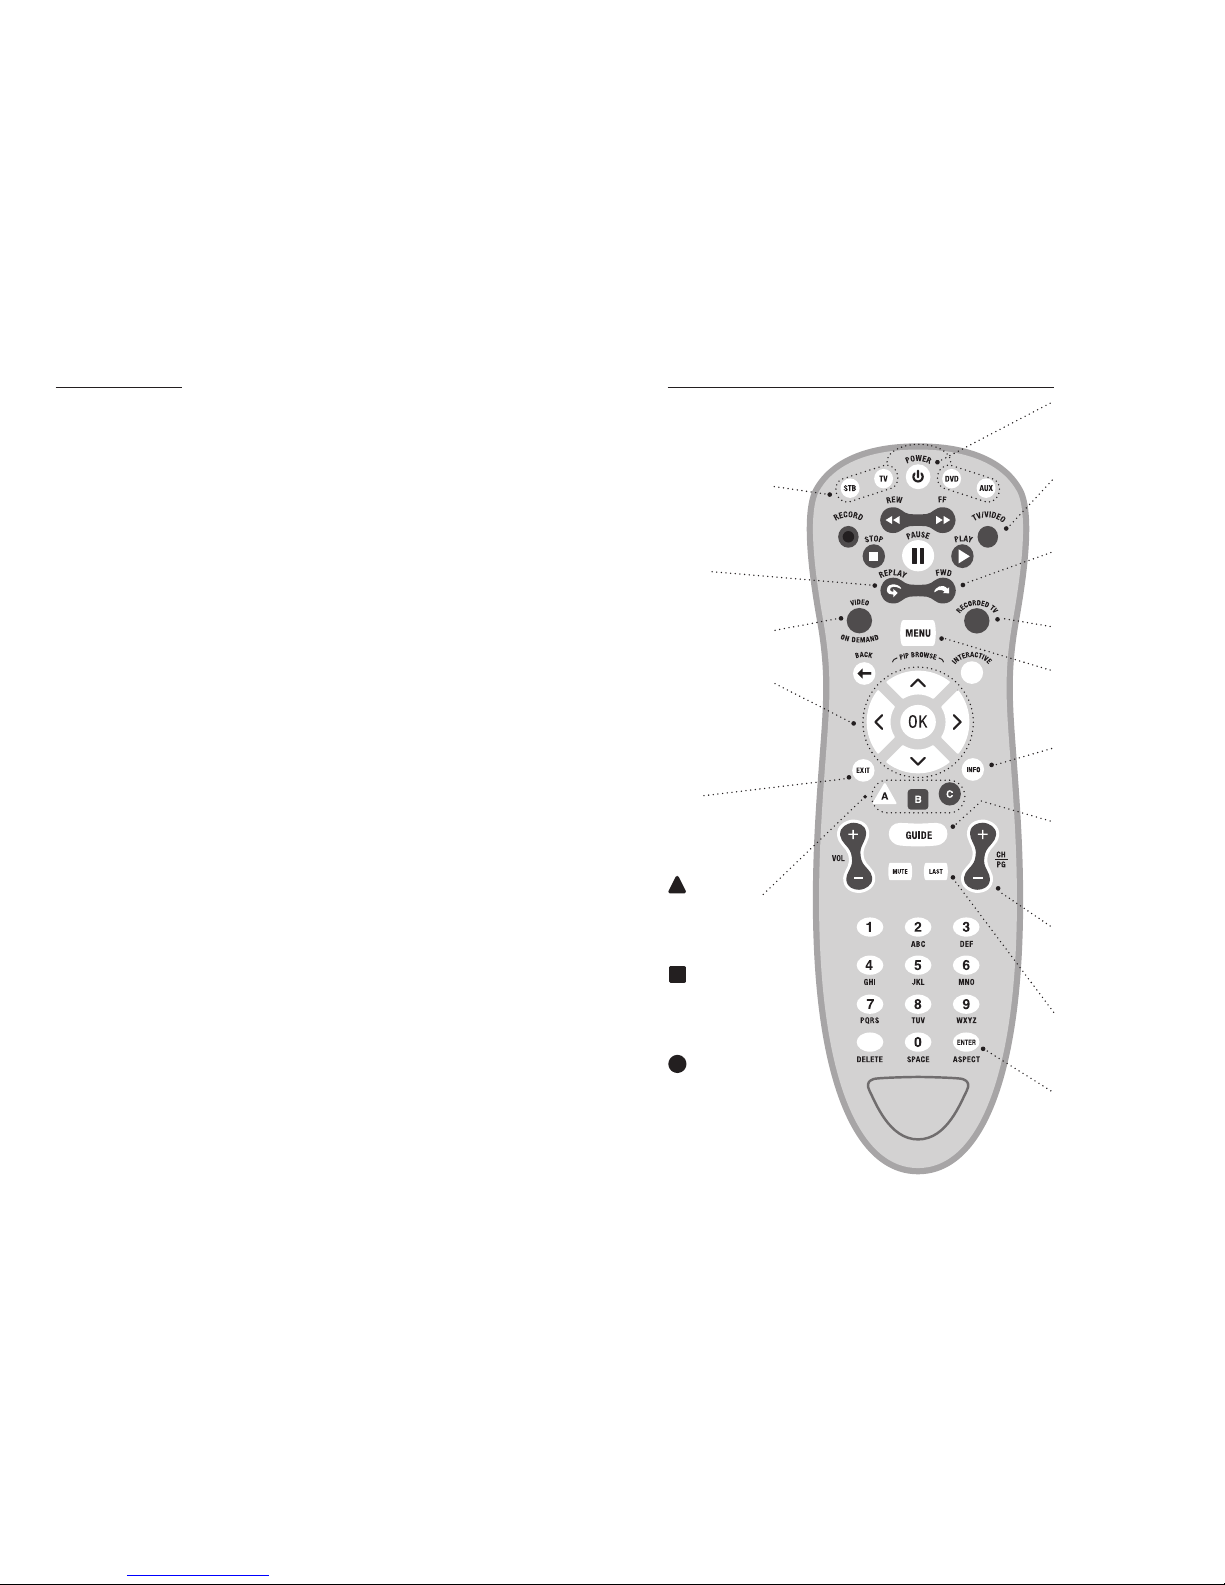
VIDEO ON DEMAND
Access to movies & more.
RECORDED TV LIST
MAIN MENU
Accesses Main Menu
navigation.
PROGRAM INF ORMATION
Displays additional
program information.
ELECTRONIC
PROGRAM GUI DE
(Channel Guide)
View up to 14 days of
programming information.
LAS T
Returns to last
channel viewed.
ASPECT
Launches Viewing Options.
Scroll down to Aspect
ratio and press OK to
make selection.
TV/VIDEO
Switches between
TV and Video inputs.
FOR WARD
Advances programming
in 30 sec. increments.
DIRECTIONAL PA D
Moves cursor in direction
indicated by the arrows.
Center button selects
items. Browse channels
while watching TV.
REP LAY
Instant replay for
DVR and live TV.
DEVICE SELECTION
Select between your
Digital Receiver (HD Digital
Receiver), TV, DVD player
& auxiliary/misc. device.
EXI T
Exits any screen or
menu and returns to last
channel viewed.
POWER
Turns ON/OFF
selected device.
FAVORITES LIST
Access your favorite
channels and programs.
SEA RCH
Search for your favorite
programs.
CALLER ID
Manage your Caller ID
application and view your
call log.
A
B
CHANNEL/PAGE
Scrolls through six
channels at a time on the
Electronic Program Guide.
C
PRTC Digital TV Service Technical Support (843) 538-5481 www.PRTC.coop PRTC Digital TV Service4 5
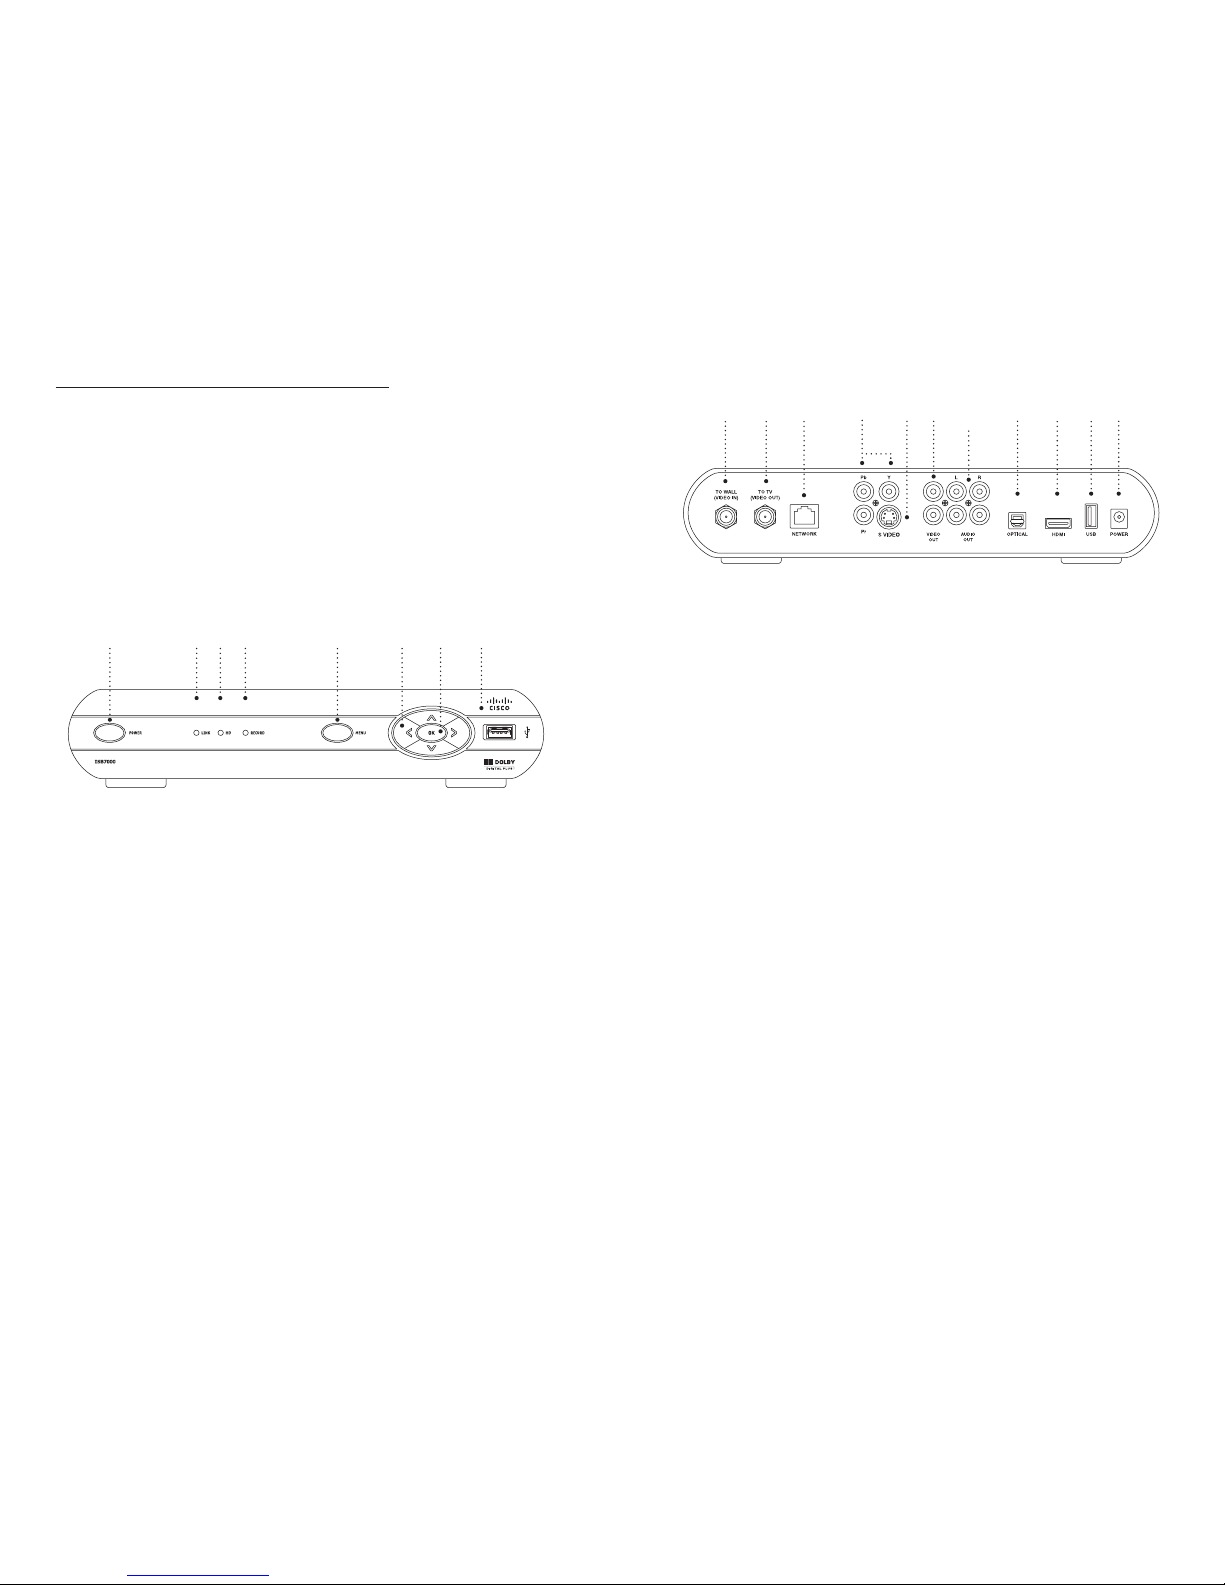
RE AR PANE L C ISC O I SB7000
The Cisco ISB7000 and the Cisco ISB7050 have similar rear-panel controls and lights; the ISB7050 is larger and contains an eSATA port.
1. To Wall (Video In) – Coax input for home video network.
2. To TV (Video Out) – Coax output for TV or VCR.
3. Network – Ethernet port.
4. Y PB PR – components to connect video output to an HDTV.
5. S-Video – Video output for VCR or TV with S-Video connections.
6. Video Out – RCA output to connect to TV, VCR, DVD recorder or other device.
7. Audio Out L and R – Left and Right RCA stereo audio output.
8. Optical – S/PDIF audio output to a digital home theater receiver.
9. HDMI – Input for high definition TV or home theater receiver with HDMI connections.
10. USB – not currently supported, reserved for future use.
11. Power +12V DC – DC power adaptor connection.
GET TO KNOW YOUR PR T C HD A ND HD/ D V R RECEIVER
PRTC currently supports two types of HD Receivers, the Cisco CIS330 and Cisco ISB7000; and
two types of Whole Home DVR receivers, the Cisco CIS430 and the Cisco ISB7050. The receivers
must be handled much in the same way as a computer to reduce potential for damage.
Position it in an open space to allow airflow around the box.
Do not place the box in an enclosed entertainment unit or cabinet.
Do not place the box on a soft surface such as a rug, sofa, bed or other similar surface.
The Digital Receiver should not be next to an external heat source that could raise the
temperature of the box.
Connection into a surge protector along with your other audio/video equipment is
highly recommended.
FR ONT PANEL CI SCO IS B70 0 0
The Cisco ISB7000 and the Cisco ISB7050 have identical front-panel controls and lights; only the size varies.
1. Power – Powers on and off the Digital Receiver. When held for more than 5 seconds the Digital
Receiver is restarted. Green light indicates that the power is on.
2. Link LED – Green light indicates data or programming stream is being received.
3. HD LED - Blue light indicates the Digital Receiver is in high definition (HD) mode (720p or 1080i). If
your receiver is connected to your TV via an HDMI cable, the HD LED will stay blue continuously.
4. Record – Red light indicates program recording. *NOTE: This feature is used with Whole Home DVR
service only.
5. Menu – Activates the on-screen menu.
6. Directional Keys – Allows you to change channels and navigate through the guide and menu.
7. OK – Confirms channels or menu options.
8. USB Port – Not supported at this time, reserved for future use.
!"#$%$&
31094 7 8651 112
1 76 82 3 4 5

PRTC Digital TV Service Technical Support (843) 538-5481 www.PRTC.coop PRTC Digital TV Service6 7
RE AR PANE L C ISC O C IS430
The Cisco CIS330 and the Cisco CIS430 have identical rear-panel controls and lights; only the size varies.
1. Network – Ethernet port.
2. USB – not currently supported, reserved for future use.
3. HDMI – Input for high definition TV or home theater receiver with HDMI connections.
4. Y PB PR – components to connect video output to an HDTV.
5. S-Video – Video output for VCR or TV with S-Video connections.
6. Video Out – RCA output to connect to TV, VCR, DVD recorder or other device.
7. Audio Out L and R – Left and Right RCA stereo audio output.
8. Optical – S/PDIF audio output to a digital home theater receiver.
9. To TV (Video Out) – Coax output for TV or VCR.
10. To Wall (Video In) – Coax input for home video network.
11. Power – power adaptor connection.
FR ONT PANEL CI SCO CIS 4 30
The Cisco CIS330 and the Cisco CIS430 have identical front-panel controls and lights; only the size varies.
1. Power – Powers on and off the Digital Receiver. When held for more than 5 seconds the digital
receiver is restarted. Green light indicates that the power is on.
2. Link LED – Green light indicates data or programming stream is being received.
3. HD LED - Blue light indicates the Digital Receiver is in high definition (HD) mode (720p or 1080i). If
your receiver is connected to your TV via an HDMI cable, the HD LED will stay blue continuously.
4. Record – Red light indicates program recording. *NOTE: This feature is used with Whole Home DVR
service only.
5. Menu – Activates the on-screen menu.
6. Directional Keys – Allows you to change channels and navigate through the guide and menu.
7. OK – Confirms channels or menu options.
8. USB Port – Not supported at this time, reserved for future use.
1 52 3 4 6 7 8 8 976 105111 2 3 4

PRTC Digital TV Service Technical Support (843) 538-5481 www.PRTC.coop PRTC Digital TV Service8 9
CONTROL UP TO FOUR DE VICES WITH YO U R REMOTE
At the time of your installation your remote was programmed to control your TV and Digital Receiver.
Your remote can also control up to two other devices like a DVD player, stereo receiver or home
theater system.
AS S IGN DEVIC E S TOTHE MO D E B U T TO NS
1. Turn on the device you would like to program into your remote.
2. Aim the remote at the device, and press and hold the mode button you want to assign it to
( ,, ).
3. Press while holding the mode button, and then release them both. All mode buttons will
flash twice.
4. Enter 9 2 2 within 10 seconds using the number keypad on the remote. The mode button you
previously selected will flash.
5. Press PLAY if the device is a TV or DVD player. Then press FF repeatedly until the device turns off.
6. Press PLAY if you are setting up the button. Then use the number keypad to enter one of
the following:
1for VCR
2for stereo receiver/tuner
3for amplifier
4for home theater in a box
7. Press to save the settings.
8. Press the device’s mode button, and then press POWER
.The device should turn on. Refer to the
remote’s manual if it does not.
9. Repeat for any other devices.
Now you can operate multiple devices with one remote by using your mode buttons.
CON T ROL THE VOLUM E
At the time of your installation your remote was programmed to control your PRTC Digital Receiver
and your TV. This includes the VOLUME and buttons.
To assign the volume controls to any other device follow the instructions below.
1. Press and hold the button. Press while holding the button then release both. All mode
buttons will flash twice.
2. Enter 9 5 5 on the number keypad. The button will flash twice.
3. Press the mode button for or if you would like to send the volume control to a device
assigned to one of those buttons. The mode button will flash three times.
4. If you want VOLUME and to control all devices depending on the active mode Press .
The button will flash three times.
CON T ROL CHANNEL SELEC T I ON
Channel control buttons like and are programmed to affect your Digital Receiver. If you
would like to assign channel controls to any or all of the devices assigned to your remote, follow the
instructions below.
1. Press and hold the button. Press while holding the button then release both. All mode
buttons will flash twice.
2. Enter 9 6 6 on the number keypad. The button will flash twice.
3. Press the mode button for or if you would like to send channel controls to a device assigned
to one of those buttons. The mode button will flash three times.
4. If you want and to control all devices depending on the active mode press . The
button will flash three times.
CON T ROL POW ER ONOTHE R DE V I CES
At the time of your installation the POWER button on your remote was programmed to affect
your Digital Receiver. If you would like to assign the POWER button to other devices, follow the
instructions below.
1. Press and hold the button. Press while holding the button then release both. All mode
buttons will flash twice.
2. Enter 9 7 7 on the number keypad. The button will flash twice.
3. Press the button, it will flash twice. Press the button, it will also flash twice.
4. Press and / or to control those devices, each button will flash twice.
5. Press once you are finished adding devices and then the button will flash three times.
PRTC Digital TV Service Technical Support (843) 538-5481 www.PRTC.coop PRTC Digital TV Service10 11
t1SFTT to select your highlighted item.
t1SFTTBACK to go back to the last menu screen you were viewing.
t1SFTTEXIT TO at anytime to return to TV viewing.
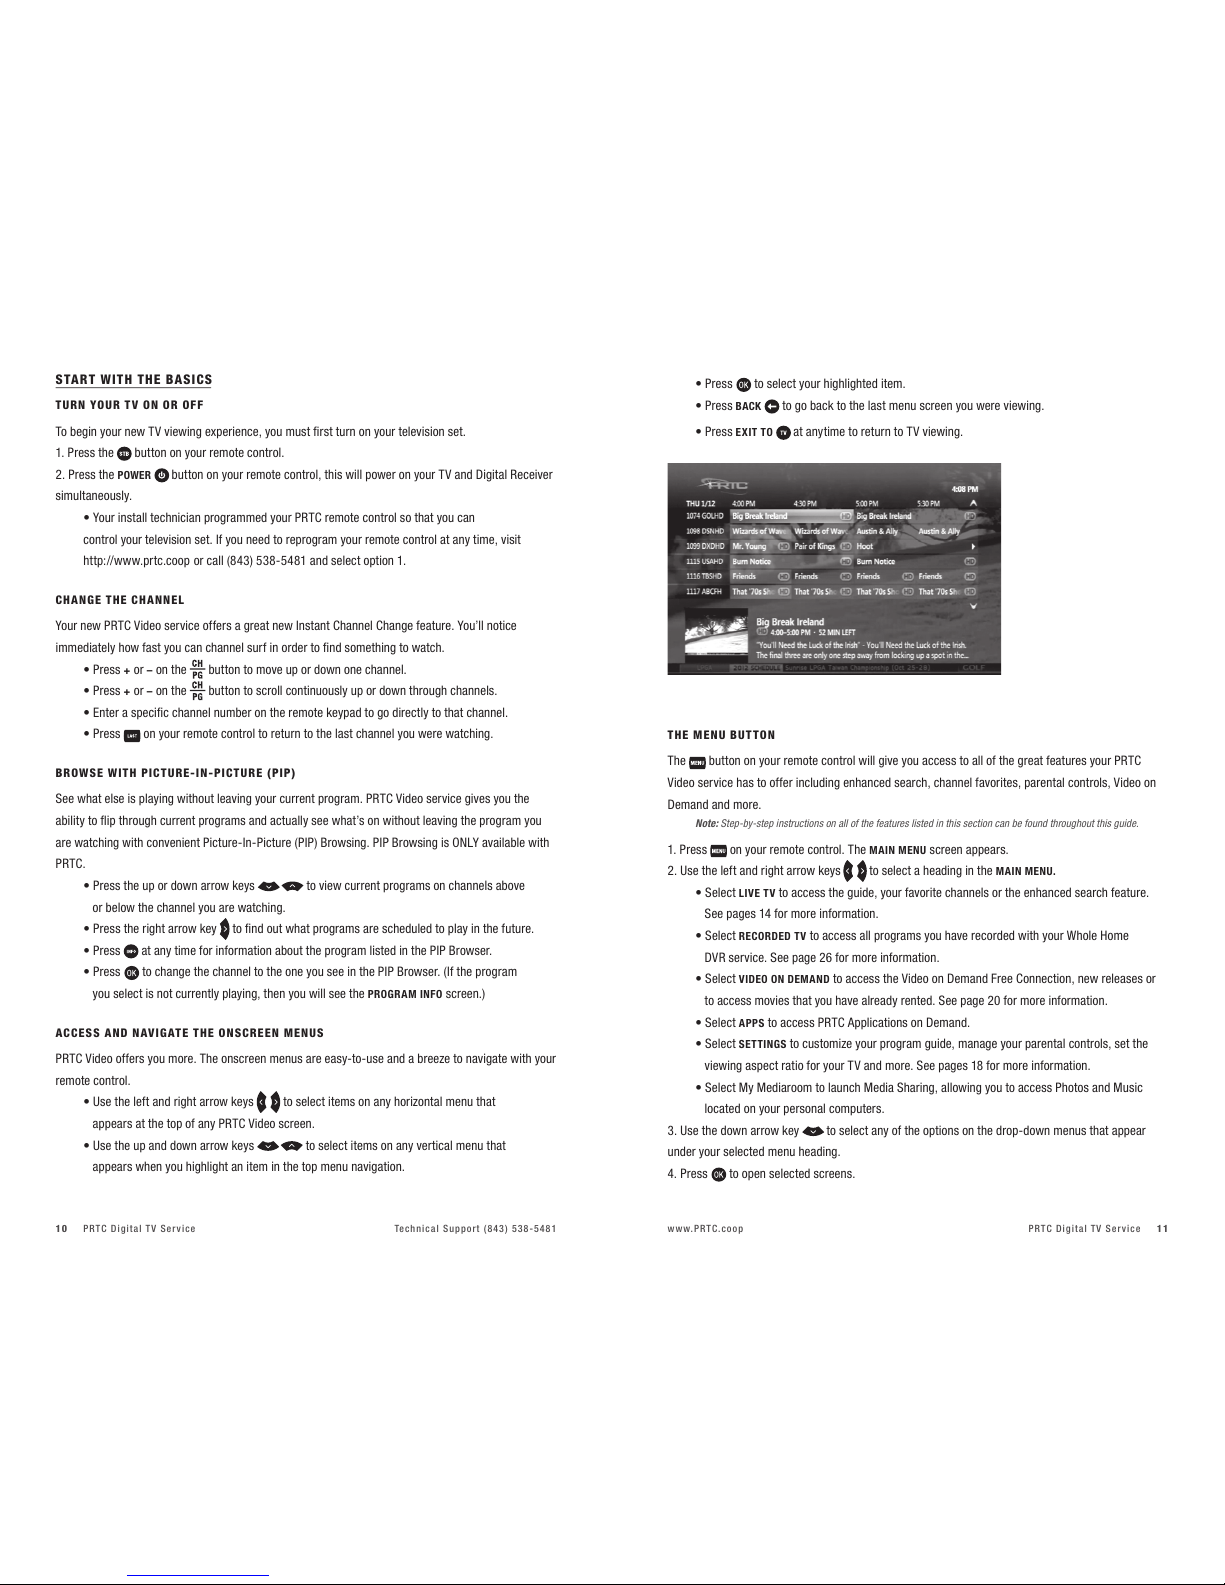
THE M EN U B U T TO N
The button on your remote control will give you access to all of the great features your PRTC
Video service has to offer including enhanced search, channel favorites, parental controls, Video on
Demand and more.
Note: Step-by-step instructions on all of the features listed in this section can be found throughout this guide.
1. Press on your remote control. The MAIN MENU screen appears.
2. Use the left and right arrow keys to select a heading in the MAIN MENU.
t4FMFDULIVE TV to access the guide, your favorite channels or the enhanced search feature.
See pages 14 for more information.
t4FMFDURECORDED TV to access all programs you have recorded with your Whole Home
DVR service. See page 26 for more information.
t4FMFDUVIDEO ON DEMAND to access the Video on Demand Free Connection, new releases or
to access movies that you have already rented. See page 20 for more information.
t4FMFDUAPPS to access PRTC Applications on Demand.
t4FMFDUSETTINGS to customize your program guide, manage your parental controls, set the
viewing aspect ratio for your TV and more. See pages 18 for more information.
t4FMFDU.Z.FEJBSPPNUPMBVODI.FEJB4IBSJOHBMMPXJOHZPVUPBDDFTT1IPUPTBOE.VTJD
located on your personal computers.
3. Use the down arrow key to select any of the options on the drop-down menus that appear
under your selected menu heading.
4. Press to open selected screens.
START WITH THE B A SICS
TUR N YOUR T V ON OR OFF
To begin your new TV viewing experience, you must first turn on your television set.
1. Press the button on your remote control.
2. Press the POWER button on your remote control, this will power on your TV and Digital Receiver
simultaneously.
t:PVSJOTUBMMUFDIOJDJBOQSPHSBNNFEZPVS135$SFNPUFDPOUSPMTPUIBUZPVDBO
control your television set. If you need to reprogram your remote control at any time, visit
http://www.prtc.coop or call (843) 538-5481 and select option 1.
CH A N GE THE CHANN EL
Your new PRTC Video service offers a great new Instant Channel Change feature. You’ll notice
immediately how fast you can channel surf in order to find something to watch.
t1SFTT+or –on the button to move up or down one channel.
t1SFTT+or –on the button to scroll continuously up or down through channels.
t&OUFSBTQFDJmDDIBOOFMOVNCFSPOUIFSFNPUFLFZQBEUPHPEJSFDUMZUPUIBUDIBOOFM
t1SFTT on your remote control to return to the last channel you were watching.
BROW S E WI T H PI C T URE-IN-PIC TURE (PIP)
See what else is playing without leaving your current program. PRTC Video service gives you the
ability to flip through current programs and actually see what’s on without leaving the program you
are watching with convenient Picture-In-Picture (PIP) Browsing. PIP Browsing is ONLY available with
PRTC.
t1SFTTUIFVQPSEPXOBSSPXLFZT to view current programs on channels above
or below the channel you are watching.
t1SFTTUIFSJHIUBSSPXLFZ to find out what programs are scheduled to play in the future.
t1SFTT at any time for information about the program listed in the PIP Browser.
t1SFTT to change the channel to the one you see in the PIP Browser. (If the program
you select is not currently playing, then you will see the PROGRAM INFO screen.)
AC C ESS AND N AV I G ATE THE O NSCR E EN ME N US
PRTC Video offers you more. The onscreen menus are easy-to-use and a breeze to navigate with your
remote control.
t6TFUIFMFGUBOESJHIUBSSPXLFZT to select items on any horizontal menu that
appears at the top of any PRTC Video screen.
t6TFUIFVQBOEEPXOBSSPXLFZT to select items on any vertical menu that
appears when you highlight an item in the top menu navigation.
PRTC Digital TV Service Technical Support (843) 538-5481 www.PRTC.coop PRTC Digital TV Service12 13
THE IN FO B UT T O N
The button gives you more information about current and future programming. Press this button
anytime you would like more information on a selected program. You can also schedule a recording
from any PROGRAM INFO screen.
Get Info About The Program You’re Watching
1. Press the button on your remote. The PROGRAM INFO screen appears with a brief description of
the program including the run time.
2. Press the right arrow key to access information on the cast and crew.
3. Press the down arrow key to record the program one time or to set up a series recording.
Press to select the desired action. See page 19 for more information.
4. Press or EXIT TO to return to the program you were watching.
Get Info About A Future Program
1. Press on your remote. See page 14 for more information.
2. Press the right arrow key to highlight a program that is not currently on.
3. Press to view details about the highlighted program and to schedule a one-time or
series recording.
Note: You can also get more information on any program in your results list when using the search feature.
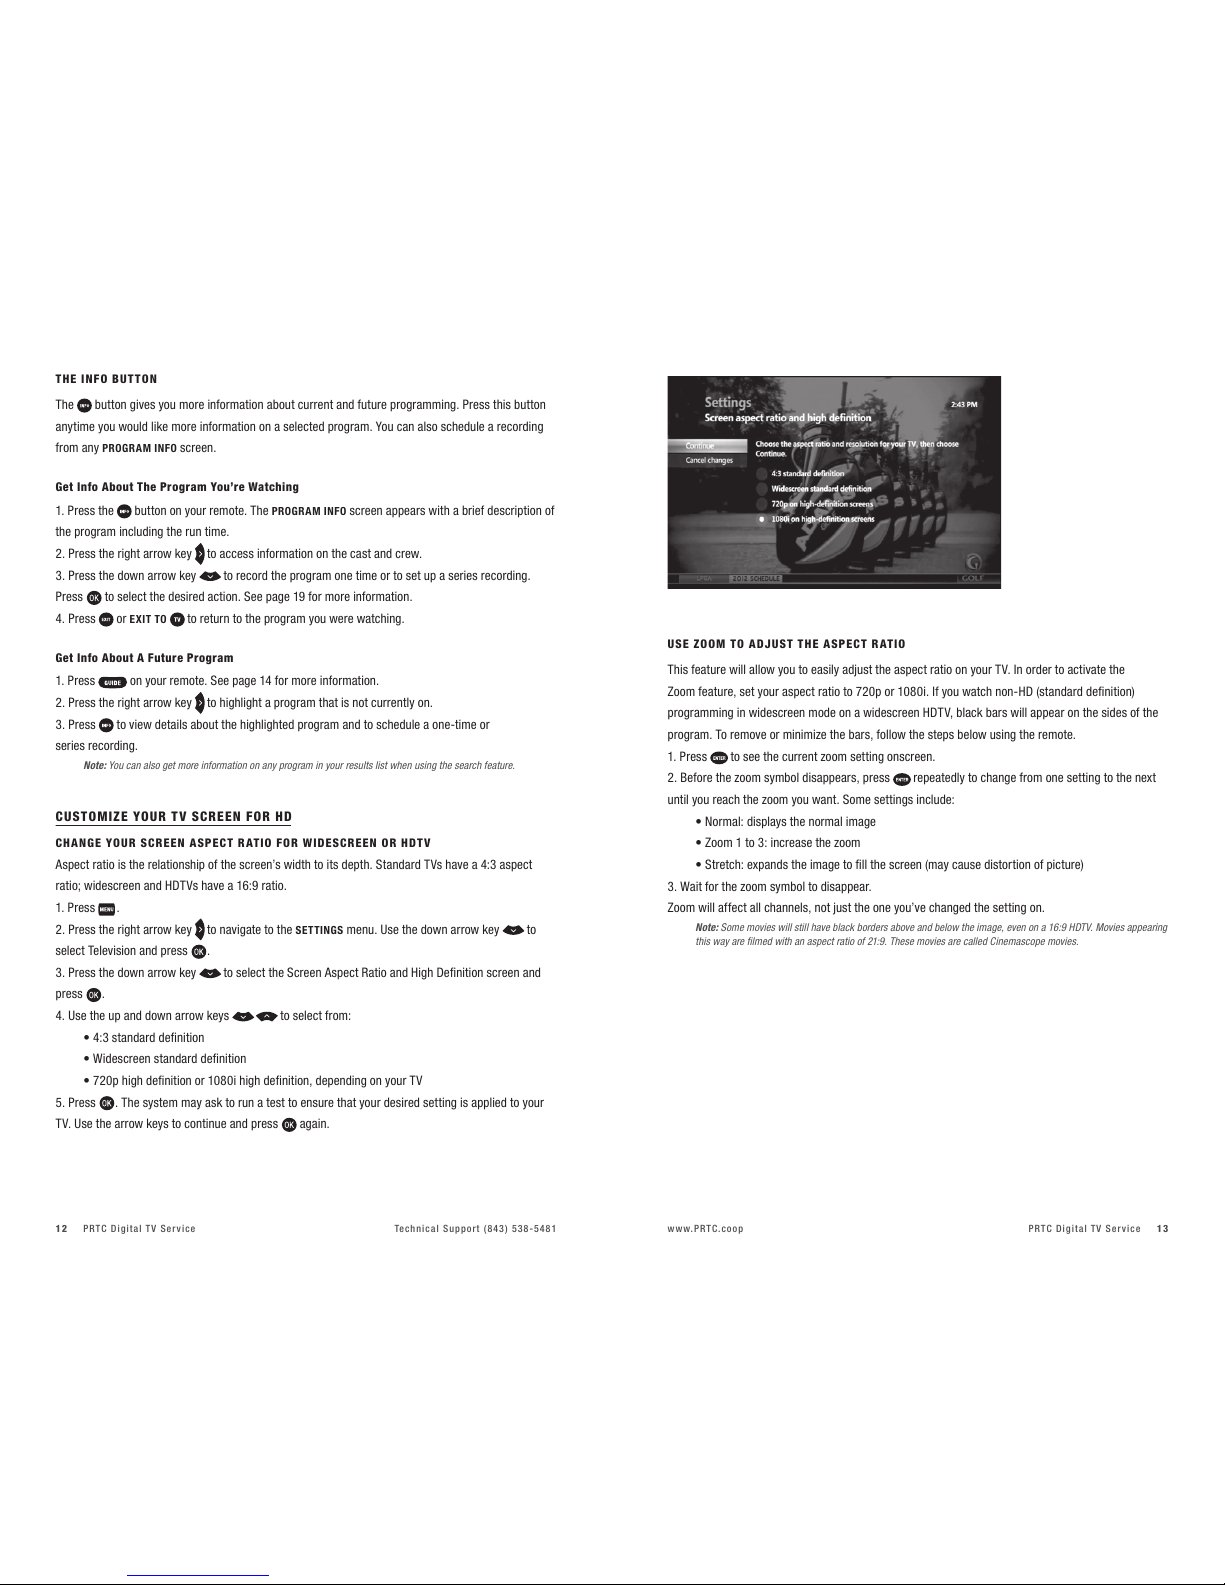
CUSTOMIZE YOUR T V S C REEN FOR HD
CH A N GE YOUR SCRE EN AS PEC T RAT IO FO R WIDESCR EEN OR H DT V
Aspect ratio is the relationship of the screen’s width to its depth. Standard TVs have a 4:3 aspect
ratio; widescreen and HDTVs have a 16:9 ratio.
1. Press .
2. Press the right arrow key to navigate to the SETTINGS menu. Use the down arrow key to
select Television and press .
3. Press the down arrow key to select the Screen Aspect Ratio and High Definition screen and
press .
4. Use the up and down arrow keys to select from:
tTUBOEBSEEFmOJUJPO
t8JEFTDSFFOTUBOEBSEEFmOJUJPO
tQIJHIEFmOJUJPOPSJIJHIEFmOJUJPOEFQFOEJOHPOZPVS57
5. Press . The system may ask to run a test to ensure that your desired setting is applied to your
TV. Use the arrow keys to continue and press again.
US E ZOO M T O ADJU S T T HE ASPECT RATIO
This feature will allow you to easily adjust the aspect ratio on your TV. In order to activate the
Zoom feature, set your aspect ratio to 720p or 1080i. If you watch non-HD (standard definition)
programming in widescreen mode on a widescreen HDTV, black bars will appear on the sides of the
program. To remove or minimize the bars, follow the steps below using the remote.
1. Press to see the current zoom setting onscreen.
2. Before the zoom symbol disappears, press repeatedly to change from one setting to the next
until you reach the zoom you want. Some settings include:
t/PSNBMEJTQMBZTUIFOPSNBMJNBHF
t;PPNUPJODSFBTFUIF[PPN
t4USFUDIFYQBOETUIFJNBHFUPmMMUIFTDSFFONBZDBVTFEJTUPSUJPOPGQJDUVSF
3. Wait for the zoom symbol to disappear.
Zoom will affect all channels, not just the one you’ve changed the setting on.
Note: Some movies will still have black borders above and below the image, even on a 16:9 HDTV. Movies appearing
this way are filmed with an aspect ratio of 21:9. These movies are called Cinemascope movies.
PRTC Digital TV Service Technical Support (843) 538-5481 www.PRTC.coop PRTC Digital TV Service14 15
FIND WHAT YOU WANT TO WATCH AND CHOOSE FAVOR I TE S
PRTC Video service offers you several ways to find what you want to watch so that you never miss a
program. You can even create a Program Guide with just your favorite channels so you only see the
channels you are interested in.
USE THE IN T E R ACTIVE PRO GR AM GU IDE
1. Press the button to display the Interactive Program Guide.
t6TFUIF"SSPX,FZTUPTDSPMMUISPVHIDVSSFOUBOEGVUVSFQSPHSBNNJOHPQUJPOT
t6TF to scroll through a page at a time.
t6TFFF / REW to skip ahead / back 24 hours at a time. Your PRTC Interactive
Program Guide will allow you to view programming information up to 14 days in the future.
2. Highlight a program to view more information.
a. Press to view the program if it is currently on. If your selected program is not currently
on, then a PROGRAM INFO screen will appear.
b. Press to see more viewing options and additional program information like
cast and crew.
c. Press the RECORD button once to record the program. Press the RECORD button
twice to record the series. See page 22 for more information on recording.
d. Press to exit the Interactive Program Guide and resume your viewing.
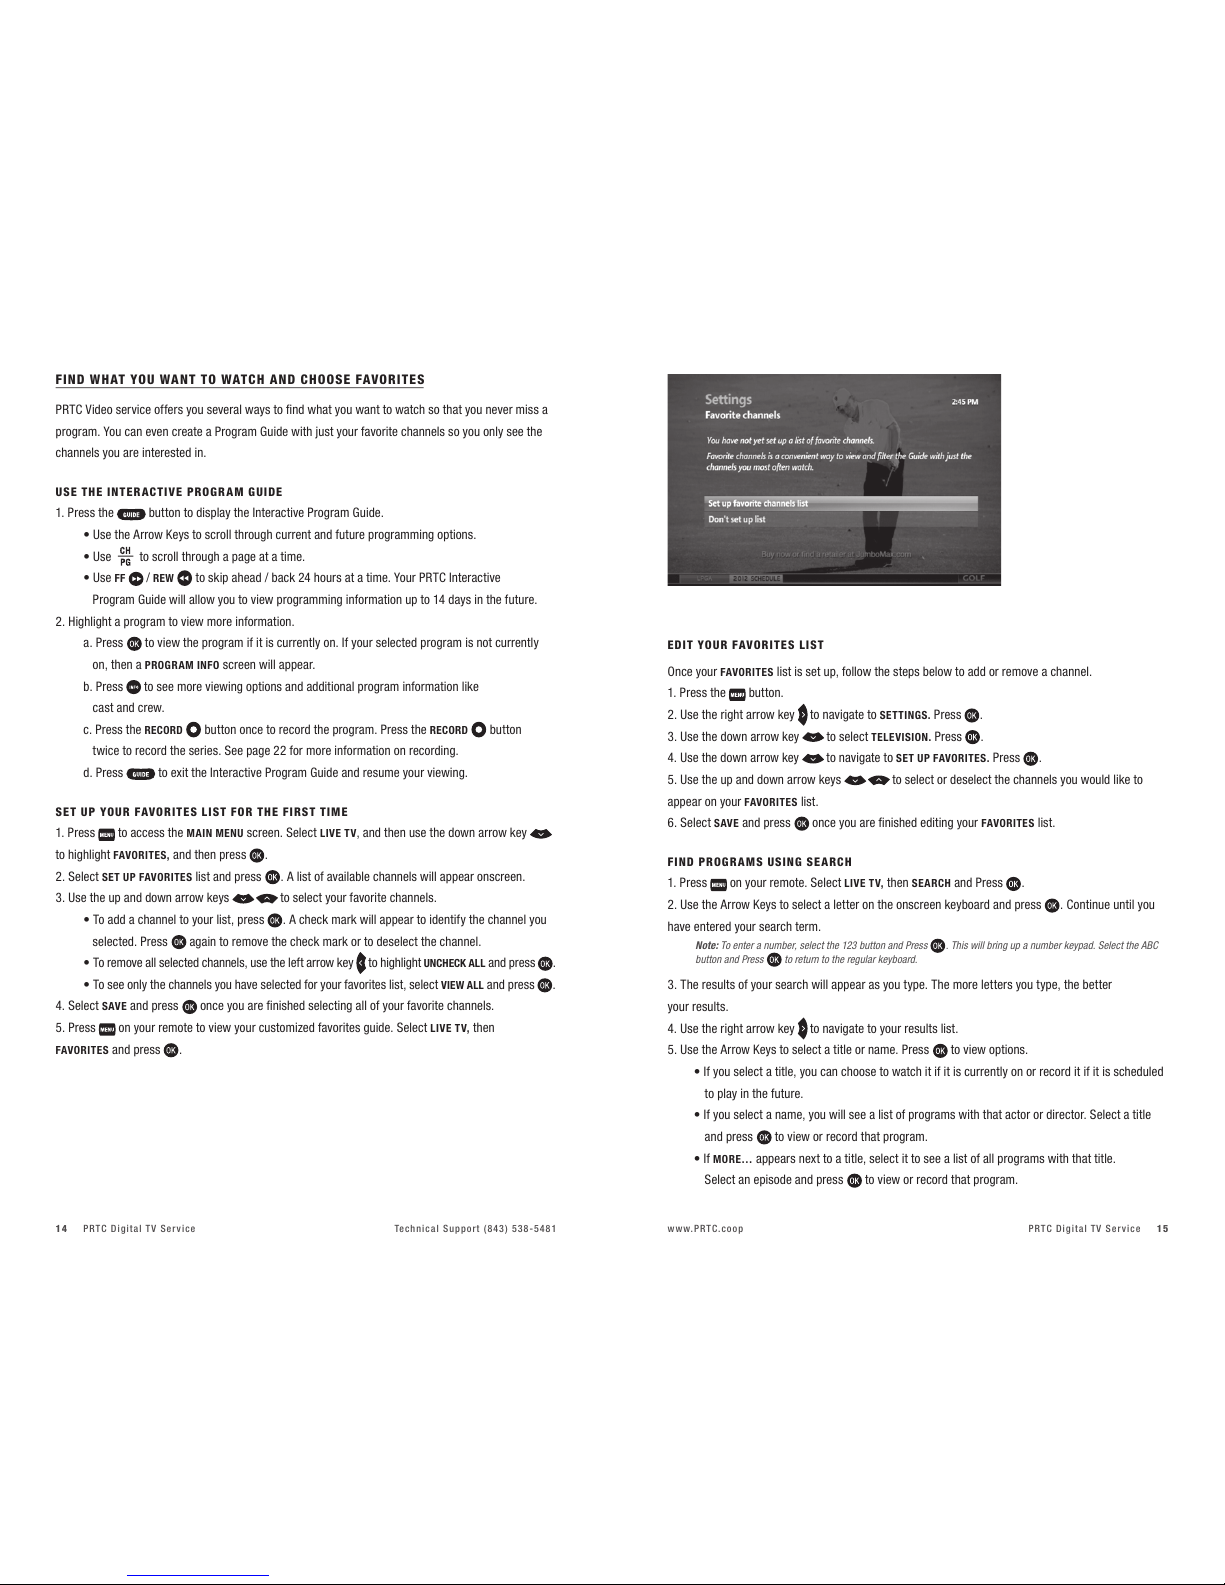
SET UPYOUR FAVOR I TES LIS T FOR TH E FIRST TIME
1. Press to access the MAIN MENU screen. Select LIVE TV, and then use the down arrow key
to highlight FAVORITES, and then press .
2. Select SET UP FAVORITES list and press . A list of available channels will appear onscreen.
3. Use the up and down arrow keys to select your favorite channels.
t5PBEEBDIBOOFMUPZPVSMJTUQSFTT . A check mark will appear to identify the channel you
selected. Press again to remove the check mark or to deselect the channel.
t5PSFNPWFBMMTFMFDUFEDIBOOFMTVTFUIFMFGUBSSPXLFZ to highlight UNCHECK ALL and press .
t5PTFFPOMZUIFDIBOOFMTZPVIBWFTFMFDUFEGPSZPVSGBWPSJUFTMJTUTFMFDUVIEW ALL and press .
4. Select SAVE and press once you are finished selecting all of your favorite channels.
5. Press on your remote to view your customized favorites guide. Select LIVE TV, then
FAVORITES and press .
ED I T YO UR FAVOR ITES LIS T
Once your FAVORITES list is set up, follow the steps below to add or remove a channel.
1. Press the button.
2. Use the right arrow key to navigate to SETTINGS. Press .
3. Use the down arrow key to select TELEVISION. Press .
4. Use the down arrow key to navigate to SET UP FAVORITES. Press .
5. Use the up and down arrow keys to select or deselect the channels you would like to
appear on your FAVORITES list.
6. Select SAVE and press once you are finished editing your FAVORITES list.
FI ND PROG R A MS USING SEARC H
1. Press on your remote. Select LIVE TV, then SEARCH and Press .
2. Use the Arrow Keys to select a letter on the onscreen keyboard and press . Continue until you
have entered your search term.
Note: To enter a number, select the 123 button and Press . This will bring up a number keypad. Select the ABC
button and Press to return to the regular keyboard.
3. The results of your search will appear as you type. The more letters you type, the better
your results.
4. Use the right arrow key to navigate to your results list.
5. Use the Arrow Keys to select a title or name. Press to view options.
t*GZPVTFMFDUBUJUMFZPVDBODIPPTFUPXBUDIJUJGJUJTDVSSFOUMZPOPSSFDPSEJUJGJUJTTDIFEVMFE
to play in the future.
t*GZPVTFMFDUBOBNFZPVXJMMTFFBMJTUPGQSPHSBNTXJUIUIBUBDUPSPSEJSFDUPS4FMFDUBUJUMF
and press to view or record that program.
t*GMORE… appears next to a title, select it to see a list of all programs with that title.
Select an episode and press to view or record that program.

PRTC Digital TV Service Technical Support (843) 538-5481 www.PRTC.coop PRTC Digital TV Service16 17
t*GVIDEO appears next to a title, you can preview or rent the program through the VIDEO ON
DEMAND feature.
NAR ROW YOUR S E A RCH
1. Navigate to the SEARCH screen. Select OPTIONS on the onscreen keyboard and press .
2. Under FILTER RESULTS, select TITLES, VIDEO ON DEMAND or PEOPLE depending on what you are
looking for. Press .
3. Use the onscreen keyboard to enter your search term. Results will appear as you type. Select from
the RESULTS list and press .
CONTROL THE KEYS TO PARENTAL LOCKS
With PRTC Video service you can control what types of programs can be viewed in your home. You
can even hide unwanted information that may appear in the program guide. Use parental locks to
make certain channels and types of programming only accessible with a Personal Identification
Number (PIN).
1. Press . Use the right arrow key to select SETTINGS and the down arrow key to highlight
PARENTAL CONTROLS. Press .
t*GBMPDLBQQFBSTOFYUUPPARENTAL LOCKING, then a PIN has already been set and parental
locks are in place.
t*GBOPQFOMPDLBQQFBSTOFYUUP PARENTAL LOCKING, then a PIN has been set but no parental
locks are in place.
t*GOPMPDLBQQFBSTUIFOB1*/IBTOPUZFUCFFOTFU
2. Press to select PARENTAL LOCKING.
3. Use your remote to enter your four-digit PIN. If no PIN has been set, enter a new four-digit PIN. You
will be prompted to enter it again for confirmation.
4. Use the Arrow Keys to navigate the locking options that appear on the PARENTAL LOCKING screen.
LOC K SP ECIFIC CH A NNEL S
1. From the PARENTAL LOCKING screen use the Arrow Keys to select CHANGE next to CHANNELS.
Press .
2. Use the up and down arrow keys to select specific channels from the onscreen list.
For faster navigation use the button. This will scroll up or down a page at a time.
t1SFTT to lock a channel. A lock will appear. Press again to unlock the channel.
t6TFUIFMFGUBSSPXLFZ to select UNLOCK ALL and Press . This will unlock all channels.
t6TFUIFMFGUBSSPXLFZ to select VIEW LOCKED ONLY to see only the channels you locked.
3. Select SAVE and press .
4. Select LOCK.Press and then or EXIT TO on your remote.
LOC K PR OGRAMS BASE D ONRAT INGS
1. From the PARENTAL LOCKING screen, use the Arrow Keys to select CHANGE next to USE TV
PARENTAL GUIDELINES or MOVIE RATINGS depending on the rating system you would like
to lock. Press .
2. Use the down arrow key to select the lowest rating you would like to lock, press .
t5IJTXJMMMPDLBMM57QSPHSBNTPSNPWJFTEFQFOEJOHPOUIFSBUJOHTZTUFNZPVTFMFDUFEXJUI
that rating or higher.
t6TFUIFMFGUBSSPXLFZ to unlock all ratings by selecting UNLOCK ALL and then pressing .
3. Select SAVE and press .
4. Select LOCK.Press and then or EXIT TO on your remote.
LOC K VID EO ON DEMA N D RE N TA L S
1. From the PARENTAL LOCKING screen, use the Arrow Keys to select CHANGE next to RENTAL
LOCKING. Press .
2. Select LOCK RENTING and press . A lock will appear. This will require your four-digit PIN before a
VIDEO ON DEMAND rental can be made.
3. Select SAVE and press .
4. Select LOCK.Press and then or EXIT TO on your remote.
Note: To prevent unauthorized rentals from occurring, it is recommended that you set a Rental Locking PIN.
This PIN will be required each time you rent a movie.
TUR N OFF LO C KS TE MPO R A R ILY
1. From the PARENTAL LOCKING screen, use the Arrow Keys to select TURN OFF LOCKING. Press .
2. Select UNLOCK ALL TV FOR 4 HOURS and press .
Note: A PIN will still be required to purchase locked rentals.
3. If you would like to turn locks on before the allotted time period, select LOCK on the PARENTAL
LOCKING screen and press .
PRTC Digital TV Service Technical Support (843) 538-5481 www.PRTC.coop PRTC Digital TV Service18 19
RE S E T ALL YOU R PARE NTAL LO CKS AND PIN
1. From the PARENTAL LOCKING screen, use the Arrow Keys to select TURN OFF LOCKING. Press .
2. Select RESET ALL PARENTAL LOCKSand press .
3. Select RESET to reset your PIN and to stop using parental locks. Press . The next time you
access the PARENTAL LOCKSscreen you will be asked to create a new PIN.
HI DE CH A NNE L S INTHE GU IDE
You can customize your channel guide by choosing to hide specific channels. Hidden channels will
not appear in the program guide or while browsing. You can still access hidden channels by using the
keypad on your remote.
1. Press
. Use the right arrow key to select SETTINGS and the down arrow key to highlight
TELEVISION. Press .
2. Select CUSTOMIZE CHANNEL GUIDE and Press .
3. Use the up and down arrow keys to select channels (or use the button to scroll
through a page at a time). Press to hide a channel. The check mark will disappear. This channel is
now hidden. Press again to unhide the channel (the check mark will reappear).
t5PSFDIFDLBMMDIBOOFMTVTFUIFMFGUBSSPXLFZ to select CHECK ALL. Press .
t5PTFFPOMZUIFDIBOOFMTZPVTFMFDUFEUPIJEFIJHIMJHIUVIEW UNCHECKED and press .
4. Select SAVE and press .
PAU SE, PL AY, RE PL AY AND RECOR D L I V E T V
If you subscribe to PRTC’s Whole Home DVR service, you can control live TV! Your Whole Home DVR
records up to 90 minutes of the channel you are currently watching. This means you can pause,
replay and record what you’re watching so that you never miss a thing.
PAU SE ORRE S TA R T A PROGR AM
1. Press PAUSE on your remote to temporarily stop a live TV program.
2. A progress bar will appear onscreen. This will show you the start and end times of your current
program, how much time has elapsed and at what point you paused the program. The program will
remain paused for up to 90 minutes. If you cannot return to your program in 90 minutes, simply press
RECORD so that you can resume viewing when you are ready.
3. Press PLAY at any time to resume viewing.
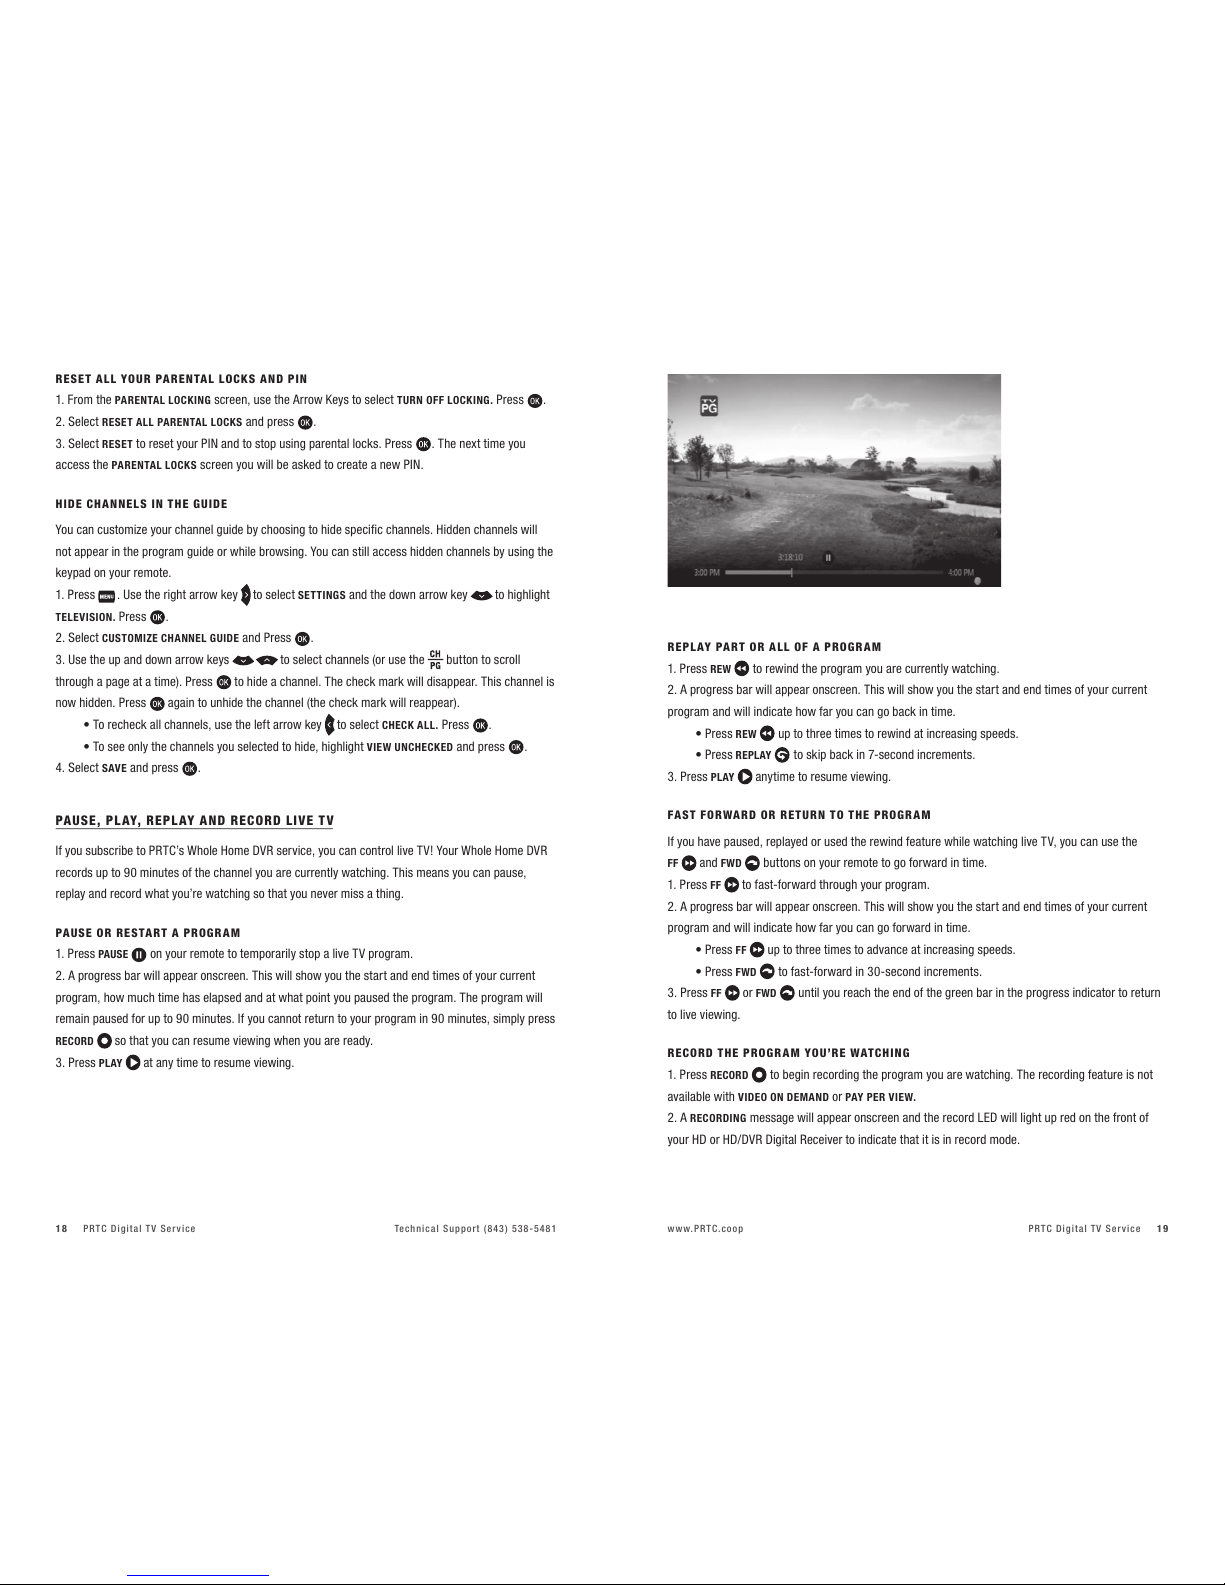
R EP L AY PA RT ORALL OF A P ROG R A M
1. Press REW to rewind the program you are currently watching.
2. A progress bar will appear onscreen. This will show you the start and end times of your current
program and will indicate how far you can go back in time.
t1SFTTREW up to three times to rewind at increasing speeds.
t1SFTTREPLAY to skip back in 7-second increments.
3. Press PLAY anytime to resume viewing.
FAST FOR WA RD ORRETUR N TOTHE PROG R A M
If you have paused, replayed or used the rewind feature while watching live TV, you can use the
FF and FWD buttons on your remote to go forward in time.
1. Press FF to fast-forward through your program.
2. A progress bar will appear onscreen. This will show you the start and end times of your current
program and will indicate how far you can go forward in time.
t1SFTTFF up to three times to advance at increasing speeds.
t1SFTTFWD to fast-forward in 30-second increments.
3. Press FF or FWD until you reach the end of the green bar in the progress indicator to return
to live viewing.
RE C ORD THE PROG R A M YOU’RE WAT CHI NG
1. Press RECORD to begin recording the program you are watching. The recording feature is not
available with VIDEO ON DEMAND or PAY PER VIEW.
2. A RECORDING message will appear onscreen and the record LED will light up red on the front of
your HD or HD/DVR Digital Receiver to indicate that it is in record mode.

PRTC Digital TV Service Technical Support (843) 538-5481 www.PRTC.coop PRTC Digital TV Service20 21
3. Press STOP to end the recording at any time and then press . If you do not manually stop the
recording it will automatically stop at the program’s scheduled end time.
Note: Your Whole Home DVR gives you the ability to watch one program while recording another program
at the same time.
4. Once your recording is complete it will be saved under the program’s title. See page 27 for more
information about playing recorded programming.
ADD EX TR A RE C ORD ING TIM E TOTHE END O F T HE PROGR AM
If you think that the program you are recording will go over its scheduled end time, you can add time
to the end of the recording. This happens often with sporting events and season finales.
1. Press after the program has begun recording. Use the Arrow Keys to select RECORD SETTINGS
and press .
2. Select STOP RECORDING and press .
3. Select the amount of time you would like to add to your recording. Press .
4. Use the left arrow key to select SAVE CHANGES and press .
5. Select WATCH and press . This will return you to your program.
DI SCOVER, PR E V I E W A N D ENJOY YOUR CH OICES WITH VIDEO ON DEMAND
With PRTC Digital TV service you can rent new releases and your old favorites using Video on
Demand. Rent movies with the touch of a button and watch them when you want. The best part is
you never have to leave your home! And did we mention no late fees? Well, there are no late fees.
Any rental charges will be added directly to your monthly bill.
RE N T MO VIE S F ROM VID EO ON DEMAND
1. Access the VIDEO ON DEMAND menu screen by performing one of the actions listed below.
t1SFTTVIDEO ON DEMAND on your remote.
t1SFTT . Use the Arrow Keys to select VIDEO ON DEMAND. Highlight BROWSE VIDEOS
and press .
2. Use the right arrow key to select movies and press .
3. Use the down arrow key to browse categories like NEW RELEASES and COMEDY. Or to search
for a particular movie or actor, press . Use the Arrow Keys to select VIDEO ON DEMAND, then
highlight SEARCH and press .
4. Use the down arrow key to select from the onscreen results list. Select a title or actor and
press .
5. A PROGRAM INFO screen appears with information about that movie or program including a
summary of the video, price and the rental period.
t6TFUIFSJHIUBSSPXLFZ to select between RENT, PREVIEW or ADD TO SAVED VIDEOS. Use the
up arrow key to select SUMMARY, CAST & CREW, MORE LIKE THIS or DETAILS.
t1SFTTBACK to leave this screen and return to the previous screen without renting.
6. Select RENTand press . Press to confirm your rental and your video will begin.
Note: If you have set up your parental locks, you may be asked to enter your PIN before the purchase is complete.
7. Select STOP at any time before your video ends to stop watching and continue watching later.
Select DONE and press .
8. Press or EXIT TO on your remote.
P L AY YO UR CU RREN T VID EO RENTAL S
You can access your rentals as often as you like within the specified rental period.
1. Press and scroll to VIDEO ON DEMAND. Press .
2. Use the right arrow key to select CURRENT RENTALS and press .
3. Use the down arrow key to select the current rental you want to watch. Press .
4. You can choose to start watching the video where you left off or from the beginning.

PRTC Digital TV Service Technical Support (843) 538-5481 www.PRTC.coop PRTC Digital TV Service22 23
OR DER PAY PER VIEW EV E NTS
Live sporting events like WWE, UFC and many others are available through Pay Per View. You can
purchase upcoming events up to 14 days in advance.
1. Press . Use the up and down arrow keys to navigate to CHANNEL 950.
t1SFTTUIFSJHIUBSSPXLFZ to find out what’s playing in the future.
t1SFTTFF to skip ahead 24 hours.
t1SFTTREW to go back 24 hours.
2. Select the live event or program you want to order and press . A PROGRAM INFO screen will
appear with details including event time and pricing. Press to order.
Note: If you have set up your parental locks, you may be asked to enter your PIN before the purchase is complete.
3. Press to confirm your order. Press or EXIT TO to resume watching normal programming.
4. Tune to the event’s channel on the scheduled day and time. If you tune in late, you will not be able
to rewind to see what you missed.
Note: Unlike Video on Demand, Pay Per View events must be watched at the scheduled time. You will be charged for
any event that you order, even if you don’t watch it.
PAY I NG FO R ONDEMA N D RE N TAL S A ND PAY PER VIEW EV E NTS
Any orders you place onscreen are automatically added to your monthly bill. You will find them in the
Usage Charges section. They will be listed by title with date rented and rental cost.
YOUR PRTC WHO L E HOME DV R H A S I T A L L
Your PRTC Whole Home DVR gives you multiple advanced recording features like recording 2
programs at once and watch recorded content from any Digital Receiver in the house! You’ve already
learned how to use your remote to control live TV... another feature of your PRTC Whole Home DVR.
In this section you will learn how to schedule, manage and view a recorded program or series.
Note: The Whole Home DVR feature only allows you to record 2 programs with your main Digital Receiver. Other
Digital Receivers in your home will not allow you to record programs in addition to the original 2 – a recording
conflict would occur. You may only watch programs or modify your original recordings with your second or
third Digital Receiver.
SC H EDU L E PR OGRAMS F OR RECOR DIN G
There are multiple ways you can record a program that is scheduled to air in the future. You can also
set your Whole Home DVR to record one show one time, all episodes of a series and more.
Schedule A Single Or Series Recording From The Program Guide
1. Press . Use the Arrow Keys to scroll through the available content and highlight a program.
2. Press RECORD . A single red dot appears next to the program listing in the guide to indicate that
a recording is scheduled.
3. Press RECORD twice to schedule a recording of the same program at the same day and time
every week. Three red dots appear next to the program listing in the guide to indicate that a series
recording is scheduled.
4. Press RECORD a third time to cancel the recording. All red dots will disappear.
5. Press or EXIT TO to resume watching normal programming.
Schedule A Single Recording From The Program Info Screen
1. Access the PROGRAM INFO screen using one of the following actions:
t1SFTT while watching a program you want to record.
t1SFTT . Use the Arrow Keys to highlight a program to record and press
.
2. Select RECORD EPISODE and press .
3. If you would like to add time to a program that is currently being recorded (in case you think it
might run long), select then the down arrow key to select RECORD OPTIONS. Select STOP
RECORDING and press . Select a time and press .
4. Select RECORD and press .
Schedule A Series Recording From The Program Info Screen
1. Access the PROGRAM INFO screen using one of the following actions:
t1SFTT while watching a program you want to record.
t1SFTT . Use the Arrow Keys to highlight a program to record and press .
2. Select RECORD SERIES and press .
3. Use the Arrow Keys to select the time and press .
4. Select from the following options to limit your recordings:
t"OZEBZBUUIFTBNFUJNF
t"OZEBZBOZUJNF
t"OZEBZBOZUJNFPODFQFSEBZ
PRTC Digital TV Service Technical Support (843) 538-5481 www.PRTC.coop PRTC Digital TV Service24 25
5. If you want to limit your series recording to first run only episodes,
select FIRST RUN ONLY under SHOW TYPE. The default setting is to record every instance.
6. If you think that the episodes may run long, add extra time to the end of the program by selecting
STOP RECORDING. Press and select a time.
Note: Your PRTC Whole Home DVR will not adjust if a program’s schedule changes unexpectedly. However,
planned schedule changes, such as a series moving from 7:00pm to 7:30pm for one week, will be detected by your
DVR and the episode will be recorded in its entirety.
Schedule A Single Recording By Channel, Time And Date
1. Press RECORDED TV on your remote. Or you can press , and use the right arrow key to
select RECORDED TV .
2. Use the Arrow Keys to select ADD RECORDING and press .
3. Select CHANNEL AND TIME and press . The MANUAL RECORD screen will then appear.
4. Use the Arrow Keys to fill in the fields on the MANUAL RECORD screen.
t:PVDBOFMFDUUPLFFQUIFSFDPSEFEQSPHSBNVOUJMZPVEFMFUFJUPSZPVDBOBMMPXZPVS
Whole Home DVR to delete it when it is time to make room for new recordings.
5. Select RECORD and press to schedule the recording.
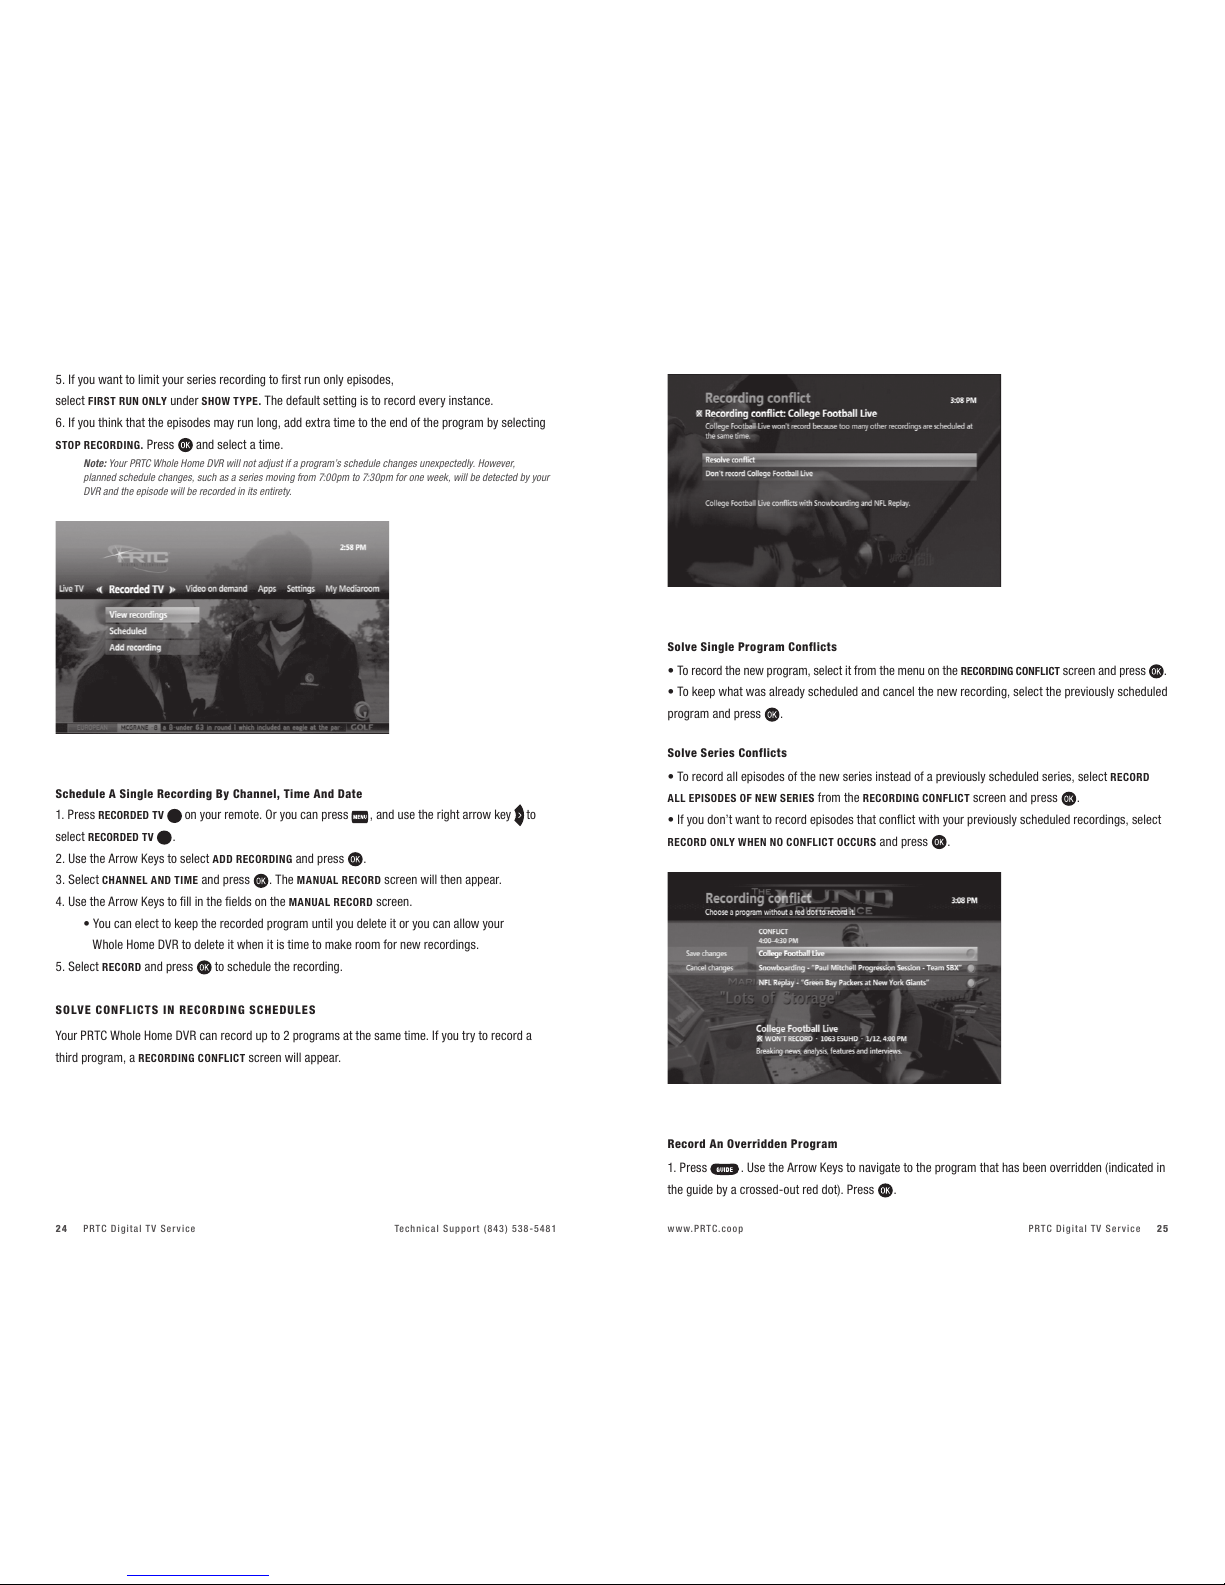
SO LV E CONFL I C T S INREC O RDI NG SC HED U LES
Your PRTC Whole Home DVR can record up to 2 programs at the same time. If you try to record a
third program, a RECORDING CONFLICT screen will appear.
Solve Single Program Conflicts
t5PSFDPSEUIFOFXQSPHSBNTFMFDUJUGSPNUIFNFOVPOUIFRECORDING CONFLICT screen and press .
t5PLFFQXIBUXBTBMSFBEZTDIFEVMFEBOEDBODFMUIFOFXSFDPSEJOHTFMFDUUIFQSFWJPVTMZTDIFEVMFE
program and press .
Solve Series Conflicts
t5PSFDPSEBMMFQJTPEFTPGUIFOFXTFSJFTJOTUFBEPGBQSFWJPVTMZTDIFEVMFETFSJFTTFMFDURECORD
ALL EPISODES OF NEW SERIES from the RECORDING CONFLICT screen and press .
t*GZPVEPOUXBOUUPSFDPSEFQJTPEFTUIBUDPOnJDUXJUIZPVSQSFWJPVTMZTDIFEVMFESFDPSEJOHTTFMFDU
RECORD ONLY WHEN NO CONFLICT OCCURS and press .
Record An Overridden Program
1. Press . Use the Arrow Keys to navigate to the program that has been overridden (indicated in
the guide by a crossed-out red dot). Press .
PRTC Digital TV Service Technical Support (843) 538-5481 www.PRTC.coop PRTC Digital TV Service26 27
2. Select RESOLVE CONFLICT in the PROGRAM INFO screen.
3. Select the title of the overridden program and press . The previously overridden program will
now be recorded instead of the other program.
Note: When you resolve a conflict, all of your other scheduled recordings will occur as programmed.
MAN A GE YOUR RE C ORD ING S F OR BR OWS ING , P L AYING A ND REP L AY ING
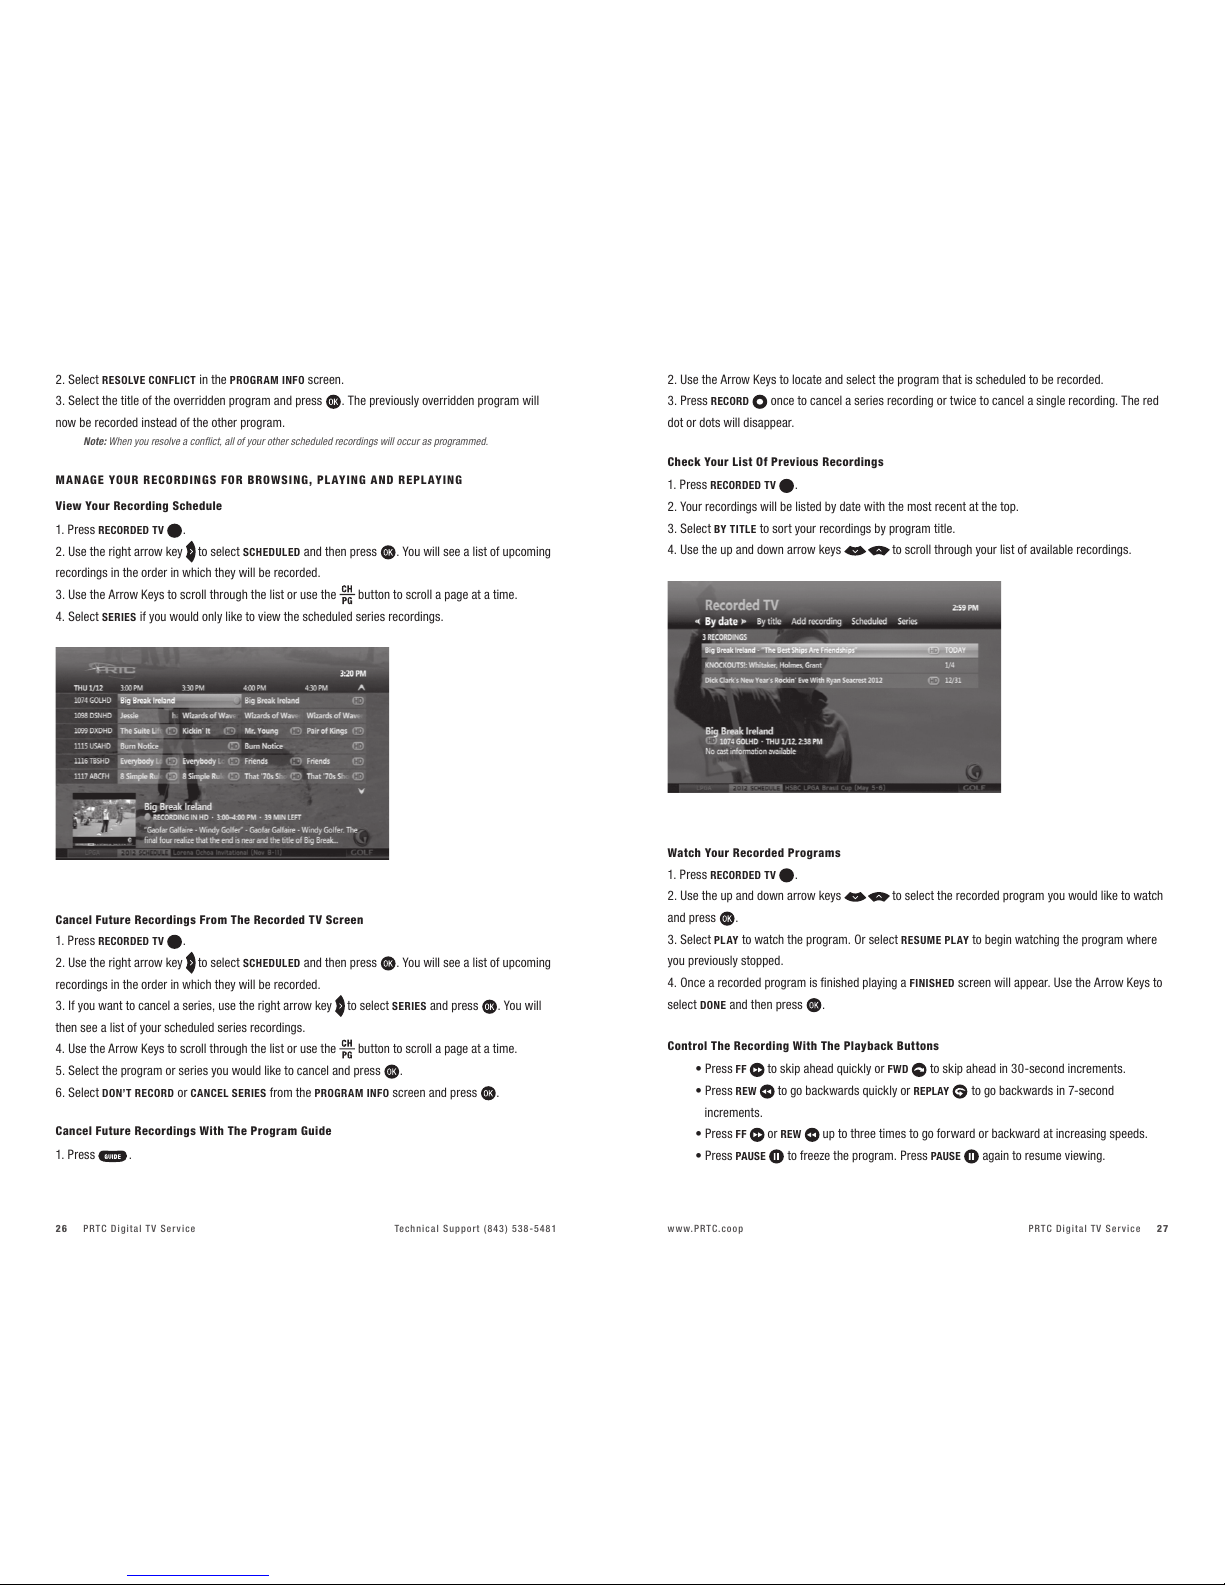
View Your Recording Schedule
1. Press RECORDED TV .
2. Use the right arrow key to select SCHEDULED and then press . You will see a list of upcoming
recordings in the order in which they will be recorded.
3. Use the Arrow Keys to scroll through the list or use the button to scroll a page at a time.
4. Select SERIES if you would only like to view the scheduled series recordings.
Cancel Future Recordings From The Recorded TV Screen
1. Press RECORDED TV .
2. Use the right arrow key to select SCHEDULED and then press . You will see a list of upcoming
recordings in the order in which they will be recorded.
3. If you want to cancel a series, use the right arrow key to select SERIES and press . You will
then see a list of your scheduled series recordings.
4. Use the Arrow Keys to scroll through the list or use the button to scroll a page at a time.
5. Select the program or series you would like to cancel and press .
6. Select DON’T RECORD or CANCEL SERIES from the PROGRAM INFO screen and press .
Cancel Future Recordings With The Program Guide
1. Press .
2. Use the Arrow Keys to locate and select the program that is scheduled to be recorded.
3. Press RECORD once to cancel a series recording or twice to cancel a single recording. The red
dot or dots will disappear.
Check Your List Of Previous Recordings
1. Press RECORDED TV .
2. Your recordings will be listed by date with the most recent at the top.
3. Select BY TITLE to sort your recordings by program title.
4. Use the up and down arrow keys to scroll through your list of available recordings.
Watch Your Recorded Programs
1. Press RECORDED TV .
2. Use the up and down arrow keys to select the recorded program you would like to watch
and press .
3. Select PLAY to watch the program. Or select RESUME PL AY to begin watching the program where
you previously stopped.
4. Once a recorded program is finished playing a FINISHED screen will appear. Use the Arrow Keys to
select DONE and then press .
Control The Recording With The Playback Buttons
t1SFTTFF to skip ahead quickly or FWD to skip ahead in 30-second increments.
t1SFTTREW to go backwards quickly or REPLAY to go backwards in 7-second
increments.
t1SFTTFF or REW up to three times to go forward or backward at increasing speeds.
t1SFTTPAUSE to freeze the program. Press PAUSE again to resume viewing.

PRTC Digital TV Service Technical Support (843) 538-5481 www.PRTC.coop PRTC Digital TV Service28 29
Stop Playing A Recording
1. Press STOP at any time during a recording to stop viewing.
2. Select DONE from the STOPPED screen and press . You can also choose START OVER to watch
the program from the beginning or ERASE to stop watching and delete it completely.
Delete Existing Recordings
1. In the RECORDED TV screen, select BROWSE RECORDINGS and press .
2. Select the program you would like to erase and then press .
3. Use the Arrow Keys to highlight ERASE and press . Press again to confirm your selection.
Protect Recordings From Automatic Deletion
1. In the RECORDED TV screen, select BROWSE RECORDINGS and press .
2. Select the recording you would like to keep and press .
3. Highlight KEEP UNTIL and then select SPACE NEEDED or ERASE. Press .
SPECIAL FE AT U RES & A PPLIC AT I ONS
REMOTE DVR (RDVR)
Allows you to remotely program your DVR from a web browser or smart phone. The first step is to
create a user account and password.
1. Press the button and then use the right arrow key to scroll to APPS. Press to select
REMOTE DVR.
2. Use the down arrow key to highlight the username field.
3. Then use the left arrow key to enter the alpha-numeric keypad on the left side of the screen.
4. Use the alpha-numeric keypad to create a username. The username must contain between 6
and 8 characters.
5. Next use the right arrow key to the username field. Then use the down arrow key to
highlight the password field.
6. Use the left arrow key to enter the alpha-numeric keypad on the left side of the screen.
7. Enter a password between 6 and 8 characters long.
8. Next use the right arrow key to return to the password field and then use the down arrow key
to highlight the Confirm password field.
9. Use the left arrow key to enter the alpha-numeric keypad on the left side of the screen.
10. Enter a password between 6 and 8 characters long.
11. Finally use the right arrow key to return to the Confirm password field and the down arrow key
to highlight the SAVE button. Press to set the username and password.
If you forget your username, highlight the GET USER button and press . This will retrieve the user
name associated with your account. If you forget your password or want to change it, highlight the
GET USER button and press . Once your username is retrieved, use the left arrow to enter the
alpha-numeric keypad on the left side of the screen and enter a new password in the Password and
Confirm password fields. Then select Save and press .
Note: The username must be unique across the PRTC system. If you enter a username that is already in use, you wil
receive a message stating “The username has already been taken. Choose another one.” Please repeat the process
above using another user name. One suggestion would be to use your email username or phone number as
the username.
RDVR Website
To access the RDVR website, enter the URL below in your computer’s web browser:
https://dvr.prtc.coop
To access the RDVR website, enter the URL below in your smartphone’s web browser:
http://dvr.prtc.coop/Remotedvr.WebMobile/Default.aspx
Enter the username and password created above to login to the RDVR web portal.

PRTC Digital TV Service Technical Support (843) 538-5481 www.PRTC.coop PRTC Digital TV Service30 31
Caller ID Options List
1. Use the Arrow Keys to select OPTIONS from the left menu in Caller ID.
t6TJOHUIF"SSPX,FZTPOZPVSSFNPUFBOEPOTDSFFOCVUUPOTZPVDBOTFUVQ1SPmMF/BNFTUP
distinguish between different STBs; enable, disable or time-suspend onscreen notification of
calls; set up a forwarding number to which incoming calls can be forwarded, and more.
Note: Profile Name and Forwarding Number may have up to 15 characters.
ANSW E RS TO THE MOS T-ASK ED QUESTIONS ABO U T PRTC VIDEO
WIL L T HE WHOLE HOME DVR RE C ORD ON M ORE TH A N O NE T V IN MY HOM E?
Yes! You can set and access recordings from every TV with an PRTC HD Digital Receiver.
CAN I RE C ORD W I T H THE D V R AND WATCH A N O THER C H A NNE L W HIL E T HE
WHO LE HOM E DVR IS R ECORDING ?
Yes, with your PRTC Whole Home DVR you can record up to two programs at the same time.
CAN PARE N TAL CON T ROL S BE USED ON VIDEO ON DE M A ND C O NTEN T ?
Yes, you can lock Video on Demand content based on rating. You can also lock the purchase feature
so that Video on Demand purchases are not made without your approval. To utilize parental locks you
must first set up your Personal Identification Number (PIN). The PIN will be required when someone
attempts to access locked content.
DO I N EED A PIN TO REC ORD A PROGR AM T HAT IS LOC K E D BY PA RENTA L C ONTROL S?
No, you do not have to enter your PIN to record locked content. However, anyone wanting to access
the program to view it once it has been recorded (or even while it is recording) will have to enter a PIN.
CA N I C A NCEL A PAY PER VI E W RENTA L A F T E R I’VE O R DER ED?
No, all Pay Per View rentals are final when ordered and cannot be cancelled. The same is true for all
Video on Demand rentals.
WHO M SHO ULD I CALL I F T HER E IS A DIS RUPT I ON IN MY VID EO SE RVIC E?
You should call (843) 538-5481 and select option 1. Please call this number to report any problems
you encounter. In some cases, rebooting the digital receiver can fix problems. You can do this by
pressing the MENU botton, then selecting Settings and Restart System.
Use the Go to Page / Jump to Channel / See schedule buttons at the bottom of the page to find the
date, time, channel and program title you want to record.
Click the name of the program. Make your selection by clicking on the option to record episode or
record series. To delete or modify your recording, click on the name of the program again and select
cancel recording, upgrade to series or keep until I erase.
CALLER ID
Receive onscreen notification of incoming calls for up to five phone numbers with our Caller
ID application.
View Incoming Calls
When a call is received while watching a program, a screen will appear over your programming with
the date, time and caller information.
1. Press the button on your remote to dismiss the Caller ID information screen.
View Call Log
1. Press the “C” button on your remote, or press the right arrow key to navigate from the MAIN
MENU to the APPS Menu.
2. Press the down arrow key to select CALLER ID.Press . The CALL LOG page will display the
phone numbers for which you can view received calls.
Use the remote’s up and down Arrow Keys and the OK key to select the call log you wish to view.
t"MMJODPNJOHDBMMTBSFMPHHFEXIFUIFSPSOPUUIF45#XBTPOBUUIFUJNFPGUIFDBMM
t5IFNPTUSFDFOUDBMMTUPUIFDIPTFOOVNCFSBSFEJTQMBZFETIPXJOHUIFDBMMFSTOVNCFSOBNF
(if available), date and time of call.
3. Scroll through the call log using the Arrow Keys.
4. Press when a call log item is highlighted. You will be able to choose from REFRESH, DELETE,
SORTor EXIT.

PRTC Digital TV Service Technical Support (843) 538-548132
TRO UBLE-S HOOTING T I PS
THE DI GITAL RE CEIV E R WON’ T TUR N ON
First, check to make sure that the receiver is plugged in. If it is, try plugging a different device into the
same socket to make sure there is not a problem with electricity flowing to the socket. If electricity is
flowing to the socket, there may be something wrong with your remote control. If you are still having
problems, call (843) 538-5481 and select option 1.
THE REMO T E WON’ T CON T ROL THE DI G ITAL RE C EIVE R
Press the button on the remote control. This will tell the remote that all controls will affect your
set-top box or Digital Receiver. If you are still having problems, call (843) 538-5481 and select option 1.
THE RE ISVI DEO, BUT NOSO UND
First, check to make sure that the volume is not muted. Press on the remote or + on the VOLUME
button. If the volume is not muted, then try changing the channel to see if the problem is only on
that particular channel. You will also want to make sure that all of the connectors are secured properly
to the Digital Receiver and to the TV. If you are still having problems, call (843) 538-5481 and select
option 1.
THE SOUND ISGOOD B U T PIC TURE QU AL I T Y ISPO OR
Make sure that all connectors are secured properly to the Digital Receiver and to the TV. Try changing
the channel to see if the problem is only on that particular channel. If you are still having problems,
call (843) 538-5481 and select option 1.
THE DI GITAL RE CEIV E R WIL L NOT RESP OND
There is a green LED surrounding the Digital Receiver’s power button that should flash each time
a remote button is pressed. If the green light flashes when you press buttons on the remote but
the Digital Receiver does not respond to your commands, you may need to restart your receiver. To
restart, press and hold the Digital Receiver’s power button for five seconds. If you are still having
problems once the Digital Receiver has been restarted, call (843) 538-5481 and select option 1.
THE REMO T E CON T ROL ISNOT WO RKIN G
First make sure there is nothing blocking the path between the remote control and the sensor on the
Digital Receiver. Make sure you are aiming the remote directly at the sensor on the receiver and that
you are no more than 20 feet away from the receiver. If your remote is still not working, try changing
the batteries. If that doesn’t work, call (843) 538-5481 and select option 1.
Bring home everything PRTC has to
offer with our Digital TV, high-speed Internet
and full-featured phone service.
Congratulations on making a brilliant new choice for your television entertainment.
It’s the viewing experience of the future, with the clear advantages of PRTC. You can
have that same level of quality, functionality and reliability in your home phone
and Internet services, too.
With packages customized to precisely fit your needs and tastes, you’ll get one
outstanding service package. And at a surprisingly affordable price!
Thank you for choosing Palmetto Rural Telephone Cooperative –
Your Only Local Total Communications Provider.

C O N T A C T I N G P A L M E T T O R U R A L T E L E P H O N E C O O P E R A T I V E
2 4 7 1 J e f f e r i e s H i g h w a y |W a l t e r b o r o , S C 2 9 4 8 8 |( 8 4 3 ) 5 3 8 - 2 0 2 0
T E C H N I C A L S U P P O R T : Te c h n i c a l s u p p o r t i s a v a i l a b l e 2 4 h o u r s a d a y 7 d a y s a w e e k
a t ( 8 4 3 ) 5 3 8 - 5 4 8 1 .
O N T H E W E B : w w w . p r t c . c o o p
o r E M A I L : i n f o @ p r t c . c o o p
Table of contents


