qtxsound QP475 User manual

QP-Series Powered Mixers
QP475, QP8200
(178.730, 178.732)
User Manual
Features:
Integral USB media player
Digital Delay Effect
Bass +Treble EQ for each channel
+15V phantom power
5-band master EQ

Introduction:
Thank you for choosing the QTX Sound QP-series powered mixer. This compact, feature-laden unit has many different settings and varied applications.
Please read this manual before using this equipment in order to avoid damage through incorrect operation and to get the best performance from your
purchase.
Warning:
To prevent the risk of fire or electric shock, do not expose any of the components to rain or moisture.
If liquids are spilled on this unit, stop using immediately, allow unit to dry out and have checked by qualified personnel before further use.
Avoid impact or heavy vibration to any of the components.
No user serviceable parts inside - refer all servicing to qualified service personnel.
Safety
Make sure that the mains lead used is not damaged and is adequately rated for the power consumption of the unit.
Check that the voltage selector is switched to the same voltage as the mains supply
Ensure speakers are connected using adequately rated speaker jack leads (not signal jack leads) and that the total load is no lower than 4Ω
Turn down the MASTER volume when switching on or off, connecting equipment or engaging phantom power.
Placement
Keep out of direct sunlight and away from heat sources.
Do not cover or obstruct cooling vents
Position the unit in a safe, stable place during operation
Keep away from damp or dusty environments.
Clear debris from fan vents regularly (with mains off)
Cleaning
Use a soft cloth with a neutral detergent to clean the unit
Lightly damp sterile wipes may be used on the microphone grille for hygiene purposes
To avoid damage, do not use solvents to clean the components
Front Panel
1. BASS + TREBLE –EQ adjustment for high and low
frequencies
2. DELAY –adjust delay effect level for channel
3. LCD display –Backlit display for USB player
4. Master EQ –5-band graphic equalizer for main output
5. MASTER –main output level control
6. Phantom –+15Vdc to XLR for condenser mics
7. MIC IN –XLR input for microphone
8. HI-Z (UNBAL) –high impedance line input jack
9. VOL –channel volume adjustment
10. USB MEDIA PLAYER –transport & EQ controls
11. Delay LEVEL –global delay effect adjustment
12. Delay REPEAT - delay regeneration control
13. Delay TIME adjustment
14. USB VOL –media player level control
15. USB INPUT –USB connector for memory device
16. AUX –level control for rear AUX input (RCA)

Rear Panel
Connection
Connect speaker cabinet(s) to SPEAKER OUT jack(s) on the rear panel, ensuring that the overall load is no lower than 4Ω(note: 8Ω+8Ω=4Ω)
and that the combined power handling of the speakers is not exceeded by the amplifier’s rated output (200Wrms - QP8200, 75Wrms - QP475).
With the POWER switch in the “off”position and MASTER turned fully down, connect power to the unit via the IEC mains lead, ensuring that the
lead is in good condition and that the voltage selector (rear panel) is the same as the mains supply.
Connect microphone(s) to the XLR channel input(s) and switch on +15V phantom power if required (for example - condenser microphones).
Connect line level sources (MP3 players, CD players, electronic keyboards etc.) via the HI Z (high impedance) input jacks and auxiliary line input
to the AUX RCA inputs on the rear panel.
If external EQ or dynamics processors are to be used, these can be connected via the MASTER INSERT jack on the rear panel using a stereo to
2 x mono jack lead. This 6.3mm jack has 3 connections as shown below…
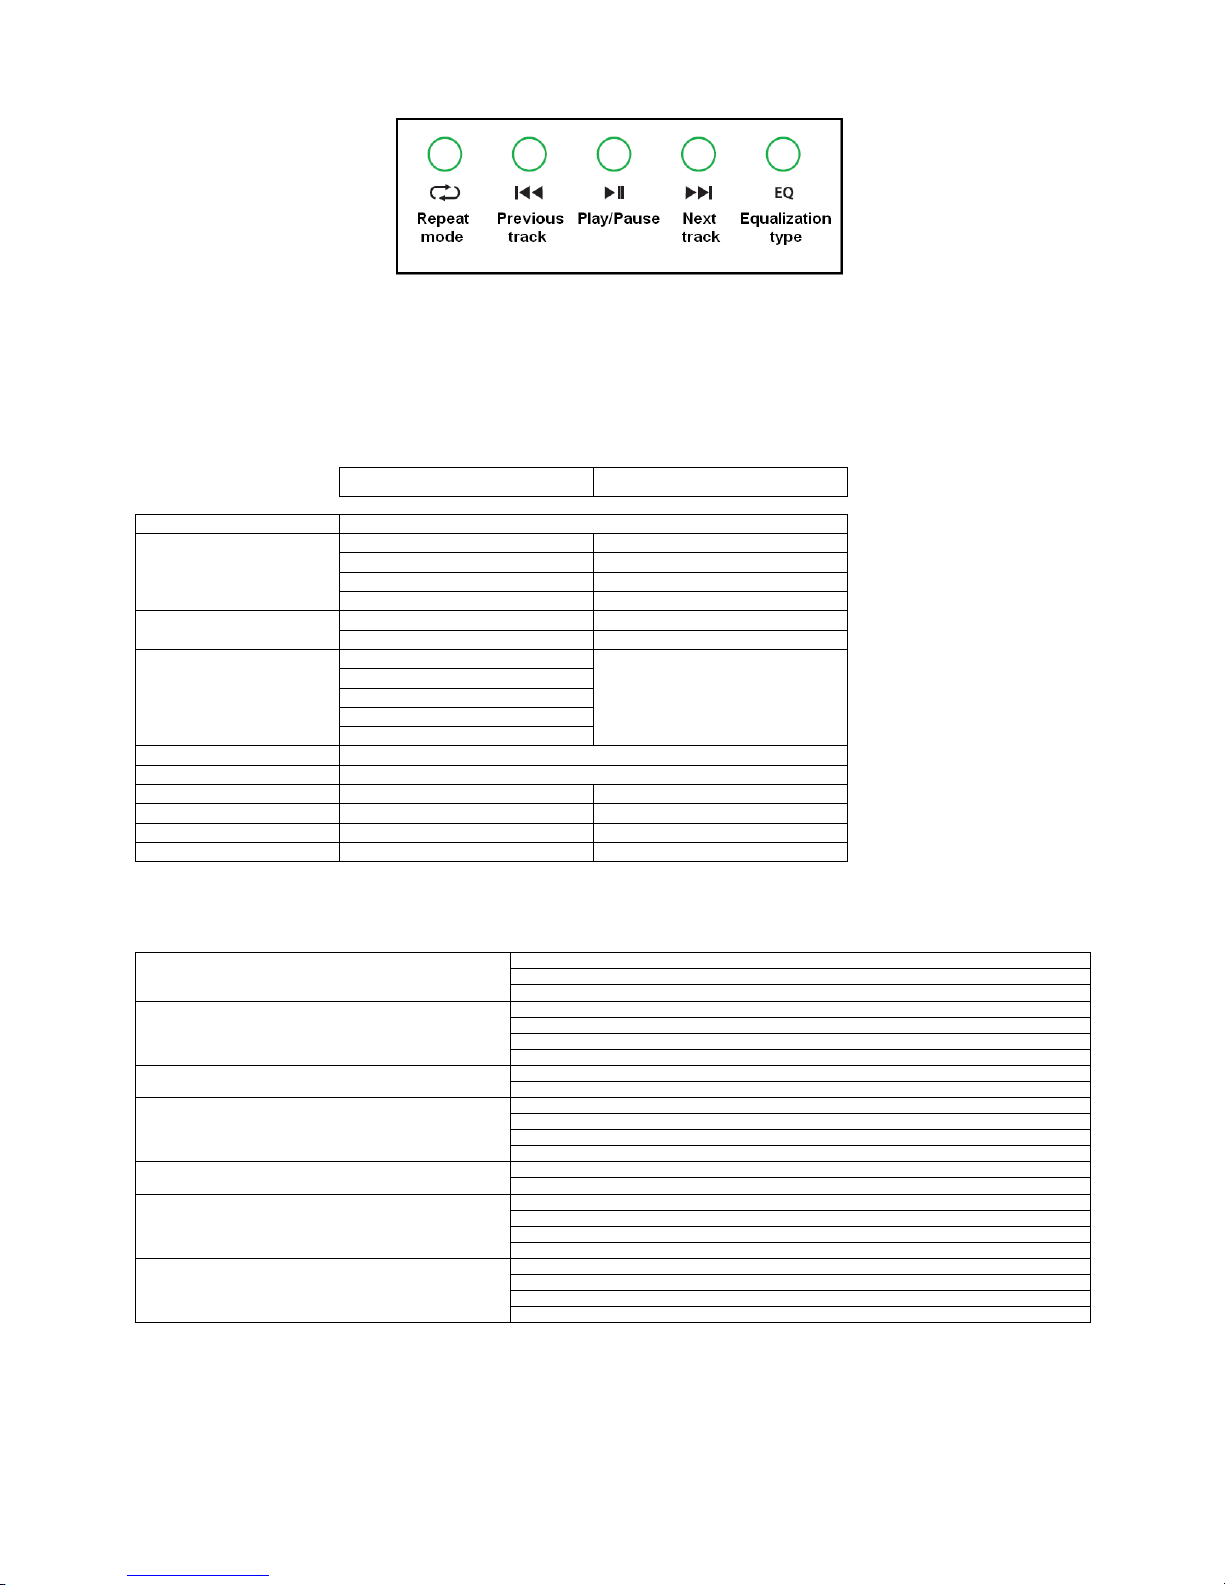
For the digital audio player, plug a USB pen drive into the USB connector on the front panel. This will need to have compressed digital audio
stored on it for playback.
To record the overall mix or as an extra line output, connect the REC OUT to the input of the external equipment via a twin RCA lead.
Operation
Switch on the POWER at the rear panel and check that the power LED on the front is illuminated. Ensure channel volumes, AUX, USB and delay
level controls are turned down and gradually turn up the MASTER volume control to roughly half way.
To test each channel input, with BASS and TREBLE controls at the 12 o’clock position, gradually increase the channel volume and speak into
the microphone or play the line level source until the sound can be heard through the speaker cabinets. Adjust BASS and TREBLE controls to
the desired low and high frequency content of the channel.
For auxiliary line input, play the audio from the source and gradually increase the AUX control to check that the sound is produced through the
speakers.
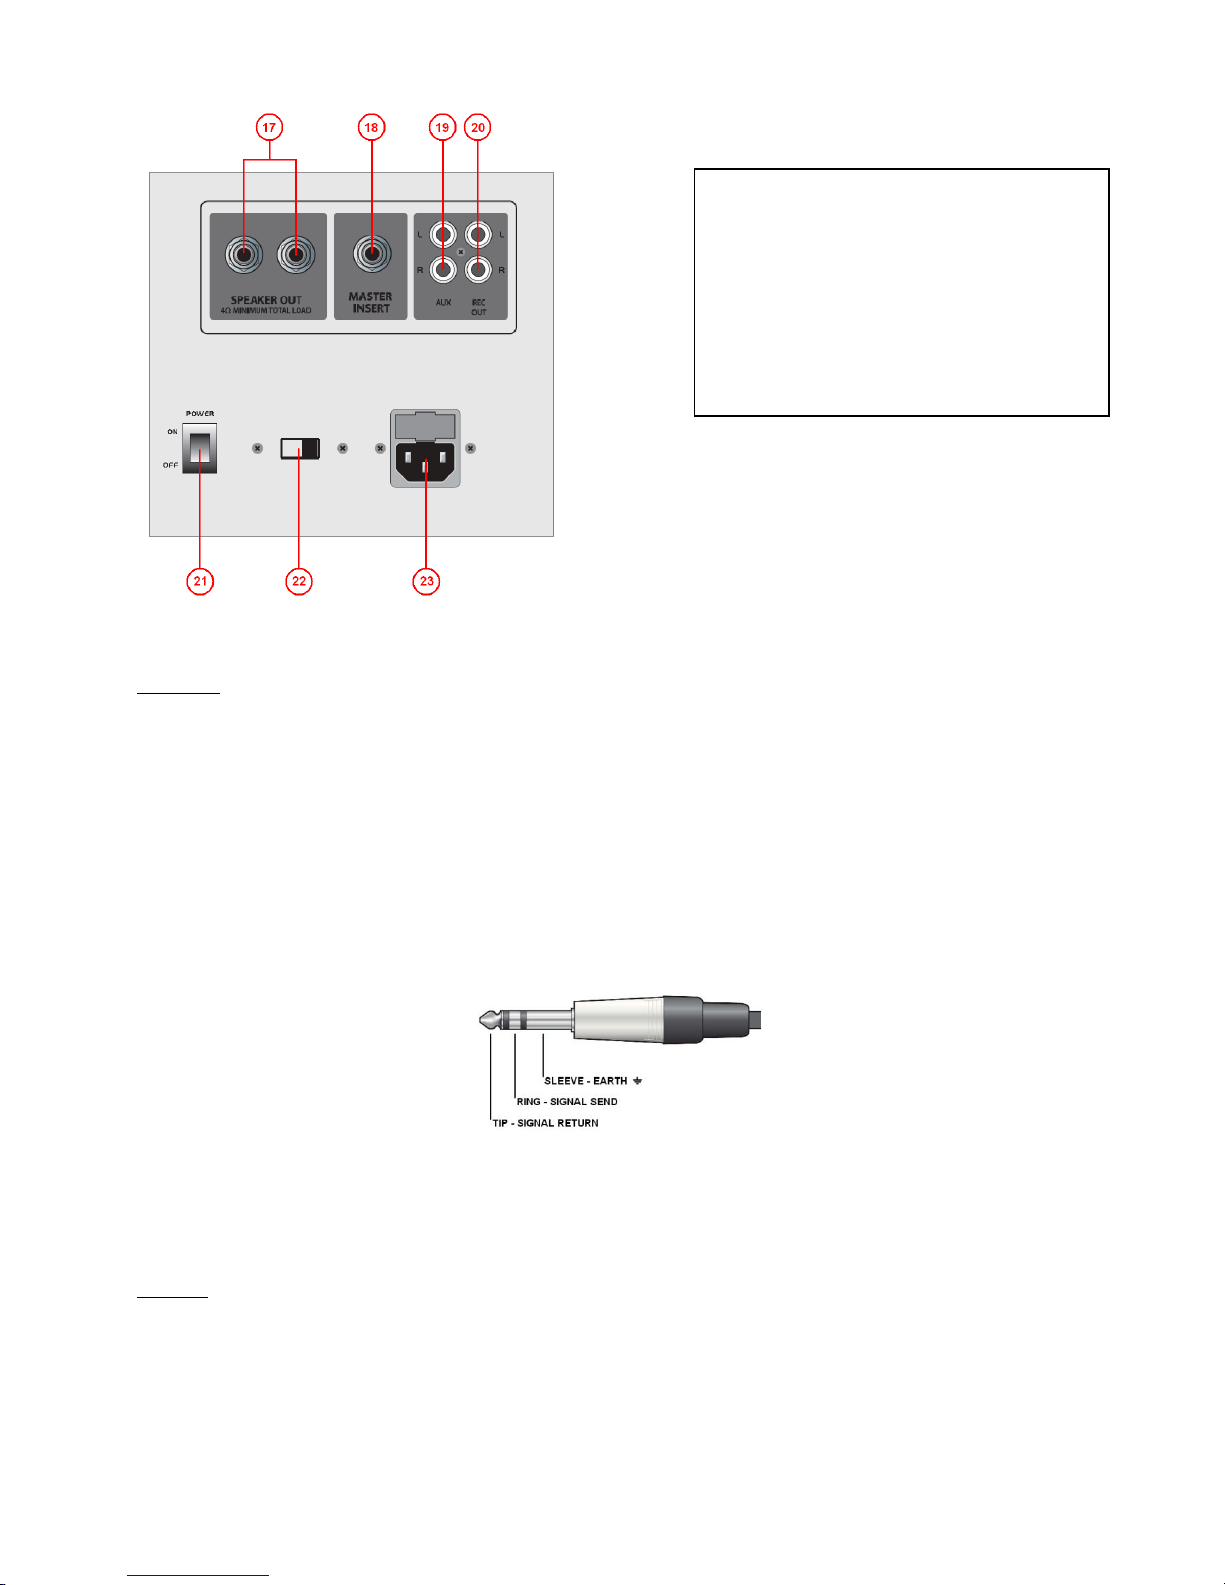
17. SPEAKER OUT –6.3mm jack output for 2 x 8Ωspeakers
18. MASTER INSERT –6.3mm TRS jack insert for overall mix
TIP –Return / RING –Send / SLEEVE –Earth
19. AUX –L+R (summed to mono) RCA auxiliary line input
20. REC OUT –L+R (parallel mono) RCA record level output
21. POWER –On/Off mains switch
22. 115/230V –mains voltage selector
23. MAINS inlet –IEC with integral mains fuse

Check the USB input by gradually increasing the VOLUME control positioned next to the USB connector. Check the LCD display to see the
media type and player status. See below for the functions of the transport controls…
For internal delay effect, turn up the LEVEL control in the delay section and dial in the DELAY control for each channel as required, adjusting
TIME and REPEAT controls to produce the desired type of echo or repeat effect.
Adjust overall volume via the MASTER control and the overall tone can be adjusted from the 5-band graphic EQ section. These sliders affect
(from left to right) low, low-mid, mid, mid-high and high frequencies to help balance the tone of the overall output.
Specifications
QP475
QP8200
Powser supply
115 / 230W, 50 / 60Hz (IEC)
Input Impedance
Mic - bal
2kΩ
Mic - unbal
1kΩ
Line
10kΩ
RCA inputs
47kΩ
Channel EQ
Treble
±12dB @ 10KHz
Bass
±12dB @ 100Hz
Master EQ
60Hz
±12dB
250Hz
600Hz
2kHz
8kHz
Frequency Response
20Hz-20KHz +1dB/-3dB @ 1W Output to 8 Ohm Speaker
THD
<1% fully driven into 4Ω load
Max Power Output
785W @ 4Ω
200W @ 4Ω
Power Consumption
120W
320W
Dimensions
319 x 247 x 198mm
463 x 247 x 198mm
Weight
6.8kg
9.7kg
Troubleshooting
“POWER” LED does not light on receiver
Ensure mains lead is connected to mains and voltage selector is same as mains supply
Ensure POWER is switched on
Check Plug-top fuse and mains fuse in IEC inlet are both OK
“POWER” LED is lit but no signal LEDs illuminating
Check input source and connection cable work (using a different mixer or amplifier)
Ensure MASTER and channel VOL levels are not turned fully down
For condenser microphones, check that +15V phantom power is switched on
Unplug MASTER INSERT and check if wired correctly and connected equipment is working.
LEDs are lit but no sound through speakers
Check speaker leads are OK and connected properly
Check speakers are working properly (using a different mixer/amplifier)
USB player will not play digital media files
Check file format is a standard compressed type –certain formats may not be recognised
Check if USB pen drive is damaged or data is corrupted (try a different USB pen)
Check LCD display for status and use transport controls to navigate through files
Ensure that VOL control next to USB input is turned up
Output is distorted or very loud
Check that line level source is not connected to an XLR input
Reduce channel VOL, TREBLE and BASS controls if set too high
Feedback (loud squealing or howling) from speakers
Ensure microphones are not pointed towards the speakers
Reduce VOL, TREBLE or BASS for microphone input(s)
Reduce DELAY level on microphone inputs
Try to eliminate feedback by reducing particular sliders on the Graphic Equalizer
Output is very low
Turn up MASTER volume and/or channel VOL controls
Turn up AUX or USB VOL controls
Ensure Graphic Equalizer sliders are not set too low
Check level on any equipment connected to MASTER INSERT isn’t set too low
Note: for further troubleshooting, refer equipment to qualified service personnel for testing
www.qtxsound.com
© QTX Sound 2011
This manual suits for next models
1
Table of contents
Other qtxsound Music Mixer manuals